Rath RGD Series Installation instructions

RATHI TRANSPOWER PVT.LTD. Gaia Apex,S No 33/2D,Viman Nagar
R-II-D-03/02-09/20
P ne, 411014, INDIA
Installation & Operating Man al (IOM)
GEAR FLEX Co pling
RGD/RGS Series
RGD Series
RGS Series

Installation & Operating Man al /GEAR-FLEX/RGD/RGS
RATHI TRANSPOWER PVT.LTD. Gaia Apex,S No 33/2D,Viman Nagar
R-II-D-03/03-10/21
P ne, 411014 Page 1 of 14
INDEX
Page No
1. Introd ction & General G idelines 02
2. Before installation information 02
3. Installation Information 03
3.1 H b Mo nting 03
3.2 Shaft Alignment 04
3.3 Final Assembly 06
4. Disassembly/ Replacement 06
5. Safety,General Hazard & Environment 07
6. Inspection & Periodic Maintenance 08
7. Spares Management & Complaint Handling 09
8. Breakdown & Tro ble-shooting 11
9. Marking Details 12
10. Declaration of comformity 13

Installation & Operating Man al /GEAR-FLEX/RGD/RGS
RATHI TRANSPOWER PVT.LTD. Gaia Apex,S No 33/2D,Viman Nagar
R-II-D-03/03-10/21
P ne, 411014 Page 2 of 14
GO TO INDEX
1. Introduction & General Guidelines
•
••
•RGD/RGS type gear co pling are designed as per API standard and certified by ATEX (explosion
protection) to transmit power and torq e between drive and driven shaft.
•
••
•This man al will help yo to install and maintain gear co pling before installing/disassembling of
co pling. It is advisable to read the man al caref lly before starting the work. These special
designs are always provided with general assembly drawing which provides detail information of
the design and connected eq ipments.
•
••
•Symbol description :
Ca tion person may get inj red
Damage the prod ct
Pay attention
Potentially explosive warning
2.
Before installation information
•
••
•RGD/RGS co plings are delivered by RTPL as assembled condition which consists components
from 1 to 8 as shown in fig. 1.
Fig. 1 PART LIST
•
••
•Inspect co pling assembly for visible damage, if yo fo nd contact RATHI.
•
••
•Disassemble the co pling by removing n ts & bolts. Clean all the parts caref lly.
Sr.No Component Qty.
1 Co pling Bolt Refer GA Drawing
2 Sleeve 02
3 Driving H b 01
4 Gasket 01
5 Driven H b 01
6 Spring Washer Refer GA Drawing
7 Hex N t Refer GA Drawing
8 O-Ring 02

Installation & Operating Man al /GEAR-FLEX/RGD/RGS
GO TO INDEX
3.
Installation Information
•Ens re the system is disconnected from electrical connection and other possible energy
transmission before starting the work.
3.1 Finish Bore Instruction (Fig. 2)
•H b finish bores machined by c stomer with reference
to o tside diameter.
•Finish bore strictly done within specified
limit (H7, Js9 ).
•Maintain face r n-o t and concentricity as per below table.
•Provide set screw at distance L ( L = LTB /2). If it is not possible, s itable distance nearer to
midpoint of the length thro gh bore (LTB) is provided.
3.2 Hub Mounting.
•Clean protective coatings/l bricants from bores & keyways.
•Remove co pling bolt (1) and separate h bs from transmission nit (fig.3).
•Slide the sleeve having internal teeth with r bber o-ring on shafts.(Fig 3)
•Mo nt the h bs having external teeth on their respective shafts fl shed with the faces of
h bs as shown in Fig. 3.
•H bs and Sleeves m st be s pported d ring installation to avoid accidental damage.
Fig.3 H b mo nting
•Assemble key(s) on to the shaft.
•Set screws to be removed from h b, if it comes thro gh the keyway or h b bore.
O tside diameter
(mm)
Face r n-o t/
Concentricity
(mm)
10-180 0.04
180-400 0.08
400-630 0.1
Fig.2 Finish bore

Installation & Operating Man al /GEAR-FLEX/RGD/RGS
RATHI TRANSPOWER PVT.LTD. Gaia Apex,S No 33/2D,Viman Nagar
R-II-D-03/03-10/21
P ne, 411014 Page 4 of 14
GO TO INDEX
•Mo nt h bs over the shaft by maintaining gap ‘G’ as mentioned in table 2 by sing a spacer
bar eq al in thickness to the req ired gap.(Fig.4)
•For spacer type, set the eq ipment at a distance eq al to DBSE by sing vernier calliper as
shown in fig. 5
Fig. 4 HUB Mo nting Fig. 5 HUB mo nting for spacer co pling
•Tighten the set screw.
3.3 haft Alignment
•In order to achieve optim m service life of the co pling, shafts m st be aligned.
•Initial misalignment sho ld not be more than 25 % of maxim m misalignment
(Refer Table 1).
Table 1 : Method of misalignment
Method
Parallel/Radial
Ang lar (X)
1
Using straight edge
•
Check the parallel/radial alignment with the help of straight edge resting
sq arely on both the h bs at 4 places 90° apart.
•
Check the ang lar misalignment with the help of slip ga ges by inserting in
the gap at 4 places 90° apart.The difference in max. & min. gap will be the
Total Indicated Reading (TIR).
•
Ang lar misalignment( X)in mm is half the Total Indicated Reading (TIR).

Installation & Operating Man al /GEAR-FLEX/RGD/RGS
RATHI TRANSPOWER PVT.LTD. Gaia Apex,S No 33/2D,Viman Nagar
R-II-D-03/03-10/21
P ne, 411014 Page 5 of 14
GO TO INDEX
Table 2 : Misalignment & Tightening Torq e
COUPLING
IZE
PERMI IBLE MAXIMUM MI ALIGNMENT
BOLT
IZE
BOLT
GRADE
TIGHT.
TORQUE
(Nm)
GREA E
QTY.(Kg)
ANGULAR PARALLEL
/RADIAL
'P' (mm)
AXIAL (mm) GAP 'G'
STD. (mm)
PER
GEAR
MESH
‘X'
(mm)
RGD RGS RGD
RGS RGD RGS
10
± 1.5º
1.2 0.6
± 0.5 ± 0.25
3 4 1/4” 8.8 11 0.03 0.02
15 1.6 0.8 3 4 3/8” 8.8 38 0.06 0.03
20 2 1 3 4 1/2” 8.8 91 0.17 0.09
25 2.4 1.2 5 5 5/8” 8.8 186 0.23 0.12
30 2.8 1.4 5 5 5/8” 8.8 186 0.34 0.17
35 3.2 1.7
± 1 ± 0.5
6 6 3/4” 8.8 331 0.45 0.23
40 3.6 2 6 8 3/4” 8.8 331 0.79 0.40
45 4 2.1 8 8 3/4” 8.8 331 1.08 0.54
50 4.4 2.6 8 9 7/8” 8.8 532 1.59 0.80
55 4.8 2.9 8 9 7/8” 8.8 532 1.93 0.97
60 5.2 3.2
± 2 ± 1
8 9.5 7/8” 8.8 532 3.46 1.73
70 6 3.7 9 11 1” 8.8 798 6.35 3.18
80 6.8 4.2 10 13 M24 8.8 673 9.60 4.80
90 7.6 4.8 13 15 M30 8.8 1338 13.3 6.65
100 8.4 5.5
± 3 ± 1.5
13 16 M30 8.8 1338 17.3 8.65
110 9.2 6.2 13 16 M36 8.8 2339 22.9 11.5
•Half Flexible Gear Co plings (RGS) cannot accommodate parallel misalignment.
•Gap ’G’ in the above table is given when ang lar & axial misalignments are zero.
•All misalignments cannot be taken by co pling at a time.

Installation & Operating Man al /GEAR-FLEX/RGD/RGS
RATHI TRANSPOWER PVT.LTD. Gaia Apex,S No 33/2D,Viman Nagar
R-II-D-03/03-10/21
P ne, 411014 Page 6 of 14
GO TO INDEX
3.4 Final Assembly
•Insert the gasket between the sleeve flanges.
position the flanged sleeves with l brication pl gs.
•Insert the bolts thr flange holes. Also place the washer
& n ts on bolts and tightening the bolts.
•Assemble only with the help of the fasteners s pplied
with the co pling.
•Fill with recommended grease (RSG with reqd. qty.) for l brication.
•For grease q antity for respective co pling size, refer table 2.
•Use Loctite to prevent the loosening of threads, if req ired.
Fig.5 Pl g details
•C stomer m st provide req ired safety g ards, RTPL does not s pply safety g ards or
shields.
4.
Disssembly/ Replacement
Fig. 6.
•Disengaged sleeve by removing co pling bolts (1) from sleeve.
•Remove the h b from shaft and assemble new h b on shaft.
•Ens re h bs have been mo nted as shown in fig.3,to maintain correct Gap 'G'.
•Repeat step of section 3.4.

Installation & Operating Man al /GEAR-FLEX/RGD/RGS
RATHI TRANSPOWER PVT.LTD. Gaia Apex,S No 33/2D,Viman Nagar
R-II-D-03/03-10/21
P ne, 411014 Page 7 of 14
GO TO INDEX
5.
afety General Hazard & Environment
5.1 afety General Hazard
•Proper care and safety m st be taken care before work started.
•The relevant safety and environmental reg lations m st be complied d ring installation,
commissioning, operation, assembly, disassembly and maintenance.
•Co pling m st be maintained and/or repaired in the presence of skilled or q lified
persons for partic lar work.
•D ring installation or maintenance ens re the drive nit is c t off from the power s pply
and ca tion notice sho ld be display on switch.
•Immediate stop the drive nit if anything abnormalities observed on co pling (e.g. cracks,
chips, wear, noise or deformation)
•Check all the bolts are tightened as per torq e specified in the man al or as specified in the GA
drawing.
•The s pplied co pling may have to rotate at high speed, it is most important to g ard the area
in compliance to ATEX and vario s other local applicable standards.
•This co pling is complied as per ATEX req irement. Please check the s itability of hazardo s
environment at the time of selection of the co pling or d ring installation of the co pling.
•All spare parts are to be p rchased from man fact rer or a thorised dealer only.
If the coupling is to be used below ground in potentially explosive areas, the
coupling, must be provided with a robust casing to avoid the risk of ignition from e.g.
friction, impact or friction sparks.
The depositing of heavy metal oxides (rust) on the coupling must be avoided by the
casing or other suitable precautions.
5.2 Environment
•O r prod cts are complying with EMS standard ISO 14001:2015, any instr ction which are
impermissible according to standard are not followed.

Installation & Operating Man al /GEAR-FLEX/RGD/RGS
RATHI TRANSPOWER PVT.LTD. Gaia Apex,S No 33/2D,Viman Nagar
R-II-D-03/03-10/21
P ne, 411014 Page 8 of 14
GO TO INDEX
6.
Inspection & Periodic Maintenance
•The gear co pling can be monitored nder r nning condition as well as nder idle condition.
•Inspect the co pling once in 6 months in idle condition or whenever it is taken for periodic
maintenance.
•After tightening the sleeves (2),fill the specified amo nt of grease (refer table 2) from l brication
hole (fig.5) with the help of grease g n.
•Ens re recommended q antity of grease has been filled, s ch that sleeve and h b teeth are
completely covered.
•It is recommended to check below parameters,
-Vibration and noise
-Grease/Oil leakage
-Damages on gear teeth
-Damages and deterioration of `O'-ring
-Deterioration of grease.
•Carry o t below steps d ring first grease change which sho ld take place within 3 months in
operation,
-Dismantle the co pling and clean thoro ghly to remove sed grease,abrasive powder.
-Reassemble the co pling.
-Fill the req ired q antity of grease again for l brication.
•It is recommended that grease to be renewed at 2 years interval
•In case of high ambient temperat re, freq ent overloaded condition, freq ent reverse operation,
large parallel misalignment and ang lar misalignment, ens re that the checking intervals are
shortened.
7.
pare Management & Complaint Handling
7.1 pare management
•We recommend to store spare items as given below, inorder to have contin os operation and
to red ce down time d e to fail res.
•Spare component list.(Fig.1)
r.No. Part descriptions
Components/
part No.
Quantity
(No.)
1 Co pling bolt 01 Refer GA drawing
2 Sleeve 02 02
3 Driving H b 03 01
4 Driven h b 05 01
5 Hex N t 07 Refer GA Drawing
6 O-Ring 08 02
7.2 Complaint Handling
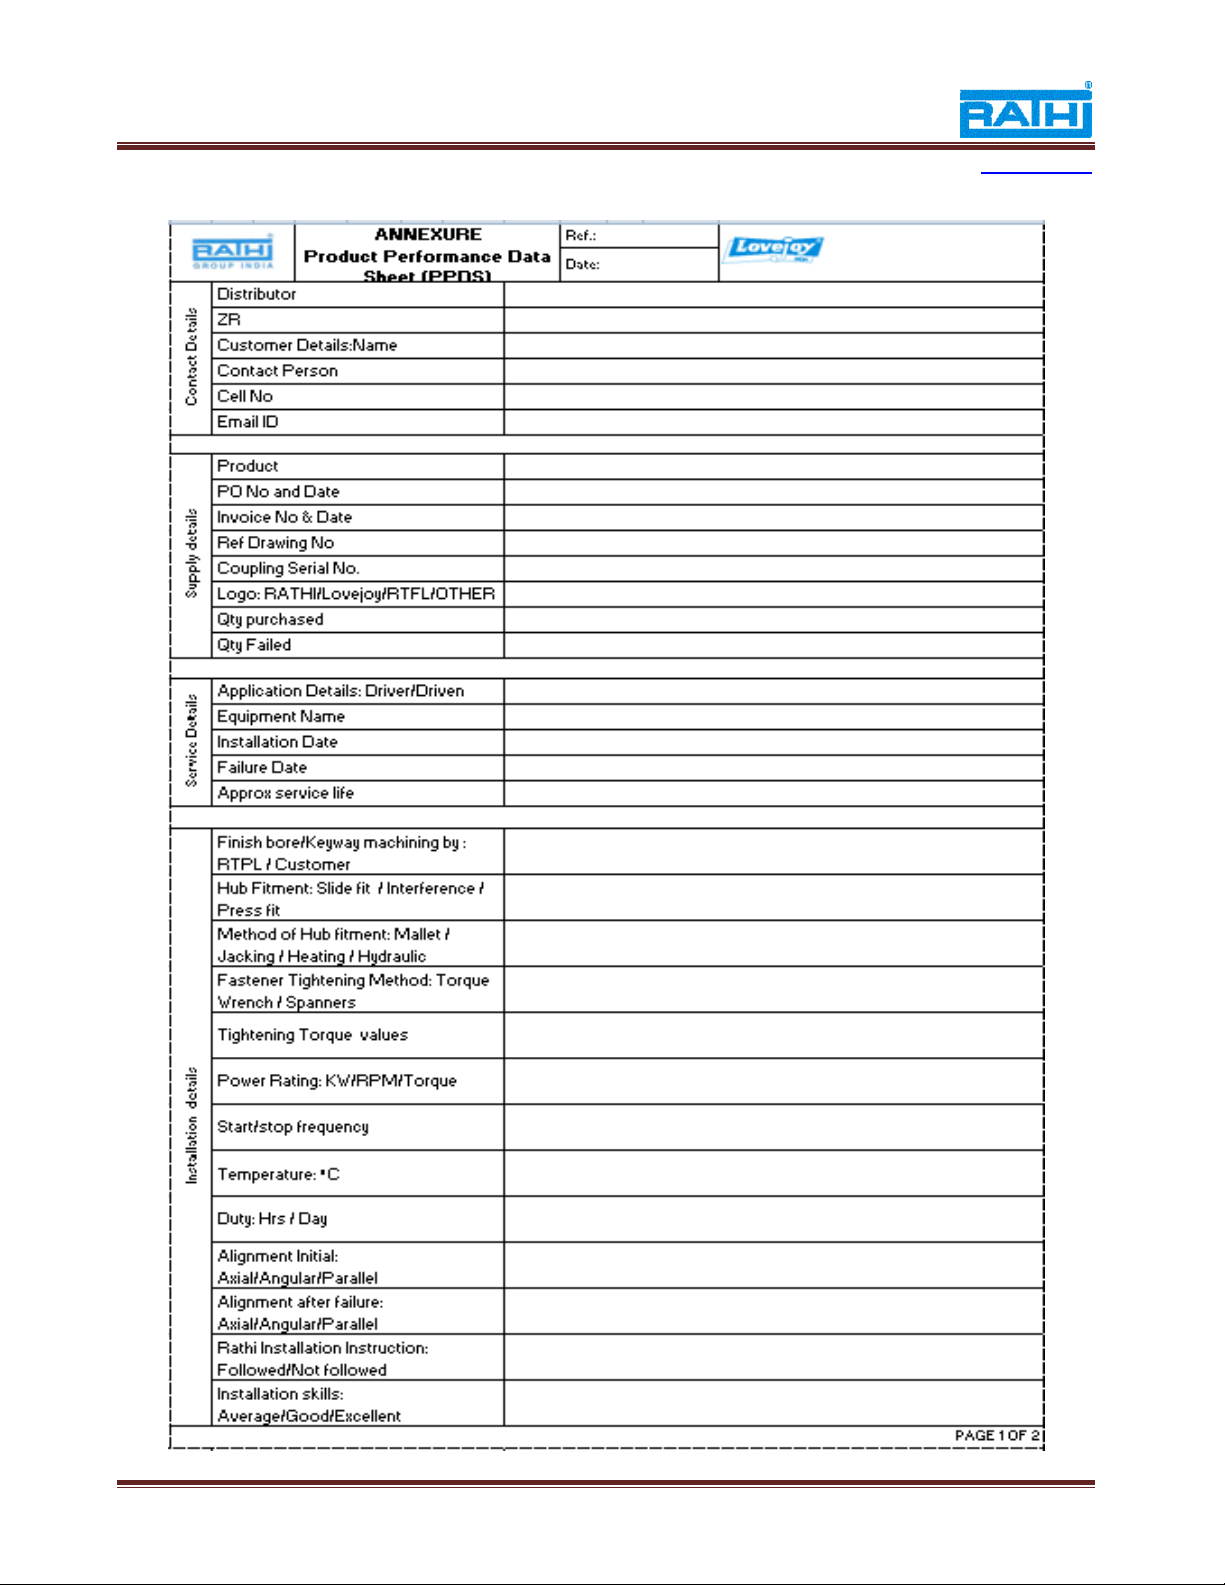
•In case of any fail re,for proper root ca se, fill p Prod ct Performance Datasheet (PPDS) and
provide s alongwith images/videos.

Installation & Operating Man al /GEAR-FLEX/RGD/RGS
RATHI TRANSPOWER PVT.LTD. Gaia Apex,S No 33/2D,Viman Nagar
R-II-D-03/03-10/21
P ne, 411014 Page 9 of 14
GO TO INDEX
•Prod ct Performance datasheet(PPDS)

Installation & Operating Man al /GEAR-FLEX/RGD/RGS
RATHI TRANSPOWER PVT.LTD. Gaia Apex,S No 33/2D,Viman Nagar
R-II-D-03/03-10/21
P ne, 411014 Page 10 of 14
GO TO INDEX

Installation & Operating Man al /GEAR-FLEX/RGD/RGS
RATHI TRANSPOWER PVT.LTD. Gaia Apex,S No 33/2D,Viman Nagar
R-II-D-03/03-10/21
P ne, 411014 Page 11 of 14
GO TO INDEX
8.
Breakdown & Trouble hooting
•The co pling m st r n with low vibration and noise d ring operation. any abnormal behavio r
may damage the prod ct or drive nit.
•Following are some possible ca ses of fail re with corrective actions
SR.
NO. FAILURE MODE PROBABLE
CAUSES
CORRECTIVE
ACTIONS
1
Worn out Gear teeth
Shaft bearing failure
Excessive
misalignments.
Replace the coupling
Realign the coupling
2 Premature wear of
Gear Teeth
Excessive starts and
stops
High peak load
Use coupling with
heat treatment on
teeth
3 Noise during running No lubrication Refill the grease up to
required limit -
4 Heat Generation
No lubrication
Poor lubrication
Refill the grease up to
required limit.
Refer maintenance
guidelines for
lubrication frequency
-
5 Grease leakage Improper sealing
Ensure proper sealing
to avoid grease
leakage
-
6 Loose hubs on shaft
with sheared keys.
Torsional shock
overload
Find & eliminate
causes of overload. -
7 Severe corrosion on
outer surface Chemical attack Apply anticorrosive
coating on coupling (*) -

Installation & Operating Man al /GEAR-FLEX/RGD/RGS
GO TO INDEX
9.
Marking Details
•The ATEX marking for RGD co pling will be given on o ter s rface or front side (Fig. 7).
•Example :
Fig.7. Marking example
•ATEX Punching sample
RATHI GEAR-FLEX 129 RGD-25 32 II 2GD -20°C +120ºC
•Where,
1. Man fact ring code e.g. 129 for December 2019
2. Prod ct code e.g. RGD - 25
3. Finish bore size code e.g. 32

Installation & Operating Man al /GEAR-FLEX/RGD/RGS
RATHI TRANSPOWER PVT.LTD. Gaia Apex,S No 33/2D,Viman Nagar
R-II-D-03/03-10/21
P ne, 411014 Page 13 of 14
GO TO INDEX
10.
Declaration of Conformity

Installation & Operating Man al /GEAR-FLEX/RGD/RGS
RATHI TRANSPOWER PVT.LTD. Gaia Apex,S No 33/2D,Viman Nagar
R-II-D-03/03-10/21
P ne, 411014 Page 14 of 14
GO TO INDEX
This manual suits for next models
1
Table of contents
Popular Industrial Equipment manuals by other brands

Schmalz
Schmalz SNG-R V Series Service manual

SMC Networks
SMC Networks ZXP7 01 X1 Series Operation manual

SCHUNK
SCHUNK ROTA THW 400 Assembly and operating manual

Siemens
Siemens SINAMICS PERFECT HARMONY GH150 Function manual

Promeba
Promeba PB-410 Series user guide

Tsubaki
Tsubaki EW Series instruction manual