Ravpower RP-WD01 User manual

1
RAVPower®
Multi-Functional Wi-Fi Disk with Built-in Power Bank (Model#:
RP-WD01)
--For PC Laptop Tablet and Smartphone with iOS & Android System
Content
1 Features ------------------------------------------------------------------------------------------------------------1
2 Specifications -----------------------------------------------------------------------------------------------------1
3 How to Use --------------------------------------------------------------------------------------------------------2
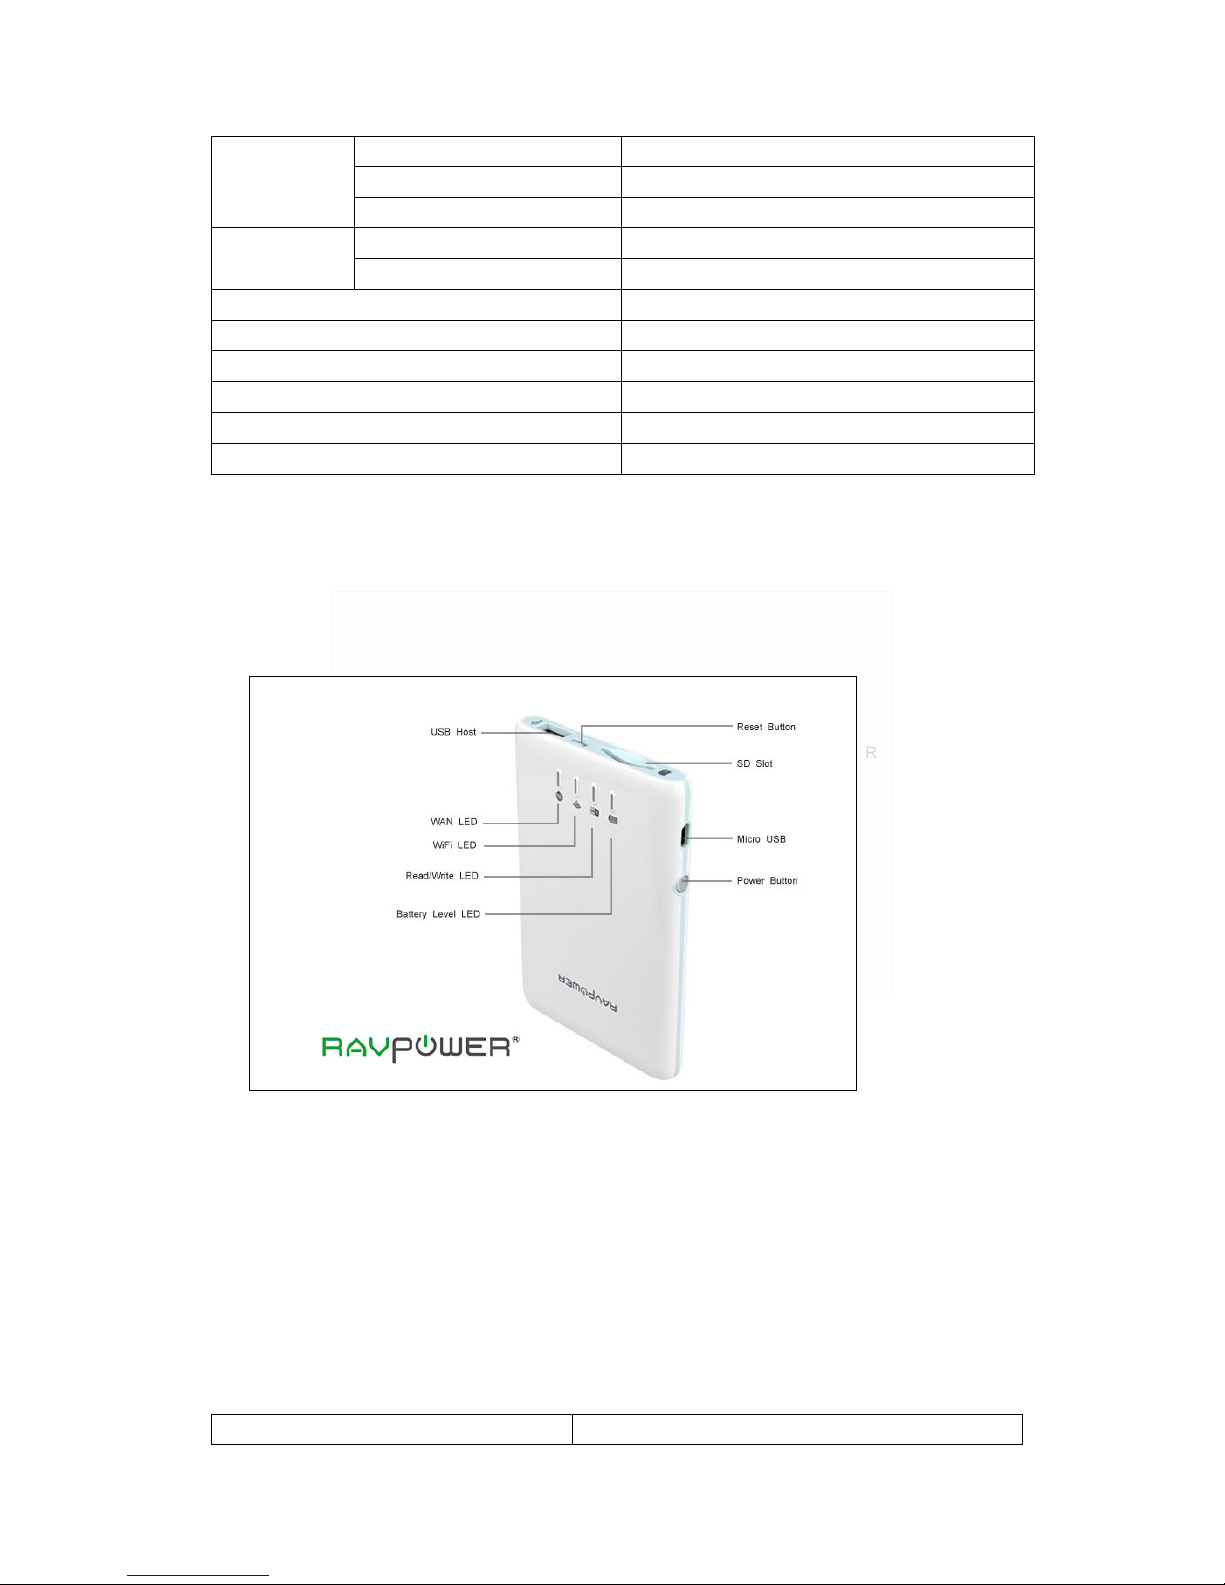
3.1 Product Diagram------------------------------------------------------------------------------------------------2
3.2 Minimum Hardware Requirements -----------------------------------------------------------------------3
3.3 Storage Installation --------------------------------------------------------------------------------------------3
3.3.1 SD Memory Card ------------------------------------------------------------------------------------3
3.3.2 USB External Storage-------------------------------------------------------------------------------4
3.4 Software APP Installation-----------------------------------------------------------------------------------5
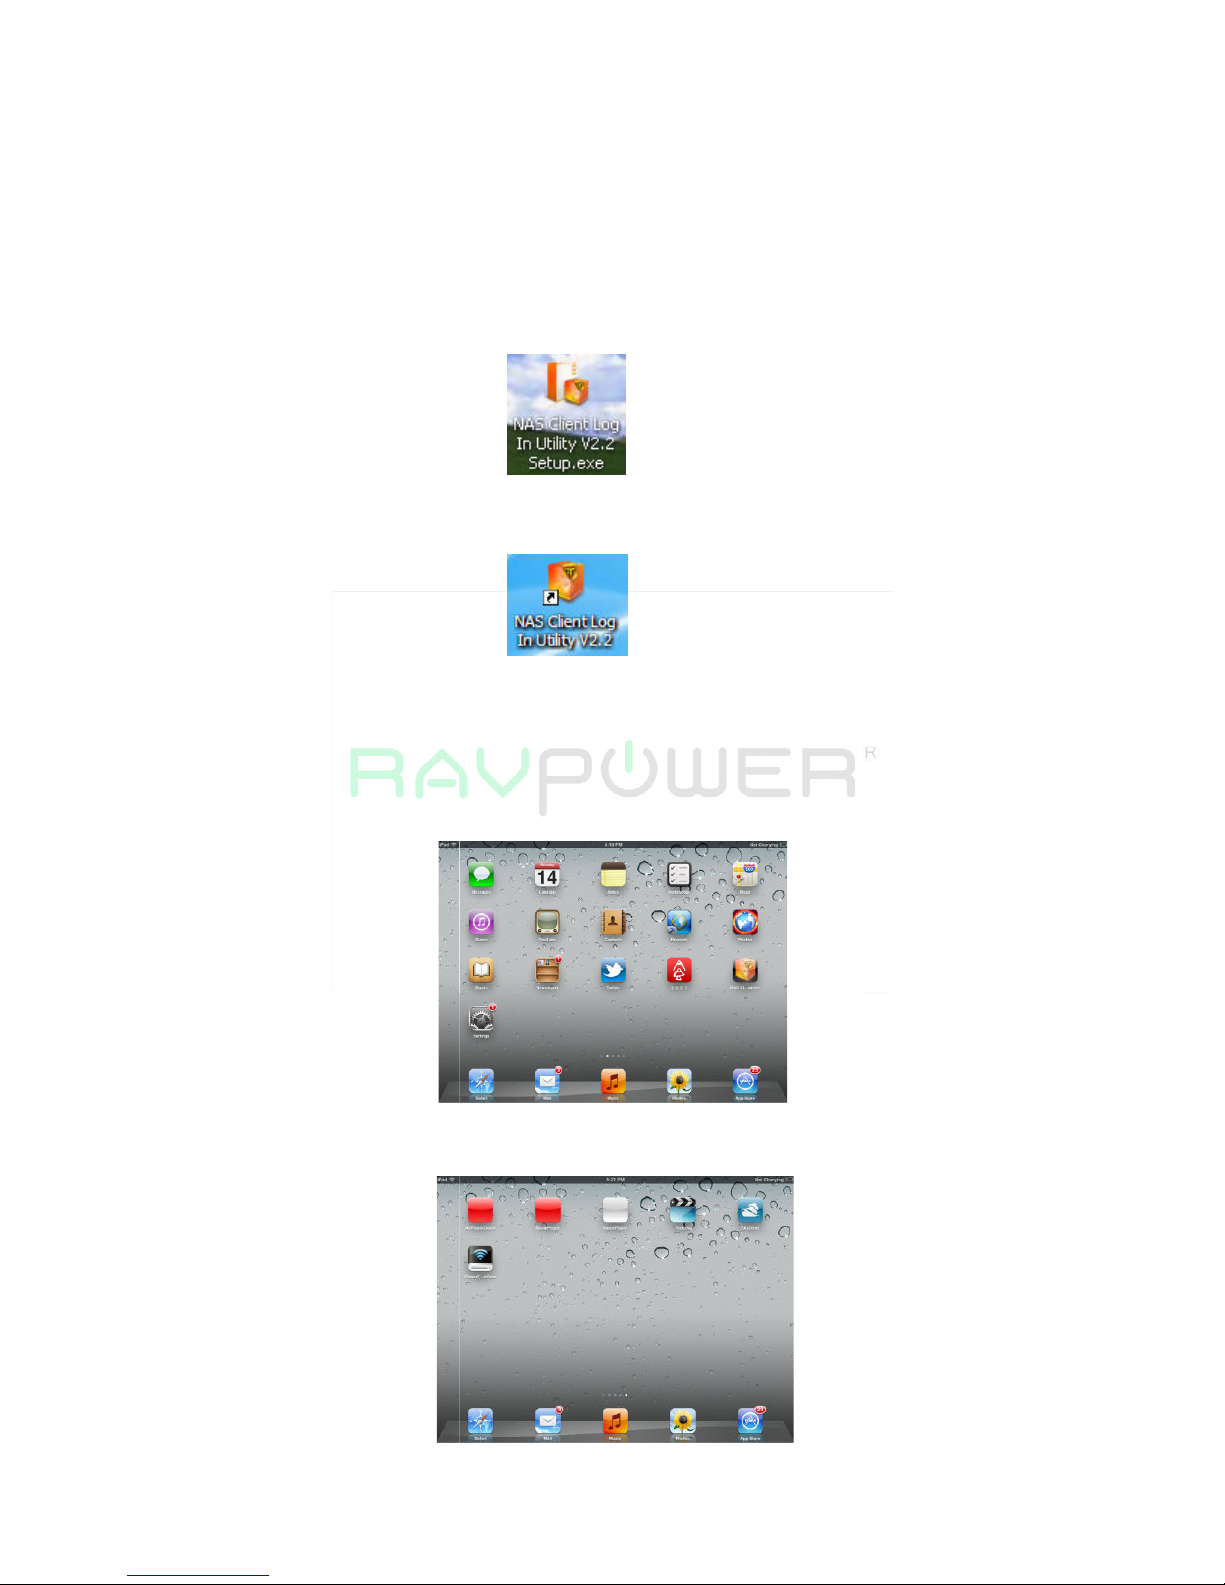
3.4.1 PC Client-----------------------------------------------------------------------------------------------5
3.4.2 Mobile Device----------------------------------------------------------------------------------------5
3.4.2.1 iOS Client App Installation-------------------------------------------------------------------5
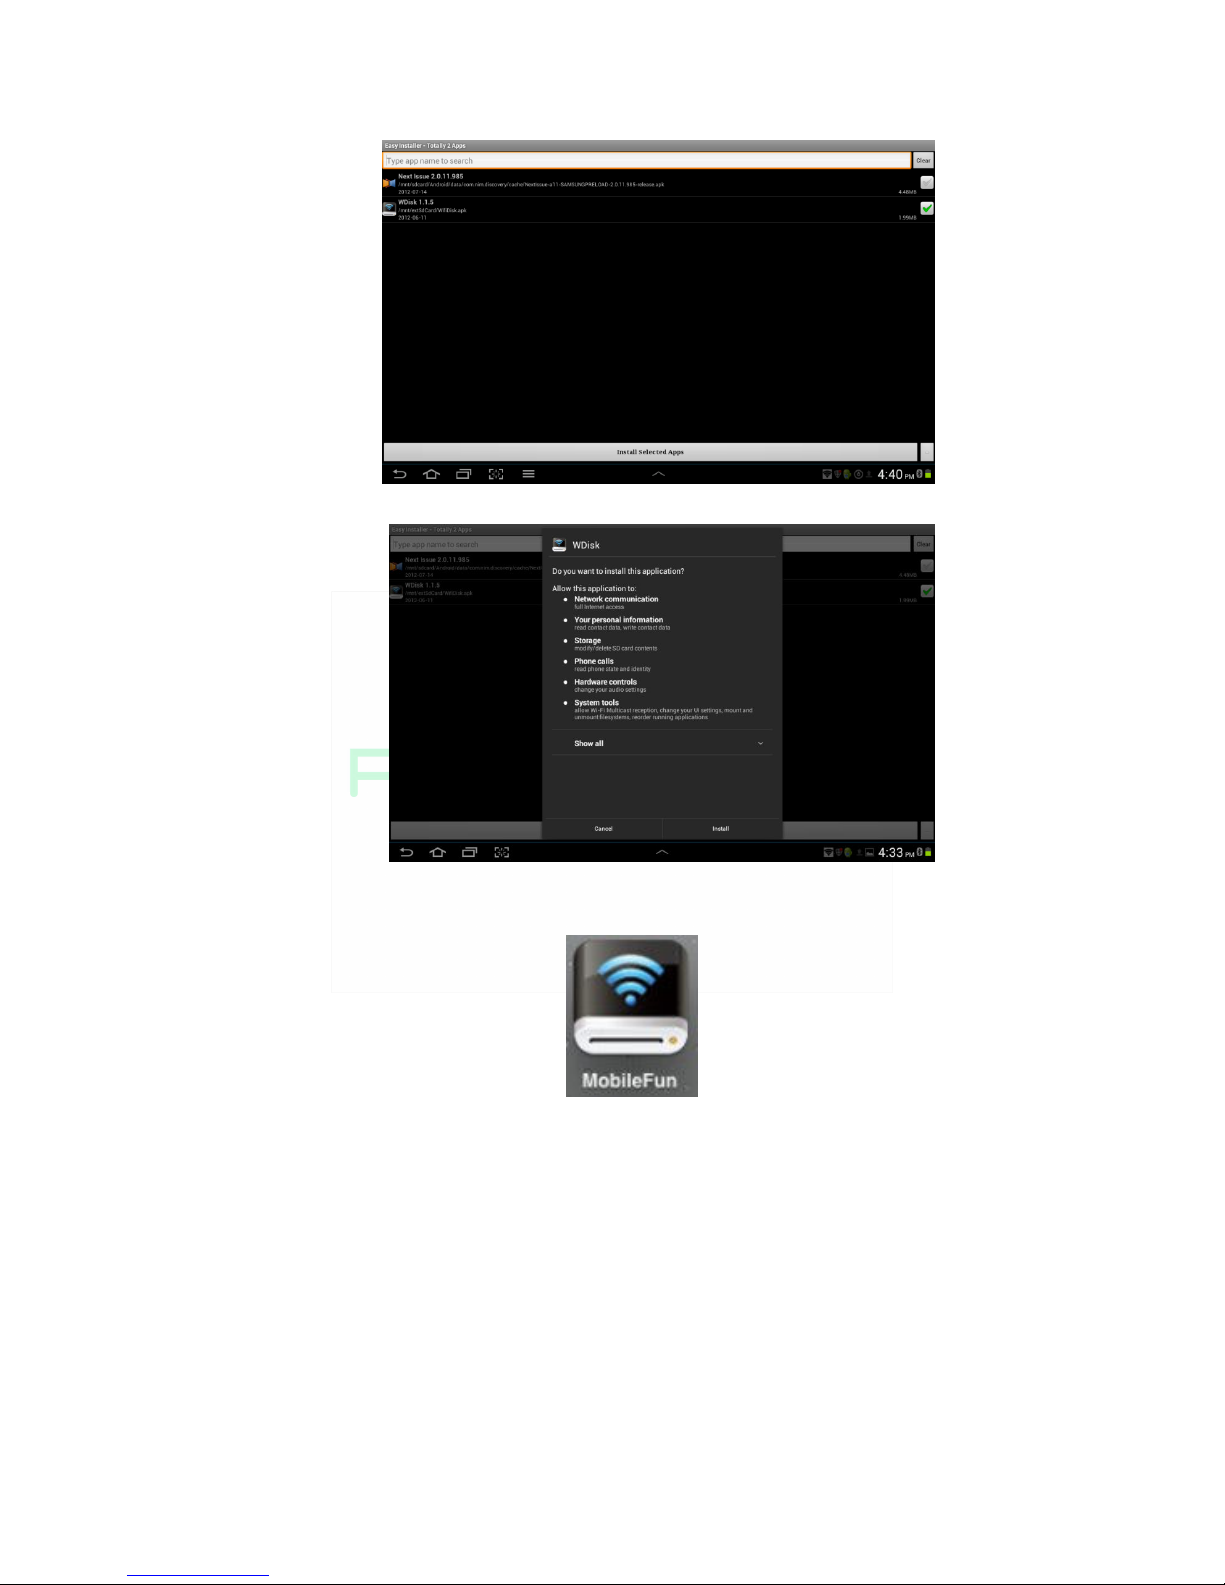
3.4.2.2 Android Client App Installation-------------------------------------------------------------6
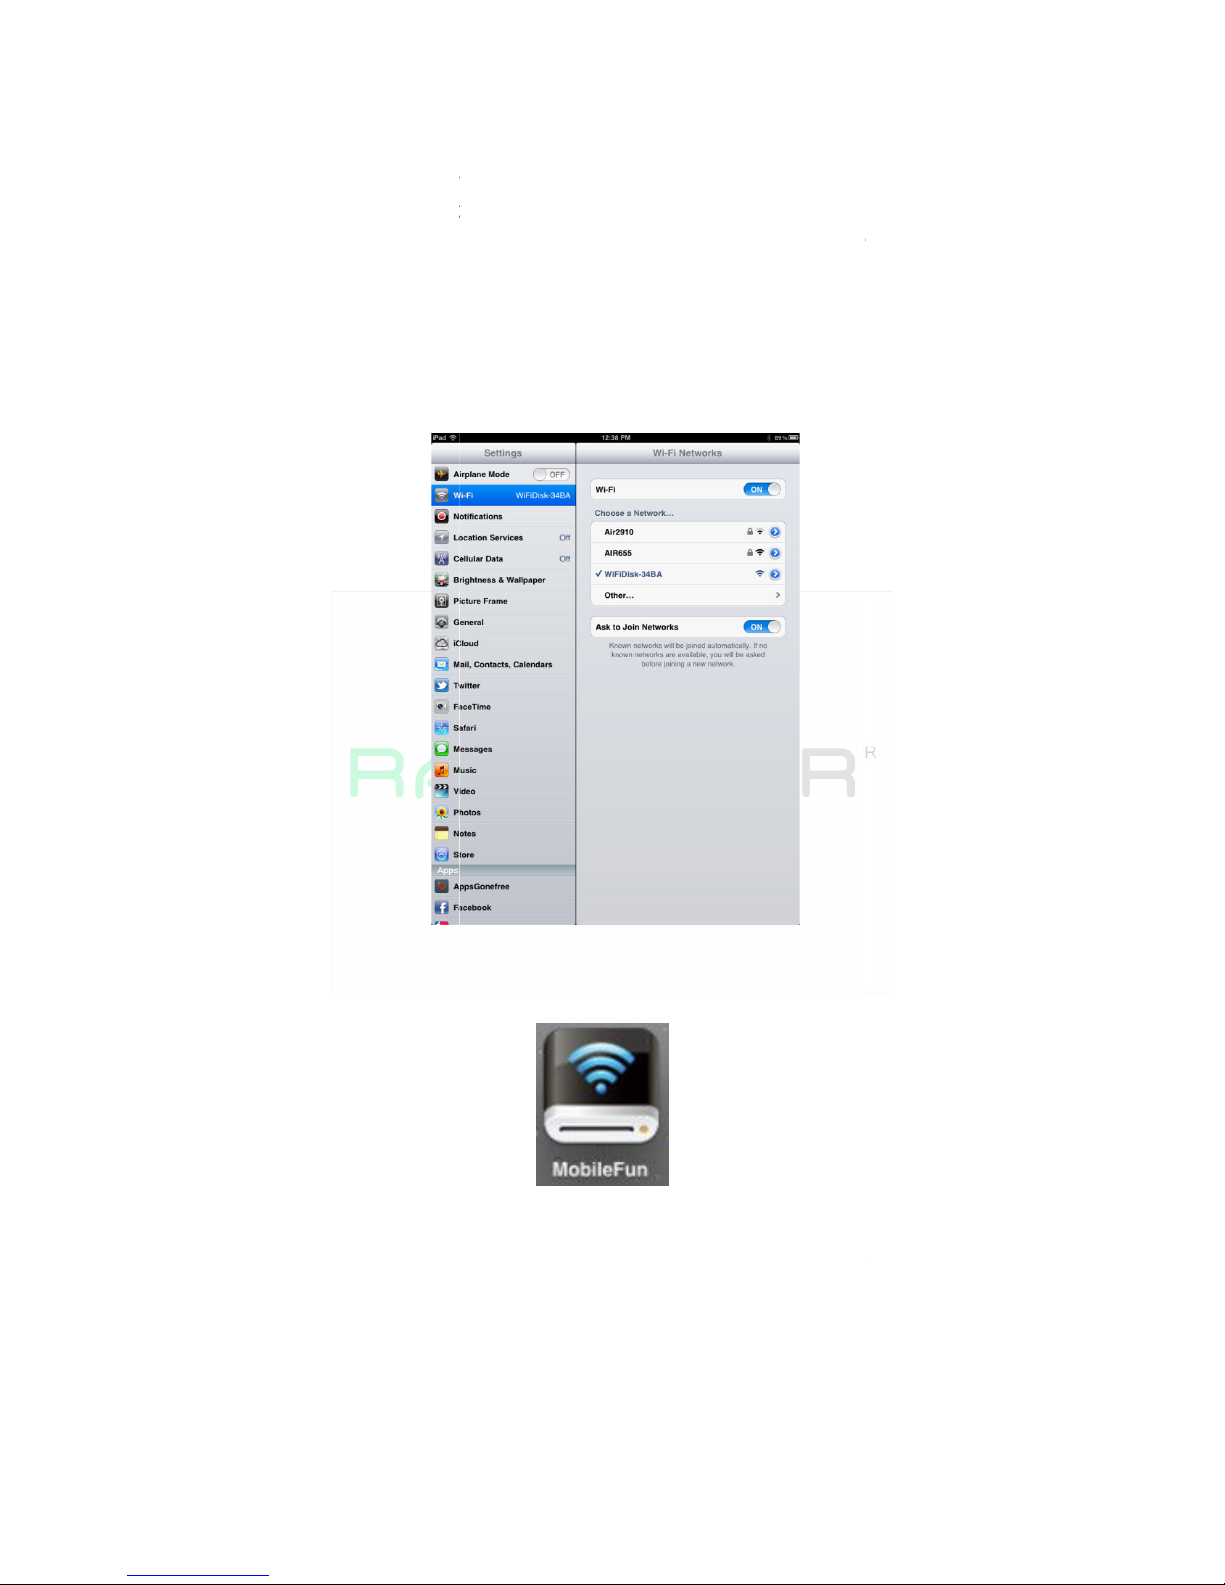
3.5 Wireless Connecting Your Device---------------------------------------------------------------------------7
3.5.1 PC Client-----------------------------------------------------------------------------------------------7
3.5.2 iOS Client----------------------------------------------------------------------------------------------8
3.5.3 Android Client----------------------------------------------------------------------------------------9
3.6 User Login-------------------------------------------------------------------------------------------------------10
3.6.1 PC Client----------------------------------------------------------------------------------------------10
3.6.2 iOS Client --------------------------------------------------------------------------------------------14
3.6.3 Android Client--------------------------------------------------------------------------------------14
3.7 Basic Function--------------------------------------------------------------------------------------------------16
3.7.1 iOS Client--------------------------------------------------------------------------------------------16
3.7.2 Android Client--------------------------------------------------------------------------------------31
3.8 Web Function--------------------------------------------------------------------------------------------------45
3.8.1 Explorer Function----------------------------------------------------------------------------------46
3.8.2 Context Menu--------------------------------------------------------------------------------------46
3.8.3 Keyboard Shortcuts-------------------------------------------------------------------------------48
3.8.4 Drag and Drop--------------------------------------------------------------------------------------49
3.8.5 Information------------------------------------------------------------------------------------------49
3.8.6 Basic Setting-----------------------------------------------------------------------------------------50
3.8.7 Network Setting------------------------------------------------------------------------------------51
3.8.8 Internet Setting------------------------------------------------------------------------------------53
3.8.9 Network Service-----------------------------------------------------------------------------------54
3.8.10 System Setting--------------------------------------------------------------------------------------55
3.8.11 Firmware Update----------------------------------------------------------------------------------57
3.8.12 Resetting to Factory default--------------------------------------------------------------------58
3.8.13 About Setting---------------------------------------------------------------------------------------59
4 DownLoad-----------------------------------------------------------------------------------------------------60
5 Product Warranty & Problem Solving------------------------------------------------------------------60

2
6 Notice------------------------------------------------------------------------------------------------------------60
7 Contact Us-------------------------------------------------------------------------------------------------------60

1
RAVPower®
Multi-Functional Wi-Fi Disk with Built-in Power Bank (Model#:
RP-WD01)
--For PC Laptop Tablet and Smartphone with iOS & Android System
Thank you for purchasing the RAVPower
®
RP-WD01
Wi-Fi Disk, which helps your P / Laptop
/ Tablet and Smartphone to read and transfer the data (photo, music & movies) from
external storage devices via Wi-Fi. Its compact and multi-functional design will bring you
unprecedented mobile experience!
1. Features:
●
Wi-Fi SD Card USB External HDD Reader
- Enable you to read the data on SD card or USB External HDD/SDD by your
iPhone, iPad, Smartphone, tablet or computer with Wi-Fi connectivity
(802.11 b/g/n).
- Two-way data transmission between RP-WD01 your iPhone, iPad,
Smartphone, tablet or computer with Wi-Fi connectivity (802.11 b/g/n).
- Available iOS and Android mobile App with search utility function to find and
locate specific data file.
●
3000mAh Power Bank External battery Charger
- Emergency backup battery for emergency charging. At least a full charge to
the battery life of most mobile phones.
- Supply the power needed for itself while used as a Wi-Fi SD ard / USB
External HDD Reader
●
Portable WLAN Hot Spot
Bypass your Internet access to your existing Wi-Fi router, so you may access any
data in the SD or HDD while surfing the Internet simultaneously.
●
Share with Friend & Family
Allow 5 maximum connections at the same time for data sharing, or connecting
to the internet service.
●
Light weight and Slim Design
Lightweight and multifunctional design makes RP-WD01 much more portable. It is a great
couple for travelers.
2. Specifications:
Model: RP-WD01
CPU Model: Ralink RT5350
Frequency: MIPS24KEc 350MHz
Wi-Fi
Standard: 802.11b/g/n
Frequency: 2.4 GHZ
Speed: 72 Mbps at 20MHz / 150 Mbps at 40MHz

2
Battery apacity: 3000 mAh
Max Input: 1.5A (support 0.5A,0.8A&1.5A Input)
Output: 1A
Power
Consumption
SD ard Read/Write* 2W
Stand-by(HDD sleep Mode) 1.5W
SD Card Read Write Speed Read: 3 MB / S Write: 3.5MB/S
USB Interface: Micro USB 2.0 for data transfer and charging
Working Temperature: 5-35°
Storage Temperature: 0-60°
Dimension(L*W*T): 118mm*77mm*13mm
Weight: 124g
3.How to Use:
3.1
Product Diagram
Micro USB Interface: Micro USB 2.0 Interface can connect to the computer to transmit and
charge the device.
Power Button:
SD Slot: Insert SD card for Wi-Fi accessing.
Reset Button: Set the device to Default Factory configuration.
USB Host: onnect USB memory, external USB potable hardisk for Wi-Fi accessing, Or connect
smartphone, mobile devices to charge.
LED Indicator:
Battery Level LED:
Green Steady Light Battery power is >30%

3
Red Steady Light Battery power is >30%
Red Fast Flash Battery power is low and will soon shut down
Green Slow Flash (every 2 seconds) Battery is charging
Green Slow Flash (every 1.5 seconds) Device is shutting down
Green Slow Flash (every 1.5 seconds) Device is powered off
Wi-Fi LED:
Blue LED shows the system initiation state. It starts flashing in the process of initiation, and it
stops flashing when the system initiation completes.
Blue Steady Light WiFi is ready
LED off Device is on, but the WiFi signal is unsteady
Device is off
Device is in Mobile HDD Mode and the WiFi is off
Internet LED:
Green Steady Light WiFi signal is good
No Light Not connected to the Internet
R/W LED:
On WiFi disk mode Blue Steady Light Memory connection is successful
Blue Flashing Light Memory is reading or writing
ard reader mode Blue Steady Light Memory is reading or writing
Blue Flashing Light onnected to USB2.0 and is reading or writing
3.2
Minimum Hardware Requirements
Internet onnection
P Operating System
Requirements
Windows: XP/Vista/Windows 7
Mac:
OS X 10.5.0 and higher version
Others: Fedora 12 (Linux) and higher version
P Web Browser
Windows: Supports Internet Explorer 7.0 and higher version
Mac: Supports Safari 3.0 and higher version
Others: Firefox 3.5 and higher version
Router or Switch
3.3
Storage Installation
3.3.1 SD Memory Card

1>
Locate the SD memory card slot.
2>
Simply insert the memory card as seen on the image below.
3>
Gently push the memory card all the way in until it locks into
4> Press the power button to switch on the device.
5> Wait for few seconds to complete the initialization process and your SD
memory card is ready to use
Note:
Do not touch the exposed connectors on your SD memory card. Prior
installing the SD memory card, make use the Wi
no USB external storage is connected.
3.3.2
USB External Storage
1>
Locate the USB port on the device.
2>
Simply insert the USB connector into the USB port of the device as seen
the image below.
3>
Press the power button to switch on the device.
4>
Wait for few seconds to complete the initialization process and your USB
external storage is ready to use.
Note:
Prior to installing your external USB Storage, make u
device is switched off and no SD memory card installed.
4
Locate the SD memory card slot.
Simply insert the memory card as seen on the image below.
Gently push the memory card all the way in until it locks into
4> Press the power button to switch on the device.
5> Wait for few seconds to complete the initialization process and your SD
memory card is ready to use
Do not touch the exposed connectors on your SD memory card. Prior
installing the SD memory card, make use the Wi
-
Fi SD/USB device is switched off and
no USB external storage is connected.
USB External Storage
Locate the USB port on the device.
Simply insert the USB connector into the USB port of the device as seen
the image below.
Press the power button to switch on the device.
Wait for few seconds to complete the initialization process and your USB
external storage is ready to use.
Prior to installing your external USB Storage, make u
se the Wi-
Fi SD/USB
device is switched off and no SD memory card installed.
Simply insert the memory card as seen on the image below.
Gently push the memory card all the way in until it locks into
its place.
5> Wait for few seconds to complete the initialization process and your SD
Do not touch the exposed connectors on your SD memory card. Prior
to
Fi SD/USB device is switched off and
Simply insert the USB connector into the USB port of the device as seen
Wait for few seconds to complete the initialization process and your USB
Fi SD/USB

3.4
Software APP
Installation
3.4.1 PC Client
1> Download
2>
To install the software, simply double
v2.2 Setup” executable file and follow the on
3>
Once the installation is complete, double
Utility V2.2” icon on your desktop to launch the software utility.
3.4.2
Mobile Device
3.4.2.1
iOS lient App Installation
1>
lick on the “App St
Search and locate the free “MobileFun” app and follow the on
installation instructions.
2>
Once the installation process has been completed, the “MobileFun” app
can be found on the desktop as seen
5
Installation
To install the software, simply double
-
click on the “NAS lient Login Utility
v2.2 Setup” executable file and follow the on
-screen
instructions.
Once the installation is complete, double
-
click on the “NAS lient Login
Utility V2.2” icon on your desktop to launch the software utility.
Mobile Device
iOS lient App Installation
lick on the “App St
ore” icon on the desktop as seen on the image below.
Search and locate the free “MobileFun” app and follow the on
installation instructions.
Once the installation process has been completed, the “MobileFun” app
can be found on the desktop as seen
on the image below.
click on the “NAS lient Login Utility
instructions.
click on the “NAS lient Login
Utility V2.2” icon on your desktop to launch the software utility.
ore” icon on the desktop as seen on the image below.
Search and locate the free “MobileFun” app and follow the on
-screen
Once the installation process has been completed, the “MobileFun” app

3> Turn-
on the Wi
initialization process. The blue Wi
solid indicating that the initialization process has been completed.
4>
lick on the “Settings” icon o
below.
5>
lick on the “Wi
should appear on the list. lick on the “WifiDisk
image below. The “34BA” part of the SSID is the last 4 digits of th
device MA Address.
6>
Once the “Wifidisk
SSID and the Wi
of the display.
3.4.2.2
Android lient App Installation
1>
Download th
as seen on the screenshot below.
6
on the Wi
-
Fi SD/USB. Wait for few minutes to complete the
initialization process. The blue Wi
-
Fi LED on the device should remain
solid indicating that the initialization process has been completed.
lick on the “Settings” icon o
n the desktop as seen on the screenshot
lick on the “Wi
-Fi”. Inside the Wi-
Fi Networks, the “WifiDisk
should appear on the list. lick on the “WifiDisk
-
34BA” as seen on the
image below. The “34BA” part of the SSID is the last 4 digits of th
device MA Address.
Once the “Wifidisk
-
XXXX” is selected, a check mark will appear before the
SSID and the Wi
-
Fi logo will appear after the device name on the top left
Android lient App Installation
Download th
e lient App called “MobileFun” from the official website
as seen on the screenshot below.
Fi SD/USB. Wait for few minutes to complete the
Fi LED on the device should remain
solid indicating that the initialization process has been completed.
n the desktop as seen on the screenshot
Fi Networks, the “WifiDisk
-XXXX”
34BA” as seen on the
image below. The “34BA” part of the SSID is the last 4 digits of th
e
XXXX” is selected, a check mark will appear before the
Fi logo will appear after the device name on the top left
e lient App called “MobileFun” from the official website

7
2> lick on the “Install” button and follow the on-screen instructions.
3> Once the lient App is successfully installed, the “MobileFun” icon can
be found on your desktop as seen on the image below.
3.5
Wirelessly Connecting Your Device
3.5.1 P lient
1> Switch-on the Wi-Fi SD/USB by pressing the power button at the front
panel.
2> Wait for few minutes until the Wireless LED has remained lit.
3> Enable the Wi-Fi feature on your P and open the Wireless Network
onnection.

4>
Select the WiFiDisk wireless connection (default wireless SSID: WiFiDisk
and with no password).
5>
Once you have successfully connected to your Wi
run t
he “NAS lient Log In Utility V2.2” to search for your device and
complete the configuration process.
3.5.2 iOS lient
1>
Turn-on the Wi-
Fi SD/USB. Wait for few minutes to complete the
initialization process. The blue Wi
in
dicating that the initialization process has been completed.
2>
lick on the “Settings” icon on the desktop as seen on the screenshot below.
3>
lick on the “Wi-
Fi”. Inside the Wi
appear on the list. lick on the “WifiDis
below. The “34BA” part of the SSID is the last 4 digits of the device MA
Address.
4>
Once the “Wifidisk
SSID and the Wi-
Fi logo will appear after the device name
the display.
8
Select the WiFiDisk wireless connection (default wireless SSID: WiFiDisk
and with no password).
Once you have successfully connected to your Wi
-
Fi SD/USB, you may now
he “NAS lient Log In Utility V2.2” to search for your device and
complete the configuration process.
Fi SD/USB. Wait for few minutes to complete the
initialization process. The blue Wi
-
Fi LED on the device should remain solid
dicating that the initialization process has been completed.
lick on the “Settings” icon on the desktop as seen on the screenshot below.
Fi”. Inside the Wi
-Fi Networks, the “WifiDisk
-
appear on the list. lick on the “WifiDis
k-
34BA” as seen on the image
below. The “34BA” part of the SSID is the last 4 digits of the device MA
Once the “Wifidisk
-
XXXX” is selected, a check mark will appear before the
Fi logo will appear after the device name
on the top left of
Select the WiFiDisk wireless connection (default wireless SSID: WiFiDisk
Fi SD/USB, you may now
he “NAS lient Log In Utility V2.2” to search for your device and
Fi SD/USB. Wait for few minutes to complete the
Fi LED on the device should remain solid
lick on the “Settings” icon on the desktop as seen on the screenshot below.
-
XXXX” should
34BA” as seen on the image
below. The “34BA” part of the SSID is the last 4 digits of the device MA
XXXX” is selected, a check mark will appear before the
on the top left of

9
3.5.3 Android lient
1> Turn-on the Wi-Fi SD/USB. Wait for few minutes to complete the
initialization process. The blue Wi-Fi LED on the device should remain solid
indicating that the initialization process has been completed.
2> lick on the “Settings” icon on your desktop as seen on the screenshot
below.
3> Switch the Wi-Fi to ON position. Inside the Wi-Fi networks, the
“WifiDisk-XXXX” should appear on the list. lick on the “WifiDisk-34BA” as
seen on the image below. The “34BA” part of the SSID is the last 4 digits of
the device MA Address.

10
4> The word “ onnected” will appear under the SSID name of which is an
indication that the Android Device is connected to the Wi-Fi SD/USB.
3.6
User Log in
3.6.1
P lient
3.6.1.1 P lient Login Utility
1>
Double-click the “ lient Log In Utility V 2.2” icon on your desktop. The
software utility will search all the connected devices in your network as seen
on the screenshot below.
2> If you do not find the WiFiDisk on the list of devices connected in your
network, click on the “Refresh” button to refresh the device list.
3> Select the WiFiDisk on the list, then click on the “Log In” button to enter the
web interface as seen on the image below.

11
4> Type the default User Name as admin and leave the User Password as blank.
lick on the “Log In” button to access the Web Management Interface.
5> If you choose to click on the “My Storage” button, enter the admin login
name and password to gain access to the Wi-Fi SD/USB. Once successfully
logged-in, it automatically mounts the storage area of the Wi-Fi SD/USB
onto your desktop
3.6.1.2
Wi-Fi SD/USB onfiguration using P
Once your Wi-Fi enabled-P is successfully connect to the Wi-Fi SD/USB,
using the “NAS lient Login Utility V2.2” will allow you to access our built-in
Web Management Interface and configure your device.
1> During the initial setup, our Wizard will automatically run and will guide you
through the step-by-step process on configuring the Wi-Fi SD/USB as seen
on the screenshot below. You may cancel this process by clicking on the “X”
at the top right corner of the window. If you cancel the Wizard, it will keep
the factory default settings of your Wi-Fi SD/USB.
2> lick on the “Next” button. By default, the Access Point (AP)+ lient is
selected.

12
Note: There are two available Internet Access options –
A. Access Point (AP) + lient. onnecting the Wi-Fi SD/USB to another wireless
device to have the internet access.
B. WAN. Directly connecting the Wi-Fi SD/USB to the available port on the back
the router.
3> Selecting the AP+ lient Option
- SSID. Type-in the SSID name or click on the “Rescan” button to
automatically search for the available wireless network connections.
- Password. Type-in the correct password to join the wireless network
connection selected.
- IP Address. Select either DH P or Manually assign an IP address
- By selecting DH P, the host will provide an automatic IP address to
connect to the internet
- By selecting Manual, you have to manually assign an IP address to
connect to the internet
4> Selecting the WAN Option - By selecting the WAN option, the Dynamic IP is
selected as the default setting. You can manually assign your own IP
address by clicking on the green arrow and select the Static IP option.
5> lick on the “X” button if you wish to cancel and exit this window.
6> lick on the “Next” button. The next step is to configure the Wi-Fi Disk.

13
Note:
- SSID: Type-in the combination of letters and numbers only. 32
characters is the maximum allowable SSID length
- hannel: The default setting is set to Auto. There are 14 available
channels to choose from.
- Modes: The default setting is 11b/g/n. You can also manually set the
modes to 11Mbps (802.11b), 54MBPS (802.11G), and 150Mbps (802.11n).
- Security: The default is set to NONE. The WPA-PSK, WPA2-PSK , Mixed
WPA/WPA2-PSK are available.
- Password: WPA-PSK , WPA2-PSK , Mixed WPA-PSK/WPA2-PSK: Minimum
8 (Maximum 63) characters.
- IP Address: The default IP address is set to 10.10.10.254 with subnet
mask of 255.255.255.0. The IP address can be changed.
7> lick on the “Next” button. The next step is to change the admin default
password. lick on the “Next” button once the password has been
modified. You may click on the “Skip” button to keep the default password.
8> The system will start rebooting. This process will take approximately 5
minutes as seen on the image below.

9> The step-by-
step wizard can be canceled at anytime. lick on the “X”
located at the top right of the window as s
on the “OK” button to exit or “ ancel”.
3.6.2 iOS lient
1>
lick on the “MobileFun” icon to launch the app as seen on the image
below.
2>
Enter the Admin password that you assigned during the configura
process. The password is only required during the first login. The device
remembers the password and there is no need to enter it again the second
time you login.
14
step wizard can be canceled at anytime. lick on the “X”
located at the top right of the window as s
een on the image below. lick
on the “OK” button to exit or “ ancel”.
lick on the “MobileFun” icon to launch the app as seen on the image
Enter the Admin password that you assigned during the configura
process. The password is only required during the first login. The device
remembers the password and there is no need to enter it again the second
step wizard can be canceled at anytime. lick on the “X”
een on the image below. lick
lick on the “MobileFun” icon to launch the app as seen on the image
Enter the Admin password that you assigned during the configura
tion
process. The password is only required during the first login. The device
remembers the password and there is no need to enter it again the second

3>
Once the password has been entered correctly, you will be automatically
connected int
o the “My WiDisk”. The “My WiDisk” is the Wi
Storage.
3.6.3
Android lient
1>
lick on the “MobileFun” icon to launch the app as seen on the image
below.
2>
Enter the Admin password that you assigned during the configuration
proces
s. The password is only required during the first login. The device
remembers the password and there is no need to enter it again the second
time you login.
15
Once the password has been entered correctly, you will be automatically
o the “My WiDisk”. The “My WiDisk” is the Wi
-
Fi SD/USB
Android lient
lick on the “MobileFun” icon to launch the app as seen on the image
Enter the Admin password that you assigned during the configuration
s. The password is only required during the first login. The device
remembers the password and there is no need to enter it again the second
Once the password has been entered correctly, you will be automatically
Fi SD/USB
lick on the “MobileFun” icon to launch the app as seen on the image
Enter the Admin password that you assigned during the configuration
s. The password is only required during the first login. The device
remembers the password and there is no need to enter it again the second

16
3>
Once the password has been entered correctly, you will be automatically
connected into the “My WiDisk”. The “My WiDisk” is the Wi-Fi SD/USB
Storage.
3.7
Basic Function
3.7.1 iOS lient
3.7.1.1 Introduction
Once you have successfully connected to the Wi-Fi SD/USB, by default, you
will be inside the “My WiDisk”. The “My WiDisk” is the Wi-Fi SD/USB and
the “My Device” is the device that you are using to access the Wi-Fi SD/USB.
Few buttons that can be found inside the Main Screen as listed below.
My Device Main Screen View – By default, the Documents folder, Music
folder, Photos Folder, Videos folders and iPad (or iPhone) folder are available
to easily organize your files inside the My Device.

My WiDisk Main Screen View
Home Button –
back to the main screen.
View Button -
change to List or Thumbnail view.
Setting Button –
change the Wi
Back Button –
back to previous screen
Share Button –
to share, copy, delete, and upload files functions
Search Box
My WiDisk
17
My WiDisk Main Screen View
–
back to the main screen.
change to List or Thumbnail view.
change the Wi
-Fi SD/USB configuration.
back to previous screen
to share, copy, delete, and upload files functions
Search Box
–
to search for specific file name and/or extension.
My WiDisk
– the Wi-
Fi SD/USB or the Remote Storage.
to share, copy, delete, and upload files functions
to search for specific file name and/or extension.
Fi SD/USB or the Remote Storage.

My Device
SD/USB or the Local Storage
Status Button –
to view the download/upload status list.
3.7.1.2
Playing Music / Audio
Tip: -
It is highly recommended to create a folder or folders where to copy all
your movie files
organization.
-
The Music or Audio files can be played regardless if you are inside the “My
WiDisk” (or “My Wifi Disk for Android) or “My Device.
-
Simply locate the music or audio file that you would like to pl
the file and your music will automatically play.
Note:
Please consult your device manual to check whether it will support the
music/audio files that you would like to play.
-
When clicked, the current music that is playing will restart
twice, it will play the previous music.
-
When clicked, it will play the next music
-
When clicked, it will start playing the music or audio file. lick again, the
will pause/stop playing the music.
-
When clicked, it will exit the
Five play-modes:
-
Play current song: the current music that is playing will be stopped, and playing
progress will back to 0.00.
18
My Device
– the
device that you are using to access the Wi
SD/USB or the Local Storage
to view the download/upload status list.
Playing Music / Audio
It is highly recommended to create a folder or folders where to copy all
your movie files
into the Wi-
Fi SD/USB for ease of use and file
The Music or Audio files can be played regardless if you are inside the “My
WiDisk” (or “My Wifi Disk for Android) or “My Device.
Simply locate the music or audio file that you would like to pl
the file and your music will automatically play.
Please consult your device manual to check whether it will support the
music/audio files that you would like to play.
When clicked, the current music that is playing will restart
at 0.00. licked
twice, it will play the previous music.
When clicked, it will play the next music
When clicked, it will start playing the music or audio file. lick again, the
will pause/stop playing the music.
When clicked, it will exit the
music player interface.
Play current song: the current music that is playing will be stopped, and playing
device that you are using to access the Wi
-Fi
It is highly recommended to create a folder or folders where to copy all
Fi SD/USB for ease of use and file
The Music or Audio files can be played regardless if you are inside the “My
Simply locate the music or audio file that you would like to pl
ay. lick on
Please consult your device manual to check whether it will support the
at 0.00. licked
When clicked, it will start playing the music or audio file. lick again, the
Play current song: the current music that is playing will be stopped, and playing
Table of contents
Other Ravpower Card Reader manuals