RAYN Lyda User manual

Lyda System
Lamp Head and LED Driver
Installation and User Manual
Part Number: 7431M1200 Rev: A
Released: 2022-05

To view a list of RAYN Growing Systemstrademarks and patents, go to rayngrowingsystems.com/ip. All
other trademarks, both marked and not marked, are the property of their respective owners.
For current and complete compliance and product information, view the available documentation at
rayngrowingsystems.com.
RAYN Growing Systems intends this document, whether printed or electronic, to be provided in its entirety.

Table of Contents
Table of Contents i
Overview 1
Safety 2
Lyda LED Driver 2
Lyda Lamp Head 3
System Overview 4
Sample Systems 5
Cabling System 6
DMX Dimming 6
1-10 V Dimming 6
Accessories 7
Specifications 8
Environment 8
Weights and Dimensions 8
Clearance 8
Electrical 9
LEDDriver 9
Lyda Lamp Head 10
DMX Adapter 10
Optical 10
Heat Dissipation 10
Radiant Flux 10

Before You Begin Installation 11
Installation 11
Install the Lyda Lamp Head 11
Install the LEDDriver 13
Install the DMX Adapter 14
Power Up Procedure 15
Operation 15
Maintenance and Serviceability 16
Troubleshooting 16
LED Driver 16
LydaLamp Head 16
Install Lens 17
ii Lamp Head and LED Driver Installation and User Manual

Overview 1
Overview
The Lyda System is comprised of a lamp head and a LED driver that is flexibly suited for
horticultural and other commercial applications.
The lamp head features solid-state, long-life LEDs in a bar style head that is equipped with the
latest generation of 5000K sun spectrum or white plus deep red LEDs. The lamp head narrow
bar design is ideal to limit shading of crops when used in greenhouses and is powerful enough
to be used as overhead lighting. The Lyda lamp head is water-resistant (IP66),
convection-cooled, and can be linked together lengthwise to form a long and uniform strip of
light.
The LED driver provides power to the Lyda lamp head and is suitable for mains power input in
the range of 100-277VAC,50/60Hz. It is dimmable using a 1-10V input or by using an
optional DMX Adapter that is also powered by the LED driver.
The lamp head operates at 100% intensity when installed without an external controller. When
used with the DMX Adapter accessory or a third-party 1-10V controller the lamp head can be
dimmed from 10-100%, or dimmed-to-off. A lamp head when off results in a minimum
quiescent standby power of less than 0.5W.
Suspend the lamp head with chain (or a suitable alternative) or suspend multiple lamp heads
linked together in a row, creating a linear array. The light output can be installed projecting
downward, horizontally sideways for interlighting applications, or built-in to a shelving system.
TheLED driver must be secured to the support structure within 3m (10ft) of the Lyda lamp
head.

2 Lamp Head and LED Driver Installation and User Manual
Safety
Lyda products are intended for professional use only. Read the entire user manual before
using this equipment.
WARNING: RISK OF ELECTRIC SHOCK! Circuits that are installed
without an accessible power disconnect device cannot be serviced or
operated safely.
AVERTISSEMENT : RISQUE DE DÉCHARGE ÉLECTRIQUE! Il est
imprudent d'utiliser ou de réparer les circuits installés sans qu'un
dispositif de déconnexion de l'alimentation ne soit accessible.
Lyda LED Driver
•
UL Class 1 apparatus. This equipment must be grounded. Équipement classe 1. Cet
équipement doit être liée à la terre.
•
The LED driver is suitable for damp locations. Prevent direct water flow on the LED driver.
Donot install any Lyda system component underneath the irrigation system.
•
The LED driver is not serviceable. Do not disassemble the driver in any way.
Independent lighting control gear Appareil de contrôle d’éclairage indépendant.
Safety extra low voltage device Dispositif de sécurité à très basse tension
110
The driver for this product prevents overheating by
ensuring that the product temperature does not
exceed this value.
Le pilote de ce produit empêche la surchauffe en s'assurant
que la température du produit ne dépasse pas cette valeur.
This product should not be discarded as unsorted
waste but must be sent to separate collection
facilities for recovery and recycling.
Ce produit ne doit pas être jeté avec les déchets ménagers
mais doit être déposé dans une collecte de déchets
électroniques ou dans un point de collecte.
CAUTION: Risk of personal injury and/or product damage. Handle the
LEDdriver carefully. Do not lift or move the driver using the input or output
wires.
CAUTION: RISK OF SHOCK - Do not make or break connection under
load.
ATTENTION : RISQUE DE CHOC ELECTRIQUE - Ne pas brancher ou
débrancher sous charge.

Safety 3
WARNING: Do not use this fixture with a damaged power cable (cord
set). If the cable is damaged, it must be replaced by a qualified
technician with an equivalent type before use. Contact your local
authorized dealer for spare.
AVERTISSEMENT : N'utilisez pas ce luminaire si le câble
d'alimentation est endommagé (cordon amovible). Tout câble
endommagé doit être remplacé avant utilisation par un câble de type
équivalent par un technicien qualifié. Contactez votre revendeur agréé
local pour une pièce de rechange.
Lyda Lamp Head
•
Do not install the lamp head against walls or ceilings. Suspend the lamp head in free-air to
allow for proper convection cooling.
•
The Lyda lamp head is suitable for damp locations. Prevent direct water flow on the lamp
head. Do not install any Lyda system component underneath the irrigation system.
Note: For use with the approved power source only.
The light source in this lamp head is not user-replaceable and must be replaced only
by a qualified technician. Contact your RAYN Growing Systems provider for
assistance.
Do not stare at the operating light source. Ne pas regarder la source de lumière lorsqu’elle
fonctionne.
The luminaire must be installed at least 0.1m
(4.0in) away from all lighted objects.
Le luminaire doit être installé à au moins 0,1m
(4,0po.) de tout objet éclairé.
This product should not be discarded as unsorted
waste but must be sent to separate collection
facilities for recovery and recycling.
Ce produit ne doit pas être jeté avec les déchets
ménagers mais doit être déposé dans une collecte
de déchets électroniques ou dans un point de
collecte.
This product meets the safety requirements
specified for Class III according to IEC 60536.
Produit à Protection Classe III Très basse tension
conforme à la norme IEC 60536.
The product input or output is suitable for direct
current only.
L’entrée et la sortie de ce produit convient
uniquement au courant continu.
CAUTION: Do not make or break connection under load.
ATTENTION : Ne pas brancher ou débrancher sous charge.

4 Lamp Head and LED Driver Installation and User Manual
System Overview
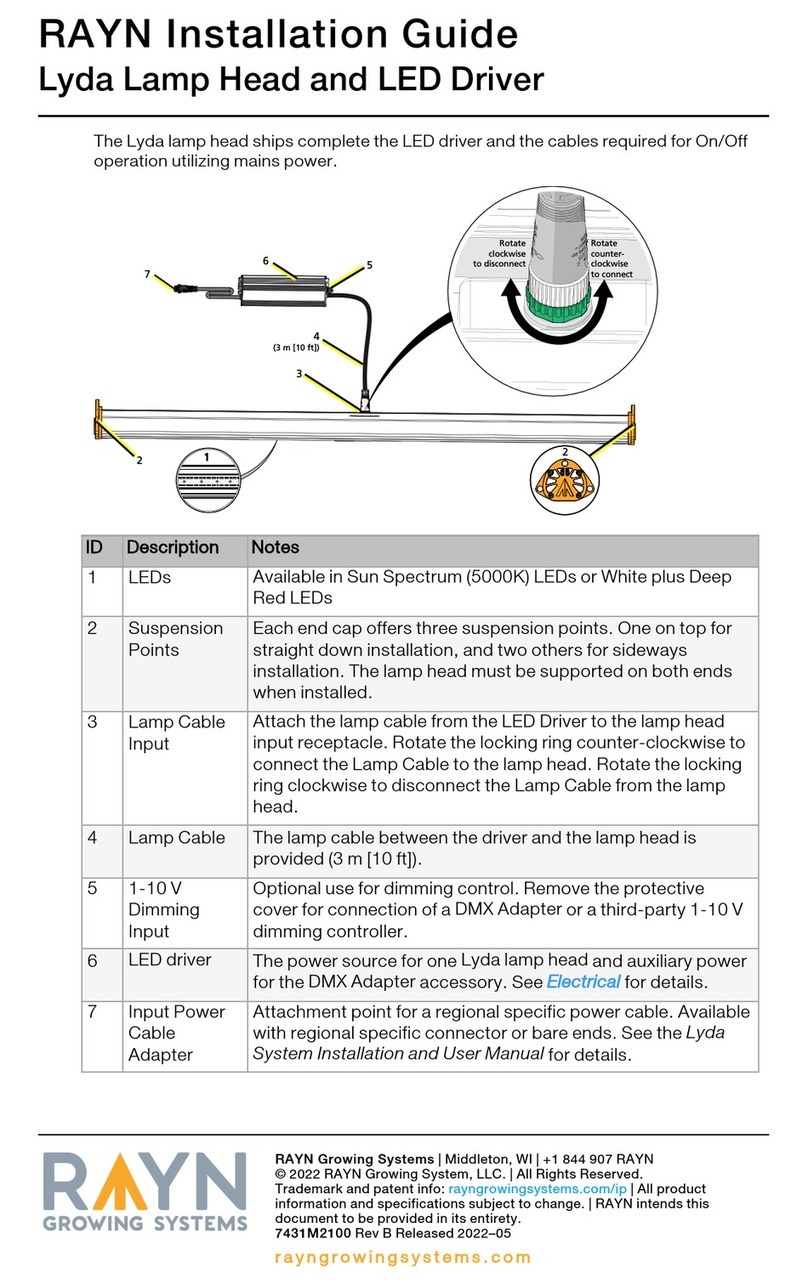
The Lyda lamp head ships complete with the LED driver and a lamp cable. A regional specific
power cable is available for connection of the LED driver to the mains power. See Accessories
on page7.
Rotate
clockwise
to disconnect
Rotate
counter-
clockwise
to connect
65
3
2
7
4
(3 m [10 ft])
1
2
ID Description Notes
1 LEDs Available in Sun Spectrum (5000K) LEDs or White plus Deep Red LEDs
2 Suspension
Points
Each end cap offers three suspension points. One on top for straight down
installation, and two others for sideways installation. The lamp head must be
supported on both ends when installed.
3 Lamp Cable
Input
Attach the lamp cable from the LEDDriver to the lamp head input receptacle.
•
Rotate the locking ring counter-clockwise to connect the Lamp Cable to the
lamp head.
•
Rotate the locking ring clockwise to disconnect the Lamp Cable from the
lamp head.
4 LampCable The lamp cable between the driver and the lamp head is provided (3m[10 ft]).
5 1-10 V
Dimming
Input
Optional use for dimming control. Remove the protective cover for connection of
aDMX Adapter or a third-party 1-10V dimming controller.
6LED driver The power source for one Lyda lamp head and auxiliary power for the DMX
Adapter accessory. See Electrical for details.
7 Input Power
Cable
Adapter
Attachment point for a regional specific power cable. Available with regional
specific connector or bare ends. See Accessories for details.

System Overview 5
Sample Systems
Lyda System with Mains Power
Power Cable*
Line (black or brown)
Neutral (white or blue)
Ground (green or green/yellow) Lamp Cable
LED Driver
Lyda Lamp Head
LydaSystem with DMX Dimming
Power Cable*
Line (black or brown)
Neutral (white or blue)
Ground (green or green/yellow)
RAYN Touch
Controller
DMX Adapter
Lamp Cable
LED Driver LED Driver
DMX Out DMX Cable (not included)
(Daisy-chain up to 32 devices)
DMX Termination
(on the last
device)
Control Cable
Lyda Lamp Head Power Cable*
Line (black or brown)
Neutral (white or blue)
Ground (green or green/yellow)
Lamp Cable
Control Cable
Lyda Lamp Head
DMX Adapter
Lyda System with 1-10 V Dimming
Current sink controller
provided by others
1-10 V
Controller
Control Cable (optional accessory)
Connections include:
Dim+ (violet)
Dim- 0 V return (gray)
Unused (black/white)
Power Cable*
Line (black or brown)
Neutral (white or blue)
Ground (green or green/yellow)
Lamp Cable
LED Driver
Lyda Lamp Head
*Bare end power cable shown. See Accessories for power cable options with a regional
specific connector.

6 Lamp Head and LED Driver Installation and User Manual
Cabling System
The Lyda lamp head ships with the cables required for On/Off operation utilizing mains power.
Provided cables per lamp head include:
•
a 3m (10 ft) lamp cable connects between the LED driver and the lamp head
•
an input power cable connects mains powertotheLED driver
See Electrical on page9 for details about the input power required and see Accessories on the
facing page for information on cable lengths available as standard. Coordinate your system
requirements with your RAYN Growing Systems provider.
Note: Cables must be installed so that they are visible over the entire length.
Concealing of the cables within walls, floors, ceilings or above suspended or dropped
ceilings is not allowed. Cables must be installed so they are not subject to strain or
damage.
DMX Dimming
When utilizing the DMX Adapter to control the lamp head by a DMXcontrol source, connect the
control cable provided on the DMX Adapter to the LED driver auxiliary input.
This connection allows the LED driver to power the DMX Adapter and passes the control signal
from the DMXcontrol source to control the Lyda lamp head for dimming control with 10% to
100% intensity and Off.
1-10 V Dimming
The LED driver auxiliary input is 1-10V current source, therefore the connected control device
must be capable to sink current.
Note: When utilizing a third-party 1-10 V controller, order a bare-end control cable
(see Accessories for ordering details).
Connect the control cable between the LED driver auxiliary input and the 1-10Vcontroller. This
connection allows the LED driver to power the DMX Adapter and passes the control signal to
the Lyda lamp head for dimming control with 10% to 100% intensity and Off for an input signal
below 0.5V.

Accessories 7
Accessories
Model Part Number Description
L-PCEU W6688 Power Cable, Shuko CEE 7/7, 1.8m (6ft) length
L-PCUK W6689 Power Cable, UK 13A BS1363, 1.8m (6ft) length
L-PCUS W6690 Power Cable, US NEMA 5-15P, 1.8m (6ft) length
L-PCBEUS W6691 Power Cable, Bare Ends US Color Code, 1.8m
(6ft)length
L-PCBEIEC W6692 Power Cable, Bare Ends IEC Color Code, 1.8m
(6ft)length
L-LNM 7431K1002 Lens, Medium (60°)
L-LN00 7431K1004 Lens, Flat (120°)
L-DRIVER 7131K1005 LED driver (Replacement)
L-DMX 7431K1006 DMX Adapter
MXLR5TERM SGE1507 DMX Terminator, 5-pin XLR Plug
L-DCBE W6702 1-10V Dimming Cable, Bare Ends

8 Lamp Head and LED Driver Installation and User Manual
Specifications
Environment
Product Ambient
Temperature
Relative
Humidity Protection
Lyda lamp head -10°C to 35°C
(14°Fto95°F)
storage maximum
is45°C(113°F)
20-100%, condensing,
non-corrosive, sulfur
residue free
suitable for
damp locations
LED driver -40°C to 55°C
(-40°Fto131°F)
storage maximum
is85°C(185°F)
10-100%, condensing,
non-corrosive
suitable for
damp locations
DMX Adapter -40°C to 70°C
(-40°Fto158°F)
storage maximum
is85°C(185°F)
5-100%, condensing,
non-corrosive
suitable for
damp locations
Weights and Dimensions
Product Weight Dimensions Notes
kg lb mm in
Lyda lamp head 2.3 5 1027x104x75 40.4x4x3 Installs suspended
LED driver 1.05 2.3 218x68x39 8.6x2.7x1.5 Includes mounting
flange
DMX Adapter 0.2 0.4 90x38x27 3.5x1.5x1.0 Includes mounting
flange
Clearance
•
Lamp heads can be ganged together lengthwise, but do not install the Lyda lamp head
against walls or ceilings. Ensure a minimum clearance of 50mm (2in) between the lamp
head and other objects such as other lights, the ceiling, or wall surface for proper cooling.
•
Suspend the lamp head in free-air to allow for proper convection cooling.

Specifications 9
Electrical
Note: Installation must follow all national and local codes for electrical equipment.
WARNING: RISK OF ELECTRIC SHOCK! Circuits that are installed
without an accessible power disconnect device cannot be serviced or
operated safely.
AVERTISSEMENT : RISQUE DE DÉCHARGE ÉLECTRIQUE! Il est
imprudent d'utiliser ou de réparer les circuits installés sans qu'un
dispositif de déconnexion de l'alimentation ne soit accessible.
LEDDriver
100-277VAC,50/60Hz input
120 VAC 220 VAC 277VAC
Power Factor 0.99 0.98 0.95
Input AC Current 2.54 A 1.34 A 1.02 A
Inrush Current (I2t) 4.39 A2s
Standby Power 0.5 W max
Typical Efficiency 89.5% 92.5% 93%
•
The LED driver is a ULClass I apparatus. This equipment must be grounded.
•
The LED driver is provided with a suitable power input cable. The power input cable is
available with bare ends (US or IEC models available) or with a regional specific connector.
See Accessories on page7 for ordering details.
The LED driver supports the following output products:
•
one Lyda lamp head (~220 W, 60VDC)
•
one DMX Adapter available from RAYN Growing Systems (see Accessories for ordering
information)or a 1-10V dimming controller (by others) utilizing sink current (0.5mA
maximum).

10 Lamp Head and LED Driver Installation and User Manual
Lyda Lamp Head
Power is supplied directly from the provided LED driver using the specialized lamp cable
provided.
Class II, SELV, 60 VDC maximum, 220 W maximum, 4.2 A maximum.
Note: For use with the approved power source only.
DMX Adapter
Power is supplied directly from the provided LED driver using a specialized control cable
provided on the DMX Adapter.
The DMXaddress is set remotely from a compatible RDM controller.
Optical
The Lyda lamp head features 120° beam angle as standard (no lens installed). A 60° medium
beam spread lens is available for field-installation and a 120° flat lens is available in cases
where additional protection is desired for the face of the lamp head. See Accessories for
ordering information and see Install Lens on page17 for installation instructions.
Heat Dissipation
Product Watts BTUs
Lyda lamp head 144 491
LED driver (L-DRIVER) 22 75
DMX Adapter (L-DMX) 1 3.4
Radiant Flux
The photosynthetic photon flux of the Lydalamp head depends on the model ordered:
Model μmol/s Lumens CRI
Lyda Luminaire White + Deep Red LEDs (LYDA WDR) 518 31,300 92.5
Lyda Luminaire 5000K Sun Spectrum LEDs (LYDA 5000) 396 22,000 >95

Before You Begin Installation 11
Before You Begin Installation
•
Prior to installation, review all safety information. See Safety on page2.
•
Review the Environment information.
•
When linking the lamp heads together lengthwise, always secure them at both ends.
•
Ensure the installation location and installation hardware can support four times the weight
of the lamp head, cables, and any installed accessories. See Weights and Dimensions on
page8.
Installation
WARNING: Risk of electric shock! This device utilizes high voltage and
should only be installed by a qualified installer or electrician. Follow all
local codes for installation. Before terminating the AC power wiring
verify that the main breaker is in the off position and follow the proper
lockout/tag out procedures per NFPA Standard 70E or applicable local
regulations.
AVERTISSEMENT : Risque de décharge électrique! Cette appareil
utilise une haute tension et ne doit être installé que par un installateur
qualifié ou un électricien. Suivez tous les codes locaux pour
l'installation. Avant de raccorder le câblage du courant alternatif,
vérifiez que le disjoncteur principal est en position d'arrêt et suivez les
procédures de Consignation/Déconsignation prescrites par la norme
NFPA 70E ou aux réglementations locales applicables.
Note: For North American installation, lamp head and LEDDriver power cables shall
be installed so that they are visible over the entire length (as opposed to the building
infrastructure cables or conduit). Concealing of the cables within walls, floors ceilings
or above suspended or dropped ceilings is not allowed. Cables shall be installed so
they are not subject to strain or damage.
Install the Lyda Lamp Head
The Lydalamp head can be mounted by suspension or by a mounting bracket in a horizontal (X)
or vertical (Y) orientation using the end caps as the attachment points (mounting hardware not
provided).
Each end of the lamp head must be secured. Lamp heads may be linked together at the ends,
end cap to end cap, and may share the same suspension chain (or suitable alternative) at that
point.
The lamp head can be installed projecting downward, horizontally sideways for interlighting
applications, or built-in to a shelving system with suitable clearance. See Clearance on page8.
Note: The lamp head must be installed within 3m (10ft) of the LED driver.
1. For installation convenience, install factory accessories, such as a lens accessory, prior to
suspending or attaching the lamp head to the installation location.

12 Lamp Head and LED Driver Installation and User Manual
2. Each end cap is provided with three mounting holes (10mm [3/8in] Ø) for directional
suspension. Attach mounting hardware (not provided) to the suspension points (each end
cap must be supported). You can interlock (link) end caps together, sharing a suspension
point between two linked end caps, creating linear arrays of the lamp heads.
CAUTION: For effective convection cooling and to prevent overheating, do
not install the lamp head vertically on its end.
Y
X
3. If the LED driver has been previously installed, connect the lamp cable from the driver to the
Lyda lamp head. The connection is secured by rotating the locking ring counterclockwise
until finger tight. If the LED driver is not yet installed, see Install the LEDDriver on the facing
page for instructions.
Rotate
clockwise
to disconnect
Rotate
counter-
clockwise
to connect
CAUTION: Do not make or break connection under load.
ATTENTION : Ne pas brancher ou débrancher sous charge.

Installation 13
Install the LEDDriver
Tip: Before You Begin
•
See the System Overview for example systems.
•
Install the related products including the Lyda lamp head and optional DMX
Adapter prior to installing the LED driver.
CAUTION: Risk of personal injury and/or product damage. Handle the LED
driver carefully. Do not lift, suspend, or move the driver using the input or
output wires.
1.
Rotate
clockwise
to disconnect
Rotate
counter-
clockwise
to connect
Using M4 (#8)hardware, secure the LED driver to a suitable structure
using the built-in mounting flange. The installation location must be
within 3m(10ft) of the desired Lyda lamp head installation location.
2. Connect the lamp cable from the LED driver to the installed Lyda
lamp head. The connection is secured by rotating the locking ring
counterclockwise until finger tight.
3. Connect the control cable (optional use for 1-10V dimming control).
•
If using the DMX Adapter, connect the control cable from the DMX Adapter to the input
connector on the LED driver.
•
If using a third-party 1-10V controller, connect the 1-10V Dimming Cable (L-DCBE) to the
connector provided on the LED driver and terminate the bare end wires to the third-party
dimming controller.
Purpose Wire Color Notes
Dim + violet 1 to 10V
Dim - gray 0VReturn
Unused black/white This wire is not used for third-party 1-10V controller purposes
4. Connect the LED driver to the power source. If using a connectorized power input cable,
simply plug the unit into the distributed power input receptacle. If using a bare end power
input cable, terminate the wiring according to the cable type and local codes.
Model Type Color
Power Cable,
USColor Code
ground/earth green
line black
neutral white
Power Cable,
IEC Color
Code
protective
earth green/yellow
line brown
neutral blue

14 Lamp Head and LED Driver Installation and User Manual
Install the DMX Adapter
The DMX Adapter converts DMXsignal to 1-10 V dimming signal and connects to the LED
driver for dimming control (10-100% with dim-to-off and low quiescent current below 10%) of
the Lyda lamp head.
The DMX Adapter conforms to ANSI E1.11 USITTDMX 512-A.
CAUTION: Risk of product damage. Handle the DMX Adapter carefully. Do
not lift, suspend, or move the device using the wires.
1. Using M4 (#8)hardware, secure the DMX Adapter to a suitable structure using the built-in
mounting flange. The installation location must be within 15cm(6in) of the LED driver
installation location.
2. Two DMX cables with 5-pin XLR connectors are provided for connection to the DMX control
system. One for DMXIn (pin-style connector) and one for DMXThru (socket-style
connector). Make the connections accordingly. See LydaSystem with DMX Dimming on
page5 for example system topology. Contact your RAYN Growing Systems provider for
additional system design guidance.
Note: The XLR connectors provided are factory terminated as follows:
Pin Use
1
2
3
4
51
2
3
4
5
DMX In
(pin-style)
DMX Through
(socket-style)
1 Common (shield)
2 Data-
3 Data+
4 not connected
5 not connected
Up to 32 DMX Adapters (or other DMXdevices) are allowed on a single control run.
You must terminate the last device in the control run with a 120 ohm resister
(connected between pins 2 and 3 (DMX- and DMX+) to prevent signal reflections or
install a DMX Terminator Plug on the last device DMXthrough connector (see
Accessories for ordering information).
3. If the LED driver has been previously installed, connect the control cable from the DMX
Adapter to the auxiliary input on the LED driver. If the LED driver is not yet installed, see
Install the LEDDriver on the previous page for instructions.

Power Up Procedure 15
Power Up Procedure
WARNING: RISK OF ELECTRIC SHOCK! Circuits that are installed
without an accessible power disconnect device cannot be serviced or
operated safely.
AVERTISSEMENT : RISQUE DE DÉCHARGE ÉLECTRIQUE! Il est
imprudent d'utiliser ou de réparer les circuits installés sans qu'un
dispositif de déconnexion de l'alimentation ne soit accessible.
1. Verify all products in the system are installed according to the specifications.
2. Check all connections to ensure the connectors are secure.
3. If not already completed, connect the provided power input cable to the source.
4. Apply power to the main circuit. As the unit powers up:
•
If no external control (DMX Adapter or third-party 1-10V controller are installed, the Lyda
lamp head will illuminate to 100% output.
•
If external control is installed, the Lyda lamp head will illuminate to the output level
signaled by the controller. Set the appropriate control level on the controller and verify the
respective light output.
WARNING: Do not use this fixture with a damaged power cable (cord
set). If the cable is damaged, it must be replaced by a qualified
technician with an equivalent type before use. Contact your local
authorized dealer for spare.
AVERTISSEMENT : N'utilisez pas ce luminaire si le câble
d'alimentation est endommagé (cordon amovible). Tout câble
endommagé doit être remplacé avant utilisation par un câble de type
équivalent par un technicien qualifié. Contactez votre revendeur agréé
local pour une pièce de rechange.
Operation
The Lyda lamp head receives power and control through the LED driver.
With no external control system, the lamp head has simple On/Off control. You can dim the LED
with an external control system, either a DMXcontrol source such as the RAYN Touch
controller paired with the DMX Adapter or from a third-party 1-10V dimming controller.
See the RAYN Touch controller User Manual for details to install and configure the system for
control.

16 Lamp Head and LED Driver Installation and User Manual
Maintenance and Serviceability
To mitigate premature LED failure due to excessive heat, ensure the lamp head is installed
within the specifications detailed in Clearance and Environment and ensure the LEDs on the
lamp head are cleaned regularly from dirt and dust using a lint-free cloth.
The Lyda lamp head, LED driver, and the DMX Adapter (if used) are not user serviceable.
Note: Do not attempt a repair. Instead, contact your RAYN Growing Systems
provider for further assistance. Contact information is available at
rayngrowingsystems.com/contact.
Troubleshooting
LED Driver
To prevent damage to the LEDdriver, an internal sensor monitors the temperature of the driver
and decreases the output current as needed. To mitigate this condition, ensure the LEDdriver
is installed within the specifications detailed in Environment on page8.
LydaLamp Head
To mitigate premature LED aging due to excessive heat, ensure the lamp head is installed
within the specifications detailed in Clearance and Environment.
To prevent damage to the Lydalamp head, an internal sensor monitors the LED temperature.
The lamp head will shut off the LED output when detrimental temperatures are reached. The
LEDs will resume normal operation when the LED temperature falls below a healthy level.
Other manuals for Lyda
1
Table of contents
Other RAYN Lawn And Garden Equipment manuals
Popular Lawn And Garden Equipment manuals by other brands

Makita
Makita DG002G instruction manual

Birko
Birko BK1004101 Operation manual

Coopers of Stortford
Coopers of Stortford 11458 Instructions for use

Miracle-Gro
Miracle-Gro Twelve Stacking Kit Instruction guide

Powermate
Powermate PFTT140 Operator's manual

Pinnacle Outdoor
Pinnacle Outdoor Cyclonic Kit 3.0m Gable Series Assembly instructions