Razer KIYO PRO ULTRA Use and care manual

.
RAZER KIYO PRO ULTRA
MASTER GUIDE

FOR GAMERS. BY GAMERS.™
1
Better image quality starts with bigger sensors. So go for the best with the
Razer Kiyo Pro Ultra—featuring the largest sensor ever in a webcam. Paired
with an ultra-large aperture lens for excellent low-light performance,
witness DSLR-like detail and clarity that outclasses all other 4K webcams.

FOR GAMERS. BY GAMERS.™
2
CONTENTS
1. WHAT'S INSIDE.......................................................................................................................................3
2. WHAT'S NEEDED ....................................................................................................................................4
3. LET'S GET YOU COVERED........................................................................................................................4
4. TECHNICAL SPECIFICATIONS ..................................................................................................................5
5. SETTING UP YOUR RAZER KIYO PRO ULTRA...........................................................................................6
6. CONFIGURING YOUR RAZER KIYO PRO ULTRA VIA RAZER SYNAPSE .....................................................8
7. SAFETY AND MAINTENANCE................................................................................................................19
8. LEGALESE..............................................................................................................................................20
FOR GAMERS. BY GAMERS.™
3
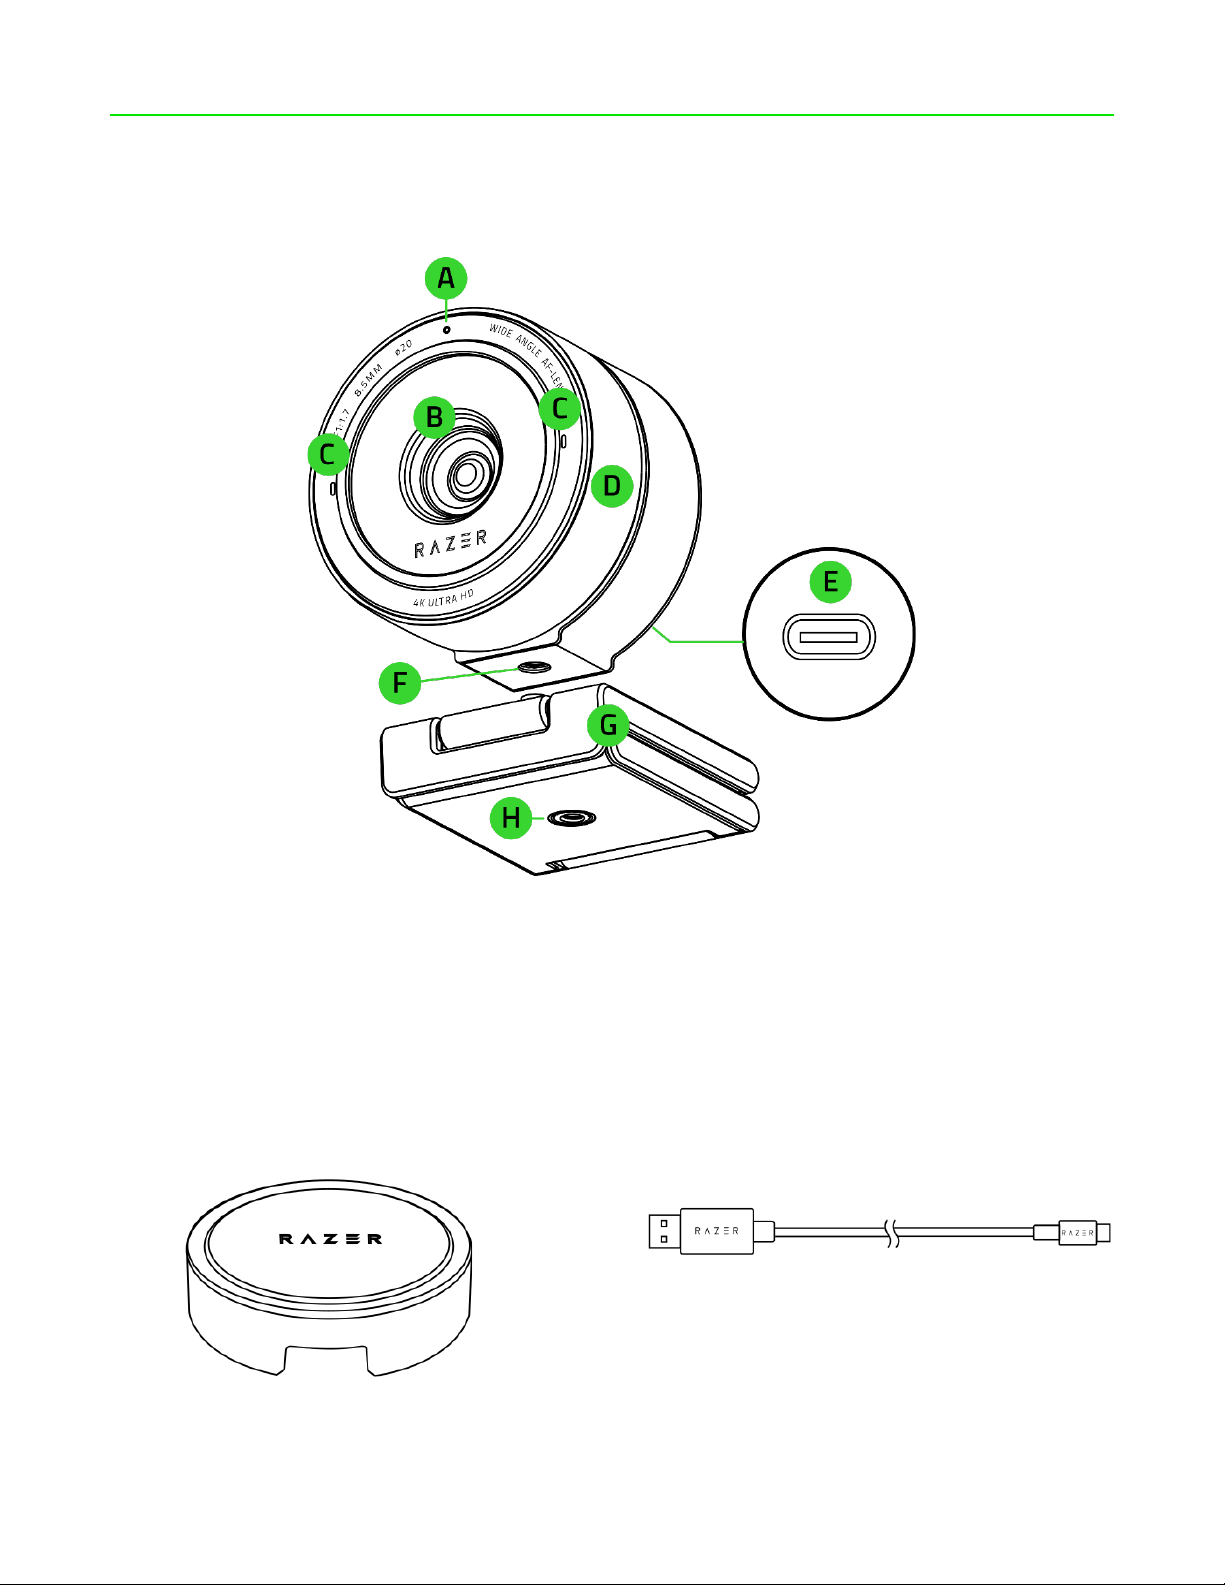
1. WHAT'S INSIDE
▪Razer Kiyo Pro Ultra
A. Status indicator
B. 8.3 MP Auto Focus lens with built-in
shutter
C. Built-in microphones
D. Privacy shutter dial
E. USB Type C port
F. Camera thread mount
G. Detachable stand
H. Stand thread mount
▪Lens cover
▪USB Type A to USB Type C cable
▪Important Product Information Guide

FOR GAMERS. BY GAMERS.™
4
2. WHAT'S NEEDED
PRODUCT REQUIREMENTS
▪Direct USB Type A port connection to a PC
RAZER SYNAPSE REQUIREMENTS
▪Windows® 10 64-bit (or higher)
▪Internet connection for software installation
*Windows® 10 and direct USB 3.0 port connection is recommended to maximize streaming and/or
recording performance.
3. LET'S GET YOU COVERED
Register your product and score exclusive benefits
razerid.razer.com/warranty
Your product’s
serial number can
be found here.

FOR GAMERS. BY GAMERS.™
5
4. TECHNICAL SPECIFICATIONS
CAMERA
▪Connection type: USB 3.0
▪Image resolution: 8.3 Megapixels
▪Video Resolution: 4K @30FPS / 1440p @30FPS / 1080p @ 60/30/24FPS / 720p @ 60/30 FPS /
480p @ 60/30FPS / 360p @ 60/30FPS
▪Video encoding:
oYUY2 & NV12 (uncompressed)
oMJPEG, H264 codec (compressed)
▪Still Image Resolution: 3840 x 2160
▪Image Quality Settings Customization: Yes
▪Diagonal Field of View (FOV): LDC Off - 82°, LDC On - 72°
▪Focus Type(s): Auto
▪Focus Range: 10 cm ~ ∞ (Optimized for 50 cm to 200 cm)
▪Aperture: f/1.7
▪Focal Length: 8.5 mm
▪Sensor: IMX585 with Sony STARVIS - 2 technology
▪Mounting Options: L-shape joint, Tripod mount
▪Cable Length: 1.5 meters braided cable
MICROPHONE
▪Channels: Stereo
▪Audio Codec: 16-bit 48 kHz
▪Polar patterns: Omni-directional
▪Sensitivity: -26dB FS
FOR GAMERS. BY GAMERS.™
6
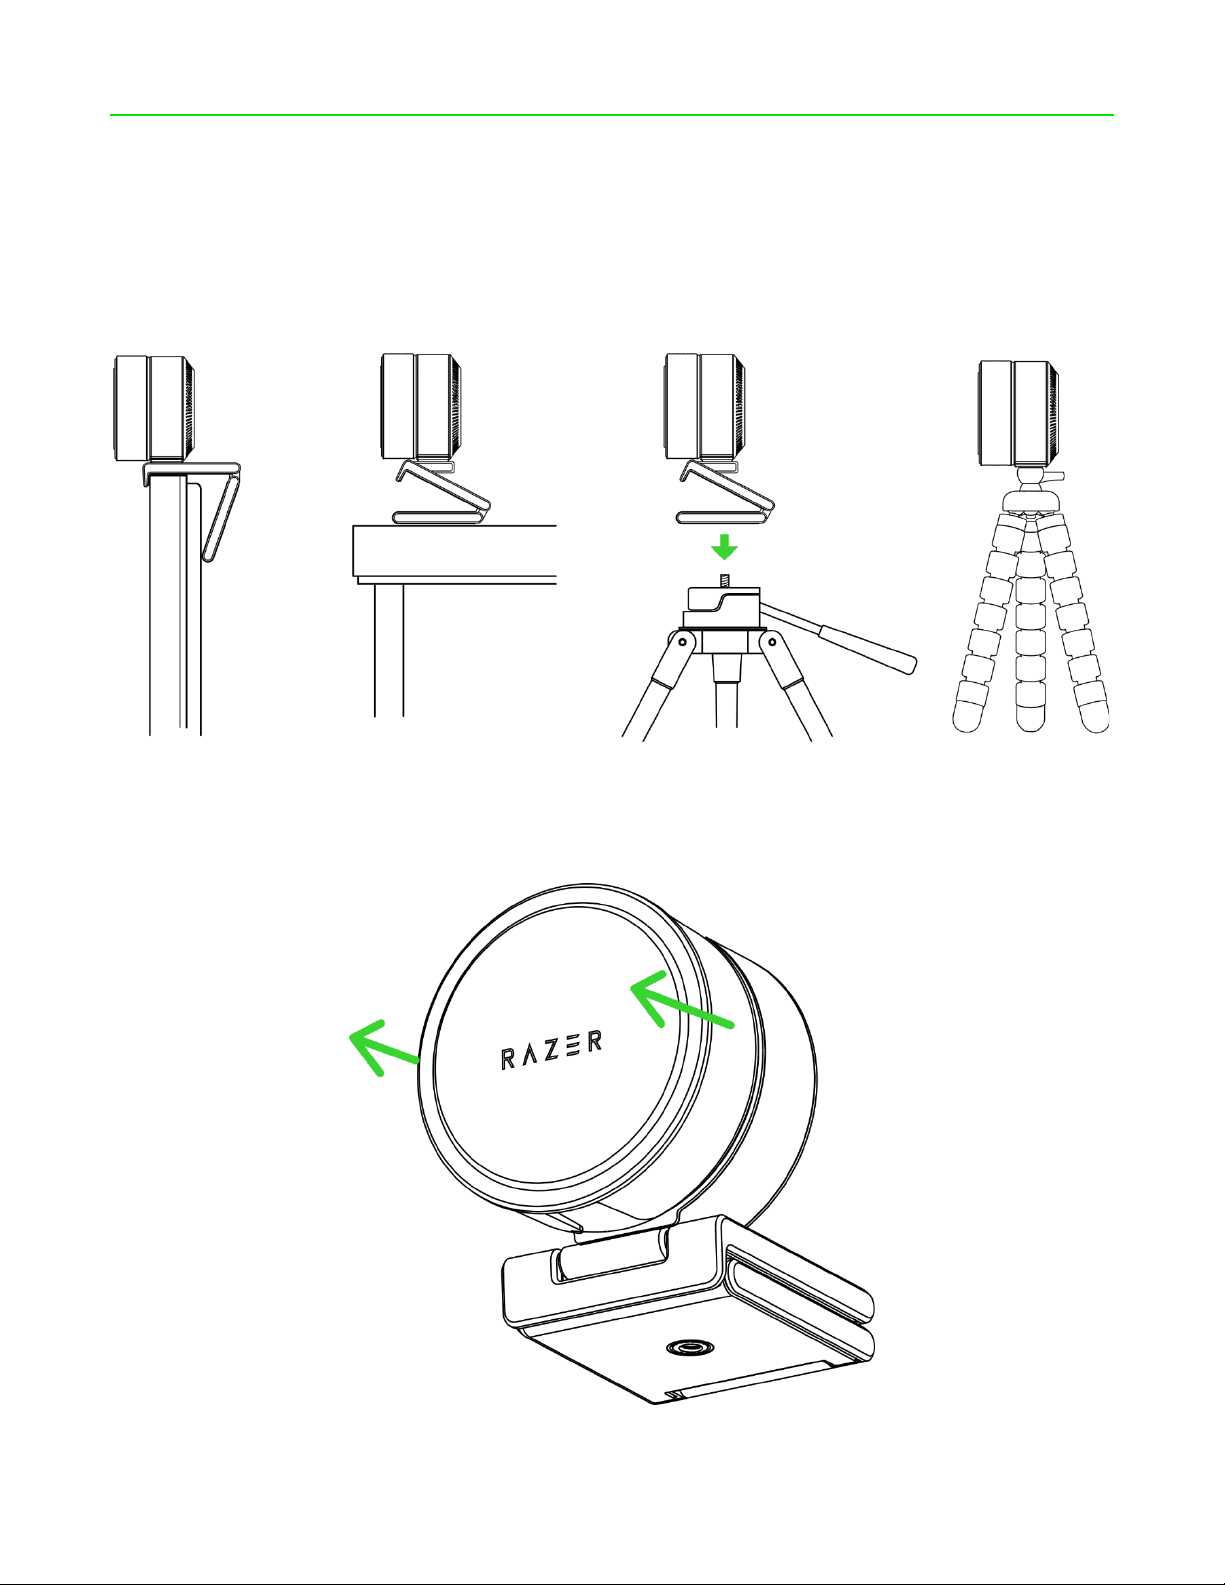
5. SETTING UP YOUR RAZER KIYO PRO ULTRA
1. Depending on your setup, you may position the camera on top of a monitor or table, attach it
to a tripod (not included) using its thread mount, or detach the stand to affix it directly to a
tripod.
2. Remove the lens cover from the camera.
OR
OR
OR
FOR GAMERS. BY GAMERS.™
7
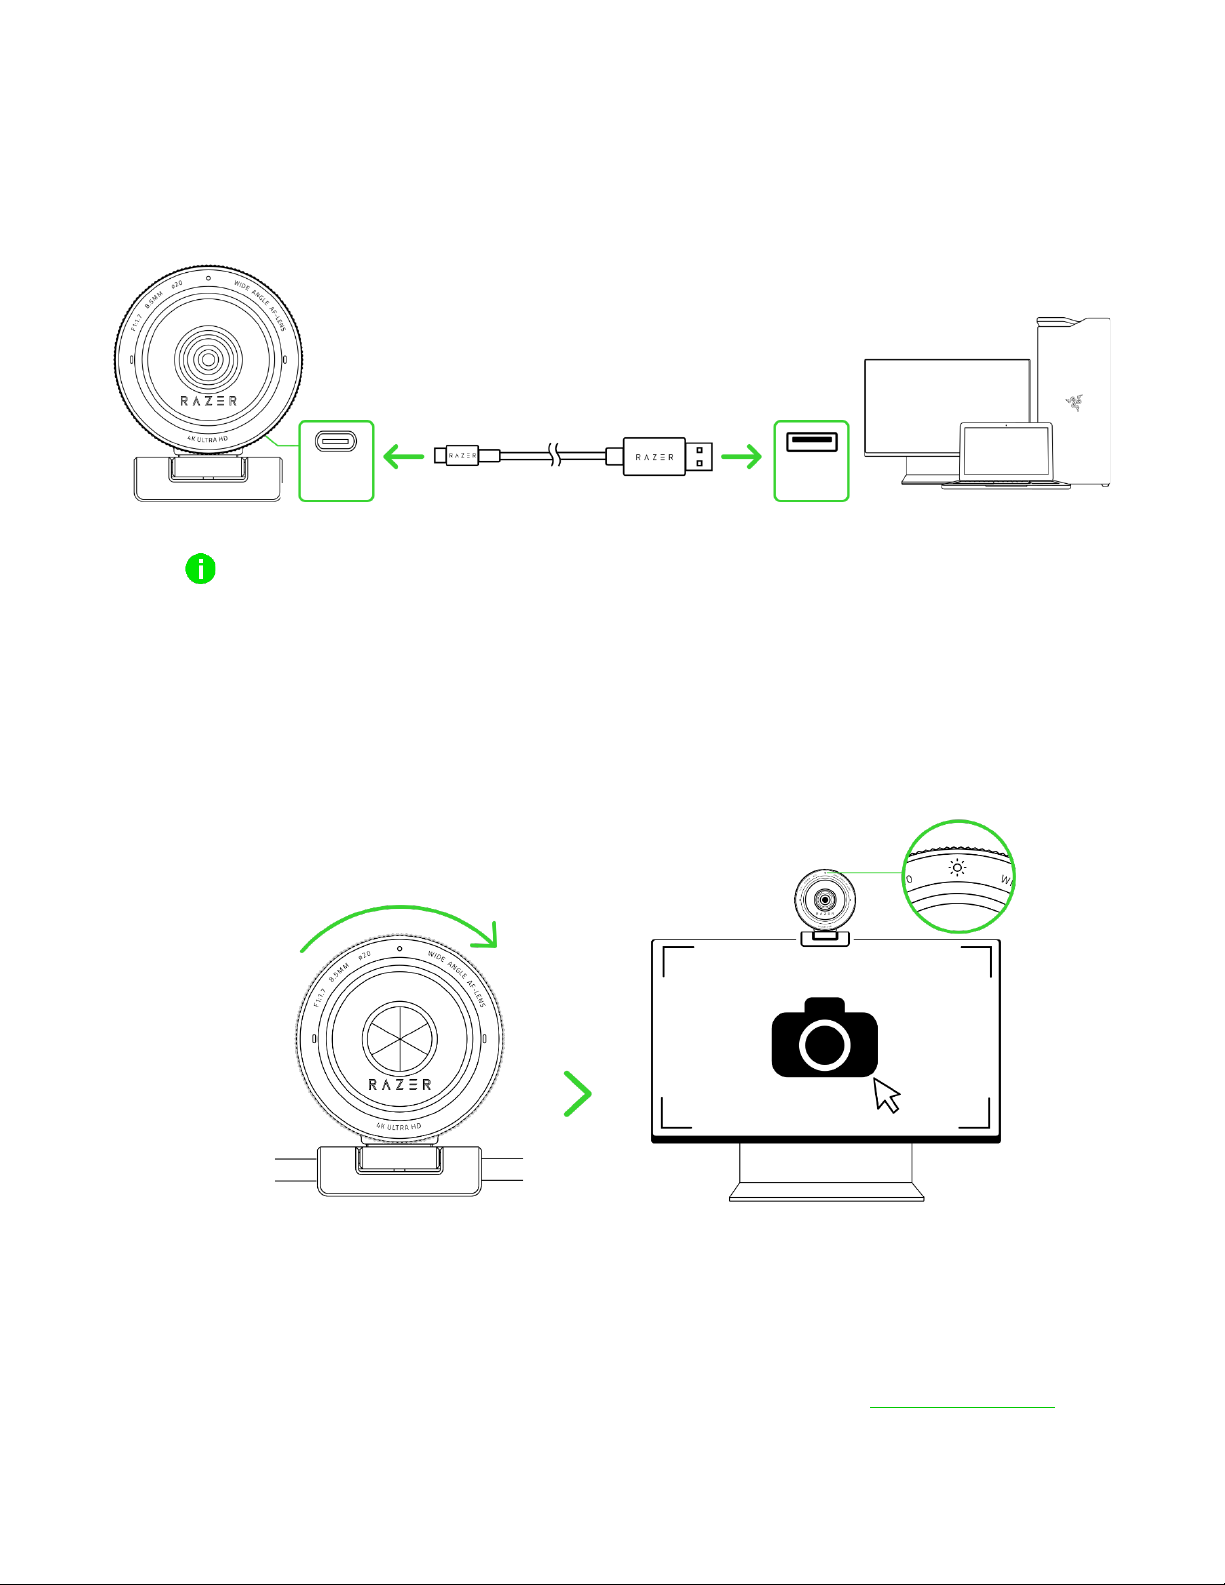
3. Connect the camera to any of the USB ports on your PC using the USB Type A to USB Type C
cable.
Use only the USB Type A to USB Type C cable included in the package. Connect the camera
directly to a USB 3.0 port on your PC to optimize the camera's streaming and recording
performance. Connecting to a USB 2.0 port, USB hub, switch, or extender may affect its
performance.
4. Rotate the privacy shutter dial clockwise to uncover the camera's lens and launch any camera
application. The camera's status indicator will light up, indicating that the camera is active.
5. Use the Razer Synapse* app to customize the camera's settings, such as its ISO, shutter speed,
Advanced Live Face Tracking, FoV, and more.
*Install Razer Synapse when prompted or download the installer from razer.com/synapse
USB
Type C
USB
Type A
FOR GAMERS. BY GAMERS.™
8
6. CONFIGURING YOUR RAZER KIYO PRO ULTRA VIA RAZER SYNAPSE
Internet connection is required for installation, updates, and cloud -based features.
Registering for a Razer ID account is recommended but optional. All listed features are
subject to change based on the current software version, the connected device(s), and
supported apps and software.
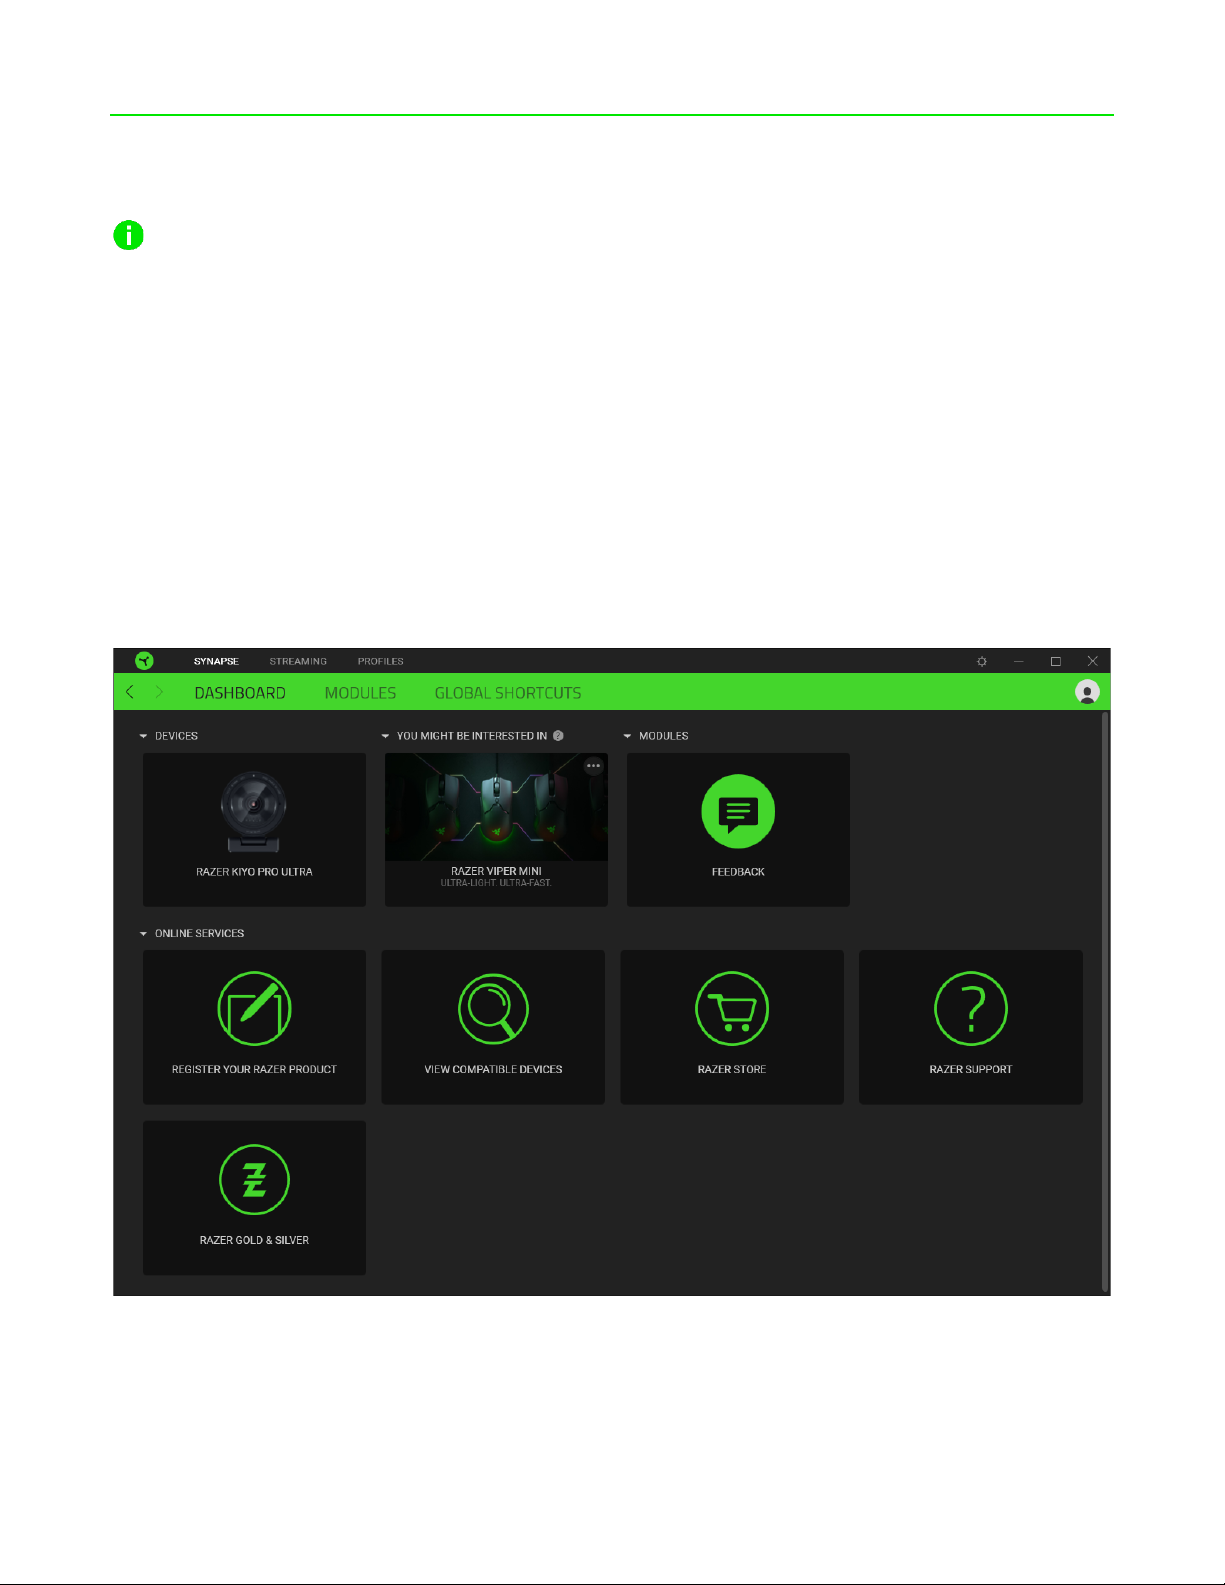
SYNAPSE TAB
The Synapse tab is your default tab when you first launch Razer Synapse. This tab allows you to
navigate the Dashboard subtab.
Dashboard
The Dashboard subtab is an overview of your Razer Synapse, where you can access all your Razer
devices, modules, and online services.
FOR GAMERS. BY GAMERS.™
9
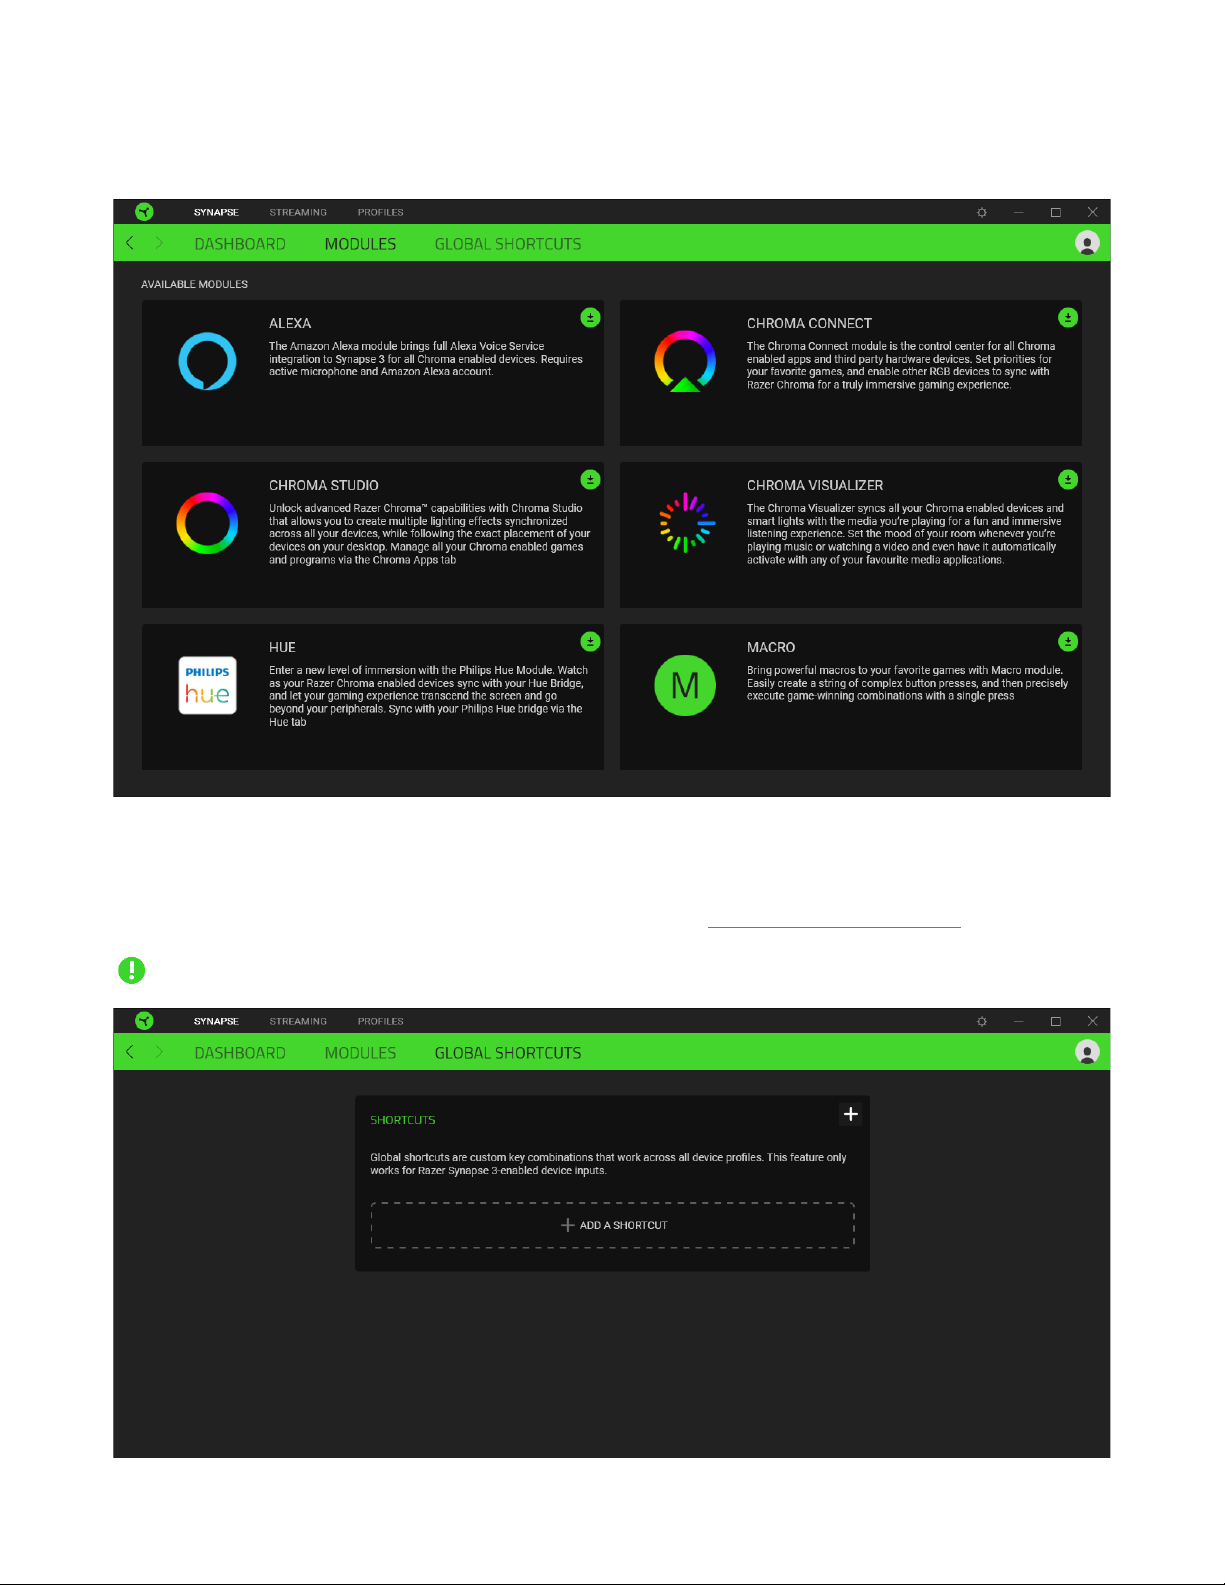
Modules
The Modules subtab displays all installed and available modules for installation.
Global Shortcuts
Bind operations or Razer Synapse functions to custom key-combinations from any Razer Synapse-
enabled device inputs, which apply across all device profiles. Learn more about Profiles
Only Razer Synapse-enabled device inputs will be recognized.
FOR GAMERS. BY GAMERS.™
10
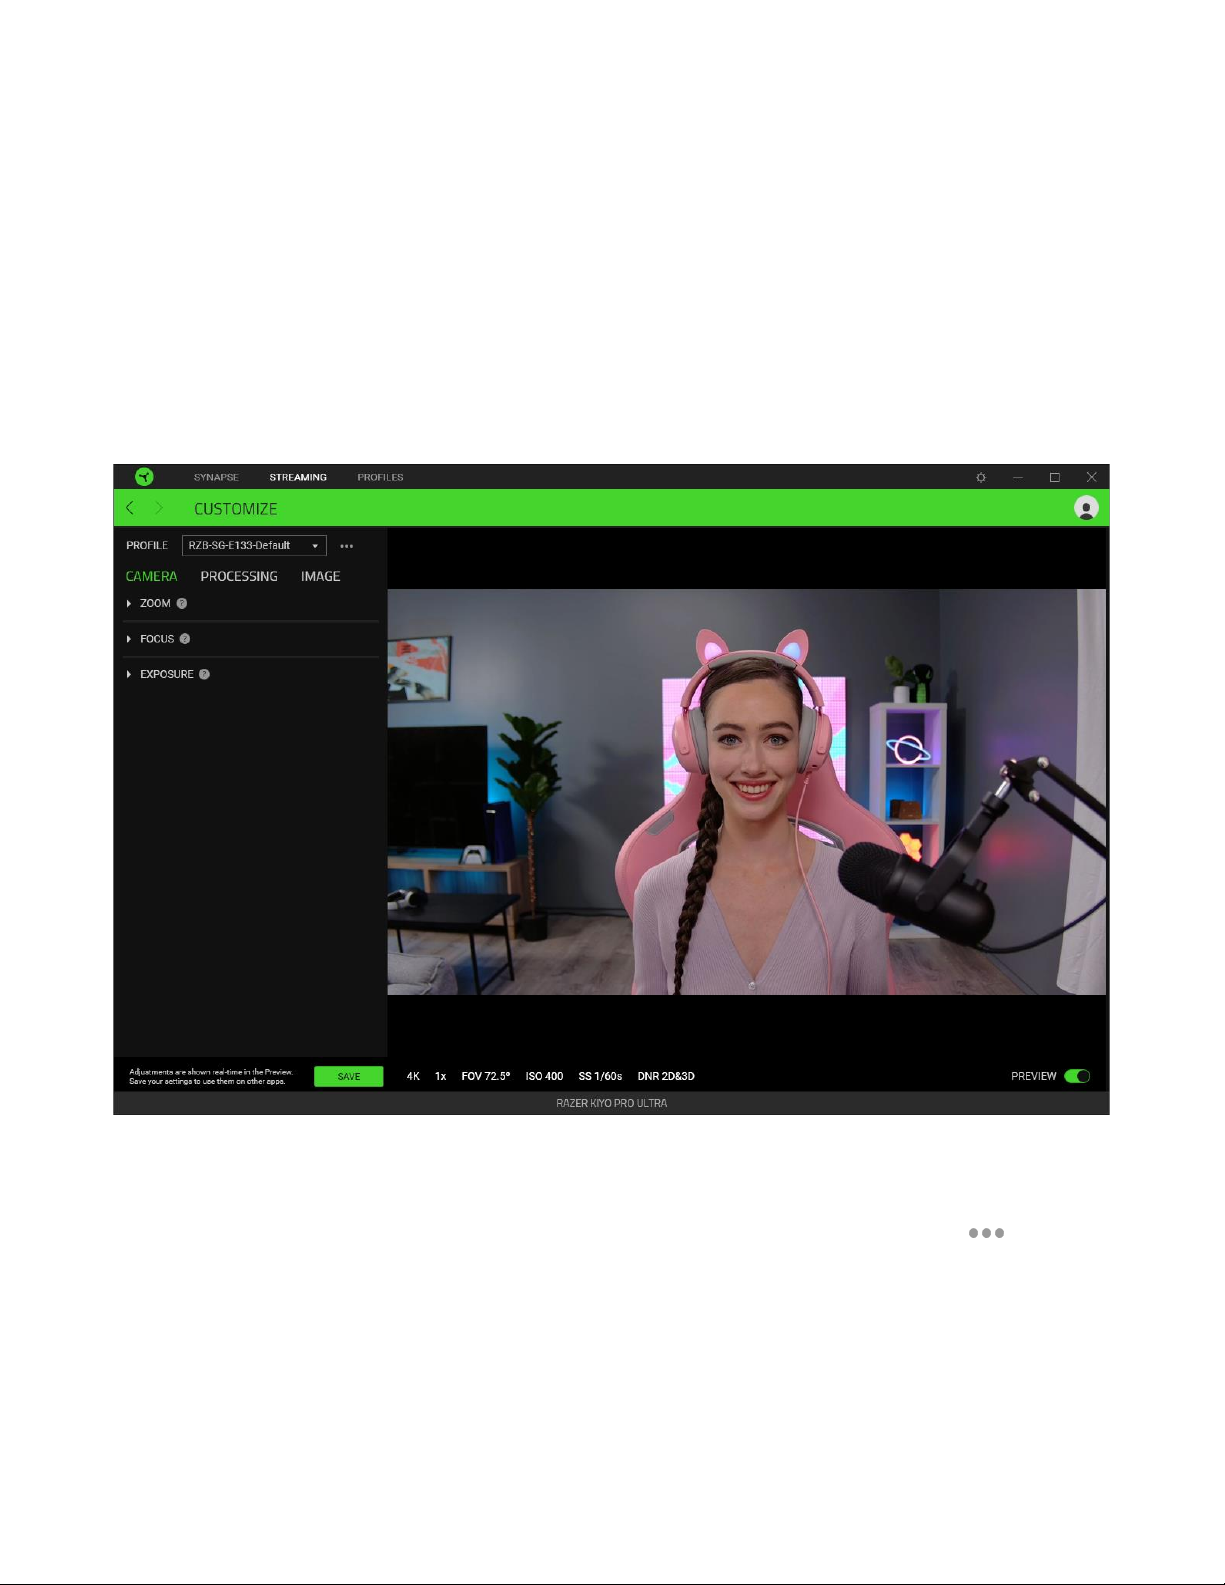
STREAMING TAB
The Streaming tab is the main tab for your Razer Kiyo Pro Ultra. From here, you'll be able to view the
camera's feed and customize its capture settings. Changes made under this tab are automatically
saved to your system and cloud storage.
Customize
The Customize subtab is the main subtab for your camera, where you'll be able to see its real-time
preview and tweak capture settings, such as zoom and focus modes, image processing, and color
adjustments.
Profile
A Profile is a data storage for keeping all your Razer devices' settings. By default, the profile name is
based on your system's name. Press the profile's corresponding Miscellaneous button ( ) to add,
import, rename, duplicate, export, delete, or reset a profile to its default.
Preview
The Preview displays the camera's real-time display when you enable the Preview toggle. It also
shows several camera settings at the bottom, such as Resolution, Zoom and FoV, ISO, and Shutter
speed.
FOR GAMERS. BY GAMERS.™
11
Save
Save and store Razer Synapse settings to your camera and use them on other applications.
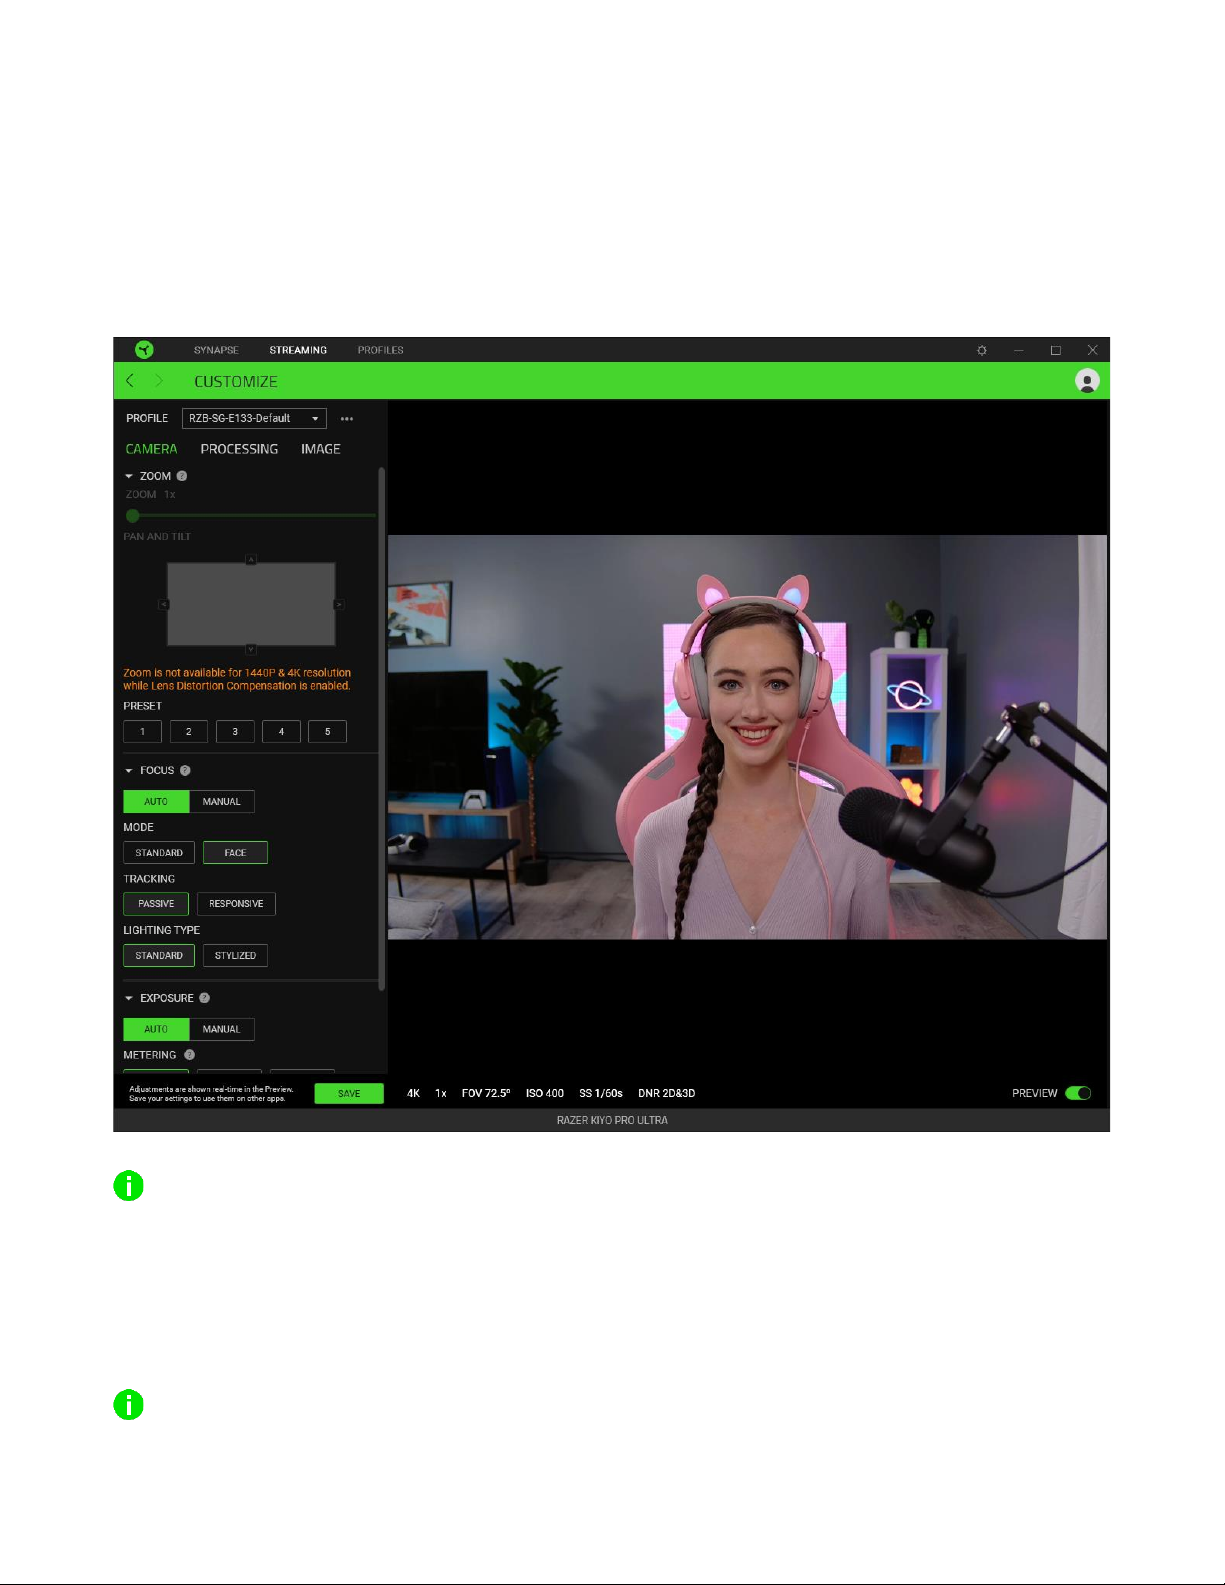
Camera
Set and control how close a subject is to the camera, how it will track a subject and determines how
light or dark its captures are.
To begin customizing the camera's settings, you must first enable the Preview toggle. Other apps
won't be able to use the camera when it's active on Razer Synapse.
Zoom
Adjust how close a subject is or how wide the camera's capture area is using the zoom slider and
control which portion is zoomed in using Pan and Tilt.
This feature is unavailable when Lens Distortion Compensation is enabled on 1440p (or higher)
resolution. The camera's current zoom status is indicated at the bottom of the Preview.

FOR GAMERS. BY GAMERS.™
12
Focus
Control how the camera focuses on a subject and how quickly it will search for focus points on set
room lighting.
▪Focus. Switch between Automatic and Manual focus. When set to Manual, you’ll be able to
adjust the camera's focus manually using a slider. Setting the Focus to Auto will allow the
camera to automatically focus on subjects using the following settings below.
oMode. Fine-tune how the camera focuses on a subject. Use Standard for default focus
and Face for the camera to focus on a subject's face.
oTracking. Adjust how quickly the camera will search for focus points. Passive is
suggested for low-lit scenes where a subject is still or stationary, and Responsive is best
used for a moving subject (in good contrast) as this setting searches more frequently
for focus points.
▪Lighting type. Determine the current lighting of a subject. Use Standard for naturally-lit scenes
and Stylized for color-lit rooms.
Exposure
Set how the camera evaluates how exposed a subject is by allowing it to automatically adjust the
highlights and shadows of its captures or manually adjust the camera's sensitivity to lighting. When
enabled, the following camera settings can be adjusted:
▪Metering. Determine how the camera automatically evaluates a scene to expose a subject.
oAverage. The camera will evaluate the overall scene as a basis of a subject's exposure
settings.
oCenter. The camera will evaluate exposure settings using the entire scene, focusing
more on the center.
oFace. The exposure setting is evaluated using the detected face of a subject in the
scene.
▪Compensation. Customize the camera's suggested exposure settings using the slider.
When disabled, you'll be able to adjust how exposure is determined manually:
▪ISO. Adjust how sensitive the camera's sensor is to light. Using a low ISO setting is suggested
to get the maximum image quality on well-lit scenes. A high ISO setting will allow the camera
to capture a subject in low-light scenes; however, a grainier output is expected.
▪Shutter Speed. Determines how long the camera's sensor takes in light. A faster shutter speed
is recommended to decrease motion blurs in videos.
The camera's current ISO and Shutter Speed status are indicated at the bottom of the Preview.
FOR GAMERS. BY GAMERS.™
13
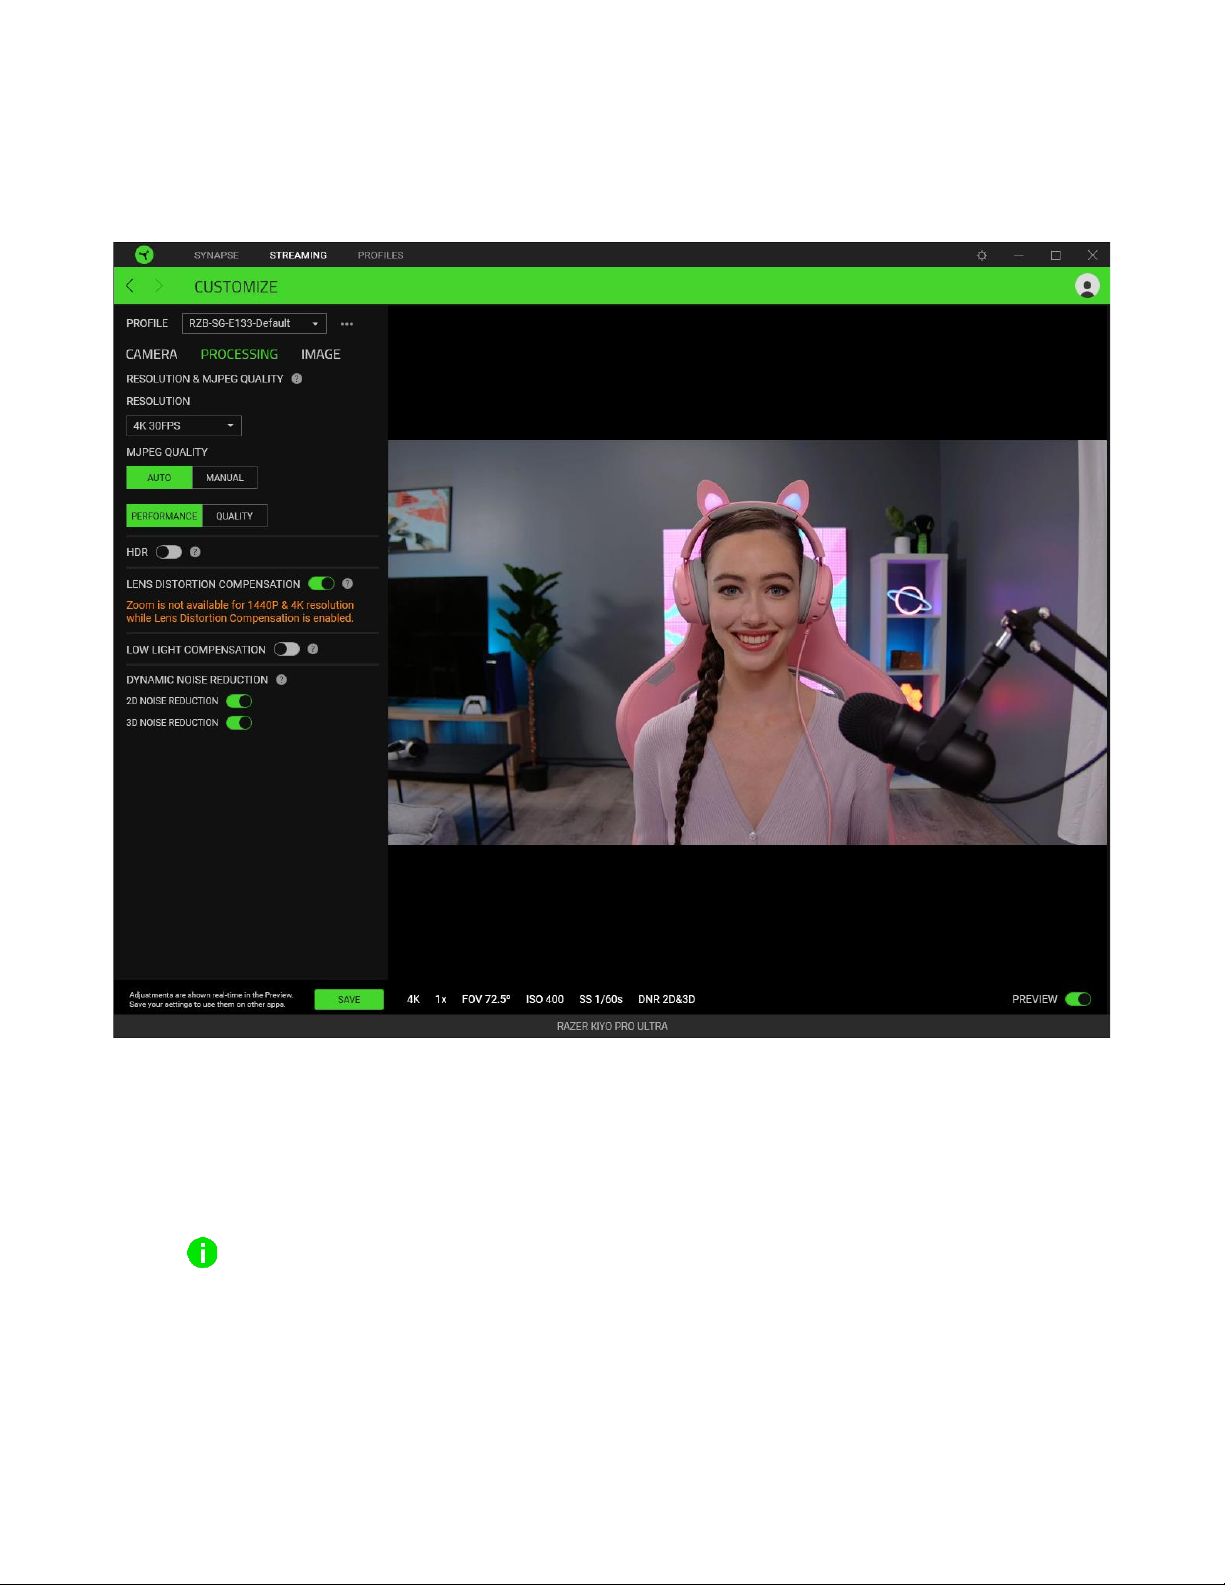
Processing
Control the quality of the camera's captures and processing of MJPEG format, brightness and
distortion corrections, and noise reduction.
Resolution and MJPEG Quality
Control the quality of the camera's image and video captures.
▪Resolution. Determine the sharpness, quality and frames per second of the camera's captures
using the drop-down options provided.
A higher resolution will result in crisp and clear photos and videos and a bigger file size.
▪MJPEG quality. Set the camera to focus on Quality or Performance when recording videos in
MJPEG format.
By default, this is set to Auto, where you can determine if the camera will record and prioritize
Quality or Performance. When set to Manual, you can tweak the camera's MJPEG quality
setting using a slider.

FOR GAMERS. BY GAMERS.™
14
HDR
Ramp up the camera's colors and dynamic range in bright or dark scenes while correcting over and
underexposed areas.
A lower camera frame rate is expected when this feature is enabled.
Lens distortion compensation
When enabled, the camera will automatically correct any distortion in its captures.
Low light compensation
When enabled, the camera will automatically adjust its brightness when capturing in low-light scenes.
Dynamic Noise Reduction
Enable to reduce noise and artifacts and improve overall image quality in low-light scenes. You should
disable these features when using the camera in well-lit scenes.
▪2D Noise Reduction. Prioritize overall noise reduction.
▪3D Noise Reduction. Reduce noise in motion-blur scenes.
The camera's current noise reduction status are indicated at the bottom of the Preview.
FOR GAMERS. BY GAMERS.™
15
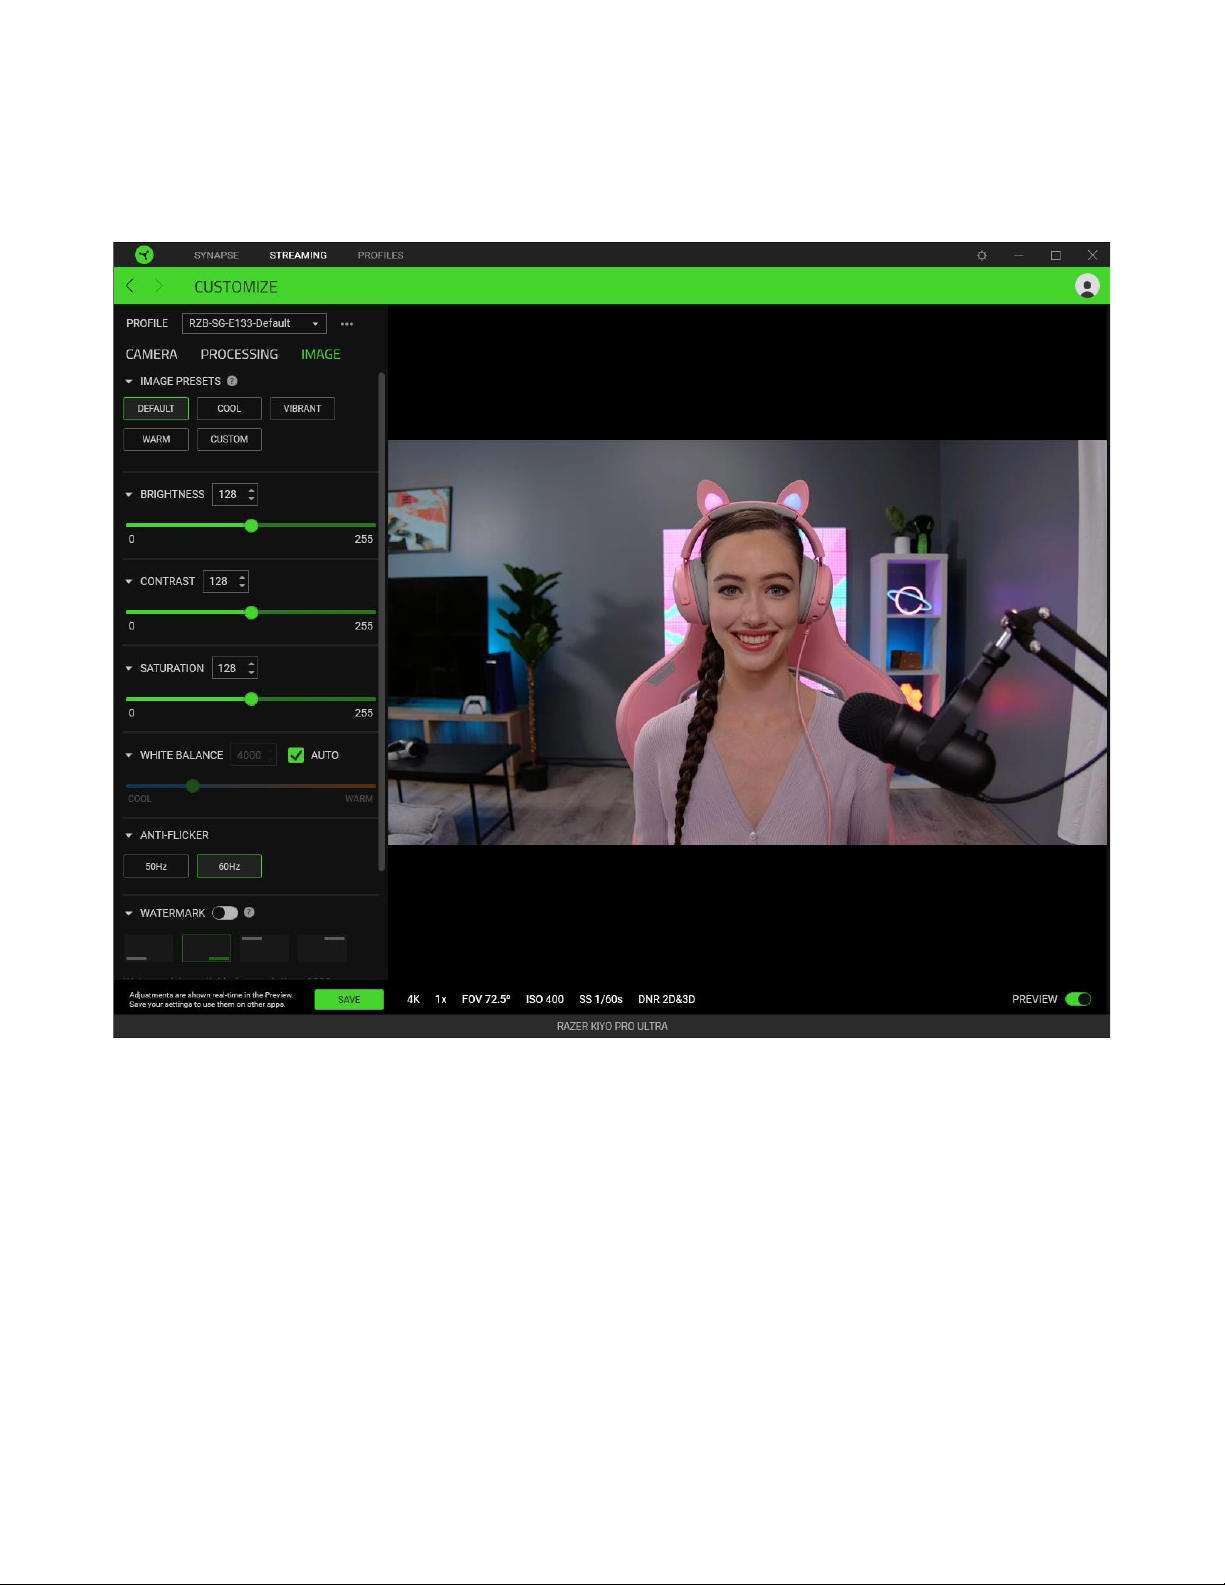
Image
Customize the camera's image settings using presets and tweak it further by customizing other
settings as needed.
Image presets
Use a pre-customized image setting for the camera.
Brightness
Control the overall brightness of the camera's captures.
Contrast
Highlight the separation of tones within the camera's captures.
Saturation
Change the color intensity of the camera's captures.

FOR GAMERS. BY GAMERS.™
16
White Balance
Control the color temperature of the camera's light source. By default, this is set to Auto, where the
camera determines the best color temperature for its captures.
Anti-flicker
Set the camera's frequency to match the correct frequency of your country.
Watermark
Add your Razer device's watermark on all captured images or videos.
Mirrored video
Flips the camera feed to reflect what you see in the mirror in the Preview.
Windows UVC Settings
Open your operating system's camera properties window and customize color corrections and camera
controls.
Razer Synapse will prompt you to select which setting you want to keep when making changes on
the Advanced Settings or other camera apps. Select' Camera' when prompted to keep changes
made from the Advanced Settings or other camera apps.
FOR GAMERS. BY GAMERS.™
17
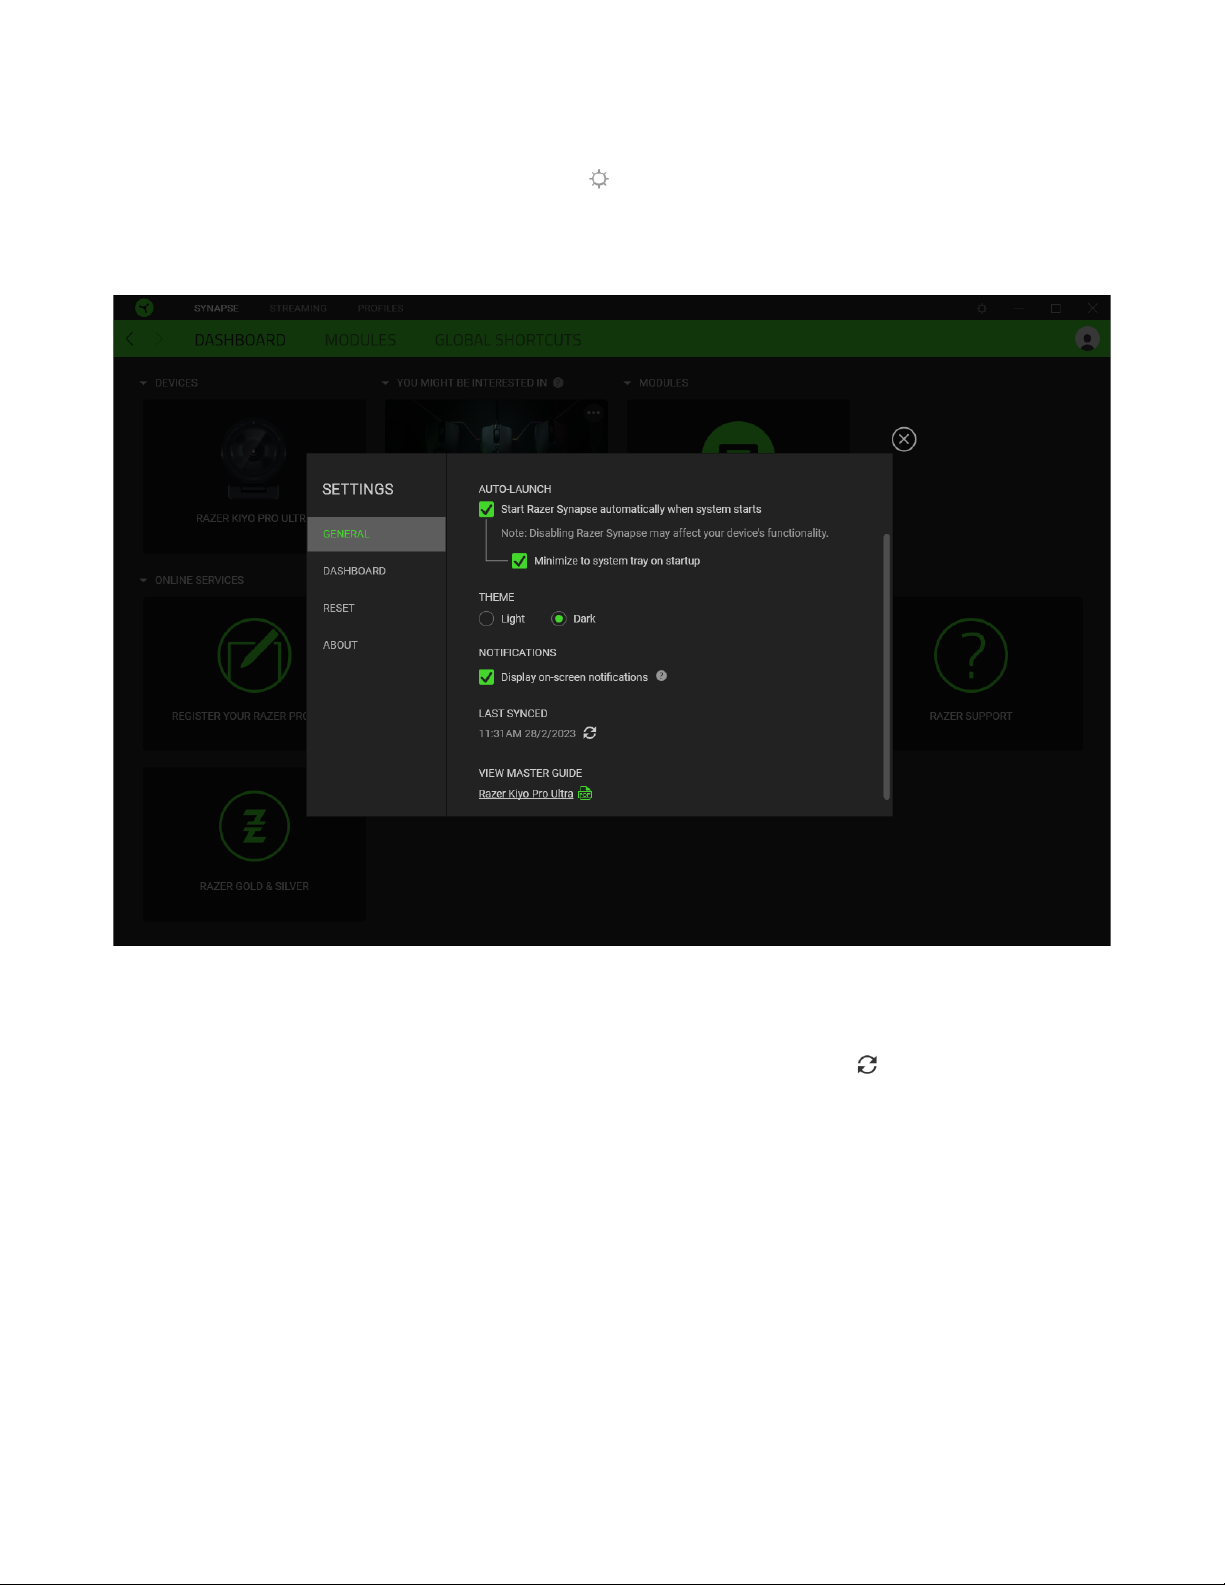
SETTINGS WINDOW
The Settings window, accessible by clicking the ( ) button on Razer Synapse, enables you to
configure the startup behavior and display language of Razer Synapse, view the master guides of each
connected Razer device, or perform a factory reset on any connected Razer device.
General tab
The General tab lets you change the software's display language, startup behavior, theme, and on-
screen notifications. You may also manually sync your profiles to the cloud ( ) or view the master
guide of all connected Razer devices and installed modules.
Dashboard tab
Use the Dashboard tab to customize which Razer device recommendations based on your setup, and
the games you play will appear on the Dashboard.
Reset tab
The Reset tab allows you to perform a factory reset on all connected Razer devices with on-board
memory and/or reset Razer Synapse tutorials to acquaint yourself again with Razer Synapse's new
features on its next launch.

FOR GAMERS. BY GAMERS.™
18
All profiles stored on the selected device's on-board memory will be erased when you reset a
Razer device.
About tab
The About tab displays brief software information and copyright statement, and provides relevant
links for its terms of use. You may also use this tab to check for software updates, or as quick access
to Razer's social communities.

FOR GAMERS. BY GAMERS.™
19
7. SAFETY AND MAINTENANCE
SAFETY GUIDELINES
To achieve maximum safety while using your Razer Kiyo Pro Ultra, we suggest that you adopt the
following guidelines:
▪Should you have trouble operating the device properly and troubleshooting does not work,
unplug the device and contact the Razer hotline or go to support.razer.com for support.
▪Don't take apart the device, and don't attempt to operate it under abnormal current loads.
Doing so will void your warranty.
▪Don't use or place the device near water, moisture, or other wet surfaces.
▪Don't expose the camera and/or its lens under direct sunlight.
▪Don't use or place the device near heat, naked flame, or other hot surfaces such as radiators,
stoves, fireplaces, and candles.
▪Ensure that the camera is always set up on a stable surface and/or firmly affixed on
accessories or surfaces using any of its thread mounts or the detachable stand.
▪Keep the device away from liquid, humidity, or moisture. Operate the device only within the
specific temperature range of 0°C (32°F) to 40°C (104°F). Should the temperature exceed this
range, unplug and/or switch off the device to stabilize the temperature to an optimal level.
MAINTENANCE AND USE
The Razer Kiyo Pro Ultra requires minimum maintenance to keep it in optimum condition. Once a
month, we recommend you unplug the device from the computer and clean it using a soft cloth or
cotton swab to prevent dirt buildup. Do not use soap, harsh cleaning agents, or abrasives.
Table of contents
Other Razer Webcam manuals


