RBSC Carnivore2 User manual

1/30
Carnivore2 User Guide
English version
Copyright (C) 2020 RBSC (Russian Bear Service Crew)
Русская версия находится здесь: Инструкция по эксплуатации Carnivore2
About the project
Carnivore2 is the multi–functional cartridge for the MSX platform that was created in 2017 by RBSC. The project is still
supported — new firmware for FPGA is being released, as well as the software — the tools for working with the cartridge, the
Boot Menu (boot block), etc. The website of RBSC can be found here.
Carnivore2 features
External storage: CF card (CompactFlash)
Nextor is used as DOS (built-in support for FAT12/16, maximum partition size: 4 GB)
High read and write speeds

2/30
Supports SD and MicroSD card adapters
Nextor supports floppy disk emulation with DSK files
Utilities compatible with MSX-DOS versions 1 and 2
The cartridge can be configured as a RAM extension, IDE disk, FMPAC and SCC/SCC+ sound cards, or a combination of
these devices
RAM: 2048 KB (2 MB)
Includes:
1024 KB main RAM with mapper
256 KB for ROM shadowing
720 KB additional RAM with a mapper, similar to MegaRAM
4 KB (in the last 64 KB–block) for the FMPAC SRAM (a backup battery is needed to save data after turning off the power)
Flash memory (FlashROM): 8 MB capacity, 64 Mbit/s
The first 256 KB are used for service information and ROM BIOSes
Mapper emulation:
Linear 64 KB mode
ASCII8
ASCII16
Konami4
Konami5 (SCC/SCC+)
Custom mapper
Sound
PPI and PSG emulation
Konami SCC and SCC+ emulation
OPLL emulation (YM2413, MSX – Music), BIOS IU translated to English
Volume setting for all emulated audio devices
PSG and PPI can be enabled and disabled in the user interface
Additional features
Boot menu with a choice of games and configurations saved in flash memory
Sorting of directory records
Customizable user interface (colors, sorting, key repeat speed, fade effects)
Help system
Joystick and joypads support
50/60Hz instant switching support
Selectable Turbo or R800 modes
Auto-Start of configuration entries and ROMs with a startup delay
Allows to run 2 ROMs at the same time in the Dual-Slot screen
Mono/stereo modes for FMPAC output
Allows to set the default startup frequency (50 or 60Hz)
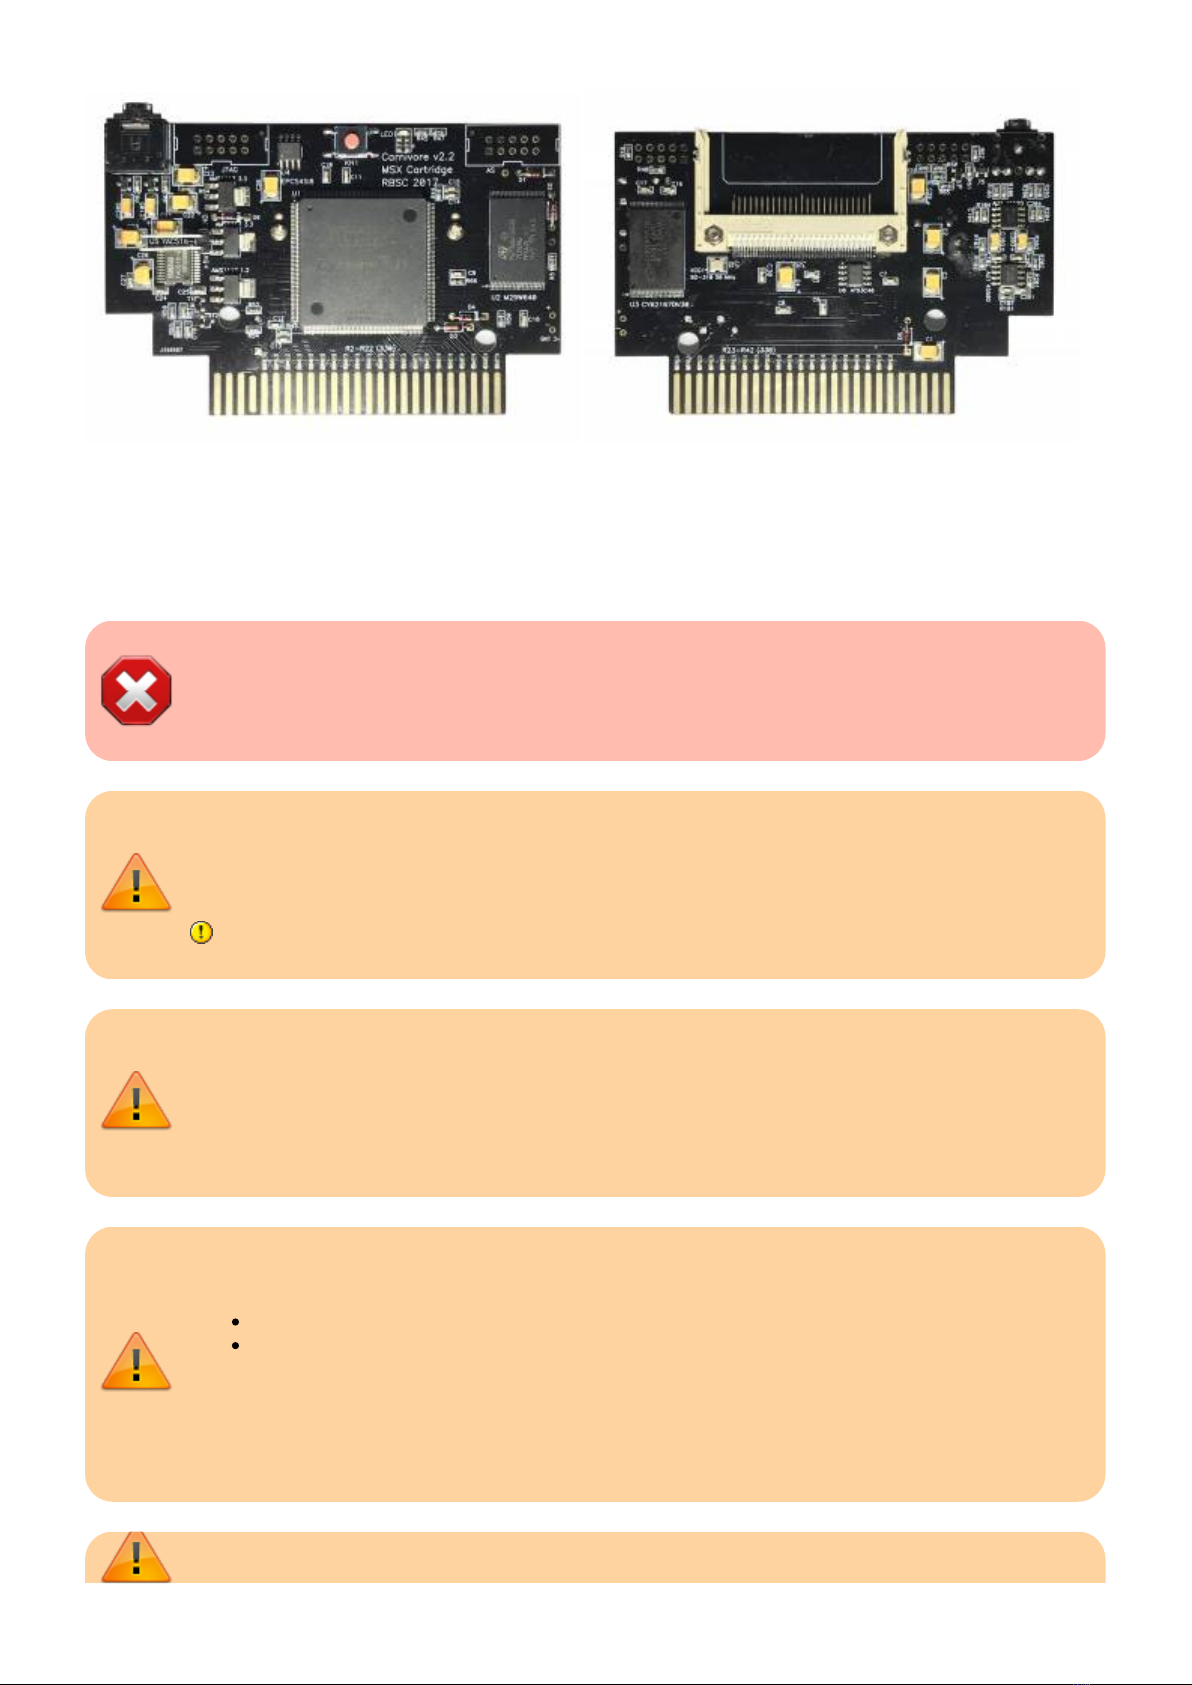
The device is designed in the form factor of the standard MSX cartridge
It operates at the standard frequency of 3.58 MHz, as well as turbo frequencies up to 7.11 MHz
Implemented on FPGA (EP2C5Q208C8 Altera Cyclone II)
Special software is used to control all functions
Download programs in ROM format to flash memory and RAM
Backing up flash memory, configuration RAM settings, and FMPAC RAM contents
Program for testing the IDE interface, etc
Easy setup and user–friendly interface
Links to important Carnivore2 documents and websites
The below table contains the links to important Carnivore2 documentation and websites.
CF card and adapter compatibility reference List of compatible cards and adapters
Detailed technical description of the cartridge Internal blocks and data layout
Changelog Version-based list of changes
Partslist List of components and their nominals

3/30
Circuit diagram (clickable)
Schematics
Link to official site RBSC's website
Repository on GitHub Source code, board files, documentation
Article on MSX Wiki Official MSX Wiki article
List of authorized distributors
The below table contains the list of authorized Carnivore2 manufacturers and distributors.
Order from Maxiol (RBSC) Official distributor in Russia
Purchase from 8bits4ever online store Official distributor in Spain
Purchase from Retro Game Restore online store Official distributor in Taiwan
Order from Carmeloco Official distributor in Spain
Photos of the cartridge board
The board from a test batch, assembled by RBSC:
The board assembled by 8bits4ever (authorized manufacturer/seller, Spain):

5/30
Note: on the board produced by Maxiol some tantalum capacitors were replaced with ceramic ones, also the audio socket was
moved to the back of the board.
Important information
WARNING! To avoid damage to the Carnivore2 cartridge and your MSX computer hardware never insert or
remove the cartridge when a computer is powered on! Always power off your computer before inserting or
removing any cartridges!
If any of your CF cards or SD-to-CF adapters no longer work with Carnivore2, try to replace the IDE bios with
an alternative version. To do this, rename BIDECMFC.ALT into BIDECMFC.BIN and write the IDE BIOS into
Carnivore2 with the C2MAN or C2MAN40 utility.
CF card and adapter compatibility reference
The correct operation of the Carnivore2 cartridge is not guaranteed in the R800 mode on Panasonic Turbo-R
computers. There may be various anomalies in this mode, for example the games that require a system
restart as well as the configuration entries won't work correctly. So for such games and configuration changes
it's not recommended to enable the R800 mode in the Boot Menu. Certain features of Carnivore2 may not
work correctly on computers with less than 16kb of RAM (for example on Casio PV-7).
Carnivore2 is incompatible with Yamaha's network modules:
network module КУВТ (installed into Yamaha YIS-503IIR)
network module КУВТ2 — Yamaha Serial I/O Unit (CB55448) (installed in Yamaha YIS-503IIIR and
Yamaha YIS-805-128R2)
If those modules are detected, Carnivore will show a warning message and halt a system to prevent conflicts.
In this case you need to remove the network module from a computer and also remove the network ROM
cartridge from the front slot of the YIS-503II MSX1.

6/30
Certain MSX computers activate the built–in software after power–on and this prevents Carnivore2's Boot
Menu from being started. To bypass the built–in software it's usually enough to hold the defined key during a
computer's startup. For example Panasonic A1 (as well as on A1 MK2), you need to hold the DEL key until the
Boot Menu appears or MSX-DOS is loaded.
Certain games with the so–called “delayed start”, for example Metal Gear 2 and King's Valley 2, will not work
on the Yamaha YIS-503IIIR because of incompatibility with the built–in CP/M. It is advised to removed the CP/M
from the SubROM on these computers, by writing this file into the 27с256 chip and replacing the Subrom chip
on the board. Alternatively you can use a different file with Subrom and TESTRAM. This file can be downloaded
from here.
On several MSX computers (for example on Casio PV models) as well as on several MSX clones (for example on
Omega) there's no +12v and -12v power on the cartridge slots. This power is needed for the audio amplifier
that is installed on Carnivore2 cartridge's board. Without this power Carnivore2 will not be able to play FMPAC,
SCC and PSG music and sound effects.
When a computer is just powered on with the Carnivore2 cartridge inserted into a slot, it may reboot twice.
This is normal and was implemented to make sure that the cartridge is fully initialized after the cold boot. You
can enable the dual–reboot feature in the Configuration settings.
The Boot Menu can detect that it is running on Korean or Arabic MSXs and in case it is not compatible with
those systems, it will output a message and will try to boot to DOS after 10 seconds. In such a case a
compatible Boot Menu (BOOTCMFC.BIN) should be installed into the cartridge (see the “Special” subfolder in the
repository for the compatible version of the boot menu).
The Setup
If you purchased the already assembled and configured cartridge, you don't need to do the firmware and BIOS
uploading.
After assembling, the cartridge needs to be programmed in order to function properly. The following steps are necessary:
Upload the Altera's firmware1.
Initialize the directory2.
Write the Boot Menu3.
Write the IDE BIOS4.
Write the FMPAC BIOS5.
Restart MSX6.
The below described features are supported in the Boot Menu and FPGA firmware starting from version 2.40; in the older
versions, these features may be missing or have different functionality.

7/30
How to prepare the CF card
The CF card needs to be formatted in the FDISK program and needs Nextor's files to be copied onto it.
Partitioning of CF memory card must be done in Carnivore2 cartridge!
Insert CF memory card into the cartridge and start the computer1.
When the boot menu appears, press the Esc button to boot using the default configuration2.
The computer boots into the MSX-BASIC3.
Type CALL FDISK and press Enter ⏎ to run the partitioning program4.
Create one or more partitions using the FDISK interface5.
When finished, restart the computer6.
You need to write the Nextor system files so that you can boot into MSX-DOS2 from the card. To do this, copy the files7.
from the archive or disk image that are available here and here (as disk image) into the root directory of the CF card
Example of copying files from a floppy disk to the main section of a CF memory card using a GoTek–based drive emulator:8.
copy "b:\*.*" to "a:\"
a: — mounted CF card's partition
b: — another drive (GoTek emulator, a physical 720kb
drive, a disk of another IDE controller)
How to upload the firmware
Before uploading the firmware please make sure that the CF card is not inserted!
For updating/uploading of the firmware you will need:
Quartus II Web Edition (Free) 15.0 software1.
Byte Blaster or USB Blaster programmer (can be purchased on Ebay or AliExpress)2.
From the Individual Files tab please download and install the following software:
Quartus II Software (includes Nios II EDS)
Cyclone IV device support
The following actions need to be performed:
Connect the USB Blaster programmer to the PC1.
Run the program Quartus II Web Edition2.
Select menu item Tools/Programmer3.
In the Programmer window:4.
Click Hardware setup
in the Hardware setup → Hardware Settings → Currently selected hardware choose your programmer device
Click Close
The device's name will be displayed to the right of the Hardware setup button and to the right of the Mode field, there you
need to select Active Serial Programming
Click Add Device
in the Select Devices chose the EPCS4 device
Click Ok
Right click on the device, chose Change File and select the desired firmware file with the .pof extension from your hard
disk
Make sure to check these options:
✔ Program/Configure
✔ Verify
✔ Blank-Check
Supply 5 volts to the cartridge board (mind the polarity!)
A simple USB cable to power–up the cartridge:

8/30
Power cable connected to the cartridge:
Connect the programmer's cable to the cartridge's AS connector (make sure the cable is connected correctly!)
To connect the programmer to the AS connector on the cartridge, you need a dual–row pin header (PLD 2 × 5, 2.54 mm) that must be
inserted into the programmer cable's connector:
Then the programmer’s connector must be inserted into the AS connector of the cartridge and slightly tilted to ensure good contact
between the pins and the board:

9/30
Click Start and follow the programming and verification process while firmly holding the connector. After successful5.
completion of the firmware uploading you should get this message:
When the operation is complete, disconnect the cables from the cartridge in the following order:6.
programmer cable from the AS connector
power cable
How to enable the cartridge and install BIOS ROMs
Please always use the latest version of the C2MAN and C2MAN40 utilities to write necessary software into the
cartridge!
The freshly–assembled Carnivore2 cartridge will not boot to MSX-DOS2 without the specific software that needs to be loaded
into the FlashROM chip from any disk drive.
Insert the cartridge into the MSX slot, preferably into the first slot. Power up MSX and check if it works well. If the computer
doesn't work properly, remove and inspect the cartridge. To fully configure the cartridge the following actions need to be
performed:
Make sure that all 3 BIN files (BIDECMFC.BIN, BOOTCMFC.BIN, FMPCCMFC.BIN) are in the same folder with the utilities1.
Run the C2MAN.COM or C2MAN40.COM (for MSX1 only) utility2.
When asked, enter the slot number where the cartridge is located (for example “10” for first slot, “20” for second slot,3.
etc.)
From the main menu select “Open cartridge's Service Menu” using the 9 key4.
With the 7 key select “Fully erase FlashROM chip” and confirm twice; if you are only updating the cartridge, this step5.
may be skipped
With the 3 key select “Init/Erase all directory entries” to initialize the directory6.
With the 4 key select “Write Boot Menu (BOOTCMFC.BIN)” to write the Boot Menu7.
With the 5 key select “Write IDE ROM BIOS (BIDECMFC.BIN)” to write Nextor IDE BIOS8.
With the 6 key select “Write FMPAC ROM BIOS (FMPCCMFC.BIN)” to write the English FMPAC BIOS9.
If there were no errors during the steps 5–9, then power down and start your MSX10.
There's also another way to write the Boot Menu and BIOSes into the FlashROM chip. This can be done on a diskless MSX
computer by loading the necessary files via the cassette interface and copying them from the specially formatted CF card into
the FlashROM chip. Please see the file. Be advised that after this operation you need to update the Boot Menu and BIOSes to
the latest versions downloaded from the repository.
Usage instructions
The program that serves as the main interface of the Carnivore2 cartridge after a computer is powered on is called the Boot
Menu. It can be also referenced as “Boot Block” or “bootblock”.

10/30
If the cartridge is inserted into slot 3, the system will be halted immediately. In this case please power down the system and
insert the cartridge into another free slot..
If the Boot Menu version is incompatible with the MSX computer, the following warning message will be shown and the
cartridge will try to boot into MSX-DOS2 within the next 10 seconds. In this case please write the special version of the Boot
Menu into the cartridge (see the Special folder in the repository).
If there's a network module from KYBT or KYBT2 system (Yamaha–based computer classes that were distributed in USSR), the
following warning message will be shown and the system will be halted. In this case please remove the network module from
the computer.

11/30
How to work with Boot Menu
The Boot Menu allows to start the ROMs from the FlashROM chip and to restart the cartridge with the desired configuration.
After a computer shows its boot logo, the cartridge's Boot Menu should appear and you should see the main menu with the
list of directory entries.
Navigating the menu is very easy. Here are the key assignments:
Esc boot MSX using the default configuration: all enabled
←, →previous/next page
↑, ↓select ROM/CFG entry

12/30
Space start selected entry (single slot configuration)
Gstart an entry directly
Rreset MSX and start an entry
Enter ⏎ , ODual-Slot setup page
1select entry for the master slot
2select entry for the slave slot
Aselect entry for autostart
Dclear Auto-Start & Dual-Slot settings
Ftoggle 50Hz or 60Hz frequency
Ttoggle Turbo or R800 mode
Ccustomize configuration
Psetup PSG and PPI Clicker
Vvolume settings of FMPAC and SCC sound cards
Hhelp
Ljump to the last used directory entry
Mtoggle background music playback
Stoggle help scroller
The main menu also supports the built–in joypads and external joysticks connected to any of the 2 joystick ports. The
joystick's stick movements and pressing the buttons are interpreted as follows:
←, →same as cursor keys
↑, ↓same as cursor keys
Astart an entry (same as Space on keyboard)
Bexit from Boot Menu (same as Esc on keyboard)
All other joystick directions are ignored.
The following data is displayed on the status line of the screen:
VDP Frequency
CPU mode
volume:
FMPAC
SCC
PSG
Directory page numbers, in the following format: CP•TP
CP — current page
TP — total pages
Directory entry icons
The symbols that are displayed near the names of directory entries indicate the following:
K5 Konami5 (SCC) mapper
K4 Konami4 mapper
A8 ASCII8 mapper
A16 ASCII16 mapper
MR mini ROM (8, 16, 32, 48 and 64kb ROM without mapper)
CF configuration entry
UN unknown mapper

13/30
–for other mappers
On Arabic and Korean MSXs there will be the following indication (prior to Boot Menu v2.40):
KKonami5 (SCC) mapper
kKonami4 mapper
aASCII8 mapper
AASCII16 mapper
Mmini ROM (8, 16, 32, 48 and 64kb ROM without mapper)
Cconfiguration entry
Uunknown mapper
Please keep in mind that some ROMs may require alternative starting method, so if pressing Space doesn't start the ROM, try
starting the ROM directly or after reboot.
Auto-Start
The Auto-Start option allows to start any configuration entry or ROM image when a computer is powered on. Starting from
version 2.40 of the Boot Menu, the record number for the auto–start feature is saved into the configuration EEPROM, so this
chip must be installed on the Carnivore2's board. The selection of an entry for auto–start is done with the A key from the
main menu. To cancel auto–start for an entry, press the D key.
There are several keys that can affect the cartridge's functionality at boot level. Certain keys can cancel the auto–start, other
keys can skip the Boot Menu:
F3 use default UI settings
F4 cancel auto–start
F5 skip Boot Menu
When auto–start is set for any entry, after reboot a message will be shown and there will be a 3 second delay before this
entry is activated. During these 3 seconds a user can abort autostart with Esc , Tab , F4 keys. If any of these keys are pressed
during the 3 seconds countdown, the autostart will be skipped and the main menu will be shown. Pressing Space will skip
countdown and start the selected directory entry. During the boot sequence with autostart the following joystick button

14/30
actions are possible:
Askip countdown and start selected entry
Bcancel autostart
Please hold a joystick's button for at least 1 second to cancel the autostart and go to the main menu or to start the selected
directory entry. This works the same way when the message about the incompatible Boot Menu is shown.
VDP frequency
The F button only temporarily changes the VDP frequency to the desired value. Use the “Frequency at startup” setting in the
Configuration screen to control what frequency you would like the computer to boot with and what frequency should be used
to start ROM images. The frequency setting is saved into the configuration EEPROM and is restored even after the computer is
powered on again.
CPU mode
The Turbo mode can be enabled with the T button only on Panasonic MSX2+ computers and R800 mode can be enabled only
on Panasonic Turbo-R computers with the same button. On other computers this functionality does not work. The status of the
Turbo or R800 mode is not saved into the configuration EEPROM and it is not restored at the start of the Boot Menu after the
power was switched off and back on. However the Turbo/R800 mode is still set for ROMs that require a reset to start.
The current mode is displayed in the status screen:
Z80 Z80 mode (default)
T2+ Turbo mode for Panasonic MSX2+
R8x R8x — R800 mode for Panasonic Turbo-R
Sound settings
The Boot Menu supports setting the volume for FMPAC and SCC sound cards. Use the V key to enter the volume control
screen from the main menu. The following keys can be used in this screen:
Changing the volume for FMPAC and SCC sound cards:

15/30
Esc save & exit to main menu
↑increase FMPAC volume
↓decrease FMPAC volume
→increase SCC/SCC+ volume
←decrease SCC/SCC+ volume
Home reset to default values
The volume's value is stored within the small EEPROM on the cartridge board. The value is saved when Esc key is used to
return to the main menu. If the small EEPROM is not present, then the volume setting is only preserved until the power–off. So
setting the volume once allows to play games and listening to the music until the computer is completely switched off.
This screen also supports joystick. The joystick's movements and buttons are interpreted as follows:
←, →increase/decrease SCC/SCC+ volume
↑, ↓increase/decrease FMPAC volume
A, Bapply changes and exit (same as Esc on keyboard)
It is also possible to disable the default FMPAC stereo mode using the setting in the Configuration screen. This will enable the
mono mode for FMPAC's sound output through the Carnivore2's audio socket.
PSG/PPI clicker settings
The Boot Menu also supports enabling or disabling the internal PSG and PPI's Clicker emulation as well as setting the volumes
for both of them. Use the 'P' key to enter the PSG control screen from the main menu. The following keys can be used in this
screen:

16/30
Esc save & exit to main menu
Space enable/disable PSG
Enter⏎ enable/disable PPI Clicker
↑increase PSG volume
↓decrease PSG volume
→increase Clicker volume
←decrease Clicker volume
Home reset to default values
The volume's value is stored within the small EEPROM on the cartridge board. The value is saved when Esc key is used to
return to the main menu. If the small EEPROM is not present, then the volume setting is only preserved until the power–off. So
setting the volume once allows to play games and listening to the music until the computer is completely switched off.
This screen also supports joystick. The joystick's stick movements and buttons are interpreted as follows:
←, →increase/decrease PPI Clicker volume
↑, ↓increase/decrease PSG volume
Aenable or disable PSG (same as Space on keyboard)
Bapply changes and exit (same as Esc on keyboard)
Configuration screen
Starting from version 2.10 the Boot Menu can be customized and the custom settings will be stored in the configuration
EEPROM.

17/30
To customize the configuration please use the C key from the main menu. Beside the cursor keys, the following keys can be
used in configuration screen:
Esc save & exit to main menu
Space change selected value
Home reset to default values
A user can customize various configuration settings including directory sorting, fade in/out effects, keyboard/joystick delay as
well as the colors (font and background) for the main menu, help screen, volume control screen and PSG setup screen. In
addition, a user can enable or disable the dual–reboot, disable stereo output for FMPAC and select what frequency to use at
startup (50Hz, 60Hz or default VDP's frequency).
Pressing Home at any time will restore all customized values to default settings. Holding F3 key at the Boot Menu's startup
allows to use the default settings for the UI — all custom settings will be ignored for the current session.
Please note that editing of the palette on MSX computers with v991x or v992x video processors will be disabled. Also if the
directory sorting is enabled or disabled, the current auto–start entry as well as the master/slave slot assignments are cleared
to prevent a mix–up.
The directory sorting is a complex operation, so if there are many entries in the Boot Menu's directory, then it may take a few
seconds to completely sort all of them. The sorting only happens at the Boot Menu's startup and when the sorting gets
enabled in the configuration screen. If the delay is too uncomfortable for you, please disable the directory sorting option.
This screen also supports joystick. The joystick's stick movements and buttons are interpreted as follows:
Atoggle setting (same as Space on keyboard)
Bapply changes and exit (same as Esc on keyboard)
How to run 2 ROMs at the same time
Starting from Boot Menu's version 2.30 and the Altera's firmware version 2.30 it is possible to run 2 ROMs at the same time.
This functionality is called “Dual-Slot”. The dual–slot setup screen can be called with the O key or by pressing Enter ⏎ in the
main menu.

18/30
The new setup screen allows to run dual–slot configuration with flexible options selection for the master slot (you can choose
what Carnivore2 built–in devices to enable). You can select 2 ROMs to run simultaneously. The only restriction for the slave
slot is that it can run games with Konami4 and Konami5 mappers as well as small games up to 32kb without mapper. The slave
slot becomes available if there's one unused physical slot found in a computer and this slot is not occupied by another device.
If there are no available slots in a system, then you can use one of the master slot's subslots to emulate the slave slot (staring
from Boot Menu v2.40).
The Boot Menu identifies whether there's a suitable free slot in the MSX and then shows this slot as “slave” in the settings.
The working slots will have their numbers shown on the left side. If only one slot was identified as usable, running 2 ROMs at
the same time will be possible only after enabling the “Slave Slot as Master's Subslot” option. This option is enabled
automatically if no free slots are found in a system.
In order for the slave slot to work as a subslot of the master slot, the master slot must be expanded. If using the subslot of a
master slot is enabled in the settings, the master slot automatically becomes expanded. If the master slot's expansion gets

19/30
disabled by a user, then the “Slave Slot as Master's Subslot” option will be disabled too.
After enabling the “Slave Slot as Master's Subslot” option, you need to select what subslot of the main slot should be used to
emulate the slave slot. This can be done by putting the cursor onto one of the Carnivore2's devices — RAM, IDE or FMPAC and
pressing Space . The name of the device will change to “Slave Slot” and the number of the slave slot will change to N1.N2
where N1 is the number of the master slot and N2 is the number of the emulated subslot.
Be aware, that some cartridge, for example SCC, MegaRAM and other ones that do not modify the slot's area in any way will
not be detected by the Boot Menu, so the slave slot will be available even if it should not be. If Carnivore2 configures the
slave slot as the same slot that is occupied by another device, this may cause conflicts and potentially damage your MSX. So
please make sure that you do have enough free slots before enabling the dual–slot configuration. If you are not sure that you
have a free physical slot to be used as the emulated slot, it is advised to enable the “Slave Slot as Master's Subslot” option
and use one of the master slot's subslots to emulate the slave slot.
Beside the cursor keys, the following keys are usable in the Dual-Slot setup screen:
Esc exit to the main menu
Space change or toggle setting, select ROM or SCC+ mode, enable or disable device, assign subslot for slave emulation
Enter ⏎ apply changes and restart
The ROMs for the dual–slot configuration can be selected from the main menu. The entry for the master slot can be selected
by pressing 1, the entry for the slave slot can be selected by pressing 2. The D key clears the selection as well as the Auto-
Start entry. The selection will be visible in the “Dual-Slot” area above the list of ROMs, to the right from the “Auto-Start”.
Also the ROMs can be selected with the Space key in the Dual-Slot screen. Pressing space bar will allow to cycle through the
compatible ROMs for each slot. After the full cycle there will be an “Empty” selection to keep the slot vacant.
The “Expand” option for each slot allows to expand this slot individually. The expanded master slot allows to use all built–in
Carnivore2 devices as well as to emulate the slave slot as one of the master's subslots. The slave slot can be expanded as
well, but we recommend to keep the slave slot always non–expanded to avoid conflicts with other hardware.
In addition, the master slot can also use the “Konami SCC+” configuration. So you can run SCC+ games in the slave slot and
enjoy SCC+ and a game on a single cartridge. It is recommended to use SCC+ mode only with certain games that support it.
It should be kept in mind that “Konami SCC+” selection makes it impossible to use the built–in Carnivore2 devices — RAM,
IDE and FMPAC as well as to use the master slot's subslot to emulate the slave slot. So to run the SCC+ configuration with a
ROM image, the ROM image must be selected at the slave slot and the slave slot must be standalone.
This screen also supports joystick. The joystick's stick movements and buttons are interpreted as follows:

20/30
↑, ↓same as cursor keys
←, →apply selected configuration and restart
Achange or toggle setting, select ROM or SCC+ mode, enable or disable device, assign subslot for slave emulation
(same as Space on keyboard)
Bexit to the main menu (same as Esc on keyboard)
Help screens
The two help screens provide a complete list of keys and their assignments as well as information on the joystick's stick and
key assignments. By pressing any key you go to the next screen and on the last help screen pressing any key will return you
to the main menu.
Table of contents