RCA DRC279RE User manual

Slow-motion Play
1. Press the SLOW button on the remote in play
mode.
• EachtimetheSLOW button is pressed, the
speed of slow-motion playback changes in
thefollowingsequence:
2. Press the PLAY button to return to normal
playbackspeed.
Audio Selection
On some DVDs, the sound is recorded in two
or more formats. Follow the directions below
to select the preferred language and sound
system.
1. While a disc is playing, press the AUDIO
button to show the current audio format
number.e.g.
2. Press the AUDIObuttonrepeatedlytoselect
the desired audio format.
Notes:
• If only one audio format is recorded on the
DVD,thenumberdoesnotchange.
• Some DVDs allow you to change audio
selectionsonlyviathediscmenu.Ifthisisthe
case,presstheMENUbuttonandchoosethe
appropriatelanguageonthediscmenu.
• You can select different audio channels
(Stereo, Left or Right) on an Audio CD by
pressingtheAUDIO button repeatedly.
Subtitle Selection
1. While a DVD is playing, press the
SUBTITLE button to display the
current language setting, as shown in
the example.
2. Press the SUBTITLE button repeatedly to
selectthedesiredsubtitlelanguage.Youcan
turn subtitles off by pressing the SUBTITLE
button repeatedly until the is
displayed.
Notes:
• Some DVDs are set to display subtitles
automatically, and you cannot turn them off
evenifyousetthesubtitlefunctiontooff.
• During some scenes, the subtitles may not
appear immediately after you select your
desiredscene.
• The number of subtitle languages recorded
differs depending on the disc. If only one
languageisrecorded,thelanguagedoesnot
change.
• This function can only be used for discs
on which subtitles have been recorded in
multiplelanguages.
• Some DVDs allow you to change subtitles
only via the disc menu. If this is the case,
press the MENU button and choose the
appropriatesubtitleonthediscmenu.
Angle Selection
Some DVDs contain scenes which have been
shotfromanumberofdifferentangles.Forthese
discs,thesamescenecanbeviewedfromeach
ofthesedifferentangles.
1. While you are playing a DVD with different
anglesrecorded,presstheANGLE button to
viewthenumberofcurrentanglesavailable.
2. Press the ANGLE button repeatedly to
changethescenetothenextrecordedangle.
e.g.
• After approx. two seconds, playback will
continuefromthenewangleyouselected.
• If no button is pressed within 10 seconds,
playback continues without changing the
currentangle.
Notes:
• This function can only be used for discs on
whichscenesshotfrommultipleangleshave
beenrecorded.
• If only one angle is recorded, is
displayed.
Display Function
While the disc is playing, press the DISPLAY
button on the remote control repeatedly to
display information on operation status.
Elapsed Time:Elapsedtimefromthebeginning
ofthechapter/titlewhichiscurrentlyplaying.
Remaining Time: Remaining time of the
chapter/titlewhichiscurrentlyplaying.
Playing a Disc
1. Press the STANDBY / ON button to turn on
the unit.
See CUSTOMIZING THE FUNCTION
SETTINGSbeforeproceedingtostep2.
2. Press the OPEN/CLOSE button to open
thedisctray.
3. Placeadisc ontothedisctraywiththe label
side up.
4. Press the OPEN/CLOSE button to close
thedisctray.Ittakesashortwhileforyourunit
toloadthedisc.Afterloading,formostDVDs,
theunitwillautomaticallytakeyoumainmenu
orstartplaying.
5. Iftheunitdoesnotautomaticallystartplaying
the DVD, press the PLAY button.
Pausing Playback (Still Mode)
Press the PAUSE button on the remote. To
resume normal playback, press the PLAY
button.
Each time you press the PAUSE button, the
pictureadvancesoneframe.
Stopping Playback
• Press the STOP button at the location
where you want to interrupt playback. To
resume playback at the position where
the disc was stopped, press the PLAY
button.
• If you press the STOP button twice, the
unit’s memory will be cleared and pressing
the PLAYbuttonwillresetthedisctothe
beginning.
Zooming into an image
Whilea discisplaying,press theZOOM button
toenlargetheimageinseverallevels.
• Whilean image iszoomed,youcanuse the
, , or CURSOR buttontoshift the
viewanddisplaythepartyouwant.
• To return to normal view, press
the ZOOM button until the
123Off
shows. The
screenwillreturntonormal.
• Whenyoureach the edge of theimage,the
displaywillnotshiftanymoreinthatdirection.
Skipping (Forward / Reverse)
• Press the PREV button to go back to
currentorpreviouschapters/tracks.
• Press the NEXT button to advance
chapters/tracks.
• For audio CDs, use the number buttons on
theremotecontroltojumpimmediatelytothe
desiredtracknumber.
Fast Forward / Fast Reverse
1. Press the SEARCH or SEARCH
buttonwhenadiscisplaying.Eachtimeyou
press the SEARCH or SEARCH
button, the playback speed changes in the
followingsequence:
2. Press the PLAY button when you reach
thedesiredpointtoresumenormalplayback.
Notes:
• The unit mutes sound and subtitles during
reverseandforwardscanofDVDs.
• Thefastplaybackspeedmaydifferdepending
onthedisc.
PlayingTitles/ChaptersinaFavoriteOrder
Youcancombineyourfavoritetitles/chaptersandplaythemintheorderyoudetermine.
1. WhenaDVDisstopped,presstheMEMORYbuttonandthefollowingdisplayappears.
2. Selecttheitemsin theorderyouwantbypressingthenumberbuttons.Eachtime youpress the
Cursorbuttons( , , , ),thespaceishighlighted.Highlight where youwanttoenter,then
pressthecorrespondingnumberbuttons.
3. PresstheCursorbuttons( , , , )tomovethehighlighted
barto“Play”,thenpressthe OK button.TheDVDplayerstarts
memoryplayback.
4. Toresumenormalplaybackfrommemoryplayback
a) PresstheMEMORYbuttoninstopmode.
b) PresstheCursorbuttons( , , , )tomovethehighlighted
barto“ClearAll”,thenpresstheOKbutton.Alltheinputprograms
willbecleared.
c) Pressthe PLAYbuttontoresumenormalplayback.
Note:
• Ifthetitle or chapter numbersyouentered is not permitted bytheDVD,after youpressthe OK
button,itwillrestoreto---.Youshouldre-entercorrectnumbers.
• Somediscsmaynotpermitmemoryplaybackoperation.
• If you select repeat during memory playback, the DVD player repeats the current memory
playback.
• If you press the MEMORY button while the display appears on the TV screen, the display
disappears.
• The programmed selections will be cleared when you open the disc tray or turn off the DVD
player.
Locating a specific chapter / track / title / time
If you know the chapter / track / title / time number you want to
play,youcanlocateaspecicchapter/track/title/timebydirectly
selectingachapter/track/title/timenumber.
1. Press the GOTObuttontosearchyourdesiredchapter/ track/
title/time.
2. Press or buttontohighlightachapter/track/title/timeand
pressthecorrespondingnumberbutton(s)forthechapter/track/
title/timeyouwant.
3. Press the OKbuttontoconrm.Theunitwillstartplaybackabout
3secondslater.
Notes:
• Somediscsmaynotrespondtothisprocess.
• Somescenesmaynotbelocatedaspreciselyasyouspecied.
• Thismethodforaccessingspeciclocationsisavailableonly within the current title of theDVD
disc.
Youcanplayaspecictitleorchapterrepeatedly.
(Titlerepeat,chapterrepeat,A-Brepeat)
Repeating a chapter
Youcanplaythesamechapterrepeatedly.
1. While the disc is playing, press the REPEAT
DISC button until the
indicator displays on the screen. The current
chapterisplayedrepeatedly.
Repeating a title
Youcanplaythesametitlerepeatedly.
2. While the disc is playing, press
the REPEAT DISC button until the
indicatordisplaysonthescreen.
Thecurrenttitleisplayedrepeatedly.
Toresumenormalplayback
3. While the disc is playing, press
the REPEAT DISC button until the
indicatordisplaysonthescreen.
You can play a single track and whole disc
repeatedly.
Repeating a single track
Youcanplaythesametrackrepeatedly.
1. While the disc is playing, press
the REPEAT DISC button until the
indicator displays on the
screen.Thecurrenttrackisplayedrepeatedly.
Repeating a whole disc
2. While the disc is playing, press
the REPEAT DISC button until the
indicatordisplaysonthescreen.
Thewholediscisplayedrepeatedly.
Toresumenormalplayback
3. Press the REPEAT DISC button until the
indicatordisplaysonthescreen.
Youcanplayaspecicsectionrepeatedly.
Repeating a specific section
1. While the disc is playing, press the REPEAT
A-B button at the beginning of the section (
is displayed) you want to play
repeatedly.
2. Press the REPEAT A-B button again at the
endofthesection( isdisplayed).
3. Theunitwillimmediately beginreplayingyour
selection.
Toresumenormalplayback
4. While the disc is playing, press the REPEAT
A-B button until the indicator
displaysonthescreen.
Notes:
• Some discs may not permit A-B repeat
operation.
• A-Brepeatcan only be usedwithinthesame
title.If the star t and end of the section to be
repeated are in different titles, A-B repeat is
cancelled.
• You can specify a segment only within the
currenttitleortrack.
• The A-B repeat function does not operate in
scenes where different camera angles are
recorded.
PLAYING A DISC
Thisusermanualexplainsthebasicinstructions
foroperatingthisunit.SomeDVDsareproduced
in a manner that allows specic or limited
operationduringplayback. Therefore,thisunit
may not respond to all operating commands.
THISISNOTADEFECT.Please refertothe
instructionsaccompanyingthespecicDVDin
questionformoreinformationabouttheoptions
availableonthatDVD.
mayappearonthescreenduringoperation.
It means that the desired operation is not
permittedbytheunitordisc.
PLAYING PICTURE FILE DISC
PRoGRAmmAbLE mEmoRY
REPEAT PLAYbACK
ThisunitcanplaypicturelesrecordedonCD-RandCD-RWdiscs.
Playing a Picture File Disc
1. Openthediscdoor.
2. Placeapicturelediscontothetraywithlabelsideup.
3.Closethediscdoor.
4.The unit will load the disc and automatically display the
contentsofthedisconthescreen,whileplayingthebeginning
oftherstpicturele.Theseleswillthenbeplayedbackone
byone.Iftheunitdoesnotautomaticallystartplaying,press
the PLAY button.
5. Press or buttontoselectapictureletoview.
6. Press the , , or CURSORbuttontoviewandselect
thelesthatyouwanttoview,thenpresstheOKbuttontoconrmtheselectedle.
NOTE:
• Youcanpressthe PAUSEbuttontointerruptplayback,andpressthe PLAY button to resume
playback.
• Duringplayback,pressthe / buttonrepeatedlytorotatethepicture.Press torotatepicture
anti-clockwiseby90°.Press torotatepictureclockwiseby90°.
LoCATING A DESIRED SECTIoN
CUSTomIZING THE FUNCTIoN SETTINGS
B. CONNECTING TO A DISPLAY (Using a
HDMI cable)
ForTVs that suppor t it, HDMI can provide the
bestqualityaudio and video output (depending
on media source), and so is the preferred
connection type.The HDMI cable incorporates
both audio and video signals, so you will have
justonecable runningfromtheunit to yourTV.
Using the HDMI cable (not included), connect
theHDMIOUTjackonyourunittotheHDMIIN
jackonyourTVorHDMI-compatibledisplay.
• WhenusingtheHDMIcable,donotconnect
tootheranalogvideooutputs.
• Setan outputsignalfromtheHDMIterminal
of the DVD player in accordance with your
TV’sinputsignal
• WhenusingHDMIcable,settheHDMIAudio
toPCM.
• PresstheHDMIbuttonontheremotecontrol
tochangeoutputsignalsasbelow:
480p(progressive)
720p(progressive)
1080I(interlace)
1080p(progressive)
Notes:
• Refertoyourowner’smanualtotheconnected
TVaswell.
• WhenyouconnecttheDVDplayertoyourTV,
besuretoturnoffthepowerandunplugboth
unitsfromthewall outlet beforemakingany
connections.
• If you have a HDMI (with HDCP) equipped
monitoror display,youcanconnectitto this
playerusingaHDMIcable.
HDMI, the HDMI logo and High-Definition Multimedia
Interface are trademarks or registered trademarks of
HDMI licensing LLC.
CONNECTING TO OPTIONAL EQUIPMENT (AMPLIFIER)
DRC279RE
Amplifier of
stereo system, etc.
AUDIO IN
ANALOGUE CONNECTION
red
white
Audio cable
(red and white)
DRC279RE
Audio equipment with
digital audio input jack
DIGITAL
AUDIO IN
DIGITAL CONNECTION
Coaxial Digital
Audio cable
A.ANALOGUECONNECTION
Usinganaudio/videocable,connecttheleft/right
AUDIOOUT jackonyour unit totheAUDIOIN
jackonyourothersource.
B.DIGITALCONNECTION
Usingacoaxialdigitalaudiocable(notincluded),
connect the DIGITAL COAXIAL OUT jack on
yourunittotheDIGITALAUDIOINjackonyour
othersource.
Notes:
• Whenyouconnecttheunittootherequipment,besuretoturnoffthepowerandunplugallofthe
equipmentfromthewalloutletbeforemakinganyconnections.
• Iftheexternalequipmentistelevisionandthisaudiosystemisclosetoit,youmayexperiencethe
interferenceifthetunerfunctionisselectedwhilethetelevisionisworking.
• Refertotheinstructionmanualoftheconnectedequipmentaswell.
Use Default Settings
1. PresstheSETUPbutton.
2. Press the / buttontoselectMisc.
3. Press the button, then select“Use Default
Settings”dialogueboxandpressOKbutton.
4. Press the / buttontoselect“Yes”. Press
the OK button and the original setting will be
restored.The unit will exit the default setting
menuautomaticallyandre-loadthediscinthe
disctray.
Note: It will take3-5 seconds to reset the DVD
playertothefactorydefault.
1/2 1/4 1/6 1/8
Filter
Repeat : Off
Mode : Normal
Search
Title
Chapter
Time
1
- - -
00. 00. 00
Search
Track
Time
Disc Time
2
00. 00. 00
-- : -- : --
Elapsed time
Remaining time
e.g.
Title number
Chapter
number
PLAY moDES FoR CD oR JPG DISC
WhenplayingCD/JPGdiscs,youcanmodifythePlayModesthroughtheToolkitwhichappearson
thepicture on thescreen.Pressthe / buttonto navigatebetweenthe windowsandthe /
buttontoselectles/tracksorplaymodeitems.ThenpresstheENTERbutton.
1. PresstheCursorbuttons( , , , )toselect“Editmode”thenpresstheENTERbutton.
2. Use the Cursor buttons ( , , , ) to select tracks/les shown on the left hand side of the
window.PresstheENTERbuttontoconrmtheselectedtracks/les.“ “ will appear in front of the
selectedtracks/les.
3. Select“Addtoprogram”, thenpresstheENTER button.“ “ will disappear fromthescreen.It
meansthatthetracks/lesyouhaveselectedareaddedintothe“Programview”.
4. Select“Programview”to viewprogrammedles.Toadd more les by“Browserview”followthe
steps.
5. Press the PLAYbuttontostarttheprogramplayback.
TheToolkithasthefollowingplaymodeitems:
• Repeat(Off/Track/All):
Off:Resumesnormalplayback.
Track:Repeatsthecurrenttrack/le.
All:Repeatsalllesonthecurrentfolderoralltracksonthedisc.
• Mode(Normal/Shufe/Musicintro):
Normal:Resumesnormalplayback.
Shufe:Playsbacktracks/lesinrandomorder.
Music intro (for Audio CD only): Only plays back the rst 10
secondsofallthetracksonthecurrentfolder/disc.
• Editmode:Programoperationworksonlywhen“Editmode”isselected.
• Programview:Toviewtracks/lesinthe“Programview”list.Itisdisabledwhenthe“Programview”
list is empty.
• Addto program:Add les/tracksto the“Program view”list.It isdisabledifthe“Edit mode”is not
selected.
• Browserview:Toviewles/tracksintheoriginalviewlist.
• Clearprogram:Deletetheles/tracksinthe“Programview”list.
Selectale/trackormoreyouwanttodeleteincompletestopmode(pressthe STOPbuttontwice).
Usethe Cursorbuttons( , , , )toselect tracks/lesyouwantto delete,a“ ” will appear
besidethedeletedle/track.Select“Clearprogram”andthenpresstheENTERbutton.Itisdisabled
ifthe“Editmode”isnotselected.
Note:Theprogramwillbedeletedifthediscdoorisopened,orselectedlesaredeletedbyselecting
“Clearprogram”.
Language
1. PresstheSETUPbutton.
2. Press the buttontoselectLanguage.
3. Press the OK button, then the / button to
shiftandchangetheLanguage.
4. Press the OK button.
5. PresstheSETUPbuttontoexitthemenu.
Subtitle
1. PresstheSETUPbutton.
2. Press the button, then the / button to
selectSubtitle.
3. Press the OK button, then the / button to
shiftandchangetheLanguage.
4. Press the OK button.
5. PresstheSETUPbuttontoexitthemenu.
Note:
•Some DVDsmaybesetto displaysubtitlesin
a different language other than the ones you
selected. A prior subtitle language may be
programmedonthedisc.
• Some DVDs allow you to change subtitle
selectionsusing the disc menu only. If this is
thecase,presstheMENUbuttonandchoose
the appropriate subtitle language from the
selectiononthediscmenu.
Audio
1. PresstheSETUPbutton.
2. Press the button, then the / button to
selectAudio.
3. Press the OK button, then the / button
until your preferred Audio is displayed.
4. Press the OK button.
5. PresstheSETUPbuttontoexitthemenu.
Note:
• Some DVDs may not be played in the
languageyou selected.A priorlanguagemay
beprogrammedonthedisc.
DVD Menu
1. PresstheSETUPbutton.
2. Press the button, then the / button to
selectDVDMenu.
3. Press the OK button, then the / button
until your preferred DVD Menu language is
displayed.
4. Press the OK button.
5. PresstheSETUPbuttontoexitthemenu.
Note:
• SomeDVDsmaynotincludeyourpre-selected
language. In this case, the DVD player
automatically displays disc menus consistent
withthedisc’sinitiallanguagesetting.
Aspect Ratio
1. PresstheSETUPbutton.
2. Press the / buttontoselectVideo.
3. Press the button, then the / button to
selectAspectRatio.
4. Press the OK button, then the / button to
shiftandchangetheaspectratio.
5. Press the OK button.
6. PresstheSETUPbuttontoexitthemenu.
Note:
• The displayable picture size is preset on the
DVD.Therefore,the playbackpictureof some
DVDsmaynotconformtothepicturesizeyou
select.
• When you play DVDs recorded in the 4:3
picture size only, the playback picture always
appears in the 4:3 picture size regardless of
theAspectRatiosetting.
• Select16:9toconform to the LCD screenon
theunit.AlwaysbesurethatyourAspectRatio
conformstotheactualTVinuseifyouconnect
theunittoaTV.
View Mode
1. PresstheSETUPbutton.
2. Press the / buttontoselectVideo.
3. Press the button, then the / button to
selectViewMode.
4. Press the OK button, then the / button to
shiftandchangetheViewMode.
5. Press the OK button.
6. PresstheSETUPbuttontoexitthemenu.
Fill: Fillthescreenwithdecodedimage.
Original: Display image as it original size.
“Original” is preferred for Jpeg
viewing.
HeightFit: Fit the screen height with image
height.
WidthFit: Fitthescreenwidthwithimagewidth.
AutoFit: Automatically t the decoded image
onscreenwithoutdistortion.
PanScan: Automaticallydisplaydecodedimage
onfullscreenwithoutdistortion.
Note:DependingontheDVD,youmaynotbeable
toviewthemodeasselected.
HDMI Resolution
1. PresstheSETUPbutton.
2. Press the / buttontoselectVideo.
3. Press the button, then the / button to
selectHDMIResolution.
4. Press the OK button, then the / button to
selectthe options(Auto,480p,720p,1080ior
1080p).
5. Press the OK button.
6. PresstheSETUPbuttontoexitthemenu.
Note:
Select the HDMI resolution according to the
performanceoftheconnectedTV.
JPEG Interval
1. PresstheSETUPbutton.
2. Press the / buttontoselectVideo.
3. Press the button, then the / button to
selectJPEGInterval.
4. Press the OK button, then the / button to
shiftandchangeJPEGinterval.
5. Press the OK button.
6. PresstheSETUPbuttontoexitthemenu.
Off: Playsbackoneleatatime.
5seconds Playsback images intheformofa
slideshowat5secondsinterval.
10seconds Playsback images intheformofa
slideshowat10secondsinterval.
15seconds Playsback images intheformofa
slideshowat15secondsinterval.
Digital Output
1. PresstheSETUPbutton.
2. Press the / buttontoselectAudio.
3. Press the button, then press the /
buttontoselectDigitalOutput.
4. Press the OK button, then press the /
buttontoselect the output sound format (Off,
PCMorRaw).
5. Press the OK button.
6. PresstheSETUPbuttontoexitthemenu.
PCM: SelectwhenconnectedtoaMulti-channel
digitalstereoamplier.
Raw: Discaudiorawdatawillbeoutput.
Off: TodisableDigitalOutput.
Note:IfyouconnectedtoaTVusingHDMI,make
suretoselect“PCM”.
Night Mode
1. PresstheSETUPbutton.
2. Press the / buttontoselectAudio.
3. Press the button, then press the /
buttontoselectNightMode.
4. Press the OK button, then press the /
buttontochangetheOn/Offmode.
5. Press the OK button.
6. PresstheSETUPbuttontoexitthemenu.
Note: Night mode is Dynamic Range Control
(DRC)optionforanalogaudiooutput.
Language
Video
Audio
Misc
- 5- - 6- - 7- - 8-
DRC279REENGIB.indd1 4/9/200910:30:47

1. OPEN/CLOSE Button
Presstoopenorclosethedisctray.
2. STANDBY/ON Button
Press to turn on the unit or put it in standby
mode
3. AUDIO Button
Press to select one of the audio sound
tracksprogrammed on aDVDor to select
theaudiooutputmodeonanaudioCD.
4. ANGLE Button
Press to switch the camera angle of the
video presentation when scenes with
multiplecamera angles arerecordedona
DVD.
5. MEMORY Button
Presstocreateprograms.
6. DISPLAY Button
Press to change disc status information
displayedontheTVscreen.
7. SETUP Button
PresstoopenandclosetheSETUPmenu
screen
8. CURSOR ( , , , ) Button
Press to highlight selections on a menu
screenandadjustcertainsettings.
OK Button
Press to conrm selections on a menu
screen.
9. CLEAR Button
Clear input selections and cancel certain
playbackfunctions.
10. PLAY Button
Presstostartplayback.
11. STOP Button
Presstostopplayback.
12. SEARCH Button
Fastreverseplayback.
13. REV Button
Press to move backwards through titles,
chaptersortracksonadisc.
14. Number (0-9) Buttons
15. A-B REPEAT Button
Press to perform point-to-point repeat
playbackonaDVDorCD.
16. GOTO Button
Pressto skipdirectlytoa speciclocation
on a DVD.
17. SUBTITLE Button
Presstoselectoneofthesubtitlelanguages
programmedonaDVD.
18. ZOOM Button
Zoominanimage.
19. RETURN Button
20. TITLE Button
Presstoopenthetitlemenuscreen.
21. MENU Button
PresstoopenandclosetheDVD’smenu.
22. HDMI Button
Presstochangethevideooutputsignalsin
stop mode.
23. PAUSE Button
Presstopauseplayback.
24. SEARCH Button
Fastforwardplayback.
25. NEXT Button
Press to move forward through titles,
chaptersortracksonadisc.
26. SLOW Button
Presstoperform slowforwardplaybackof
DVDs.
27. STEP Button
Presstoadvanceframebyframe.
28. DISC REPEAT Button
Press to repeat chapter or title of a DVD.
PresstorepeatsingletrackorwholeCD.
1. Readtheseinstructions.
2. Keeptheseinstructions.
3. Heedallwarnings.
4. Followallinstructions.
5. Do not use this apparatus near water.
6. Cleanonlywithadrycloth.
7. Do not block any of the ventilation
openings. Install in accordance with the
manufacturer’sinstructions.
8. Donot install nearanyheatsources such
as radiators, heat registers, stoves, or
other apparatus (including ampliers) that
produceheat.
9. Do not defeat the safety purpose of the
polarized or grounding - type plug. A
polarized plug has two blades with one
wider than the other. A grounding type
plughas twobladesandathirdgrounding
prong.Thewidebladeorthethirdprongis
providedforyoursafety.Whentheprovided
plugdoesnottintoyourACpoweroutlet,
consultanelectricianforreplacementofthe
obsolete outlet.
10. Protect the AC power cord from being
walkedonorpinchedparticularlyatplugs,
convenience receptacles, and the point
where they exit from the apparatus.
11. Only use attachments/accessories
speciedbythemanufacturer.
12. Useonlywithacart,stand,tripod,bracket,
or table specied by the manufacturer, or
sold with the apparatus. When a cart is
used, use caution when moving the cart/
apparatuscombinationtoavoidinjuryfrom
tip-over.
13. Unplug this apparatus during lightning
stormsorwhenunusedforlongperiodsof
time.
14. Refer all servicing to qualied service
personnel. Servicing is required when
the apparatus has been damaged in any
way,suchastheACpowercordor plugis
damaged,liquidhasspilledorobjectshave
fallen into the apparatus, the apparatus has
been exposed to rain or moisture, does not
operate normally, or has been dropped.
IMPORTANT SAFETY
INSTRUCTIONS
DISC FoRmATS
Region Management Information
This unit is designed and manufactured to
respondtotheRegionManagementInformation
thatisencodedonDVDs. If the region number
printedonthe DVDdoes not correspondtothe
region number of this unit, it cannot play that
disc.
Theregionnumberofthisunitis1.
Disc Function or Operation that is Not
Available
When the appearsonthescreen,itindicates
that the function or operation attempted is not
availableat that time.This occurs because the
DVD manufacturer determines the specic
functions of DVDs. Certain functions may not
beavailableonsomeDVDs.Besuretoreadthe
documentationprovidedwiththeDVD.
Icons Used on DVDs
Samplelcons
Note:Whenplayingbacka CD-G(Graphics)or
CDEXTRAdisc,theaudioportionwillbeplayed,
butthegraphicimageswillnotbeshown.
Title, Chapter and Tracks
• DVDs are divided into “titles” and
“chapters”. If the disc has more than one
movieonit,eachmoviewouldbeaseparate
“title”. “Chapters”aresectionsoftitles.
• Audio CDs are divided into “tracks”. A
“track”isusuallyonesongonanAudioCD.
Note:
Numbersidentifyeachtitle,chapter,andtrackon
adisc.Mostdiscshavethesenumbersrecorded
on them, but some do not.
Theunitcanplayback:
Languageselectionsforaudio
Languageselectionsforsubtitles
Screenaspectratio
Multiplecameraangles
Regioncodeindicator
SoUND SYSTEm
Dolby Digital
DolbyDigitalisatechnologydevelopedbyDolbyLaboratories.SoundtracksencodedinDolbyDigital
canreproducefromoneto5.1discretechannelsofexcellentqualityaudio.
The unit automatically recognizes the Dolby Digital bitstream and provides a downmixsuitable for
two-channellistening.AnadditionalDolbyDigitaldecoderisrequiredforreproductionofthediscrete
multi-channelsoundtracksavailableonmanyDVDs.
ManufacturedunderlicensefromDolbyLaboratories.
‘Dolby’andthedouble-DsymbolaretrademarksofDolbyLaboratories.
ACCESSoRIES
Please check and identify the supplied accessories.
•Toorderaccessoriesvisitwebsitehttp://www.RCAav.com
RemoteControl.......................................................................................................... x 1
2xAAA batteries .......................................................................................................... x 1
AVcable...................................................................................................................... x 1
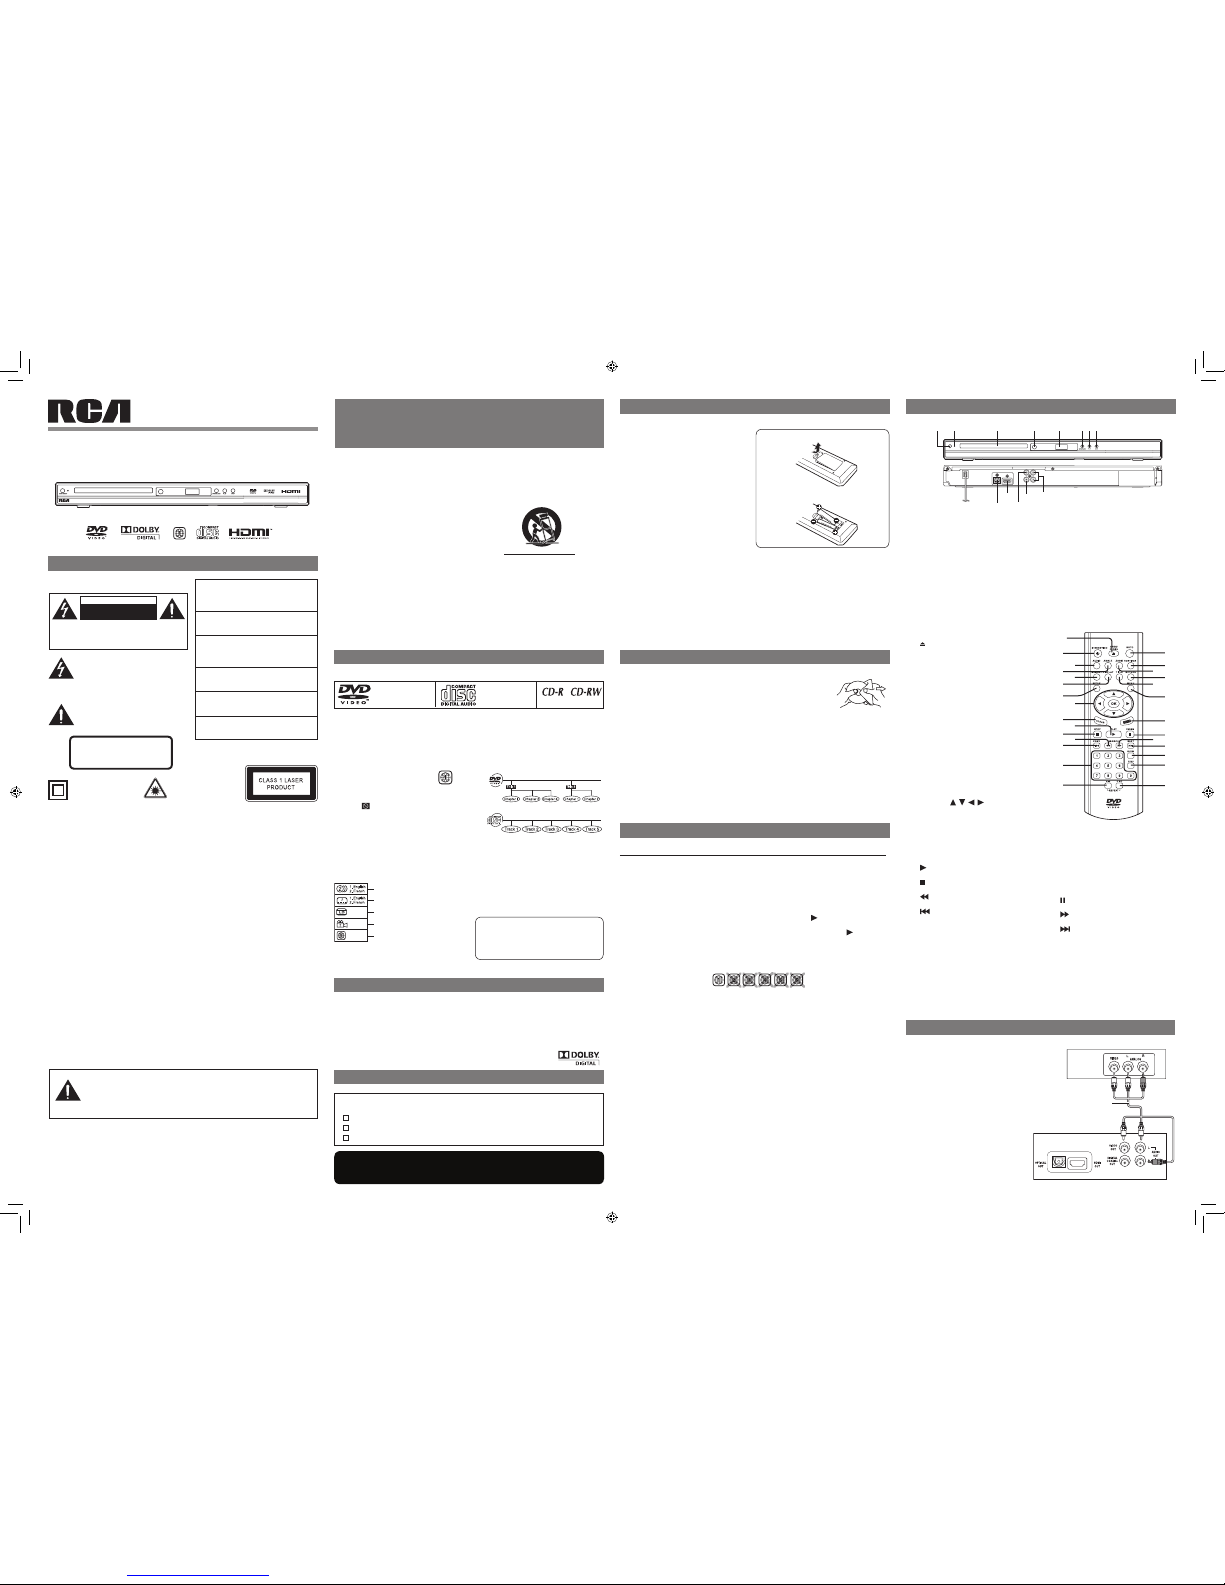
CoNTRoL REFERENCE GUIDE
Remote Control
Using the Remote Control
• Point the remote control at the REMOTE
SENSORlocatedontheunit.
• Whenusing thisunitinverybrightlight,the
infraredREMOTECONTROLSENSORmay
notworkproperly.
• The recommended effective distance
for remote operation is about 16 feet (5
meters).
Battery Replacement
Whenthebatteriesbecomeweak,theoperating
distance of the remote control will be greatly
reduced and you will need to replace the
batteries.
Notes:
• Iftheremote controlisnotgoing tobeused
for a long time, remove the batteries to
avoid damage caused by battery leakage
corrosion.
• When discarding batteries, environmental
problems must be considered and local
rulesorlawsgoverningthedisposalofthese
batteriesmustbestrictlyfollowed.
WARNING:
• Donotdisposeofthebatteryinreoritmay
explodeorleak.
• Batteries shall not be exposed to excessive
heatsuchassunshine,reorthelike.
CAUTION:
Danger of explosion if battery is incorrectly
replaced. Replace only with the same or
equivalenttype.
REmoTE CoNTRoL
DVDs
[8cm/12cmdisc]
AudioCDs
[8cm/12cmdisc] Compatible
Unit
1. STANDBY/ON Button
Turntheunitonorputitinstandbymode.
2. Power Indicator
IndicatorOn:Theunitisinstandbymode.
IndicatorOff:Theunitisturnedon.
3. DISC TRAY
Opens or closes the tray by pressing the
OPEN/CLOSEbutton.
4. REMOTE SENSOR
Receivestheremotecontrolunitsignals.
5. DISPLAY LENS
Display units information.
6. OPEN/CLOSE Button
Opensorclosesthetray.
7. PLAY Button
Startsorresumesplaybackofadisc.
8. STOP Button
Stopplayingadisc.
9. OPTICAL OUT jack
10. HDMI OUT jack
11. VIDEO OUT jack
12. DIGITAL COAXIAL OUT jack
13. LEFT/RIGHT AUDIO OUT jacks
SYMPTOM CAUSE (AND REMEDY)
• EnsuretheACpowercordisconnected.
• Theunitisnotturnedon.
• Removeanyobstaclesbetweentheremoteandtheunit
• Usetheremoteneartheunit.
• Pointtheremoteattheremotesensorontheunit.
• Replacethebatteriesintheremotewithnewone.
• MakesurethatyouselectONmode.
• The system is in pause mode. Press the PLAY button to return to
normal play mode.
• Theunitisinfast-forwardorfast-reversemode.Pressthe PLAY button
to return to normal play mode.
• MakesuretheAUDIOoutputiscorrect.
• Makesuretheaudiocableisconnectedsecurely.
• Theregionnumberofthediscdoesn’tmatch the region number of this
unit.
• TheTVisnotsettoreceiveDVDsignaloutput.
• Thevideo/HDMIcableisnotconnectedsecurely.
• TheTVisnotturnedon.
• Cleanthedisc.
• CheckconnectionbetweenHDMITVandtheunit.
• Replacethe HDMI cablewitha better one.Bad HDMI cable can cause
data lost.
• PressHDMIkeyonremotehandsetseveraltimestotoggleamongdifferent
HDOUTPUT.
• Checktheconnections.
• Theplugsand jacksaredirty.Wipethem with aclothslightly moistened
withalcohol.
• Cleanthedisc.
• Thereisnodiscinside.(“NoDisc”appearsonthescreen).
• Insertthedisccorrectlywiththeplaybacksidefacingdown.
• Cleanthedisc.
• Theunitanddiscregionnumberareincompatible.
• Condensationmayhaveformedinsidetheunitduetoasuddenchangein
temperature.Waitaboutanhourforittoclearandtryagain.
• Resettheunit,presstheSTANDBY/ONbuttontoturnofftheunit,waitfor
afewseconds,thenrestarttheunit.
No power.
The remote control
doesnotfunction.
No sound or only a
verylow-levelsound
is heard.
No picture or
abnormalcolor.
No output on your
HDMITV.
Severehumornoise
is heard.
The disc does not
play.
The DVD door
cannotopen.
TRoUbLESHooTING GUIDE
SAFETY PRECAUTIoNS
The lightning ash with an arrowhead
symbol, within the equilateral triangle, is
intendedtoalerttheusertothepresenceof
uninsulated “dangerous voltage” within the
product’senclosurethatmaybeofsufcient
magnitudetocauseanelectricshock.
Theexclamation pointwithinthe equilateral
triangle is intended to alert the user to
the presence of important operating and
maintenance (servicing) instructions in this
user manual.
CAUTION
INVISIBLE LASER RADIATION WHEN
OPEN AND INTERLOCKS DEFEATED.
AVOID EXPOSURE TO BEAM.
THIS CLASS B DIGITAL APPARATUS
COMPLIES WITH CANADIAN ICES-003.
On Placement
• Do not use the unit in places that are
extremelyhot,cold,dusty,orhumid.
• The ventilation should not be impeded by
covering the ventilation openings with items
such as newspaper, table-cloths, curtains,
etc.
On Safety
• When connecting or disconnecting the AC
power cord, grip the plug and not the cord
itself. Pulling the cord may damage it and
createahazard.
• Whenyouare notgoingtousetheunitfora
longperiodoftime,disconnecttheACpower
cord.
• No naked ame sources such as lighted
candles should be placed on the AC power
cordandtheunit.
• Leave a minimum of 10 cm around the
apparatusforventilation.
• Attentionshouldbedrawntotheenvironmental
aspectsofbatterydisposal.
• Useofapparatusinmoderateclimates.
On Condensation
• Whenleftinaheatedroomwhereit iswarm
and damp, water droplets or condensation
may form inside the unit. When there is
condensation inside the unit, the unit may
not function normally. Let the unit stand for
1to 2 hoursbeforeturning thepoweron, or
graduallyheattheroomandlettheunitdry
before use.
Rating Plate Location
• Theratingplateislocatedonthebackofunit.
FCC Statements
NOTE: This equipment has been tested and
found to comply with the limits for a Class
B digital device, pursuant to Part 15 of the
FCC Rules. These limits are designed to
provide reasonable protection against harmful
interference in a residential installation. This
equipmentgenerates,usesandcanradiateradio
frequencyenergy and, ifnotinstalled andused
inaccordancewiththeinstructions,maycause
harmful interference to radio communications.
However,thereisnoguaranteethatinterference
will not occur in a particular installation. If this
equipment does cause harmful interference
to radio or television reception, which can be
determined by turning the equipment off and
on,theuser is encouragedtotrytocorrect the
interference by one or more of the following
measures:
– Reorientorrelocatethereceivingantenna.
– Increase the separation between the
equipmentandreceiver.
– Connect the equipment into an outlet on a
circuitdifferentfromthattowhichthereceiver
isconnected.
– Consult the dealer or an experienced radio/
TVtechnicianforhelp.
Shielded cables must be used with this unit to
ensurecompliancewiththeClassFCClimits.
Warning: Changesormodicationstothisunit
notexpresslyapprovedbythepartyresponsible
forcompliancecouldvoidtheuser’sauthorityto
operatetheequipment.
• Shouldanytroubleoccur,disconnecttheACpowercordand referservicingtoa
qualiedtechnician.
• Mainplugis usedasthedisconnect device,it shallremainreadilyoperableand
shouldnotbeobstructedduringintendeduse.Tobecompletelydisconnectedthe
apparatusfromsupplymains,themainplugoftheapparatusshallbedisconnected
fromthemainssocketoutletcompletely.
WARNING
Notes on Copyright
Itisforbiddenby lawtocopy, broadcast, show,
broadcast on cable, play in public, or rent
copyrightedmaterialwithoutpermission.
ApparatusClaimsofU.S.PatentNos.6,836,549;
6,381,747;7,050,698;6,516,132;and5,583,936
licensedforlimitedviewingusesonly.
This product incorporates copyright protection
technology that is protected by U.S. patents
and other intellectual property rights. Use of
this copyright protection technology must be
authorized by Macrovision, and is intended for
homeandotherlimitedviewingusesonlyunless
otherwise authorized by Macrovision. Reverse
engineeringordisassemblyisprohibited.
Thisproduct
containsalowpower
laserdevice.
User manual
DRC279RE
Notes on Unauthorized Discs
You may not be able to play some DVDs on
thisunit,particularlyifthey werepurchased
fromoutsideyourgeographic areaormade
for business purposes.
mAINTENANCE
Cleaning the Disc
A defective or soiled disc inserted into the unit can cause sound to drop out
duringplayback.Handlethediscbyholdingitsinnerandouteredges.
• DoNOTtouchthesurfaceoftheunlabeledsideofthedisc.
• DoNOTstickpaperortapeonthesurface.
• DoNOTexposethedisctodirectsunlightorexcessiveheat.
• Cleanthediscbeforeplayback.Wipethediscfromthecenteroutwardwitha
cleaningcloth.
• NEVERusesolventssuchasbenzineoralcoholtocleanthedisc.
• Do NOT use irregular shaped discs (example: hear t shaped, octagonal, etc.). Theymay cause
malfunctions.
Cleaning the Unit
• BesuretoturntheunitoffanddisconnecttheACpowercordbeforemaintainingtheunit.
• Wipetheunitwithadrysoftcloth.Ifthesurfacesareextremelydirty,wipecleanwithacloththat
hasbeendippedinaweaksoap-and-watersolutionandwrungoutthoroughly,thenwipewithadry
cloth.
• Neverusealcohol,benzine,thinner,cleaninguidorotherchemicals.DoNOTusecompressedair
toremovedust.
Important Note
Beforetransportingtheunit,removethediscfromthedisccompartment.
CAUTION
RISK OF ELECTRIC SHOCK
DO NOT OPEN
CAUTION:TOREDUCETHERISKOFELECTRICSHOCK,DO
NOTREMOVECOVER (ORBACK).NO USER-SERVICEABLE
PARTSINSIDE.REFERSERVICINGTOQUALIFIEDSERVICE
PERSONNEL.
WARNING: THE APPARATUS SHALL NOT BE
EXPOSED TO DRIPPING OR SPLASHING AND
THATNOOBJECTSFILLEDWITHLIQUIDS,SUCH
ASVASES,SHALLBEPLACEDONAPPARATUS.
WARNING: TO REDUCE THE RISK OF FIRE
OR ELECTRIC SHOCK, DO NOT EXPOSE THE
APPLIANCETORAINORMOISTURE.
CAUTION:USEOFCONTROLSORADJUSTMENTS
OR PERFORMANCE OF PROCEDURES OTHER
THAN THOSE SPECIFIED MAY RESULT IN
HAZARDOUSRADIATIONEXPOSURE.
CAUTION: DANGEROFEXPLOSIONIFBATTERY
IS INCORRECTLY REPLACED. REPLACE ONLY
WITHTHESAMEOREQUIVALENTTYPE.
CAUTION: TO REDUCE THE RISK OF FIRE,
DO NOT PLACE ANY HEATING OR COOKING
APPARATUSBENEATHTHISUNIT.
CAUTION: TO PREVENT ELECTRIC SHOCK,
MATCHWIDEBLADEOFPLUGTOWIDESLOTOF
POWEROUTLET,THENFULLYINSERT.
ThesymbolforClass
II(DoubleInsulation)
Caution Marking and rating plate was located at
rear enclosure of the apparatus.
Portable Cart Warning
2. InserttwoAAAsizebatteries.
1. Open the battery door.
To Change Remote Batteries
1
16
17
19
21
22
23
25
24
20
18
26
27
28
2
4
6
7
9
11
13 12
10
8
5
3
14
15
13245678
To wall outlet 9
10 12 13
11
SETUP AND CoNNECTIoNS
CONNECTING TO A TV
TheunitcanbeconnectedtoyourTVinseveraldifferent
ways,dependingonthedesignofyourTV.
Note: Use only one of the below listed connection
methodforconnectingtoyourTV.
A. RCA AUDIO/VIDEO JACKS
Use the Audio/Video cable (supplied). Connect the
VIDEOOUTandleft/rightAUDIOOUTjacksontheunit
totheVIDEOINand left/right AUDIOINjacks onyour
T V.
TV
red
white
yellow
AV cable
DRC279RE
Itisimportanttoreadthisinstructionpriortousingyournewproductforthersttime.
Need more help?
Please visit online help at www.RCAav.com
Specicationsandexternalappearancearesubjecttochangewithoutnotice.
PrintedinChina 811-727991W011
- 1- - 2- - 3- - 4-
DRC279REENGIB.indd2 4/9/200910:30:52
Other RCA DVD Player manuals

RCA
RCA Scenium DRS720N User manual

RCA
RCA DRC277A Instruction Manual

RCA
RCA DRC69705 - Dual Screen Portable DVD Player User manual

RCA
RCA DRC480N User manual

RCA
RCA DRC282 User manual

RCA
RCA DRC225N User manual

RCA
RCA DRC69705 - Dual Screen Portable DVD Player User manual

RCA
RCA DRC8335 - DVD Recorder & VCR Combo User manual

RCA
RCA RTD120 - DVD Home Theater System User manual

RCA
RCA DRC212N User manual