RCA DRC300iH User manual

For TVs that support it, HDMI can provide
the best quality audio and video output
(depending on media source), and so is the
preferred connection type. The HDMI cable
incorporates both audio and video signals, so
you will have just one cable running from the
unit to your TV.
Using an HDMI cable (not included), connect
the HDMI OUT jack on your unit to the HDMI
IN jack on your TV or HDMI-compatible
display.
• Settheoutput resolution(usingthe HDMI
button on the remote control) to match the
maximum resolution of your TV.
•
When using HDMI connection to HDMI TV,
please set the DIGITAL AUDIO under Audio
SetupmenutobePCM(STEREO).
• PresstheHDMIbuttonontheremotecontrol
to change output signals as below:
480P(progressive)
720P(progressive)
1080i (interlace)
1080P(progressive)
Notes:
• Refer to your TV Owner’s Manual to the
determine the maximum resolution your TV
can support. If the picture quality or colors
on TV appear distorted, you may have set
the output resolution on the DVD player to
too high a value.
• Whenyou connectthe DVD playerto your
TV, be sure to turn off the power and unplug
both units from the wall outlet before making
any connections.
• Ifyou haveaHDMI(withHDCP) equipped
monitor or display, you can connect it to this
player using an HDMI cable.
A.ANALOGCONNECTION
Using an audio cable (not included), connect
the left/right AUDIO OUT jack on your unit to
the AUDIO IN jack on your other source.
B.DIGITALCONNECTION(preferred)
Using a coaxial digital audio cable (not
included), connect the DIGITAL AUDIO OUT
jack on your unit to the DIGITAL AUDIO IN
jack on your other source.
1. OPEN/CLOSEButton
Presstoopenorclosethedisctray.
2. STANDBY/ONButton
Press to turn on the unit or put it in
standby mode
3. AUDIO Button
Press to select one of the audio sound
tracks programmed on a DVD or to select
theaudiooutputmodeonanaudioCD.
4. ANGLEButton
Presstoswitchthecamera angleofthe
video presentation when scenes with
multiple camera angles are recorded on
a DVD.
5. MEMORYButton
Presstocreateprograms.
6. DISPLAYButton
Pressto change discstatus information
displayed on the TV screen.
7. SETUPButton
Press to open and close the SETUP
menu screen
8. CURSOR( , , , ) Button
Pressto highlightselectionson amenu
screen and adjust certain settings.
OK Button
Press to conrm selections on a menu
screen.
9. CLEARButton
Clearinputselectionsandcancelcertain
playback functions.
PresstoselectiPod’s“RemoteUImode”
or“ExtendedInterfacemode”.
10. PLAYButton
Presstostartplayback.
11. STOPButton
Presstostopplayback.
12. SEARCHButton
Fast reverse playback.
13. REVButton
Presstomovebackwardsthroughtitles,
chapters or tracks on a disc.
14. Number (0-9) Buttons
15. A-BREPEATButton
Press to perform point-to-point repeat
playbackonaDVDorCD.
16. SOURCEButton
Selectsinputsources.
17. SUBTITLEButton
Press to select one of the subtitle
languages programmed on a DVD.
18. ZOOM Button
Zoom in an image.
19. RETURNButton
Press to return to the normal operation
afterusingtheSETUPbutton.
Pressto return totheprevious menu in
iPod/iPhonemode.
20. TITLEButton
Presstoopenthetitlemenuscreen.
21. MENUButton
PresstoopenorclosetheDVD’smenu.
22. HDMI Button
Pressonce to viewcurrentHDMI output
resolution. Press repeatedly to change
resolution (480P, 720P, 1080i, or
1080P).
23. PAUSEButton
Press to pause playback, frame
advance.
24. SEARCHButton
Fast forward playback.
25. NEXTButton
Press to move forward through titles,
chapters or tracks on a disc.
26. SLOWButton
Pressto performslow forwardplayback
of DVDs.
27. GOTO Button
Presstoskipdirectlytoaspeciclocation
on a DVD.
28. DISCREPEATButton
PresstorepeatchapterortitleofaDVD.
Press to repeat single track or whole
CD.
Presstorepeatsongs/albumsfromyour
iPod/iPhone.
1. Readtheseinstructions.
2. Keep these instructions.
3. Heed all warnings.
4. Follow all instructions.
5. Do not use this apparatus near water.
6. Cleanonlywithadrycloth.
7. Do not block any of the ventilation
openings. Install in accordance with the
manufacturer’sinstructions.
8. Do not install near any heat sources
such as radiators, heat registers, stoves,
orotherapparatus(includingampliers)
that produce heat.
9. Do not defeat the safety purpose of the
polarized or grounding - type plug. A
polarized plug has two blades with one
wider than the other. A grounding type
plug has two blades and a third grounding
prong. The wide blade or the third prong
is provided for your safety. When the
provided plug does not t into your AC
power outlet, consult an electrician for
replacement of the obsolete outlet.
10. Protect the AC power cord from being
walked on or pinched particularly at
plugs, convenience receptacles, and
the point where they exit from the
apparatus.
11. Only use attachments/accessories
speciedbythemanufacturer.
12. Use only with a cart, stand, tripod,
bracket, or table specied by the
manufacturer, or sold with the apparatus.
When a cart is used, use caution when
moving the cart/apparatus combination
to avoid injury from tip-over.
13. Unplug this apparatus during lightning
storms or when unused for long periods
of time.
14. Refer all servicing to qualied service
personnel. Servicing is required when
the apparatus has been damaged in
anyway,suchasthe ACpower cordor
plug is damaged, liquid has spilled or
objects have fallen into the apparatus,
the apparatus has been exposed to rain
or moisture, does not operate normally,
or has been dropped.
IMPORTANT SAFETY
INSTRUCTIONS
DISC FORMATS
Region Management Information
This unit is designed and manufactured
to respond to the Region Management
Information that is encoded on DVDs. If the
region number printed on the DVD does not
correspond to the region number of this unit, it
cannot play that disc.
The region number of this unit is 1.
Disc Function or Operation that is Not
Available
When the appears on the screen, it
indicates that the function or operation
attempted is not available at that time. This
occurs because the DVD manufacturer
determines the specic functions of DVDs.
Certain functions may not be available
on some DVDs. Be sure to read the
documentation provided with the DVD.
Icons Used on DVDs
Samplelcons
Note:When playingbackaCD-G(Graphics)
orCD EXTRA disc,theaudio portion willbe
played, but the graphic images will not be
shown.
Title, Chapter and Tracks
• DVDs are divided into “titles” and
“chapters”. If the disc has more than
one movie on it, each movie would be a
separate“title”. “Chapters”are sectionsof
titles.
• Audio CDs are divided into “tracks”. A
“track” is usually one song on an Audio
CD.
Note:
Numbers identify each title, chapter, and track
on a disc. Most discs have these numbers
recorded on them, but some do not.
The unit can playback:
SOUND SYSTEM
Dolby Digital
DolbyDigitalisatechnologydevelopedbyDolbyLaboratories.SoundtracksencodedinDolby
Digital can reproduce from one to 5.1 discrete channels of excellent quality audio.
The unit automatically recognizes the Dolby Digital bitstream and provides a downmix suitable
for two-channel listening. An additional Dolby Digital decoder is required for reproduction of the
discrete multi-channel soundtracks available on many DVDs.
Manufactured under license from Dolby Laboratories.
‘Dolby’andthedouble-DsymbolaretrademarksofDolbyLaboratories.
ACCESSORIES
Pleasecheckandidentifythesuppliedaccessories.
RemoteControl(withbatteries)................................................................................. x 1
Audio/Video cable ...................................................................................................... x 1
CONTROL REFERENCE GUIDE SETUP AND CONNECTIONS
Remote Control
Using the Remote Control
• Pointtheremote control at the REMOTE
SENSORlocatedontheunit.
• Whenusingthisunitinverybrightlight,the
infrared REMOTE CONTROL SENSOR
may not work properly.
• The recommended operating range for
remote operation is about 16 feet (5
meters).
Battery Replacement
When the batteries become weak, the
operating distance of the remote control
will be greatly reduced and you will need to
replace the batteries.
Notes:
• Iftheremotecontrolisnotgoingtobeused
for a long time, remove the batteries to
avoid damage caused by battery leakage
corrosion.
• Whendiscardingbatteries,environmental
problems must be considered and local
rules or laws governing the disposal of
these batteries must be strictly followed.
• Do not mix old and new batteries. Do
not mix ALKALINE, standard (CARBON-
ZINC), or rechargeable (Ni-Cd, Ni-MH,
etc.) batteries.
WARNING:
• Donot dispose of the battery in re or it
may explode or leak.
• Batteriesshallnotbeexposedtoexcessive
heatsuchassunshine,reorthelike.
CAUTION:
Danger of explosion if battery is incorrectly
replaced. Replace only with the same or
equivalent type.
REMOTE CONTROL
DVDs
[8cm/12cm disc]
AudioCDs
[8cm/12cm disc] Compatible
Unit
1
16
17
19
21
22
23
25
24
20
18
26
27
28
2
4
6
7
9
11
13 12
10
8
5
3
14
15
1. DISCTRAY
Opens or closes the tray by pressing the
OPEN/CLOSEbutton.
2. REMOTESENSOR
Receivestheremotecontrolunitsignals.
3. DISPLAYWINDOW
Display units information.
4. PowerIndicator
Indicator On: The unit is in standby mode.
Indicator Off: The unit is turned on.
5. ON/STANDBYButton
Turn the unit on or put it in standby mode.
6. OPEN/CLOSEButton
Opens or closes the tray.
7. PLAYButton
Startsorresumesplaybackofadisc.
8. STOPButton
Stopplayingadisc.
9. iPod/iPhonedockdoor
Push once & slide out the iPod/iPhone
dock.
10. COMPOSITEVIDEOOUTjack
11. HDMI OUT jack
12. S-VIDEOOUTjack
13. AUDIOOUT(L/R)jacks
14. COAXIALDIGITALAUDIOOUTjack
15. COMPONENTVIDEOOUTjacks
(Y,Pb&Pr)
SYMPTOM CAUSE (AND REMEDY)
TROUBLESHOOTING GUIDE
CONNECTINGTOATV
The unit can be connected to your TV in several different ways, depending on the design of your TV.
Note: Use only one of the connection methods listed below for connecting to your TV.
B. COMPONENT VIDEO OUT (DVD)
Some TVs or monitors are equipped with
component video inputs.
Using the red and white connection on an
audio cable (not included), connect the left/
right AUDIO OUT jacks on your unit to the
left/right AUDIO IN jacks on your TV.
Using a component video cable (not
included),connect the YVIDEOOUT jack
(greenplug)onyourunittotheYVIDEOIN
jackonyour TV, the Pb VIDEO OUT jack
(blueplug)onyourunittothePbVIDEOIN
jackonyourTVandthePrVIDEOOUTjack
(redplug) onyour unitto thePr VIDEOIN
jack on your TV to view the highest quality
picture playback.
SAFETY PRECAUTIONS
Thelightningash with an arrowhead
symbol, within the equilateral triangle,
is intended to alert the user to the
presence of uninsulated “dangerous
voltage”withintheproduct’senclosure
thatmay be ofsufcient magnitudeto
cause an electric shock.
The exclamation point within the
equilateral triangle is intended to alert
the user to the presence of important
operating and maintenance (servicing)
instructions in this user manual.
CAUTION
INVISIBLE LASER RADIATION WHEN
OPEN AND INTERLOCKS DEFEATED.
AVOID EXPOSURE TO BEAM. THIS CLASS B DIGITAL APPARATUS
COMPLIESWITHCANADIANICES-003.
On Placement
• Do not use the unit in places that are
extremely hot, cold, dusty, or humid.
• The ventilation should not be impeded by
covering the ventilation openings with items
such as newspaper, table-cloths, curtains,
etc.
On Safety
• Whenconnecting ordisconnecting theAC
power cord, grip the plug and not the cord
itself.Pulling the cord maydamageit and
create a hazard.
• Whenyouarenotgoingtousetheunitfor
a long period of time, disconnect the AC
power cord.
• No naked ame sources such as lighted
candlesshouldbeplacedontheACpower
cord and the unit.
• Leave a minimum of 10 cm around the
apparatus for ventilation.
• Attention should be drawn to the
environmental aspects of battery disposal.
• Useofapparatusinmoderateclimates.
On Condensation
• Whenleftinaheatedroomwhereitiswarm
and damp, water droplets or condensation
may form inside the unit. When there is
condensation inside the unit, the unit may
not function normally. Let the unit stand for
1 to 2 hours before turning the power on, or
gradually heat the room and let the unit dry
before use.
Rating Plate Location
• The rating plate is located on the rear of
unit.
FCC Statements
NOTE: This equipment has been tested and
found to comply with the limits for a Class
B digital device, pursuant to Part 15 of the
FCC Rules. These limits are designed to
provide reasonable protection against harmful
interference in a residential installation.
This equipment generates, uses and can
radiate radio frequency energy and, if not
installed and used in accordance with the
instructions, may cause harmful interference
to radio communications. However, there is
no guarantee that interference will not occur
in a particular installation. If this equipment
does cause harmful interference to radio or
television reception, which can be determined
by turning the equipment off and on, the user
is encouraged to try to correct the interference
by one or more of the following measures:
– Reorientorrelocatethereceivingantenna.
– Increase the separation between the
equipment and receiver.
– Connect the equipment into an outlet on
a circuit different from that to which the
receiver is connected.
– Consultthedealeroranexperiencedradio/
TV technician for help.
Warning: Changes or modications to this
unit not expressly approved by the party
responsible for compliance could void the
user’sauthoritytooperatetheequipment.
Notes on Copyright
It is forbidden by law to copy, broadcast,
show, broadcast on cable, play in public, or
rent copyrighted material without permission.
Apparatus Claims of U.S. Patent Nos.
6,836,549; 6,381,747; 7,050,698; 6,516,132;
and 5,583,936 licensed for limited viewing
uses only.
This product incorporates copyright protection
technology that is protected by U.S. patents
and other intellectual property rights. Use of
this copyright protection technology must be
authorized by Macrovision, and is intended
for home and other limited viewing uses only
unless otherwise authorized by Macrovision.
Reverse engineering or disassembly is
prohibited.
WARNING:
• Should any trouble occur, disconnect the
AC power cord and refer servicing to a
qualiedtechnician.
• To be completely disconnected the
apparatus from supply mains, the mains
plug of the apparatus shall be disconnected
from the mains socket outlet completely.
• Themainsplugofapparatusshouldnotbe
obstructedORshouldbe easily accessed
during intended use.
This product
contains a low
power laser device.
User manual
DRC300iH
Notes on Unauthorized Discs
Youmay not beable to playsomeDVDs
on this unit, particularly if they were
purchased from outside your geographic
area or made for business purposes.
MAINTENANCE
Cleaning the Disc
A defective or soiled disc inserted into the unit can cause sound to drop out during playback.
Handle the disc by holding its inner and outer edges.
• DoNOTtouchthesurfaceoftheunlabeledsideofthedisc.
• DoNOTstickpaperortapeonthesurface.
• DoNOTexposethedisctodirectsunlightorexcessiveheat.
• Cleanthediscbeforeplayback.Wipethediscfromthecenteroutwardwitha
cleaning cloth.
• NEVERusesolventssuchasbenzineoralcoholtocleanthedisc.
• Do NOT use irregular shaped discs (example: heart shaped, octagonal, etc.). They may
cause malfunctions.
Cleaning the Unit
• BesuretoturntheunitoffanddisconnecttheACpowercordbeforemaintainingtheunit.
• Wipetheunitwithadrysoftcloth.Ifthesurfacesareextremelydirty,wipecleanwithacloth
that has been dipped in a weak soap-and-water solution and wrung out thoroughly, then wipe
with a dry cloth.
• Never use alcohol, benzine, thinner, cleaning uid or other chemicals. Do NOT use
compressed air to remove dust.
Important Note
Before transporting the unit, remove the disc from the disc compartment.
A. RCA AUDIO/VIDEO JACKS
1. Using the red, white and yellow connection
on the AV cable (included), connect the
VIDEO OUT and left/right AUDIO OUT
jackson the unittothe VIDEOINand left/
right AUDIO IN jacks on your TV.
2. UsingaS-videocable(notincluded).S-Video
will give slightly better picture quality than a
standard(yellowRCA-type)AV connection.
Ifyour TV hasan S-Video connection,you
may prefer to use this connection.
HDMI, the HDMI logo and High-Definition Multimedia Interface are trademarks or registered
trademarks of HDMI licensing LLC.
C. CONNECTING TO A DISPLAY (Using an HDMI cable)
CONNECTING TO OPTIONAL EQUIPMENT (AMPLIFIER or HOME THEATER)
Notes:
• Whenyouconnecttheunittootherequipment,besuretoturnoffthepowerandunplugallof
the equipment from the wall outlet before making any connections.
• Iftheexternalequipmentistelevisionandthisaudiosystemisclosetoit,youmayexperience
the interference if the tuner function is selected while the television is working.
• Refertotheinstructionmanualoftheconnectedequipmentaswell.
CAUTION
RISK OF ELECTRIC SHOCK
DO NOT OPEN
CAUTION:TOREDUCE THERISKOFELECTRIC SHOCK,
DO NOT REMOVE COVER (OR BACK). NO USER-
SERVICEABLE PARTS INSIDE. REFER SERVICING TO
QUALIFIEDSERVICEPERSONNEL.
WARNING:THEAPPARATUS SHALLNOTBE
EXPOSEDTODRIPPINGORSPLASHINGAND
THAT NO OBJECTS FILLED WITH LIQUIDS,
SUCH AS VASES, SHALL BE PLACED ON
APPARATUS.
WARNING: TO REDUCE THE RISK OF FIRE
ORELECTRICSHOCK,DONOTEXPOSETHE
APPLIANCETORAINORMOISTURE.
CAUTION: Use of controls or adjustments or
performance of procedures other than those
specied may result in hazardous radiation
exposure.
CAUTION: DANGER OF EXPLOSION IF
BATTERY IS INCORRECTLY REPLACED.
REPLACE ONLY WITH THE SAME OR
EQUIVALENTTYPE.
CAUTION: TO REDUCE THE RISK OF FIRE,
DONOTPLACEANYHEATINGOR COOKING
APPARATUSBENEATHTHISUNIT.
CAUTION: TOPREVENT ELECTRICSHOCK,
MATCH WIDE BLADE OF PLUG TO WIDE
SLOT OF POWER OUTLET, THEN FULLY
INSERT.
The symbol for
Class II (Double
Insulation)
Caution Marking and rating plate was located at
rear and bottom enclosure of the apparatus.
Portable Cart Warning
2. Insert two AAA size batteries.
1. Open the battery door.
To Change Remote Batteries
12345
No power.
The remote
control does not
function.
No sound or only
a very low-level
sound is heard.
No picture or
abnormal color.
No output on your
HDMI TV.
Severe hum or
noise is heard.
The disc does not
play.
The DVD door
cannot open.
12359
6478
To wall outlet 10 11
12
13 14 15
TV
red
red white
white
Audio cable
(red and white)
S-video
cable
green
blue
red
TV
red
red
white
white
VIDEO IN
AUDIO IN
Audio cable
(red and white)
green
blue
red
Component
video cable
(green/blue/red)
Audio equipment with
digital audio input jack
DIGITAL
AUDIO IN
DIGITAL CONNECTION
Coaxial Digital
Audio cable
Need more help?
Please visit online help at www.RCAav.com
TV
red
white
yellow
red
white
yellow
AV cable
(included)
Method A (AV jacks) will give good picture quality. Method B (Component Video)
will give better picture quality. Method C (HDMI) will give best picture quality.
Amplifier of
stereo system, etc.
AUDIO IN
ANALOGUE CONNECTION
red
white
red
white
Audio cable
(red and white)
• EnsuretheACpowercordisconnected.
• Theunitisnotturnedon.
• Removeanyobstaclesbetweentheremoteandtheunit
• Usetheremoteneartheunit.
• Pointtheremoteattheremotesensorontheunit.
• Replacethebatteriesintheremotewithnewone.
• MakesurethatyouselectONmode.
• Thesystemisinpausemode.Pressthe PLAYbuttontoreturnto
normal play mode.
• Theunitis infast-forwardorfast-reversemode.Pressthe PLAY
button to return to normal play mode.
• MakesuretheAUDIOoutputiscorrect.
• Makesuretheaudiocableisconnectedsecurely.
• Theregion number ofthedisc doesn’t matchthe region numberof
this unit.
• TheTVisnotsettoreceiveDVDsignaloutput.
• Thevideo/HDMIcableisnotconnectedsecurely.
• TheTVisnotturnedon.
• Cleanthedisc.
• CheckconnectionbetweenHDMITVandtheunit.
• Replace the HDMI cable with a better one. Bad HDMI cable can
cause data lost.
• PressHDMI key onremote handsetseveraltimes totoggleamong
differentHDOUTPUT.
• Checktheconnections.
• The plugs and jacks are dirty. Wipe them with a cloth slightly
moistened with alcohol.
• Cleanthedisc.
• Thereisnodiscinside.(“NoDisc”appearsonthescreen).
• Insertthedisccorrectlywiththeplaybacksidefacingdown.
• Cleanthedisc.
• Theunitanddiscregionnumberareincompatible.
• Condensation may have formed inside the unit due to a sudden
change in temperature. Wait about an hour for it to clear and try
again.
• Resettheunit,press the STANDBY/ON button to turn off the unit,
wait for a few seconds, then restart the unit.
Language selections for audio
Language selections for subtitles
Screenaspectratio
Multiple camera angles
Regioncodeindicator
1
CD-R CD-RW
DRC300iHengib.indd1 10/6/2009 9:45:13 AM

Playing a Disc
1. PresstheSTANDBY/ONbuttontoturnontheunit.
SeeCUSTOMIZINGTHEFUNCTIONSETTINGSbeforeproceedingtostep2.
2. Pressthe OPEN/CLOSEbuttontoopenthedisctray.
3. Placeadiscontothedisctraywiththelabelsideup.
4. Pressthe OPEN/CLOSEbuttontoclosethedisctray.Ittakesashortwhileforyourunittoload
the disc. After loading, for most DVDs, the unit will automatically take you main menu or start
playing.
5. If the unit does not automatically start playing the DVD, press the PLAYbutton.
Pausing Playback (Still Mode)
Pressthe PAUSE button on the remote. Each timeyoupress the PAUSE button, the picture
advances one frame. To resume normal playback, press the PLAYbutton.
Stopping Playback
• Pressthe STOPbuttonatthespotwhereyouwantto interruptplayback.Toresumeplayback
at the spot where the disc was stopped, press the PLAYbutton.
• Ifyoupressthe STOPbuttontwice,theunit’smemorywillbeclearedandpressingthe PLAY
button will reset the disc to the beginning.
Fast Forward / Fast Reverse
1. PresstheSEARCH orSEARCH buttonwhenadiscisplaying.Eachtimeyoupressthe
SEARCH orSEARCH button, the playback speed changes in the following sequence:
2. Pressthe PLAYbuttonwhenyoureachthedesiredpointtoresumenormalplayback
Note:
• TheunitmutessoundandsubtitlesduringreverseandforwardscanofDVDs.
• Thefastplaybackspeedmaydifferdependingonthedisc.
Skipping to a Different Chapter/Title
• Pressthe PREVbuttontogobacktocurrentorpreviouschapters/tracks.
• Pressthe NEXTbuttontoadvancechapters/tracks.
• ForaudioCDs,usethenumberbuttonsontheremotecontroltojumpimmediatelytothedesired
track number.
Slow-motion Play
1. PresstheSLOWbuttonon theremoteinplay
mode.
• EachtimetheSLOWbuttonispressed,the
speed of slow-motion playback changes in
the following sequence:
2. Pressthe PLAYbuttontoreturntonormalplaybackspeed.
Audio Selection
On some DVDs, the sound is recorded in two or more formats. Follow the directions below to select
the preferred language and sound system.
1. While a disc is playing, press the AUDIO button to
show the current audio format (eg 5.1 or 2 channel).
2. PresstheAUDIObuttonrepeatedlytoselectthedesiredaudioformat.
Note:
• IfonlyoneaudioformatisrecordedontheDVD,theAUDIObuttonbecomesaninvalidkeyand
will be displayed.
• SomeDVDsallowyoutochangeaudioselectionsonlyviathediscmenu.Ifthisisthecase,press
theMENUbuttonandchoosetheappropriatelanguageonthediscmenu.
• Youcanselectdifferentaudiochannels(Stereo,MonoL,MonoRorMixMono)onanAudioCD
by pressing the AUDIO button repeatedly.
Subtitle Selection
1. Whilea DVDis playing,press theSUBTITLEbuttontodisplaythecurrent languagesetting, as
shown in the example.
2. PresstheSUBTITLEbuttonrepeatedlytoselectthe
desired subtitle language.
Note:
• SomeDVDsaresettodisplaysubtitlesautomatically,andyoucannotturnthemoffevenifyouset
the subtitle function to off.
• During some scenes, the subtitles may not appear immediately after you select your desired
scene.
• Thenumberofsubtitlelanguagesrecordeddiffersdependingonthedisc.Ifonlyonelanguageis
recorded, the language does not change.
• This function can only be used for discs on which subtitles have been recorded in multiple
languages.
• SomeDVDs allowyouto changesubtitles onlyviathe discmenu. Ifthis isthecase, pressthe
MENUbuttonandchoosetheappropriatesubtitleonthediscmenu.
Angle Selection
Some DVDs contain scenes which have been shot
from a number of different angles. For these discs,
the same scene can be viewed from each of these
different angles.
1. While you are playing a DVD with different angles
recorded, press the ANGLE button to view the
number of current angles available.
2. PresstheANGLEbuttonrepeatedly tochange the
scene to the next recorded angle.
• Afterapprox.twoseconds,playbackwillcontinuefromthenewangleyouselected.
• Ifnobutton is pressed within 10 seconds,playbackcontinues without changing the current
angle.
Note:
• This function can only be used for discs on which scenes shot from multiple angles have been
recorded.
• Ifonlyoneangleisrecorded,“ OFF”isdisplayed.
Playing Videos
1. IniPod/iPhoneHomemenu,usethe / button to
select Videos and press the OK button.
2. Use the / button to select from Movies, Music
Videos, TV Shows, Video Podcasts or Rentals,
presstheOKbuttontoenter.(“Navigate youriPod/
iPhoneVideoLibrarydirectlyfromyouriPod/iPhone”
mayappearonthe screenifyourareusinganiPod
Touch.)
3. Use the / button to navigate the iPod/iPhone
menu lists and select a video, press the OK button
tobeginplayback. (You mayalsouse the control wheelandkeys on your iPod/iPhoneto
operate it.)
• Pressthe PAUSEbuttontopause,pressthe PLAYbuttontoresume.
• Pressthe / button to skip to the previous / next movie.
• Pressthe / button to begin fast reverse/forward, press the PLAY buttonto
resume normal playback.
4. PresstheRETURNbuttontogobacktothepreviousmenu.
Note:MakesureTVOutiniPodissettoONwhenyouareplayingthevideo.
Settings
1. IniPod/iPhoneHomemenu,usethe / button to
selectSettingsandpresstheOKbutton.
2. Use the / buttontoselectfromShufe,Repeat
or Lanuage. Press the OK button to enter the
settings.
3. Use the / button to a setting, press the OK
buttontoconrm.
4. PresstheRETURNbuttontogobacktotheprevious
menu.
• Shufe:Selectfrom Shufe Off, Shufe Songs
andShufeAlbums.
• Repeat:SelectfromRepeatOff,RepeatOneandRepeatAll.
• Language:SelectOSDlanguage.
WARNING:DuetotheiPod/iPhonelimitation,notallfunctionsofsomeiPod/iPhonemodelscan
be controlled via the remote control.
Iftheabovescreenappears,youmayneedtocontroltheiPodLibrarydirectlyfrom youriPod/
iPhone.
Note
IfyouriPhoneiscalledwhileitisdocked,playbackwillbepaused.
iPodisatrademarkofAppleComputer,Inc.,registeredintheU.S.andothercountries.
Using an iPod Touch to view photos
1. IniPodHomemenu,usethe / buttontoselectPhotosandpresstheOKbutton.“Navigate
youriPodPhotoLibrarydirectlyfromyouriPod”willappearonthescreen.
2. Touchthe“Photos”selectiononiPodpanel,andthenselectthephotoyourprefer.
3.Touchthe“ ”toconrmthephoto.
4. DependingonthevideooutputsettingofyouriPod,you mayneedtotap“yes”onyouriPod
screentoactivateiPod’svideooutput.
5.PressRETURNbuttontoendthephotoviewingandgobacktothepreviousmenu.
Using an iPod Classic / iPod Nano to view photos
1. IniPodHomemenu,usethe / buttontoselectPhotosandpresstheOKbutton.“Navigate
youriPodPhotoLibrarydirectlyfromyouriPod”willappearonthescreen.
2. Pressthe / buttontoselect“Photos”,andthenpresstheOKbuttontoconrm.
3. Use the button to select a photo, press the OK button to begin playback.
4. PressOKbuttontwicetoactivatephotoshowingtoTVscreen.
5.PressRETURNbuttontoendthephotoviewingandgobacktothepreviousmenu.
6. PresstheCLEARbuttontoexitPhotoMode.
Note:
Makesurevideooutis activatedinthesettingof iPodClassicoriPod
Nano.
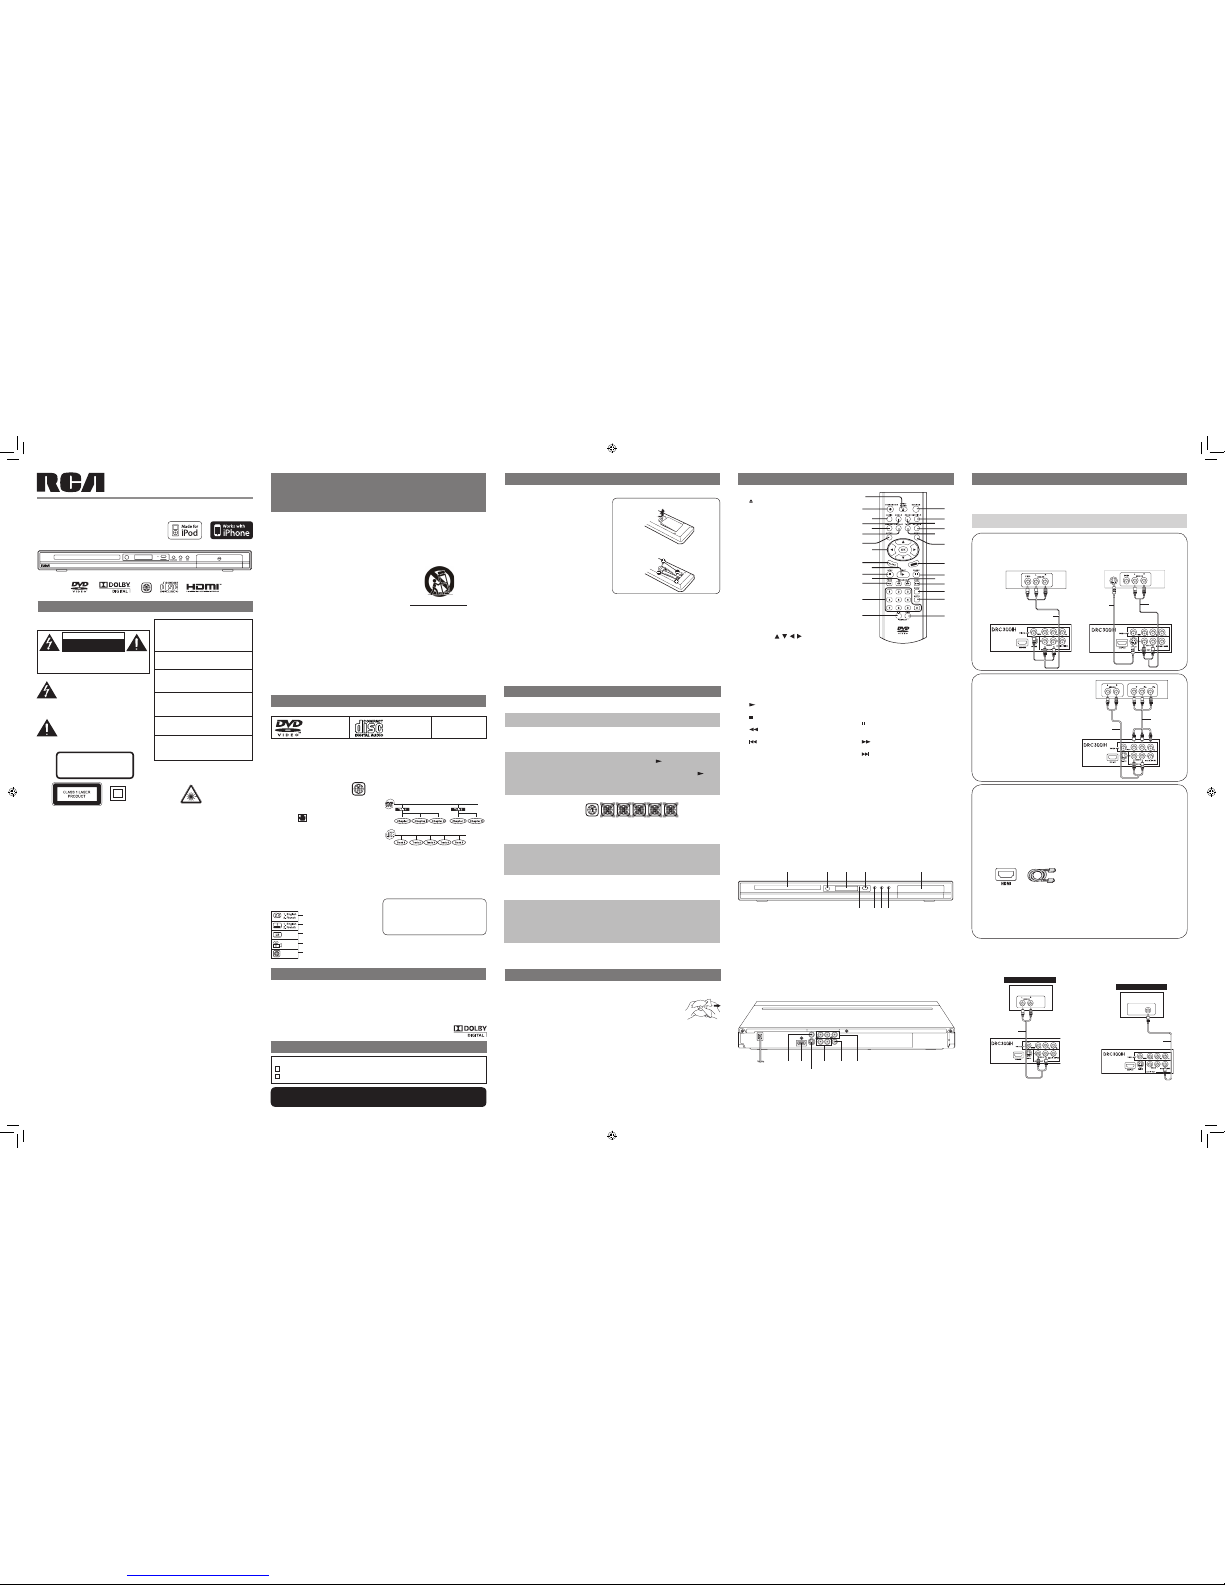
Connecting your iPod/iPhone
1. InsertyouriPod/iPhoneintotheconnectorinthedock.
2. Press the SOURCE button to select iPod/iPhone mode, the iPod/iPhone Home menu
appears.YouriPod/iPhonewillconnectautomaticallywithinafewseconds.
Note:
• YouriPod/iPhonewillbecharged automatically(untilfullycharged)once itisconnected,no
matterwhethertheunitisiniPod/iPhonemodeornot.
Playing Music
1. IniPod/iPhoneHomemenu,usethe / button to
select Music and press the OK button.
2. Use the / buttontoselectfromPlaylists,Artists,
Albums, Songs, Genres or Composers. Press the
OK button to enter.
3. Use the / button to navigate the iPod menu
lists and select songs, press the OK button to begin
playback.(Youmay also navigate usingyouriPod
screen after pressing CLEAR key to activate the
menuontheiPodscreen.)
• Pressthe PAUSEbuttontopause,pressthe PLAYbuttontoresume.
• Pressthe / button to skip to the previous / next song.
• Pressthe / button to begin fast reverse/forward, press the PLAY buttonto
resume normal playback.
• PressREPEATDISCbuttontoselectarepeatplaybackmode(asinglerepeatorallsongs
repeat).Pressagainrepeatedlytocancelthisrepeatplayback.
4. PresstheRETURNbuttontogobacktothepreviousmenu.
Note:
• Youcanusethe / button to quickly navigate menu lists one screen at a time.
Playing Photos
1. IniPod/iPhoneHomemenu,usethe / buttontoselectPhotosandpresstheOKbutton.
“NavigateyouriPodPhotoLibrarydirectlyfromyouriPod”willappearonthescreen.
2. PleaseusethecontrolonyouriPod/iPhonetooperate.
• Press the PAUSE button to pause, press the
PLAYbuttontoresume.
• Pressthe / button to skip to the previous /
next photo.
3. PresstheRETURNbuttontogobacktotheprevious
menu.
4.PresstheCLEARbuttontoexitPhotoMode.
Youcanplayaspecictitleorchapterrepeatedly.(Titlerepeat,chapterrepeat,A-Brepeat)
Repeatingachapter
Youcanplaythesamechapterrepeatedly.
1. While the disc is playing, press the REPEAT DISC button until the REP: [ CHAPTER ]
indicator displays on the screen. The current chapter is played repeatedly.
Repeatingatitle
Youcanplaythesametitlerepeatedly.
2. Whilethediscisplaying,presstheREPEATDISCbuttonuntiltheREP:[TITLE]indicator
displays on the screen. The current title is played repeatedly.
To resume normal playback
3. Whilethediscisplaying,press theREPEATDISCbuttonuntiltheREP: [OFF]indicator
displays on the screen.
Youcanplayasingletrackandwholediscrepeatedly.
Repeatingasingletrack
Youcanplaythesametrackrepeatedly.
1. Whilethediscisplaying,presstheREPEATDISCbuttonuntiltheREP:[REP1]indicator
displays on the screen. The current track is played repeatedly.
Repeatingawholedisc
2. While the disc is playing, press the REPEAT DISC button until the REP: [ REP ALL ]
indicator displays on the screen. The whole disc is played repeatedly.
To resume normal playback
3. PresstheREPEATDISCbuttonuntiltheREP:[OFF]indicatordisplaysonthescreen.
Youcanplayaspecicsectionrepeatedly.
Repeatingaspecicsection
1. While the disc is playing, press the REPEAT A-B button at the beginning of the section
(REPEATA-isdisplayed)youwanttoplayrepeatedly.
2. PresstheREPEATA-Bbuttonagainattheendofthesection(REPEATA-Bisdisplayed).
3. The unit will immediately begin replaying your selection.
To resume normal playback
4. While the disc is playing, press the REPEAT A-B button until the A-B CANCEL indicator
displays on the screen.
Note:
• SomediscsmaynotpermitA-Brepeatoperation.
• A-Brepeat canonly beusedwithinthesame title.If thestart andend ofthesectiontobe
repeated are in different titles, A-B repeat is cancelled.
• Youcanspecifyasegmentonlywithinthecurrenttitleortrack.
• The A-B repeat function does not operate in scenes where different camera angles are
recorded.
PLAYING A DISC
This user manual explains the basic instructions for operating this unit. Some DVDs are
producedinamannerthatallowsspecicorlimitedoperationduringplayback.Therefore,this
unitmaynotrespondtoalloperatingcommands.THISISNOTADEFECT.Pleasereferto
theinstructions accompanying thespecic DVD inquestion for moreinformation aboutthe
options available on that DVD.
may appear on the screen during operation. It means that the desired operation is not
permitted by the unit or disc.
Therearefouroptionsinthemain setupmenu: SystemSetup,LanguageSetup,AudioSetup
andVideoSetup.
InDVDmode,pressSETUPtobringupthemainmenu.Selectoneofthemenuiconsacrossthe
top of the screen using the or buttons.Themenu’soptionsaredisplayedontheleftsideof
thescreen.Pressthe , , or buttonstomovetotheoption’schoicesontheright.Then
pressOKtoselect.PressSETUPorRETURNifyouwanttoexit.
SYSTEM SETUP
1. PresstheSETUPbuttoninDVDmode.
2. SelectSystemSetupinthemainmenuusingthe , , or
buttons.
3. Selectamenu optionusingthe or buttons and press OK
button.
VIDEO OUTPUT (HD OUTPUT / ANALOG VIDEO)
ThisallowstoyoupickthevideooutputandvideoresolutionthatbestsuitsyourTV’scapabilities.
Note:Notallvideooutputsareoperationalforallvideosettings–theCompositeVideo
Out (YELLOW jack) is active for all video settings – we STRONGLY recommend you
connect this jack to your TV using the AV cable (included with this product), even if
youintendtouseadifferentconnectionfornormalviewing.Ifyoundyoulosevideo
by enabling a particular unsupported setting when using a connection other than
CompositeVideoOut–simplyswitchyourTVtotheAVinputthatyou’veconnected
the AV cable to, then continue with your Video Menu setup activity.
If using digital HDMI connection (recommended), you should pick the resolution (480p, 720p,
1080i, 1080p) that matches the capabilities on your TV.
Ifusinganalog videoconnection- CompositeVideo(AV),S-Video,orComponentVideo-you
must select 480p resolution under HDMI settings. There are three analog video settings:
INTERLACE-YUV :Selectifyouareconnectingthe playerwithComponentVideooutputstoa
non-ProgressiveScanTV.
P-SCANYPbPr :SelectifyouareconnectingtheplayerwithComponentVideooutputstoa
ProgressiveScanTV.
S-VIDEO :Select ifyou areconnecting theplayer withS-VIDEOoutputtoa TVwith
S-VIDEOinput
TV TYPE
Depending on the format of the DVD, you can choose the picture format (aspect ratio) best
suited to the format of your TV screen:
4:3PS(PanScan)
• When wide-screen video is played, this mode clips the right and left
sides of the image so that it can be viewed on a conventional screen.
• Somewide-screenDVDsthatdonotpermitPanScanmodeplaybackare
automatically played in letterbox mode (black bands top and bottom).
4:3 LB (Letter Box)
• When wide-screen video is played in this mode on a conventional
Analog TV, black bands appear at the top and bottom of the screen.
16:9 (Wide screen)
• Thisis thecorrect modeforplaying wide-screenvideos ononawide-
screenTV(mostmodernDigitalTV’s).
Note :
• Thedisplayable picturesizeisdeterminedbytheDVDdisc.Therefore
the playback picture of some DVD discs may not conform to the picture
size you select.
• WhenyouplayDVDdiscsrecordedinthe4:3aspectratio,theplayback
picture will always appears in the 4:3 aspect ratio regardless of the TV
TYPEsetting.
DEFAULT
It takes 3-5 seconds to reset the unit to the factory default.
LANGUAGE SETUP
1. PresstheSETUPbuttoninDVDmode.
2. Use buttontoselectLanguageSetup.
3. Use , , or button to select a language, then press
the OK button. The screen will change to your selected
language immediately.
4. ToexittheSETUPMENUandreturntothenormalscreen,
presstheRETURNorSETUPbutton.
Note:
• SomeDVDsmaynotplayintheaudiolanguageselected.
A prior language may be programmed on the disc.
• SomeDVDsmaybesettodisplaysubtitlesinalanguageotherthantheoneyouselected.A
different subtitle language may be programmed on the disc.
• SomeDVDsallowyoutochangesubtitleselectionsonlyviathediscmenu.Ifthisisthecase,
presstheMENUbuttonandchoosetheappropriatesubtitlelanguagefromtheselectionon
the disc menu.
• Some DVDs may not include your pre-selected language. In this case, the DVD player
automaticallydisplaysdiscmenusconsistentwiththedisc’sinitiallanguagesetting.
AUDIO SETUP
1. PresstheSETUPbuttoninDVDmode.
2. Select Audio Setup in the main menu using the or
buttons.
3. Selectamenuoptionusingthe , , or buttons and
press OK button.
DIGITAL AUDIO
SelecttheDigitalAudioOutputformatthatmatchesyouraudiosystem’scapabilities.Ifyouraudio
systemsupportsDolbyDigital(surroundsound),youshouldselect“RAWDVDFORMAT”setting.If
yoursystemonlysupportsStereo(orifyou’reusingyourTV’sstereospeakersforaudioplayback),
thenyou select“PCM (STEREO)”setting. Note,you’llonlyexperiencefullsurroundsoundifyou
usetheCOAXIALDigitalAudiooutput,andhaveselected“RAWDVDFORMAT”setting.
PleasealsonotethatnotallDVD’shavesurroundsoundaudiotracks.
• If using HDMI connection to TV for Video AND Audio playback, you should select “PCM
(STEREO)”setting,soasto ensureastereo(notsurround sound)signalispassedto your
TV’sspeakers.
VIDEO SETUP
1. PresstheSETUPbuttoninDVDmode.
2. Select Video Setup in the main menu using the or
buttons.
3. SelectBrightness, Contrast,Hue, Saturationor Sharpness
using the or buttons, highlight your selections and
press OK button.
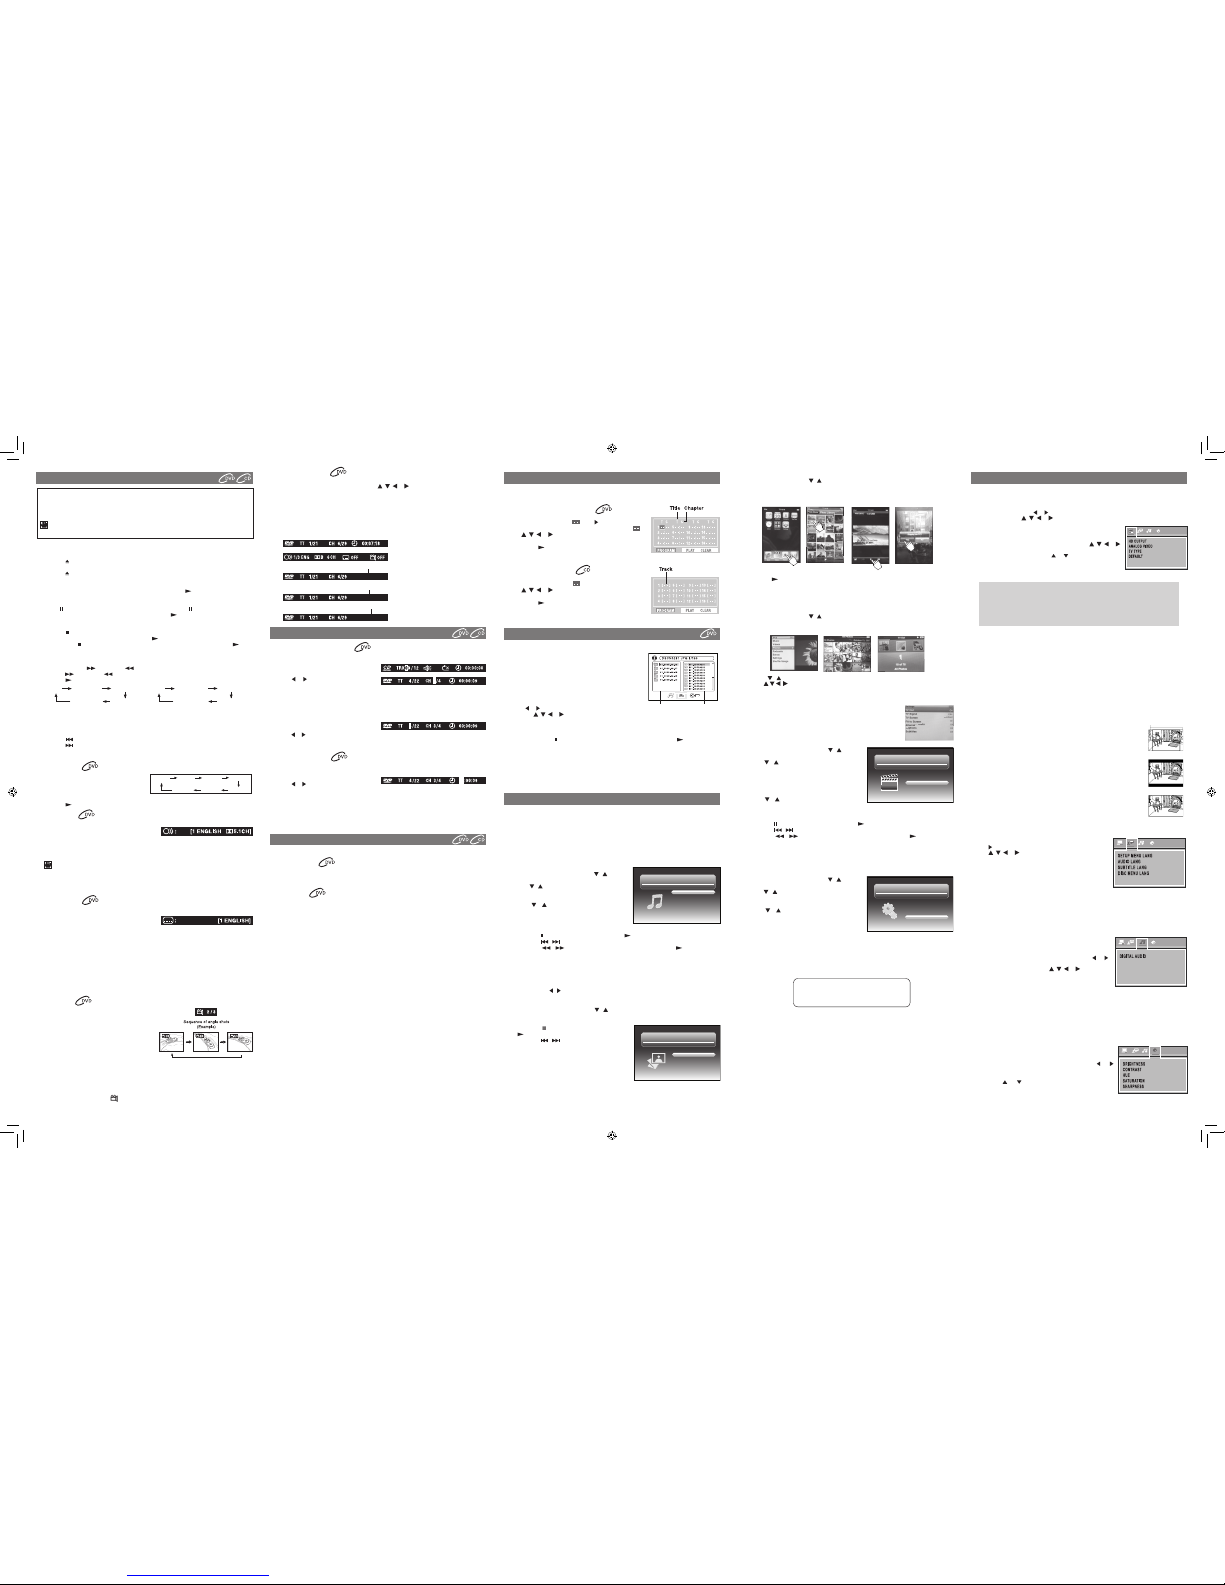
PLAYING PICTURE FILE DISC
PROGRAMMABLE MEMORY
Locating a specic chapter / track
If you know the chapter / track number you want to play, you can locate a specifc chapter / track
by directly selecting a chapter / track number.
1. Press the GOTO button to search your
desired chapter / track.
2. Press or button to highlight a chapter /
track and press the corresponding number
button(s) for the chapter you want.
3. PresstheOKbuttontoconrm.Theunitwillstartplaybackabout3secondslater.
Locating a specic title
Ifa DVDdisc containstitle numbers,you canlocateaspecictitlebydirectlyselectinga title
number.
1. In stop mode, press the GOTO button.
2. Press or buttontohighlightaspeciceldandpressthecorrespondingnumberbutton(s)
for the title you want.
3. PresstheOKbuttontoconrm.Theunitwillstartplaybackabout3secondslater.
Locating a specic time
You can move to a specic location by entering its corresponding time (hours, minutes,
seconds)
1. PresstheGOTObutton.
2. Press or button to highlight time.
3. Pressthecorrespondingnumberbuttonsforthesettingpointyouwant.
4. PresstheOKbuttontoconrm.Theunitwillstartplaybackabout3secondslater.
Note :
• Somediscsmaynotrespondtothisprocess.
• Somescenesmaynotbelocatedaspreciselyasyouspecied.
• Thismethod for accessingspeciclocations is availableonlywithin thecurrenttitle of the
DVD disc.
REPEAT PLAYBACK
The two types of programmed playback provided by this unit are title/chapter programmed
playback and track programmed playback.
Title / Chapter programmed playback
1. PresstheMEMORYbutton.
2. Enter thetitle numbersin . Use button to move the
highlight to chapter and enter the chapter numbers in .
3. Use , , or buttontomovetotheothereld.
4. Repeatsteps2to3.
5. Press the PLAY button to start the programmed
playback.
Note:IfyoupresstheSTOPbuttontwice,theprogrammedselectionwillbecleared.
Track programmed playback
1. PresstheMEMORYbutton.
2. Enterthetracknumbersin .
3. Use , , or buttontoothereld.
4. Repeatsteps2to3.
5. Press the PLAY button to start the programmed
playback.
ThisunitcanplaypicturelesrecordedonCD-RandCD-RWdiscs.
Playing a Picture File Disc
1. Open the disc door.
2. Placeapicturelediscontothetraywithlabelsideup.
3.Closethediscdoor.
4. The unit will load the disc and automatically display the
contents of the disc on the screen, while playing the
beginning of the rst picture le. These les will then be
played back one by one.
5. Press or buttontoselectapictureletoview.
6. Pressthe , , or CURSORbuttontoviewandselect
thelesthatyouwanttoview,thenpresstheOKbuttontoconrmtheselectedle.
Note:
• Youcan pressthe PAUSEbuttontointerruptplayback,andpressthe PLAYbuttonto
resume playback.
• YoucanusetheGOTOfunctionorusethenumberedbuttonstoenterthenumberofapicture
letoquicklyselecttheimage.
• PresstheANGLEbuttonontheremotecontroltorotatethepictureorientationby90°.
Folders Files within the
current folder
LOCATING A DESIRED SECTION
PleaseNavigatedirectlyonyouriPod
OR
PressThe[CLEAR] Key
to go back to main menu
CUSTOMIZING THE FUNCTION SETTINGS
Zooming into an image
While a disc is playing, press the ZOOM button repeatedly to enlarge the image in several levels.
• Whileanimageiszoomed,youcanusethe , , or CURSORbuttontoshifttheview
and display the part you want.
• Toreturntonormalview,presstheZOOMbuttonuntilthe“ZOOM:OFF”shows.Thescreen
will return to normal.
• Whenyoureachtheedgeoftheimage,thedisplaywillnotshiftanymoreinthatdirection.
Step2 Step3 Step4
Step2 Step3 Step4
Display Function
Whilethediscisplaying,presstheDISPLAYbuttonontheremotecontrolrepeatedlytodisplay
information on operation status.
e.g.
Specifications and external appearance are subject to change without notice.
-
T
C
-
T02:01:22
00:30:15
00:12:03
ChapterRemainingtime
Total time
TitleElapsedtime
ElapsedTime:
Elapsedtimefromthebeginningofthe
chapter/title which is currently playing.
RemainingTime:
Remaining time of the chapter/title
which is currently playing.
67 10
9
8
iPod/iPhone FEATURES
SF1/2 SF1/3 SF1/4 SF1/5
PLAY SF1/7 SF1/6
e.g.
or
PLAY FORWARD x2 FORWARD x4
FORWARD x8FORWARD x20
PLAY BACKWARD x2 BACKWARD x4
BACKWARD x8BACKWARD x20
WIDE SCREEN
LETTER BOX
PAN SCAN
Cut off when a wide-
screen video image is
played.
Docking System for iPod
iPod
Home
Music
Photos
Videos
Settings
Docking System for iPod
iPod
Home
Music
Photos
Videos
Settings
Docking System for iPod
iPod
Home
Music
Photos
Videos
Settings
Docking System for iPod
iPod
Home
Music
Photos
Videos
Settings
PrintedinChina811-793091W010
DRC300iHengib.indd2 10/6/2009 9:45:27 AM
Other RCA DVD Player manuals

RCA
RCA HDV5000 User manual

RCA
RCA 811-727191W030 User manual

RCA
RCA DRC277A Instruction Manual

RCA
RCA DRC300iH Manual

RCA
RCA DRC279BK User manual

RCA
RCA RTD315WR User manual

RCA
RCA DRC290 User manual

RCA
RCA DRC288SU Manual

RCA
RCA RC6001P User manual

RCA
RCA DRC69705 - Dual Screen Portable DVD Player User manual

RCA
RCA DRC300N User manual

RCA
RCA RC5910P User manual

RCA
RCA RC5220P User manual

RCA
RCA DRC300iH User manual

RCA
RCA DRC015 User manual

RCA
RCA Scenium DRS720N User manual

RCA
RCA BLD774 User manual

RCA
RCA DRC69705 - Dual Screen Portable DVD Player User manual

RCA
RCA RC5200P User manual

RCA
RCA DRC277A User manual