RCA MRP1150 User manual

DVD Player
User's Manual
The New Era in Entertainment.
Model: MRP1150
TOCOM 1583577A
Please read this manual
before using this product for
the first time.

CAUTION
RISKOFELECTRICSHOCK
DO NOT OPEN
This symbol indicates
“dangerous voltage” inside the
product that presents a risk of
electric shock or personal injury.
This symbol indicates
important instructions
accompanying the product.
WARNING
To reduce the risk of fire or shock
hazard, do not expose this DVD
player to rain or moisture.
CAUTION
THIS PRODUCT UTILIZES A
LASER. USE OF CONTROLS OR
ADJUSTMENTS OR
PERFORMANCE OF
PROCEDURES OTHER THAN
THOSE SPECIFIED HEREIN
MAY RESULT IN HAZARDOUS
RADIATION EXPOSURE. DO
NOT OPEN COVERS AND DO
NOT REPAIR YOURSELF.
REFER SERVICING TO
QUALIFIED PERSONNEL.
CAUTIONS
Caution: To prevent electric shock,
match wide blade of plug to wide
slot, fully insert.
Power Consumption:
100-240V ~50/60 Hz
15 W
To prevent electromagnetic interference with
electric appliances, such as radios and televisions,
use shielded cables and connectors for connections.
TO REDUCE THE RISK OF ELECTRIC SHOCK, DO NOT
REMOVE THE COVER (OR BACK). NO USER-
SERVICEABLE PARTS ARE INSIDE. REFER
SERVICING TO QUALIFIED SERVICE PERSONNEL.
CAUTION: DVD PLAYERS USE A VISIBLE
LASER BEAM WHICH COULD CAUSE
HAZARDOUS RADIATION EXPOSURE IF
DIRECTED. BE SURE TO OPERATE THE
PLAYER CORRECTLY AS INSTRUCTED.
Note:
This DVD player is designed and
manufactured to respond to the
Region Management Information.
If the Region number of a DVD
disc does not correspond to the
Region number of this DVD player,
this DVD player cannot play the
disc. The Region number for this
DVD player is Region No 4.
Note:
This device is protected by U.S. patent numbers
4,631,603 and 4,577,216 and 4,819,098 and
other intellectual property rights. The use of
Macrovision’s copy protection technology in the
device must be authorized by Macrovision and is
intended for home and other limited pay-per-
view uses only, unless otherwise authorized in
writing by Macrovision. Reverse engineering or
disassembly is prohibited.
Note:
This unit can be used only where the
power supply is AC 100-240 V, 50-
60Hz. It cannot be used elsewhere.
CLASS 1
LASER
PRODUCT

1
Table of Contents
Manufactured under license from Dolby Laboratories. “Dolby” and the double-D symbol are trademarks of Dolby Laboratories.
Confidential unpublished works. ©1992-1997 Dolby Laboratories, Inc. All rights reserved.
DTS is a registered trademark of Digital Home Theater Systems, Inc.
Chapter 1 – Setup and Connections
Things to Consider Before You Connect ......................................................................6
Choose Your Connection...............................................................................................7
DVD Player + TV with Audio/Video Input Jacks...................................................8
DVD Player + TV + VCR..........................................................................................9
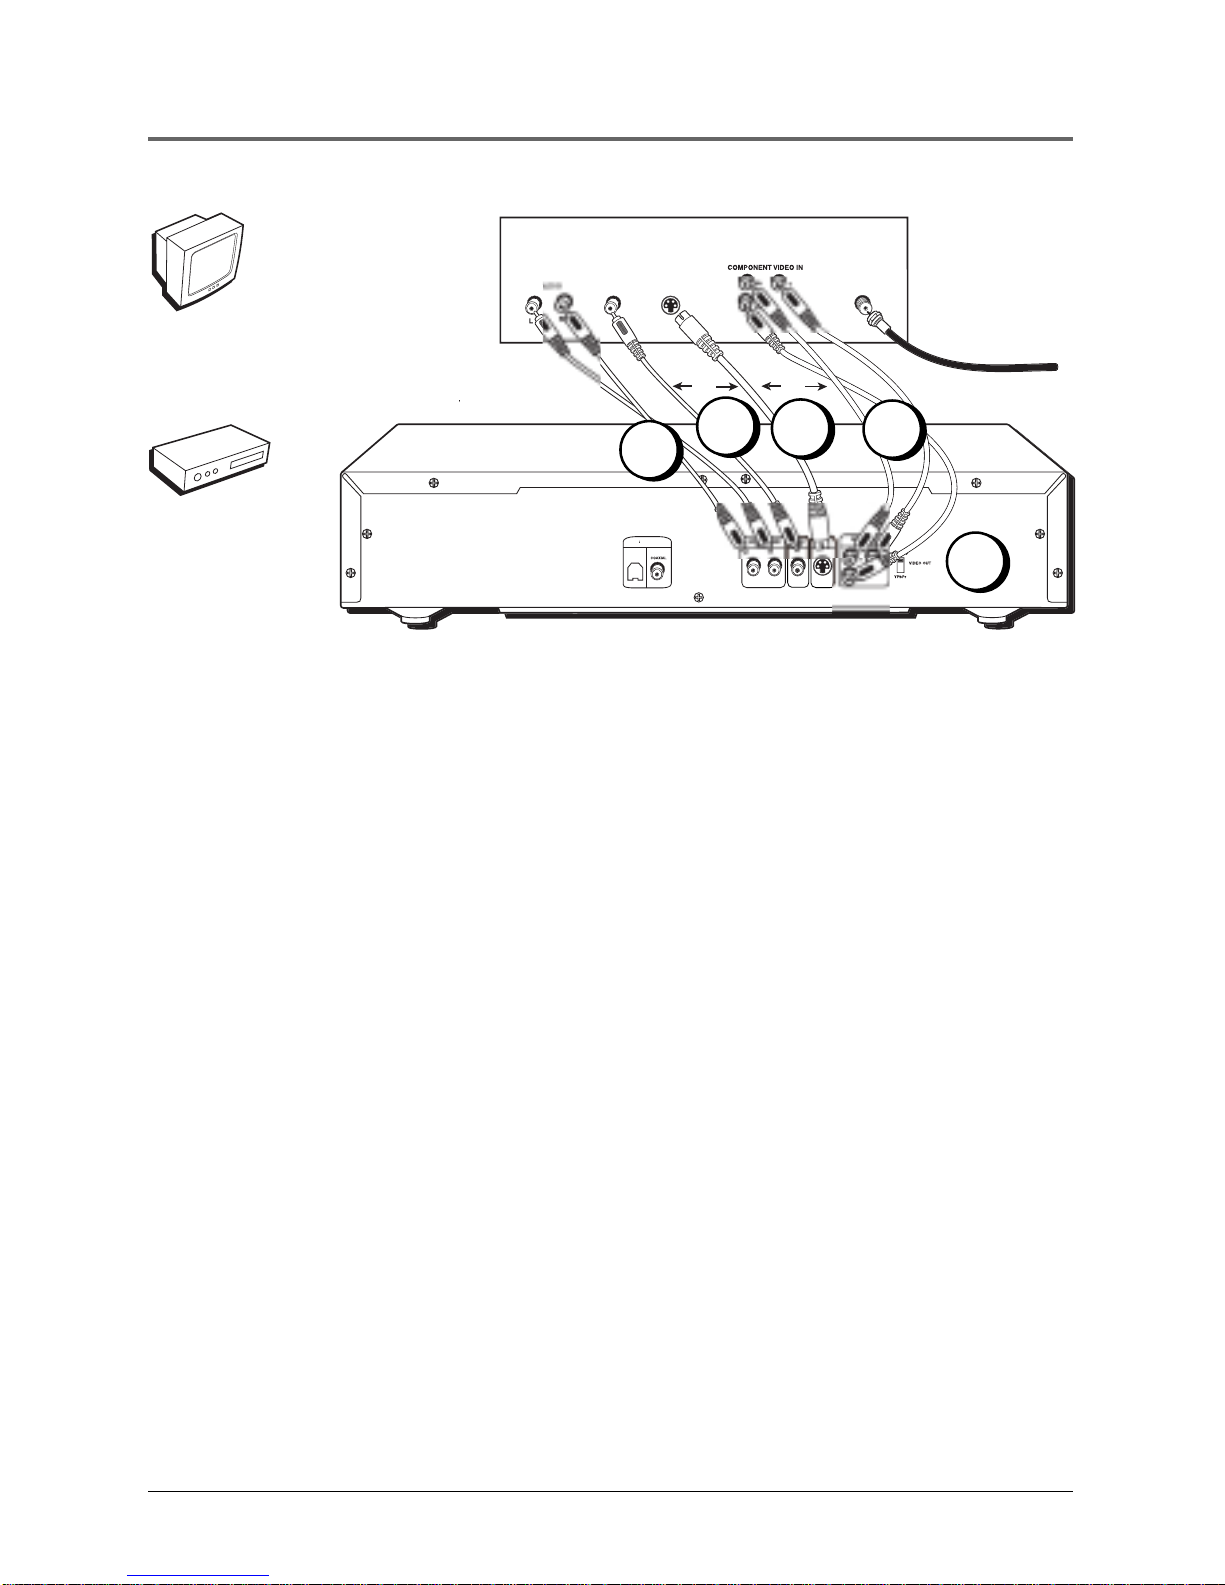
DVD Player + TV + Dolby Pro Logic, Dolby Digital or DTS Receiver ...................11
DVD Player + TV + VCR + Satellite Receiver .........................................................13
Install Batteries in the Remote .....................................................................................14
Important Battery Information.............................................................................14
Turn on the TV and DVD Player ....................................................................................14
How to Find Your TV’s Video Input Channel ...............................................................15
How to Move Around the DVD Player’s Menu System .............................................. 16
Set the Menu Language................................................................................................16
The Remote Control Buttons ........................................................................................17
Chapter 2 – Playing DVDs
Regional Coding ............................................................................................................20
Using Different Menus ..................................................................................................20
Loading and Playing Discs ............................................................................................20
Using a Disc Menu .........................................................................................................22
DVD Playback Features .................................................................................................23
Fast Motion Playback (Picture Scan).....................................................................23
Freeze Frame and Frame Advance .......................................................................23
Slow Motion Playback (in Freeze Frame mode) ..................................................24
Random Playback ..................................................................................................24
Program Playback ..................................................................................................25
Deleting Programmed Chapters ...........................................................................25
Using the On-Screen Info Banner.................................................................................26
Selecting a Title Number .......................................................................................26
Selecting a Chapter Number.................................................................................26
Using Subtitles .......................................................................................................27
Using Elapsed Time................................................................................................27
Changing the Subtitle Language (On the Player) ...............................................28
Changing the Audio Language ............................................................................29
Changing the Camera Angle ................................................................................29
Using the Marker Feature .............................................................................................30
Storing a Marker During DVD Playback...............................................................30
Recalling a Marked Scene .....................................................................................30
Clearing a Marker..................................................................................................30

2
Table of Contents
Chapter 2 – Playing DVDs (continued)
Using the Repeat Feature .............................................................................................31
To Repeat a Chapter or Title .................................................................................31
A•B Repeat.............................................................................................................31
Turning Off Repeat Functions...............................................................................31
Using the 3-D Surround Button .................................................................................... 32
Special Features .............................................................................................................32
Screen Saver ...........................................................................................................32
Auto Power Off .....................................................................................................32
Pro-tect Plus™ Locking Feature............................................................................32
Chapter 3 – Playing Audio CDs
Loading and Playing an Audio CD ...............................................................................34
Audio CD Playback Features .........................................................................................34
Selecting a Specific Track ......................................................................................34
Random Playback ..................................................................................................34
Program Playback ..................................................................................................35
Deleting Programmed Tracks................................................................................35
Using the Repeat Feature .............................................................................................36
Repeating a Track or Disc ......................................................................................36
A•B Repeat.............................................................................................................36
Loading and Playing an MP3 CD ..................................................................................37
The MP3 Menu...............................................................................................................37
Skipping Songs.......................................................................................................38
Chapter 4 – Playing Video CDs
What is a Video CD? ......................................................................................................40
The Video CD Disc Menu...............................................................................................40
Loading and Playing a Video CD ..................................................................................40
If the Video CD Has Playback Control ..........................................................................41
Bypassing Playback Control ..................................................................................41
Resuming Playback Control ..................................................................................41
Video CD Playback Features .........................................................................................42
Selecting a Specific Track ......................................................................................42
Changing the Audio Channel Output ..................................................................42
Random Playback ..................................................................................................42
Program Playback ..................................................................................................43
Deleting Programmed Chapters ...........................................................................43
Disc View........................................................................................................................44

3
Table of Contents
Chapter 5 – The Menu System
The Audio Menu – Selecting the Audio Preference ....................................................46
The Subtitles Menu – Selecting the Subtitle Language.............................................. 47
The Player Menu – Changing the Player Menu Language ......................................... 47
The Disc Menu – Selecting the Disc Menu Language .................................................48
The Rating Limit Menu..................................................................................................48
Creating a Password ..............................................................................................48
Setting the Rating Limit ........................................................................................49
Unlocking the Rating Limit ...................................................................................50
Changing the Password.........................................................................................50
If a DVD’s Rating Exceeds the Player’s Rating Limit ............................................51
The Audio Options Menu .............................................................................................51
Selecting Digital Output Type...............................................................................51
DTS..........................................................................................................................52
Dynamic Compression ...........................................................................................52
2x Playback Audio .................................................................................................52
The Display Menu..........................................................................................................53
Selecting the Screen Format Setting ....................................................................53
Using Still State......................................................................................................54
Turning the On-Screen Messages On and Off .....................................................54
Dimming the Front Panel Display.........................................................................55
Changing the Black Level......................................................................................55
Chapter 6 – Other Information
Troubleshooting ............................................................................................................58
The Jacks on the Back of the DVD Player ....................................................................61
Front Panel Controls ......................................................................................................62
Front Panel Display........................................................................................................63
Index...............................................................................................................................65

This page intentionally left blank.

Chapter Overview
•Things to Consider Before You Connect
•Choose your Connection
•Connections
•Installing the Batteries
•How to Find Your TV’s Input Channel
•How to Move Around the DVD Player’s Menu System
•Set the Menu Language
•Setting Other Options
•The Remote Control
Connections and Setup
The New Era in Entertainment.
Illustrations contained in this document are for representation only. 5
Chapter 1

6Chapter 1
Connections and Setup
Things to Consider Before You Connect
Protect Against Power Surges
• Connect all components befor e you plug any of their power cor ds into the wall outlet.
• Turn off the TV and/or components befor e you connect or disconnect any cables.
• Make sur e all antennas and cables ar e properly gr ounded. Refer to the Impor tant Safeguar ds
sheet packed with your DVD player .
Protect Components from Overheating
• Don’t block ventilation holes on any of the components. Arrange the components so that air
can circulate fr eely.
• Don’t stack components.
• When you place components in a stand, make sur e you allow adequate ventilation.
• If you connect an audio r eceiver or amplifier , place it on the top shelf so the heated air fr om
it won’ t flow ar ound other components.
Position Cables Properly to Avoid Audio Interference
• Insert each cable fir mly into the designated jack.
• If you place components above the TV , route all cables down the side of the back of the TV
instead of straight down the middle of the back of the TV .
• If your antenna uses 300-ohm twin lead cables, do not coil the cables. Also, keep the twin
lead cables away fr om audio/video cables.
Connection Pictures
Audio/video cables ar e usually bundled together . For better visibility , the connection pictur es in
this book show each cable separately (audio left, audio right, and video).
Note: The illustrations in this book are representational, and in some instances may not
exactly match the item represented.
VIDEO CD
Manufactured under license from Dolby Laboratories. “Dolby”and the double-D symbol are trademarks of Dolby Laboratories.
Confidential unpublished works. ©1992-1997 Dolby Laboratories, Inc. All rights reserved.
DTS is a registered trademark of Digital Home Theater Systems, Inc.
Types of Discs Your DVD Player will Play
• DVD video discs – DVD video discs contain high quality pictur e and
sound content.
• Audio discs – Audio CDs contain musical or sound content only.
• Video CD discs – Like DVD video discs, Video CDs contain pictur e and
sound content. The dif fer ence is the amount of infor mation that can be
stor ed on the disc.

Chapter 1 7
Connections and Setup
Choose Your Connection
There are several ways to connect your DVD player . Please use the following char t to deter mine
which connection is best for you. T urn to the appr opriate page and connect your DVD player .
TV
DVD
Components Cables Connection Go to...
Needed Title
•Coaxial
•Audio/video
•S-Video
(optional)
•Component
video (optional)
•Coaxial
•Audio/video
•S-Video
(optional)
•Component
video (optional)
Dolby Digital
Receiver
•Coaxial
•Audio/video
•S-Video
(optional)
•Component
video (optional)
Satellite
Cables Needed to Connect Components to Your TV
The pictur es below show the cables needed for the connections r epresented in this book.
Note: Audio/Video cables (A/V cables for short) are usually sold as a bundled set, but the
connection pictures in this book show each cable separately for better visibility.
TV
DVD
TV
DVD
TV + DVD page 8
TV + DVD +
Dolby Digital pages
10-11
TV + DVD +
VCR + Satellite page
12-13
VCR
TV
DVD
•Coaxial
•Audio/video
•S-Video
(optional)
•Component
video (optional)
TV + DVD + VCR page 9
VCR
Audio/Video cables Coaxial cable S-Video cable Component video cables

8Chapter 1
Connections and Setup
DVD Player + TV with Audio/Video Input Jacks
1. Connect the audio cables to the AUDIO OUT L (left – white) and R (right – r ed) jacks on the
back of your DVD Player , and to the cor responding Audio Input jacks on your TV .
2. Connect the video cable(s).
A. Basic video connection – Connect the video cable (yellow) to the VIDEO OUT jack on
the back of your DVD Player , and to the V ideo Input jack on your TV .
OR
B. S-Video (optional) – If your TV has an S-V ideo Input jack, connect the S-V ideo cable to
the S-VIDEO OUT jack on the back of your DVD Player and to the S-V ideo jack on your
TV. If your TV doesn’ t have S-V ideo, use the basic video connection listed above.
OR
C. Component video (optional) – If your TV has component video (Y , PB, and PR jacks)
use video-grade cables for the Y , PB, and PRconnections. Note that it is essential to
match the color -coded connectors with a compatible TV . If your TV doesn’ t have
component video, use the S-V ideo or Basic video connection listed above.
3. Set the VIDEO OUT SELECT switch to S-VIDEO or YPbPr , depending on the type of
connection you used. Either setting works for the Basic video connection (2A).
Note: Your cable or off-air connection to the television should not be affected by this
connection. Connect your cable or off-air antenna to your television as you normally
would. You may need to consult your television manual for details.
Go to page 14
S
ELE
CT
DIGIT
AL
T
AL
T
A
U
DI
O
OUT
O
PTI
C
AL
ANT IN
DVD PLA
YER
A
YER
A
(BA
C
K
P
ANEL)
TV (BA
C
K
P
ANEL)
VIDE
O
C
ABLE
O
R
O
FF-AIR
S
I
G
NAL
A
S
-VIDE
O
I
N
OR
OR
TV
DVD
1
3
2A 2B 2C

Chapter 1 9
Connections and Setup
SELECT
YPbPr
DIGIT
AL
T
AL
T
O
PTI
C
AL
CO
AXIA
L
ANT IN
DVD PLA
YER
A
YER
A
(BA
C
K
P
ANEL)
TV (BA
C
K
P
ANEL)
VIDE
O
A
S
-VIDE
O
I
N
OR
OR
L
V
C
R(BA
C
K
P
ANEL)
R
L
R
OUT
IN
C
ABLE
O
R
O
FF-AIR
S
I
G
NAL
DVD Player + TV + VCR
1. Connect the audio cables to the AUDIO OUT L (left – white) and R (right – r ed) jacks on the
back of your DVD Player , and to the cor responding Audio Input jacks on your TV .
2. Connect the video cable(s).
A. Basic video connection – Connect the video cable (yellow) to the VIDEO OUT jack on
the back of your DVD Player , and to the V ideo Input jack on your TV .
OR
B. S-Video (optional) – If your TV has an S-V ideo Input jack, connect the S-V ideo cable to
the S-VIDEO OUT jack on the back of your DVD Player and to the S-V ideo jack on your
TV. If your TV doesn’ t have S-V ideo, use the basic video connection listed above.
OR
C. Component video (optional) – If your TV has component video (Y , PB, and PR jacks)
use video-grade cables for the Y , PB, and PRconnections. Note that it is essential to
match the color -coded connectors with a compatible TV . If your TV doesn’ t have
component video, use the S-V ideo or Basic video connection listed above.
3. Set the VIDEO OUT SELECT switch to S-VIDEO or YPbPr , depending on the type of
connection you used. Either setting works for the Basic video connection (2A).
4. Connect the antenna or cable to the Antenna Input jack on the VCR.
5. Connect a coaxial cable to the antenna output jack on the VCR and to the Antenna Input jack
on the television. Go to page 14
TV
DVD
1
3
4
5
VCR
2A 2B 2C

10 Chapter 1
Connections and Setup
DIGIT
AL
T
AL
T
A
U
DI
O
OUT
O
PTI
C
AL
CO
AXIA
L
DVD PLA
YER
A
YER
A
(BA
C
K
P
ANEL)
TV (BA
C
K
P
ANEL)
VIDE
O
C
ABLE
O
R
O
FF-AIR
S
I
G
NAL
A
U
DI
O
LR
S
-VIDE
O
I
N
OR
OR
DOLBY DIGIT
AL RECEIVER
T
AL RECEIVER
T
(
BACK
P
ANEL
)
A
U
L
R
O
PTI
C
A
L
CO
A
X
DI
G
ITAL A
U
DI
O
OR
OR
Dolby Digital®and DTS®
Both Dolby Digital and DTS ar e audio for mats used to r ecord 5.1-channel audio signals onto the
digital track of film (while the film is being made). Both of these for mats pr ovide up to six separate
channels: left, right, center , left r ear, right r ear, and common subwoofer .
The disc will play 5.1-channel sound only if you’ve connected a DTS or Dolby Digital r eceiver or
decoder and if the original movie the disc was r ecorded fr om was encoded in the Dolby Digital or
DTS format.
Please Read This Before Using the DIGITAL AUDIO OUT Jack!
This player’s digital output jack is designed for a connection to a Dolby Digital or DTS
receiver or decoder.
Older digital equipment may not be compatible with the Dolby Digital bitstream. Such a
connection can create a high level of noise that may be harmful to your ears, and could
damage headphones or speakers.
It is important to choose the correct Digital Output setting in the DVD Player’s Sound menu,
especially when you use the DIGITAL AUDIO OUT jack. For more information, see chapter 5.
3
Dolby Digital
Receiver
TV
DVD
2A 2B 2C
1A
1C
1B

Chapter 1 11
Connections and Setup
DVD Player + TV + Dolby Pro Logic, Dolby
Digital or DTS Receiver
To Connect the DVD Player
1. Connect the audio cable(s).
A. Basic audio connection – Connect the left and right audio cables
to your audio/video r eceiver and to the AUDIO OUT L (left – white)
and R (right – r ed) jacks on the back of your DVD player .
OR
B. Optical digital audio connection – If you have a Dolby Digital or
DTS receiver with an optical digital connection, inser t an optical
digital cable (not pr ovided) in the OPTICAL digital audio out jack on
the DVD player . Connect the other end of the cable to the Optical
Digital Input jack on the back of the r eceiver. You must also set the
Digital Output setting in the Sound menu (see Chapter 5).
OR
C. Coaxial digital audio connection – If you have a Dolby Digital or
DTS receiver with a coaxial digital connection, inser t a coaxial
digital cable (not pr ovided) in the COAXIAL digital audio out jack
on the DVD player . Connect the other end of the cable to the
Coaxial Digital Input jack on the back of the r eceiver. You must also
set the Digital Output setting in the Sound menu (see Chapter 5).
2. Connect the video cable(s).
A. Basic video connection – Connect the video cable (yellow) to the
VIDEO OUT jack on the back of your DVD Player , and to the V ideo
Input jack on your TV .
OR
B. S-Video (optional) – If your TV has an S-V ideo Input jack, connect
the S-V ideo cable to the S-VIDEO OUT jack on the back of your
DVD Player and to the S-V ideo jack on your TV . If your TV doesn’ t
have S-Video, use the basic video connection listed above.
OR
C. Component video (optional) – If your TV has component video (Y ,
PB, and PR jacks) use video-grade cables for the Y , PB, and PR
connections. Note that it is essential to match the color -coded
connectors with a compatible TV . If your TV doesn’ t have
component video, use the S-V ideo or Basic video connection listed
above.
3. Set the VIDEO OUT SELECT switch to S-VIDEO or YPbPr , depending on
the type of connection you used. Either setting works for the Basic video
connection (2A).
Go to page 14

12 Chapter 1
Connections and Setup
S
ELE
CT
DIGIT
AL
T
AL
T
A
U
DI
O
OUT
O
PTI
C
AL
ANT IN
DVD PLA
YER
A
YER
A
(BA
C
K
P
ANEL)
TV (BA
C
K
P
ANEL)
VIDE
O
A
U
DI
O
S
-VIDE
O
I
N
OR
CO
MP
O
NE
N
Pr
OR
L
V
C
R(BA
C
K
P
ANEL)
OU
TT
O
T
V
R
L
R
OUT
IN
VIDE
O
L
R
S
-VIDE
O
SA
A
SA
TELLITE RECEIVER
A
TELLITE RECEIVER
A
(
BACK
P
ANEL
)
CABLE
,
CABLE BOX
,
OR ANTENN
A
SA
TELLITE SIGNAL
A
TELLITE SIGNAL
A
1
3
4
Satellite
TV
DVD
VCR
5
2A 2B 2C

Chapter 1 13
Connections and Setup
DVD Player + TV + VCR + Satellite Receiver
1. Connect the audio cables to the AUDIO OUT L (left – white) and R (right – r ed)
jacks on the back of your DVD Player , and to the cor responding Audio Input jacks
on your TV.
2. Connect the video cable(s).
A. Basic video connection – Connect the video cable (yellow) to the VIDEO
OUT jack on the back of your DVD Player , and to the V ideo Input jack on
your TV.
OR
B. S-Video (optional) – If your TV has an S-V ideo Input jack, connect the S-
Video cable to the S-VIDEO OUT jack on the back of your DVD Player and to
the S-V ideo jack on your TV . If your TV doesn’ t have S-V ideo, use the basic
video connection listed above.
OR
C. Component video (optional) – If your TV has component video (Y , PB, and
PR jacks) use video-grade cables for the Y , PB, and PRconnections. Note that
it is essential to match the color -coded connectors with a compatible TV . If
your TV doesn’ t have component video, use the S-V ideo or Basic video
connection listed above.
3. Set the VIDEO OUT SELECT switch to S-VIDEO or YPbPr , depending on the type
of connection you used. Either setting works for the Basic video connection (2A).
4. Use a coaxial cable to connect the antenna output on the satellite r eceiver to the
antenna input on the VCR.
5. Use a coaxial cable to connect the OUT TO TV jack on the VCR to the antenna
input on the TV . Go to page 14

14 Chapter 1
Connections and Setup
Install Batteries in the Remote
1. Remove the batter y compar tment cover on the back of the r emote.
2. Insert new batteries. Match the polarities (+ and –) on the batteries with
the diagram on the r emote.
3. Put the batter y compar tment cover back on the r emote.
Important Battery Information
• If you’r e not going to use the r emote for a month or mor e, be sur e to
remove the batteries because they can leak and cause damage.
• Dispose of batteries in the pr oper manner , according to federal, state, and
local regulations.
• Any batter y may leak electr olyte if mixed with a dif fer ent batter y type, if
inserted incor rectly, if all batteries ar e not r eplaced at the same time, if
disposed of in fir e, or if an attempt is made to char ge a batter y not
intended to be r echar ged.
• Discard leaky batteries immediately. Leaking batteries can cause skin
burns or other personal injur y.
Point the Remote in the Right Direction
When you want the r emote to operate the DVD Player , point the r emote at the
DVD Player, not the TV. The remote has to be pointed in the cor rect dir ection
and towar d the cor rect component in or der for the r emote contr ol’s signal to
communicate with the sensor on the component. Make sur e ther e is a clear
path between the r emote contr ol and the component you want to operate so
the signal isn’t blocked.
Turn on the TV and DVD Player
1. Turn on your TV and tune to the cor rect video input channel (see
following page).
2. Press the ON•OFF button on the r emote or on the DVD player itself.

Chapter 1 15
Connections and Setup
How to Find Your TV’s Video Input
Channel
In order to see what’ s playing on your DVD player , you need to tune your TV
to the V ideo Input Channel that cor responds to the jacks you used to hook up
the player to the TV . The video channel on TVs varies for dif fer ent brands and
different models. In or der for your DVD r emote to work, your TV must be set
on the cor rect video input channel. Below ar e some things to tr y.
• If your TV brand is RCA, GE, or Pr oScan, pr ess the TV button on the
remote that came with your TV (not the DVD r emote). Then pr ess the
INPUT button on the r emote.
• If you have another brand, consult your TV’s Owner’s Manual.
If those options don’t work, try one of the following options.
• Press a button on the TV r emote (see table below).
• Select it fr om the TV’ s menu system.
• Tune dir ectly to the DVD input channel by pr essing a specific number
(see table below).
• Go thr ough all the channels in the channel list by pr essing the channel
up/down buttons on the TV .
Some common scenarios ar e listed in the following table:
Video Input Channel Variations
Button/switch Button on the Channel #
on the TV TV Remote
VIDEO VID 1 00
SIGNAL LINE 90
VID 1 VID 91
VID 2 VIDEO 92
S-VID S-VID 93
S-VIDEO INPUT VID 1
S-VIDEO VID 2
SOURCE
AUX

16 Chapter 1
Connections and Setup
3
6
12
5
7
4
89
0
PLAY MODE
FORWARD
STOP PAUSE
INFO
PLAY
REVERSE
REPEAT 3-D
FORMAT
MARKER INDEX
ZOOM
ANGLE
SUBTITLE
AUDIO
OPEN CLOSE
ON OFF
GOBACK
MENU
GUIDE
CLEAR
SKIP -SKIP+
OK
How to Move Around the DVD
Player’s Menu System
The technical ter m for how you move thr ough the DVD
Player’s menu system is “Navigation.”
This book tells you how to select dif fer ent menu items,
but you can explor e the menu system on your own by
following a few “navigational rules.”
Press the ar row buttons on the r emote (highlighted in the
pictur e on the left) to highlight dif fer ent menu items on
the scr een. (In your DVD Player ’s menu, a highlighted
item appears brighter than the other items on the scr een.)
To select a menu item, pr ess OK on the r emote when the
menu item is highlighted.
The invalid symbol appears on the TV scr een when
you press a button that doesn’ t have any function on that
disc.
Set the Menu Language
When you turn on your DVD player for the first time,
the Language Selection screen appears. This screen
sets all language preferences for on-screen displays to
the same language.
If you do not select a language, this screen will appear
each time you turn on the player until you select a
language.
By default, the player’s on-screen displays are shown in
English. If you want the on-screen menus to appear in
English, press OK or PLAY on the remote to accept
the default.
To change the language:
1. Press the number button on the remote which
corresponds to the number of the language you
want to select.
You can use the DVD player menu to set individual
language preferences (see chapter 5).
This is the Language Selection
screen. English is the default
language.
These are the
navigation
buttons

Chapter 1 17
Connections and Setup
The Remote Control Buttons
(listed alphabetically)
This section describes what each button does when the
remote is operating the DVD Player .
3-D Press this button to simulate a 3-D sur round ef fect fr om
2 ster eo speakers (this featur e only works if the disc was
recorded using Dolby Sur round or Dolby Digital).
Arrow buttons Use the ar row buttons (left, right, up, and
down) to move thr ough the on-scr een menus. Y ou highlight a
menu item by pr essing the ar row buttons and select a
highlighted item by pr essing the OK button.
ANGLE Press this button to access various camera angles on
a disc (this featur e only works if the disc contains multiple
camera angles).
AUDIO Use this button to access various audio languages
on a disc (if the disc contains multiple audio str eams).
CLEAR Clears menus and on-scr een displays.
FORMAT If the DVD for mat is 16:9 and if the Scr een For mat
option of the Player Menu is set as 16:9 wide, you can use
this button to toggle the dif fer ent display options.
FORWARD Allows you to sear ch for ward thr ough a disc
while it is in play mode. Each pr ess of the button incr eases
the sear ch speed. When in Pause mode, pr ess to sear ch
forward at slow speed.
GO BACK When you’r e using the DVD Player ’s menu
system, pr ess this button to r etur n to the pr eceding menu
screen.
GUIDE Allows you to see the titles that ar e available on the
current disc (if the disc contains a guide menu).
INDEX Brings up the index scr een for DVD and VCD discs.
INFO Press this button while you’r e playing a disc to see
the on-scr een infor mation banner . The infor mation banner
contains various playback featur es and gives you infor mation
about the disc you’r e playing.
MARKER Press this button to access the Marker info banner .
The Marker info banner allows you to set markers at points
on the disc that you’d like to r etur n to.
MENU To see the disc’ s menu, pr ess this button when
you’r e playing a disc. T o see the DVD player ’s menu, pr ess
this button when a disc is not playing.
Number buttons (0-9) Use the number buttons to input
infor mation such as chapter numbers, track numbers, or to
make selections on some menu scr eens (if a number appears
next to a menu item).
3
6
12
5
7
4
89
0
PLAY MODE
FORWARD
STOP PAUSE
INFO
PLAY
REVERSE
REPEAT 3-D
FORMAT
MARKER INDEX
ZOOM
ANGLE
SUBTITLE
AUDIO
OPEN CLOSE
ON OFF
GO BACK
MENU
GUIDE
CLEAR
SKIP -SKIP+
OK
Note:
Some of the buttons on the
remote (3-D, Angle, etc.) won’t
work if the disc wasn’t created
with that particular feature.
For example, if you press
ANGLE, but the disc’s author
didn’t put multiple camera
angles on the disc, you won’t
see a different angle (the icon
will appear to indicate that
the ANGLE button is inactive).

18 Chapter 1
Connections and Setup
OK Press this button to select a highlighted menu item.
ON•OFF Turns on the player when it is in standby mode;
or puts the player in standby mode when power is on. Pr ess
twice within 3 seconds to tur n off all of the RCA, GE and
PROSCAN components the r emote operates.
OPEN•CLOSE Press and hold to open and close the disc
tray.
PAUSE Pauses disc play. Each subsequent push of the
button advances one frame.
PLAY Begins disc play (and closes disc tray if it is open).
PLAY MODE Press this button to access the Play Mode info
banner to set random and pr ogram playback.
REPEAT Press this button to bring up the Repeat info
banner . You can r epeat par t or all of a chapter , track, or an
entir e disc.
REVERSE Allows you to sear ch backwar d thr ough a disc
while it is in play mode. Each pr ess of the button incr eases
the sear ch speed. When in Pause mode, pr ess to sear ch
backward at slow speed.
SKIP+ Skips to the next chapter , track (VCDs and audio
CDs) or song (MP3).
SKIP- Skips to the pr evious chapter , track (VCDs and audio
CDs) or song (MP3).
STOP Stops disc play.
SUBTITLE When a disc is playing, pr ess this button to show
the Subtitle banner (if the disc was cr eated with subtitles).
ZOOM Use this button to zoom in on the pictur e.
3
6
12
5
7
4
89
0
PLAY MODE
FORWARD
STOP PAUSE
INFO
PLAY
REVERSE
REPEAT 3-D
FORMAT
MARKER INDEX
ZOOM
ANGLE
SUBTITLE
AUDIO
OPEN CLOSE
ON OFF
GO BACK
MENU
GUIDE
CLEAR
SKIP -SKIP+
OK
Table of contents
Other RCA DVD Player manuals