RCA 26LA33RQ User manual

@a
For qualified service personne_ only
Version 1 ,_0
Mode_o
26LASSRQ
Changing Entertainment. Again.
www.rca.com

Revision No. Revision Date Page Description
1 May.24th, 2011 All Initial Release
Version 1.0

1.1 Basic Specifications
Diagonal Display Size
Television System
Channel Coverage
Temperature
Humidity
Power Supply
RF input
Connection
Interface
Video input
Audio input
Audio output
Graphic input
Resolution
Component/HDMI mode
With stand
Dimensions Without stand
With stand
Weight Without stand
Power Consumption
26 inches
American TV standard ATSC/NTSC system
VHF:2_13 UHF: 14_69 CATV: 1_135
Digital Terrestrial Broadcast (8VSB) : 2_69
Digital Cable (64/256QAM) : 1_135
Storage Temperature is _0°C_ +60°C
Operating Temperature is 0°C_+50°C
(-4°F_+ 140°F)
(_32°F_+ 122°F)
Storage Humidity: Less than 85% RH (No condensation)
Operating Humidity: Less than 80% RH (No condensation)
AC 110 V, 60Hz
Cable/Antenna x 1
AVx 1
Component x 1
HDMI x 4
AVx 1
Component x 1
PC Audio In x 1
Headphone x 1, Digital Audio Out x 1, AV x 1
RGB 15pin x 1
1366 x 768
480i, 480p, 720p, 1080i
25.9" W x 18.7" H x 8. 0"D
25.9" W x 17.2" H x 4.3"D
19.8LBS (9.0KGS)
15.9LBS (7.2KGS)
less than 80W
Version 1.0
1

1,2 Product Function
Side Keypad Buttons
If you cannot locate your remote, you can use the side keypad buttons on your TV to operate many TV features.
INPUT: Displays the Source Select List.
MENU: Displays the TV Main Menu.
OH ,, : Scans up through the channel list. In the TV menu system, it acts like the up arrow on the remote control and
can be used to select menu options.
OH ,, : Scans down through the channel list. In the TV menu system, it acts like the down arrow on the remote control
and can be used to select menu options.
VOL+: Increases the volume. In the TV menu system, it acts like the right arrow on the remote control and can be used
to select menu options.
VOL-:Decreases the volume. In the TV menu system, it acts like the left arrow on the remote control and can be used
to select menu options.
POWER (O): Turns the TV on and off.
Front Panel
Power/Standby Indicator: Blue and red dual-color LED. It shows red when the TV is turned off and blue when turned on.
Remote Control Sensor: Remote control IR sensor, which receives infrared ray sent by remote control.
-_ _ _- I
Remote Control Sensor
'_ Power/Standby Indicator
(blue/red)
For more information about TV function, please refer to the User's Manual.
Version 1.0
2

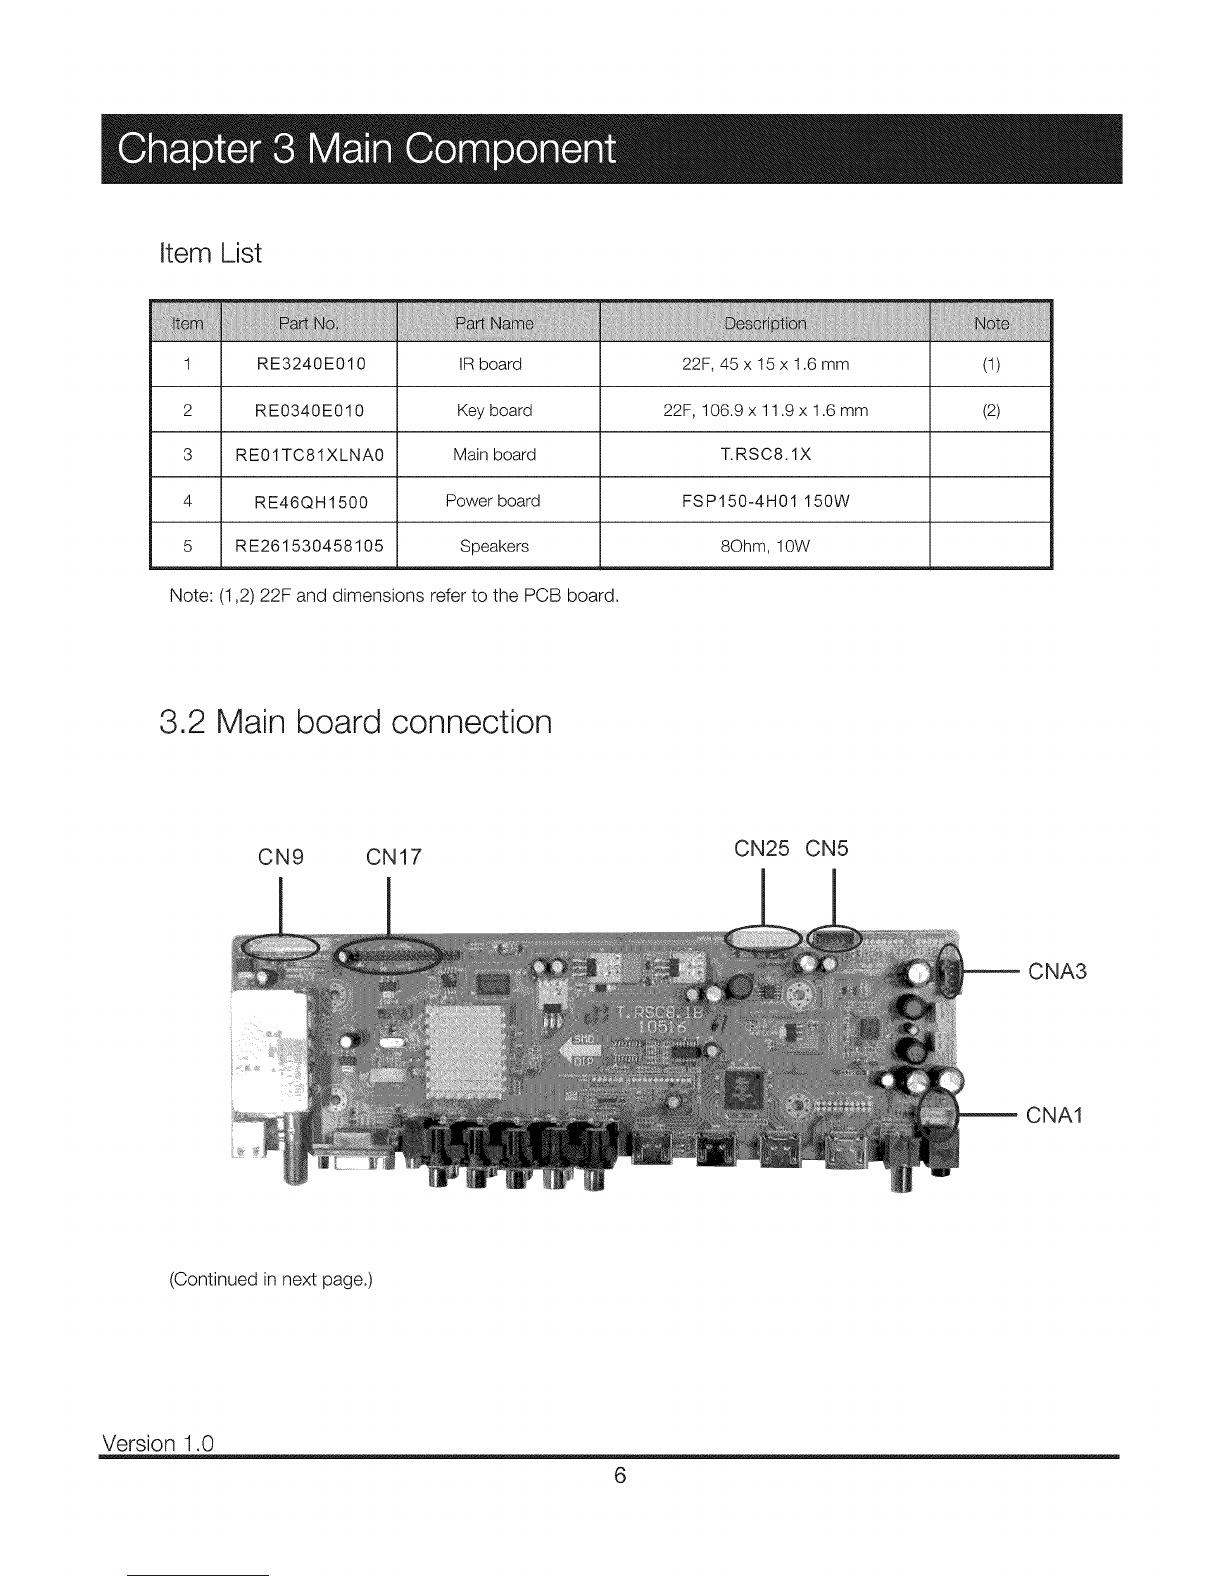
1.3 Connection Interface
HEAD PHONE: Connect a 3.5mm headphone for personal audio.
Digital Audio-out: Connect a coaxial cable for digital audio output.
HDMII, 2, 3, 4: (High-Definition Multimedia Interface) It provides an
uncompressed digital connection that carries both video and audio data by
way of an integrated mini-plug cable.
AUDIO OUTPUT L/R: Connect double-channel coaxial cables for analog
audio output.
Note: .DigitalAudio-out and AUDIO OUTPUT L/R are supposed to be
connected to audio power amplifer, which provides smoother and more
powerful sound performance.
AUDIO-IN L/R, Video In: Connect an AV device that has composite video
jacks, such as a VCR or a DVD player. To access device connected to these
jacks, press the INPUT button on your remote; then press the up/down arrow to
select AV. Press the ENTER button at last to confirm.
• AUDIO-IN L: Left audio channel connection. The left audio connector is usually white.
For mono audio sources, be sure to use the leftAUDIO INPUT.
• AUDIO-IN R: Right audio channel connection. The right audio connector is usually red.
COMPONENT Y/Pb/Pr: Connectadevicethathascomponentvideojacks, such as a DVD player.
To access device connected to the Y/Pb/Prjack, press the INPUT button on your remote; then press the
up/down arrow to select Component. Press the ENTER button at last to confirm.
• Y/Pb/Pr (Component Video): They provide good picture quality because the video signal is separated into
three components.
Use three video-grade or component video cables for the connection. When using Y/Pb/Pr, make sure you
connect left and right audio cables to the Audio L and Audio R jacks.
PC INPUT VGA: Connect your computer or other device withaVGAoutputtothisjackusinga15-pin, D-
sub cable.
PC INPUT Audio-In: Use to obtain sound when a PC is connected to TV. Use 3.5mm stereo mini-pin cable
to connect PC to TV.
ANT/CABLE: Connect to receive the signal from your antenna or cable via coaxial cable.
SERVICE: For service use only. Do not connect any device.
3

2.1 General Information
GENERAL DESCRIPTION
OVERVIEW
V260B2- P03 is a 26-inch TFT LCD cell with driver ICs and Ich-LVDS interface. This module supports
1366 x 768 WXGA format and can display 16.7M colors ( 6 bit+Hi FRC). The backlight unit is not built in
CHARACTERISTICS
CHARACTERISTICS ITEMS
Screen Diagonal in]
Pixels [lines]
Active Area [mm]
Sub Pixel Pitch [mm]
Pixel Arrangement
Weight g]
Physical Size mm]
Display Mode
Contrast Ratio
Glass thickness (Array/CF) [mm]
Viewing Angle (CR>10)
Color Chromaticity
Cell Transparency ]
Polarizer (CF side)
Polarizer (TFT side)
SPECIFICATIONS
26.0
1366" 768
575.769* 323.712
0. 1405 (H)_0. 4215 (V)
RGB vertical stripe
TYP. 850
592(W) x 339.8(H) x 1.84(D) Typ.
TN, Normally White
800:1 Typ.
(Typical value measured at CMOs module)
0.7/0.7
+80/ 80(H), +80/ 70iV) Typ.
(Typical value measured at CMOs module)
R 0.653, 0.326
GO. 272, 0. 587
B 0. 150, 0. 086
W0.311,0. 320
•Please refer to color chromaticity on p. 16
7.0_,OTyp.
(Typical value measured at CMOs module)
Anti Glare coating,
587.4(H) x 335.2(w). Hardness: 3H
587.4 (H) x 335.2 (w),
Hardness: 3H
4

3.1 Inner Structure
Inside cabinet (front)
43
5 5
Version 1.0
5

Item List
1 RE3240E010 IR board 22F, 45 x 15 x 1.6 mm (1)
2 RE0340E010 Key board 22F, 106.9 x 11.9 x 1.6 mm (2)
3 RE01TC81XLNA0 Main board T.RSC8.1X
4 RE46Q H1500 Power board FS P 150-4 H01 150W
5 RE261530458105 Speakers 8Ohm, 10W
Note: (1,2) 22F and dimensions refer to the PCB board.
3.2 Main board connection
CN9 CN17 CN25 CN5
CNA3
CNA1
(Continued in next page.)
Version 1.0
6

Jack List
Jack No, Specification Description Connection I Note
CN25 10 Pin 2.54mm Main power To Power board
CN17 2x20 Pin 2,0ram LVDS interface To LCD panel
CN9 14 Pin 2.0mm IR and keyboard jack To IR board and keyboard
CN5 6Pin2.0mm inverter Jack To LCD panel inverter board Backtightcontrol
CNA3 4 Pin 2.54mm Amplifier power supply jack To power board
CNA1 4 Pin 2.54mm Speaker jack To Speaker
3.3 Power board connection
CON3
CON4
CON1
Jack List
CON1 2 Pin 3.96mm AC input jack To AC power supply
Amplifier power supply To main board
CON3 8 Pin 2.54mm Backlight power supply To LCD panel backlight inverters
CON4 13 Pin 2.54mm Main board power supply To main board
Version 1.0
7

8
3,4 Connection Diagram
Pin flat cable ......... {%
©CON3
@
2 _
o
o_
-_ _ CON4
CON1
8Pin flat cable
Keyboard
26" LCD panel
%
@
@
>
c
Z
6 Pin flatcable
r .....
4Pin to 4.Pin
J _
AC 110V
50/60Hz
flat cable
13Pin to 10Pin flat cable
IR board
5 Pin flatcable
4Pin flat cable °°°,
LVDS double array cable
CN17
CN5
CNA3 o
CN25 _ _
CN9
CNA1
E]_ Left speaker
[_ R_ght
Version 1.0 8

Note: Before opening the cabinet and working on the repairs, please read the troubleshooting and Q&A attached in the
user's manual, which has covered most of the problems caused by unproper using or settings to the TV set. If that does not
work, please carry out the easy troubleshooting before checking or replacing the main parts of the television. The
troubleshooting guides given below base on the situation in which the TV's functions are set and used properly.
Plus, if the easy troubleshooting can not help, please work on the repairing according to the procedures given in chapter 5,
Exception Handles.
4.1 Troubleshooting for Common Use
TV can not be turned on
• Check the connection and condition of wires and inlets that relate to power board, including the AC power inlet, the
power incoming wire, wires between power board and mainboard, etc.
o Check the diagram arround power board to see If there exists a short circuit or creepage.
• The power board may be bad. Please change the board for testing. If it cannot help, refer to the chapter 5 for more
intensive information.
•In addition, the malfunction of LCD panel can cause failure of power on. Please refer to 4.2 Troubleshooting for Displaying
for more information.
Auto turning off
o Check the sleep timer setting.
•Check the surrounding diagram of power board. The problem is most possibly caused by short circuit or wire breakage,
because this kind of malfunctions can cause excessive current, which will make the power board startup self-protection.
The screen goes black after a shorting blink
e Ifthe TV screen can not display after the blink, that means the panel or other parts of equipment is broken (most likely by
unproper input voltage). Ensure the input voltage of every component, and then check the part that is suspected damaged.
o Ifthis problem occurs repeatedly, check the surrounding diagram and connections of panel inverter board. Also, the
blacklight unit and LCD lamps should be checked out.
There exists afterimages after power off
• If the panel can work normally at the other time, it may be caused by bad mainboard. Upgrade to the latest software first,
if that does not work, attempt to change the mainboard.
There exists squeak when TV is working
e IListen to the squeak carefully to make sure where the noise comes from. If it is from speakers, the voice may be caused by
bad speakers. Change them for a try..
• If the noise comes from the inner parts of cabinet, it may be produced by abnormal AC current in power board. Change the
board and check its surrounding circuits for a try.
• Check the routing of wires inside the cabinet to suppress interference.
Version 1.0
9

4.2 Troubleshooting for Displaying
Note: If the troubleshooting given below can not help you, change the LCD panel for a try. But we strongly suggest you
regard changing the panel as the last step of fixing the display problem.
No display (including white screen, black screen, etc.)
• Check the power board output and main board input ports to make sure whether the TV has been turned on successfully,
because the failure in power on can lead to a no-display problem.
o If it is proved to have been electrified and turn on, check the LVDS cable first.
• Check if both of the two plugs of the flat cable between mainboard and power board have been well inserted into the slots.
Unstable power supply can also cause serious display problem.
• If the display problem only happens in one input mode, that may be caused by wrong version software. Update the new
software. If that can't help, change the main board for a try.
Screen tearing, or there exists moire on screen
• Bad LVDS cable and inappropriate panel driving voltage is still the biggest factor of this problem. So check them first.
eIf the cable and voltage are correct, update the software for a try.
o Sometimes the fastening pieces can make unproper pressure to LCD panel, check them out.
• If the screen tearing happens in one or several input sources while the other source can display normally, it can be caused
by bad mainboard most likely. Please change the mainboard for a try.
• Refer to chapter 5 for more details and resolution ways.
Straight darWlight line(s) on screen
•If the bad line is very narrow, it is usually caused by LCD panel malfunction, change the panel for a try.
•If the lines link together and become a bad band, upgrade the software and then check the ports abd circuits of broken-
down output mode(s).
eIf the darWlight line ,or band, apprears inall the input modes, please change the LCD panel. But we suggest you check the
panel inlet board(which links the panel and mainboard though LVDS cable) first, because sometimes the liquid crystal
displaying unit is okay, while the inlet board has a transmitting problem, which also will lead to a displaying failure.
• Refer to chapter 5 for more details and resolution ways.
Color cast or interference
•If the cast or interference happens in only one input mode, check the output port(on mainboard) and transmitting network
(arround mainboard) of that mode.
• If the cast or interference happens in all the input modes, please exclude the malfunction according to easy troubleshooting
for No Display. If that can not help, refer to chapter 5 for more details and resolution ways. In addtion, most of this kind of
problems come from the bad mainboards.
Version 1.0
10

4.3 Troubleshooting for Audio
Note: Comparing with the display problem, the audio malfunctions are easier to work out. Constantly, if you have excluded
the possibility of bad speakers and bad connection of audio output, the problem generally comes from the audio processing
parts of mainboard. Please change mainboard for a try, or refer to chapter 5 for further information about repairing.
No Sound
o Check whether the speakers are broken first.
o Check the wire that links the mainboard and speakers. Watch if there is fracture or cladding material breakage.
• Check the joint of speakers and audio wire, watch if there is poor soldering or fake solder. Besides, the polarity mistake
can also lead to audio problem.
Volume too low
o Check whether there is a jam at the sound hole in front cabinet.
• Check whether one or more speakers are bad.
Sound channel loss or confounding
• Check whether the audio wires are installed reversedly. The left channel wire should be white and the right channel wire
is red.
• Check the audio output socket of mainboard to see whether it is wrongly inserted. If not, the mainboard audio output module
may be bad, refer to chapter 5 for more details and resolution ways.
• If the connection is stable and right, the mainboard audio output module may be bad, refer to chapter 5 for more details
and resolution ways.
Noise
o Check ifthere is anything should not exist in the speaker hollow space (such as screws).
• Check ifthe antihunting EVA is broken or missing.
• Check ifthe speakers are bad.
4.4 Troubleshooting for Keyboard
No key can work
e Check the wire between mainboard and keyborad, watch if there is fracture or cladding material breakage.
• Check the joint of mainboard and keyboard wire, watch if there is poor soldering ofrfake solder.
• Check the resistances that locate on the keyboard PCB. Watch ifthere is wrong or broken ones. Also, the poor soldering
of fake solder should be concerned and checked carefully.
o Check the other components of keyboard(such as capacitances and microswithes) are wrong or bad.
Version 1.0
11

Keys are sunken
• Check the screws that fasten the keyboard to the cabinet. They may be lost or getting loose.
• The key set may be bad, change them.
There is a reacting delay when operating the keys
o That is usually caused by bad keyboard, change it for a try.
Functions of keys are out of order
o Check the keyboard to see whether there is a short circuit between each soldering joint.
• Check all the resistances on PCB board.
o If a key is supposed to be able to achieve more than one functions, but it can achieve not all of them, that is usually
caused by wrong software. Please update the latest and correct software for a try.
• If you can't ensure where the problem comes from, change the keyboard for a try. If that still can't help, refer to chapter 5
for more details and resolution ways.
4.5 Troubleshooting for Remote Control
Note: If the troubleshooting can not help, please change the RC board. If that still can't solve the problem, please refer to
chapter 5 for more details and resolution ways with a will to mainboard repairing.
The RC (remote control, the same below) does not work
• Check the wire between mainboard and RC board, watch ifthere is fracture or cladding material breakage.
• Check the joint of mainboard and RC board wire, watch if there is poor soldering or fake solder. Also, the short circuit
can lead to this problem, too.
o Check the infrared senser that locates on the keyboard PCB. Watch if it is wrong or broken. Also, the poor soldering of
fake solder should be concerned and checked carefully.
• Check the other components of RC board are wrong or bad.
The LCD displays light in wrong color
• The short circuit is the most probable causation factor of this proble. Check the wire and joints for a judgement.
• Check the cable that links mainboard and RC board, watch if it is inserted with wrong location(similar with left-right channel
wire fault for audio).
o Check the LCD assembling, watch if its pins are in wrong location.
Version 1.0
12

Note: The exception handles are prepared for qualified personal only.
5.1 Display Exceptions
5,1.1 Black screen and no display
Note: If the troubleshooting guide can not help you with the obviation of faults, please change the non-conforming
materials to rework.
Can the LED No Yes the other Yes
Does the pin1 is UI6 FLASH
indicator light? of CN25 have 5VSB? power supply IC's
voltage OK? upgrading failed?
Yes Check power board or
connecting wires
_ower board work
iormal after turning on the
No
Is the p2 of
< CN25(Pon) high
Ch20_t hu8_i_ntbr°;cimrC_itcft[°n_ e1
them or change main board m
1
CheckU16 and FLASH,
change the FLASH
Yes
No Yes
I hange the power IC 1
or main board FLASH is bad, change
FLASH or main board
Change the bad RNL 1
Change U8 or main board
Version 1.0
13

5,1 DispJay Exceptions
5.1.2 White screen
- White screen "_
Do pin1-3 of
CN17have 12Vdrvi _
voltage?
No
Yes
No
<.. Check the voltage >
Check the power board
i Change Q8 or R27
_o___
i ChangeU8 or main
board
i
i
Check the LVDS
signal of CN17 open
or s_ort c rcu t?
if the open
circuit is caused by
bad PCB
Sho_ Yes
Check RN6_RN10 is normal? 1
$ 4
ChangeU8 1 ChangeRN6-RN10 1
Version 1.0
14

5.1 Display Exceptions
5.1.3 Dazzling screen
No
_ Reset the driving voltage
Check if the LVDS
cable is bad
No Change LVDS cable
Yes
e if the Yes ]
panel is bad? Change LCD panel J
No
Change main board 1
¢hk" t
Check the power supply and _Upgrade firmware or adjust
clock circuit of U8 P7 LVDS MAP
Version 1.0
15

5,2 Audio Exceptions
5,2.1 No sound (completely)
No sound
Check if there
is audio input
Yes
<_, volume are
Yes
Does CNA1
_ve output signa
No
if the
p13,p14,p37,p38 of
UA1 is ok?
Yes
Check ifp34of
UAI have high
tevel voltage
Yes
Checkifthe plg,
p32 of UA1 have
signal input?
No
No
No
Yes
No
1
Check external equipment
Set the mute and volume 1
Check the TV speakers 1
Audio power supply circuit 1
is bad, change main board 1
Check the MUTB/STB circuit,
if bad, change main board
Yes Check if p1,2 Yes
p35,36 of U20
have output wave
No
Circuit between U8 and CNA1
is bad, change main board
Version 1.0
Circuit between U8 and UA1
is bad, change main board
Change U8
Audio input circuit is bad,
change main board
Change UA1 1
16

5,2 Audio Exceptions
5.2.2 No sound (TV)
Refer to NO SOUND 1
Yes
Check if the circuit
between T1 and U8 is OK
Yes Change U8, if that doesnt
work, change main board
No
Change T1 tuner 1
Version 1.0
17

5.2 Audio Exceptions
5.2.3 No sound (HDMI)
1
Is the signal No _]]_1
source HDMI OK? 1
Unsupported signal, change
input signal of HDMI device
Yes
Check if the PC/AV
sound is normal
No Refer to NO SOUND
Yes
<_ Is the EDID(1) Yes>_l _
Upgraded firmware
Change U7 or U8
or main board
Note (I): EDtD means Extended Display Identification Data
Version 1.0
18
Other manuals for 26LA33RQ
1
Table of contents
Other RCA LCD TV manuals

RCA
RCA RLC3257B User manual

RCA
RCA L42FHD37R - 41.9" LCD TV User manual

RCA
RCA 46LA45RQ User manual

RCA
RCA L40FHD41 User manual

RCA
RCA RLDED3230A-RR User manual

RCA
RCA 46LA55R120Q User manual

RCA
RCA L32WD12 - 32in Widescreen LCD Quick start guide

RCA
RCA J22H760 User manual

RCA
RCA LED24B45RQD User manual

RCA
RCA SCENIUM L37WD14 User manual

RCA
RCA RLC2685A User manual

RCA
RCA 4-INCH COLOR TFT LCD TV User manual

RCA
RCA LRK32G45RQ User manual

RCA
RCA LED32A30RQ User manual

RCA
RCA 46LA45RQ User manual

RCA
RCA RS32H2-EU User manual

RCA
RCA SLD55A55RQ User manual

RCA
RCA 26LB33RQ User manual

RCA
RCA 55LA55R120Q User manual

RCA
RCA 20F424T - 20 Flat-Tube TV User manual