RCA RS2606EA User manual

No film output on this page
RS2606EA 7/16/02 5:29 PM Page 1

POWER
DECK-1
REC/PLAYBACK
PHONES
SOUND SYSTEM
KEVLAR
5 DISC CHANGER
DIGIT
ALAUDIO SYSTEMRS2531
SIMULTANEOUS PLAY AND LOAD SYSTEM
COMPACTDISC AUDIO
CD-RW COMPATIBLE
CLOCKTIMER
BUIL
T
-IN POWEREDSUBWOOFERSYSTEM
CUSTOM/FLATROCK/CLASSIC
POP/JAZ
DIRECT DISC ACCES
DISC
1
DISC
2
DISC
3
SOURCE
BAND
AUTOPROG.
AUTOMATIC RECORDLEVEL/ AUTOSTOPC
SURROUND
KEVLARWOOFER
EQCONTROL
DISCSKIP
OPEN/CLOSE
3
W
A
Y
S
P
E
A
K
E
R
S
Y
S
T
E
M
K
E
V
L
A
R
S
E
P
A
R
A
T
E
E
N
C
L
O
S
U
R
E
S
P
E
A
K
E
R
S
Y
S
T
E
M
3
W
A
Y
S
P
E
A
K
E
R
S
Y
S
T
E
M
S
E
P
A
R
A
T
E
E
N
C
L
O
S
U
R
E
S
P
E
A
K
E
R
S
Y
S
T
E
M
POWERED SUPER WOOFER
Thomson multimedia Marketing Australia Pty Ltd.
Level 6, 7 Macquarie Place
SYDNEY NSW2000
AUSTRALIA
55523540
TIMER
AUTO PROG.
STANDBY
DIGITAL AUDIO SYSTEM
ROCK
/CLASSIC CUSTOM/FLAT POP
D
O
W
N
U
P
DIGITAL AUDIO SYSTEM RS2602
RS2606EA 7/16/02 5:30 PM Page 2

DEMO
DIMMER
DECK-2
PLAYBACK
SUB
WOOFER
VOLUME
D
O
W
N
U
P
HANGER
TEMRS2531
AND LOAD SYSTEM
PROG. SET
REPEAT
SUBWOOFERSYSTEM
CUSTOM/FLAT
POP/JAZZ
CT DISC ACCESS
DISC
3
DISC
5
UTOSTOPCONTINUOUSPLAY/TAPEDUBBING2 - 1
SURROUND
VLARWOOFER
EQCONTROL
TUNE/PRESET
DISC
4
3
W
A
Y
S
P
E
A
K
E
R
S
Y
S
T
E
M
S
E
P
A
R
A
T
E
E
N
C
L
O
S
U
R
E
S
P
E
A
K
E
R
S
Y
S
T
E
M
3
W
A
Y
S
P
E
A
K
E
R
S
Y
S
T
E
M
K
E
V
L
A
R
S
E
P
A
R
A
T
E
E
N
C
L
O
S
U
R
E
S
P
E
A
K
E
R
S
Y
S
T
E
M
POWERED SUPER WOOFER
CD DISPLAY
usermanual
RS2606EA
TUNE/PRESET
OPEN/CLOSE
O SYSTEM
CLOCK PROG./SET
USTOM/FLAT POP/JAZZ VOLUME
D
O
W
N
U
P
RS2606EA 7/16/02 5:30 PM Page 3

Safety Information
EN
WARNING:TO PREVENT FIRE OR ELECTRICAL
SHOCK HAZARD, DO NOT EXPOSETHIS PRODUCT
TO RAIN OR MOISTURE.
SEE MARKING ON BOTTOM / BACK OF PRODUCT
CAUTION
RISKOFELECTRICSHOCK
DONOTOPEN
THE EXCLAMATION
POINT WITHIN THE
TRIANGLE IS A
WARNING SIGN
ALERTING YOU OF
IMPORTANT
INSTRUCTIONS
ACCOMPANYING
THE PRODUCT.
THE LIGHTNING
FLASH AND ARROW-
HEAD WITHIN THE
TRIANGLE IS A
WARNING SIGN
ALERTING YOU OF
"DANGEROUS
VOLTAGE" INSIDE
THE PRODUCT.
CAUTION: TO REDUCE THE
RISK OF ELECTRIC SHOCK,
DO NOT REMOVE COVER
(OR BACK). NO USER-
SERVICEABLE PARTS IN-
SIDE. REFER SERVICING
TO QUALIFIED SERVICE
PERSONNEL.
CAUTION!
Invisible laser radiation when open. Avoid exposure to
beam. Class 1 laser product. This system must be
opened only by qualified technicians to prevent acci-
dents caused by the laser beam.
LASER λ= 780 nm, P max = 5 mW
Rating Information: At bottom of the unit
this unit comply with the existing requirements
In accordance with the rating plate of the unit, this
unit complies with current standards concerning elec-
trical safety and electromagnetic compatibility.
Please respect the environment Before throwing any
batteries away, consult your distributor who may be
able to take them back for specific recycling.
Have a Blast- Just Not in Your Eardrums
Make sure you turn down the volume on the unit
before you put on headphones. Increase the volume to
the desired level only after headphone are in place.
ADVARSEL!
USYNLIG LASERSTRÅLNING VED ÅBNING NAR
SIKKERHEDSAFBRYDERE ER UDE AF FUNKTION.
UNGDÅ UDSAETTELSE FOR STRÅLNING.
VORSICHT!
UNSICHTBARE LASERSTRALUNG
WENN ABDECKUNG GEÖFFNET UND SICHERHEITS–
VERRIEGELUNG ÜBERBRÜCKT.
NICHT DEM LASERSTRAHL AUSSETZEN!
CLASS 1 LASER PRODUCT
LASER KLASSE 1
APPAREIL A LASER
DE CLASSE 1
LUOKAN 1 LASERLAITE
KLASS 1 LASERAPPARAT
CAUTION – INVISIBLE LASER RADIATION
WHEN OPEN AND INTERLOCKS FAILED OR
DEFEATED. AVOID EXPOSURE TO BEAM.
ATTENTION –
RAYONNEMENT LASER INVISIBLE
DANGEREUX EN CAS D'OUVERTURE ET LORSQUE
LA SECURITE EST NEUTRALISEE.
EXPOSITION DANGEREUSE AU FAISCEAU.
VARNING–
OSYNLIG LASERSTRÅLNING NÄR DENNA DEL
ÄR ÖPPNAD OCH SPÄRRAN ÄR URKOPPLADE.
BETRAKTA EJ STRÅLEN.
VARO!
AVAT T AESSA JA SOUJALUKITUSOHITETT
AESSA
OLET AL
TTIINA NÄKYMÄTTÖMÄLLE.
LASERSÄTEILYLLE ÄLÄ KATSO SÄTEESEEN.
AC Power
Important: This set operates
on power 240V~50Hz and
the power cord is supplied
with SAA plug. It complies
with AS/NZS 3250.
FOR ALL YOUR SERVICE NEEDS AND ENQUIRIES
ABOUT THIS PRODUCT, RING 1-800-000-155.
(ONLY APPLICABLE IN AUSTRALIA).
RS2606EA 7/16/02 5:30 PM Page 4

Safety Information
Installation . . . . . . . . . .2
Controls & Indicators
Main Unit . . . . . . . . . . . . . . .3
Tape Player . . . . . . . . . . . . . .3
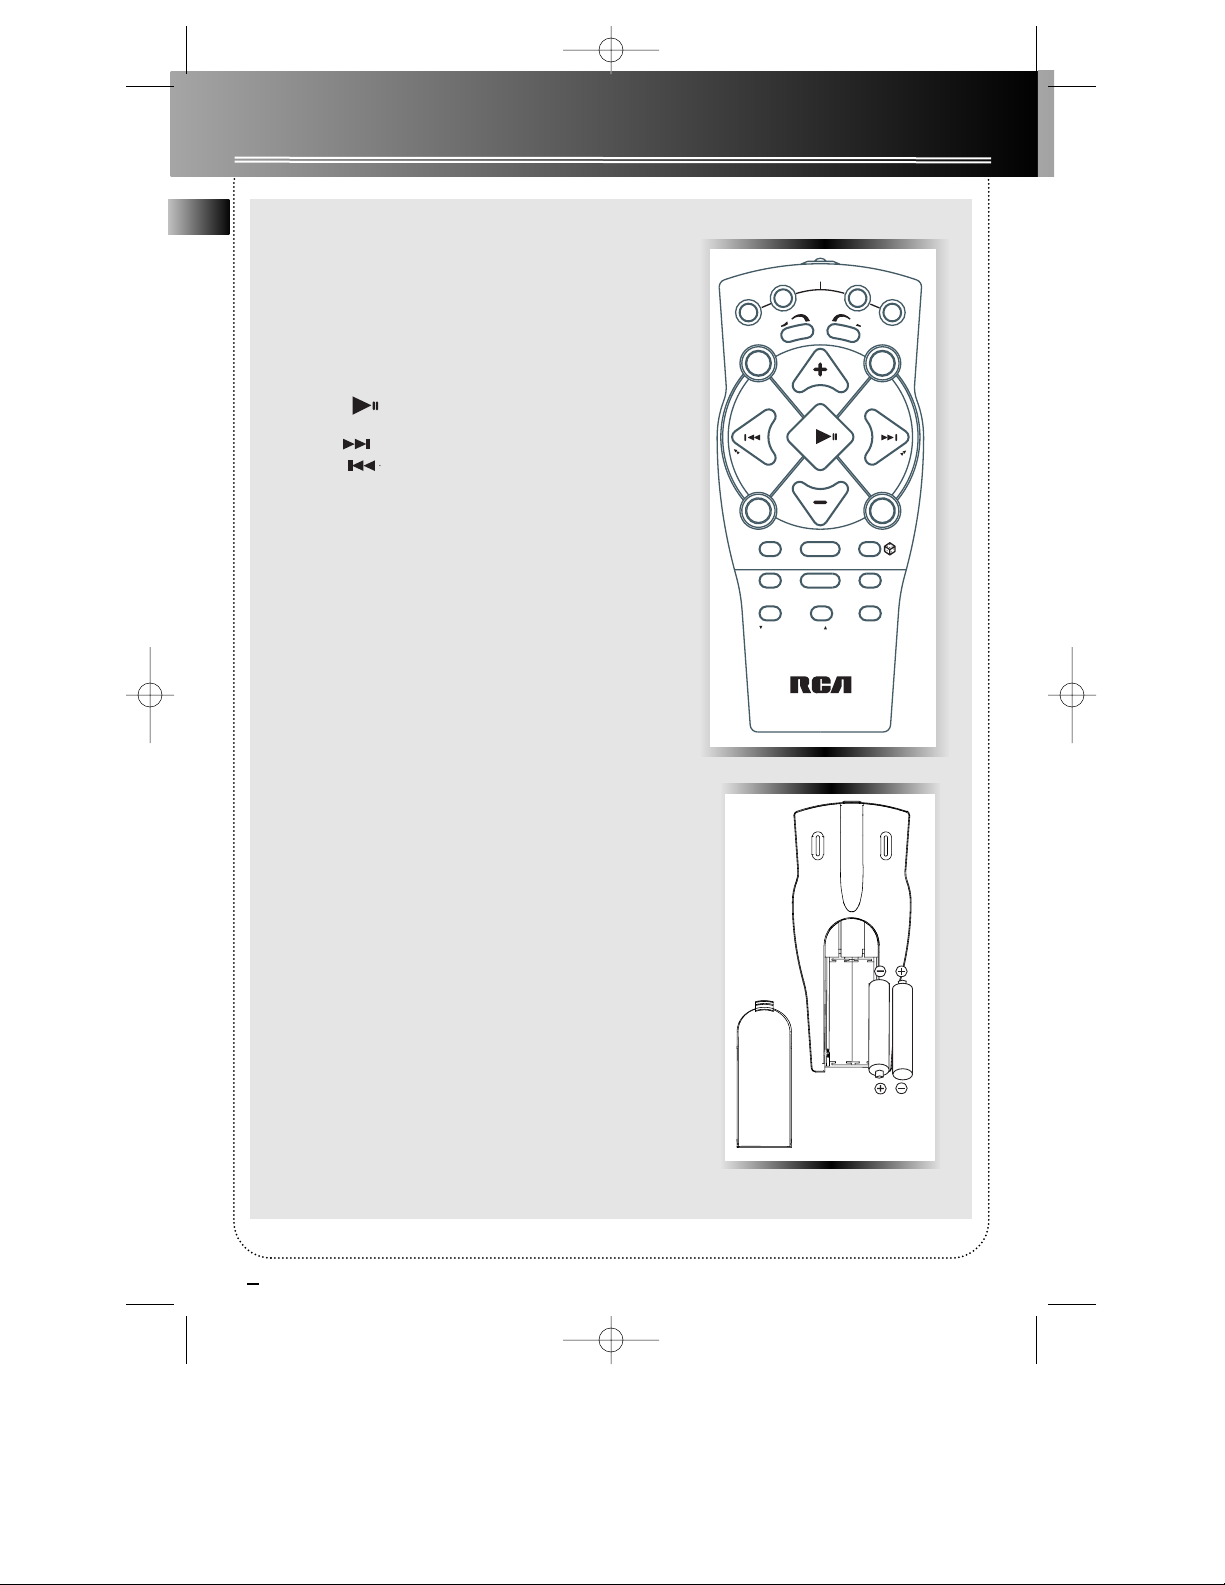
Remote Control . . . . . . . . . .4
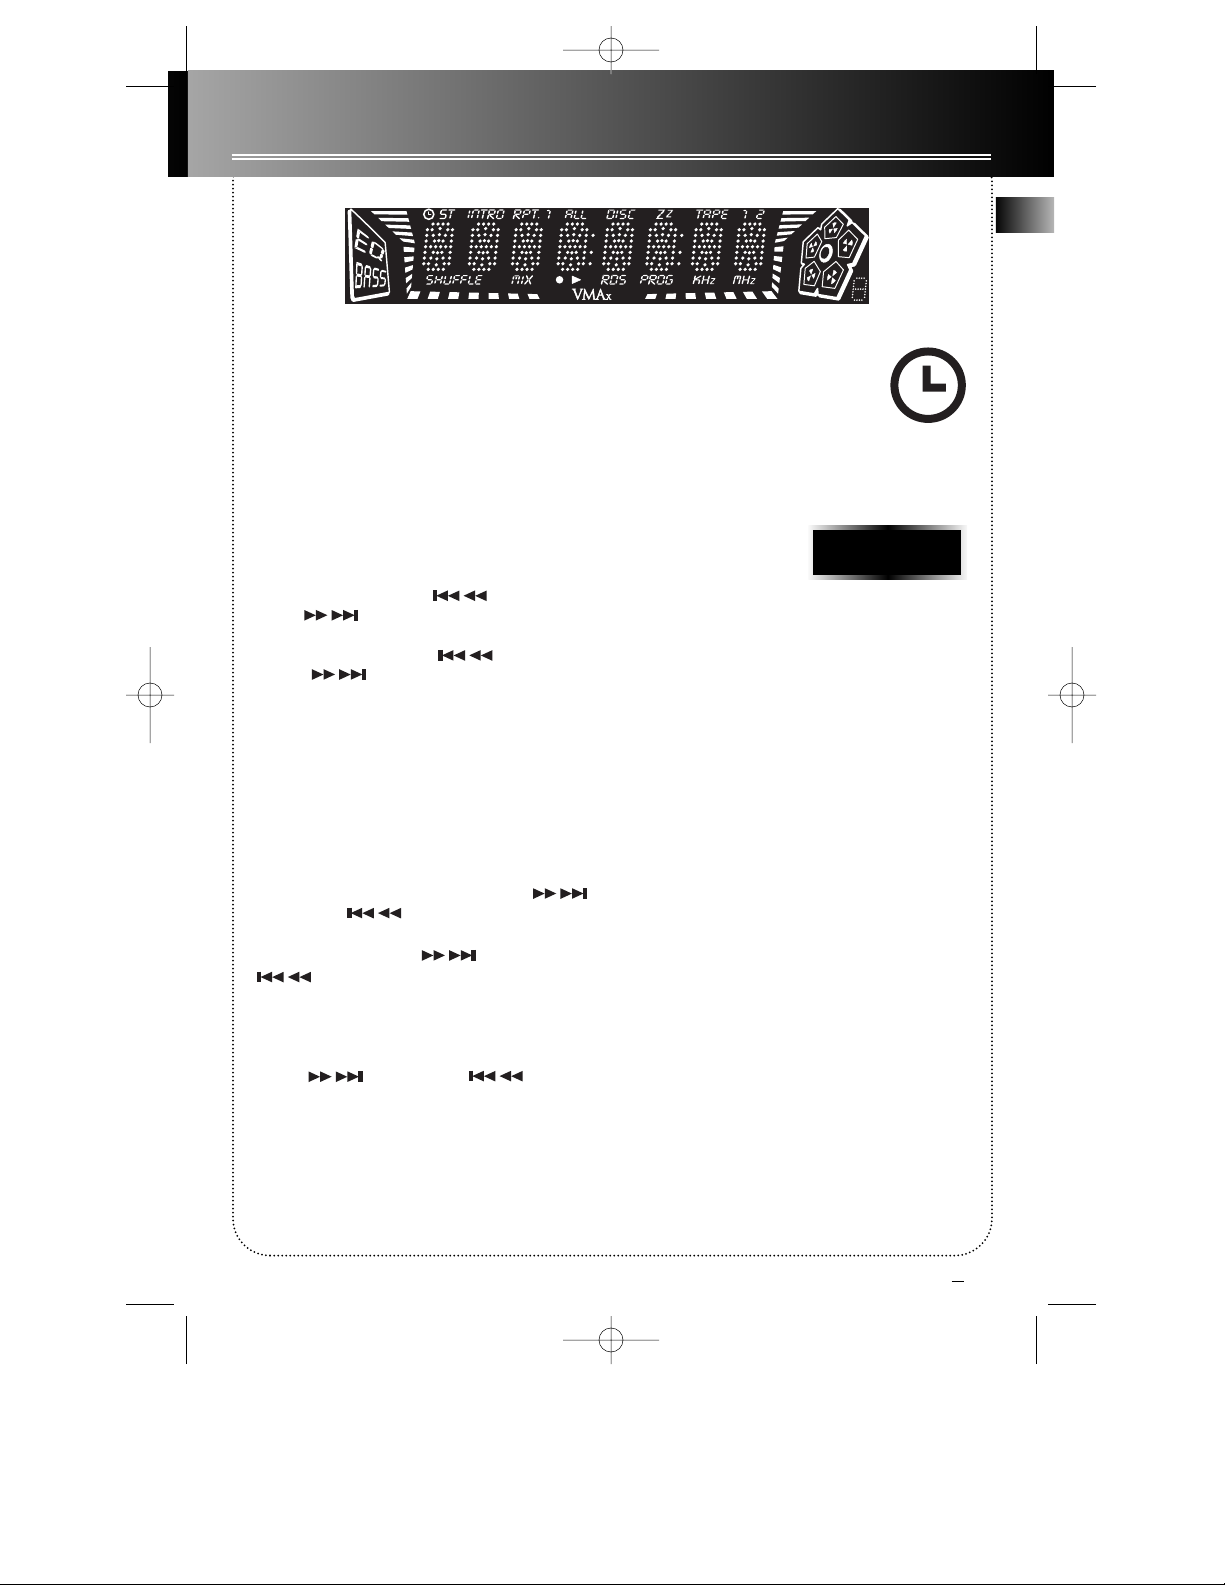
Display
Showing the Demonstration
. . . . . . . . . . . . . . . . . . . . . . . .5
Display Timer/Clock . . . . . . .5
Setting the Time . . . . . . . . .5
Setting the Timer . . . . . . . . .5
Activating the Timer . . . . . .5
Adjusting the Display
Brightness . . . . . . . . . . . . . . .5
Sleep Mode . . . . . . . . . . . . . .5
Sound Features
Using Preset Equalizer Curves
. . . . . . . . . . . . . . . . . . . . . . . .6
Creating a Custom Curve
. . . . . . . . . . . . . . . . . . . . . . . .6
Bass Boost . . . . . . . . . . . . . . .6
Muting Audio . . . . . . . . . . . .6
X- Surround . . . . . . . . . . . . . .6
CD Player
Loading Discs . . . . . . . . . . . .6
Playing Discs . . . . . . . . . . . . .6
Shuffling the Play Order . . .6
Sampling Tracks . . . . . . . . . .6
Repeating the Play Order . .7
Setting Up a CD program . .7
Playing a Program List . . . . .7
Displaying the Program list
. . . . . . . . . . . . . . . . . . . . . . . .7
Deleting a Program List . . .7
Skipping a Disc . . . . . . . . . . .7
Searching through a CD . . .7
Tuner
Tuning to a Station . . . . . . .8
Using Presets . . . . . . . . . . . .8
Auto Preset Program (for FM
only) . . . . . . . . . . . . . . . . . . . .8
Setting Presets . . . . . . . . . . .8
Suppressing Stereo Signal
. . . . . . . . . . . . . . . . . . . . . . . .8
Tape Player
Playing a Tape . . . . . . . . . . .9
Continuous Play . . . . . . . . . .9
Recording . . . . . . . . . . . . . . .9
From Tuner . . . . . . . . . . . . . .9
From CD . . . . . . . . . . . . . . . .9
Tape to Tape . . . . . . . . . . . . .9
From an Auxiliary Input . . .9
Troubleshooting Tips
. . . . . . . . . . . . . . . . . . .10
Maintenance
Cleaning . . . . . . . . . . . . . . .11
CD Player . . . . . . . . . . . . . . .11
Tape Player . . . . . . . . . . . . .11
More Information . . . .12
EN
1
Contents
RS2606EA 7/16/02 5:30 PM Page 5

Installation
TIMER
AUTO PROG.
TUNE/PRESET
OPEN/CLOSESTANDBY
DIGITAL AUDIO SYSTEM
CLOCK PROG./SET
ROCK
/CLASSIC CUSTOM/FLAT POP/JAZZ VOLUME
D
O
W
N
U
P
To ensure sufficient ventilation, keep the spacings shown below free from other surfaces:
10 cm 10 cm
10 cm 5 cm
10 cm
EN
2
1. AM Loop Antenna Connector
2. Auxiliary Connector
3. Surround Speaker Jacks
4. Main Speaker Jacks
5. Subwoofer Speaker Jacks
6. FM Antenna Jack
Unpacking the system:
You should have:
• one main unit (with 2 speakers);
• surround speakers
• one remote control;
• one AM loop antenna;
• T-Type FM antenna wire;
• one user’s guide;
75
Ω
FM
AM LOOP
R L
AUX IN
SURROUND SPEAKERS 8
Ω
MAIN SPEAKERS 6
Ω
R L
R
+ +
- -
~
WOOFER SPEAKERS 6
Ω
+ R - - L +
1
2
3
4
5
6
Release tab to lock wire in
the terminal.
NOTE: Make sure the insulation is completely removed from the
ends of the Antenna and speaker wires at all connection
points.
Antenna and Speaker Wire Connection
Push terminal tab down to
insert wire.
RS2606EA 7/16/02 5:30 PM Page 6

3
Controls and Indicators
EN
Main Unit
OPEN/CLOSE —Opens or closes
the disc tray.
DISC 1 - DISC 5 —Selects disc 1,
2, 3, 4, or 5
DISC SKIP —Skips to the next CD
in the tray
STANDBY/POWER —Turns
power on or off (STANDBY mode).
PHONES —Jack for connecting
headphones
SOURCE—Selects the CD player/
tuner/ tape player/ external source
DIMMER/DEMO —Turns the fea-
ture demonstration on or off,
adjusts display brightness.
STOP / TUNE / PRESET—
Stops CD track, sets tune
or preset mode
SKIP FORWARD —
Increments radio fre-
quency, CD tracks or set-
ting options.
SKIP BACKWARD —
Decrements radio fre-
quency, CD tracks or set-
ting options
PLAY/PAUSE —Plays or
pauses CD
CLOCK —Shows clock time and
enters clock setting mode.
TIMER —Enters timer setting
mode and turns the mode on/off.
BAND/AUTO PROG.
—Changes
between FM and AM tuner
bands. Enters auto preset pro-
gram in FM mode.
REPEAT - Selects among repeat
modes.
PROG./SET- enters program or
setting mode for CD & tuner
mode.
BASS BOOST —Turns Bass boost
on or off
ROCK/CLASSIC, CUSTOM/FLAT,
POP/JAZZ —selects among the
different EQ modes.
X-SURROUND —Press once to
display current setting, press
again while the setting is
shown on display to toggle
Bass Boost on / off.
VOLUME
—I
ncreases/ decreases
volume.
Tape Player
RECORD
PLAY
REWIND
FAST-FORWARD
STOP/EJECT
PAUSE
TIMER
AUTO PROG.
TUNE/PRESET
OPEN/CLOSESTANDBY
DIGITAL AUDIO SYSTEM
CLOCK PROG./SET
ROCK
/CLASSIC CUSTOM/FLAT POP/JAZZ VOLUME
D
O
W
N
U
P
Tip: In STANDBY mode (press
POWER off), the system dis-
plays the time. Press POWER to
turn the system on in the previously used
mode. Press CD, TAPE, TUNER, or AUX
(Remote Only) to select the corresponding
mode. Look at the display icons to identify
the current mode.
RS2606EA 7/16/02 5:30 PM Page 7

Controls and Indicators
4
Remote Control
POWER —Turns power on or off (STANDBY mode).
TUNER —Selects tuner
CD —Selects CD player
TAPE —Selects tape player
AUX —Selects external input.
B-BOOST - Turns B BOOST on or off
VOL+ or VOL- —Increases/ decreases volume
EQ —Selects equalizer presets
PLAY/PAUSE —Plays or pauses current CD
STOP —Stops playing CD
NEXT/FWD —Increments CD track; searches through CD
PREV/REV—Decrements CD track; searches through CD
(Press NEXT/FWD or PREV/REV to tune up/ down tuner frequen-
cy)
DISC SKIP —Skips to next CD
REPEAT —Repeats a track, CD, or all CDs.
MUTE - mutes sound
SHUFFLE —Turns on/off random listening
FM ST. - Toggles between FM stereo and mono
INTRO - Turns INTRO mode on or off to play the first 10 seconds
of each track.
PRESET UP/DOWN —Selects next/ previous preset station
OPEN/CLOSE —opens/closes cd tray door
SLEEP - selects the time interval in minutes before the unit turns
off
X-SURROUND - enables/disables X-surround feature
CD
TUNER TAPE
AUX
SOURCE
E Q
B BOOST
VOL
VOL
REV
PREV
FWD
NEXT
DISC SKIP
PRESET
REPEAT
MUTE
SHUFFLE
SLEEP
FM ST.
DOWN
INTRO
UP
POWER X-SURROUND
OPEN/CLOSE STOP
Battery Size:
“AAA” or “UM-4” or “R03”
EN
RS2606EA 7/16/02 5:30 PM Page 8

Showing the Demonstration
Not operational in CD mode. Press DIMMER/DEMO
to turn on/off demonstration mode. The demonstra-
tion scrolls through all display operations.
DISPLAY TIMER/CLOCK
Setting the Time
1. Press and hold CLOCK until the hour flashes on
the display.
2. Press SKIP BACKWARD or SKIP FOR-
WARD to set the hour and then press
CLOCK to shift to minute digits.
3. Press SKIP BACKWARD or SKIP FOR-
WARD to set the minute.
4. Press SET to save settings and STOP to quit set-
ting.
Note: When system is ON, you can press CLOCK to
display the current time for about 2 seconds.
Setting the Timer
1. Press and hold TIMER until the ON appear with
the hour flashing ( ON - timer on time )
2. For setting time, press SKIP FORWARD /
BACKWARD to set the hour and then
press TIMER to shift to minute digits.
3. Press SKIP FORWARD / BACKWARD
to set the minute.
4. Press TIMER to change to OF (timer off time) with
hour flashing. Repeat steps 2 & 3 for timer off time
setting.
5. Press TIMER to select source. Press SKIP FOR-
WARD / BACKWARD to select
between CD /TUNER / TAPE)
6. Press TIMER to set volume. Rotate the VOLUME
knob to set desired volume level.
7. Press SET to save settings or STOP to quit setting.
Activating the Timer
Press and release TIMER to turn on/off
the alarm. The alarm is active when the
clock icon indicator is lit.
Adjusting the Display Brightness
1. Press and hold DIM-
MER/DEMO for more
than 2 seconds.
2. While the dimmer is dis-
played, press and release
DIMMER/DEMO to select the desired level (DIM 0 -
3).
Sleep Mode
You can select the time interval in minutes before
the unit turns off automatically. Press SLEEP on the
remote to select among 120, 90, 60, 45, 30, 15 & 5
minutes. (Remote Only)
5
EN
Display
DIM 2
RS2606EA 7/16/02 5:30 PM Page 9

CD PLAYER
Loading Discs
1. Press SOURCE repeatedly to select CD mode.
2. Press OPEN/CLOSE to open the drawer.
3. Insert up to five discs with label face up. (Press DISC
SKIP to rotate the disc carrier.)
4. Press OPEN/CLOSE to close the drawer. Loaded disc
position icon lights.
Playing Discs
Press PLAY/PAUSE to begin or pause play, and STOP
to stop play.
Select a specific disc by pressing DISC 1 - DISC 5.
Press SKIP FORWARD / BACKWARD
to select a specific track.
Play and load simultaneously by:
1. Press OPEN/CLOSE to open the tray while a CD is
playing
2. Load/change discs for available trays by pressing
DISC SKIP.
3. Press OPEN/CLOSE to close the tray.
Shuffling the Play Order
Press SHUFFLE to turn on/off the playing of tracks in
random order. (Remote Only)
Sampling Tracks
Press INTRO to play the first 10 seconds of each track
on the current disc, all discs in the tray, or turn INTRO
mode off. (Remote Only)
(Note: You may also press REPEAT to select 1 disc or
all discs before activating INTRO & SHUFFLE func-
tions)
5 DISC CHANGER
DIGITALAUDIO SYSTEM
SIMULTANEOUS PLAY AND LOAD SYSTEM
COMPACTDISC AUDIO
CD-RWCOMPATIBLE
Using Preset Equalizer Curves
Press ROCK/CLASSIC, CUSTOM/FLAT, POP/JAZZ on the
main unit or EQ on the remote to toggle among
FLAT, ROCK, JAZZ, POP, CLASSICAL & CUSTOM. The
display shows briefly the selection.
Creating a Custom Curve
1. Press CUSTOM/FLAT to select CUSTOM mode.
2. While "CUSTOM" is displayed, press SKIP FOR-
WARD / BACKWARD to cycle
among displayed bass-, and treble - range levels.
3. While BAS or TRE is dis-
played, adjust VOLUME
to set the associated gain
between -10 - +10.
Boosting the bass
Press Bass Boost to turn on/off boosting the bass
frequency.
Muting Audio
Press MUTE on the
remote to cut the sound. (Remote Only)
X-Surround
Press X-SURROUND to enjoy enriched sound quality.
This feature gives you:
1. Better width and depth for vocal and instrumental
sound.
2. More powerful presence for studio recording.
3. Enhanced surround effects with greater flexibility
in positioning speakers.
Tip: While playing a CD, press
and hold SKIP-FORWARD or
BACKWARD for more than 2 sec-
onds to search through the CD.
EN
TRE+08
MUTE
Sound Features
6
RS2606EA 7/16/02 5:30 PM Page 10

7
EN
CD Player
Repeating the Play Order
Press REPEAT to repeat the current track, current disc,
all discs, or turn REPEAT mode off.
Setting Up a CD Program
You can program the CD player to play up to any 32
tracks on the CDs in the tray.
1. While the CD player is
stopped, press PROG./SET
to enter
program mode. The sys-
tem displays the next available program number: “- -
P:01,” with “- -” flashing, prompts you for the first
track in the program list.
2. Press SKIP FORWARD / BACKWARD
to select a track (press DISC SKIP or DISK 1
- DISK 5 to select a track from a different disc).
3. Immediately press SET to assign the selected track
to the program number. After 3 seconds, you are
prompted for the next track in the program list.
(In CD program mode, PROG icon will be lit.)
Playing a Program List
While in PROGRAM mode, press PLAY .
Displaying the Program List
1. While the CD player is stopped, press SET to enter
PROGRAM mode.
2. Press SET repeatedly to list each track assignment
in the program list.
Deleting Program List
While in PROGRAM mode, press and hold STOP
for 5 seconds. They system displays the message
CLEAR.
Skipping a Disc
Press DISC SKIP.
Searching Through a CD
Press and hold SKIP FORWARD / BACK-
WARD to search through a CD as it is play-
ing.
Tips: You can create a pro-
gram of up to 32 tracks.
Press CD DISPLAY repeatedly to view
elapsed track time, track number, track
remain time and disc remain time.
Caution: Do not push to force closing of the tray
during CD playback or tray opening.
5 P:01
RS2606EA 7/16/02 5:30 PM Page 11

8
1. Press SOURCE to select TUNER.
2. Press BAND to select between AM or FM radio
band.
Tuning to a Station
Press SKIP FORWARD / BACKWARD
to select frequencies.
Using Presets
The tuner can be either
TUNE or PRESET mode.
When in PRESET mode, the PROG light is on.
Press SKIP BACKWARD or SKIP FOR-
WARD on the main system or PRESET UP
or DOWN on the remote control to access the previ-
ous or next preset station. The display first shows the
preset program number and after a few seconds, the
frequency and preset program number will be dis-
played. (FMPR:01 is FM preset 1)
Note: You can toggle between TUNE or PRESET mode
by pressing TUNE/PRESET button.
Auto Preset
Programming
(for FM only)
Press and hold BAND button for 2 second to scan sta-
tions in the selected band. The stations will then be
stored as preset channels. A Maximum 32 stations can
be stored. Beware of your preset channels being
erased accidentally because the scanning and storing
process is automatic upon pressing the button.
You can stop the automatic scan by pressing any but-
ton, but the erased stations cannot be recovered.
Setting Presets
1. Press SKIP FORWARD / BACKWARD
to access the desired frequency.
2. Press the SET button once.
3. The most recently accessed program location will
be displayed.
4. If a different program location is preferred, press
SKIP BACKWARD / FORWARD
to move to the desired preset number (1-32).
5. Press SET to store the selected frequency at that
preset.
Suppressing Stereo Signal
Press FM ST to toggle between FM mono and stereo
for stereo FM stations. (Remote Only)
PR:01
87.50 MHz
TIMER
AUTO PROG.
TUNE/PRESET
OPEN/CLOSESTANDBY
CLOCK PROG./SET
ROCK
/CLASSIC CUSTOM/FLAT POP/JAZZ VOLUME
D
O
W
N
U
P
Tip: Your audio system has 32 preset stations.
EN
Tuner
RS2606EA 7/16/02 5:30 PM Page 12

9
EN
Tape Player
Playing a Tape
Tip: You can play a tape from either deck.
1. Press SOURCE repeatedly to select TAPE.
2. Press STOP/EJECT to open the cassette door.
3. Insert a tape into the door and push the door
closed.
4. Press REWIND /FAST FORWARD to posi-
tion the tape to the desired starting position. (Deck 1
Only)
5. Press PLAY to start playback.
Continuous Play
1. Insert a tape into deck 2 and start playback.
2. Insert a tape into deck 1 and press PLAY and
PAUSE together.
3. When the tape in deck 2 finishes playback, PAUSE
at deck 1 will be released automatically and start
playback.
Recording
From Tuner
1. Insert a tape into deck 1.
2. Press SOURCE repeatedly to select TUNER and to
access the desired radio band.
3. Tune to the station to be recorded.
4. Press RECORD to begin recording.
5. Press STOP/EJECT to end recording.
From CD
1. Insert a tape into deck 1.
2. Press SOURCE repeatedly to select CD.
3. Insert the disc(s) to be recorded.
4. Select the track, CD, or program to be recorded.
5. Press RECORD to begin recording.
6. CD begins to play.
7. Press STOP/EJECT to end recording.
Tape to Tape
1. Insert the destination tape in deck 1.
2. Insert the source tape into deck 2.
3. Press PAUSE and then RECORD on deck 1.
4. Press PLAY on deck 2. The playback and
recording start simultaneously.
From an Auxiliary Input
1. Insert the cassette in deck 1.
2. Check that the auxiliary device has been connected
correctly to the AUX connector on the back of the
audio system.
3. Start playback on the auxiliary device.
4. Press RECORD on deck 1 to begin recording.
5.. Press STOP/EJECT to end recording.
RS2606EA 7/16/02 5:30 PM Page 13

10
Troubleshooting Tips
Solution
• Check power cord for a secure
connection.
• Unplug the unit for a moment, and
then plug into power source again.
• Check the outlet by plugging in
another device.
• Increase the volume setting.
• Check connection to speakers.
• Check that you have selected the
appropriate function: CD, TAPE, Tuner.
• Make sure mute is off.
• Check antenna connection.
• Move antenna.
• Turn off nearby electrical appliances,
such as hair dryer, vacuum cleaner,
microwave, fluorescent lights.
• Check that CD is in the tray.
• Check that CD label is facing up.
• Check that PAUSE mode is not on.
• Check that CD function is selected.
• Use CD lens cleaner.
• Clean the disc.
• Clean the disc.
• Check disc for warping, scratches, or
other damage.
• Check if something is causing the
system to vibrate. If so, move the
system.
• Make sure the speakers are at least 3
feet away or on a different surface
from the main unit.
Problem
System will
not turn on
No sound
Poor radio
reception
CD does
not play
CD sound
skips
Problem
CD button
will not
respond, or
does not
change
discs when
you press
DISC SKIP
Distorted or
noisy tape
recordings
Remote
control
does not
work
Solution
• Switch to another function (TAPE,
Tuner) and then back to CD.
• Inspect the tape heads, clean it if
neccessary.
• Check that the batteries are properly
installed.
• Replace weak batteries.
• Check the system is plugged into
power source.
• Point the remote directly at the
system’s front panel.
• Move closer to the system.
• Remove any obstacles between the
remote and the system.
EN
RS2606EA 7/16/02 5:30 PM Page 14

11
EN
Maintenance
Disconnect the audio system from the power source
before performing any maintenance.
Cleaning
Clean the exterior of the system using a soft dust
cloth.
CD Player
CAUTION! This system operates with a laser. It must
be opened by only a qualified technician.
Tape Player
To prevent deterioration of sound quality, periodical-
ly open the door of each deck and clean the magnetic
heads, pinch roller, and capstan with a cotton bud
dipped in alcohol. Also, demagnetize the head by
playing a demagnetizing cassette (available through
an audio equipment store).
To protect recordings on
one or both sides of a tape,
remove the corresponding
tab. If you later want to
record on the tape, affix a
piece of adhesive tape over the hole.
Quit Slacking - A little bit of slack
in your tapes can cause scratches
on the tape, or worse yet, the
tape could break. If you notice
some slack in the tape, use a
pencil to tighten it up before
you insert it.
Handling CDs
• Do not touch the signal surfaces. Hold CDs by the
edges, or by one edge and the hole. Do not affix
labels or adhesive tapes to the label surfaces. Do not
scratch or damage the label. CDs rotate at high
speeds inside the player. Do not use damaged
(cracked or warped) CDs
Cleaning CDs
• Dirty CDs can cause poor sound quality. Always
keep CDs clean by wiping them gently with a soft
cloth from the inner edge toward the outer perime-
ter.
• If a CD becomes dirty, wet a soft cloth in water,
wring it out well, wipe the dirt away gently, and
then remove any water drops with a dry cloth.
• Do not use record cleaning sprays or antistatic
agents on CDs. Also, never clean CDs with benzene,
thinner, or other volatile solvents which may cause
damage to disc surface
CD Lens Care
When your CD lens gets dirty it can also cause the
system to output poor sound quality. To clean the
lens you will need to purchase a CD lens cleaner
which can maintain the output sound quality of
your system. For instructions on cleaning the CD
lens, refer to the ones accompanying the lens
cleaner.
A
Side A Protection
B
Side B Protection
A
RS2606EA 7/16/02 5:30 PM Page 15

12
More Information
EN Safety Precautions
• Never open the cabinet under any circumstances.
Any repairs or internal adjustments should be made
only by a trained technician.
• Never operate this product with the cabinet
removed.
•Do not use your System immediately after transport-
ing it from a cold place to a warm place, as
condensation may cause the system to malfunction.
• Keep your unit away from humid areas and
abnormally hot places.
• Do not touch the player with wet hands. If any
liquid enters the player cabinet, take the player to a
trained technician for inspection.
• This compact disc player uses a laser to read the
music on the disc. The laser mechanism corresponds
to the cartridge and stylus of a record player.
Although this product incorporates a laser pick-up
lens, it is completely safe when operated according to
directions.
• Discs rotate at high speed inside the player. Do not
use damaged, warped, or cracked discs.
• Do not touch the pick-up lens which is located
inside the disc compartment. To keep dust from
collecting on the pick-up lens, do not leave the
compartment door open for an extended period of
time. If the lens becomes dirty, clean it with a soft
brush, or use an air blower brush designed for
camera lenses.
• The apparatus shall not be exposed to dripping and
splashing.
Important Battery Information
• Remove the batteries to avoid leakage if you do not
use your remote control for more than one month.
• Discard leaky batteries immediately as leaking bat-
teries may cause skin burns or other personal injuries.
Dispose of batteries in the proper manner, according
to provincial and local regulations.
• Any battery may leak electrolyte under the follow-
ing circumstances:
- if mixed with a different battery type,
- if inserted incorrectly,
- if all batteries are not replaced at the same time,
- if disposed of in fire, or
- if an attempt is made to charge a battery not
intended to be recharged.
Headset Safety
• Do not play your headset at high volume.
Hearing experts warn against extended high-vol-
ume play.
• If you experience ringing in your ears, reduce vol-
ume or discontinue use.
• You should use with extreme caution or temporar-
ily discontinue use in potentially hazardous situa-
tions.
Even if your headset is an open-air designed to let
you to hear outside sounds, do not turn up the vol-
ume so high that you are unable to hear what is
around you.
Don’t Infringe
This product should only be used for the purposes
for which it is sold, that is, entertainment, violating
no copyright law. Any attempts to use this product
for which it is not intended is unlawful and there-
fore not condoned by Thomson multimedia.
Technical Specification
Power supply: 240V~50Hz
Dimensions ( H x W x D mm0):
Unit size - 329 x 306 x 390
Main Speaker - 329 x 240 x 230
Surround Speaker - 86x 175 x 68
Tape deck: Response curve: 125Hz-8kHz (-5dB)
CD player: Response curve (+/- 2dB): 60Hz to 15 kHz
Rating Plate: Look for it at the back of the set.
RS2606EA 7/16/02 5:30 PM Page 16
Table of contents
Other RCA Speakers manuals