RCA RS2060i User manual

RS2060i
It is important to read this instruction book prior to using your new product for the first time.
Nous vous recommandons de lire ce manuel d’instructions avant d’utiliser votre nouveau produit pour la première fois.
Es importante leer este manual antes de usar por vez primera su euipo.
User manual
Guide de l’utilisateur
Manual de usuario
iPod not included.
iPod non inclus.
iPod no incluido.
RS2060i EN(18_12_06) 18/12/06 11:35 AM Page 3

FCC Information
This device complies with Part 15 of the FCC
Rules. Operation is subject to the following two
conditions: (1) This device may not cause harmful
interference, and (2) this device must accept any
interference received, including interference that
may cause undesired operation.
In accordance with FCC requirements, changes or
modifications not expressly approved by Thomson
Inc. could void the user’s authority to operate this
product.
This device generates and uses radio frequency
(RF) energy, and if not installed and used
properly, this equipment may cause interference
to radio and television reception.
If this equipment does cause interference to radio
or television reception (which you can determine
by unplugging the unit), try to correct the
interference by one or more of the following
measures:
•Re-orient the receiving antenna (that is, the
antenna for the radio or television that is
"receiving" the interference).
•Move the unit away from the equipment that
is receiving interference.
•Plug the unit into a different wall outlet so
that the unit and the equipment receiving
interference are on different branch circuits.
If these measures do not eliminate the
interference, please consult your dealer or an
experienced radio/television technician for
additional suggestions. Also, the Federal
Communications Commission has prepared a
helpful booklet, "How To Identify and Resolve
Radio TV Interference Problems." This booklet is
available from the U.S. Government Printing
Office, Washington, DC 20402. Please specify
stock number 004-000-00345-4 when ordering
copies.
This product complies with DHHS Rules 21 CFR
Subchapter J. Applicable at the date of
manufacture.
For Your Safety
The AC power plug is
polarized (one blade is wider
than the other) and only fits
into AC power outlets one
way. If the plug won’t go into
the outlet completely, turn
the plug over and try to insert it the other way. If
it still won’t fit, contact a qualified electrician to
change the outlet, or use a different one. Do not
attempt to bypass this safety feature.
CAUTION: To prevent electric shock, match wide
blade of plug to wide slot, fully insert.
Main plug is used as the disconnect device, it
shall remain readily operable and should not be
obstructed during intended used.
To be completely disconnected the apparatus
from supply mains, the main plug of the
apparatus shall be disconnected from the mains
socket outlet completely.
FCC Information
EN
RECORD
Headphone Safety
Make sure you turn down the
volume on the unit before you
put on headphones. Increase
the volume to the desired level
only after headphones are in
place.
RS2060i EN 4/10/06 5:48 PM Page 4

EN
The descriptions and characteristics given in this document are given as a general indication and not as a guarantee.
In order to provide the highest quality product possible, we reserve the right to make any improvement or
modification without prior notice. The English version serves as the final reference on all products and operational
details should any discrepancies arise in other languages.
Technical Specification
Product: 5CD Audio System
Brand: RCA
Model: RS2060i (Audio System)
Electrical Consumption:
Power Supply: 120V~60Hz
Power consumption: 150 Watts
IMPORTER
Comercializadora Thomson de México,
S.A. de C.V.
Álvaro Obregón No. 151. Piso 13.
Col. Roma. Delegación Cuauhtémoc
C.P. 06700. México, D.F.
Telefono: 52-55-11-020360
RFC: CTM-980723-KS5
For Your Records
In the event that service should be required, you
may need both the model number and the serial
number. In the space below, record the date and
place of purchase, and the serial number:
Model No.
Remote Control No.
Date of Purchase
Place of Purchase
Serial No.
Service Information
This product should be serviced only by those
specially trained in appropriate servicing
techniques. For instructions on how to obtain
service, refer to the warranty included in this
Guide.
WARNING:TO PREVENT FIRE OR ELECTRICAL
SHOCK HAZARD, DO NOT EXPOSETHIS PRODUCT
TO RAIN OR MOISTURE.
SEE MARKING ON BOTTOM / BACK OF PRODUCT
CAUTION
RISKOFELECTRICSHOCK
DONOTOPEN
THE EXCLAMATION
POINT WITHIN THE
TRIANGLE IS A
WARNING SIGN
ALERTING YOU OF
IMPORTANT
INSTRUCTIONS
ACCOMPANYING
THE PRODUCT.
THE LIGHTNING
FLASH AND ARROW-
HEAD WITHIN THE
TRIANGLE IS A
WARNING SIGN
ALERTING YOU OF
"DANGEROUS
VOLTAGE" INSIDE
THE PRODUCT.
CAUTION: TO REDUCE THE
RISK OF ELECTRIC SHOCK,
DO NOT REMOVE COVER
(OR BACK). NO USER-
SERVICEABLE PARTS IN-
SIDE. REFER SERVICING
TO QUALIFIED SERVICE
PERSONNEL.
Portions based upon Microsoft Windows Media Technologies.
Copyright © 1999 Microsoft Corporation. All Rights Reserved. Microsoft, Windows Media, and the Windows Logo are
trademarks or registered trademarks of Microsoft Corporation in the United States and/or other countries.
iPod is a registered trademark of Apple Inc.
RS2060i EN 4/10/06 5:48 PM Page 5

Safety Precautions
• Never open the cabinet under any
circumstances. Any repairs or internal
adjustments should be made only by a
trained technician.
• Never operate this product with the cabinet
removed.
•Do not use your Unit immediately after
transporting it from a cold place to a warm
place, as condensation may cause the unit to
malfunction.
• Keep your unit away from humid areas and
abnormally hot places.
• Do not touch the player with wet hands. If
any liquid enters the player cabinet, take the
player to a trained technician for inspection.
• This compact disc player uses a laser to read
the music on the disc. The laser mechanism
corresponds to the cartridge and stylus of a
record player. Although this product
incorporates a laser pick-up lens, it is
completely safe when operated according to
directions.
• Discs rotate at high speed inside the player.
Do not use damaged, warped, or cracked discs.
• Do not touch the pick-up lens which is located
inside the disc tray. To keep dust
from collecting on the pick-up lens, do not
leave the tray door open for an
extended period of time. If the lens becomes
dirty, clean it with a soft brush, or use an air
blower brush designed for camera lenses.
• The apparatus shall not be exposed to dripping
or splashing and that no objects filled with
liquids, such as vases, shall be placed on the
apparatus.
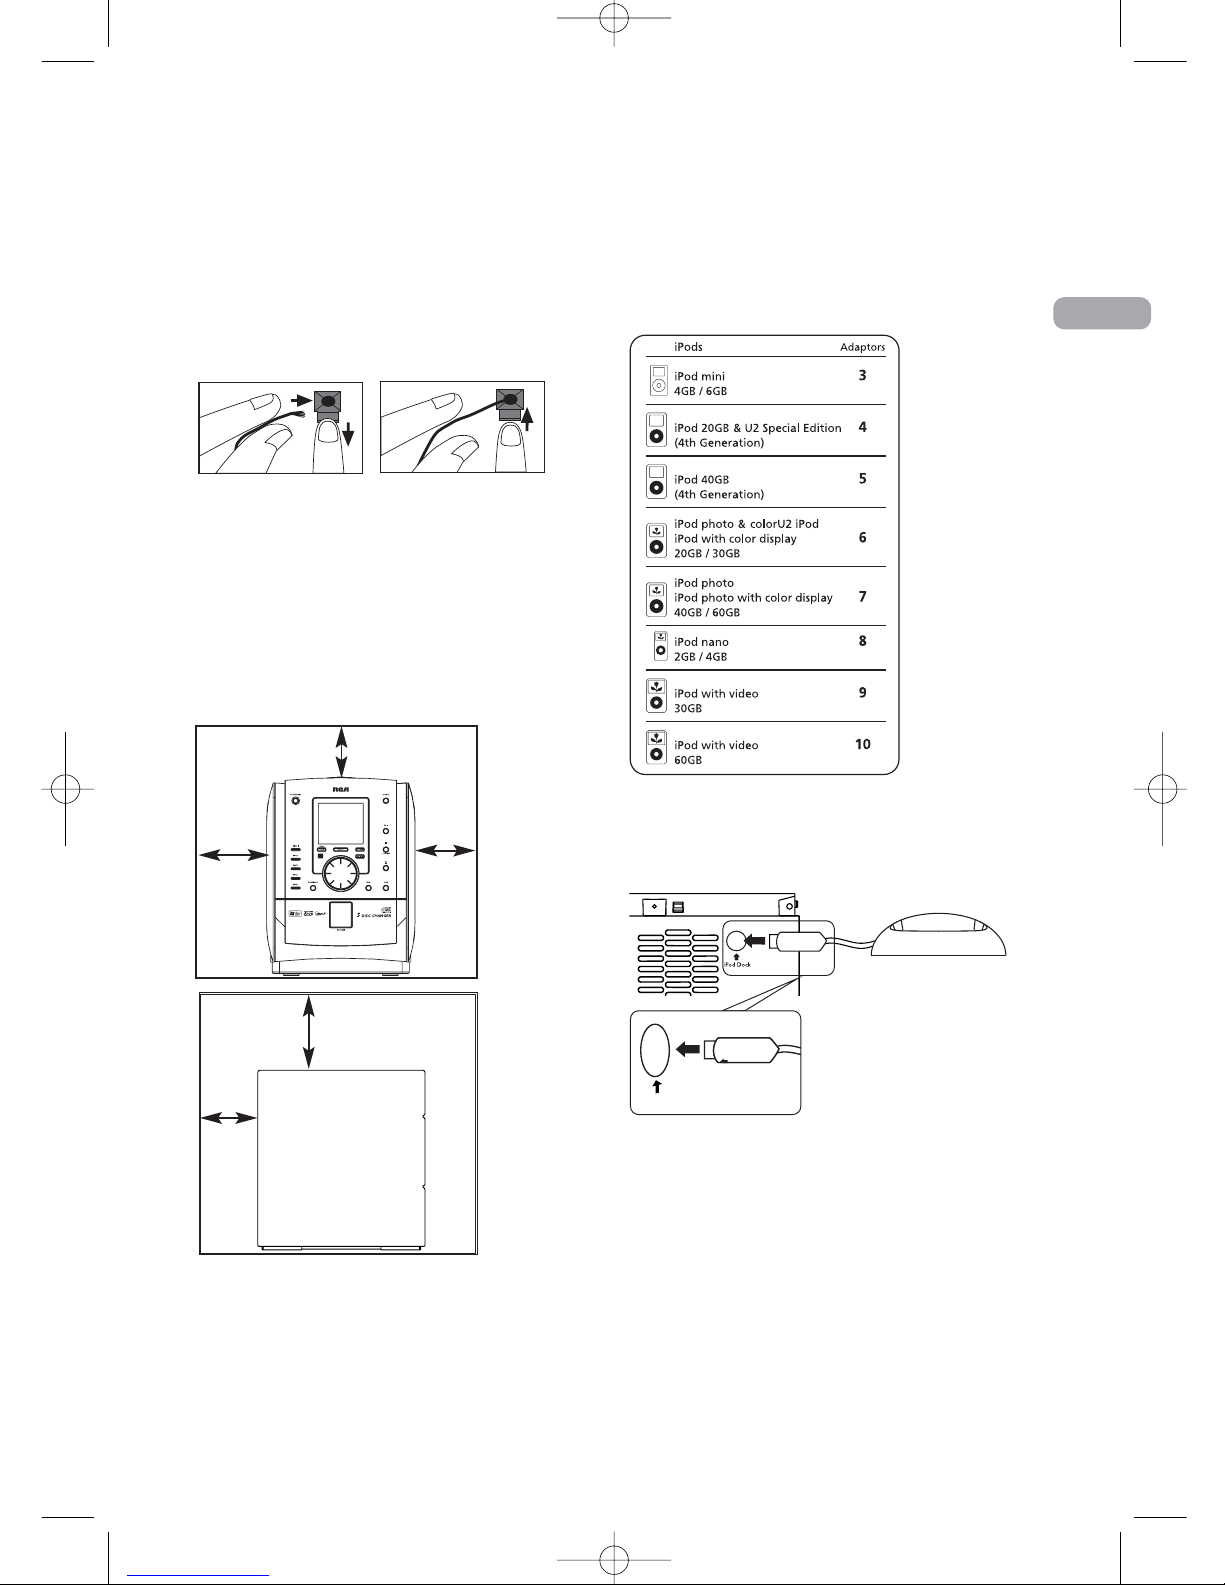
•Minimum distances around the apparatus for
sufficient ventilation .
•The ventilation should not be impeded by
covering the ventilation opening with items,
such as newspaper,table-cloths,curtains,etc.
•No naked flame sources, such as lighted
candles,should be placed on the apparatus.
•Attention should be drawn to the
environmental aspects of battery disposal .
Important Battery Information
• Remove the batteries to avoid leakage if you
do not use your remote control for more than
one month.
• Discard leaky batteries immediately as leaking
batteries may cause skin burns or other
personal injuries. Dispose of batteries in the
proper manner, according to provincial and
local regulations.
• Any battery may leak electrolyte under the
following circumstances:
- if mixed with a different battery type,
- if inserted incorrectly,
- if all batteries are not replaced at the same
time,
- if disposed of in fire, or
- if an attempt is made to charge a battery
not intended to be recharged.
Please Respect the Environment!
Before throwing any batteries away, consult your
distributor who may be able to take them back
for specific recycling.
Don’t Infringe
This product should only be used for the purposes
for which it is sold, that is, entertainment,
violating no copyright law. Any attempts to use
this product for which it is not intended is
unlawful and therefore not condoned by
Thomson.
EN
Important Information
RS2060i EN 4/10/06 5:48 PM Page 6

1
EN
Getting Started
. . . . . . . . . . . . . . . . .
2
Content of Box
Connections
General Controls
. . . . . . . . . . . . . . . . .
4
Main Unit
Remote Control . . . . . . . . . . . . . . . . . . . . . . . . .5
Display
. . . . . . . . . . . . . . . . . . . . . . . . . . .
6
Settings
. . . . . . . . . . . . . . . . . . . . . . . . . . .
7
Setting the Clock/Timer
Sleep Mode
Sound Features
. . . . . . . . . . . . . . . . . .
8
Volume Control
Bass Boost and Equalizer
CD and mp3 Disc Playback
. . . . . . .
8
USB Playback
. . . . . . . . . . . . . . . . . . . .
10
Connecting USB device to the Main Unit
Selecting USB Mode
USB Playback Features
Memory Usage
Radio
. . . . . . . . . . . . . . . . . . . . . . . . . . . .
10
Selecting Tuner Mode
Selecting Tuner Band
Tune Mode and Preset Mode
Tune Mode
Preset Mode
Suppressing Stereo Signal . . . . . . . . . . . . . . . .11
Recording to the USB drive
. . . . .
11
An Overview
Recording Tuner/AUX to USB drive . . . . . . . .12
Deleting Files from USB drive
Deleting All Files
iPod Mode
. . . . . . . . . . . . . . . . . . . . . .
13
Connecting iPod Dock
Playing Files via iPod
Playback Features
Charging your iPod
Advanced Playback Controls
. . . .
14
Intro/ Repeat/Random
Setting Up a Program List
Rename Tracks . . . . . . . . . . . . . . . . . . . . . . . . .15
Advanced Navigation Controls .15
File Navigation
Main Unit
Remote Control . . . . . . . . . . . . . . . . . . . . . .16
Display
Tips on Playback Sequence of Disc . . . . . . . . .17
Troubleshooting Tips
. . . . . . . . . . . .
18
Maintenance
. . . . . . . . . . . . . . . . . . . .
19
Cleaning
Handling CDs
CD Lens Care
Technical Specification
Limited Warranty (U.S.)
. . . . . . . . .
20
Limited Warranty (Canada)
. . . . .
21
Contents
RS2060i EN 4/10/06 5:48 PM Page 7

2
EN
Getting Started
Content of Box
Connections of Antennas and Speakers
1. AM Loop antenna Jack.
2. AUX IN.
3. FM Pigtail Antenna.
4. Main Speaker Jacks.
5. iPod dock socket.
Using the FM and AM Antennas
Before you use your unit, you’ll want to make
sure both the FM and AM antennas are
positioned properly.
Uncoil the FM antenna at the back of the unit,
making sure it is fully extended (you may even
want to tape it to the wall behind the unit if
possible. The higher the better.) You’ll also need
to connect the AM antenna loop to the back of
the unit if you listen to AM stations. Rotate the
AM loop antenna for better reception.
one AM loop antenna
RS2060i
one main unit two main speakers
one iPod dock and
eight adapters
User Manual
Quick Start Guide
Safety Leaflet
one remote control
~
1
3
24
5
Owner
Registration
Card
d
RS2060i EN 4/10/06 5:48 PM Page 8

EN
Connecting the Speakers
Each speaker has a black (negative) and a red
(positive) wire. When connecting the speakers,
match the red wires to the red jacks and the
black wires to the black jacks.
Installation
To ensure sufficient ventilation, keep the space
shown below free from other surfaces:
Connecting iPod Dock
1. Check the table and use the appropriate
adapter for your iPod.
2. Install the correct adapter to the dock.
3. Connect the USB cable from the iPod dock to
the iPod dock socket at the back of the unit.
4 inches
2 inches
Side View
Release tab to lock wire in
the terminal.
NOTE: Ensure the insulation is completely removed from the
of the speaker wires at all connection points.
Push Speaker terminal tab
down to insert wire.
ends
4 inches
4 inches
Front View
4 inches
3
~
iPod Dock
RS2060i EN 4/10/06 5:48 PM Page 9

Main Unit - Front View
ON/STANDBY*
• Turns power on or off (STANDBY mode).
SOURCE
• Allows selection of the following modes: CD
player, USB, Tuner, AUX and iPod.
DISC 1/DISC 2/DISC 3/DISC 4/DISC 5
• Allows direct access to the corresponding disc
tray for playback.
• In the CD, USB, iPod or MP3/WMA mode, it
starts and pauses playback.
TUNE/PRESET
• In the CD, USB or MP3/WMA mode, it stops
playback.
• In Recording mode, it stops recording to USB
drive.
• In Tuner mode, it selects tune or preset mode.
• Opens or closes the disc tray.
/
• In CD, USB, iPod or MP3/WMA mode, it goes to
the previous/next track; fast forward or reverse
through track.
• In Tuner mode, it tunes the radio.
BAND/INFO
• In CD, USB or MP3/WMA mode, it displays
various information. e.g. Track time, remaining
time, ID3 tag, memory usage etc.
• In Recording mode, it selects display options
and show record time and remaining time.
• In Tuner mode, it selects radio band.
RECORD
• Starts and stops recording to the USB drive.
Navigation Buttons
Use the navigation buttons to navigate through
the menu.
VOLUME CONTROL
• Adjusts the volume.
• In the navigation mode, it selects the items on
a list.
SELECT
• From the stop mode, it selects navigation mode .
• In the navigation mode, it navigates forward.
BACK
• In the navigation mode, it navigates
backwards.
DELETE
• Deletes the selected item.
DEMO (on top of the unit)
• Turns the demonstration on/off .
USB Jack (on top of the unit)
• Connects the USB drive.
4
EN
General Controls
RS2060i EN 4/10/06 5:48 PM Page 10

EN
Remote Control
ON/STANDBY
• Turns the power on or off
(STANDBY mode).
SOURCE
• Selects the CD player,
USB, tuner, AUX and
iPod.
BAND
• In Tuner mode, it selects
radio band.
FM ST
• Selects between stereo
and mono sound in the
FM tuner mode.
INFO
• In the CD or MP3/WMA
mode, it displays various
information (e.g. Track
time, remaining time, ID3
tag, etc.)
• In the USB mode, it
shows memory usage.
OPEN/CLOSE
• Opens and closes the disc tray.
B. BOOST
• Turns on or off the Bass Boost.
EQ
• Selects theequalizer presets.
• Mutes the audio output.
VOL or
• Adjusts the volume.
• In CD, iPod or USB mode, it starts and pauses
playback.
/
• In the CD, USB, iPod or MP3/WMA mode, it
goes to the previous/next track; fast forward or
reverse through track.
• In Tuner mode, it tunes down/up frequency.
• In Clock or Timer mode - Decreases/increases
hour and minute digit.
RECORD
• Starts and stops recording to the USB drive.
TUNE/PRESET
• In CD, USB or MP3/WMA mode, it stops
playback.
• In Recording mode, it stops recording.
DISC SKIP
• Skips to the next disc in CD mode.
PROG
• In CD, USB or Tuner mode, it enters program
mode.
INTRO
• In CD, USB or MP3/WMA mode, it turns intro
mode on or off to play the first 10 seconds of
each track / file.
CLOCK
• Displays clock time. Press and hold to enter
clock setting mode.
• In CD, USB, iPod or MP3/WMA mode, it turns
on/off random playback.
TIMER
• Enters timer setting mode.
• Activates and deactivates timer.
REPEAT
•In the CD mode, it repeats a track, CD or all
CDs.
• In USB or iPod mode, it selects repeat one file,
repeat all files mode.
SLEEP
• Selects the time interval in minutes before the
unit turns off.
RS2060i
5
RS2060i EN 4/10/06 5:48 PM Page 11

Navigation Buttons
Use the navigation buttons to navigate through
menu.
• From stop mode, you can enter Navigation
mode.
• In navigation mode, you can enter navigates
forward.
• In navigation mode, you can navigate
backwards.
/
• In navigation mode, it moves up/down a list.
• In tuner mode - Selects the previous or the
next preset number.
ADD
• In the CD, USB or MP3/WMA mode, it adds
track / file to the Program List.
DEL
• When reviewing program, it removes track
from Program List.
• In the USB mode, it removes file from the
connected USB drive.
• In rename mode, you can delete current
alphabet.
Installing Batteries
Insert 2 "AAA"("UM-4"/"R03") batteries to the
remote control prior to use.
6
General Controls
EN
CD TUNER USB MEMCARD AUX
ROCK POP JAZZ CLASSIC CUSTOM
INTRO REPEAT I ALL DISC MP3WMA
FM AM
STEREO
RECORD
BASS BOOST
PROGRAM
SLEEP
5
4
3
2
1
Source indication
Recording status
CD Tray Status:
Lights when loaded.
Flash when playing.
Current EQ setting
Play Mode status
Display
Tips*: In STANDBY mode, press
ON/STANDBY to turn the unit on in the
previously used mode. Press SOURCE to
select the corresponding mode. Look at the
display icons to identify the current mode.
RS2060i EN 4/10/06 5:49 PM Page 12

EN
Settings
Setting the Clock
1. Press and hold CLOCK on the remote control
until the hour flashes on the display.
2. Press or to set the hour and then
press CLOCK to shift to minute digits.
3. Press or to set the minute.
4. Press CLOCK to save settings. Or press
TUNE/PRESET to cancel the setting.
Timer and Program Recording
You can turn on/off the unit or record TUNER at
preset times by setting the timer.
You can use Program Recording to preset the unit
to record your favorite radio program. When
setting the timer, choose TUNER REC as the
source to record radio at the preset time. Ensure
there is adequate memory, when the mp3 player
is connected.
Setting the Timer
1. Press and hold TIMER on the remote control
until Timer On and the clock hour flashes on
the display.
2. For time setting, press or to set the
hour and then press TIMER to shift to minute
digits.
3. Press or to set the minute.
4. Press TIMER to change to Timer Off setting
with clock time flashing. Repeat steps 2 & 3 for
timer off time setting.
5. Press TIMER to select source. Press or
to select TUNER/TUNER REC/DISC/USB/iPod.
If TUNER REC is selected, press or to
select the preset station.
6. Press TIMER to set volume. Adjust VOLUME
CONTROL to select desired volume level.
7. Press TIMER to save settings.
Press TUNE/PRESET to cancel setting.
The timer is automatically activated once timer
setting is saved.
Activating the Timer
Press TIMER to turn on/off the alarm. The timer
icon is displayed when timer is activated.
Sleep Mode
You can select the time interval in minutes before
the unit turns off automatically.
Press SLEEP to select among OFF, 120, 90, 60, 45,
30, 15 and 5 minutes.
The SLEEP icon lights on the display when sleep
mode is activated.
View and Adjust Remaining Sleep Time
When sleep is activated, press SLEEP once to
view remaining sleep time. Press again to change
the time.
Showing Demonstration
Press DEMO to turn on/off demonstration mode.
Note: Sleep is automatically de-activated
when the unit is turned off.
7
RS2060i EN 4/10/06 5:49 PM Page 13

8
EN
Sound Features
Volume Control
Turn the volume control on the main unit or press
VOL or on the remote control to adjust
volume level. The volume level shows briefly on
the display.
Bass Boost
Press B.BOOST to turn on/off boosting the bass
frequency. The BASS BOOST icon displays when
it is activated.
Muting Audio
Press on the remote to mute the sound.
MUTE flashes on the display.
Using Preset Equalizer Curves
Press EQ to toggle among FLAT, ROCK, POP, JAZZ,
CLASSIC and CUSTOM. The display shows your
selection briefly and the relative icon lights on
the display.
Creating a Custom Curve
1. Press EQ to select CUSTOM mode.
2. While CUSTOM is displayed, press or
to cycle among displayed bass and treble
range levels.
3. While BAS and TRE is displayed, adjust volume
control to set the associated gain between
-10 - +10.
4. Press EQ to save setting and exit.
CD and mp3 Disc Playback
D
Loading Discs
1. In the CD mode, press OPEN/CLOSE to open
the disc tray.
2. Insert up to 5 discs with label face up.
3. Press OPEN/CLOSE again to close the disc
tray.
The occupied disc tray icons displays and the
current disc icon flashes on the display.
If the disc is a mp3 / WMA CD, the respective
MP3 and WMA icon will be displayed.
Play Discs
To play all discs in the disc tray
Press in stop mode to begin playback.
To play a specific disc in the disc tray
Press DISC 1-DISC 5 to play the corresponding
disc.
To play a specific track in the disc
Press or to select the track and press
to start playback.
Pause Discs
Press during playback to pause disc. Press
again to resume.
Play and load simultaneously
While playing one disc, you can press
OPEN/CLOSE to open or close other disc trays
to load or change disc without interrupting the
playback.
Stop Playback
During playback, press TUNE/PRESET to stop
playback.
The unit returns to navigation mode briefly
(approximately 10 seconds) before entering stop
mode.
Tips:
•See page 15-16 for details on Navigation
Mode.
•In CD stop mode, press SELECT/ to
enter navigation mode and show disc
menu.
In CD navigation mode, press /BACK to
return to stop mode.
RS2060i EN 4/10/06 5:49 PM Page 14

9
EN
Selecting a Disc
Press DISC 1, DISC 2, DISC 3, DISC 4 or DISC 5
on the main unit or DISC SKIP on the remote
control to skip discs.
Fast Forwarding/Reversing/Skipping
Tracks
•Press and hold or to fast forward or
reverse through a CD while it is playing.
• Press or to skip to the previous or
next track.
Program Playback
Refer to page 14 for details.
Important CD and mp3/WMA
Information
Notes on CD-R/RW Disc:
•Some CD-R and CD-RW discs may not be
playable due to the state of the disc or the
device that was used for recording.
•Do not affix any type of labels to either
side (recordable or labeled side) of a
CD-R/RW disc as this may result in the
unit malfunctioning.
• To avoid damages to the CD-R/RW disc, do
not open the disc tray door while
the disc is being read.
• Do not load an unrecorded CD-R/RW disc
into the unit. This may take a longer time
to read the disc.
• Playback capability for CD-RW discs
may vary due to variations in the
quality of the CD-RW disc and the
recorder used to create the disc.
Notes on mp3/WMA Disc:
• Use .mp3 as the extension when converting
audio files into mp3 for saving onto CD-R(W)
or CD-ROM, e.g. Abc08.mp3. Do not use any
other extension e.g. .doc, .pdf.
• Do not use the .mp3 extension for other
text or non-audio data files as this may
result in serious malfunction and harmful
noise interference.
• For better quality mp3/WMA disc
playback, the CD quality should be
recorded at 128kbps or 64kpbs.
• Disc data size > 650MB is not
recommended.
• Total files and folders in the disc should
not exceed 250, it also depends on the
length of the file/folder names.
• For mixed mode discs, only one mode will
be selected for playback depending on the
recording format.
• To ensure good performance, wait until
the disc changer completely reads the disc
before proceeding.
• mp3 files in CD ROM EXTRA format disc
are not recognized.
Note:
•Be sure to remove all discs from the disc
tray before moving or transporting the
unit.
•Do not push and force the tray to close
during CD playback or tray opening.
•File formats/bitrates supported by the
player:
mp3: 32 to 320kbps
wma: 48 to 160kbps
RS2060i EN 4/10/06 5:49 PM Page 15

EN
USB Playback
Selecting Tuner Mode
Press SOURCE to enter Tuner mode.
Selecting Tuner Band
In Tuner mode, press BAND to select between FM
or AM Radio band.
Tune Mode and Preset Mode
The tuner can be in either TUNE or PRESET
mode.
• To select between TUNE and PRESET mode,
press TUNE/PRESET.
• In PRESET mode, "P XX" will be displayed
where "XX" represents the preset number (1-
32).
Tune Mode
In TUNE mode, you can press or to
select desired frequencies.
• Press or to select frequencies.
• Press and hold or to scan
frequencies.
Preset Mode
In PRESET mode, the unit can store up to 32
radio stations in its memory. You can program the
presets in two ways:
• Manually setting the by entering every single
radio station yourself.
• Perform Auto Preset Programming and the
unit can store all available radio stations
automatically in ascending order.
Manually Setting Presets
1. Press TUNE/PRESET to enter TUNE mode.
2. Press or to adjust the desired
frequency.
3. Press PROG once and the most recently
accessed program location flashes on the
display.
4. If a different program location is preferred,
press or to move to the desired
preset number (1-32).
5. Press PROG to store the selected frequency at
that preset.
Auto Preset Programming (FM only)
Press and hold the BAND button for 2 seconds to
scan stations in the FM band. The stations will
then be stored as preset channels. A maximum of
32 stations can be stored. Be careful of your
preset channels being erased accidentally because
the scanning and storing process is automatic
upon pressing the button. You can stop the
automatic scan by pressing any button, but the
erased stations cannot be recovered.
Connecting USB drive to the Main Unit
Insert the USB drive's connector into the main
unit’s USB Jack, on top of the unit. To disconnect,
unplug the drive.
Selecting USB Mode
Press SOURCE repeatedly to select USB mode.
USB Playback Features
Start and Pause Playback
Press to start and pause playback.
Stop Playback
Press to stop playback. The unit enters the
navigation mode for 10 seconds before entering
th stop mode.
Fast Forwarding/Reversing/Skipping Files
•Press and hold or to fast forward
or reverse through a file while it is playing.
• Press or to skip to the previous
or next file.
Memory Usage
Press BAND/INFO on the main unit or INFO on
the remote control to view memory usage on the
USB drive.
Radio
10
RS2060i EN 4/10/06 5:49 PM Page 16

Using Presets
• When in PRESET mode, press or to
access the previous or next preset station.
Suppressing Stereo Signal
Press FM ST to toggle between FM mono and
stereo mode. (Remote Only) “STEREO” is
displayed in stereo mode.
EN
Recording to the USB drive
An Overview
• You can record CD, Tuner or AUX files to any
MSC devices connected to the USB Jack.
• Recording function always records what is
being played. Press SOURCE to select the
source you want to record from.
• In general, recording starts instantly RECORD
is pressed. It stops when STOP is pressed.
• During recording, “Record” displays.
• There is one exception where recording will
not start immediately when RECORD is pressed
while in CD mode and the CD is NOT
Playing. In this case, the unit goes into
Recording Standby Mode, which is indicated by
the flashing recording icon. This is to avoid
recording in “silence” to the USB device.
• The unit will go from Recording Standby Mode
to Recording Mode as soon as the CD starts
playing.
• When recording CD, there are 2 options:
“Normal”, which records the CD in real time as
it plays; or “High Speed”, which records the CD
at roughly double the normal speed.
• There are two situations during recording:
• Situation A: Recording any passage from
a CD. Play the CD, press RECORD when you
want to start recording, and press RECORD
again when you want to stop recording. You
can start whenever you want.
• Situation B: Recording a track from the
CD. In CD stop mode. Press RECORD and
select either Normal or High Speed recording.
The unit will remain in Recording Standby
Mode. Then select and play the track.
Recording will start synchronizing
automatically with the start of the CD
playback.
Recording CD to USB drive
Recording on Standby and Selecting
Recording Speed
1. Connect the USB drive to the unit's USB Jack at
the top of the unit.
2. In CD stop mode, press RECORD.
3. Turn VOLUME CONTROL knob or press ,
, or to select Normal or High
Speed.
4. Press SELECT to confirm selection. The unit will
enter recording standby mode. This is indicated
by the RECORD icon flashing on the display.
5. Press to start playback and recording
will begin and the RECORD icon displays.
6. Press TUNE/PRESET to stop recording.
Examples
Record one CD
Repeat steps 1 to 4 under "Recording
Standby/Selecting Recording Speed" on this
page. Press DISC 1 to DISC 5 to start recording
the corresponding disc.
Record all 5 CDs
Repeat steps 1 to 4 under "Recording
Standby/Selecting Recording Speed" on this
page. Press to start recording. Ensure “All
Disc” mode is selected.
Rec. Speed
Normal
High
Tips: Under PRESET mode, press
or can only access the preset
stations. Manual tuning is not available in
this mode.
11
RS2060i EN 4/10/06 5:49 PM Page 17

12
Recording to the USB drive
EN
Record only selected tracks from a CD
1. Create a CD program by following the
instructions under “Setting Up a CD Program”
on page 14.
2. In CD stop mode, press RECORD. Select
Normal/High speed using , , or
, then press SELECT.
3. Press PROG and then to enter program
playback mode. Playback and recording should
begin automatically. The PROGRAM and
RECORD icons will light on the display.
4. Press TUNE/PRESET to stop recording.
Recording Tuner/AUX to USB drive
1. In Tuner or AUX mode, press RECORD to start
recording.
Example:
1. In Tuner mode, select the station to record
(refer to page 14-16 for details).
2. Press RECORD to start recording.
3. Press TUNE/PRESET to stop recording.
Program Recording
Refer to ”Setting the Timer” on page 7.
Deleting Files from USB drive
1. In navigation mode, select the file for deletion
using the navigation buttons (Refer to
“Advanced Navigation Controls” on page 15
for details.)
2. Press DELETE on the main unit or DEL on the
remote control.
3. Turn the Volume button on the main unit or
press or on the remote control to
select Yes to delete or No to cancel.
4. Press SELECT on the main unit or press on
the remote control to confirm selection.
If Yes is selected, the display shows memory
usage information after deleting selected file
for a few seconds, then the unit returns to
navigation mode.
Deleting All Files
In navigation and mp3 stop modes, press and
hold DELETE on the main unit or DEL on the
remote control to delete all the files on the mp3
player.
Tips:
• If CD playback has already started,
recording will begin instantly when
RECORD is pressed. If CD playback is
stopped, select Normal/High speed
using , , or , then press
SELECT and to start recording.
Recording will not start until CD starts
playback.
• Recording stops automatically when CD
stops.
• To view recording time and remaining
time, press BAND/INFO on the main unit or
INFO on the remote in recording mode.
• High speed recording mode
can save time when recording from CDs. It
is normal that the pitch is increased during
high speed recording.
• The encoding bitrate for tuner, CD and
AUX signal are:
CD / Aux : 128 kbps
Tuner : 96 kbps
0:22
146:14
Elapsed
recording
time
Remaining
Time
RS2060i EN 4/10/06 5:49 PM Page 18

13
EN
iPod Mode
In iPod mode, you can navigate and playback
music on your iPod.
Connecting your iPod to the Unit
• Ensure the iPod dock is connected to the unit
as described on page 3.
• Place the iPod on the iPod dock and press
SOURCE to select iPod mode.
• "iPod Connecting" displays on the main unit.
"iPod not found" will be displayed if no iPod is
connected to the unit. Playlists, Artists, Albums
and Genre will be displayed if the connection is
successful.
• Once connected, the iPod will resume playback
from where it last stopped.
Navigate and Playback Audio Files
on your iPod
Once docked, the iPod’s own display and buttons
will be disabled. Navigate and playback your
iPod using the unit’s buttons and remote control.
The iPod’s keys are similarly copied to the unit.
Control the iPod as you would with the iPod’s
own control.
Shuffle and Repeat Modes
You control the shuffle and repeat modes by
pressing and REPEAT on the remote control.
Auxiliary Functions of the iPod
Non-music functions of the iPod, such as photo,
video, stopwatch, game will be disabled when
the iPod is docked to the unit.
Charging your iPod
Your iPod is charged when the unit is in iPod
mode .
Disconnecting your iPod
Stop the iPod playback before disconnecting it
from the unit.
Remote
VOL or
/MENU
button
/
Main Unit
VOLUME
CONTROL knob
BACK/MENU
button
SELECT button
/
iPod Control
Click Wheel
Menu button
Center button
/
RS2060i EN 18/12/06 11:32 AM Page 19

EN
In CD and USB mode, advanced playback
controls allow you to sample, repeat and
random playback files and set up a Program List.
In USB mode, it allows you to rename tracks.
Sampling Tracks
Press INTRO on the remote control to play the
first 10 seconds of each track on the current disc,
all discs in the tray, or turn intro mode off.
INTRO is displayed when sampling is activated.
Repeat
Press REPEAT on the remote control to toggle
repeat options:
Repeat the current track (REPEAT 1),
Repeat all tracks in USB mode (REPEAT ALL),
Repeat current disc (REPEAT 1 DISC) ,
Repeat all discs (REPEAT ALL DISC), or
Normal playback (ALL DISCS).
Random Playback
Press on the remote control to turn on/off
random playback. is displayed when it is
activated.
All the tracks on one disc will be shuffled and
played once before shuffling and playing tracks
from the next disc.
Setting Up a Program List
1. In the navigation mode, press DISC SKIP to
select disc.
2. Use the navigation buttons to select the track
to add to Program List.
3. Press ADD on the remote control to add
selected track into the next available
program location.
4. Repeat steps 1 to 3 to store more tracks into
program memory.
5. Wait for a few seconds timeout to return to
navigation mode.
Playing a Program List
Press PROG to enter program mode and then
press . Program playback will begin.
PROGRAM is displayed.
Display Program List
1. While the CD playback is stopped, press PROG
to enter PROGRAM mode. To display program
list, press .
2. Press or repeatedly to view
each track assignment in the program list.
Deleting from Program List
1. While in PROGRAM mode, press or to
select the program to delete.
2. Press DELETE on the unit or DEL on the
remote control.
3. Press or to select between "No" to
cancel and "Yes" to confirm.
4. Press to confirm selection.
Deleting the Entire Program List
Follow the above steps by pressing and holding
DELETE on the unit or DEL on the remote
control instead of pressing and releasing.
Advanced Playback Controls
Note:
• You can create a program of up to 32
tracks.
• In CD stop mode, press PROG to toggle
between the program mode and normal
modes.
Tips: Random playback can be
activated simultaneously with repeat 1
disc (randomly play tracks from one disc
repeatedly) or repeat all discs (randomly play
tracks from all discs repeatedly).
14
RS2060i EN(18_12_06) 18/12/06 11:39 AM Page 20

15
EN
File Navigation
Main Unit
SELECT
• From the stop mode, you can enter navigation
mode.
• In navigation mode, it plays selected track or
enters selected folder.
BACK
• In navigation mode, you can exit current folder
and returns to higher level.
DELETE
• Deletes the selected item.
VOLUME CONTROL
• Adjusts volume.
• In navigation mode, you can select items on a
list.
Renaming Tracks
You can rename files in the USB drive.
1. In the USB stop mode, press or to
select folder.
2. Press or to select the file in the current
folder.
3. Press PROG to enter rename mode.
4. Press or or VOLUME CONTROL to
select the first letter of the new file name.
5. Press to confirm the current letter and
move to the next letter.
6. Press to modify the previous letter.
7. Press PROG again to confirm and store the new
file name after entering the last letter of the
file name (maximum seven letters).
Note:
• You can only rename the files but not the
folders.
• You need to enter a folder and select a
file you want to rename before pressing
PROG. If you press PROG while you are
navigating the folders, "NO PROG" will be
displayed.
Advanced Navigation Controls
RS2060i EN 4/10/06 5:49 PM Page 21

16
Advanced Navigation Controls
EN
Remote Control
• From stop mode, you can enter Navigation
mode.
• In navigation mode, you can navigate forward.
• Navigates backwards.
/
• In navigation mode, you can move up/down a
list.
• In tuner mode, you can select the previous or
the next preset number.
ADD
• In CD, USB or MP3/WMA mode, you can add
track / file to the Program List.
DEL
• When reviewing program, it removes track
from Program List.
• In USB mode, it removes file from the
connected USB drive.
• In rename mode, it deletes current letter.
Display
In the navigation mode, the display looks like the following with the highlighted item.
-ROOT
Folder A
Folder B
Folder C
root or
current folder
name
selected folder
folder
-Folder A
File A
File B
File C
selected audio
files
audio files
root or
current folder
name
RS2060i EN 4/10/06 5:49 PM Page 22
Table of contents
Other RCA Stereo System manuals