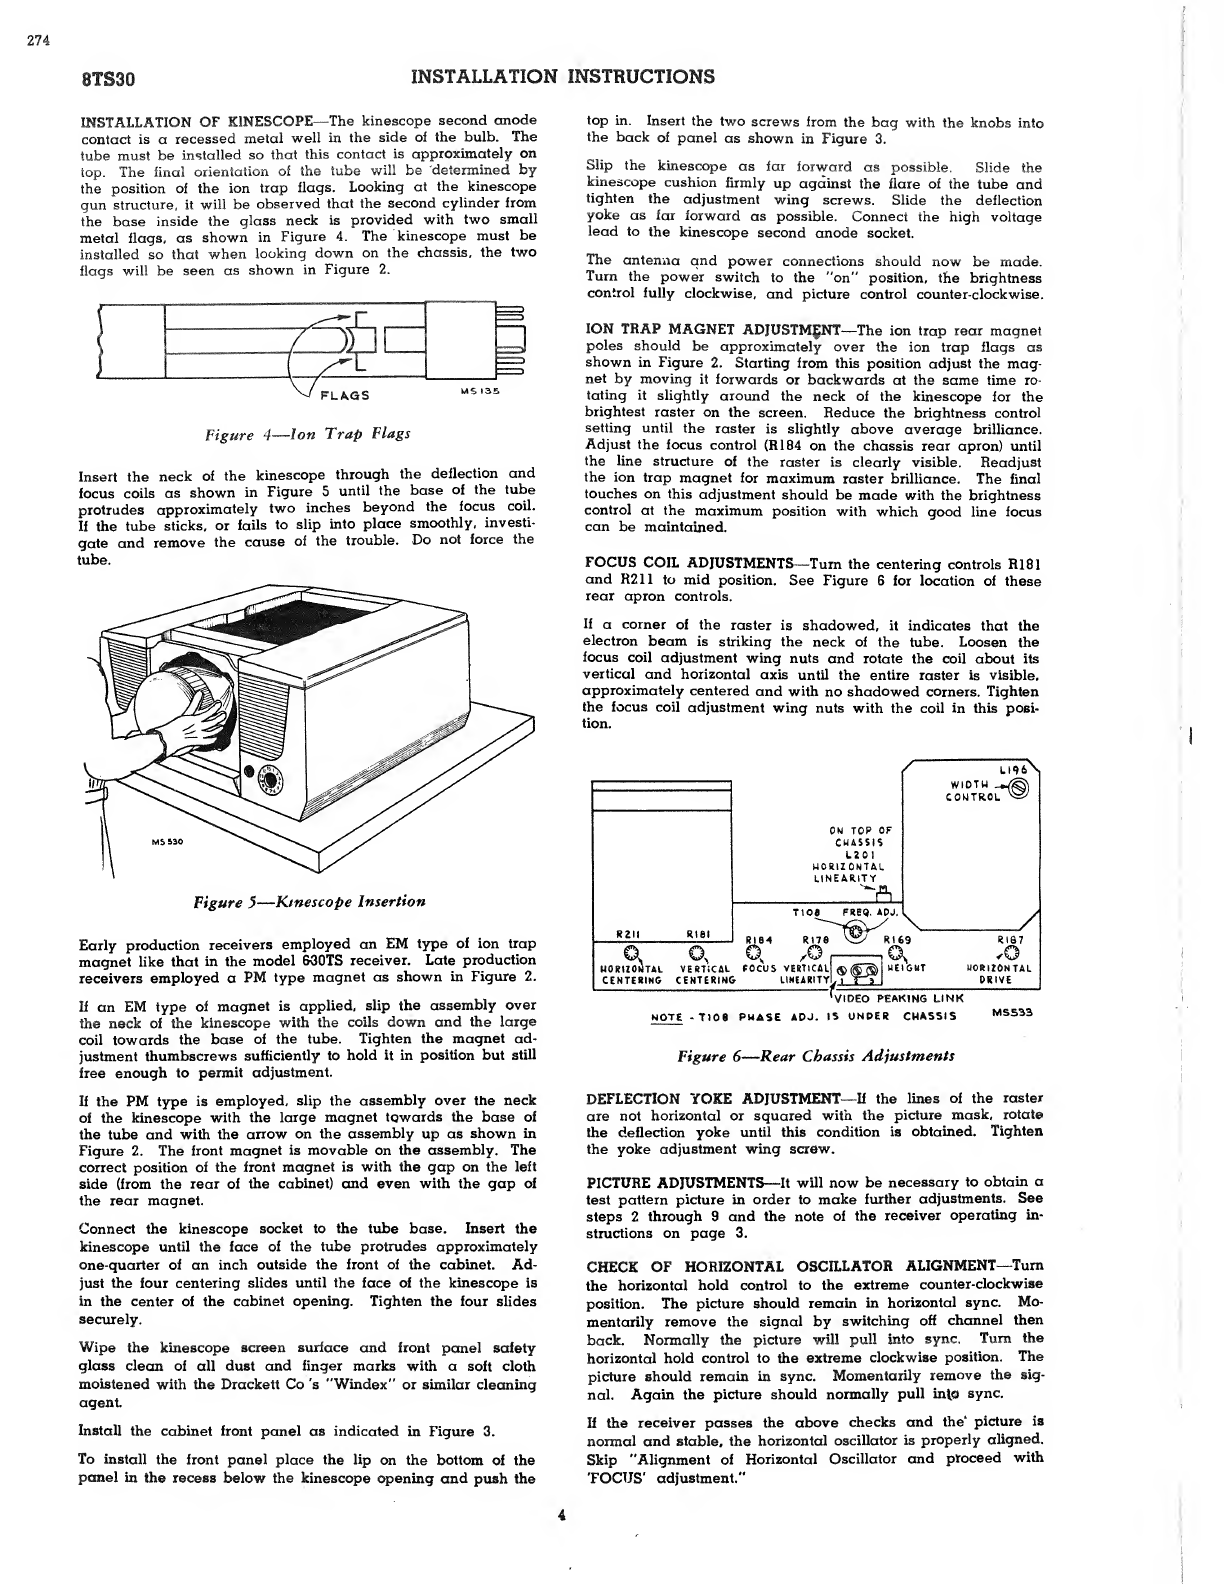
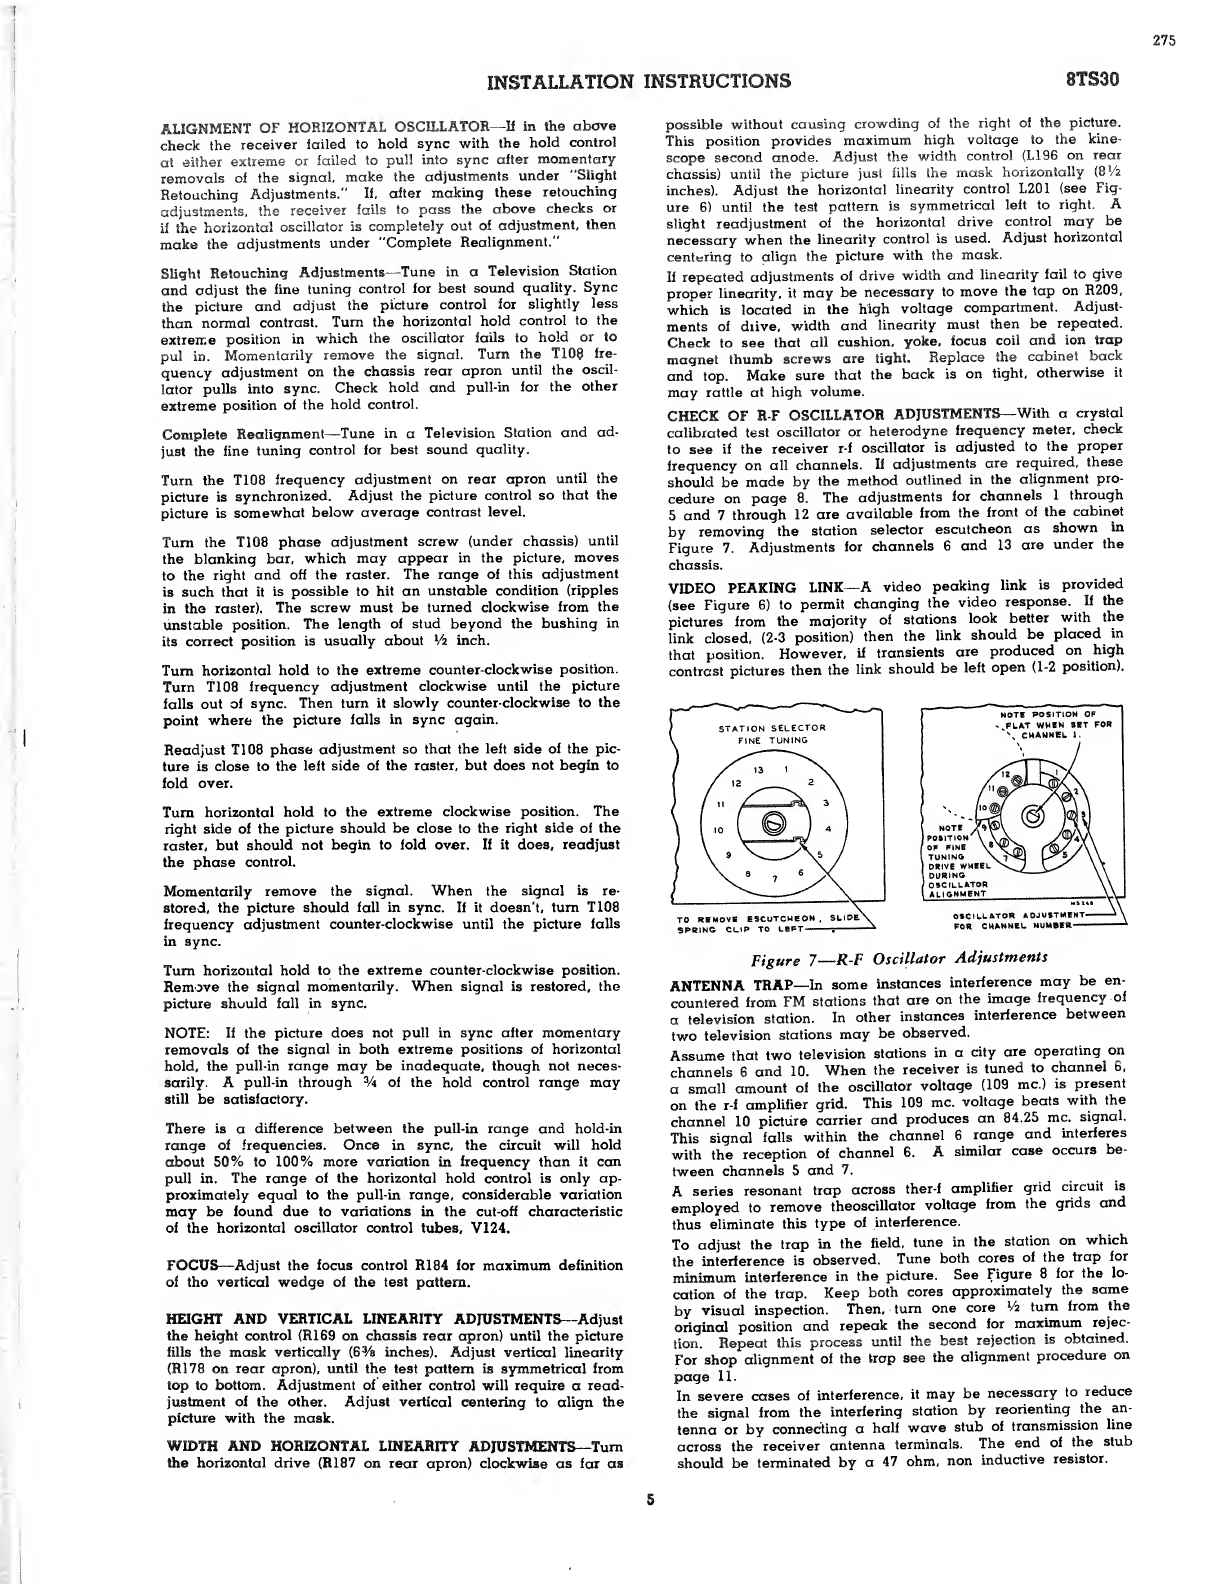
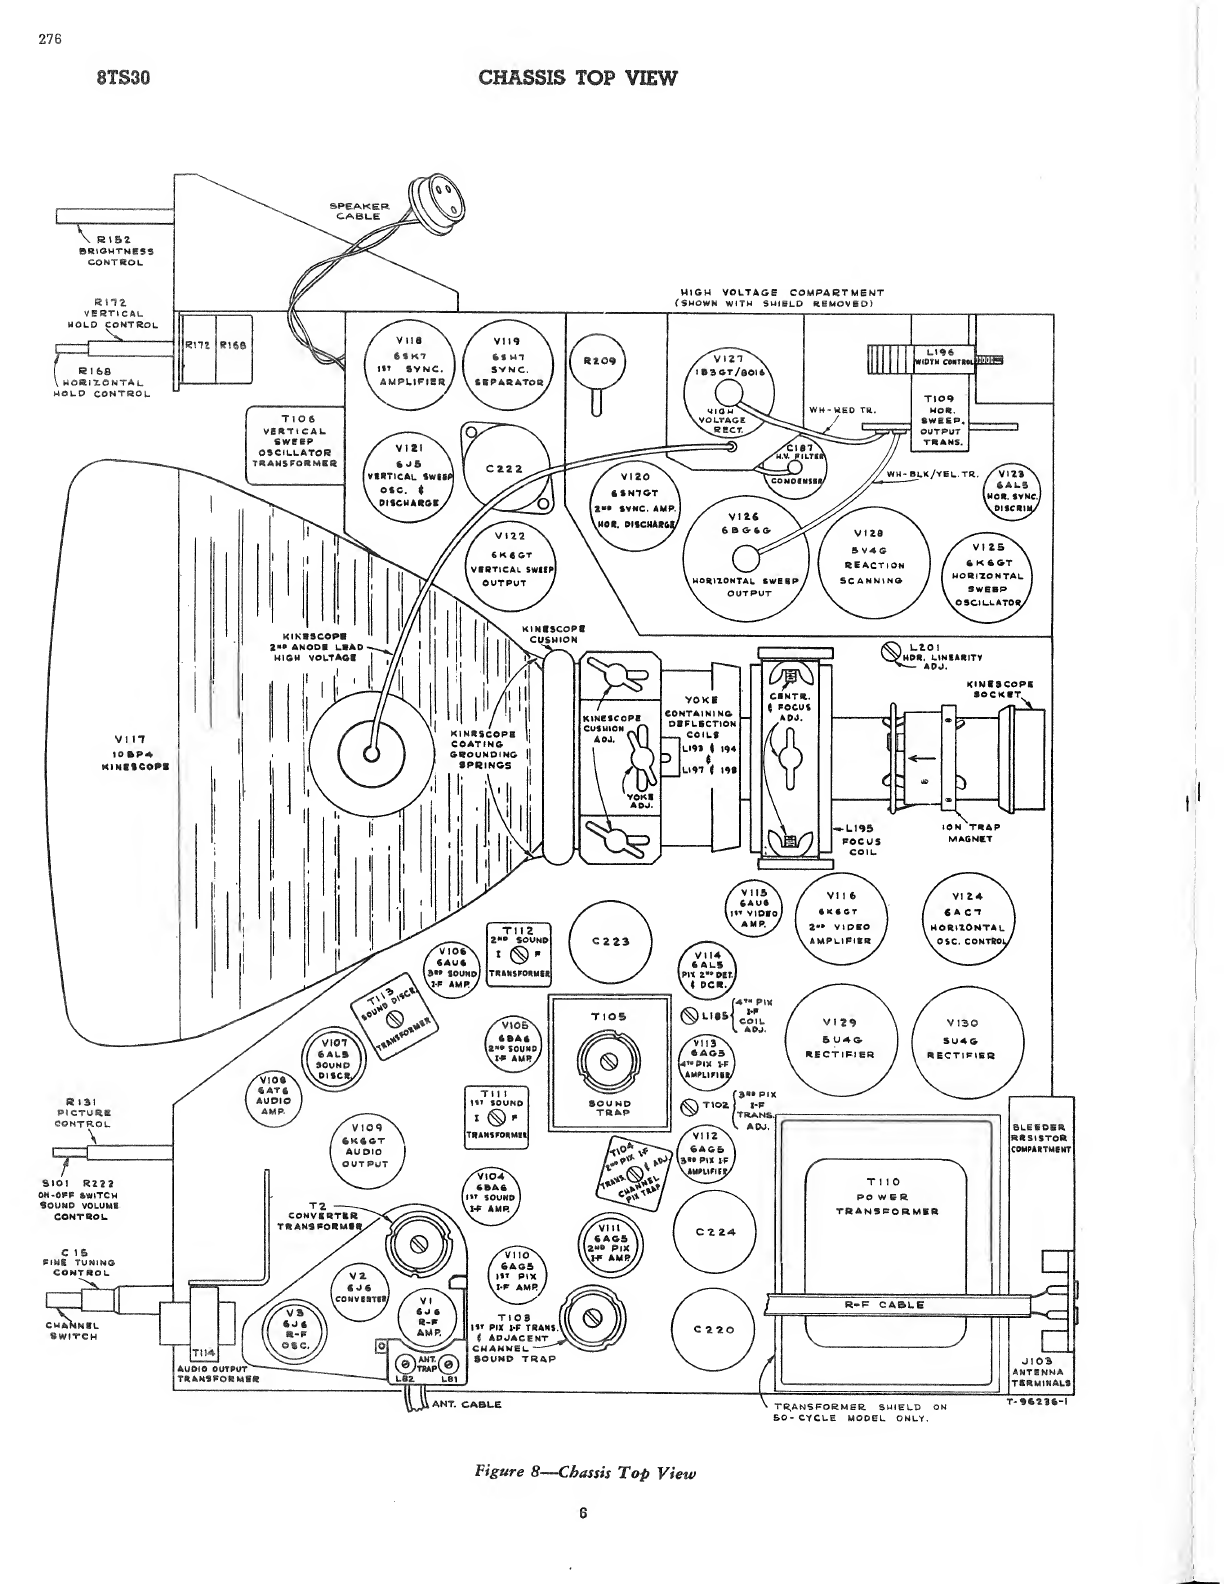
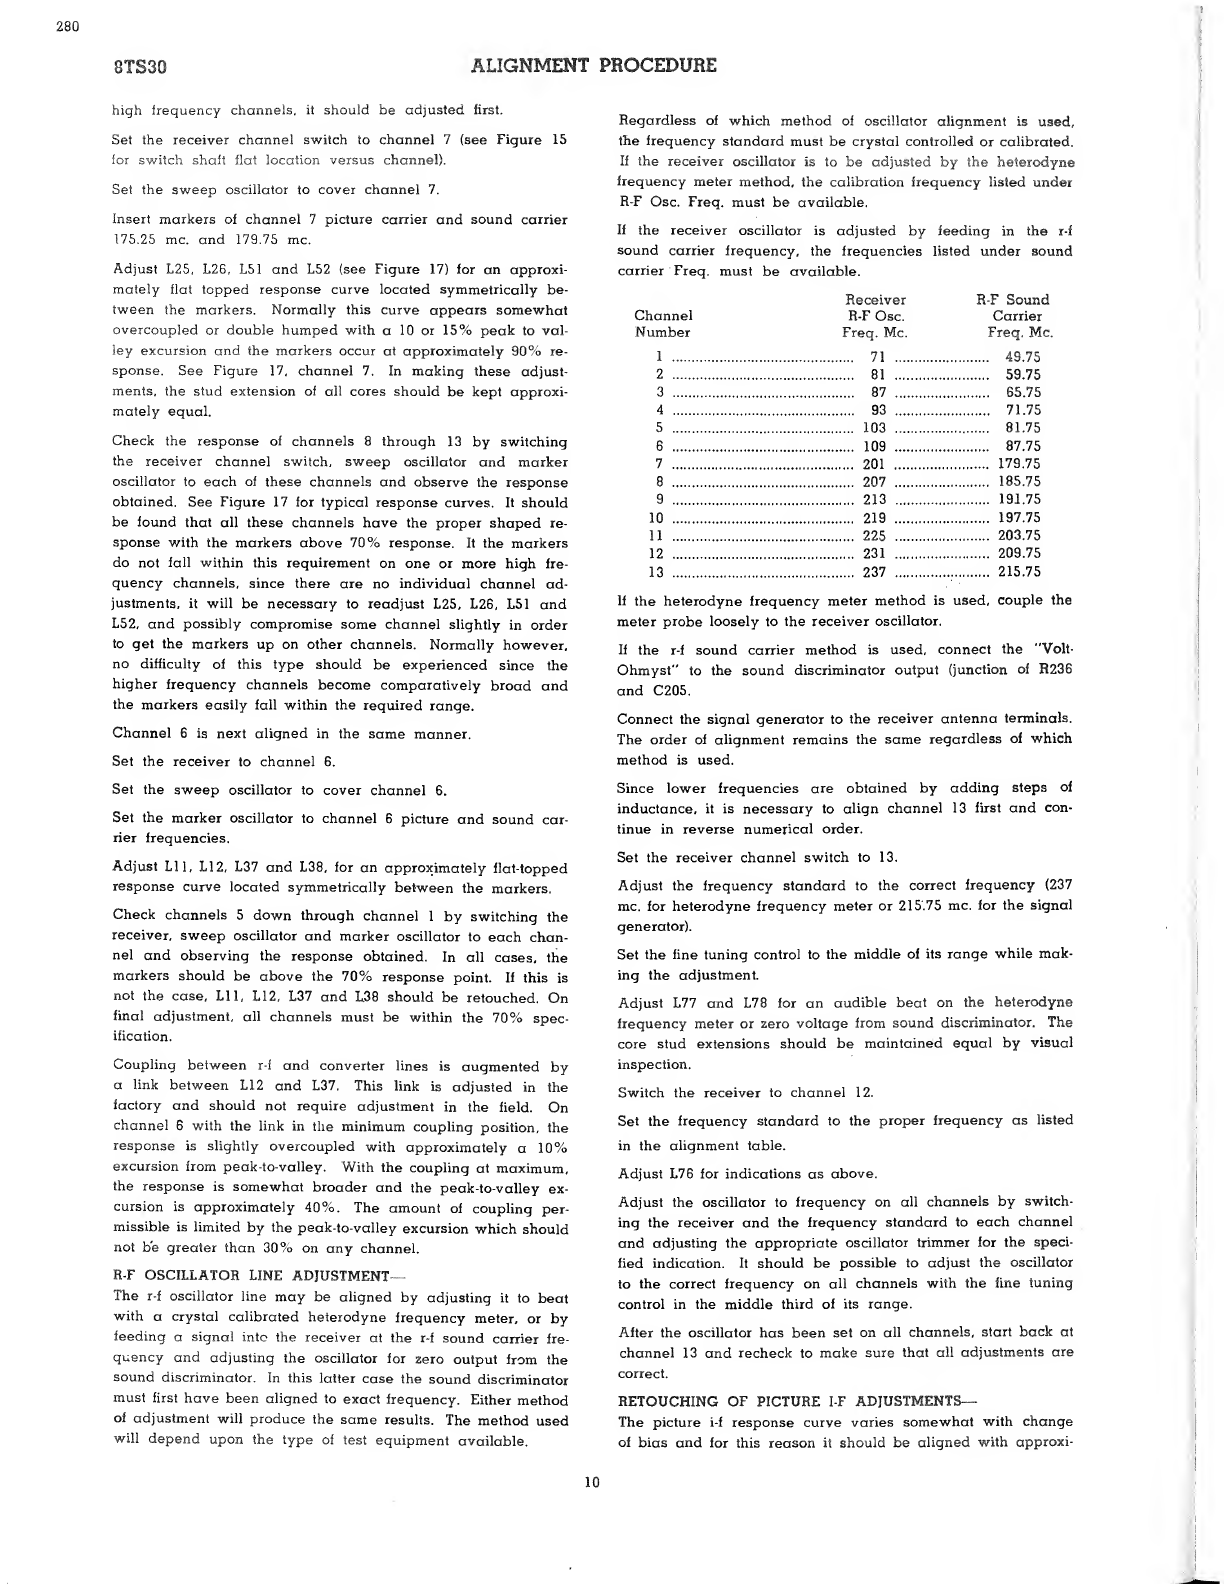
RCA 8TS30 Mounting instructions

271
|p
rcaVictor
TELEVISION
RECEIVER
MODEL
§1530
Chasils
No,
KCS
20J-1
(60
cycles)
and
KCS
20K-2
(50
cycles)—
Mh,
No,
274
Service
data
—
1948
No.
T1
—
RADIO
CORPORATION
OF
AMERICA
RCA
VICTOR
DIVISION
Model
STS30
CAMDEN,
N.
J.,
U.
S.
A.
Walnut,
Mahogany
or
Toasted
Mahogany
GENERAL
DESCRIPTION
Model
8TS30
is
a
thirty-tube,
direct-viewing,
10"
table
model,
Television
Receiver.
The
receiver
is
complete
in
one
unit
and
is
operated
by
the
use
of
seven
front-panel
controls.
Features
of
the
receiver
include:
Full
thirteen
channel
coverage;
F-M
sound
system;
Improved
picture
brilliance;
A-F-C
horizontal
hold;
Stabilized
vertical
hold;
Two
stages
of
video
amplifica¬
tion;
Noise
saturation
circuits;
Three
stage
sync
separator
and
clipper;
Four
me.
band
width
for
picture
channel,
and
Re¬
duced
hazard
high
voltage
supply.
ELECTRICAL
AND
MECHANICAL
SPECIFICATIONS
PICTURE
SIZE
.
GVa"
x
8Vi"—-2"
radius
at
comer
R-F
FREQUENCY
RANGES
Picture
Sound
Receiver
Channel
Channel
Carrier
Carrier
R-F
Osc.
Number
Freq.
Me.
Freq.
Me.
Freq
Me.
Freq.
Me.
1.
.44-50.
.45.25.
.49.75.
.71
2.
.54-60.
.55.25.
.59.75.
.81
3.
.....60-66.
.61.25.
.65.75.
.87
4
.
.66-72.
.67.25.
.71.75.
.93
5.
.76-82.
.77.25.
.81.75.
.103
6.
.82-88.
.83.25.
.87.75.
.109
7..........
...174-180.......
.175.25.
.179.75..
.201
8.
...180-186.
.181.25.
.185.75.
.207
9..........
...186-192.
.187.25.
.191.75.
.213
10.
...192-198.
.193.25.
.197.75.
.219
11
.
...
1
9
8-204
.
.199.25.
.
203.75
.
.225
12
..........
...
204
-
210
.......
.....
205
.
2
5
........
......
209
.75.
.
.
.
..
.231
13
.
...210-216.
.211.25.
.215.75.
.237
F’WE
TUNING
RANGE
Plus
and
minus
approximately
300
kc
on
channel
1
and
plus
and
minus
approximately
750
kc
on
channel
13.
POWER
SUPPLY
HATING
KCS
20J-1
.115
volts,,
60
cycles,
320
watts
KCS
20K-2
.115
volts,
50
cycles,
320
watts
AUDIO
POWER
OUTPUT
RATING
Undistorted
...
2.5
watts
Maximum
.
4
watts
LOUDSPEAKER
(92573-2)
Typo
..
5x7
inch
Permanent
Magnet
Dynamic
Voice
Coil
Impedance
.
3.2
ohms
at
400
cycles
WEIGHT
Chassis
with
Tubes
in
Cabinet
(less
Kinescope)
.
80
lbs.
Shipping
Weight
.
93
lbs.
RECEIVER
ANTENNA
INPUT
IMPEDANCE.
.300
ohms
balanced
DIMENSIONS
(inches)
Length
Height
Depth
Cabinet
(Outside
...
26
14
Vi
19
Chassis
Base
(Outside)
.
19
Vi
3
Vi
15
Vi
Chassis
Overall
.
21
3
/i
11%
16
V4
RCA
TUBE
COMPLEMENT
Tube
Used
Function
(1)
RCA
6J6
...
R-F
Amplifier
(2)
RCA
6J6
.
R-F
Oscillator
(3)
RCA
6J6
.
Converter
(4)
RCA
6BA6
.
1st
Sound
I-F
Amplifier
(5)
RCA
6BA6
.
2nd
Sound
I-F
Amplifier
(6)
RCA
6AU6
.
3rd
Sound
I-F
Amplifier
(7)
RCA
SALS
...
Sound
Discriminator
(8)
RCA
6AT6
.
1st
Audio
Amplifier
(9)
RCA
6K6GT
...
Audio
Output
(10)
RCA
6AG5
.
1st
Picture
I-F
Amplifier
(11)
RCA
6AG5
...
2nd
Picture
I-F
Amplifier
(12)
RCA
6AG5
.
3rd
Picture
I-F
Amplifier
(13)
RCA
6AG5
..
4th
Picture
I-F
Amplifier
(14)
RCA
6AL5
.
Picture
2nd
Detector
and
D-C
Restorer
(15)
RCA
6AU6
.
1st
Video
Amplifier
(16)
RCA
6K6GT
.
2nd
Video
Amplifier
(17)
RCA
6SK7
.
1st
Sync
Amplifier
(18)
RCA
6SH7
.
Sync
Separator
(19)
RCA
6SN7GT
.
2nd
Sync
Amplifier
and
Horizontal
Discharge
(20)
RCA
6J5
.Vertical
Sweep
Oscillator
and
Discharge
(21)
RCA
6K6GT
.
Vertical
Sweep
Output
(22)
RCA
6AL5
.,...
Horizontal
Sync
Discriminator
(23)
RCA
6K6GT
..
Horizontal
Sweep
Oscillator
(24)
RCA
6AC7
.
Horizontal
Sweep
Oscillator
Control
(25)
RCA
8BG6G
...
Horizontal
Sweep
Output
(26)
RCA
5V4G
.
Horizontal
Reaction
Scanning
(27)
RCA
1B3-GT/8016
....
High
Voltage
Rectifier
(28)
RCA
5U4G
.
Power
Supply
Rectifiers
(2
tubes)
(29)
RCA
10BP4
...
Kinescope
Specifications
continued
on
page
2
1

272
8TS30
ELECTRICAL
AND
MECHANICAL
SPECIFICATIONS
(Continued)
PICTURE
I-F
FREQUENCIES
Picture
Carrier
Frequency
.
25.75
Me.
Adjacent
Channel
Sound
Trap
.
27.25
Me.
Accompanying
Sound
Traps
.
21.25
Me.
Adjacent
Channel
Picture
Carrier
Trap
..
19.75
Me.
OPERATING
CONTROLS
(front
panel)
Channel
Selector
(
Fine
Tuning
(
.
Picture
i
Sound
Volume
and
On-Off
Switch
|
.Dual
Control
Knobs
.Dual
Control
Knobs
SOUND
I-F
FREQUENCIES
Sound
Carrier
Frequency
..
21.25
Me.
Sound
Discriminator
Band
Width
between
peaks)
.
350
kc
Picture
Horizontal
Hold
Picture
Vertical
Hold
.Dual
Control
Knobs
Brightness
Single
Control
Knob
VIDEO
RESPONSE
.
To
4
Me.
FOCUS
......
...
Magnetic
SWEEP
DEFLECTION
.
Magnetic
SCANNING
.
Interlaced,
525
line
HORIZONTAL
SCANNING
FREQUENCY
.
15,750
cps
VERTICAL
SCANNING
FREQUENCY
.
60
cps
FRAME
FREQUENCY
(Picture
Repetition
Rate)
.
30
cps
NON-OPERATING
CONTROLS
not
including
r-f
&
i-f
adjust¬
ments)
Horizontal
Centering
.
rear
chassis
adjustment
Vertical
Centering
.
rear
chassis
adjustment
Width
.
rear
chassis
screwdriver
adjustment
Height
.
rear
chassis
adjustment
Horizontal
Linearity
.
top
chassis
screwdriver
adjustment
Vertical
Linearity
.
rear
chassis
adjustment
Horizontal
Drive....
rear
chassis
adjustment
Horizontal
Oscillator
Frequency
.
rear
chassis
adjustment
Horizontal
Oscillator
Phase
.
bottom
chassis
adjustment
h’oeus
.
rear
chassis
adjustment
Focus
Coil
.
top
chassis
wing
nut
adjustment
Ion
Trap
Magnet
.
top
chassis
thumb
screw
adjustment
Deflection
Coil
.
top
chassis
wing
nut
adjustment
HIGH
VOLTAGE
WARNING
OPERATION
OF
THIS
RECEIVER
OUTSIDE
THE
CABINET
OR
WITH
THE
COVERS
REMOVED,
INVOLVES
A
SHOCK
HAZARD
FROM
THE
RECEIVER
POWER
SUPPLIES.
WORK
ON
THE
RECEIVER
SHOULD
NOT
BE
ATTEMPTED
BY
ANYONE
WHO
IS
NOT
THOROUGHLY
FAMILIAR
WITH
THE
PRECAUTIONS
NECES¬
SARY
WHEN
WORKING
ON
HIGH
VOLTAGE
EQUIPMENT.
DO
NOT
OPERATE
THE
RECEIVER
WITH
THE
HIGH
VOLTAGE
COMPARTMENT
SHIELD
REMOVED.
KINESCOPE
HANDLING
PRECAUTIONS
DO
NOT
OPEN
THE
KINESCOPE
SHIPPING
CARTON,
INSTALL,
REMOVE
OR
HANDLE
THE
KINESCOPE
IN
ANY
MANNER
UNLESS
SHATTERPROOF
GOGGLES
AND
HEAVY
GLOVES
ARE
WORN.
PEOPLE
NOT
SO
EQUIPPED
SHOULD
BE
KEPT
AWAY
WHILE
HANDLING
KINESCOPES.
KEEP
THE
KINESCOPE
AWAY
FROM
THE
BODY
WHILE
HANDLING.
The
kinescope
bulb
encloses
a
high
vacuum
and.
due
to
its
large
surface
area,
is
subjected
to
considerable
air
pressure.
For
these
reasons,
kinescopes
must
be
handled
with
more
care
than
ordinary
receiving
tubes.
I
he
large
end
of
the
kinescope
bulb
particularly
that
part
at
the
rim
of
the
viewing
surface—must
not
be
struck,
scratched
or
sub¬
jected
to
more
than
moderate
pressure
at
any
time.
In
installation,
if
the
tube
sticks
or
fails
to
slip
smoothly
into
its
socket,
or
de¬
flecting
yoke,
investigate
and
remove
the
cause
of
the
trouble.
Do
not
force
the
tube.
Refer
to
the
Receiver
Installation
section
for
de¬
tailed
instructions
on
.kinescope
installation.
All
RCA
kinescopes
are
shipped
in
special
cartons
and
should
be
left
in
the
cartons
until
ready
for
installation
in
the
receiver.
Keep
the
carton
for
possible
future
use.
2

273
OPERATING
INSTRUCTIONS
8TS30
The
iollowing
adjustments
are
necessary
when
turning
the
receiver
on
for
the
first
time.
1.
Turn
the
receiver
"ON"
and
advance
the
SOUND
VOL¬
UME
control
to
approximately
mid-position.
2.
Set
the
STATION
SELECTOR
to
the
desired
channel.
3.
Turn
the
PICTURE
control
fully
counter-clockwise.
4.
Turn
the
BRIGHTNESS
control
clockwise,
until
a
glow
appears
on
the
screen
then
counter-clockwise
until
the
glow
just
disappears.
5.
Turn
the
PICTURE
control
clockwise
until
a
glow
or
pat¬
tern
appears
on
the
screen.
6.
Adjust
the
FINE
TUNING
control
for
best
sound
fidelity
and
SOUND
VOLUME
for
suit¬
able
volume.
7.
Adjust
the
VERTICAL
hold
control
until
the
pattern
stops
vertical
movement.
8.
Adjust
the
HORIZONTAL
hold
control
until
a
picture
is
ob¬
tained
and
centered.
9.
Adjust
the
PICTURE
control
for
suitable
picture
con¬
trast.
10.
After
the
receiver
has
been
on
for
some
time,
it
may
be
necessary
to
readjust
the
FINE
TUNING
control
slightly
for
improved
sound
fidelity.
11.
In
switching
from
one
station
to
another,
it
may
be
necessary
to
repeat
steps
number
6
and
9.
12.
When
the
set
is
turned
on
again
after
an
idle
period,
it
should
not
be
necessary
to
re¬
peat
the
adjustments
if
the
posi¬
tions
of
the
controls
have
not
been
changed.
If
any
adjust¬
ment
is
necessary,
step
number
6
is
generally
sufficient.
13.
I
f
the
positions
of
the
con¬
trols
have
been
changed,
it
may
be
necessary
to
repeat
steps
number
1
through
9.
NOTE:
If
any
difficulty
is
ex¬
perienced
with
steps
number
7
or
8,
turn
the
PICTURE
control
Vi
turn
counterclockwise
and
re¬
peat
those
adjustments.
Figure
1—Receiver
Operating
Controls
INSTALLATION
INSTRUCTIONS
The
Model
8TS30
television
receiver
is
shipped
complete
in
one
carton
except
for
the
10BP4
kinescope.
The
kinescope
is
shipped
in
a
special
carton
and
should
not
be
unpacked
until
ready
for
installation.
UNPACKING—To
unpack
the
receiver,
tear
open
the
carton
bottom
flaps,
pick
the
receiver
up
from
under
the
bottom
of
the
cabinet
and
lift
it
out
of
the
shipping
carton.
The
cabinet
safety
glass
front
panel
is
packed
in
a
cardboard
box.
Remove
the
box
and
unpack
the
panel.
Take
off
the
cabinet
top
and
back.
The
operating
control
knobs
are
packed
in
a
paper
bag
which
is
tied
to
the
inside
of
the
cabinet
brace.
Remove
the
bag.
Remove
the
protective
cardboard
shield
from
the
5U4G
recti¬
fier.
Make
sure
all
tubes
are
in
place
and
are
firmly
seated
in
their
sockets.
Loosen
the
two
kinescope
cushion
adjustment
wing
screws
and
slide
the
cushion
toward
the
rear
of
the
chassis.
Loosen
the
deflection
yoke
adjustment,
slide
the
yoke
toward
the
rear
of
the
chassis
and
tighten.
See
Figure
2
for
the
location
of
the
cushion
and
yoke
adjustments.
\
FRONT
MAGNET
GAP
ON
THIS
SIDE
AND
EVEN
WITH
REAR
MAGNET
GAP
Figure
2—Yoke
and
Focus
Coil
Adjustments
From
the
front
of
the
cabinet,
look
through
the
deflection
yoke
and
check
the
alignment
of
the
focus
coil
with
the
yoke.
If
the
focus
coil
is
not
in
line,
loosen
the
three
focus
coil
adjust¬
ment
wingnuts
and
raise,
lower,
or
rotate
the
coil
until
align¬
ment
is
obtained.
Tighten
the
wingnuts
with
the
coil
in
this
position.
Loosen
the
two
lower
kinescope
face
centering
slides,
and
set
them
at
approximately
mid
position.
See
Figure
3
for
loca¬
tion
of
the
slides
and
their
adjustment
screws.
TO
INSTALL
CABINET
FRONT
PANEL,
INSERT
THESE
SCREWS
SLIDES
SCREWS
Figure
3—
Cabinet,
Front
View
KINESCOPE
HANDLING
PRECAUTION—Do
not
open
the
kine¬
scope
shipping
carton,
install,
remove,
or
handle
the
kinescope
in
any
manner,
unless
shatterproof
goggles
and
heavy
gloves
are
worn.
People
not
so
equipped
should
be
kept
away
while
handling
the
kinescope.
Keep
the
kinescope
away
from
the
body
while
handling.
The
shipping
carton
should
be
kept
for
use
in
case
of
future
moves.
3

274
8TS30
INSTALLATION
INSTRUCTIONS
INSTALLATION
OF
KINESCOPE—The
kinescope
second
anode
contact
is
a
recessed
metal
well
in
the
side
of
the
bulb.
The
tube
must
be
installed
so
that
this
contact
is
approximately
on
top.
The
final
orientation
of
the
tube
will
be
determined
by
the
position
of
the
ion
trap
flags.
Looking
at
the
kinescope
gun
structure,
it
will
be
observed
that
the
second
cylinder
from
the
base
inside
the
glass
neck
is
provided
with
two
small
metal
flags,
as
shown
in
Figure
4.
The
kinescope
must
be
installed
so
that
when
looking
down
on
the
chassis,
the
two
flags
will
be
seen
as
shown
in
Figure
2.
Figure
4—loti
Trap
Flags
Insert
the
neck
of
the
kinescope
through
the
deflection
and
focus
coils
as
shown
in
Figure
5
until
the
base
of
the
tube
protrudes
approximately
two
inches
beyond
the
focus
coil.
If
the
tube
sticks,
or
fails
to
slip
into
place
smoothly,
investi¬
gate
and
remove
the
cause
of
the
trouble.
Do
not
force
the
tube.
Early
production
receivers
employed
an
EM
type
of
ion
trap
magnet
like
that
in
the
model
630TS
receiver.
Late
production
receivers
employed
a
PM
type
magnet
as
shown
in
Figure
2.
If
an
EM
type
of
magnet
is
applied,
slip
the
assembly
over
the
neck
of
the
kinescope
with
the
coils
down
and
the
large
coil
towards
the
base
of
the
tube.
Tighten
the
magnet
ad¬
justment
thumbscrews
sufficiently
to
hold
it
in
position
but
still
free
enough
to
permit
adjustment.
If
the
PM
type
is
employed,
slip
the
assembly
over
the
neck
of
the
kinescope
with
the
large
magnet
towards
the
base
of
the
tube
and
with
the
arrow
on
the
assembly
up
as
shown
in
Figure
2.
The
front
magnet
is
movable
on
the
assembly.
The
correct
position
of
the
front
magnet
is
with
the
gap
on
the
left
side
(from
the
rear
of
the
cabinet)
and
even
with
the
gap
of
the
rear
magnet.
Connect
the
kinescope
socket
to
the
tube
base.
Insert
the
kinescope
until
the
face
of
the
tube
protrudes
approximately
one-quarter
of
an
inch
outside
the
front
of
the
cabinet.
Ad¬
just
the
four
centering
slides
until
the
face
of
the
kinescope
is
in
the
center
of
the
cabinet
opening.
Tighten
the
four
slides
securely.
Wipe
the
kinescope
screen
surface
and
front
panel
safety
glass
clean
of
all
dust
and
finger
marks
with
a
soft
cloth
moistened
with
the
Drackett
Co's
"Windex"
or
similar
cleaning
agent.
Install
the
cabinet
front
panel
as
indicated
in
Figure
3.
To
install
the
front
panel
place
the
lip
on
the
bottom
of
the
panel
in
the
recess
below
the
kinescope
opening
and
push
the
top
in.
Insert
the
two
screws
from
the
bag
with
the
knobs
into
the
back
of
panel
as
shown
in
Figure
3.
Slip
the
kinescope
as
far
forward
as
possible.
Slide
the
kinescope
cushion
firmly
up
against
the
flare
of
the
tube
and
tighten
the
adjustment
wing
screws.
Slide
the
deflection
yoke
as
far
forward
as
possible.
Connect
the
high
voltage
lead
to
the
kinescope
second
anode
socket.
The
antenna
and
power
connections
should
now
be
made.
Turn
the
power
switch
to
the
"on"
position,
the
brightness
control
fully
clockwise,
and
picture
control
counter-clockwise.
ION
TRAP
MAGNET
ADJUSTMENT—The
ion
trap
rear
magnet
poles
should
be
approximately
over
the
ion
trap
flags
as
shown
in
Figure
2.
Starting
from
this
position
adjust
the
mag¬
net
by
moving
it
forwards
or
backwards
at
the
same
time
ro¬
tating
it
slightly
around
the
neck
of
the
kinescope
for
the
brightest
raster
on
the
screen.
Reduce
the
brightness
control
setting
until
the
raster
is
slightly
above
average
brilliance.
Adjust
the
focus
control
(R184
on
the
chassis
rear
apron)
until
the
line
structure
of
the
raster
is
clearly
visible.
Readjust
the
ion
trap
magnet
for
maximum
raster
brilliance.
The
final
touches
on
this
adjustment
should
be
made
with
the
brightness
control
at
the
maximum
position
with
which
good
line
focus
can
be
maintained.
FOCUS
COIL
ADJUSTMENTS—Turn
the
centering
controls
R181
and
R211
to
mid
position.
See
Figure
6
for
location
of
these
rear
apron
controls.
If
a
corner
of
the
raster
is
shadowed,
it
indicates
that
the
electron
beam
is
striking
the
neck
of
the
tube.
Loosen
the
focus
coil
adjustment
wing
nuts
and
rotate
the
coil
about
its
vertical
and
horizontal
axis
until
the
entire
raster
is
visible,
approximately
centered
and
with
no
shadowed
corners.
Tighten
the
focus
coil
adjustment
wing
nuts
with
the
coil
in
this
posi¬
tion.
Figure
6—Rear
Chassis
Adjustments
DEFLECTION
YOKE
ADJUSTMENT—If
the
lines
of
the
raster
are
not
horizontal
or
squared
with
the
picture
mask,
rotate
the
deflection
yoke
until
this
condition
is
obtained.
Tighten
the
yoke
adjustment
wing
screw.
PICTURE
ADJUSTMENTS—It
will
now
be
necessary
to
obtain
a
test
pattern
picture
in
order
to
make
further
adjustments.
See
steps
2
through
9
and
the
note
of
the
receiver
operating
in¬
structions
on
page
3.
CHECK
OF
HORIZONTAL
OSCILLATOR
ALIGNMENT—Turn
the
horizontal
hold
control
to
the
extreme
counter-clockwise
position.
The
picture
should
remain
in
horizontal
sync.
Mo¬
mentarily
remove
the
signal
by
switching
off
channel
then
back.
Normally
the
picture
will
pull
into
sync.
Turn
the
horizontal
hold
control
to
the
extreme
clockwise
position.
The
picture
should
remain
in
sync.
Momentarily
remove
the
sig¬
nal.
Again
the
picture
should
normally
pull
into
sync.
If
the
receiver
passes
the
above
checks
and
the'
picture
is
normal
and
stable,
the
horizontal
oscillator
is
properly
aligned.
Skip
"Alignment
of
Horizontal
Oscillator
and
proceed
with
'FOCJJS'
adjustment."
4

275
INSTALLATION
INSTRUCTIONS
8IS30
ALIGNMENT
OF
HORIZONTAL
OSCILLATOR—If
in
the
above
check
the
receiver
failed
to
hold
sync
with
the
hold
control
at
either
extreme
or
failed
to
pull
into
sync
after
momentary
removals
of
the
signal,
make
the
adjustments
under
"Slight
Retouching
Adjustments.’'
If,
after
making
these
retouching
adjustments,
the
receiver
fails
to
pass
the
above
checks
or
if
the
horizontal
oscillator
is
completely
out
of
adjustment,
then
make
the
adjustments
under
"Complete
Realignment."
Slight
Retouching
Adjustments—Tune
in
a
Television
Station
and
adjust
the
fine
tuning
control
for
best
sound
quality.
Sync
the
picture
and
adjust
the
picture
control
for
slightly
less
than
normal
contrast.
Turn
the
horizontal
hold
control
to
the
extreme
position
in
which
the
oscillator
fails
to
hold
or
to
pul
in.
Momentarily
remove
the
signal.
Turn
the
T10$
fre¬
quency
adjustment
on
the
chassis
rear
apron
until
the
oscil¬
lator
pulls
into
sync.
Check
hold
and
pull-in
for
the
other
extreme
position
of
the
hold
control.
Complete
Realignment—Tune
in
a
Television
Station
and
ad¬
just
the
fine
tuning
control
for
best
sound
quality.
Turn
the
T108
frequency
adjustment
on
rear
apron
until
the
picture
is
synchronized.
Adjust
the
picture
control
so
that
the
picture
is
somewhat
below
average
contrast
level.
Turn
the
T108
phase
adjustment
screw
(under
chassis)
until
the
blanking
bar,
which
may
appear
in
the
picture,
moves
to
the
right
and
off
the
raster.
The
range
of
this
adjustment
is
such
that
it
is
possible
to
hit
an
unstable
condition
(ripples
in
the
raster).
The
screw
must
be
turned
clockwise
from
the
unstable
position.
The
length
of
stud
beyond
the
bushing
in
its
correct
position
is
usually
about
V
2
inch.
Turn
horizontal
hold
to
the
extreme
counter-clockwise
position.
Turn
T108
frequency
adjustment
clockwise
until
the
picture
falls
out
of
sync.
Then
turn
it
slowly
counter-clockwise
to
the
point
where
the
picture
falls
in
sync
again.
Readjust
T108
phase
adjustment
so
that
the
left
side
of
the
pic¬
ture
is
close
to
the
left
side
of
the
raster,
but
does
not
begin
to
fold
ever.
Turn
horizontal
hold
to
the
extreme
clockwise
position.
The
right
side
of
the
picture
should
be
close
to
the
right
side
of
the
raster,
but
should
not
begin
to
fold
over.
If
it
does,
readjust
the
phase
control.
Momentarily
remove
the
signal.
When
the
signal
is
re¬
stored,
the
picture
should
fall
in
sync.
If
it
doesn't,
turn
T108
frequency
adjustment
counter-clockwise
until
the
picture
falls
in
sync.
Turn
horizontal
hold
to
the
extreme
counter-clockwise
position.
Remove
the
signal
momentarily.
When
signal
is
restored,
the
picture
shuuld
fall
in
sync.
NOTE:
If
the
picture
does
not
pull
in
sync
after
momentary
removals
of
the
signal
in
both
extreme
positions
of
horizontal
hold,
the
pull-in
range
may
be
inadequate,
though
not
neces¬
sarily.
A
pull-in
through
%
of
the
hold
control
range
may
still
be
satisfactory.
There
is
a
difference
between
the
pull-in
range
and
hold-in
range
of
frequencies.
Once
in
sync,
the
circuit
will
hold
about
50%
to
100%
more
variation
in
frequency
than
it
can
pull
in.
The
range
of
the
horizontal
hold
control
is
only
ap¬
proximately
equal
to
the
pull-in
range,
considerable
variation
may
be
found
due
to
variations
in
the
cut-off
characteristic
of
the
horizontal
oscillator
control
tubes,
V124.
FOCUS—Adjust
the
focus
control
R184
for
maximum
definition
of
tho
vertical
wedge
of
the
test
pattern.
HEIGHT
AND
VERTICAL
LINEARITY
ADJUSTMENTS—Adjust
the
height
control
(R169
on
chassis
rear
apron)
until
the
picture
fills
the
mask
vertically
(6
3
/s
inches).
Adjust
vertical
linearity
(R178
on
rear
apron),
until
the
test
pattern
is
symmetrical
from
top
to
bottom.
Adjustment
of
either
control
will
require
a
read¬
justment
of
the
other.
Adjust
vertical
centering
to
align
the
picture
with
the
mask.
WIDTH
AND
HORIZONTAL
LINEARITY
ADJUSTMENTS—Turn
the
horizontal
drive
(R187
on
rear
apron)
clockwise
as
far
as
possible
without
causing
crowding
of
the
right
of
the
picture.
This
position
provides
maximum
high
voltage
to
the
kine¬
scope
second
anode.
Adjust
the
width
control
(LI96
on
rear
chassis)
until
the
picture
just
fills
the
mask
horizontally
(8
V
2
inches).
Adjust
the
horizontal
linearity
control
L201
(see
Fig¬
ure
6)
until
the
test
pattern
is
symmetrical
left
to
right.
A
slight
readjustment
of
the
horizontal
drive
control
may
be
necessary
when
the
linearity
control
is
used.
Adjust
horizontal
centering
to
align
the
picture
with
the
mask.
If
repeated
adjustments
of
drive
width
and
linearity
fail
to
give
proper
linearity,
it
may
be
necessary
to
move
the
tap
on
R209,
which
is
located
in
the
high
voltage
compartment.
Adjust¬
ments
of
drive,
width
and
linearity
must
then
be
repeated.
Check
to
see
that
all
cushion,
yoke,
focus
coil
and
ion
trap
magnet
thumb
screws
are
tight.
Replace
the
cabinet
back
and
top.
Make
sure
that
the
back
is
on
tight,
otherwise
it
may
rattle
at
high
volume.
CHECK
OF
R-F
OSCILLATOR
ADJUSTMENTS—With
a
crystal
calibrated
test
oscillator
or
heterodyne
frequency
meter,
check
to
see
if
the
receiver
r-f
oscillator
is
adjusted
to
the
proper
frequency
on
all
channels.
If
adjustments
are
required,
these
should
be
made
by
the
method
outlined
in
the
alignment
pro¬
cedure
on
page
8.
The
adjustments
for
channels
1
through
5
and
7
through
12
are
available
from
the
front
of
the
cabinet
by
removing
the
station
selector
escutcheon
as
shown
in
Figure
7.
Adjustments
for
channels
6
and
13
are
under
the
chassis.
VIDEO
PEAKING
LINK—A
video
peaking
link
is
provided
(see
Figure
6)
to
permit
changing
the
video
response.
If
the
pictures
from
the
majority
of
stations
look
better
with
the
link
closed,
(2-3
position)
then
the
link
should
be
placed
in
that
position.
However,
if
transients
are
produced
on
high
contrast
pictures
then
the
link
should
be
left
open
(1-2
position).
Figure
7
—
R-F
Oscillator
Adjustments
ANTENNA
TRAP—In
some
instances
interference
may
be
en¬
countered
from
FM
stations
that
are
on
the
image
frequency
of
a
television
station.
In
other
instances
interference
between
two
television
stations
may
be
observed.
Assume
that
two
television
stations
in
a
city
are
operating
on
channels
6
and
10.
When
the
receiver
is
tuned
to
channel
6,
a
small
amount
of
the
oscillator
voltage
(109
me.)
is
present
on
the
r-f
amplifier
grid.
This
109
me.
voltage
beats
with
the
channel
10
picture
carrier
and
produces
an
84.25
me.
signal.
This
signal
falls
within
the
channel
6
range
and
interferes
with
the
reception
of
channel
6.
A
similar
case
occurs
be¬
tween
channels
5
and
7.
A
series
resonant
trap
across
ther-f
amplifier
grid
circuit
is
employed
to
remove
theoscillator
voltage
from
the
grids
and
thus
eliminate
this
type
of
interference.
To
adjust
the
trap
in
the
field,
tune
in
the
station
on
which
the
interference
is
observed.
Tune
both
cores
of
the
trap
for
minimum
interference
in
the
picture.
See
Figure
8
for
the
lo¬
cation
of
the
trap.
Keep
both
cores
approximately
the
same
by
visual
inspection.
Then,
turn
one
core
V
2
turn
from
the
original
position
and
repeak
the
second
for
maximum
rejec¬
tion
Repeat
this
process
until
the
best
rejection
is
obtained.
For
shop
alignment
of
the
trap
see
the
alignment
procedure
on
page
11.
In
severe
cases
of
interference,
it
may
be
necessary
to
reduce
the
signal
from
the
interfering
station
by
reorienting
the
an¬
tenna
or
by
connecting
a
half
wave
stub
of
transmission
line
across
the
receiver
antenna
terminals.
The
end
of
the
stub
should
be
terminated
by
a
47
ohm,
non
inductive
resistor.
5

276
8TS30
CHASSIS
TOP
¥1EW
\
R\BZ
&R10MTNB
SS
CONTROL
sm
VERTICAL
MOLD
CONTROL
WIGM
VOLTAGE
COMPARTMENT
(SHOWN
WITH
SUIELO
REMOVED)

BOTTOM
VIEW
8TS30
R
!
B
2
Figure
9—Chassis
Bottom
View

278
ALIGNMENT
PROCEDURE
8
fS30
TEST
EQUIPMENT
—To
properly
service
the
television
chassis
of
this
receiver,
it
is
recommended
that
the
following
test
equipment
be
available:
R-F
Sweep
Generator
meeting
the
following
requirements;
(a)
Frequency
Ranges
18
to
30
me.,
1
me.
sweep
width
40
to
90
me.,
10
me.
sweep
width
170
to
225
me.,
10
me.
sweep
width
(b)
Output
adjustable
with
at
least
.1
volt
maximum.
(c)
Output
constant
on
all
ranges.
(d)
"Flat”
output
on
all
attenuator
positions.
Cathode-ray
Oscilloscope,
preferably
one
with
a
wide
band
vertical
deflection,
an
input
calibrating
source,
and
a
low
ca¬
pacity
probe.
Signal
Generator
to
provide
the
following
frequencies.
(a)
I-F
frequencies
19.75
me.
adjacent
channel
picture
trap
21.25
me.
sound
i-f
and
sound
traps
21.8
me.
converter
transformer
22.3
me.
second
picture
i-f
transformer
23.4
me.
fourth
picture
i-f
coil
25.2
me.
third
picture
i-f
coil
25.3
me.
first
picture
i-f
transformer
25
75
me.
picture
carrier
27.25
me.
adjacent
channel
sound
trap
(b)
R-F
frequencies
Picture
Sound
Channel
Carrier
Carrier
Number
Freq.
Me.
Freq.
Me.
1
.
..
45.25
.
.
49.75
2
.
..
55.25
.
.
59.75
3
.
..
61.25
.
.
65.75
4
.
..
67.25
.
.
71.75
5
.
..
77.25
.
.
81.75
6
.
..
83.25
.
.
87.75
7
.
..
175.25
.
.
179.75
8
.
..
181.25
.
.
185.75
S
.
..
187.25
.
.
191.75
10
.
..
193.25
.
.
197.75
11
.
..
199.25
.
.
203.75
12
.
..
205.25
.
.
209.75
13
.
...
211.25
.
215.75
(c)
Output
on
these
ranges
should
be
adjustable
and
at
least
.1
volt
maximum.
Heterodyne
Frequency
Meter
with
crystal
calibrator
if
the
sig¬
nal
generator
is
not
crystal
controlled.
Electronic
Voltmeter
of
Junior
"VoltOhmyst"
type
and
a
high
voltage
multiplier
probe
for
use
with
this
meter
to
permit
measurements
up
to
10
kv.
Service
Precautions—If
necessary
to
remove
the
chassis
from
cabinet,
the
kinescope
must
first
be
removed.
See
Figures
3
and
5.
If
possible,
the
chassis
should
then
be
serviced
without
the
kinescope.
However,
if
it
is
necessary
to
view
the
raster
during
servicing,
the
kinescope
should
be
inserted
only
after
the
chassis
is
turned
on
end.
The
kinescope
should
never
be
allowed
to
support
its
weight
by
resting
in
the
deflecting
yoke.
A
bracket
should
be
used
to
support
the
tube
at
its
viewing
screen.
By
turning
the
chassis
on
end
with
the
power
transformer
down,
all
adjustments
will
be
made
conveniently
available.
Since
this
is
the
only
safe
position
in
which
the
chassis
will
rest
and
still
leave
all
adjustments
accessible,
the
trimmer
location
drawings
are
oriented
similarly
for
ease
ol
use.
CAUTION:
Do
not
short
the
kinescope
second
anode
lead.
Its
short
circuit
current
is
approximately
3
ma.
This
repre¬
sents
approximately
9
watts
dissipation
and
a
considerable
overload
on
the
high
voltage
filter
resistor
R235.
Adjustments
Required—Normally,
only
the
r-f
oscillator
line
will
require
the
attention
of
the
service
technician.
All
other
circuits
are
either
broad
or
very
stable
and
hence
will
seldom
require
re-adjustment.
Due
to
the
high
frequencies
at
which
the
receiver
operates
the
r-f
oscillator
line
adjustment
is
critical
and
may
be
affected
by
a
tube
change.
The
line
can
be
adjusted
to
proper
frequency
on
channel
13
with
practically
any
6J6
tube
in
the
oscillator
socket.
However,
it
may
not
then
be
possible
to
adjust
the
line
to
frequency
on
all
of
channels
7,
8,
9,
10,
11
and
12.
To
be
satisfactory
as
an
oscillator
tube,
it
should
be
possible
to
adjust
the
line
to
proper
frequency
with
the
fine
tuning
control
in
the
middle
third
of
its
range.
It
may
therefore
be
necessary
to
select
a
tube
for
the
oscillator
socket.
In
replac¬
ing,
if
the
old
tube
can
be
matched
for
frequency
by
trying
several
new
ones,
this
practice
is
recommended.
At
best,
however,
it
will
probably
be
necessary
to
completely
realign
the
oscillator
line
when
changing
the
tube.
Tubes
which
cannot
be
used
as
oscillator
will
work
satisfac¬
torily
as
r-f
amplifier
or
converter.
ORDER
OF
ALIGNMENT—When
a
complete
receiver
align¬
ment
is
necessary,
it
can
be
most
conveniently
performed
in
the
following
order;
Sound
discriminator
Sound
i-f
transformers
Picture
i-f
traps
Picture
i-f
transformers
R-F
and
converter
lines
R-F
oscillator
line
Retouch
picture
i-f
transformers
Antenna
trap
adjustment
Sensitivity
check
SOUND
DISCRIMINATOR
ALIGNMENT—
Set
the
signal
generator
for
approximately
.1
volt
output
at
21.25
m
e.
and
connect
it
to
the
third
sound
i-f
grid.
Detune
T113
secondary
(bottom).
Set
the
"VoltOhmyst”
on
the
10
volt
scale.
Connect
the
meter
in
series
with
a
one
megohm
resistor
to
the
junction
of
diode
resistors
R219
and
R220.
Do
not
remove
the
discriminator
shield
to
make
connection
to
R219
and
R220.
Connection
can
be
easily
made
by
fashioning
a
hook
on
the
1
meg
resistor
lead
and
making
connection
to
the
transformer
lug
"C"
through
the
hole
provided
for
the
adjusting
tool.
Adjust
the
primary
of
T113
(top)
for
maximum
output
on
the
meter.
Connect
the
"VoltOhmyst"
to
the
junction
of
R236
and
C205.
Adjust
T113
secondary
(bottom).
It
will
be
found
that
it
is
pos¬
sible
to
produce
a
positive
or
negative
voltage
on
the
meter
de¬
pendent
upon
this
adjustment.
Obviously
to
pass
from
a
posi¬
tive
to
a
negative
voltage,
the
voltage
must
go
through
zero.
T113
(bottom)
should
be
adjusted
so
that
the
meter
indicates
zero
output
as
the
voltage
swings
from
positive
to
negative.
This
point
will
be
called
discriminator
zero
output.
Connect
the
sweep
oscillator
to
the
grid
of
the
third
sound
i-f
amplifier.
8

ALIGNMENT
PROCEDURE
8TS30
Adjust
the
sweep
band
width
to
approximately
1
me.
with
the
center
frequency
at
approximately
21.25
and
with
an
output
of
approximately
.1
volt.
Connect
the
oscilloscope
to
the
junction
of
R236
and
C205.
The
pattern
obtained
should
be
similar
to
that
shown
in
Figure
16A.
If
it
is
not.
adjust
the
T113
(top)
until
the
wave
form
is
symmetrical.
The
peak
to
peak
bandwidth
of
the
discriminator
should
be
approximately
350
kc.
and
it
should
be
linear
from
21.75
me.
to
21.325
me.
SOUND
I-F
ALIGNMENT—
Connect
the
sweep
oscillator
to
the
second
sound
i-f
amplifier
grid.
Connect
the
oscilloscope
to
the
third
sound
i-f
grid
return
(terminal
A
T112)
in
series
with
a
33,000
ohm
isolating
resistor.
Insert
a
21.25
me.
marker
signal
from
the
signal
generator
into
the
second
sound
i-f
grid.
Adjust
T112
(top
and
bottom)
for
maximum
gain
and
sym¬
metry
about
the
21.25
me.
marker.
The
pattern
obtained
should
be
similar
to
that
shown
in
Figure
16B.
The
output
level
from
the
sweep
should
be
set
to
produce
approximately
.3
volt
peak-to-peak
at
the
third
sound
i-f
grid
return
when
the
final
touches
on
the
above
adjustment
are
made.
It
is
necessary
that
the
sweep
output
voltage
should
not
exceed
the
specified
values
otherwise
the
response
curve
will
be
broadened,
permitting
slight
misadjustment
to
pass
unnoticed
and
possibly
causing
distortion
on
weak
signals.
Connect
the
sweep
and
signal
generator
to
the
top
end
of
the
trap
winding
of
T2
(on
top
of
the
chassis).
Adjust
Till
(top
and
bottom),
for
maximum
gain
and
symmetry
at
21.25
me.
Reduce
the
sweep
output
for
the
final
adjustments
so
that
approximately
.3
volt
peak-to-peak
is
present
at
the
third
sound
i-f
grid
return.
The
band
width
at
70%
response
from
the
first
sound
i-f
grid
to
the
third
i-f
grid
should
be
approximately
200
kc.
PICTURE
I-F
TRAP
ADJUSTMENT—
Turn
the
receiver
picture
control
for
-3
volts
on
the
picture
i-f
grids.
Set
the
channel
switch
to
channel
13.
Connect
the
"VoltOhmyst"
across
the
picture
second
detector
load
resistor
R137.
Connect
the
output
of
the
signal
generator
to
the
junction
of
C14
and
R6.
This
connection
is
available
on
a
terminal
lug
through
a
hole
in
the
side
apron
of
the
chassis,
beside
the
r-f
unit.
This
hole
is
normally
down
when
the
chassis
is
in
the
recommended
position.
Connection
can
be
easily
made,
how¬
ever,
by
allowing
the
receiver
to
hang
over
the
edge
of
the
test
bench
by
a
few
inches.
Set
the
generator
to
each
of
the
following
frequencies
and
tune
the
specified
adjustment
for
minimum
indication
on
the
"VoltOhmyst."
In
each
instance
the
generator
should
be
checked
against
a
crystal
calibrator
to
insure
that
the
gen¬
erator
is
exactly
on
frequency
21.25
m
e.—T2
(top)
21.25
me.—T105
(top)
27.25
me.—T103
(top)
27.25
m
e.—T102
(bottom)
19.75
me.-
1
T104
(top)
Note—On
some
sets,
T102
bottom
adjustment
is
omitted.
PICTURE
I-F
TRANSFORMER
ADJUSTMENTS—
Set
the
signal
generator
to
each
of
the
following
frequencies
and
peak
the
specified
adjustment
for
maximum
indication
on
the
"VoltOhmyst,"
21.8
me.—T2
(bottom)
25.3
me.—T103
(bottom)
22.3
me.—T104
(bottom)
25.2
me.—T’02
(top
of
chassis)
23.4
me.—LI85
(top
of
chassis)
If
T104
(bottom)
required
adjustment,
it
will
be
necessary
to
reset
T104
(top)
for
minimum
response
at
19.75
me.
Picture
I-F
Oscillation—If
the
receiver
is
badly
misaligned
and
two
or
more
of
the
i-f
transformers
are
tuned
to
the
same
frequency,
the
receiver
may
fall
into
i-f
oscillation.
I-F
oscilla¬
tion
shows
up
as
a
voltage
in
excess
of
3
volts
at
the
picture
detector
load
resistor.
This
voltage
is
unaffected
by
r-f
signal
input
and
sometimes
is
independent
of
picture
control
setting.
If
such
a
condition
is
encountered,
it
is
sometimes
possible
to
stop
oscillation
by
adjusting
the
transformers
approximately
to
frequency
by
setting
the
adjustment
stud
extensions
of
T2,
T103,
T104,
T105,
TT102,
and
L185
to
be
approximately
equal
to
those
of
another
receiver
known
to
be
in
proper
alignment.
If
this
does
not
have
the
desired
effect,
it
may
now
be
possible
to
stop
oscillation
by
increasing
the
grid
bias.
If
so,
it
should
then
be
possible
to
align
the
transformers
by
the
usual
method.
Once
aligned
in
this
manner,
the
i-f
should
be
stable
with
reduced
bias.
If
the
oscillation
cannot
be
stopped
in
the
above
manner,
shunt
the
grids
of
the
first
three
pix
i-f
amplifiers
to
ground
with
1000
mmf.
capacitors.
Connect
the
signal
generator
to
the
fourth
pix
i-f
grid
and
align
LI85
to
frequency.
Pro¬
gressively
remove
the
shunt
from
each
grid
and
align
the
plate
coil
of
that
stage
to
frequency.
If
this
does
not
stop
the
oscillation,
the
difficulty
is
not
due
to
i-f
misalignment
as
the
i-f
section
is
very
stable
when
prop¬
erly
aligned.
Check
all
i-f
by-pass
condensers,
transformer
shunting
resistors,
tubes,
socket
voltages,
etc.
R-F
AND
CONVERTER
LINE
ADJUSTMENT—
Connect
the
r-f
sweep
oscillator
to
the
receiver
antenna
ter¬
minals.
If
the
sweep
oscillator
has
a
50
ohm
single-ended
output,
it
will
be
necessary
to
obtain
balanced
output
by
connecting
as
shown
in
Figure
10.
Figure
10—Unbalanced
Sweep
Cable
Termination
Connect
the
oscilloscope
to
the
junction
of
C14
and
R6
(in
the
r-f
tuning
unit)
through
a
10,000
ohm
resistor.
By-pass
the
first
picture
i-f
grid
to
ground
through
a
1000
mmfd.
capacitor.
Keep
the
leads
to
this
by-pass
as
short
as
possible.
If
this
is
not
done,
lead
resonance
may
fall
in
the
r-f
range
and
cause
an
incorrect
picture
of
the
r-f
response.
Turn
the
picture
control
for
—1.5
volts
on
the
r-f
grids.
Connect
the
signal
generator
loosely
to
the
receiver
antenna
terminals.
Turn
the
antenna
trap
L81
and
L82
cores
fully
counterclock¬
wise
so
that
the
trap
will
not
affect
the
channel
6
r-f
response.
Since
channel
7
has
the
narrowest
response
of
any
of
the

280
ALIGNMENT
PROCEDURE
8TS30
high
frequency
channels,
it
should
be
adjusted
first.
Set
the
receiver
channel
switch
to
channel
7
(see
Figure
15
for
switch
shaft
flat
location
versus
channel).
Set
the
sweep
oscillator
to
cover
channel
7.
Insert
markers
of
channel
7
picture
carrier
and
sound
carrier
175.25
me.
and
179.75
me.
Adjust
L25,
L26,
L51
and
L52
(see
Figure
17)
for
an
approxi¬
mately
flat
topped
response
curve
located
symmetrically
be¬
tween
the
markers.
Normally
this
curve
appears
somewhat
overcoupled
or
double
humped
with
a
10
or
15%
peak
to
val¬
ley
excursion
and
the
markers
occur
at
approximately
90%
re¬
sponse.
See
Figure
17,
channel
7.
In
making
these
adjust¬
ments,
the
stud
extension
of
all
cores
should
be
kept
approxi¬
mately
equal.
Check
the
response
of
channels
8
through
13
by
switching
the
receiver
channel
switch,
sweep
oscillator
and
marker
oscillator
to
each
of
these
channels
and
observe
the
response
obtained.
See
Figure
17
for
typical
response
curves.
It
should
be
found
that
all
these
channels
have
the
proper
shaped
re¬
sponse
with
the
markers
above
70%
response.
It
the
markers
do
not
fall
within
this
requirement
on
one
or
more
high
fre¬
quency
channels,
since
there
are
no
individual
channel
ad¬
justments,
it
will
be
necessary
to
readjust
L25,
L26,
L51
and
L52,
and
possibly
compromise
some
channel
slightly
in
order
to
get
the
markers
up
on
other
channels.
Normally
however,
no
difficulty
of
this
type
should
be
experienced
since
the
higher
frequency
channels
become
comparatively
broad
and
the
markers
easily
fall
within
the
required
range.
Channel
6
is
next
aligned
in
the
same
manner.
Set
the
receiver
to
channel
6.
Set
the
sweep
oscillator
to
cover
channel
6.
Set
the
marker
oscillator
to
channel
6
picture
and
sound
car¬
rier
frequencies.
Adjust
L11,
L12,
L37
and
L38,
for
an
approximately
flat-topped
response
curve
located
symmetrically
between
the
markers.
Check
channels
5
down
through
channel
1
by
switching
the
receiver,
sweep
oscillator
and
marker
oscillator
to
each
chan¬
nel
and
observing
the
response
obtained.
In
all
cases,
the
markers
should
be
above
the
70%
response
point.
If
this
is
not
the
case,
LI
I,
L12,
L37
and
L.38
should
be
retouched.
On
final
adjustment,
all
channels
must
be
within
the
70%
spec¬
ification.
Coupling
between
r-f
and
converter
lines
is
augmented
by
a
link
between
LI2
and
L37.
This
link
is
adjusted
in
the
factory
and
should
not
require
adjustment
in
the
field.
On
channel
6
with
the
link
in
the
minimum
coupling
position,
the
response
is
slightly
overcoupled
with
approximately
a
10%
excursion
from
peak-to-valley.
With
the
coupling
at
maximum,
the
response
is
somewhat
broader
and
the
peak-to-valley
ex¬
cursion
is
approximately
40%.
The
amount
of
coupling
per¬
missible
is
limited
by
the
peak-to-valley
excursion
which
should
not
be
greater
than
30%
on
any
channel.
R-F
OSCILLATOR
LINE
ADJUSTMENT—
The
r-f
oscillator
line
may
be
aligned
by
adjusting
it
to
beat
with
a
crystal
calibrated
heterodyne
frequency
meter,
or
by
feeding
a
signal
into
the
receiver
at
the
r-f
sound
carrier
fre¬
quency
and
adjusting
the
oscillator
for
zero
output
from
the
sound
discriminator.
In
this
latter
case
the
sound
discriminator
must
first
have
been
aligned
to
exact
frequency.
Either
method
of
adjustment
will
produce
the
same
results.
The
method
used
will
depend
upon
the
type
of
test
equipment
available.
Regardless
of
which
method
of
oscillator
alignment
is
used,
the
frequency
standard
must
be
crystal
controlled
or
calibrated.
If
the
receiver
oscillator
is
to
be
adjusted
by
the
heterodyne
frequency
meter
method,
the
calibration
frequency
listed
under
R-F
Osc.
Freq.
must
be
available.
If
the
receiver
oscillator
is
adjusted
by
feeding
in
the
r-f
sound
carrier
frequency,
the
frequencies
listed
under
sound
carrier
Freq.
must
be
available.
Receiver
R-F
Sound
Channel
R-F
Osc.
Carrier
Number
Freq,
Me.
Freq.
Me.
1
.
.
71
.
.
49.75
2
.
.
81
.
.
59.75
3
.
.
87
.
.
65.75
4
.
.
93
.
.
71.75
5
.
.
103
.
..
81.75
6
.
.
109
.
.
87.75
7
.
.
201
.
.
179.75
8
.
.
207
.
..
185,75
9
.
.
213
.
.
191.75
10
.
.
219
.
.
197.75
11
.
.
225
.
..
203.75
12
.
.
231
.
.
209.75
13
.
.
237
.
.
215.75
If
the
heterodyne
frequency
meter
method
is
used,
couple
the
meter
probe
loosely
to
the
receiver
oscillator.
If
the
r-f
sound
carrier
method
is
used,
connect
the
"Volt-
Ohmyst"
to
the
sound
discriminator
output
(junction
of
R236
and
C205.
Connect
the
signal
generator
to
the
receiver
antenna
terminals.
The
order
of
alignment
remains
the
same
regardless
of
which
method
is
used.
Since
lower
frequencies
are
obtained
by
adding
steps
of
inductance,
it
is
necessary
to
align
channel
13
first
and
con¬
tinue
in
reverse
numerical
order.
Set
the
receiver
channel
switch
to
13.
Adjust
the
frequency
standard
to
the
correct
frequency
(237
me.
for
heterodyne
frequency
meter
or
215.75
me.
for
the
signal
generator).
Set
the
fine
tuning
control
to
the
middle
of
its
range
while
mak¬
ing
the
adjustment.
Adjust
L77
and
L78
for
an
audible
beat
on
the
heterodyne
frequency
meter
or
zero
voltage
from
sound
discriminator.
The
core
stud
extensions
should
be
maintained
equal
by
visual
inspection.
Switch
the
receiver
to
channel
12.
Set
the
frequency
standard
to
the
proper
frequency
as
listed
in
the
alignment
table.
Adjust
L76
for
indications
as
above.
Adjust
the
oscillator
to
frequency
on
all
channels
by
switch¬
ing
the
receiver
and
the
frequency
standard
to
each
channel
and
adjusting
the
appropriate
oscillator
trimmer
for
the
speci¬
fied
indication.
It
should
be
possible
to
adjust
the
oscillator
to
the
correct
frequency
on
all
channels
with
the
fine
tuning
control
in
the
middle
third
of
its
range.
After
the
oscillator
has
been
set
on
all
channels,
start
back
at
channel
13
and
recheck
to
make
sure
that
all
adjustments
are
correct.
RETOUCHING
OF
PICTURE
I-F
ADJUSTMENTS—
The
picture
i-f
response
curve
varies
somewhat
with
change
of
bias
and
for
this
reason
it
should
be
aligned
with
approxi-
10

ALIGNMENT
PROCEDURE
8TS30
mately
the
same
signal
input
as
it
will
receive
in
operation.
If
the
receiver
is
located
at
the
edge
of
the
service
area,
it
should
be
aligned
with
approximately
-1
volt
i-f
grid
bias.
However,
for
normal
conditions,
(signals
of
1000
microvolts
or
greater),
it
is
recommended
that
the
picture
i-f
be
aligned
with
a
grid
bias
of
-3
volts.
Connect
the
r-f
sweep
generator
to
the
receiver
antenna
ter¬
minals.
Connect
the
signal
generator
to
the
antenna
terminals
and
feed
in
the
25.75
me
i-f
picture
carrier
marker
and
a
22.3
me
marker.
Connect
the
oscilloscope
across
the
picture
detector
load
re¬
sistor.
Turn
the
picture
control
for
-3
volts
at
its
arm.
Set
the
sweep
output
to
produce
approximately
.3
volt
peak-to-
peak
across
the
picture
detector
load
resistor.
Observe
and
analyze
the
response
curve
obtained.
The
re¬
sponse
will
not
be
ideal
and
the
i-f
adjustments
must
be
retouched
in
order
to
obtain
the
desired
curve.
See
Figure
18.
If
T104
(bottom)
required
any
adjustment,
it
will
be
necessary
to
reset
T104
(top)
for
minimum
response
at
19.75
me.
On
final
adjustment
the
picture
carrier
marker
must
be
at
approximately
45%
response.
The
curve
must
be
approxi¬
mately
flat
topped
and
with
the
22.3
me.
marker
at
approxi¬
mately
100%
response.
The
most
important
consideration
in
making
the
i-f
adjust¬
ments
is
to
get
the
picture
carrier
at
the
45%
response
point.
If
the
picture
carrier
operates
too
low
on
the
response
curve,
loss
of
low
frequency
video
response,
of
picture
brilliance,
of
blanking,
and
of
sync
may
occur.
If
the
picture
carrier
oper¬
ates
too
high
on
the
response
curve,
the
picture
definition
is
impaired
by
loss
of
high
frequency
video
response.
In
making
these
adjustments,
care
should
be
taken
that
no
two
trans¬
formers
are
tuned
to
the
same
frequency
as
i-f
oscillation
may
result.
ANTENNA
TRAP
ALIGNMENT—When
the
receiver
is
aligned
in
the
shop,
the
antenna
trap
should
be
adjusted
to
reject
the
type
of
interference
which
might
be
encountered
at
the
cus¬
tomer's
home.
It
can
be
adjusted
by
actual
observation
of
the
interference
on
the
air
or
by
the
use
of
a
signal
gen¬
erator.
Two
methods
of
adjustment
are
possible
if
a
signal
generator
is
employed.
Select
the
type
of
interference
and
method
to
suit
the
test
equipment
involved.
Method
1
for
channel
6-10
interference.
Set
the
"VoltOhmyst"
on
the
3
volt
scale
and
connect
it
to
the
junction
of
LI88
and
R137.
Turn
the
picture
control
to
the
maximum
clockwise
po¬
sition.
Connect
the
signal
generator
to
the
antenna
terminals
through
balancing
network
as
shown
in
Figure
10.
Tune
the
receiver
oscillator
to
109
me.
with
the
fine
tuning
control
as
determined
by
the
method
employed
in
the
previous
section
on
r-f
oscillator
line
adjustment.
Feed
in
the
channel
10
pic¬
ture
carrier
(193.25
me.)
from
the
signal
generator.
Adjust
L81
and
L82
for
minimum
reading
on
the
"VoltOhmyst,"
keep¬
ing
both
cores
about
the
same.
For
final
touches,
adjust
L81
one-half
turn
clockwise
and
readjust
L82
for
minimum
on
the
meter.
If
this
minimum
is
lower
than
the
previous,
repeat
un¬
til
the
lowest
minimum
is
obtained.
If
this
minimum
was
higher,
adjust
L81
one-half
turn
counterclockwse
and
readjust
L82.
Repeat
for
the
lowest
minimum.
Method
2
for
channel
6-10
interference.
With
the
same
setup
as
above,
switch
the
receiver
to
channel
3
and
tune
the
re¬
ceiver
oscillator
to
87
me.
Feed
in
a
signal
of
109
me.
from
the
signal
generator
and
adjust
the
trap
as
above.
Method
1
for
channel
5-7
interference.
With
the
same
setup
as
above,
switch
the
receiver
to
channel
5
and
tune
the
re¬
ceiver
oscillator
to
103
me.
Feed
in
the
picture
7
sound
car¬
rier
(179.75
me.)
from
the
signal
generator
and
adjust
the
trap
as
above.
Method
2
for
channel
5-7
interference.
With
the
same
setup
as
above,
switch
the
receiver
to
channel
2
and
tune
the
re¬
ceiver
oscillator
to
81
me.
Feed
in
a
103
me,
signal
from
the
generator
and
adjust
the
trap
as
above.
Method
for
FM
image
interference.
With
the
same
setup
as
above,
switch
the
receiver
to
channel
2
and
tune
the
receiver
oscillator
to
81
me.
Feed
in
a
signal
of
the
frequency
of
the
interfering
FM
station
and
adjust
the
trap
as
before.
To
adjust
the
trap
by
observation
of
the
picture
under
actual
operating
conditions,
connect
an
antenna
to
the
receiver
and
tune
in
the
station
on
which
the
interference
is
observed.
Ad¬
just
the
trap
as
above
for
minimum
interference
in
the
picture.
Since
the
customer's
antenna
will
affect
these
adjustments
slightly,
in
cases
of
severe
interference
it
may
be
necessary
to
retouch
the
trap
adjustment
when
the
receiver
is
installed
in
the
customer's
home.
SENSITIVITY
CHECK—A
comparative
sensitivity
check
can
be
made
by
operating
the
receiver
on
a
weak
signal
from
a
television
station
and
comparing
the
picture
and
sound
ob¬
tained
to
that
obtained
on
other
receivers
under
the
same
conditions.
This
weak
signal
can
be
obtained
by
connecting
the
shop
antenna
to
the
receiver
through
an
attenuator
pad
of
the
type
shown
in
Figure
11.
The
number
of
stages
in
the
pad
de¬
pends
upon
the
signal
strength
available
at
the
antenna.
A
sufficient
number
of
stages
should
be
inserted
so
that
a
some¬
what
less
than
normal
contrast
picture
is
obtained
when
the
picture
control
is
at
the
maximum
clockwise
position.
Only
carbon
type
resistors
should
be
used
to
construct
the
pad.
RESPONSE
CURVES—The
response
curves
shown
on
page
and
referred
to
throughout
the
alignment
procedure
were
taken
from
a
production
set.
Although
these
curves
are
typical,
some
variations
can
be
expected.
Channel
2
response
(not
shown)
is
similar
to
that
of
channel
3
REFER
TO
PAGES
238
TO
243
INC.
FOR
RE¬
SPONSE
CURVES,
TEST
PATTERN
PHOTO¬
GRAPHS,
SERVICE
SUGGESTIONS
AND
WAVE¬
FORM
PHOTOGRAPHS.
ALIGNMENT
TABLE
-
Both
methods
of
oscillator
alignment
are
presented
in
the
alignment
table.
The
service
technician
may
thereby
choose
the
method
to
suit
his
test
equipment.
11

282
8TS30
ALIGNMENT
TABLE
THE
DETAILED
ALIGNMENT
PROCEDURE
BEGINNING
ON
PAGE
8
SHOULD
BE
READ
BEFORE
ALIGNMENT
BY
USE
OF
THE
TABLE
IS
ATTEMPTED.
STEP
No.
CONNECT
SIGNAL
GENERATOR
TO
SIGNAL
GEN.
FREQ.
MC.
CONNECT
SWEEP
GENERATOR
TO
HUH
■
MISCELLANEOUS
CONNECTIONS
AND
INSTRUCTIONS
ADJUST
REFER
TO
DISCRIMINATOR
AND
SOUND
I-F
ALIGNMENT
1
3rd
sound
i-f
(pin
1,
V106)
grid
21.25
.1
volt
output
Not
used
Not
used
In
series
with
1
meg.
to
junction
of
R219
&
R220
Detune
T113
(bot¬
tom).
Adjust
T113
(top)
for
max.
on
meter
Fig.
14
Fig.
13
Fig.
12
■
"
Junct
of
R236
&
C205
Meter
on
3
volt
scale
T113
(bottom)
for
zero
on
meter
Fig.
14
Fig.
13
|
3rd
sound
i-f
grid
(pin
1,
V106)
21.25
center
1
me.
wide
.1
v.
out
Junction
of
R236
A
C205
Not
used
Check
for
symmetrical
response
wave¬
form
(positive
&
negative).
If
not
equal
adjust
T113
(top)
until
they
are*
equal
Fig.
14
Fig.
16
A
l
2nd
sound
i-f
(pin
1,
V105)
grid
21.25
re¬
duced
output
2nd
sound
i-f
grid
21.25
reduced
output
Terminal
A,
T112
in
series
with
33,000
ohms
Sweep
output
re¬
duced
to
provide
.3
volt
p-to-p
on
scope
T112
(top
&
bot¬
tom)
for
max.
gain
and
sym¬
metry
at
21.25
me.
Fig.
14
Fig.
12
Fig.
13
Fig.
16
B
5
Trap
winding
on
T2
(top
of
chas¬
sis)
21.25
re¬
duced
output
Trap
winding
T2
on
21.25
reduced
output
Till
(top
6,
bot¬
tom)
for
max.
gain
and
sym¬
metry
at
21.25
me.
Fig.
12
Fig.
13
Fig.
14
Fig.
16
B
PICTURE
I-F
AND
TRAP
ADJUSTMENT
6
Not
used
Not
used
Not
used
Junction
of
R189
&
R190
Picture
control
for'
-3
volts
on
meter
Fig.
14
■
21.25
■
Junction
of
LI88
&
R137
Meter
on
3
volt
scale.
Receiver
on
channel
13
T105
(top)
for
min.
on
meter
Fig.
12
8
—
21.25
"
T2
(top)
tor
mm.
Fig.
14
Fig.
12
27.25
"
T103
(top)
for
min.
T102
(bot.)
for
min.
Fig.
12
Fig.
13
IS
19.75
"
"
T104
(fop)
for
min.
Fig.
12
a
m
"
"
T2
(bottom)
for
max.
Fig.
13
■
iii
"
T103
(bottom)
for
max.
mm
13
22.3
"
"
T104
(bottom)
for
max.
■
25.2
99
T102
(top
chassis)
for
max.
Fig.
12
23.4
"
"
"
L185
(top
chassis)
for
max.
"
■
til
If
T104
(bottom)
required
adjustment
in
step
13,
repeat
step
10.
R-F
A
ND
CONVERTER
LINE
ALIGNMENT
17
Not
used
Not
used
Not
used
Pin
5
or
6
VI08
Picture
control
for
-1.5
volts
on
meter
Fig.
14
Fig.
13
18
Antenna
terminal
(loosely)
175.25
179.75
Antenna
terminals
(see
text
for
precaution)
Sweep¬
ing
channel
7
Junction
C14
and
R6
through
10,000
ohm
series
re¬
sistor
Not
used
1st
i-f
grid
by¬
pass
to
gnd.
with
1000
mmf.
Re¬
ceiver
on
chan¬
nel
7
L25,
L26,
L51
&
L52
for
approx,
flat
top
response
between
markers.
Markers
above
70%
Fig.
14
Fig.
13
Fig.
17
(7)
19
181.25
185.75
channel
8
Receiver
on
chan¬
nel
8
Check
to
see
that
response
is
as
above
Fig.
17
(8)
H
187.25
191.75
channel
9
90
Receiver
on
chan¬
nel
9
"
Fig.
17
(9)
H
193.25
197.75
channel
10
11
"
Receiver
on
chan¬
nel
10
"
Fig.
17
(10)
mn
M/mm
199.25
203.75
channel
11
**
"
Receiver
on
chan¬
nel
11
"
Fig.
17
(ID
23
205.25
209.75
chasm©!
12
"
"
Receive?
on
chan¬
nel
12
"
Fig.
17
(12)
24
211.25
215.75
channel
13
"
Receiver
on
chan¬
nel
13
"
Fig.
47
(13)
25
If
the
response
response
up
on
on
any
channel
(steps
19
through
24)
is
below
70%
at
eith.
that
channel.
Then
recheck
steps
18
through
24.
sr
marker,
switch
to
that
channel
and
ac
just
L25,
L26,
L51,
&
L52
to
pull
12

ALIGNMENT
TABLE
8TS30
CONNECT
SWEEP
SWEEP
GEN.
GENERATOR
FREQ.
TO
MC.
OSCILLOSCOPE
TO
R-F
AND
CONVERTER
LINE
ALIGNMENT
(Cont'd)
No!
used
MISCELLANEOUS
CONNECTIONS
AND
INSTRUCTIONS
Receiver
on
chan-
Lll,
L12,
L37
L38
lor
response
as
above
Receiver
on
chan-
Check
to
SB®
that
nel
S
response
is
as
above
channel
2
channel
1
Receiver
on
chan¬
nel
1
32
If
the
response
on
any
channel
(steps
27
through
31)
is
below
70%
at
either
marker,
switch
to
that
channel
and
adjust
Lll,
L12,
L37
&
L38
to
pul
response
up
on
that
channel.
Then
recheck
steps
26
through
31.
R-F
OSCILLATOR
ALIGNMENT
CONNECT
SIGNAL
SIGNAL
GEN.
FREQ.
MC.
CONNECT
HETERODYNE
FREQ.
METER
TO
CONNECT
"VOLTOHMYST'
TO
33
Antenna
terminals
215.75
Loosely
coupled
to
r-f
osc.
209.75
203.75
197.75
191.75
185.75
179.75
87.75
81.75
71.75
65.
59.
49.75
Repeat
steps
33
through
45
as
a
check.
MISCELLANEOUS
CONNECTIONS
AND
INSTRUCTIONS
Fine
tuning
cen¬
tered
for
all
ad¬
justments
Receiver
on
chan¬
nel
13
L77
&
L78
for
zero
on
meter
or
beat
on
het.
feq.
meter
Rec.
on
chan.
12
L76
as
above
Rec.
on
chan.
11
L74
as
above
Rec.
on
chan.
10
L72
as
above
Rec.
on
chan.
9
L70
as
above
Rec.
on
chan.
8
L68
as
above
Rec.
on
chan.
7
L66
as
above
Rec.
on
chan.
6
L33
6
L64
as
above
Rec.
on
chan.
5
L62
as
above
Rec.
on
chan.
4
L60
as
above
Rec.
on
chan.
3
L58
as
above
Rec.
on
chan.
2
L56
as
above
Rec.
on
chan.
1
L54
as
above
RETOUCHING
PICTURE
I-F
TRANSFORMERS
Not
used
Junction
of
RI89
Receiver
&
sweep
&
R190
on
a
channel
be¬
tween
1
and
6
known
to
have
good
r-f
response
8
Antenna
terminals
(loosely)
Junction
L188
and
Not
used
R137
-3
volts
on
meter
Retouch
pix
i-f
adjustments
(T2,
T103,
Fig.
14
T104,
bottoms
T102
&
L185
as
neces-
Fig.
13
sary
to
provide
proper
response
Fig.
18
If
T104
(bottom)
was
adjusted
in
step
48,
repeat
step
10
and
step
48.
ANTENNA
TRAP
ADJUSTMENT
Select
1
of
the
6
steps
below
for
suitable
m3thod
for
type
of
interference
encountered.
50-1
Antenna
ter¬
minals
through
termination
193.25
Loosely
coupled
to
r-f
osc.
Junction
of
L188
|
Rec.
on
chan.
6
I
LSI
&
L82
for
min.
Rec.
on
chan.
3
Rec.
on
chan.
5
Rec.
on
chan.
2
Rec.
on
interfered
LSI
&
L82
for
min.
channel
interference
SENSITIVITY
CHECK
Connect
antenna
to
receiver
through
attenuator
pod
to
provide
weak
signal.
Compare
picture
and
sound
obtained
to
that
obtained
on
other
re¬
ceivers
under
the
same
conditions.

286
STS80
ALIGNMENT
DATA
OSCILUATOR
ADJUSTMENTS
FOE
CHANNELS
6
AND
13
ARE
ON
SIDE
OF
E.
F.
UNIT
Figure
15
—
R-F
Oscillator
Adjustments
Figure
13—Bottom
Chassis
Adjustments
Figure
16—Sound
Discriminator
and
l-F
Response
PIX
SOUND
Figure
17
—
R-F
Response
Figure
14
—
Test
Connection
Points
Figure
18—Overall
Response
16

CHASSIS
WIBIMG
DIA

HHHi

289
CIRCUIT
SCHEMATIC
DIA
V105
6BA6
2ND.SOUND
I.FT
VIC
6A
3RD.
SO
C
15
0.25-2.75
FINEJjUNlNG^
JL
7_l|
13
1
I
&i
02
03
04
os
60
<
07
08
09
olo
ait
012
o
j
,
m
r—
)|
*
.
—
C19
LS4
L5fc
L68
L60
L£>2
LG4
L6fe
L6
g
L70
L72
L
74
L76
L
^®
10
C8
M500
**
IN
SOME
SETS
GRN.
LEAD
FROM
THE
R.F.
UNIT
IS
DISCONNECTED
|
AT
im
and
connected
TO
GROUND
AS
SHOWN
+275
V.
VltB
6SK7
1ST.
SYNC.
AMPL.
V119
6SH7
5YNC.SE
PAR
ATOf
NOTES
All
resistance
values
are
in
ohms.
K
2
=
1000.
Capacitance
values
less
than
1
are
in
mfd.
and
above
1
in
rnmid.,
unless
otherwise
noted.
Direction
of
arrows
at
controls
indicates
clockwise
rotation.
All
voltages
measured
with
VoltOhmyst
and
with
picture
control
counterclockwise.
Voltages
should
hold
within
±20%
with
117
v.
a-c
supply.
In
some
receivers,
substitutions
have
caused
changes
in
component
lead
color
codes,
in
electro¬
lytic
capacitor
values
and
their
lug
identification
markings.
In
some
receivers,
the
antenna
trap
(L81
,
L82,
C21
and
C
22)
may
be
omitted.
In
some
receivers,
on
EM
type
of
ion
trap
magnet
is
employed.
In
these
sets,
the
magnet
coils
and
the
shunting
resistor
R232
are
connected
as
shown
by
the
dotted
lines
of
the
schematic.
In
this
case,
the
jumper
across
R232
is
omitted.
In
some
receivers,
the
green
lead
from
the
r-f
unit
is
connected
to
ground
to
minimize
interchannel
inter¬
ference.
In
this
condition
the
receiver
will
overload
on
signals
in
excess
of
15,000
microvolts.
If
such
signals
are
present,
it
will
be
necessary
to
reconnect
the
lead
as
shown
or
to
reduce
the
signal
input
to
the
receiver
by
a
pad
or
stub
on
the
antenna
trans¬
mission
line.
In
some
receivers,
the
trap
winding
on
T102
is
omitted.
In
some
receivers,
the
fuse
FI
is
omitted.
19

!9
290
SlTIC
diagram
V106
6AU6
3RD.
SOUND
\.F.
Vt07
6AL5
SOUND
DISCR
8TS30
-lOOV.
(000
iWOOOOO
«
00
5
5ns
7
,
O.Gil
,
1/
_
11
UJ
f
cfl£¥
r
ItfII'
C183
4-
C184-
.01
.01
JIOI
rg
(
t
no
20
Figure
20—Circuit
Schematic
Diagr
4
m

(OZZZ'^t
'88220
'¥
8220
)
sjioa
0
S
8
"Pjui
or
jo
uotpss
[
I
puo
'sjioa
Qgj-
Pjui
01
jo
uoijoas
j
’s}joa
Qg,
'
p/ux
j
Of
P
uoijoas
i
Buisuduioo
‘oijAioijoaig—lojpDdDq
(92220
'
V
ZZZD)
“
S||OA
Q§
Pl^
OS
J®
uoipes
J
piID
S|[OA
0
S^
*’pjm
j
Q
8
J°
uoijoas
I
fiinsiiduioo
'aijApijoaig-
iojpDdoQ
01220
'91220
'VI
2
20
)
I
SJIOA
OSI
"P?
™
01
P
uoipas
I
PUD
'sj[oa
0
g,
’-pjui
0
fr
jo
suoijoas
z
fcuisuduioo
'oijAioijoaig—lojpDdon
!
(8H0
'S2I0)
s
H
OA
001
Pjui
S2'0
'icqnqnx
-lojioDdDQ
:
OHO)
s
ll
0A
009
'
Pjui
r
o
'JDfnqnj;—jojtoDdDo
(2810
'ZSIO)
S
J(°
A
001
"Pjui
ro
'-iDinqnx—JojpDdDo
,
(
9810
)
sjioa
0001
"Pjui
SO'
'pajoubaiduii
po
'iD[nqnx—JOjpDdDQ
.
(
8
SIO)
sjioa
009
"PJ
111
SO'
'pajDubaiduii
[io
-i
D
[nqnx—lojioDdoo
(0810
'SZIO
't-ZIO
'
2
H
O
i
'IHO
'OHO)
S
H°
A
009
"Pjui
SO'
'iD^qnx—jojpDdDQ
(OZIO
'
81-10
’IHO
'SeiD)
sjioa
001
"Pjui
SO’
'iDinqnx—jojpndDo
(9020
'2610
I
‘ZZIO
'
6
HO)
s
»!
OA
OOf-
"PJUI
10
'
MD[nqnj_—JOjpDdeQ
J
(1810
'
8810
)
sjioa
001
PJuiui
io'
naded
pappioj^—
JojpedBQ
{
r
,
(
8810
)
sjioa
0001
PJUI
S
80
‘
'pajDubaiduii
[to
-jDinqnx—
lojpodDQ
(
(6910
8910
)
sjioa
001
Pjui
SIO'
'pajDubaiduit
no
'iD
(
nqnx—
iojiODdoo
<
(6020)
SJPA
009
"Pjui
S00'
'iDjnqnx—jojpodDo
t
(8020
'1623
‘2SIO)
sjioa
001
"pjui
S00'
’i°inqnx—j
0
jp
D
dDo
i
c
(CZIO)
SJIOA
0001
"PJUI
K)0'
'iD[nqnx-
JtojpDdDo
/
(ZZIO
7,910)
sjioa
001
"PJUI
1-00’
'io[nqnx--ioipDdDn
c
(IS
10)
sjjoa
ooi
"pjui
200'
'iDinqnx—JcjtoDdD-)
!
T
(8ZtO)
sjioa
0001
"Pjui
100'
'iDjnqnx—
JojtODdD-)
?
S>l
°
A
00*
‘
P,UI
SZ00
'
’
■
ID
I
n
q
n
J.—lOJIDDdDO
2
(ZOZD)
sjioa
009
"Pjui
SI00'
'ipinqnx-iojioodDo
l
(0020)
'juiui
00S9
'oiuimaQ—lojioodon
n
(ISIO)
'JUIUI
00L
p
'D3l
W
_
JO
,podDO
f-
§g
:
™
2
:*£
wo
“!§
££
(I9TO)
-JUIUI
0021
'DIUIDiaO-ioJJDDdDO
o
•Hum
An.
,
6i
Pi
089
'DDlW-iojioDdDO
o
;,°n
“
3
Bd,
i
oa
i
i
6
!H—JojpodDQ
s;
(I9IO)
juiui
0Xf-
'doiw—
lojioDdDo
4
(9ZIO)
'juiui
068
'D3IW--rojpDdDo
21
i
'oiit
(8020
'ZHO
'St-Tn
un\?'„r“‘
°“
'
D3
>W-
IO|pDdr
J;)
,
6
J
a
»,
«iqu,£°^6
IZT
V
7
P
™
!1
03
«
25
*a
•«
SISSVHD
NOISIA3131
iS.oSo,,
1
’
™
^i
m
;
v
■
5
,
4
uuajuy—lauuojsuDix
Buiunj
am,
(SIO
jo
Jidj)
iMuEafi
6828Z
j
S6HX
ZOSIX
V
<t
DUUdS
dDUQ—fim,J
otuiui
jaaoo*
^
S
6u
I-ids
i°J
Pioup
aq
n
,
,a5
I°°S
;S"
"
*
P
D3
l-—pjatuQ
P
^
|
8c
{nj
pu3j
—pjetqg
(is
JO
,io
d
)
J
°lDlIps
0
-juamfiag
.
(IS
JO
JIDJ)
IOJD
n
p
so
_
}us
s
n°o
ssaj
S
,
l
J
WD
M
io
spo
3
®J
J
,
aAU
°3—luauifiag
J
JiD(j)
s[iod
ssar
Ji(duj
D
o
SS3
I
la
.„
11
1°
S[TOO
in
«
U
O0
~~
lUdxu£
>*S
m
897
-qo
7
moo
h
—
Maiag
|
99HX
I
I9HX
[
I6HX
I
IS62X
|
‘°U
[
HOOIS
z
/i
'%0I-
z
/i
'%02
:
IS7
spoo
ioj
Avaios
butjsnloD
-,
-
v^
^S7
uijsnipD
x
0fr
.
fr
^
_
Mej3S
gz
QAup
joj
Buij
buiuiDjag—Buig
gj,
z
/i
'%02^
uiqobaui
j
uotjpoduioo
pexij^o
}
^e
H
z
/i
'%02^
sutqo
OOO'OOI
'uotjisoduioo^pa^o^aH
z
/i
*%0
I
h
=
smqo
QOO'OI
'uotjisoduioo
pexj^^H
z
/i
'%02+
suiqo
00X1
'uoijisodmoo
paxil-.o^H
2
/t
%02-f-
suiqo
0001
'uoijisodmoo
paxij—jojsi^aH
z
/i
'%0I+
suiqo
os
j
-uoijisodmoo
pSij—jojsitaa
Z/l
s
I
mi
(
0
Lf
'uotjisoduioo
pax/q—jojstsau
°°I
uq
noo
pub
iajja
A
uoo
oj
JtojD([pso~dooq
291
S
I
?
°
D
CI
#
PUD
9#
s
I
su
U
Dqo
joj
AI
uo^mio^
"fioQ
—iujo
j
X8I
IO
T
^
m
r
aAPP
Jei{SDM
q3U?d
6U
?
Un
»
autj
3AU
a
ff
L
(SIO
jo
UD
d
)
loijuoo
buiunj
auq
jo,
ostp
io,o
H
-os,
a
59
j
,
JJDqs
ajqt,
puD
uistuDqoaiu
juaja
a
—,uaja
a
8^X
c,
puis
puD
eioo
arqDjsnl
"
P
'
S
n
°
3
IO,DIp3SO
P
UD
Juoii
9
#
iauuoqo-aioo
xBI
ain
,j
„
.
P
n,s
puo
aioo
aiqDjsnlpD
snoo
U03
inS
1
11
^
PU
°
,U
°
JJ
IO
SP
°
3
P^
6
ISJIOA
PUD
JUOIJ
eiPUD
2#
siauuDqQ—aioQ
86H
<STTn-,
pn,s
P
UD
9100
a
iqOJSnfpD
.snoo
iojdupso
maj
puo
juojj
EI#
puuoqo-ajoo
Z6SI
lojoauuoo
juauibag—lojoauuoQ
86t-l
(087)
Ijoo
aqoqo
j-t
puB
jajiaAuoQ
—jioq
90S
I
(6X7)
Ijoo
aqoqo
jajDajj
—non
SOS
I
8Z7
uoipas
juoj,—
l?
oo
lojDUpso
0I
^
jauuoqo—jioQ
88H
97>“uS
S
^"“
'
0,D
"
PS
°
CI
#
I—iog
68M
(197)
uoijoas
iDai—qoo
iojdupso
g#
fauuDuo—non
7
/
b
i
6S1)
.oipas
»«_„«,
ioiD,[pso
;#
od
ESSZ
(
iS1
)
«o,p,s
^-,,
0
=
joionpso
\%
««
mmr
^
09ri
997
'9S7)
suoijoas
B91-SSI)
»ou°rS
SI
’’
p
“
c
‘
z#
n<0
OiH,
(291
SS7)
uoijoas
JD3J—jpo
jojdjiioso
7
#
jauuDuo
”
U
°’
P9S
laoJJ
[loo
»
IO
„„
so
s#
(I„'
q
o
4
3
0
3
UH
,
“
S
,D
“'
“
ll
“-
,J
'-
:
n
>p
.O)o„pso
r^putS^^o
69H
,
(227
187
'97
’S7)
uoijoas
icai
io
juoii
8
°I
d
N
t#
le
™
„
q3
p„
D
J
p
°J
OI
’
"4r
6
C#
(auuoqp—poo
.
(2S7
927)
uoijoas
juoii—
noo
ajDid
”""
d
“°
8
>
#
UUd-£d
06HZ
T
_
T
T
»
(1ST
SZD
uolpGs
iD
0
i—rioo
qidtcI
■
J
I
dU1D
11
10
P
^
6
I^JIOAUOO
El#
leuaoqo-iioo
I6H
X
ji
n
io
S
pu&
30S
!Dai
IO
itqqduSn
J
io
puB
iajjaAuoo
'io,D„pso
9#
ia
UUD
q
0
_
IIO
3
26HX
(987
S87
'017
'67)
uoijoas
mai
jo
juoii
L
oo
pub
lajiaAuoo
puuoqo
jo
uoijoas
idsj
oi,
-noo
ajDid
laijqduiD
,-j
g
#
[auuDqo-jioQ
I8
H
X
in
lnniT
^
*Z7)
uoijoas
iioai
’
J
n
°°
a,D
'
d
I9
9HduiD
,-j
b#
lauuoqo—poo
0
8
H
X
SaS
C7)
UO?,
°
9S
1031
10
J
uo
iJ-
-noo
p
C
ub
io
Him
PUD
Z
#
s
I
auuDl
P
IO
uoijoas
iDai
L?
D
‘
I0!PldmD
2#
leuuoqo-noo
6ZHX
(827
X27
27
17)
uoijoas
mai
io
juoii
IO
n.nr
P!l£>
J9MaAUO:3
I#
I
a
UUDqo
IO
UOIJ03S
ID3I
(zro
in
'R°n
■
^
[
*
amdm
°
}
'\
l
#
I
auUD
7D
mo
32I2X
•J
60
80
SO)
juiui
OOSI
oiuiDiaQ—lojioDdDQ
I
OS
IX
(8IO)
juiui
0X2
'oojjq—lojtODdDQ
101-99
(20
IO)
juiui
0X2
'oiuimaQ
lojioodDQ
01-SIX
(HO)
junu
22
'oiuidisq—
lojioDdDQ
I0I88
(6IO)
Juiuiqj
'oiuiDiaQ--jojpDdDQ
99t’SI-
(olO
LO
90)
Jtuxu
p
*oiiiiDi3^)
iojiddcId^
0291Z.
(OIO)
juiur
2
2
'oiuiDiaQ
-lojioDdoQ
20SIX
(IO
80)
juiui
gq
'oiuidisq
—iojioodo
3
00SIX
(8IO)
juiui
89
0
'oiuiDiaQ
lojioDdDQ
{-0SIX
2XHX
__
A7SW3SSY
IINil
3
H
NOIIdlHOSSd
SIHVd
lN3W30Yld3H
’°M
XDOIS
0CS18

(Oil
H)
l)DM
z/
x
|
(I9IH)
suiqo
000
022
'uopisoduioo
paxtg—jojsisaa
z/i
'
q
|
-f_
suiqo
0001
*uoi|isocitiioD
psxi^-—
jo|sis©u
(80ZH)
HDai
z/i
(91ZH
'%
0
Z-f-
suiqo
OOO'OZZ
'uopisoduioo
paxii—JOjsisay
'eizh
'seia
'8zia
'czia
'zzia
'sna
'zua)
(191H)
Vi
Vi
'%0ZT
suiqo
Q00I
'uopisoduioo
paxty—Uoisisay
'%Ql+
suiqo
OOO'OSI
'uopisoduioo
paxij—lojsisay
(zeia)
(6CZH)
Vi
Vi
'VoOI
1
?
suiqo
Q89
'uopisoduioo
paxty—io}Sisay
'o/
0
q
%z£.
suiqo
OOO'OSI
'uopisoduioo
paxig—lojsisay
(56IH)
(02ZH
*6IZH
'991H)
»
DM
z
/i
z/
t
'o/
o
n
j
q
i
suiqo
095
'uopisoduioo
paxiq—io}sisaa
'%0I-+-
suiqo
OOO'OOI
'uopisoduioo
paxij—Jojsisaa
(ma)
Hdm
(8»IB)
»
DM
Vi
’VoOIh
1
sut
a°
008
'uopisoduioo
paxiy—loistsay
y,
'%02^h
suiqo
OOO'OOI
'uopisoduioo
paxij—lojsisaa
(Z8IH)
S
»
DM
Z
'
sui
a
o
0ZZ
'punoM.
aii
M
—lojsisay
50968
(I22H)
U
DM
(88ia
'oem
'^zia
'6iia
'i-iia)
zj.
•
o/nr
zf
suiqo
000'28
'uopisoduioo
paxy—iojsisay
(8ZIB)
»
DA
^
V\
'
%
01
"+
■
suiqo
000'9S
'uopisoduioo
paxig—lojsisay
(861H)
»
DM
z/x
'
%0I
hP
suiqo
051
'uopisoduioo
paxiy—jojsisaa
(SIZH
'ziza)
H
Dm
Vi
'%0Z
:
+
;
suiqo
001
'uopisoduioo
paxij—lojsisaa
I
^OIh-
suiqo
000'Zt
'uopisoduioo
paxtg—jojsisay
(05IU)
»
DM
(90Za)
sudm
Z
'%0I+
suiqo
001
'uopisoduioo
paxij—loisisay
y..
'
%
0
I
h
P
suiqo
000'
L
V
'uopisoduioo
paxig—lojsisay
(I02H)
jj
0
-^
sjas
auios
ut
'(3£2H)
))DM
I
'VoOI
1
?
sui
a
o
95
'uopisoduioo
paxijr—Kpsisay
1
'%5^
suiqo
000'6C
'uopisoduioo
paxig—lojsisaa
(Z.6IH)
»
DM
ozia
'izia
'9iia)
z/j
'
%
01
suiqo
68
'uopisoduioo
paxij—loisisay
j
‘o/g^
suiqo
000‘SC
‘uopisoduioo
paxig—lojsisay
(88IH)
I
'o/oOI^
suiqo
000'ZZ
'uopisoduioo
paxig—lojsisay
(96IH)
»
DM
(Ot'Za)
»
DM
I
'suiqo
zi
'punoM
aii/^-—joisisaa
(*61
a)
Vi
'VoOIh
1
suiqo
01
'uopisoduioo
paxiy—joisisay
(88Za)
»
D
^
Vi
'
sui
a
o
8
8—-
■
Joisisay
8608Z
615IZ
zj.
-o
/o0
i
+
suiqo
000'ZZ
‘uopisoduioo
paxij—lojsisay
(Z.0ZH)
P
DAV
(08Za)
P
D
-^
l
'sujpo
z
i
'punoM.
aii^—loisisay
aiqDO
laMod
ioj
6rqd
apui
6uoid
z
—brqa
8161A
st-friz
i
‘%0I^
suiqo
000'ZZ
'uopisoduioo
paxtg—Jojsisay
(Z.IZH)
aiqDO
laqDads
ioj
frnid
apuiaj
pDjuoo
£—bnja
EEH
l
#
P
UD
18HZ#
6115
Vi
'VoOI^
suiqo
000'ZZ
'uopisoduioo
paxij;—lojsisay
(9GZH
‘891B
'Z9IH)
H
DM
-
sopAtoipaia
ioj
aiDid
bupunom
aiqaqDa—apiy
lopoDdDO
abDqoA-qbiq
pnoui
oi
inu
paadg—}njq
(paimb
-ai
o)
poo
snoo}
bupunoui
ioj
>nu
buiM
ZZ
8
#
—
l
n
N
69^81
ISt-lZ
Vi
'%0
ZhP
suiqo
000'ZZ
'uopisoduioo
paxig—lojsisay
(80ZH)
U
DM
SSl'IZ
l
'%oi^
siuqo
000'81
'uopisoduioo
paxij—lojsisay
(68IH)
JJ
DiA
(adAi
Wd)
pubDui
dDij
uoj—}aubD^
(80Z1
'Z0ZD
W3)
pubDui
dDp
uoi—jaubnjq
1088Z
ZZSIZ
y
,
'%oiq=
suiqo
000’81
'uopisoduioo
paxij—lojsisay
(8IZH
'66IH)
»
DM
j
'o
/o0
i
^
:
suiqo
000'01
'uopisoduioo
paxij—lojsisay
sapp
pDai
pub
auiq
puD
jopauuoo
apouD
io}
lauiuioib
laqqny—iaiuuioif)
(
T
i
i
)
spoA
05Z
53^0
asny
uoiqsno
laiAOj
pooq
aqoA
uopoapaQ—uoiqsriQ
551CZ
0098Z
0T5IZ
(6ZIB)
P
DM
-
uotqsno
laddn
pooq
aqoA
uopoapaa—uoiqsno
605TZ
I
’%
dOZ+
suiqo
OOO'OI
'uopisoduioo
paxij—lojsisay
eet’iz#
(0ZIH
'51
IB)
»J
DM
puD
xe^iz#
sopAjoipaia
10}
ia
aoo
bupDinsuj
—ibaoq
Z8HZ
z/
’%8+
suiqo
OOO'OI
'uopisoduioo
paxij
lojsisay
bnid
puD
pioo
laMoy
P-ic>D
Z5t-IZ
(z.czH
'szia
'9t-ia)
»
aM
(tots
'zzza
'ism)
a^i^vs
Vi
'VoOIh
1
suiqo
OOO'OI
'uopisoduioo
paxij
lujsisey
iaMod
puD
joiiuoo
aiurqoA
qopuoo
ainpiy
pquoQ
Z5I8Z
(I'Zia)
a
DM
(8Zia)
lopuoo
ApiDaup
[DopiaA—lopuoQ
Ifrf'IZ
z/
'o
/o
g
i
p
suiqo
00Z8
‘uopisoduioo
paxij—lojsisay
(ITZH
'I8IH)
(06ia
'99ia
’t-9ia)
»
DM
ropuoo
buuaiuao
iDjuozuoq
puD
jDopiaA
loquoQ
ei'Hz
Vi
'o/oOI^h
suiqo
00Z8
'uopisoduioo
paxij
lojsisay
(zzia
(oiza
'zoza
‘8Sia
ana)
'891
a)
lopuoo
pioq
iDjuozuoq
puD
iDopiaA—lOipoQ
\ZLZL
y
'%
0
I
h
P
suiqo
0089
'uopisoduioo
paxij—iojsisay
(Z8ia)
lOiJUOO
BAUp
IDIUOZUOJJ—ioiiuoq
Zl'J'lZ
(frCIH)
(691
a)
lopuoo
iqbian—ppuoo
Ol'l'IZ
Vi
'VoS^
suiqo
0095
'uopisoduioo
paxij—lojsisay
9Z85t
(^81
a)
FPuoo
snooj
qopuoQ
zn\L
(nnZH)
s»dm
S
'suiqo
0005
'punoM
aix^—io\sis^
(351
a)
lopuoo
ssauiqbug—lopuoQ
95I8Z
(SSia
't-5IH)
»
D/A
pDjuoo
pDai
lopoDdDO
abDpoA-qbijj
--pDjuoQ
IZ5IZ
T
-o/
n0T
q
i
suiqo
OOZI'
'uopisoduioo
paxij—lojsisay
lopauuoo
apouY
—
lopauuoQ
ezsiz
(5Zia)
(9611)
l
l
°
3
lopuoo
qipiM
I?°0
ezi'iz
z/,
-o
/o5
=
p
suiqo
OOZ?'
'uopisoduioo
paxij—JOjsisay
(5811)
l
l
°°
P
1
ajnpid
qimoq—
poQ
gz^iz
(09ia)
(3611
'0611)
n°
3
buiqDaa-
poo
ZZ51Z
z/
'o/giq;
suiqo
OOZI'
'uopisoduioo
paxij
lojsisay
(s^m
(zsia)
z/,
'o/
n
q+
suiqo
0068
'uopisoduioo
paxij
lojsisay
'68ia
'981H
'1611
'6811
'Z811)
O
03
6uiqoa
d
poQ
(8811)
IP
3
butqDaa—poQ
6Z51Z
9Z51Z
(ot'ia)
a
D/A
(TD7T)
1100
lopuoo
ApiDaup
JDJUOZUOJJ
llOQ
6Pf-lZ
z/i
'VnOI^
suiqo
0088
'uopisoduioo
paxij
lojsisay
(5611)
ll
OD
snooj—poo
IZHZ
(zhb)
j»
dm
T
'O/0II+:
suiqo
0088
'uopisoduioo
paxiy—lojsisaa
(9811
>811
'Z811
'1811
'0811)
Poo
anoqo-poo
(00Z1)
lajpi—i951010
505IZ
I’SISZ
(t-eza)
»
DM
(9SZZO
'YSZZD)
za
'°/
n
Q
Z
z
£-
suiqo
0088
'uopisoduioo
paxiy
lojsisaa
spoA
9
"pjui
0001
I
0
uotpas
1
puD
spoA
oi
PJ
ra
(zzia)
a
DM
z/,
-o/^q;
suiqo
00ZZ
'uopisoduioo
paxiy—io]sisaa
003
10
uotpas
1
buisuduioo
'opApipaig—iopoDdDO
(ai’ZZD
'Yl'ZZO)
9G^IZ
(6zia)
z/
'°/nTHh
suiqo
00ZZ
'uopisoduioo
paxiy
loisisay
/l
70
(zzza
'9zza)
sudm
spoA
088
'
pjui
08
I
0
uoipas
x
puc
'spoA
05^
PJUi
07
10
uoxpas
t
buisuduioo
'opAioipaia—lopoDdDQ
(OOZZO
SGJ'IZ
2
‘o
/o0Z
+
suiqo
00ZZ
'uopisoduioo
paxiy—io}sisa
a
(TPTvr)
I
'suiqo
0081
'puno/A
aii/A—;
I0
^
s
?
sa
a
ZISU
’SOZZD
'Y0ZZD)
spoA
051
"PJ
111
08
J°
uoipas
\
PUD
'spoA
051-
"Pjui
01
JO
uoipas
\
'spoA
051*
"PJ
™
Of,
jo
uoipas
x
buisuduioo
'opAjoipaxg
lopondo^
(ZZIH)
P
D/A
z/x
'%0I+
smqo
0081
'uopisoduioo
paxiy
lo^sisay
lej'iz
—
NOiidiHDsaa
•on
XDOIS
Noudiaosaa
'ON
XOOiS
0GS18
(panupuoo)
SJLHYd
IN3W30Yld3H
Table of contents
Other RCA TV Receiver manuals