manuals.online logo
Brands
  1. Home
  2. •
  3. Brands
  4. •
  5. RCA
  6. •
  7. TV
  8. •
  9. RCA COLOR TV NCJ11 User manual

RCA COLOR TV NCJ11 User manual

This manual suits for next models

1

Other RCA TV manuals

RCA P46729 User manual

RCA

RCA P46729 User manual

RCA 24V510T User manual

RCA

RCA 24V510T User manual

RCA F32730 User manual

RCA

RCA F32730 User manual

RCA 27GT720TX2AX1 User manual

RCA

RCA 27GT720TX2AX1 User manual

RCA G32710 User manual

RCA

RCA G32710 User manual

RCA Roku TV RTR4060-U-US User manual

RCA

RCA Roku TV RTR4060-U-US User manual

RCA MMC101 User manual

RCA

RCA MMC101 User manual

RCA 24V412T User manual

RCA

RCA 24V412T User manual

RCA 27F520T - 27" TruFlat Picture Tube TV Quick start guide

RCA

RCA 27F520T - 27" TruFlat Picture Tube TV Quick start guide

RCA E13319F11 User manual

RCA

RCA E13319F11 User manual

RCA Trans Vista 100 User manual

RCA

RCA Trans Vista 100 User manual

RCA E13205 User manual

RCA

RCA E13205 User manual

RCA P60820 User manual

RCA

RCA P60820 User manual

RCA 20F530T User manual

RCA

RCA 20F530T User manual

RCA TruFlat F20TF20 User manual

RCA

RCA TruFlat F20TF20 User manual

RCA F32676SB User manual

RCA

RCA F32676SB User manual

RCA RLDED3956A User manual

RCA

RCA RLDED3956A User manual

RCA F27675 User manual

RCA

RCA F27675 User manual

RCA RBA29550 User manual

RCA

RCA RBA29550 User manual

RCA F32705YX1CL2 User manual

RCA

RCA F32705YX1CL2 User manual

RCA HDTV Television User manual

RCA

RCA HDTV Television User manual

RCA Scenium D32TF20 User manual

RCA

RCA Scenium D32TF20 User manual

RCA F27679BCFE1AC User manual

RCA

RCA F27679BCFE1AC User manual

RCA X20103 User manual

RCA

RCA X20103 User manual

Popular TV manuals by other brands

IKEA UPPLEVA user manual

IKEA

IKEA UPPLEVA user manual

Toshiba 19A20 Service manual

Toshiba

Toshiba 19A20 Service manual

Sony XBR-100Z9D reference guide

Sony

Sony XBR-100Z9D reference guide

Sony Trinitron KV-HR36M90 Service manual

Sony

Sony Trinitron KV-HR36M90 Service manual

JVC AV-14AG16 instructions

JVC

JVC AV-14AG16 instructions

Loewe Table Stand Reference 55 user guide

Loewe

Loewe Table Stand Reference 55 user guide

Panasonic Genus TX-G10 operating instructions

Panasonic

Panasonic Genus TX-G10 operating instructions

Samsung LN26C350D1D Service manual

Samsung

Samsung LN26C350D1D Service manual

BBK LT1516D Service manual

BBK

BBK LT1516D Service manual

Samsung 55S9 B Series Quick setup guide

Samsung

Samsung 55S9 B Series Quick setup guide

Sharp LC-40FI5012E user manual

Sharp

Sharp LC-40FI5012E user manual

Evervue BN185 Operation manual

Evervue

Evervue BN185 Operation manual

North State TV2GO user guide

North State

North State TV2GO user guide

Toshiba CX35F70 owner's manual

Toshiba

Toshiba CX35F70 owner's manual

Magnavox PS1980 owner's manual

Magnavox

Magnavox PS1980 owner's manual

Philips 20HF5335D manual

Philips

Philips 20HF5335D manual

Panasonic QuintrixF TX-29AS1D operating instructions

Panasonic

Panasonic QuintrixF TX-29AS1D operating instructions

Samsung 4 Series Quick setup guide

Samsung

Samsung 4 Series Quick setup guide

manuals.online logo
manuals.online logoBrands
  • About & Mission
  • Contact us
  • Privacy Policy
  • Terms and Conditions

Copyright 2025 Manuals.Online. All Rights Reserved.

nCJ11 Color TV
Owner's Manual
tTlrst _lme Operation
Accessories and Order Fo_ pp. 44-46
WARNING: To prevent fire or shock hazard, do not
expose this TV to rain or moisture.
If you suspect that liquid has entered the TV, unplug it
immediately and have it inspected by an Authorized TV
Servicenter. Turning it off is not enough-your TV has power
applied to some circuits even when the TV is turned off.
The lightning flash
Ind arrowhead
within the triangle
lee warning sign
alerting you of
"dangerous
voltage" inside the
product that
presents e dsk of
electric shock.
CAUTION; TO REDUCE THE
RISK OF ELECTRIC SHOCK,
IX) NOT REMOVE COVER
(OR BACK), NO USER-
SERVICEABLE PARTS
INSIDE. REFER SERVICING
TO QUAUFIED SERVICE
PERSONNEL
The Ixclsmatlon
point within the
triangle Is e
warning sign
alerting you of
Important
Instructions
acoompanylng the
product.
CAUTION: Maintain electrical safety. Powerline-operated
equipment or accessories connected to this unit should bear the
UL listing mark or CSA certification mark on the accessory
itself and should not have been modified so as to defeat the
safety features. This will help avoid any potential hazard from
electric shock or fire. If in doubt, contact qualified service
personnel.
Note to Cable TV Installer: This reminder is provided to call
your attention to Article 820-40 of the National Electrical
Code (Section 54 of the Canadian Electrical Code, Part 1)
which provides guidelines for proper grounding and, in
particular, specifies that the cable ground shall be connected to
the grounding system of the building as close to the point of
cable entry as practical.
• Your TV operates on 120 volts, 60 Hz AC power (normal
house power) and has a polarized AC plug. Because one
blade of the plug is wider than the other, the plug fits into the
wall socket only one way. Do not defeat the safety feature of
this plug. If you need an extension cord, make sure it is
polarized.
_AUTION: To prevent electric shock, do not use
the polarized plug on this TV with an extension
cord, receptacle, or other outlet unless both blades
can be fully inserted to prevent blade exposure.
Match wide blade of plug to wide slot, fully insert.
MISE EN GARDE: Poui"pr6venir les chocs
(51ectriques,ne pas utiliser la fiche polaris6e de cet
appareil avec une rallonge, une prise de courant
ou une autre sortie, _ moins que les lames ne
puissent _tre ins6r_Ses_tfond sans qu'aucune partie ne soit
laiss6e _tddcouvert, lntroduire la lame la plus large de la
fiche dans la borne correspondante de la prise et pousser
jusq6 au fond.
•All operating controls and their functions are identified and
explained in this manual. For warranty service or routine
maintenance, contact the nearest Authorized TV Servicenter.
All servicing and adjustments to electrical components
should be done by a qualifie.d service technician.
Mail Your Registration Card Today
•AProduct Registration Card is packed with your set. Please
fill out the card and return it immediately.
•Your prompt submission of this card confirms your right to
the protection available under the terms and conditions of the
warranty and also allows us to contact you should it ever
become necessary.
• With your card on file, we can also help you in the event of
loss or theft by verifying your ownership.
•If you did not receive a Product Registration Card, please
contact your dealer.
Record Vital Information Here
• No other set has the same serial number as yours. You will
find the serial number and the model number on the back of
your set.
•Make sure you record both numbers below so that you will
have them in case your set is stolen or if you need a complete
description for identification.
Model:
Serial:
Attach Your Sales Receipt Here and File at Home for
Future Reference
•To obtain warranty parts and service, you must show your
sales receipt (or evidence of purchase) to your Authorized TV
Servicenter.
•Tape or staple your sales receipt to this manual so you will
have it handy should service ever be needed. File it at home
for future reference. Do not mail your sales receipt to us.
Purchase Date:
Dealer Name/Address/Phone:
Thank you for choosingRCA
Congratulationsonyourpurchaseof
anRCA TV. You have selected a
high-quality, precision-engineered
instrument designed to give you
years of enjoyment.
Despite its sophistication, your new
TV is amazingly simple to operate
because it has so many automatic
features. To simplify operation even
more, the TV provides on-screen
prompts that guide you thru each
step of the special functions. The
remote control allows adjustment of
major operating controls and special
features from the comfort of your
favorite easy chair.
Not only is your new set a state-of-
the-art television receiver that
combines sophistication with ease of
operation, it also has monitor
capability thus providing you
flexibility whenever you choose to
add additional components.
About This Manual
To take full advantage of all the
features and benefits of this unique
TV, be sure to read this owner's
manual carefully and then keep it in
a safe place for future reference.
Table of Contents
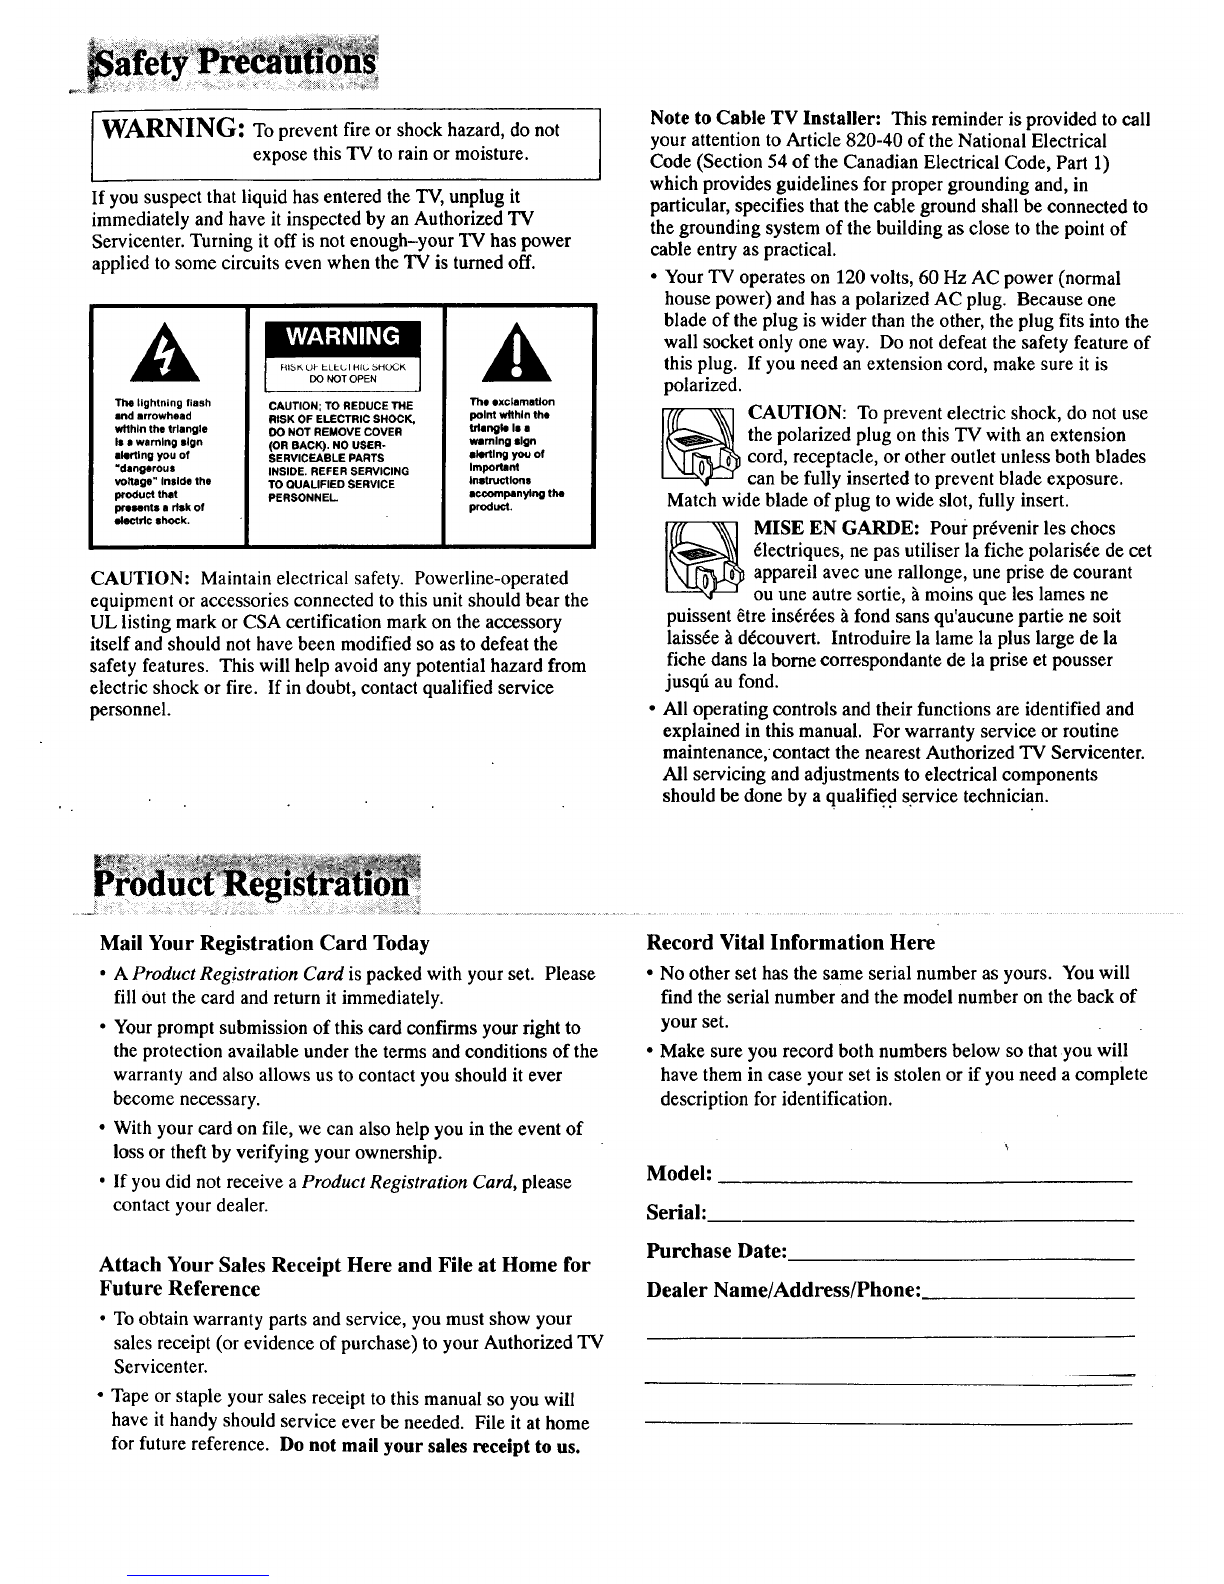
Safety Precautions ................................................. Inside Front Cover
Product Registration ............................................. Inside Front Cover
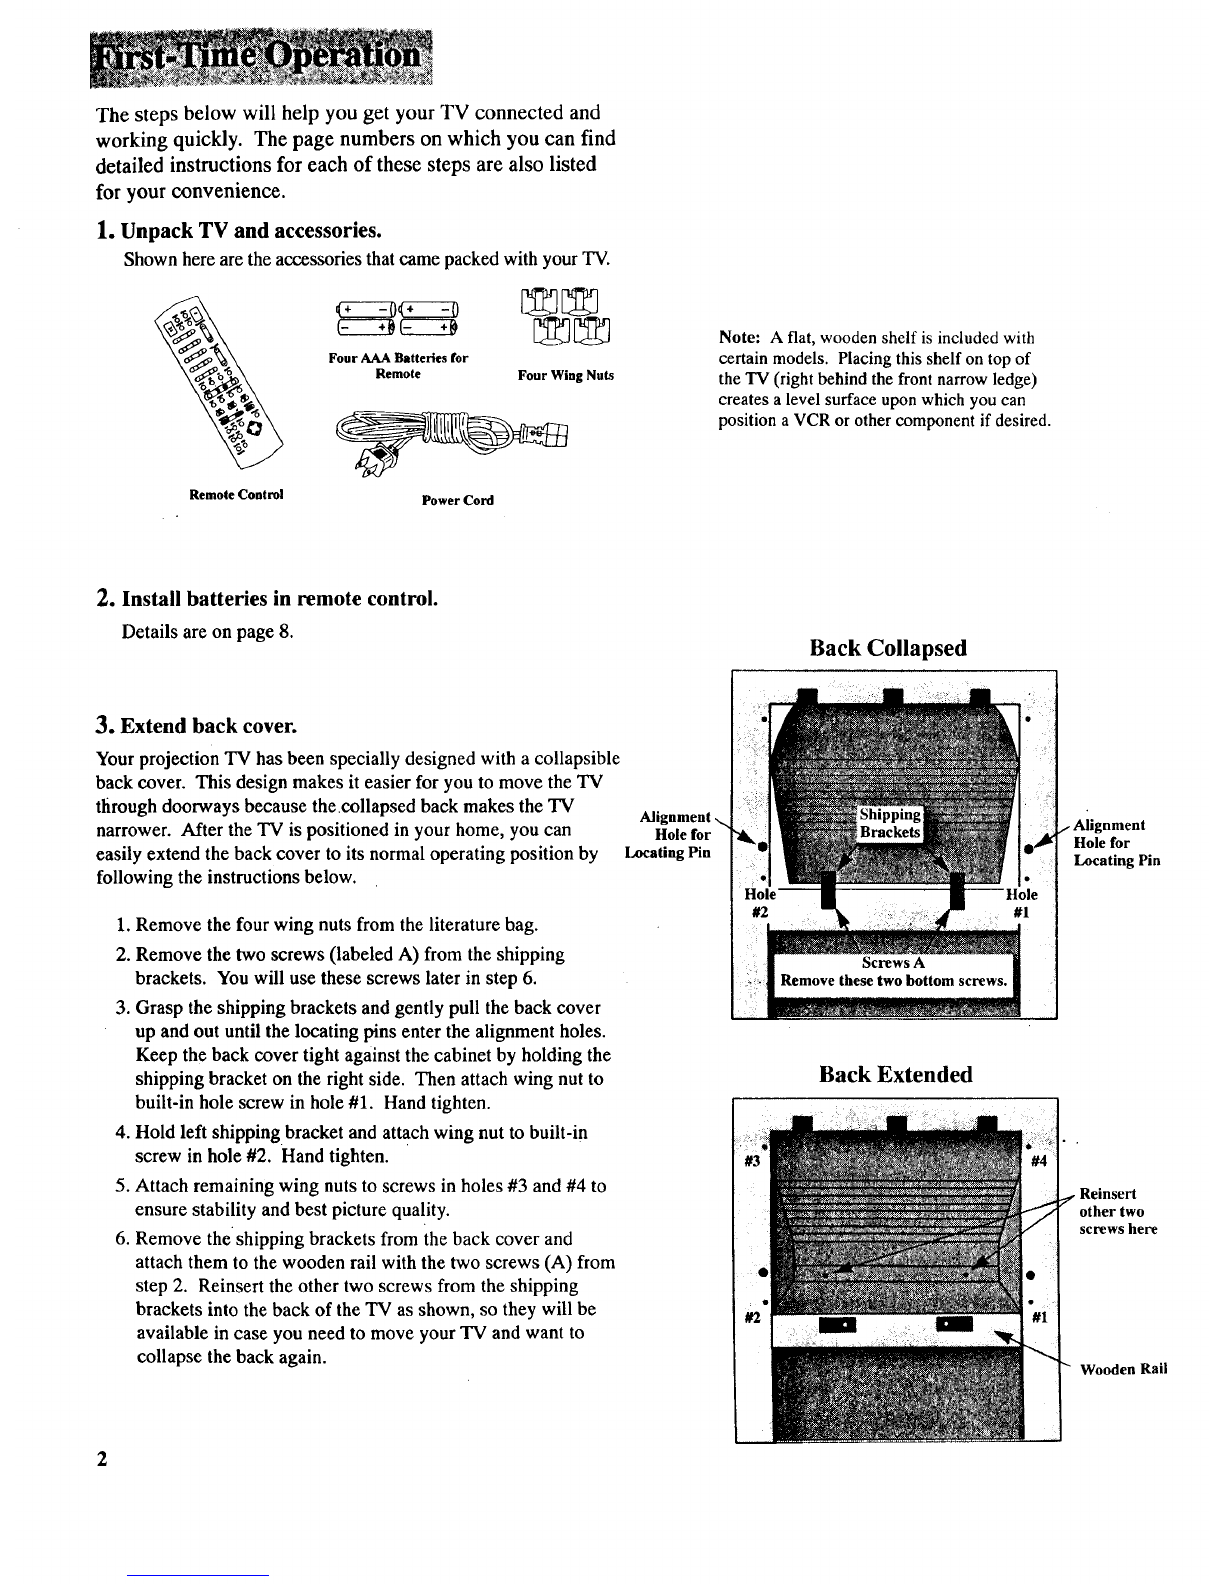
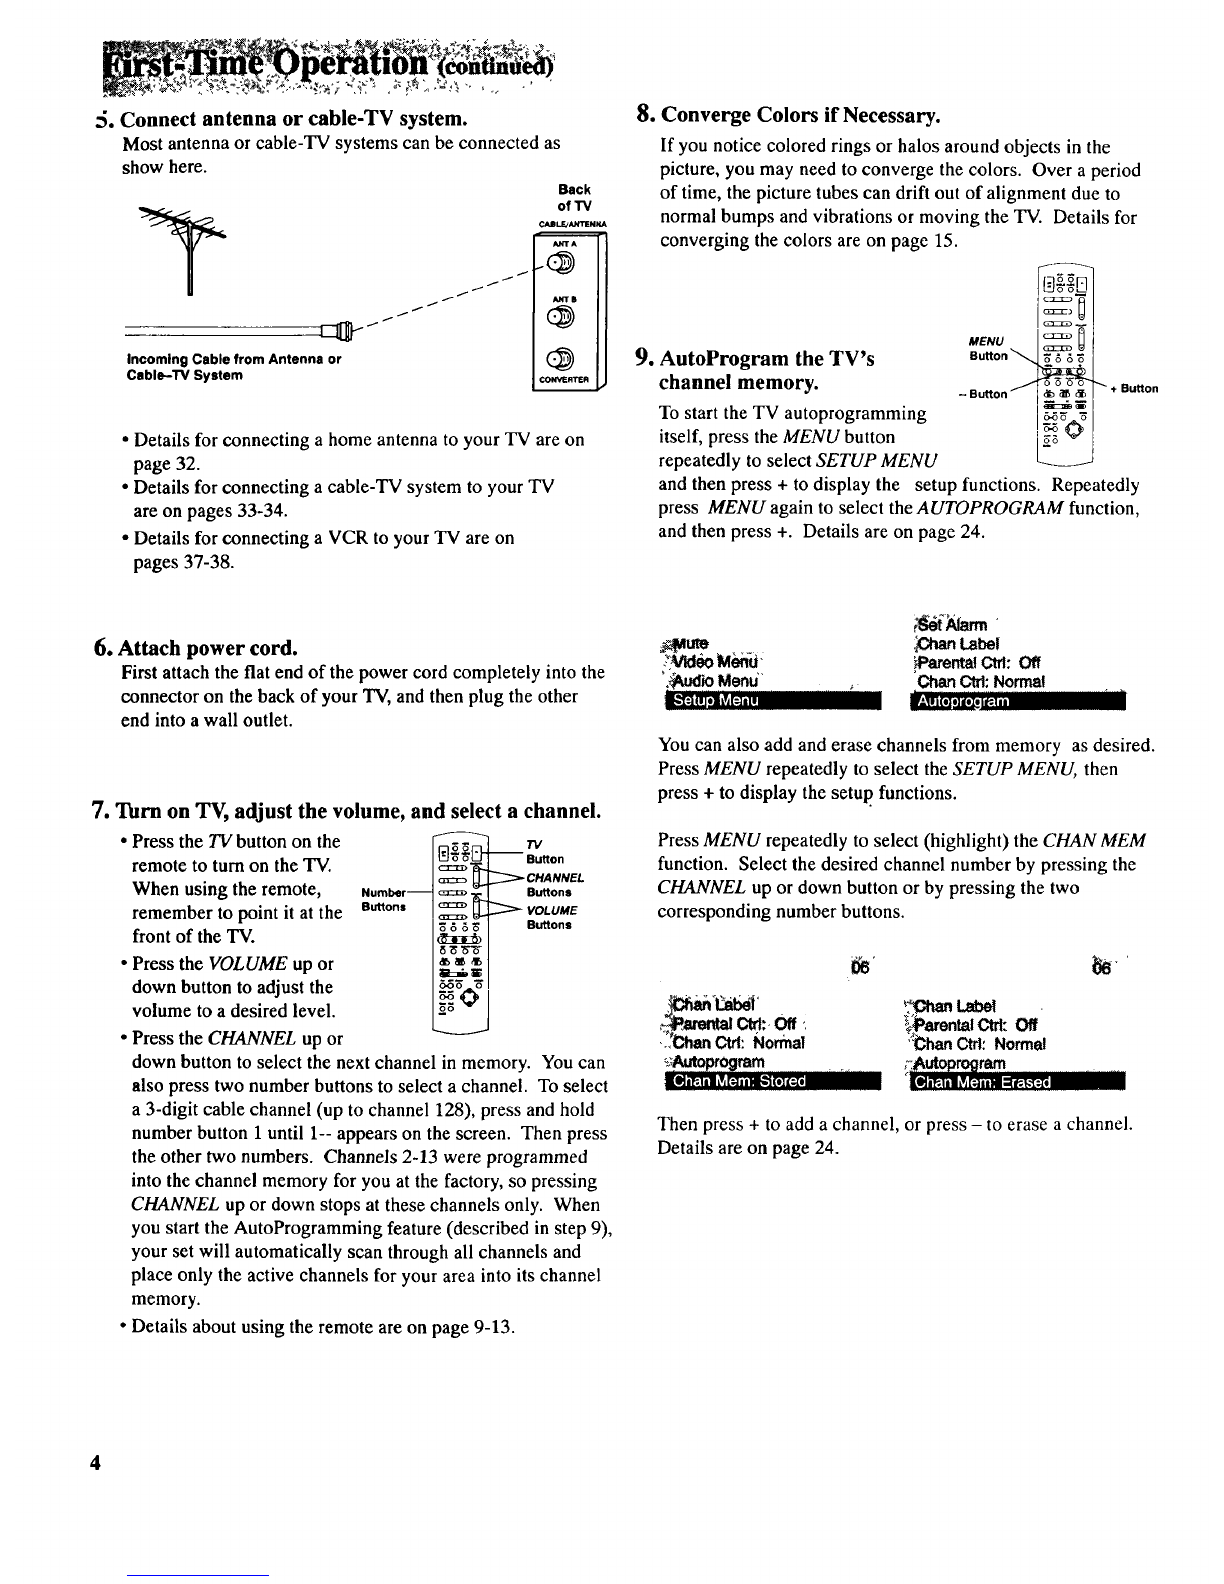
First-Time Operation ..................................................................... 2-5
Operating Instructions
Front Panel Controls ................................................................................... 6
TV On-Screen Status Displays ................................................................... 7
Remote Control
• Installing Batteries .................................................................................... 8
• Basic Operation Theory ............................................................................ 9
• TV Functions ..................................................................................... 10-11
Freeze and Zoom ....................................................................................... 12
Channel Guide ........................................................................................... 13
VIDEO Menu- General Instructions ......................................................... 14
• Color Convergence Adjustments ............................................................ 15
AUDIO Menu-General Instructions ........................................................ 16
• Sound Retrieval System-SRS(•) ......................................................... 17
SETUP Menu- General Instructions ......................................................... 18
• Setting Closed Captioning ...................................................................... 19
• Setting the Sleep Timer ........................................................................... 20
• Setting the Alarm .................................................................................... 21
•Labeling Channels .................................................................................. 22
• Parental Control ...................................................................................... 23
• Channel Memory (Autoprogramming Channels) .......... ......................... 24
• Channel Memory (Erasing/Adding Channels) ....................................... 24
• Changing Antenna Input. ........................................................................ 25
• Setting up VCR Channels ...................................................................... 26
• Setting up Cable Box Channel ................................................................ 27
Picture-in-Picture (PIP) .............................................................. ......... 28-29
Detailed Connections
Tips to Read Before Connecting Components .......................................... 30
Monitor Panel ............................................................................................ 31
Antenna and Cable Connections
• Home Antenna Connections ................................................................... 32
• Cable-TV Connections ...................................................................... 33-34
• Programming Remote to Control Cable Box .......................................... 35
• Cable-TV Operation ............................................................................... 36
Component Connections
• Standard VCR .................................................................................... 37-38
••S-VHS (Super VHS) VCR .............................................................. :........ 38
• Remote Buttons That Control RCA VCRs ............................................. 39
• Controlling Other Brands of VCRs ........................................................ 40
•Camcorder............................................................................................... 41
•Computers and Other Equipment .............................. i............................ 42
•Audio Amplifier ...................................................................................... 43
• Programming Remote to Control Audio Equipment .............................. 44
•Speaker Connections .............................................................................. 45
Reference Section
Optional Accessories and Order Form................................................. 46-48
Trouble Checks .................................................................................... 49-51
Cleaning and Care ..................................................................................... 51
Index (Alphabetical Subject Reference) .............................................. 52-53
Limited Warranty....................................................................... Back Cover
The steps below will help you get your TV connected and
working quickly. The page numbers on which you can find
detailed instructions for each of these steps are also listed
for your convenience.
1. Unpack TV and accessories.
Shown here are the accessories that came packed with your TV.
Remote Control
Four AAA Batteries for
Remote Four Wing Nuts
Power Cord
Note: Aflat, wooden shelf is included with
certain models. Placing this shelf on top of
the TV (right behind the front narrow ledge)
creates a level surface upon which you can
position a VCR or other component if desired.
2. Install batteries in remote control.
Detailsareonpage 8. Back Collapsed
3. Extend back cover.
Your projection TV has been specially designed with a collapsible
back cover. This design makes it easier for you to move the TV
through doorways because the collapsed back makes the TV
narrower. After the TV is positioned in your home, you can
easily extend the back cover to its normal operating position by
following the instructions below.
1. Remove the four wing nuts from the literaturebag.
2. Remove the two screws (labeled A) from the shipping
brackets. You will use these screws later in step 6.
3. Grasp the shipping brackets and gently pull the back cover
up and out until the locating pins enter the alignment holes.
Keep the back cover tight against the cabinet by holding the
shipping bracket on the right side. Then attach wing nut to
built-in hole screw in hole #1. Hand tighten.
4. Hold left shipping bracket and attach wing nut to built-in
screw in hole #2. Hand tighten.
5. Attach remaining wing nuts to screws in holes #3 and #4 to
ensure stability and best picture quality.
6. Remove the'shipping brackets from the back cover and
attach them to the wooden rail with the two screws (A) from
step 2. Reinsert the other two screws from the shipping
brackets into the back of the TV as shown, so they will be
available in case you need to move your TV and want to
collapse the back again.
Hole for
Locating Pin
Back Extended
Hole for
Locating Pin
other two
screws here
Wooden Rail
2
A major benefit of a Projection Color Television is its large
viewing screen. To receive full benefit of the expanded
screen size, placement of the TV in the viewing room is
important. The illustrations suggest the "best viewing areas"
relating to the TV's screen.
You will see the best picture if you sit directly in front of the
TV about 10-18 feet from the screen. Picture brightness will
decrease if you sit to the extreme left or right of the TV.
Your Projection TV is designed to provide a watchable
picture when viewed within the full 160°horizontal viewing
area.
During daylight hours, you may also see some reflection on
the screen from exterior light sources. If so, you may wish to
use drapes or screens to reduce reflection or consider a
different placement of the TV.
CAUTION: Inadequate or poor ventilation may
cause overheating, damage, or the risk of fire
hazard.
This projection TV is equipped with ventilation openings in
the cabinet back and bottom to allow heat generated during
operation to be released. Inadequate air flow to these
openings may result in failures due to overheating, damage to
your TV, and the risk of fire hazard.
When locating and installing your projection television
receiver, read and carefully follow the instructions contained
in the "Installation" section in the enclosed safety pamphlet.
Side View
+10 0
_4c,
Center of Screen
i I I
0 5' 10'
:S. Connect antenna or cable-TV system.
Most antenna or cable-TV systems can be connected as
show here.
Back
of 13/
t
/
/
/
f
/
/
i
/
/
Incoming Cable from Antenna or
Csble-TV System
ANTI
CONVERTER
m
•Details for connecting a home antenna to your TV are on
page 32.
• Details for connecting a cable-TV system to your TV
are on pages 33-34.
• Details for connecting a VCR to your TV are on
pages 37-38.
9. AutoProgram the TV's
channel memory.
To start the TV autoprogramming
itself, press the MENU button
repeatedly to select SETUP MENU
8. Converge Colors if Necessary.
If you notice colored rings or halos around objects in the
picture, you may need to converge the colors. Over a period
of time, the picture tubes can drift out of alignment due to
normal bumps and vibrations or moving the "IV. Details for
converging the colors are on page 15.
MENU
Button
- Button /db _ _. I ÷ Button
andthenpress + todisplaythe setupfunctions. Repeatedly
press MENU again to select theAUTOPROGRAM function,
and then press +. Details are on page 24.
6. Attach power cord.
First attach the flat end of the power cord completely into the
connector on the back of your TV, and then plug the other
end into a wall outlet.
7. Turn on TV, adjust the volume, and select a channel.
•Press the TV button on the
remote to turn on the TV.
When using the remote,
remember to point it at the
front of the TV.
• Press the VOLUME up or
down button to adjust the
volume to a desired level.
• Press the CHANNEL up or
13/
_J_ Button
_=_ _ CHANNEL
Number-- _-_ Buttons
Buttons _ _ VOLUME
down button to select the next channel in memory. You can
also press two number buttons to select a channel. To select
a 3-digit cable channel (up to channel 128), press and hold
number button 1 until 1-- appears on the screen. Then press
the other two numbers. Channels 2-13 were programmed
into the channel memory for you at the factory, so pressing
CHANNEL up or down stops at these channels only. When
you start the AutoProgramming feature (described in step 9),
your set will automatically scan through all channels and
place only the active channels for your area into its channel
memory.
• Details about using the remote are on page 9-13.
._u_ _ Labe!
_VldeoM_i_ parentalC_: Off
@¢xr_ Menu _O..,hanCtrl:Normal
You can also add and erase channels from memory as desired.
Press MENU repeatedly to select the SETUP MENU, then
press + to display the setup, functions.
Press MENU repeatedly to select (highlight) the CHAN MEM
function. Select the desired channel number by pressing the
CHANNEL up or down button or by pressing the two
corresponding number buttons.
Ctrl:.Off .
•._'CtuanGirl: Normal
_-_Autowo_ram ....
_._an Label
_iParentalGirl: Off
'iDhanCtrl:Normal
Then press + to add a channel, or press - to erase a channel.
Details are on page 24.
4
O erahon
10. Set the clock.
1. Repeatedly press the MENU button to select the SETUP
MENU and then press +. Press MENU repeatedly again
to select the CLOCK SET display.
VCR1Chan:Off _
VCR2CI'_: Off
CableChan:Off :__:,,,
Eel[;I;l,'$-r_lI! J'I'll_m.
2. Press and hold the - button to select the correct hour
(including AM or PM). Press and hold the + button to
select the correct minute. The correct time will now
appear on the screen whenever you change channels or
press the TV orDISPLAY button.
Note: If power is interrupted for an extended time, you will
need to reset the clock.
11. Review menus.
,To see the video menu, repeatedly
press MENU button to select
VIDEO MENU and then press +.
Repeatedly press MENU to select
desired function and then press +
or- to adjust it. Details are on
page 14.
dbldb
_:Mute _ :; :_ ,'o,_ ._'Tint -.......I.............+
m"_'t=J;l_[_'" _Contrast -. ............. I.:,,,.+
Audio Menu Bright -, ........I...........
-Setup Menu ,Sharp -, ...........,!.......+
_PlctureReset .,:'i-::"_
Convergence ,,, '
3. To see the setup menu, repeatedly press MENU to select
SETUP MENU and then press +. Repeatedly press
MENU to select desired function and then press + or - to
adjust it. Details begin on page 18.
_.SleepTimer: 0:00
:Set Alarm
.;ChartLabel
ParentalCtrt:Off
Ctd: Normal
Autoprogram
Chan Mern: Stored
Antenna: A
Cable/Air: Cable
VCR 1Chan: Off
VCR 2 Chan: Off
Cable Chan: Off
Clock Set -Hr +Min
12. Review other features.
Later, after you feel comfortable with your TV and remote
control, you can review the detailed control descriptions and
special features covered in this manual.
You can use the rest of this manual as a reference guide to
review detailed information about each operating control
and function. The alphabetical index in the back will help
you quickly locate desired information•
2. To see the audio menu repeatedly press MENU to select
the AUDIO MENU and then press + or - to adjust it.
Details begin on page 16.
Setup Menu
_r'_l _]1-_ .....................
_Bass -.......I.............+
,I
3Stereo/./././_P:Stereo
_,SRS:Off
,_SRSWIdm:Off , _ ;
_._poakem:On ......."._
5
_. "' _,:_'," °_?:__,_'""i_,,_ _,A-.,_,;:
Shown here are two front panel controls. The
controls on your TV will resemble one of the
pictures shown here. You can use either the
front panel controls or the remote control to
operate the TV. When using the remote
control, point it toward the screen. <
Y
,)
,)
-- ÷
• •
\I
MENU CH vCH AVOLv VOLA POWER
®
• • 0 0
\/\/. 0
t
(_ POWER Button
•Press once to turn on TV.
• Press again to turn off TV.
• The indicator inside the POWER button will light
whenever the TV is turned on.
(_VOL (Volume) Buttons
• Press VOL up to increase volume, orpress VOL down to
decrease volume.
• The volume display will automatically appear on the
screen when you press the VOL buttons.
(_)CH (Channel) Buttons
• Press CH up to see the next higher channel in memory.
• Press CH down to see the next lower channel in memory.
• You can add or erase channels in memory as desired.
Details are on page 24.
(_ MENU Button
•Press repeatedly until the menu you want to display is
selected, then press + or -. Next press MENU repeatedly to
select the function you want to adjust and then press + or -
to adjust the setting.
•Details about using each function begin on page 14.
(_ -and + Buttons
Use these buttons after you have pressed the MENU button
to enter or adjust functions.
6
w
Time
Sleep Timer
Parental Control
®Channel
(blue for ANTA
and yellow for ANT B)
Channel Label
Captioning
MUTE
Commercial Skip
O
®
®
®
®
®
Time Display
This display appears (after the clock is set) whenever you
change channels or press the remote's TV or DISPLAY
button.
Sleep Timer (SLEEP)
This display appears when the SLEEP TIMER function has
been activated. Details areon page 20.
PARENTAL CONTROL
This display appears to let you know the channel you
have tuned is locked-out andnot viewable because the
PARENTAL CONTROL function is activated. Details
are on page 23.
MUTE
This display appears when the TV's sound is muted. It is
not displayed when closed captioning is turned on. Details
are on page 10.
Commercial Skip
This display is a count-down timer that appears whenever
the commercial skip function is activated. Details are on
page 11.
Captioning
This display appears if closed CAPTIONING is turned on
and the TV program uses closed captioning. Details are on
page 19.
®
®
Channel Label
This display appears when you label achannel. Details are
on page 22.
Channel
This display shows the TV's channel number whenever you
change channels or press the remote's TV or DISPLAY
button.
When the channel numbers are blue, you are watching the
signals from the ANTA antenna input. If you change the
ANTENNA: A/B function to B, the color of the channel
numbers will change to yellow to let you know you are
watching the signals from the ANTB input.
The word STEREO appears next to the channel number if
the STEREO/SAP function is set to STEREO and the channel
you've tuned is broadcasting stereo. An asterisk will appear
behind the word stereo (STEREO*) if that stereo channel is
also broadcasting SAP (Second Audio Program). Details
about stereo and SAP are on page 16.
Channels 90, 91, and 92 are used to see the signals coming
from other devices like VCR's or camcorders that are
connected to the INPUT jacks on the back of the TV.
• When you select channel 91, the words INPUT 1 appear to
let you know you are now watching whatever signal is
coming in through the TV's INPUT 1 jacks.
• When you select channel 92, the words INPUT 2 appear to
let you know you are now watching whatever signal is
coming in through the TV's INPUT 2 jacks.
• When you select channel 90, the word S-VIDEO appears to
let you know you are now watching whatever signal is
coming in through the TV's S-VIDEO connector.
Before attempting to operate your
remote control, install the batteries
as shown here.
The remote control produces an
invisible (infrared) beam that travels
in a straight line much as the beam
of a flashlight. For this reason,
when operating the remote control,
you must point it directly at the front
of the TV without objects between
that can block the infrared light
beam.
Your remote control is designed to
be very rugged and will withstand a
considerable drop. If it receives an
extreme blow, the case is designed
to slightly separate at the seam
rather than fracture. If this happens,
simply squeeze the case where it
separated until it snaps back
together. The operation of the
remote will probably not be affected.
--Installing/Replacing Batteries
1. Turn the remote control face
down.
2. Press down on the ridged area of
the battery cover and slide it off.
3. Install four "AAA" batteries in the
battery compartment as shown.
Make sure you insert the negative
(-) end of each battery first.
4. Replace the cover and turn remote
over-face up.
Notes:
Never place anything heavy on top of
the remote control or lay it upside-
down. This may accidentally depress
the buttons for a long time and
discharge the batteries.
Replace the batteries when theTV fails
to respond to the remote control.
If you programmed your remote to
control other components, you may
have to reprogram the code numbers
When you change the batteries. Try not
to press any buttons while changing
batteries.
8