RCA F32690 User manual

C O •

fWARNING:: _ _ -/_
k
TO reduce the risk of fi;e or"-"
shock hazard, do not exp,ose/, ....
thisWto rainormoisture. :
To,reduce the risk of electric shock, do not remove
(:oger (or back). No user 'serviceable parts inside.
Referservicing to qualified service personnel. .
_k his symbol indicates
."dangerous voltage" inside
the prOduct that presentsa
risk,of electric shock or
persohal injury.
i
This symbol indicates
prO_nt in=ructions °...=
" _ __ d
.i_an in .th fo
•"_ri_
Caution: To reduce the risk'of e_ectric st_:k, _ch v_itlg-
blade of plug to widdslot, fully insert.
Attention: Pour 6viter leschocs _lectriq ues, introduire la
• lame la pluslarge de la fiche dane la borne
corresponda nte de la prise et pousser jusqO au fond.
t_'_theidentification/rating label located on the back panel of.Refer your
product for'i_s-_'" "_proper Ope_rati'ng voltage.
FCCRe_l-uiationsstate thatunauthorized changes or modifications to this
equipment may void the user's authority to operate it.
If fixed (non-moving) images are left on the screen for long
periods; they_ may be permanently imprinted on the screen. Such
images include network Iogos, phone numbers, and video games.
This damage is not covered by your warranty. Extended viewing
of channels displaying these images should be avoided.
Cable TV Installer: Thisreminder isprovided to call your attention to
Article 820-40 of the National ElectricalCode (Section 54 of the Canadian
Electrical Code, Part 1)which provides guidelines for proper grounding
and_ in particular, specifiesthat the cable ground Shall be connected to the
grounding systemof the building as close to the point Of cable entry as
practical
_Ti_eGUIDE Plus+ Gold system ;smanufactured under license from Index /
:/L SystemsInc..,'. ' " J

SETUP AND CONNECTIONS ]r.,_..._................................... ]............. )
Step !: Unpack the TV ................. .'................... ..... ..]...................... ...4
Step 2: Connecting your Tv ........................... ._.i.._,_.........._............._4
TV Only (PIP Not Available) ................. ....._............................ .... 4
The BasicCOnnection (pip not available) ........:......................... 5
Advanced Connections .;................. .............. ................ ......... .... 6
:Step 3: connecting the IR Controller ............... ..._....... ........ ,......... 9
Attaching the IR Controllers ............ :...,].......,............ ............... 9
Step 4: Plug in the TV ............................ ].,...................................... 10
Step 5: Place batteries in remote 10
Step 6: Turn on the TV 10
On-Screen ProgTan_Guide ....................................................... 10
Step 7: Program the TV .......... _.................................................... ... 10
INTERACTIVE SETU P ., 11
Using Point and Select ................................................................... 12
Entering Setup ......................................................................... ,...... 12
Select a Language .............. ................. :.......................................... 13
Auto Channel Search. ............................... ................ t.................. .. i3
GUIDE Plus+ System. .......................... ........].................................. .. 14
Setthe lime. ........ ................. .:......._........._...................................... 14
Set the VCR1 Channel (auto tuning) ............ _................................. 15
Set the VCR2 Channel (auto tuning) ............................................. 15
I
Set the DVD Channel (auto tuning) .............................................. 16
Set the SAT/CABLECl_annel (auto tuning) .................................... 17
Label *theChannels ...................... ........... _..................... _.................. 18
USING THE REMOTE ....................... .............................................. 19
Remote Buttons .............................................................................. 20
Using the WHOolNPUT button .......... ].......... '................ ............ 21
Programming the Remote ............................................................. 22
Testing the remote 22
Programming the remote ...........;........................................... 22
Using tl_e remote to control a device 23
Modes of Operation 23
Front Panel,.]..,..;..;.;.._._i.......].._..._............... _....... :.............. ]....._....... 23

FEATURESAND MENUS _................. -................ ................. i ....... ." 25
Menus and Control Panels ................................... .......... :.-............. 26
Menus • _ ...._ ...................... ._............... 26
Control Panels ..................................................... ..................... 27
Audio Menu ..................... :...........•..... .................... ..................... :.... 28
Using the remote to select an audio processor .............. i............. 29
_-Picture QualityMenu.... ........ ._,......._.,.................. -.....-..:.......... -..... 30
Screen Menu .............................. •.... •.......................... _......._......... ;...31
Using Closed Captioning ............ ............................................. 32
channel Menu ............................................................................... .33
Time Menu .........,........ i........................ 34
Parental Controls Menu .......... ......i............................................. _..35
GUIDE Plus+ Menu ........................ .................. ,........................... ..i.36,
Setup Menu ........................... •.......................... •............................. _36
PIP (Picture-in-Picture) Operation ...................................... ;.......... 37
Channel Marker .................... ................... ....................... _................ 38
TROU BLESHOOTI NG .................................................................... 39
CARE AND CLEANING ........ ...................................... :..,.... ...._".....40
RCA LIMITED wAR RANTY .., ..................................... ... ....... •.... .4!
ACCESSORY IN FORMATION ...................................................... 42
INDEX......................................................................!......:.............

GE'rrlNG STARTED
. . o
This-man_Jalis •designed to get you sta_ed quickly.
The first four sectionJ of the manual show you how
to get your TV Setup and Connected, run the
Interactive Setup; Program the Remote, and use all of
the Features and Menus of your TV.
The Referencesection in the back of the book
contains troubleshooting tips_care and cleaning
instructions, accessoryordering information and your.
warranty.
We!l... if your TV's out of the box, let's get started.
Ii 1.,_.;_Tuu).,Xiq..b_-€OiqNEr.Tio,s II
¥.
.y
¥
( Ch_ko=the.oi,,th.t_,,,_,...,dd,d_:
| throughoutthe.manual in theseTip". "+T,• :|i
|Boxes,There aresomeImportant, ,. " |
I tips.that will helpyou get'the'most from :|_
3

•4-. . •
• .o
STEP 1: UNPACK THE TV
Makesure to locate the remote control and your GUIDE Plus+.Booklet.
STEP 2: CONNECTING YOUR TV
There are three,types of connections outlined in this Section:
TV only: if you're only going to connect the
TVto your home antenna or cable
system.
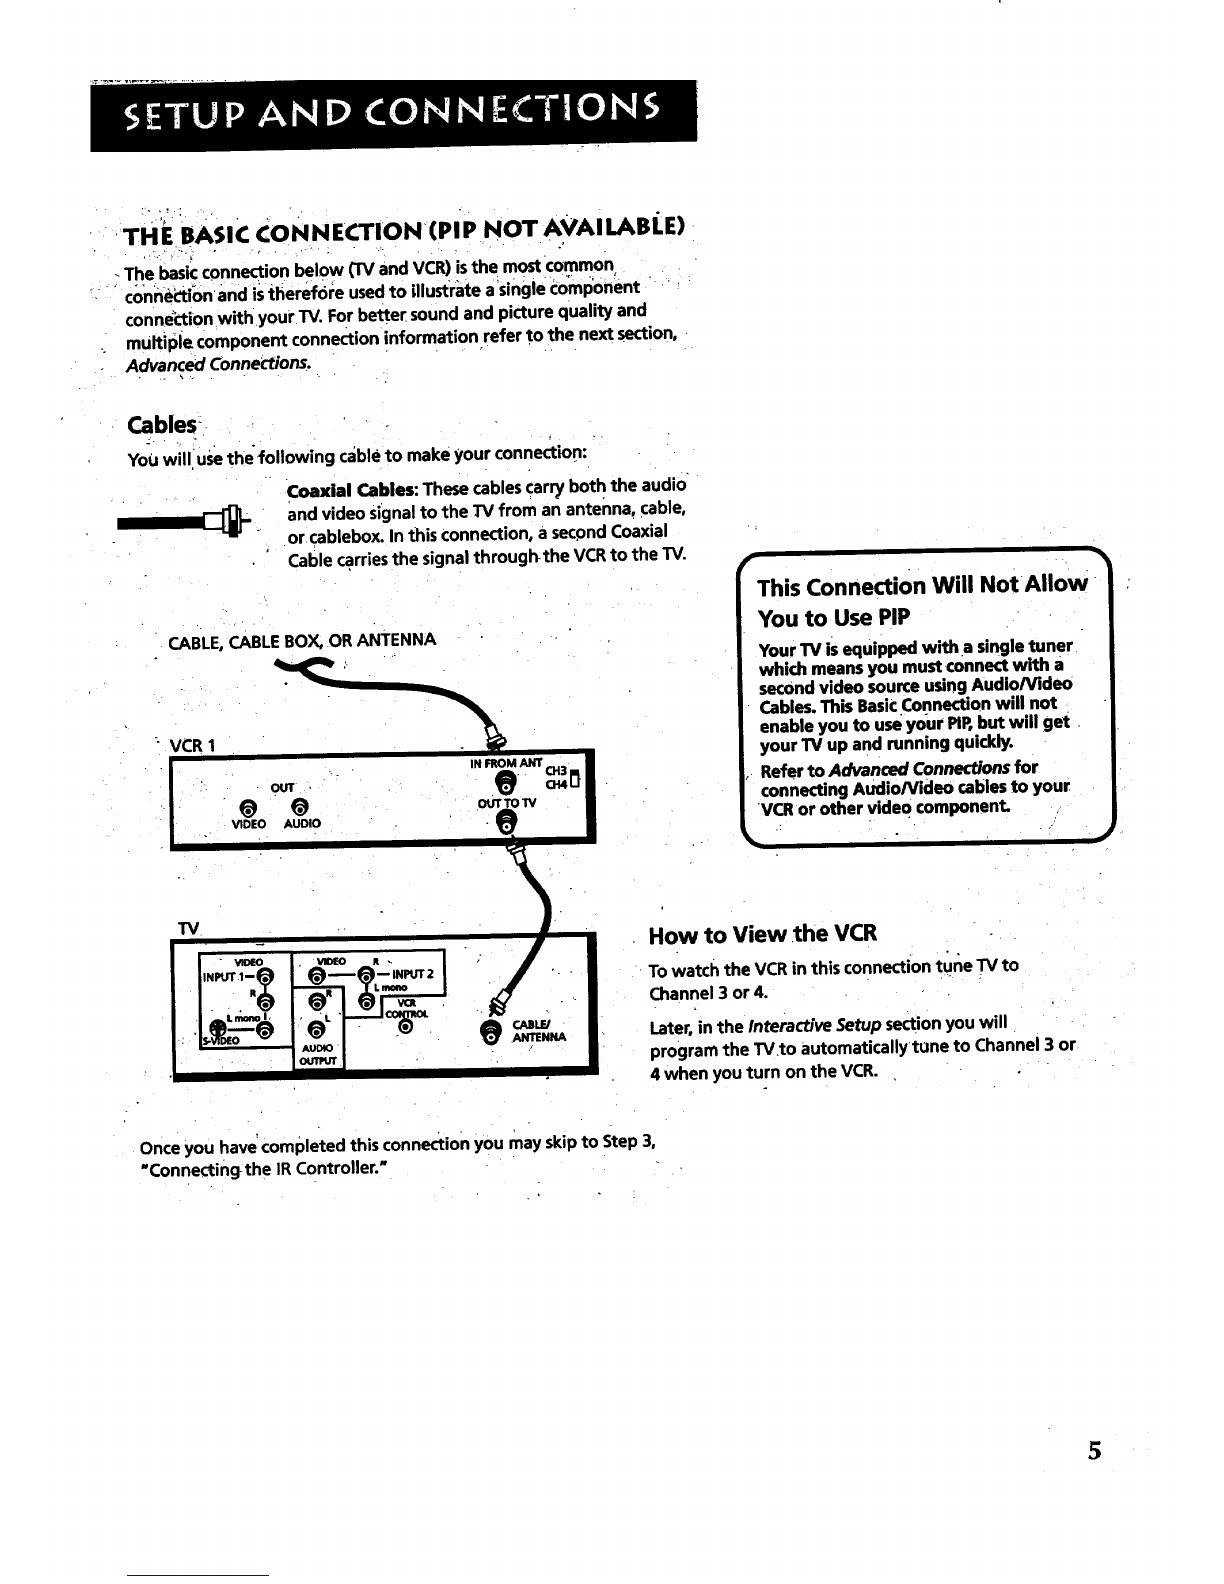
The Basic Connection:
Advanced Connections:
, - . . .-
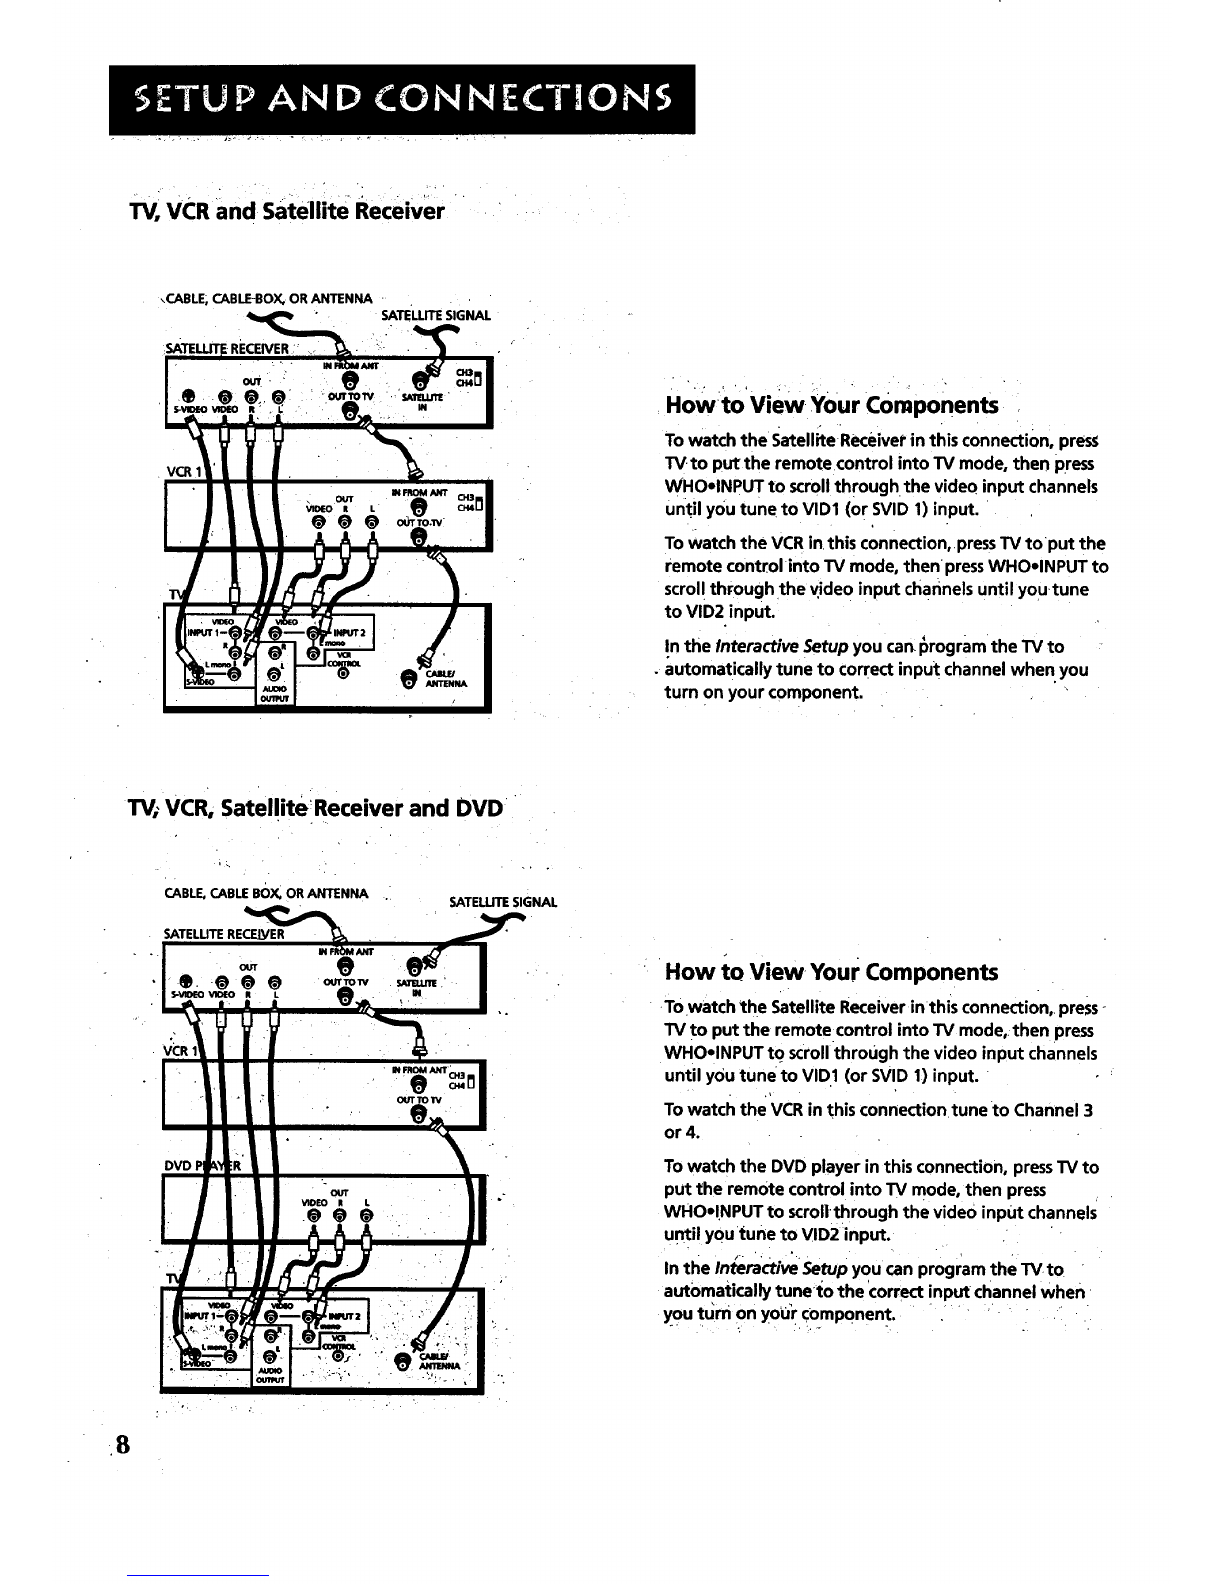
If you're going to connectthe TVto a
VCRor satellite receiver.
If you're going tO make multiple
connections, hooking up the TV to
one or two VCRs, DVD player, and a
satellite receiver.
Cableinformation and illustrationsare givenfor eachtype of connection.
Onceyou havecompleted your desiredconnectionyou mayskipforward
to .Step3.
TV 1ON LY (PI P NOT AVAI I.ABLE)
•/r
This rsa basic connectionfrom'an antenna' or cable system to your TV.
Connect the cable into the Cable/Antenna jack as shown. .
.Important Stand Information
•, -
•CAUTION: Choose the location for your TV
carefully. Take precautions that the stand
or other fumiturethe TV is placed on is
:properly, located (see Important
Safeguards sheet) and of adequate size
and strength to prevent the TV from
accidentally being tipped over, pushed off,
or pulled off. This could cause damage to
the TV and/or personal injury.
_4
t=
Before You Connect
Protect against power surges:
• Connect all components b_fore
plugging any power cords into the wall
outlet.
•.Turn off the TV and/or component
before connecting or disconnecting any
cables.
•Make sureall antennasand cables are
properly grounded. Referto your
Safety Tipssheetpecked with your 1_/.
Cables
YOUwill use the-following cable to make your•connection:
Coaxial Cable: These Cables carry audio and video
.... signal to the TV from an ante.nna; cable, or
cablebox.
CABLE,CABLE BOX, OR ANTENNA
TV
Once you have completed this connection you may skip to Step 3:
This Connection Will Not Allow
You to Use Your PIP
Your TV is equipped with a single tuner
which means you must connect with a
second video source using Audio/Video
Cable_ This TV Only connection will not
_enable you touse your PIP,but will get,
your'rV up and running quickly.
Refer to Advanced Connections for
connecting Audio/Video cables to your
VCR or other video component.
%
4

BASi€ P.OTAVA
The basicconnection below (TV and VCR)isthe most common
•conn_,cti_onand istherefore usedto illustratea_singlecomp'onent
connectionwith your TV. Forbetter soundand picture quality and
multiple componentconnectioninformation refer to the nextsection,
Advanced Connections.
Cables
YoUwilluse the following cableto make your connection:
Coaxial Cables: Thesecables carryboth the audio
and video Signalto the TV from an antenna, cable,
or cablebox.In this Connection,a secondCoaxial
Cablecarriesthe signalthroughthe VCRto the TV.
CABLE, CABLE BOX, OR ANTENNA
: VCR 1
IN FROM ANT CH3
@ @ ou.olv
VIDEO AUDIO
This Connection Will NotAllow
You to Use PIP
YourTV isequipped with a singletuner
which meansyou mustconnectwith a
secondvideo sourceusingAudio/Video
Cables.This BasicConnectionwill not
enableyou to useyour PIP,but will get
yourTV up and running quickly.
Refer to Advanced Connectionsfor
connectingAudio/Video cablesto your
VCR or other video component.
TV
CABLE/ANTENNA
How to View the VCR
To watchthe VCRinthis connectiont_ne TV to
Channel3 or 4.
Later, in the Interactive Setup section you will
program the TV,to automaticallytune to Channel 3 or
4 when you turn on the VCR.
Once you have completed this connection you may skip to Step 3,
"Connectingthe IR Controller."
5

ADVANCED ¢oNNEcTIONS
Advanced connections give you better sound and video by separating"
the audioandvideo Signals and enableyou tO connect multiple _" *<
components, i" ' ; _ .... } ;"
This section describes the types of inputs available on the back of your '
TV and suggests ways_you can usethem for optimum pe_ormance. ....
- . . - ,.... * . , -. .
k of he "
Bac t TV : _ i.
- .. ".
The diagram below describes each of the back panel jacks. When
• connecting AN cables, be sure to connect corresponding OUTPUTS and
INPUTS (Video to Video, Right Audio to Right Audio, etc.).
, . • - ,.
Once youhave made your connections" "
you will need to programthe TV to tune _
to the correct Video INPUT channel in- ''
order to see and hear audio and video
from the component. You will program
this iater m the Interactive Setup. ' "
i
Input I " " *
Connect any of the,following components:
•VCR *Internet AccessDevice
•LaserdiscPlayer *DVD Player
-. Satellite Receiver
To view the component connected to Input 1:
Usethe WHO-INPUT button on the remote.
input, 2
i
Connect any of the following components:
• VCR • Internet Access Device
• Laserdisc Player • DVD Player
•Satellite Receiver
To view the componentconnected to Input 2:
'Usethe WHO*INPUT button on the remote.
S-Video
This oPtional
connection can
be used for
better video
quality picture.
%
VIDEO" VIDEO R .
mono
VCR
CABLE/
ANTENNA
rAudio Outputs
/Conne_ to anlaudioreceiveror
|amplifier for Variable controlled
ot fixed level stereo output_ '
VCR Control
Connect Guide Plus+_
controller for one-buttor_
recording and channel
tuningfrom the Guide.
-_Cable/Antenna
JTakesthe signal input from a cable, J
|cable box, or anoff-air antenna, Canalso |
*L_|beusedfor basiccomponent connections._'.
6

SamPleConnections
The following are sample connection scenarios which-YOU may encounter
-whenconnecting comPonents tOYour T_. Note: those components which
offer an S-Video connection, such as DVD, VCR or Satellite Receivers,
must match their S-Video connection With their audio INPUT connection. -
Cables
You will use the following cable to make your connection: "
Coaxial Cables: Carries the signal from the
antenna or cable directly to the television or
through a cablebox, as needed by your cable
system.
Audio/Video Cables: Carries sound and video
from the component to the TV.
S-Video Cable: Carries video from an S-Video'
capable component which provides best
picture quality.
TV and Stereo VCR
CABLE, CABLE BOX, OR ANTENNA
r
•cautions:
i
Position cables to Avoid Audio Hum
or Interference
• insert all cables firmly !nto jacks.
• Place the audio/video cable_ to the
•sides of the W_ back panel !nsteed of
straight down the middle. • ....
. . ,-',
i _j not to coil any twin-lead cables and
•keep them away from the audio/video
cables.
Protect your components from
Overheating
•Do not block ventilation holes in any of
the components. Arrange the
components so that air can drculate
freely.
•Do not stack components.
•Allow adequate ventilation when
plating you r components in a stand.
• Pla_:ean amplifier on the top shelf of
the stand so heated air rising from it
will not flow around other
components.
VCR 1
OUT"
t_@_
VIDEO ,R . L
n fl n
> .
IN F_M ANT OH3 '
• @
OUT TO IlV
" ° 'i
I
,
__.2, LrI_, .
,. OUTPUT
oHow to View Your VCR
To watch the VCR inthis connection, press TV to put the
remote control into TV mode, then pressWHOolNPUT to
si:rollthrough the video input channels until you tune to
VID1 input.
In the Interactive setup section you•can program the TV to-
automatically tune to the VID1 input channel when you
turn onthe VCR.
. Compared,to the Basic Connection, using audio, Video and
S-Video (if available) cables will enhance the sound and picture quality
. . .., . ,-.
froma component. ". :
7

TV, VCR and satellite Receiver
\CABLE, CABLE-BOX, OR ANTENNA -
SATELLITE SIGNAL
,SATELLITERECEIVER ._ .
Howto View •Your Components
To watch the Satellite Receiver in this connecti0n, press
TV.to put the remote control into TV mode, then press
WHOolNPUT to scroll through the video input channels
Until you tune to VID1 (or SVID 1) input.
To watch the VCR in this connection,.press TV toput the
remote control into TV mode, then press WHOolNPUT to
scrol! through the vide 0 input channels until YoU.tune
to VID2 input.
In the Interactive Setup you can I_rogramthe TV to
.automatically tune to correct input channel when you
turn on your component.
TV_VCR, Satellite Receiver and DVD
CABLE, CABLE BOX, OR ANTENNA SATELLITE SIGNAL
VCR
How to View Your Components
Towatch _he Satellite Receiver inthis connection,, press °
TV to put the remote control into TV mode,, then press
WHOelNPUT t0 scroll through the video input channels
until you tuneto VID1 (or SVID 1) input.
To watch the VCR in this connection tune to Channel 3
or 4.
To watch the DVD player in this connection, press TV to
put the remote control into TV mode, then press
WHOolNPUT to scrollthrough the video input channels
until you tune to VID2 input.
t - • °.
In the Interactive Setup you can program the TV to
automatically tunel:o the correct input channel when
you turn on your component.
""r "" "-- " "
•8

STEP3: CONNECTING THE'IR.
CONTROLLER "
The IR (Infrared) Controller.enables' GUIDE Plus+ Gold" to control your
VCR and cablebox (if necessary) so that you can tune to television
channels and even start recording a program •from the program guide.
After you have affixed the ends of the controller to the necessary devices
(VCR, or Cable box),you will use the' on_creen interactive setup routine
for GUIDE Plus+ to test the connected devices.
The iR Controller is used to send commands
to your VCR and/orcable Ix)x,"
ATTACH I NG TH E I R CONTROLLE RS
Some components label the infrared, remote sensor, and others do not. If
your component islabeled, affix the IR controller directly over the
sensor. For components that do not label the rembte sensor, you need to
use to usethe component's remote control to locate the sensor.
1. Hold the component's remote €Or;trol (not the remote that came
with your TV) Sothat it istouching the front of the Component.
.Slowly move the remoteover the front of the component while
pressing the remote power button on and off. (Be sure to press and
release the power button each •time you move the remote. Holding
•the button may not work.)
0
3. Whenthe component turns off or on, you've located the sensor.
4. Affix thecontroller's node directly to the remote sensor.
,ol
...... AU_h_otheC_ Ikx (Wyo.haveone)
I
i
Tip •
You may want to use a piece of clear
plastic tape to temporarily affix the
controller's node until you have completed
the interactive setup. That way you easily
move it if you have not placed it exactly
over the sensor.
"GqlDEPlus+Gold isa trademarkof IndexSvsteminc.The GUIDEPlus. Gold systemismanufactured under licensefrom indexSystemsInc. '.-
9

•STEP14:IP[UG:_i NTHE TV
Plug the end into the wall outlet, matching•the wide blade of the plug
wil_h.the wide slot in the Outlet. Besure to insert the plug completely.
STEPS: PLACE BA'I-Ir'ERiES IN REMOTE
• Remove the battery compartment cover from the back of the
remote.
•Insertfresh batteries. Make sure that the polarities(+ and -) are
alignedcorrectly.
•Replace the cover.
STEP 6: TURN ON THETV
PressTV on the remote, or pressPOWERon the TV itself.
Pressingthe TV button not onlyturns on the TV, but puts the remote
intoTV mode,sothat the buttonson the remote will controlTV
functions. *
ON-SCREEN PROGRAM GUIDE
The TV is designed to bring up the GUIDE Plus+ on-screen program
guide when you use the TV button on the •remote to turn on the TV
(after you have set up the GUIDE Plus+ system). For more information,
see the GUIDE Plus+ Features & Setup booklet.
To get out of the Guide:
•PressOK exit the Guide and tune to the highlighted channel.
•PressGUIDE to exit the Guide and tune to the channel displayed in'
the View window.
o- PressCLEARto exit the guide and go to the last channel you were
watching.
STEP 7: PROGRAM THE TV
Proceed to the.next section, Interactive Setup. The interactive setup
routine walks you through the steps needed to fully configure the TV.
The first steps ask you to select your preferred language for •the menu
System and to beginthe auto channel search, which puts available cable
TV or antenna signals into theTV's memory.
10

THERE;S AN ON'SCREEN SETUP ROUTINE •
The interactive setup routine takes you through thesteps
neededto configure.the TV: •- "_, ' - •
• Select a menu language
•Search foravailable channels
• _ .Set up the GUIDE Plus+ system
•Set the time
•Set the VCR1 channel
Set the VCR2 channel
set the DVD channel
Set the SATICABLEchannel
Make the channel list and labels
¥,
:¥
1:.1

USING POINT AND SELECT
You only needto know one rule when_using the remot e toaccess on-
screen menus and control panels_point and select. The point and select
metho.d has two steps.
1. "Point to a menu item using the MOVE arrows on the remote.
To point up or down, press the up ordown arrow_ TO point left dr
_' ! right,, press the left or right arrows.
2; Select a menu item by pressingMENU orOK.
Selectingan item tellsthe TV'smenu systemto go ahead and make
the changeor go to a placeyou haveindicated.
ENTERINGSETUP
The first screen of.the Interactive Setup appears automatically when
you turn on your TV for the first time or after a power outage.
1. PressMENU to begin setup or CLEARto exit.
Point and Select
buttons
You can also acc-essthe Interactive Setup through the Main menu:
1. •PressMENU to bring*up the Main menu.
.
12
Point to Setu_oand press MENU or OK,.The first Setup screen comes
Up, 'asking youto confirm that you want to begin.
. . _. . ,. . . ,,
You can.also select a menu item by
entering the item number with the
number buttons on the remote.
Press cUEAR at anytime to remove all
displays from the screen and retu.rn toW:
ii
Many vat.user manuals refer to a
.PROGRAM button; The MENU button on
this• remote works as a PROGRAM button_
_in Vat mode, Other manuab may refer to
• a SELECTbutton, The OK button on this
remote works as a SELECTbutton.

3. PointtoBegin setup now and press MENU or OK.
SELECTALANGUAGE '• " '-.
The first part of the setup routine asks you to select your preferred
language for the menu system.
1;, Point to You:r preferred language for the menu system.'
2. Press •MENU or OK to select that language.
AUTO CHANNEL SEARCH "
The next part of the setup routine asksyou if you want the TVto search
automatically for all channels available throughyour antenn a or cable
TV system. This is sometimes called =autoprogramming."
'a ': ./i = '
: 1.!: PressMENU or OK totell the TV to beg!n searching for channels;
The display gives you,a progress report and tells you when it has
finished. _
2._ Press MENUor OK:to continue,:
• r If you"s"p Auto Channel seardl now, you
I can accessit later through the channel /
/.menu._Youcan also put channels i;t,:: . i:, :|,
/memory manually_ using Ust & Labels.See: l
| Featuresand Menus,for morQ1details;: • |
•,r
13

GUIDE PLUS+ SYSTEM
The next step letsyou set _Jpthe GUIDE Plus+ system to display your '_
local progr.am listings;and control your cablebox and VCR. _'!
You can either press MENU or OK to bring up the GUIDE Plus+ initial
menu or point to Skip this Step to move tothe next step in the •
Interactive Setup. .....
P_ For M0re GUIDE Plus+
•_iInformation i
Specific-information about the GUIDE
Plus+System is contained in a separate
ibooklet thataccompanied this producL
See the GUIDE Plus+ Features &Setup Booklet for detailed setup
instructions.
SET TH ETIME
J
The next step in the Interactive Setup lets you set the time of day. If your r
GUIDE Plus+ system has not completed its first download you need to set
the time. Once the Guide system hascompleted its first download, it'sets
the time for you automatically. ,'
' . . . . • T.
1. •Press MENU or OK to bring up the set Time control panel.
2. •Usethe left and right aiTOWs to point tothe hour and minutes
:space_ Use_the up and down arrows to scroll through Z_e numbers
;and change frc_mAM to PM_ ........
3v Press MENU or OK to continue.
14

SETTHE VCRiCHANNEL (AUTOTUNING)
. . ..... ,..... '.
,r The,_next step lets youset the VCR1 channel. Wheny0usetthe VCRll "
channel, You're telling theTV what channel to tune to when you press.,
theVCR1 button on the remote. This is Auto Tuning.
Indik,ate which inputyou used to connect the VCR.. If you don'l: have a.
-VCR1 component connected to the TV, Skip this step or select Not ,
Connecte_ from the VCR1 Channel choice list. (FOr more; SeeAuto '
, Tuning,in the Features andMenus section.) ,,
1. PressMENU or OK to bring upthe VCRi choice list.
2. Point to the choice that matches the way you have your VCR
Connected to the TV.
3. PressMENU or OK to continue. •
SET THE VCR2 CHANNEL (AUTO TUNING)
The next step lets you set the'VCR2 channel, when you setthe VCR2
channel, you're telling the TV what channel to tune to when you press
tl_e VCR2 buttqn on the remote.
Indicate which_input you used to connect a second VCR. If you don't
have a sec0ndVCR component connected to the TV, skip this step or. -
select Not Connected from the VCR2 Channelchoice list. (For more, see
Auto Tuning,in the Features and Menus section.)
.. . .
15

1.. PressMENU or OKto bring up the VCR2 choice'list.
,
i
Point to the choice that matches the way you have your second VCR
connected'to the TV.
3. PressMENU or OK to continue.
SETTHE DVD CHANNEL (AUTO TUNING)
The next stel_ iets you set the DVD channel. When you set the I)VD
channel, you're telling the TV what channel to tune to when you press
the DVD button on the remote.
Indicate which input you used to connect a DVD player. If yoU don't have
a DVD player connected to the TV, skip ,thisstep or se!ectNot Connected
from the DVD Channel choice list. (For more, see Auto Tuning in the
Features and Menus section.)
1. Pres_MENU or OKto brin_q."UPtheDVD choice list;
16 ,

2. Point to the choice that matches.the wayyou haveyour DVD player
connected to the TV.
3. PressMENU or OK to continue.
SET THE SAT/CABLE CHANNEL(AUTO
TUNING)
The next step lets you set the SATICABLEchannel. When you set the SAT/
CABLEchannel, you're telling the TV what channel to tune to when you
press the SAT, CABLE button on the remote.
Indicate which input you used to connect a satellite receiver or a cable
box_ If you don't have a satellite receiver or cable box connected to the
TV, skip this step or select Not Connected from.the SAT/CABLEChannel
clloiceilist. (For more, see Auto Tuning in the Features and Menus section.)
1. PressMENU or OK to bring up the SAT/CABLEchoice list.
2.' "Pointto the choice that matches the way youhave your satellite
: receiv'eror Cable box connected to th_'TV.
:-;._".:_.:,.- . .. ..
PressMENU or OK to continue.
If You Have Both a Satellite
Receiver and a Cable Box
Connected tO the TV
The remote cannot control both a cable
box and the satellite receiver. If you. .
choose to have the remote control the.
satellite receiver, you must then use your
(able box remote to control the cable box.
You;may. however, prefer to use the
satellite receiver remote for satellite .,.
programming; and set your, SAT, CABLE_i.
button to control your cable box, It'syour
choice.
17

LABE LTHE ,¢ HANN ELS
This.la_ step in thernteractive Setup letsyou create your channel list and
label your channels. (For more, seeListand Labelsin the Featuresand
Menussection.)
1. PressMENU qr OKto bring up the List and'Labelscontrol.panel.
r. -_.>: . ..,. ,. ....
Usethe CH^(channelup) or CHv
(channel down) buttonsto change :_.
channels inthe Chan# field, Thisworks
even ifyou're not in the Chan# field. Or,
enter the channelnumber directlyusing
the number buttons on the universal
remote. To enter a number greater:than
99, press and hold "1"to enterthe
hundreds digit, then press the two"
remaining numbers.
The list and labels feature can also be
accessed from the Channel menu. Because
this procedure can be time consuming,
feel free to skip this step and come back
to it later.
2. Usethe left and right arrowsto point to the three different areasof
thecontrol panel (called"fields").
3. Usethe up and down arrowsto scroll through the numbersand
lettersand select Yesor No in theNormal List field. You maywish to
refer to the call letters listedin your newspaper'sTV section for ideas
on labellingthe channels....
4. Repeatthis processfor eachof your chanr_els.Then pressMENUor
•OKto continue. The TV canstore up to 27 labelsin memory.
WHAT NOW?.
Now that you've finishedthe interactivesetup,you can sit back,relax,
and enjoy the TV.Or... .
PROGRA/_ THE REMOTE •
Sinceyou've gone this far, YOucantake inuresto programthe ;.
remOteto.contro.!.your VCR,DVD player, Satellite receiver,or other..
components. To find out how to program the remote, goto ti_e next
section. " _'
18
This manual suits for next models
2
Table of contents
Other RCA TV manuals