manuals.online logo
Brands
  1. Home
  2. •
  3. Brands
  4. •
  5. RDP
  6. •
  7. Outdoor Cart
  8. •
  9. RDP JUNO Series User manual

RDP JUNO Series User manual

Popular Outdoor Cart manuals by other brands

Gearwrench 83167 user manual

Gearwrench

Gearwrench 83167 user manual

Costway TH10057 manual

Costway

Costway TH10057 manual

Vivo CART-PC02S instruction manual

Vivo

Vivo CART-PC02S instruction manual

Ergotron STYLEVIEW SV42-3162-1 quick reference

Ergotron

Ergotron STYLEVIEW SV42-3162-1 quick reference

VEVOR SC01 quick start guide

VEVOR

VEVOR SC01 quick start guide

Vivo CART-PC01 instruction manual

Vivo

Vivo CART-PC01 instruction manual

Carts Vermont 20 manual

Carts Vermont

Carts Vermont 20 manual

Westward 2CZY4 Operating instructions and parts manual

Westward

Westward 2CZY4 Operating instructions and parts manual

Numatic EcoMatic EM-5 Assembly

Numatic

Numatic EcoMatic EM-5 Assembly

Bosch XL-Cart Operating/safety instructions

Bosch

Bosch XL-Cart Operating/safety instructions

Tennsco Modular Cart Top Component Assembly Assembly Instructions/Parts Manual

Tennsco

Tennsco Modular Cart Top Component Assembly Assembly Instructions/Parts Manual

Clam POLAR TRAILER HD MAX manual

Clam

Clam POLAR TRAILER HD MAX manual

Costway TL0400 user manual

Costway

Costway TL0400 user manual

Trinity 1569839 owner's manual

Trinity

Trinity 1569839 owner's manual

Outsunny 845-340 manual

Outsunny

Outsunny 845-340 manual

XPOtool 30261 user manual

XPOtool

XPOtool 30261 user manual

Westfalia 94 59 66 Original instructions

Westfalia

Westfalia 94 59 66 Original instructions

Gorilla Carts GCR-10P quick start guide

Gorilla Carts

Gorilla Carts GCR-10P quick start guide

manuals.online logo
manuals.online logoBrands
  • About & Mission
  • Contact us
  • Privacy Policy
  • Terms and Conditions

Copyright 2025 Manuals.Online. All Rights Reserved.

JUNO Series Laptop Cart ‐Assembly InstrucƟons
3 X 10MM
FIXING PACK CONTENTS
RDP Health, Units 1 & 2, 17 Albert Drive
Victoria Industrial Estate, Burgess Hill, West Sussex RH15 9TN
Tel: 01444 245123 Email: [email protected] Website: www.rdphealth.com
2 X 12MM 4 X 40MM
4 X
3 X 8MM
1 X
10MM
12MM
40MM
TOOLS REQUIRED
(INCLUDED IN FIXING PACK)
1
15 MINUTES
1 X
2 X
4 X
8MM
1 X 12MM
4 X 40MM
4 X
STEP
1
4 MINUTES
A
B
D
E
F
G H
C
A
B
E
3 X 10MM
STEP
2
3 MINUTES
B
C
NEED HELP OR ADVICE?
Call our Support Team on 01444 245123 or email [email protected]
IMPORTANT: Failure to use the correct fixing in the correct place may result in product damage.
Insert and tighten the 4 x 40MM fixings with
shakeproof washers through the bottom of
the H-base (A), sandwiching the infill plate
(E) between the central column (B)
Insert and tighten the 3 x 10MM flange head fixings
through the central column (B) into the work surface (C)
IMPORTANT
When fitting the central column to the base, make sure the
wire for the height adjustment handle is facing forwards. This
will ensure that the handle can be fitted on the left or right
hand side.
For users that have twin flip-ups, the handle can be mounted
in the middle of the work surface. For precise locations,
please refer to the hole position guide in this document.
E
1 X 12MM
1 X
Insert and tighten the 1 x 12MM flange head fixings through P-
clip then central column (B) into the work surface (C)
10MM
12MM
40MM
8MM
STEP
3
1 MINUTE
H
2 X
STEP
4
1 MINUTES
G
H
2 X 12MM
STEP
6
1 MINUTE
D
3 X 8MM
STEP
5
3 MINUTES
F
Insert 2x hole bung to both LH & RH retainer (H & G)
(If using accessory holders miss step)
Place both retainers (H+G) into the slots* and fix using wing nuts
provided. If the laptop is to be fitted later, leave loose so the
retainers can be easily moved for laptop installation.
Attach the secure PSU holder (I) using the 4 x 10mm flange
head fixings. Once this is in place, access to the retainers can
only be gained by removing the PSU holder first.
SAVE TIME TIP
Fit the laptop and PSU at this stage to save
having to undo at a later date.
Attach the height adjustment handle (D) using the 2
x 12mm pan head fixings
2 X M5 Hole Bung
FITTING OPTIONS & ACCESSORIES
IMPORTANT: Failure to use the correct fixing in the correct place may result in product damage.
RDP Health, Units 1 & 2, 17 Albert Drive
Victoria Industrial Estate, Burgess Hill, West Sussex RH15 9TN
Tel: 01444 245123 Email: [email protected] Website: www.rdphealth.com
4 X 12MM
Attach the optional front wire utility basket
using the 4 x 12mm fixings.
2 X 10MM
Attach the accessory holders to either the
left or right hand retainers using the 2 x
10MM flanged head fixings
All the accessory holders attach in the
same way.
FITTING THE OPTIONAL FRONT UTILITY BASKET
FITTING THE OPTIONAL ACCESSORY HOLDERS
Each laptop retainer has 2 accessory mounng point at the back allowing up to
2 devices to be mounted per cart.
1
HOLE POSITION: C
INSTALLING THE OPTIONAL FLIP‐UP WORK SURFACE
IMPORTANT: Failure to use the correct fixing in the correct place may result in product damage.
RDP Health, Units 1 & 2, 17 Albert Drive
Victoria Industrial Estate, Burgess Hill, West Sussex RH15 9TN
Tel: 01444 245123 Email: [email protected] Website: www.rdphealth.com
STEP
1
4 MINUTES
STEP
2
1 MINUTE
STEP
3
1 MINUTE
Ax 1 B x 1 C x 1 D x 4 E x 4
4 X
B
C
E
A
D
D
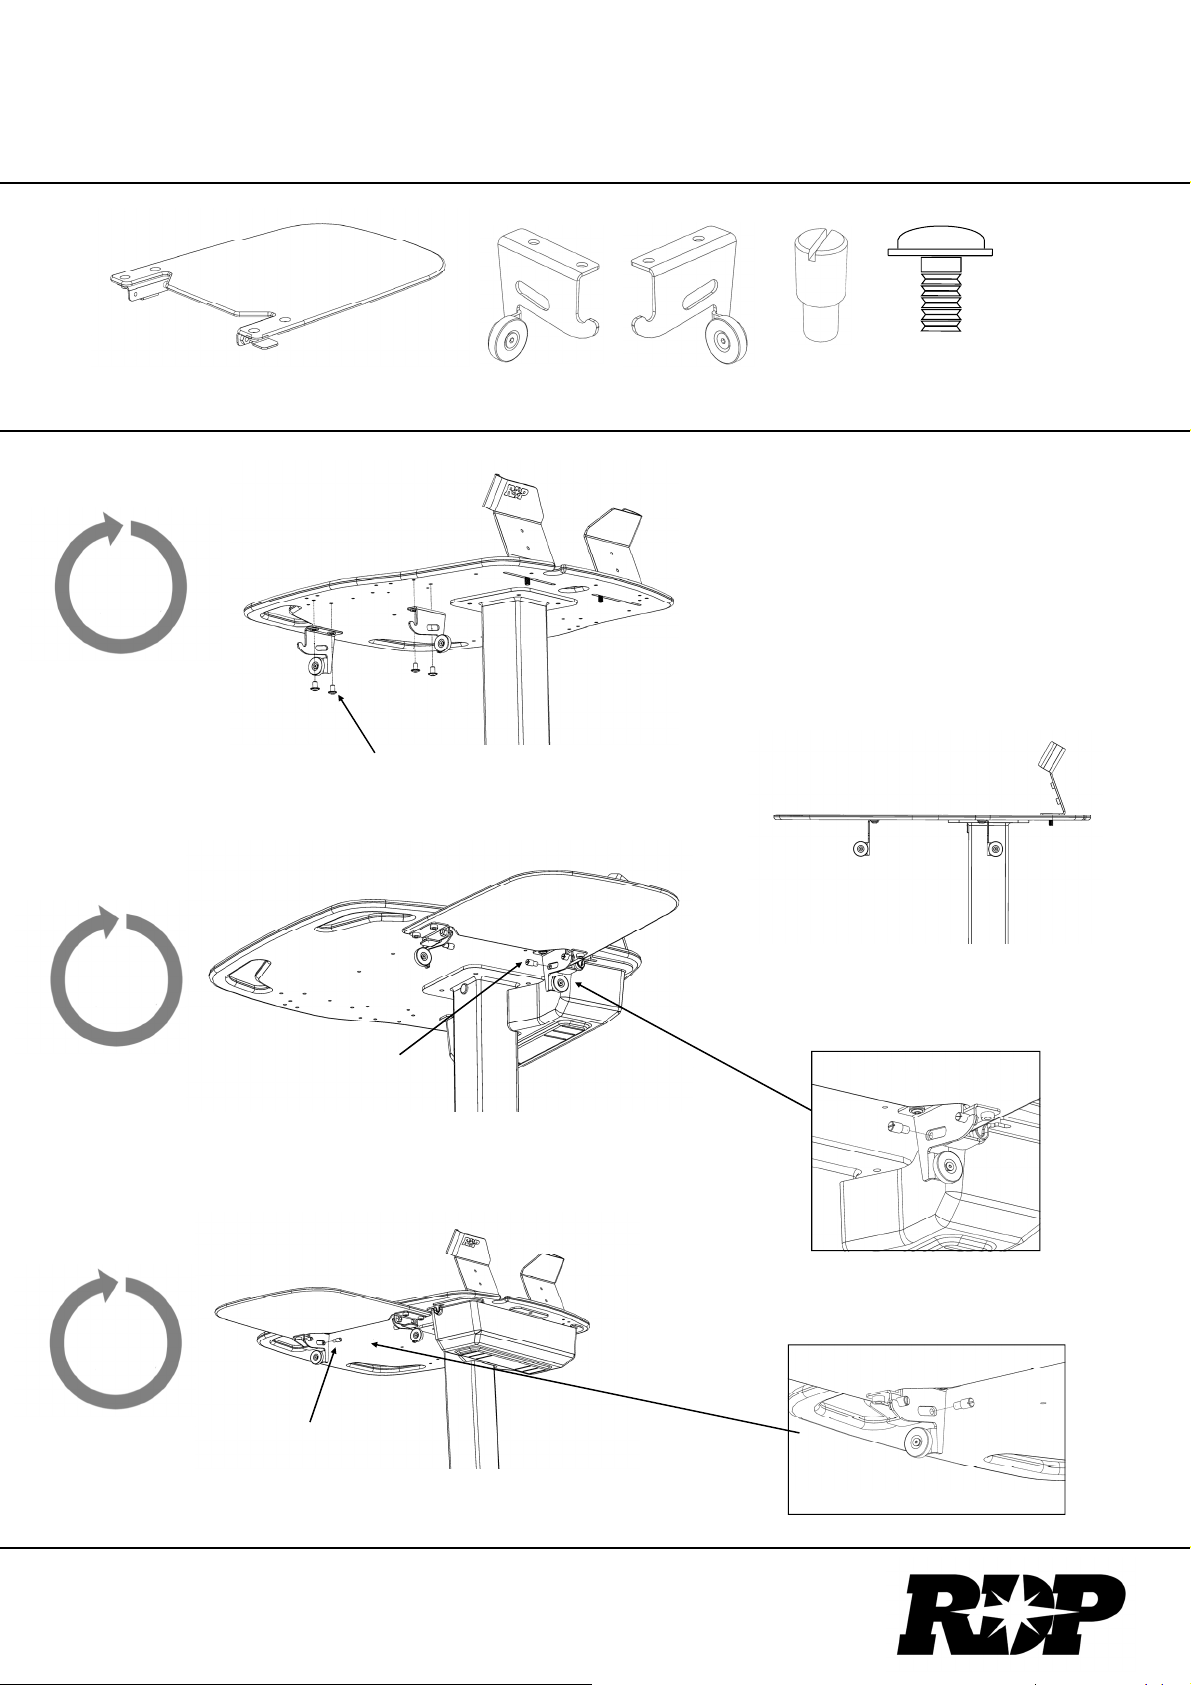
The flip-up work surface can be fitted to either the
left or right hand side and the method of fitting is the
same for both sides. For the hole guide, please refer
to the drawing at the back of this booklet.
Attach the left hand bracket (B) using the 2 fixings
(E). Attach the right hand bracket (C) using the 2
fixings and washers (E+F). Once the brackets are
fitted, the magnets should both face inwards as
shown below.
Position the flip-up work surface (A) so the
positioning screw sits on the ledge and then screw
in tight the shoulder fixing (D) as shown.
Repeat the above for the right hand bracket.
HOLE POSITION: D
FITTING THE A4 WIRE FOLDER HOLDER
IMPORTANT: Failure to use the correct fixing in the correct place may result in product damage.
RDP Health, Units 1 & 2, 17 Albert Drive
Victoria Industrial Estate, Burgess Hill, West Sussex RH15 9TN
Tel: 01444 245123 Email: [email protected] Website: www.rdphealth.com
2 X 8MM
Hook fing bracket to the front
edge of the ulity basket
HOLE POSITION: F
2 X 10MM
Hook basket to
the fixing
bracket
2 X 10MM
WITH A FRONT UTILITY BASKET WITHOUT A FRONT UTILITY BASKET 
RDP Health, Units 1 & 2, 17 Albert Drive
Victoria Industrial Estate, Burgess Hill, West Sussex RH15 9TN
Tel: 01444 245123 Email: [email protected] Website: www.rdphealth.com
HOLE POSITION: H
4 X 8MM
FITTING THE PULL‐OUT KEYBOARD TRAY
IMPORTANT: Failure to use the correct fixing in the correct place may result in product damage.
Connect keyboard tray
to worktop bracket
RDP Health, Units 1 & 2, 17 Albert Drive
Victoria Industrial Estate, Burgess Hill, West Sussex RH15 9TN
Tel: 01444 245123 Email: [email protected] Website: www.rdphealth.com
A Central Column E PH bracket
B Rear secure PSU holder F Notes basket bracket
C Front ulity basket/A4 folder bracket G Handle (le/right or centre)
D Flip‐up work surface (le/right or both) H Pull‐out Keyboard
A A
A A
B
BB
C C
C C
DD
DD
D D
D D
E
E
E
E
E E
E
E
E
E
F & H
G
G
G
G
G
G
H H
F & H
HOLE POSITION GUIDE
Need help or advice? Call our Support Team on 01444 245123 or email [email protected]