RDS Technology Master Driers MMM 100 Use and care manual

1
MMM 100 Moisture Meter
Installation, Calibration and
Operation
Software Reference WZ501-001 rev.06
Electro-Magnetic Compatibility (EMC)
This product complies with Council Directive
2014/30/EU when installed and used in accordance
with the relevant instructions.
Service and Technical Support
Master Farm Services (GB) Ltd
Bures Park, Colne Road,
Bures, Suffolk
CO8 5DJ
Tel: 01787 228450 / 229083
Fax: 01787 229146
© Copyright RDS Technology Ltd 2012
Document number
S/DC/500-10-691: Issue 3.00 : 05.02.2016
\UK691300.DOC
User Guide

MASTER DRIERS MMM 100 : INSTALLATION, CALIBRATION AND OPERATION
2
Contents
1. Overview_________________________________________4
1.1 Operation....................................................................................................... 4
1.2 Calibration ..................................................................................................... 5
2. Operating Mode __________________________________6
2.1 Startup........................................................................................................... 6
2.2 Selecting the crop type ................................................................................. 6
2.3 Correcting the Moisture Reading................................................................... 7
2.3.1 Setting the Moisture Correction Factor ............................................ 7
2.4 Displaying the Grain Temperature................................................................. 7
2.4.1 Nudging the Temperature Display ................................................... 7
2.5 Low Moisture Content Alarm ......................................................................... 8
2.5.1 Select Low Moisture Content Alarm option...................................... 8
2.5.2 Set Low Moisture Content Threshold............................................... 8
3. Calibration Mode _________________________________9
3.1 Navigating the Calibration Mode ................................................................... 9
3.2 Programming a Calibration Setting ............................................................. 10
3.2.1 Entering a Negative Value.............................................................. 10
3.3 Factor A ("A.FAc") / Factor B ("B.FAc") ........................................................ 11
3.4 Factor C ("C.FAc") ....................................................................................... 11
3.5 Moisture Content Alarm ("ALAr").................................................................. 11
3.6 Low Grain Voltage Threshold ("UOLt") ........................................................ 11
3.7 Display Smoothing Factor ("FILt")................................................................ 12
4. Diagnostic Mode _______________________________ 13
5. Data Logging___________________________________ 14
5.1 Setup ........................................................................................................... 14
5.2 Data Dictionary ............................................................................................ 14

MASTER DRIERS MMM 100 : INSTALLATION, CALIBRATION AND OPERATION
3
6. Installation _____________________________________ 15
6.1 Parts List ......................................................................................................15
6.2 Installation....................................................................................................17
6.2.1 Head Unit .......................................................................................17
6.2.2 Power Supply.................................................................................18
6.2.3 Junction Box ..................................................................................19
6.2.4 Moisture Sensor Installation ...........................................................20
6.3 External Alarm..............................................................................................20
6.4 Test installation ............................................................................................21

MASTER DRIERS MMM 100 : INSTALLATION, CALIBRATION AND OPERATION
4
1. Overview
1.1 Operation
The Master Driers MMM 100 Moisture Meter is used in conjunction with a
Grain Moisture Sensor to continuously monitor crop moisture content as it
passes through the mobile drier.
As the grain is flowing through the drier, the instrumentIt provides a
continuous, dynamic display of the grain moisture content,and the option to
and display the crop temperature at the press of a button.
It has an audible internal alarm to warn the operator when the moisture
content gets down to a pre-programmable threshold (factory default for all
channels = 5%) An external alarm is optional.
The operator is able to select from channels "A" to "F", which correspond to
different crop types.
The head unit has a rear-mounted on-off switch that also enables entry into
the calibration mode.
Channel
(crop)
indicator
Select channel (crop)
Display temperature

MASTER DRIERS MMM 100 : INSTALLATION, CALIBRATION AND OPERATION
5
1.2 Calibration
The grain moisture value should still be checked periodically against a
reading from a reference moisture meter, particularly when processing oily or
dirty crops, since the sensor can produce a false reading due to extraneous
material adhering to it.
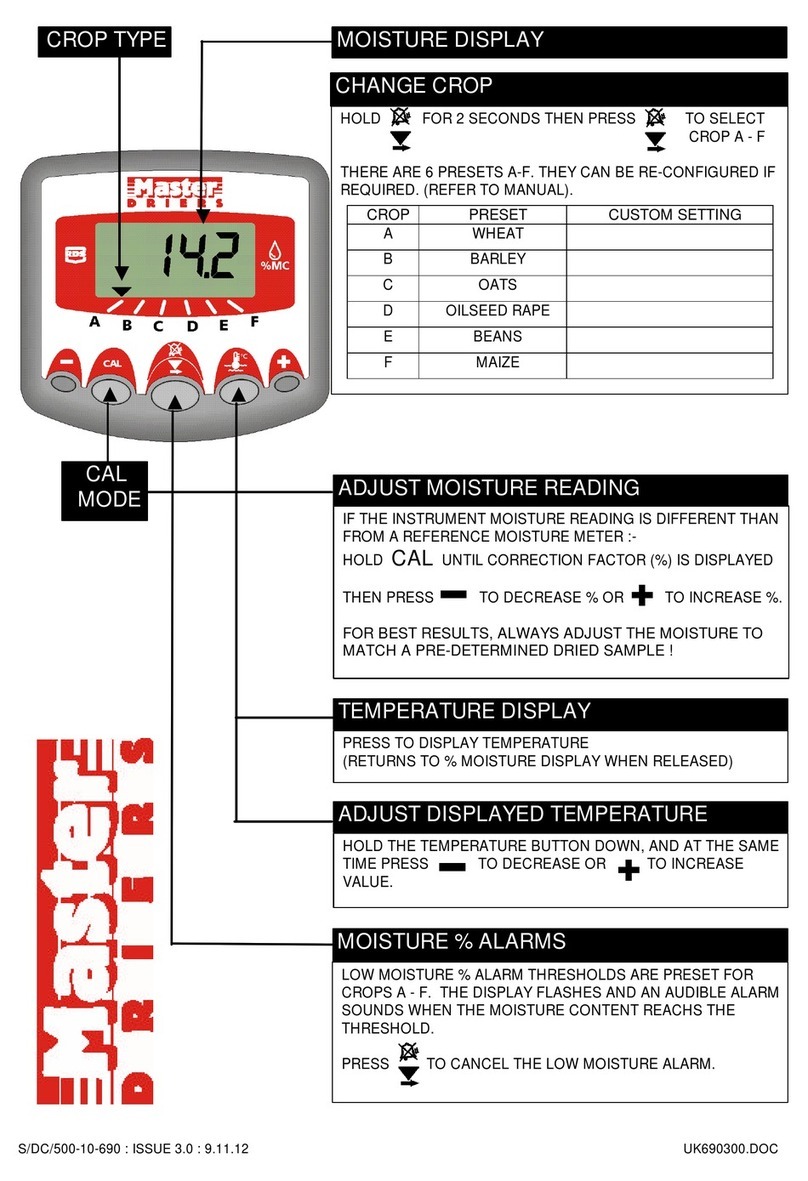
The instrument has factory-default calibration settings for each channel A to
F. These settings assume channels A to F are assigned to the following crop
types,
A = Wheat
B = Barley
C= Oats
D = Oilseed Rape
E = Beans
F = Maize
Adjustment is needed if the moisture reading is different from that of a
reference moisture meter.
The operator can and adjust the calibration settings for each channel, . The
adjustable calibration settings includinge:
Calibration Factors"A", "B" and "C"–(for calibrating the sensor.)
, Low Moisture Content - Alarm Threshold
and Low Grain Voltage Threshold –(for when there is insufficient grain
passing over the sensor to give a sensible reading of moisture content, such
as occurs when the drier first starts up. By default, this feature is switched off
in the CAL mode ("UOLt" setting).).
The operator changes the calibration settings for each channel using a
secure method of entry that helps to prevent any accidental changes.
Please refer to the "Calibration" section.

MASTER DRIERS MMM 100 : INSTALLATION, CALIBRATION AND OPERATION
6
2. Operating Mode
2.1 Startup
Switch the instrument on via the rear-mounted switch.
The instrument first displays the software version installed e.g.
"A.501" "E.001" "r.006" indicates software version WZ501-001 rev.06
The display then defaults to the channel previously selected and displays
one of the following,
"Ch. <A - F>" This is displayed if the grain auger is not yet delivering a
sufficient flow of grain into the tank. The moisture
content cannot be calculated accurately until the sensor
is covered with grain.
<value> This is the Moisture Content display. It should be
checked against a reading obtained from a reference
moisture meter on a regular basis. If necessary, it is
corrected by changing "factor C" (ref. section 2.3.1).
<value> flashing This is the Low Moisture Content Alarm display,
meaning the moisture content is below the threshold
programmed in the calibration mode.
"Err 1" or "Err 2" This indicates no signal from the sensor.
2.2 Selecting the crop type
By default, channels A to F are assigned to the following crop types,
A = Wheat
B = Barley
C= Oats
D = Oilseed Rape
E = Beans
F = Maize
The indicator shows which channel is selected.
Press and hold the button for two seconds. You can then press or
hold the button to select the required channel.

MASTER DRIERS MMM 100 : INSTALLATION, CALIBRATION AND OPERATION
7
2.3 Correcting the Moisture Reading
The grain moisture reading should be checked periodically against a reading
from a reference moisture meter, particularly when processing oily or dirty
crops, since the sensor can produce a false reading due to extraneous
material adhering to it.
A Moisture Correction Factor (C) is needed if the harvest moisture reading is
different from that of a reference moisture meter.
A Moisture Correction Factor (C) is specific to each crop. To establish the
factor, subtract the instrument moisture reading from the reference meter
reading. The difference is the correction factor.
For example: Instrument reading = 20%
Reference meter reading = 18.5%.
So the Correction factor = (18.5 - 20) = -1.5 (%)
If a large Correction factor is needed, first check that the fin on the moisture
sensor is clean.
2.3.1 Setting the Moisture Correction Factor
The Moisture Content reading can be corrected by adjusting the Correction
Factor C while the instrument is in the normal operating mode.
1. To change the correction factor, first press and hold the button until
the current correction factor (x.x) is displayed.
2. Then press the button or the button to set the correction factor in
0.1 increments.
3. On releasing the buttons, the instrument should then display the correct
moisture content reading.
2.4 Displaying the Grain Temperature
Press and hold the button to display the (grain) temperature.
Release the button to return to the Moisture Content display.
2.4.1 Nudging the Temperature Display
If determined that the displayed temperature is not correct, then press and
and hold the button,
then press either the button or the button to adjust the temperature
readout to the correct value.

MASTER DRIERS MMM 100 : INSTALLATION, CALIBRATION AND OPERATION
8
2.5 Low Moisture Content Alarm
If the moisture content goes below the preset threshold, the display flashes
continuously and the alarm beeps every 30 seconds.
NOTE: If fitted, the (optional) external audible alarm unit will operate in tandem with
the instrument internal buzzer.
The alarm will continue until either,
(i) the moisture content increases to at least 2% above the alarm threshold for
at least 3 seconds.
(ii) the alarm is cancelled by pressing the key.
2.5.1 Select Low Moisture Content Alarm option
The instrument is factory set for a High Moisture Content Alarm (for
combining). Therefore you must first set the instrument to enable a Low
Moisture Content Alarm for drying as follows.
1. Press and hold the button as you switch the instrument on, and
continue to hold for (5 seconds) until the instrument enters the calibration
mode. The instrument displays "ALAr then "25.00".
2. Press the button again to display the "HIGH" / "LO" option. By default
"HIGH" is displayed. Press the button to select "LO".
NOTE: When "HIGH" is selected, all channels default to a 25% M.C. threshold. When
"LO" is selected, all channels default to a 5% M.C. threshold.
2.5.2 Set Low Moisture Content Threshold
Having first set the "LO" alarm option, you can then individually set the low
alarm threshold (% M.C.) for each channel as desired.
1. In CAL mode press the button to cycle through the factors until "ALAr"
is displayed. The default threshold ("5.00") is displayed for the selected
channel.
2. Press the button to select the desired channel.
3. Edit the setting as described in section 3.2.
NOTE: Changing the "HIGH" / "LO" alarm option resets any pre-programmed
threshold values to the factory default values (25% / 5%).

MASTER DRIERS MMM 100 : INSTALLATION, CALIBRATION AND OPERATION
9
3. Calibration Mode
3.1 Navigating the Calibration Mode
1. Press and hold the button as you switch the instrument on, and
continue to hold for 5 seconds until the instrument enters the calibration
mode. The instrument displays "CAL" then "ALAr" (for the channel last
selected in Normal Operating Mode), then the current moisture alarm
threshold setting (xx.xx).
2. Press the button to select the required channel. The indicator
shows which channel is selected.
3. Press the button to cycle to the required setting for the selected
channel.
Factory Default
settings
Channel (Grain Type)
A
B
C
D
E
F
M.C. Alarm ("LO")
Threshold ("HIGH")
("ALAr")
5.00
25.00
5.00
25.00
5.00
25.00
5.00
25.00
5.00
25.00
5.00
25.00
High/Low Level Alarm
option
("HIGH"/"LO")
Factor A
("A.FAc")
0.00
0.00
0.00
0.00
0.00
0.00
Factor B
("B.FAc")
7.04
3.75
5.52
2.12
4.01
07.91
Factor C
("C.FAc")
6.60
12.20
10.40
12.00
7.10
2.00
Low Grain Voltage
Threshold
("UOLt")
0.00
0.00
0.00
0.00
0.00
0.00
Smoothing Factor
("FILt")
99.50
99.50
99.50
99.50
99.50
99.50
The default settings are for grain types:
A = Wheat, B = Barley, C= Oats, D = Oilseed Rape, E = Beans
F = Maize

MASTER DRIERS MMM 100 : INSTALLATION, CALIBRATION AND OPERATION
10
NOTE 1: If the operator wishes to programme the instrument for alternative crops, then
they can if necessary, seek advice from the Factory Service Department
NOTE 2: The factory-default settings will be restored after a "Power-On Reset ".
3.2 Programming a Calibration Setting
Once you have selected the setting you wish to change (ref. section 3.1),
1. Press and release the button to select the digit you want to change.
00.00 00.00 00.00 00.00
2. Press and hold the button to change the digit.
3. Release the button when you have changed the digit.
4. Repeat steps 1 to 3 for the remaining digits as necessary.
3.2.1 Entering a Negative Value
A negative value is indicated by the MIDDLE indicator on the left of the
display.
1. Press and hold the button to switch between negative and positive
value.
2. Release the button when you have changed it.
NOTE: If a positive value is set, the top and bottom indicators on the left of the
display disappear. If a negative value is set, the middle indicator remains as
shown below.
NOTE: If a particular setting does not support a negative value, then the side
indicators will not appear.

MASTER DRIERS MMM 100 : INSTALLATION, CALIBRATION AND OPERATION
11
3.3 Factor A ("A.FAc") / Factor B ("B.FAc")
May require changing if drying crops other than the default grain types.
To edit - Ref. section 3.2.
3.4 Factor C ("C.FAc")
This setting is the Moisture Correction Factor, required to match the moisture
content reading of the instrument to that of a reference moisture meter. It can
be changed within the calibration mode, or in the Normal Operating Mode as
described (ref. section 2.3.1).
To edit - Ref. section 3.2.
3.5 Moisture Content Alarm ("ALAr")
This setting is either the minimum or maximum moisture content (%) below
or above which, an alarm warns the operator.
The instrument is designed either for combine installation where the high
alarm is enabled, or for dryer installation where the low alarm is enabled. The
default setting is for a high alarm.
The factory-default setting for all channels is 5% moisture content (low alarm)
and 25% (high alarm). It can only be changed within the calibration mode.
To edit alarm settings - Ref. section 2.5.
3.6 Low Grain Voltage Threshold ("UOLt")
This setting (Volts) determines when the instrument displays "Ch.AF" to
indicate insufficient grain flow over the sensor. It is possible that this value
may need to be adjusted for each grain type.
To edit - Ref. section 3.2.

MASTER DRIERS MMM 100 : INSTALLATION, CALIBRATION AND OPERATION
12
3.7 Display Smoothing Factor ("FILt")
This value determines how steady the moisture content display remains,
when reacting to variations in moisture content during drying.
A higher value (%) gives a more averaged (steadier) reading.
A lower value (%) gives a more instant (but less steady) reading.
To edit - Ref. section 3.2.
A zero setting disables display smoothing. The calculated temperature and
Moisture content displays for each channel will be based on raw input
voltages. The display updates @ 2Hz to ensure readability.

MASTER DRIERS MMM 100 : INSTALLATION, CALIBRATION AND OPERATION
13
4. Diagnostic Mode
1. Press and hold the button as you switch the instrument on, and
continue to hold for (5 seconds) until the instrument enters the diagnostic
mode. The instrument displays "dIAG" and then defaults to channel A (see
table 1).
2. Press the button to select the required channel. The indicator
shows which channel is selected.
Channel
Function
Display
A
Moisture Sensor input voltage [1]
*A reading below 0.05V (50mV) indicates either
a faulty sensor or a bad connection, and
generates the error message "Err.1"
0.1V* - 5V
B
Temperature Sensor Input Voltage [1]
*A reading below 0.05V (50mV) indicates either
a faulty sensor or a bad connection, and
generates the error message "Err.2"
0.1V* - 5V
C
Calculated Temperature
0.1°C
D
Calculated % Moisture Content [2]
(without temperature compensation)
0.1 % M.C.
E
Calculated % Moisture Content [2]
(with temperature compensation)
0.1 % M.C.
F
Display Smoothing [3]
ON /OFF
Table 1: Diagnostic functions
[1] For diagnostic mode only, display smoothing can be switched OFF (channel
F). The raw input voltages are displayed, and used to calculate the
temperature and Moisture Content displays. The display updates @ 2Hz to
ensure readability.
Display smoothing remains active for each channel in the Normal Operating
Mode, based on the settings for each channel in the Calibration Mode.
[2] The calculated values displayed are for the grain type last selected in the
Normal Operating Mode.
[3] Select channel F, and press the button to toggle this function on or off.

MASTER DRIERS MMM 100 : INSTALLATION, CALIBRATION AND OPERATION
14
5. Data Logging
The instrument continuously outputs a line of
data every second. A 'Wizard Upload Lead'
(Pt No. S/CB/327-1-030) is required, and
suitable data capture software must be
installed on your PC. This software is not
provided by RDS.
Each time you press the CAL button, the
instrument transmits a header line and the
'Sample ID' (line count) is reset to zero.
5.1 Setup
Connect the 'Wizard Upload Lead' to the 4-
way header 'PL1' in the 'Terminator ' junction
box. This lead is then connected to an
RS232 serial port on a PC or laptop
computer.
If a serial port is not available, a Serial-to-USB
converter can be used (available from any
computer store).
Port settings required are,
Baud Rate: 4800
Data Bits: 8
Parity: None
Handshake: OFF
Mode: Free
5.2 Data Dictionary
Typical data line: 1, A, 90.00, 2.35, 3.80, +38.4, 20.7, 19.6
Sample ID
Channel
Average Filter Ratio
Moisture Sensor Input (V)
Temp. Sensor Input (V)
Calculated Temp. (deg C)
Calculated Moisture Content (%)
Calculated Temp. compensated Moisture Content ( % )
Connect 'Wizard
Upload Lead'
here

MASTER DRIERS MMM 100 : INSTALLATION, CALIBRATION AND OPERATION
15
6. Installation
6.1 Parts List - Kit : P/CMM100
Part No.
Description
Qty
S/HU/327-25-001
Head Unit
1
S/AC/327-25-006
Junction Box
1
K/INSTRUMENT
Power Supply Kit
1
K/WIZ/MTG/BKT
Head Unit Mounting Kit
1
K/ MOIST/SNR/MK4
Moisture Sensor Kit
1
Please refer to the
installation leaflet supplied
with this kit
S/DC/500-10-690
Quick Reference Card
1
S/DC/500-10-691
Instruction Manual
1
S/DC/500-10-015
Warranty Registration
Card
1
S/DC/500-10-014
Warranty Card
1
S/DC/500-10-021
RDS Label
1

MASTER DRIERS MMM 100 : INSTALLATION, CALIBRATION AND OPERATION
16
K/MOIST/SNR/MK4
Head Unit
S/HU/327-25-001
Terminator
S/AC/327-25-006
Power Supply
(K/INSTRUMENT)

MASTER DRIERS MMM 100 : INSTALLATION, CALIBRATION AND OPERATION
17
6.2 Installation
Requiring,
S/HU/327-25-001 : Head Unit
S/AC/327-25-005 : Terminator
K/INSTRUMENT : Power Supply Kit
K/WIZ/MTG/BKT : Head Unit Mounting Kit
(External Alarm optional)
6.2.1 Head Unit
Confirm with the operator on where to mount the head unit. The head unit is
fitted with a 1-metre flying lead terminating with an 8/10-way IDC type
connector, ready for connection into the junction box.
The instrument mounting kit K/WIZ/MTG/BKT is designed to offer maximum
flexibility in positioning the head unit. Either the long or short bracket can be
attached to the head unit, whichever enables the most suitable orientation. You
can index each pivot point on the mounting bracket to angle the head unit in
relation to the mounting plate.

MASTER DRIERS MMM 100 : INSTALLATION, CALIBRATION AND OPERATION
18
(i) Snap the cover plate into the recess of the long bracket (it only fits one way).
(ii) Assemble the two brackets and mounting plate with the clamping knobs, and
attach to the head unit.
(iii) Having established the orientation for the bracket, fix the mounting plate to the
cab with the self-tapping screws provided.
Do not attempt to adjust the mounting bracket assembly without first
slackening off the clamping knobs, otherwise you might damage the bracket.
6.2.2 Power Supply
The Head Unit and Sensor operate satisfactorily over the voltage range 11-30V
DC. Power is fed to the system via the junction box.
Using a multimeter, check the main electrical panel to identify a suitable +V
supply. Connect the brown wire to+V and the blue wire to 0V.
Reverse Polarity and Power LED
The head unit has reverse polarity protection and therefore will not be
damaged if you inadvertently have the power supply connections reversed.
The LED on the junction box PCB will not light when the 0V and +V
connections are reversed. If after connecting the power supply, the instrument
does not power up then:
(a) Check you have connected to a suitable point on the electrical system as
described above.
(b) If (a) is OK but the LED is not lit, check the polarity is correct.
(c) If the LED is lit but the head unit does not come on, check the 18-way
connector is properly connected (section 5.2.3).

MASTER DRIERS MMM 100 : INSTALLATION, CALIBRATION AND OPERATION
19
6.2.3 Junction Box
The junction box connects the head unit, moisture sensor, power supply and
optional external alarm.
NOTE: The junction box is not sealed. It must be located where it will be protected
from EXCESSIVE MOISTURE AND DIRT
The Base Moulding can be mounted using the screws provided, or can be left
in-line with the cables.
Connect the head unit lead onto the PCB header PL2.
Locate the cable grommet onto the moulding, and cable-tie the head unit lead
onto the moulded cable saddle to provide strain relief.
Function
Wire Colour
Power
Supply
+V
BROWN
0V
BLUE
Moisture
Sensor
+Vss
RED
+V Temp signal
GREEN
+V Moisture signal
YELLOW
-V Moisture signal
-
0V
BLUE
Ext. Alarm
+V
BROWN
0V
BLUE
RED/BLUE
(8-way connector)
RED
(10-way connector)
Power connection
To Head Unit
Cable entry with strain relief

MASTER DRIERS MMM 100 : INSTALLATION, CALIBRATION AND OPERATION
20
6.2.4 Moisture Sensor Installation
Requiring,
K/MOIST/SNR/MK4 : Mk 4 Moisture Sensor Kit
For mounting the sensor, please refer to the installation leaflet enclosed with
the Moisture Sensor Kit.
6.3 External Alarm
An external alarm is optional. If fitting one, mount the alarm buzzer where it
will stay dry.
Connect as shown in section 5.2.3.
Other manuals for Master Driers MMM 100
1
Table of contents
Other RDS Technology Measuring Instrument manuals
Popular Measuring Instrument manuals by other brands

GE
GE StressTel T-MIKE E Operation & Maintenance Specifications Manual

WAGNER
WAGNER TITANUS SUPER-SENS Technical manual

Raycus
Raycus RFL-C Series user guide

Levenhuk
Levenhuk Wezzer Air MC20 user manual

multicomp pro
multicomp pro MP760607 user manual

Netafim
Netafim M Series Installation, operation and maintenance guide