Re ATD-7443 Instructions for use

Read this manual and follow all the Safety Rules and Operating Instructions before using this product.
This is the safety alert symbol. It is used to alert you to potential personal injury hazards.
Obey all safety messages that follow this symbol to avoid possible injury or death.
!
!ADVERTENCIA
r, comprender, y seguir las instrucciónes antes
de utilizar el aparato.
seguridad deben estar comunicado en lengua del
operador antes del uso.
personales o materiales.
!WARNING
To avoid crushing and related injuries:
NEVER work on, under or around a
load supported only by a hydraulic
jack. ALWAYS use adequately rated
jack stands.
Heavy Duty
Jack Stands
8447-DTAledoM3 and ATD-7446447-DTAsledoM
Model Number
ATD-7443
ATD-7446
ATD-7448
Operating Instructions & Parts Manual
Capacity per pair
3 Ton
6 Ton
12 Ton
WARNING: This product may contain chemicals, including lead, known to the State of California to cause cancer,
birth defects or other reproductive harm. Wash hands after handling.
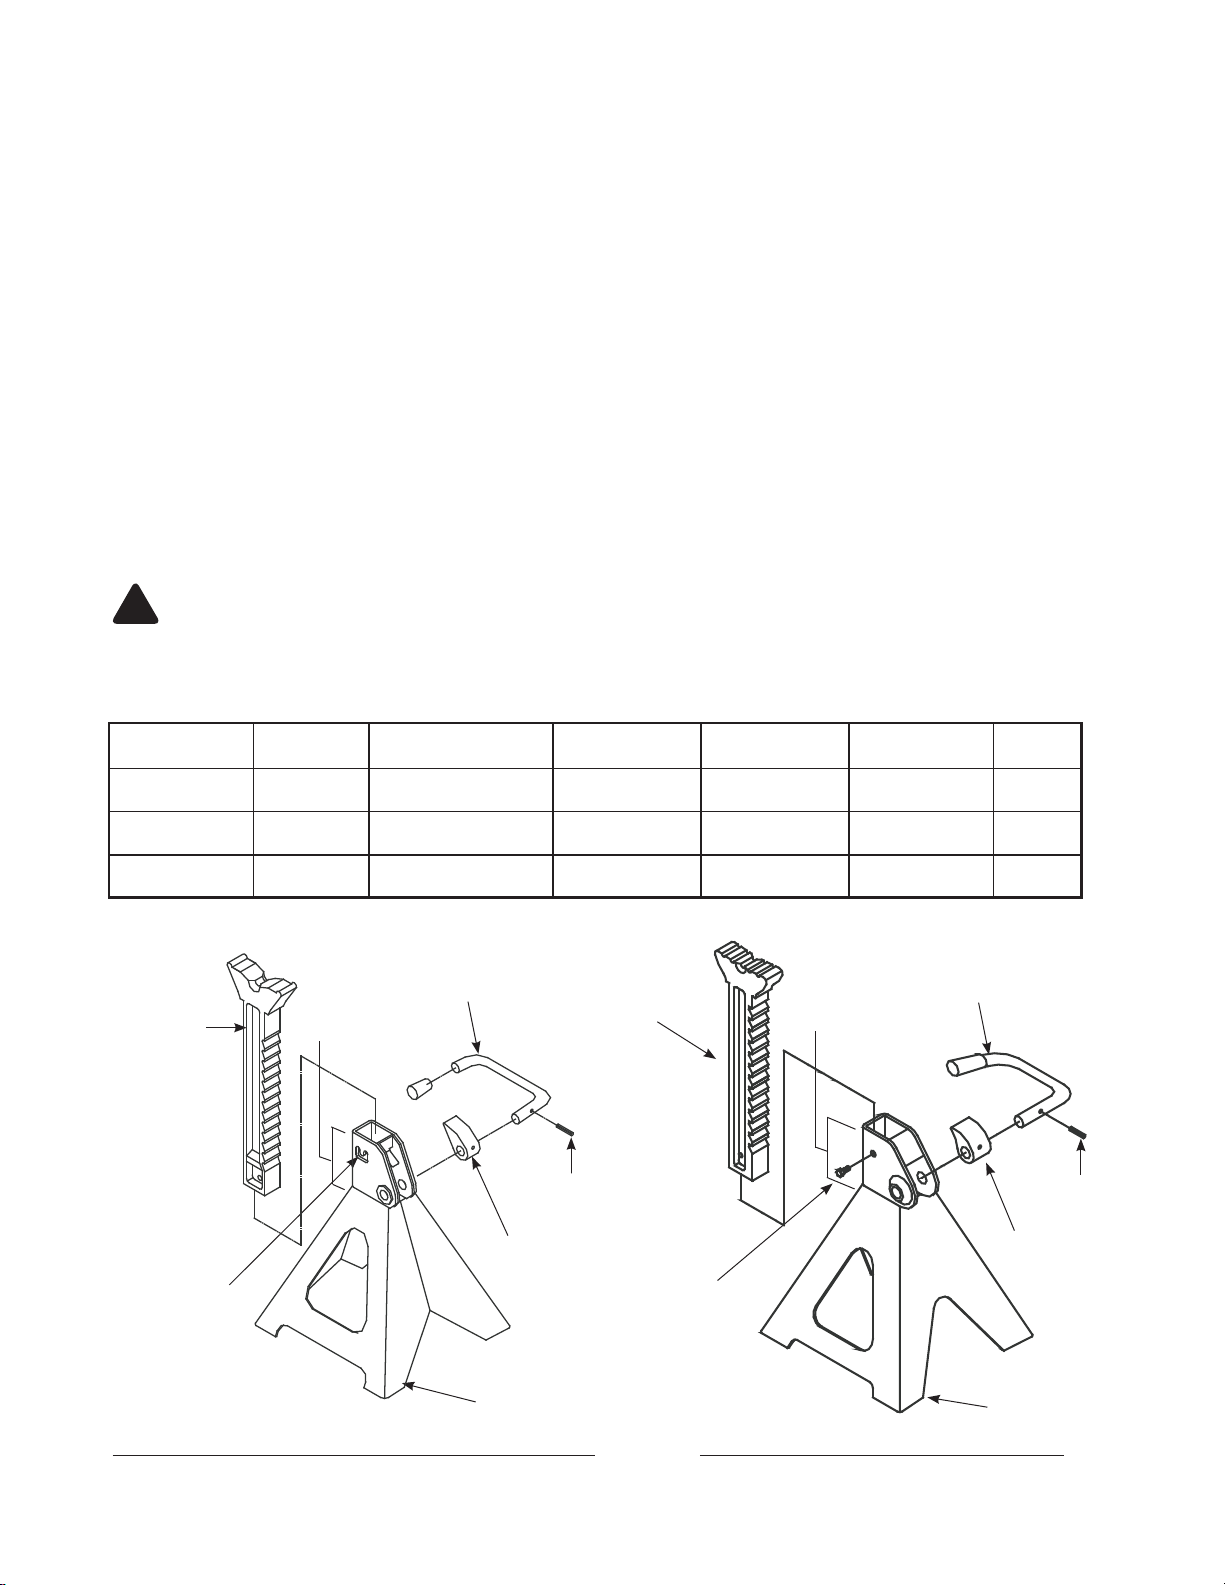
Press Tab
Ratchet Bar
Locking Handle
Lock Pin
Locking Pawl
(stopper)
Base Frame
Stand Collar
2
SPECIFICATIONS
Figure 2 - Model ATD-7448 componentsFigure 1 - Models ATD-7443 & ATD-7446 components
Model Capacity
(per pair) Base Size Min. Height Max. Height Saddle Size Weight
16 lbs.
34 lbs.
61 lbs.
3-1/2” x 1”
4-1/4” x 1-1/4”
4-5/8” x 1-1/2”
ATD-7443 3 Ton 7-3/4" x 6-3/4” 11-1/2” 17”
ATD-7446 6 Ton 10-5/8” x 9-1/4" 15-3/8” 24-3/8”
ATD-7448 12 Ton 12” x 10-3/4” 17-1/2” 27-1/2”
SAFETY and GENERAL INFORMATION
Save these instructions.
For your safety read, understand, and follow the information provided with and on this
pair of jack stands before using. The owner and operator of this equipment shall have an understanding of the jack
stands and safe operating procedures before attempting to use. The owner and operator shall be aware that use of
this product may require special skills and knowledge. Instructions and safety information shall be conveyed in the
operator's native language before use of these jack stands is authorized. If any doubt exists as to the safe and proper
use of these jack stands, remove from service immediately.
Inspect before each use. Do not use if broken, bent, cracked, or damaged parts (including labels) are noted. Any
jack stand that appears damaged in any way, operates abnormally or is missing parts, shall be removed from service
immediately. Ifyoususpectthat thejack standwas subjectedto a shock load (a load droppedsuddenly,unexpectedly
uponit), immediatelydiscontinue use untilthe standhas beenchecked bya factoryauthorized service center(contact
distributor or manufacturer for list of authorized service centers). It is recommended that an annual inspection be
done by qualified personnel. Labels and Owner’s Manuals are available from the manufacturer.
PRODUCT DESCRIPTION
Heavy Duty
Jack Stands are designed to support rated capacity, partial vehicle loads consisting of one end of a
vehicle. Use as a matched pair to support one end of a vehicle only.
NEVER use automotive jack stands to support both ends or one side of a vehicle!
Use only one (1) pair per vehicle. Rated capacity is per pair only!
!
Bolt
Ratchet Bar Locking Handle
Lock Pin
Locking Pawl
(stopper)
Base Frame
Stand Collar

3
PREPARATION
Assembly
(refer Fig. 1 & 2)
1.Make sure all parts are present. If any part is missing
or damaged, do not attempt to assemble, install or
operate the product.
2.Install ratchet barinto baseframe with ratchetportion
of bar aligned with locking pawl.
3. Move the ratchet bar to its lowest position by raising
thelockinghandle, thereby releasingthestopper and
guiding the bar downward.
4. To help prevent inadvertent loss of the ratchet bar:
a) For Model ATD-7443 & ATD-7446:
(Tools required: Hammer and Punch)
Press the press tab inward using a suitable
hammer and punch.
b) For Model ATD-7448:
(Tools required: 12mm Wrench)
Tighten the M7.5x20 hex bolt found on the collar.
Before Use
1. Verify that the product and the application are
compatible, if in doubt call the Technical Service
line (888) 332-6419.
2.
Inspectstandsbeforeeach use. Do notuseifthereare
bent,broken or crackedcomponentsnoted (including
labels). Ensure that all parts move freely.
3. Read the operator's manual completely and
familiarize yourself thoroughly with the product and
thehazards associated with its improper usebefore
using this product.
4.Alwaysrefer to the vehicle owners or service manual
for location of proper lift and support points.
OPERATION
Use only
by the vehicle manufacturer.
Use ONLY on
vehicles whose support points are
compatible
with
the saddle of the jack stand. Incompatibility may result
in structural damage to the vehicle and/or jack stand.
Structural damage to either may result in sudden and
unexpected loss of load height!
Only attachments and/or adapters supplied
by the manufacturer shall be used.
1. Adjust height by pulling up on ratchet bar.
2. The weight of locking handle should secure the
simply push down on the locking handle. Ensure
ratchet is secure before loading.
3.
Carefullyposition jack standsso that loadis centered
on stand’s saddle.
4. Slowly lower the vehicle onto the stands.
5.Checktoensurevehicleissecurebefore working on,
around or under. Use wheel chocks on all unlifted
wheels in both directions to prevent inadvertent
movement.
To lower load
Be sure that all tools and personnel
are clear
before lowering load.
1. With suitable jack, raise vehicle clear of stands.
2. Carefully release stopper and allow ratchet to glide
down to lowest position.
3. Carefully remove stands, then carefully lower
vehicle with lift device.
MAINTENANCE
Periodically inspect each stand. Ensure all parts move
freely. Do not apply oil or grease to any portion of this
product. If rust appears, sand affected area and cover
with suitable utility paint.
Storage
Storestands in uprightposition andin a clean,dry area.
REPLACEMENT PARTS
Individual replacement parts are not available for this
product. Jack stands are sold as a matched pair. For
product labels and owners manual, call your distributor.
Study, understand, and follow all instructions
provided with and on this device before use.
Rated capacity is PER PAIR! DO NOT exceed
rated capacity.
of a
vehicle only. Use only ONE (1) PAIR per vehicle.
Jack stands are not to be used to simultaneously
support both ends or one side of a vehicle.
personal injury and/or property damage.
!WARNING !
!
!
Learn more about automotive tools on our website.
This manual suits for next models
2
Popular Jack manuals by other brands

Omega Lift Equipment
Omega Lift Equipment 18122C Operating instructions & parts manual

Pittsburgh
Pittsburgh 58816 Owner's manual & safety instructions

Unimec
Unimec TP Assembly instructions

Sonic
Sonic 4800703 instructions

BGS technic
BGS technic 70039 instruction manual

TradeQuip
TradeQuip 1128T owner's manual

VEVOR
VEVOR TJD-12000SP-F quick start guide

ULTIMATE SPEED
ULTIMATE SPEED URW 2 A1 HYDRAULIC TROLLEY JACK operating instructions

Stels
Stels 51131 user manual

Bushranger
Bushranger RJX01 instruction manual

Clarke
Clarke CTJ2500QLG Operating & maintenance instructions

Valex
Valex 1650520 Translation of the original instructions


