REALINN RL0023 User manual


Please read the instructions carefully before using this product, and operate according
to the instructions. It is recommended that you keep this manual for future reference
Do not disassemble the device or tear off the sealing label from the device, otherwise
the product warranty will be invalidated
All the pictures in this manual are for reference only, the actual product may be
different. The information contained here is subject to change without notice
If you have any question or concern about the operation of the scanner, please contact
us at following Email:
server@realinn.cn
realinn@126.com
It is recommended that you send us the product model and specific questions.
Customer services will find out the problem according to your description,and then
provide you with a solution.

Contents
Technical Parameter
.......................................
1
Scanner Appearance
.......................................
2
Installation Method
.......................................
2
Scanning Tip
.......................................
3
Maintenance
.......................................
3
Optional Function Settings
.......................................
4
1.Restore Factory Setting
.......................................
4
2. Illuminator Setting
.......................................
5
3. Aiming Light Setting
.......................................
5
4. Scanning Mode
.......................................
6
5.Barcode Upload Speed Adjustment
.......................................
6
6.Reread Timeout
.......................................
7
7.Scanner Version
.......................................
7
8.Voice Setting
.......................................
8
9.Auto Power Off setting
.......................................
9
10.Communication Interface Setting
.......................................
11
11.Function Key Setting
.......................................
11
12.Case Setting
.......................................
13
13.End Character Setting
.......................................
13
14.Identify Barcode Type(Code ID)
.......................................
14
15.AIM ID Setting
.......................................
15
16.Keyboard Language Setting
.......................................
16
17.Bar Code Parameter Setting
.......................................
17
18.Insert Prfix & Suffix
.......................................
23
19.Delete Character
.......................................
27
ASCII Table
.......................................
31

1
Technical Parameter
Mfr P/N
EP2300
Image sensor
640*48 CMOS
Illumination
White LED
Interface
USB
Printing Contract
≥20% Minimum Reflectance Difference
Typical Decode Range
EAN-13 (13mil) 45mm~200mm(Size:31mm*7mm)
PDF417 (6mil) 30mm~135mm(Size:14mm*7mm)
Code39 (5mil) 40mm~120mm(Size:27mm*8mm)
Data Matrix (10mil) 30mm~140mm(Size:5mm*5mm)
QR Code (15mil) 30mm~200mm(Size:10mm*10mm
Dimension(mm)
55.5(W)×50.5(D)×24(H)
Working Voltage
5 VDC±5%
Operating
-10℃~+60℃
Storage Temperature
-40℃~+70℃
Operating Humidity
5%~95%(No condensation)
Ambient Light
0~100,000LUX
Applicable Barcode Type
1D: Codabar、Code 39、Code 32、Interleaved 2 of 5 、
Industrial 2 of 5、Matrix 2 of 5、Code 93、Code 11、Code
128、GS1-128、UPC-A、UPC-E、EAN/JAN-8、EAN/JAN-13、
GS1 DataBar(RSS14)、Standard 2 of 5 etc.
2D:PDF417、Micro PDF417、QR Code、Micro QR、Data
Matrix、Aztec etc.
2
Packing list
•Module*1
•USB Cable*1
•Quick Start Guide*1
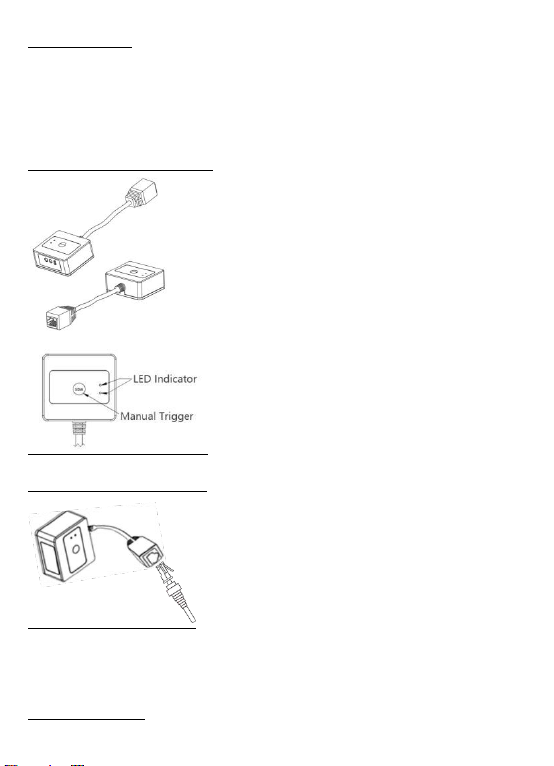
Scanner Appearance
Installation Method
The scanner connect the computer via USB cable.Pressing the yellow button to turn on
the scanner.
Scanning Tip

3
If the size of the barcode is small, please move the barcode close to the scanning
window. If the size of the barcode is big, please move the barcode slightly away from
the scanning window for correct reading.If the barcode is highly reflective (for example,
the coated surface), you may need to tilt the barcode at an angle to successfully scan it.
Maintenance
* The window must be kept clean, the supplier do not bear the guarantee responsibility
due to the improper maintenance.
* Avoid the window being wear and tear or scratched by hard object
* Use the hairbrush to remove the stain on the window
* Clean the window with a soft cloth, such as lens cleaning cloth
* Spraying liquid onto the window is prohibited.
* Prohibit any cleaning solvents, except for the cleaning water.

4
Optional Function settings
The scan engine is able to read 1D and 2D barcodes from papers/labels or screens.
Settings of the barcode scanner can be changed by scanning the setup barcodes in this
user manual.
1. Restore Factory Setting
All barcode readers have a factory default setting. Reading the setting barcode will
restore all barcode reader property settings to the factory state.
Decoding tone is different.
You are most likely to use this barcode in the following situations:
1,You have forgotten what settings were made for the barcode reader before, and you
do not want to use the previous settings.
2,Accidentally scan to other setting codes, which led to the scanning function can not
be used normally.
Restore Factory Default
Manual Trigger Mode
NOTE:
Scan the setting code to "Restore Factory Default", the scanner will automatically
restart after about 15 seconds and the barcode scanner will turn to continuous
scanning mode.If the user wants to scan the barcode manually,please scan the setting
code"Manual Trigger Mode" .

5
2. Illuminator Setting
Normal Mode(default): the white LED illuminator will light up when scanning barcodes.
Always On: the white LED illuminator will stay on after the scanner is turned on.
Always Off: the white LED illuminator will never light up after the scanner is turned on.
Normal Mode(default)
Always On
Always Off
3. Aiming Light Setting
Aiming light helps users aim at the target barcode. Even if the aiming light is turned off,
the scanner can still read the barcode.
Normal Mode(default): the aiming light will light up when scanning barcodes.
Always On: the aiming light will stay on after the scanner is turned on.
Always Off: the aiming light will never light up after the scanner is turned on.
Normal Mode
Always On
Always Off

6
4. Scanning Mode
4.1 Manual Trigger Mode
In this scanning mode, users need to manually press the yellow “scan”button to read
barcodes.
Manual Trigger Mode
4.2 Auto-sensing Mode
Auto-sensing Mode
4.3 Continuous Scanning Mode
Continuous Scanning Mode
5. Barcode Upload Speed Adjustment
Users can change the barcode upload speed of the scanner through the following
setting codes.
High Speed
Medium Speed
Low Speed
Table of contents
Popular Control Unit manuals by other brands

Festo
Festo Compact Performance CP-FB6-E Brief description

Elo TouchSystems
Elo TouchSystems DMS-SA19P-EXTME Quick installation guide

JS Automation
JS Automation MPC3034A user manual

JAUDT
JAUDT SW GII 6406 Series Translation of the original operating instructions

Spektrum
Spektrum Air Module System manual

BOC Edwards
BOC Edwards Q Series instruction manual

KHADAS
KHADAS BT Magic quick start

Etherma
Etherma eNEXHO-IL Assembly and operating instructions

PMFoundations
PMFoundations Attenuverter Assembly guide

GEA
GEA VARIVENT Operating instruction

Walther Systemtechnik
Walther Systemtechnik VMS-05 Assembly instructions

Altronix
Altronix LINQ8PD Installation and programming manual


