Rebel Comp KOM1055 User manual

COMP
model: KOM1055, KOM1056
WEBCAM
WITH MICROPHONE
OWNER’S
MANUAL
DE EN PL RO
Extended version

DE DE
2
SICHERHEITSANLEITUNGEN
1. Schützen Sie dieses Gerät vor Wasser, Feuchtigkeit und
andere Flüssigkeiten und direkter Sonneneinstrahlung.
Vermeiden Sie die Benutzung/Auewahrung in extremen
Temperaturen.
2.Schließen Sie das Gerät an den funktionierenden USB-
Steckplatz an. Das Anschließen des Geräts an einen
beschädigten USB-Steckplatz kann zu unsachgemäßen
Funktionieren oder Beschädigung des Geräts führen.
. Verhindern Sie, dass das Gerät auf den Boden fällt oder
starken Stößen ausgesetzt wird.
4. Benutzen Sie das Gerät nicht an Orten, wo es verboten ist,
dieses zu benutzen oder, wenn es zu Störungen kommen
oder Gefahr entstehen kann.
5.Verwenden Sie dieses Gerät nicht, wenn es beschädigt
wurde und nicht richtig funktioniert.
6.Versuchen Sie nicht dieses Gerät selbst reparieren. Im Falle
einer Beschädigung wenden Sie sich zur Überprüfung oder
Reparatur an einen autorisierten Kundendienst.
7. Trennen Sie das Produkt vor der Reinigung immer von der
Stromquelle.
8.Reinigen Sie das Gerät mit einem weichen, trockenem Tuch
PRODUKTBESCHREIBUNG
1. Kamerasensor
2.Mikrofon
. Drehständer
4. Betriebsanzeige (Nur KOM1056 Modell)
5.Aktivitätsanzeige (Nur KOM1056 Modell)
3
2
15 4
3
21
KOM1055 KOM1056

DE DE
4 5
MONTAGE AM MONITOR
1. Önen Sie den Drehständer.
2.Setzen Sie die Kamera am Rande des Monitors.
. Stabilisieren Sie die Kamera auf der Rückseite des Monitors.
BETRIEB
1. Schließen Sie den USB-Stecker an den kompatiblen USB-
Steckplatz eines Computers an.
2.Schließen Sie den ,5-mm-Klinkenstecker an den
Mikrofoneingang an (nur Modell KOM1055).
. Das Betriebssystem erkennt die Kamera. Nach einer Weile
ist die Kamera einsatzbereit.
4. Stellen Sie sicher, dass die Kommunikations-Anwendung
ordnungsgemäß konfiguriert ist.
KONFIGURATIONFÜRKOMMUNIKATIONS-ANWENDUNGEN
Skyp
1. Drücken Sie auf das Symbol Drei Punkte.
2.Drücken Sie auf die Taste Einstellungen.
. Gehen Sie zu Audio & Video.
4. Im Kamerabereich wählen Sie die Webkamera aus: “HD
2MP WEBCAM”.
5.Im Mikrofonbereich wählen Sie das Mikrofon aus: “Mikrofon
(USB Microphone)”.

DE DE
6 7
Microsoft T ams
1. Drücken Sie auf das Benutzerbild / Initialen des Benutzers.
2.Drücken Sie auf die Taste Einstellungen.
. Gehen Sie zu Geräte.
4. Im Mikrofonbereich wählen Sie das Mikrofon aus: “Mikrofon
(USB Microphone)”.
5.Im Kamerabereich wählen Sie die Webkamera aus: “HD
2MP WEBCAM”.
Zoom
1. Drücken Sie auf das Symbol Einstellungen unter dem
Benutzerbild / Initialen des Benutzers.

DE DE
8 9
2.Gehen Sie zum Abschnitt Video und erweitern die
Kameraliste. Wählen Sie "HD 2MP WEBCAM".
. Gehen Sie zum Abschnitt Audio und erweitern die
Mikrofonliste. Wählen Sie "Mikrofon (USB-Microphone)".
• Hinweis: Die Standardeinstellung für die Sprachaktivierung
ist Drücken der Leertaste. Um die Sprachaktivierung
auszuschalten, Desaktivieren das Kontrollkästchen
(Markiert am Bildschirmfoto).
Discord
1. Drücken Sie die Taste Benutzereinstellungen neben dem
Benutzerbild.
2.Im Abschnitt Sprache & Video erweitern Sie die Liste der
Eingabegeräte. Wählen Sie "Mikrofon (USB-Microphone)”.
• Die Sprachkommunikation kann über eine Taste oder über
die Sprachaktivität aktiviert werden. Aktivieren Sie das
Kontrollkästchen neben der ausgewählten Option.

DE DE
10 11
Deutsch
Korrekte Entsorgung dieses Produkts
(Elektromüll)
(Anzuwenden in den Ländern der Europäischen Union und
anderen europäischen Ländern mit einem separaten Sammelsystem)
Die Kennzeichnung auf dem Produkt bzw. auf der dazugehörigen Literatur
gibt an, dass es nach seiner Lebensdauer nicht zusammen mit dam
normalem Haushaltsmüll entsorgt werden darf. Entsorgen Sie dieses Gerät
bitte getrennt von anderen Abfällen, um der Umwelt bzw. der menschlichen
Gesundheit nicht durch unkontrollierte Müllbeseitigung zu schaden.
Recyceln Sie das Gerät, um die nachhaltige Wiederverwertung von
stoichen Ressourcen zu fördern. Private Nutzer sollten den Händler, bei
dem das Produkt gekauft wurde, oder die zuständigen Behörden
kontaktieren, um in Erfahrung zu bringen, wie sie das Gerät auf
umweltfreundliche Weise recyceln können. Gewerbliche Nutzer sollten sich
an Ihren Lieferanten wenden und die Bedingungen des Verkaufsvertrags
konsultieren. Dieses Produkt darf nicht zusammen mit anderem
Gewerbemüll entsorgt werden.
Hergestellt in China für LECHPOL ELECTRONICS Sp. z o.o. Sp.k.,
ul. Garwolińska 1, 08-400 Miętne.
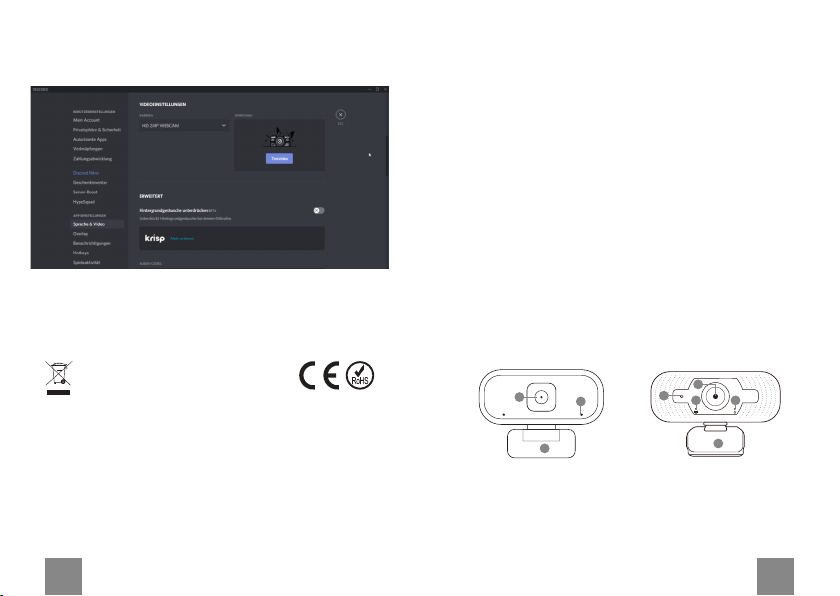
. Blättern Sie hinunter zum Abschnitt Videoeinstellungen.
4. Erweitern Sie die Kameraliste. Wählen Sie "HD 2MP
WEBCAM".
EN EN
10 11
SAFETY INSTRUCTIONS
1. Protect this device from water, humidity and other liquids.
Avoid using/storing it in extreme temperatures. Do not
expose it to direct sunlight.
2.Connect the device to working USB port. Connecting the
device to damaged USB port may result in improper work or
damaging the device.
. Protect this device from shock and being dropped.
4. Do not use this product in places, where it is forbidden to
use electronic devices.
5.Do not use this device if it has been damaged and
malfunctions.
6.Do not attempt to repair this device yourself. In case of
damage, contact authorized service point for check-up or
repair.
7. Always disconnect the product from the power source
before cleaning.
8.Use dry piece of cloth to clean this product.
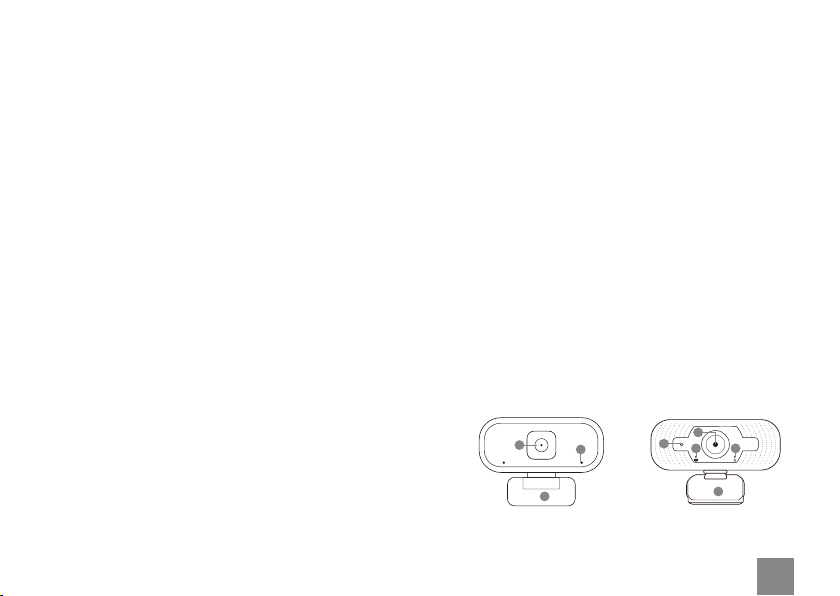
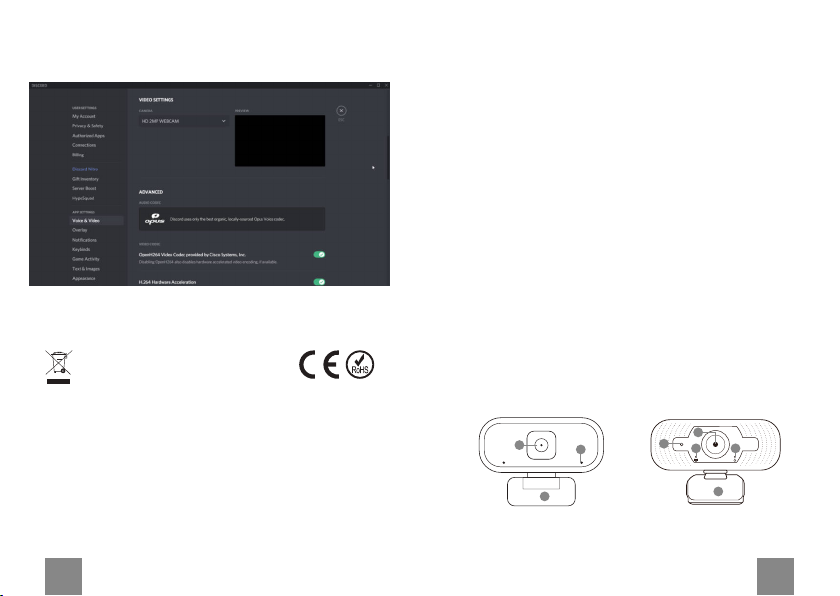
PRODUCT DESCRIPTION
1. Camera sensor
2.Microphone
. Mount
4. Power indicator (KOM1056 model only)
5.Activity indicator (KOM1056 model only)
MOUNTING ON A MONITOR
1. Open the mount.
2.Place the camera on the edge of a monitor.
. Stabilize the camera on the back of a monitor.
3
2
15 4
3
21
KOM1055 KOM1056

OPERATION
1. Connect the USB plug to the compatible USB port of a
computer.
2.Connect the ,5 mm jack plug to the microphone input
(KOM1055 model only).
. The operating system will detect the camera. After a while,
the camera is ready to use.
4. Make sure that the communication application is configured
properly.
CONFIGURATION FOR COMMUNICATION APPS
Skyp
1. Press the three dots icon.
2.Press the Settings button.
EN EN
12 1
. Go to Audio & Video tab.
4. In Camera section select the “HD 2MP WEBCAM”.
5.In Microphone section select the “USB Microphone”.

Microsoft T ams
1. Press the avatar/initials of the user.
2.Press the Settings button.
EN EN
14 15
. Go to Devices tab.
4. In Microphone section select the “USB Microphone”.
5.In Camera section select the “HD 2MP WEBCAM”.
Zoom
1. Press the Settings icon below the avatar/initials of the user.

2.Go to Video section and expand the Camera list. Select “HD
2MP WEBCAM”.
. Go to Audio section and expand the Microphone list. Select
“USB Microphone”.
• Note: the default setting of voice activation is pressing the
space button. To turn it o, uncheck the box marked on the
screenshot.
EN EN
16 17
Discord
1. Press the User Settings button next to the user’s avatar.
2.In Voice & Video tab expand the Input device list. Select
“USB Microphone”.
• Voice communication can be enabled with a button or with
the voice activity. Tick the box next to selected option.

EN EN
18 19
. Scroll down to the Video settings section.
4. Expand the Camera list. Select “HD 2MP WEBCAM”.
English
Correct Disposal o This Product
(Waste Electrical & Electronic Equipment)
(Applicable in the European Union and other European countries with
separate collection systems) This marking shown on the product or its
literature, indicates that it should not be disposed with other household
wastes at the end of its working life. To prevent possible harm to the
environment or human health from uncontrolled waste disposal, please
separate this from other types of wastes and recycle it responsibly to
promote the sustainable reuse of material resources. Household users
should contact either the retailer where they purchased this product, or their
local government oce, for details of where and how they can take this item
for environmentally safe recycling. Business users should contact their
supplier and check the terms and conditions of the purchase contract. This
product should not be mixed with other commercial wastes for disposal.
Made in China for LECHPOL ELECTRONICS Sp. z o.o. Sp.k., ul. Garwolińska 1,
08-400 Miętne.
KWESTIE BEZPIECZEŃSTWA
1. Produkt należy chronić przed wilgocią, wodą oraz innymi
płynami. Nie należy używać ani przechowywać urządzenia
w zbyt wysokich temperaturach. Produkt należy chronić
przed bezpośrednim nasłonecznieniem.
2.Urządzenie należy podłączać do sprawnych portów USB.
Podłączenie urządzenia do uszkodzonego portu USB grozi
niewłaściwym działaniem lub uszkodzeniem urządzenia.
. Urządzenie należy chronić przed silnymi wstrząsami i
upadkami.
4. Nie należy używać urządzeniach w miejscach, gdzie
zabronione jest korzystanie z urządzeń elektronicznych.
5.Nie należy używać produktu, jeśli został uszkodzony lub nie
działa poprawnie.
6.Zabrania się własnoręcznej naprawy sprzętu. W wypadku
uszkodzenia, należy skontaktować się z autoryzowanym
punktem serwisowym w celu sprawdzenia/naprawy.
7. Należy ZAWSZE odłączyć urządzenie od źródła zasilania
przed czyszczeniem.
8.Do czyszczenia należy używać suchej ściereczki.
OPIS URZĄDZENIA
1. Sensor kamery
2.Mikrofon
. Uchwyt
4. Wskaźnik zasilania (tylko model KOM1056)
5.Wskaźnik aktywności kamery (tylko model KOM1056)
3
2
15 4
3
21
KOM1055 KOM1056
PL PL
18 19

MONTAŻ NA MONITORZE
1. Otworzyć uchwyt.
2.Ustawić kamerę na krawędzi monitora.
. Ustabilizować kamerę na tylnej obudowie monitora.
OBSŁUGA
1. Podłączyć kabel USB do kompatybilnego portu USB
komputera.
2.Podłączyć kabel Jack ,5 mm do wejścia mikrofonu
komputera (tylko model KOM1055).
. System operacyjny wykryje kamerę. Po chwili kamera jest
gotowa do użycia.
4. Należy upewnić się, że program do komunikacji jest poprawnie
skonfigurowany.
KONFIGURACJA PROGRAMÓW KOMUNIKACYJNYCH
Skyp
1. Nacisnąć ikonę trzech kropek.
2.Nacisnąć przycisk Ustawienia.
. Przejść do zakładki Dźwięk i obraz.
4. W sekcji Kamera należy wybrać „HD 2MP WEBCAM”.
5.W sekcji Mikrofon należy wybrać „USB microphone”.
PL PL
20 21

Microsoft T ams
1. Nacisnąć awatar/inicjały użytkownika.
2.Nacisnąć przycisk Ustawienia.
. Przejść do zakładki Urządzenia.
4. W sekcji Mikrofon należy wybrać „USB Microphone”.
5.W sekcji Kamera należy wybrać „HD 2MP WEBCAM”.
PL PL
22 2

Zoom
1. Nacisnąć symbol ustawień znajdujący się pod awatarem/
inicjałami użytkownika.
2.W zakładce Video należy wybrać z listy „HD 2MP
WEBCAM”.
. W zakładce Audio należy wybrać „USB Microphone”
• Należy pamiętać, że domyślnym ustawieniem jest aktywacja
głosu po naciśnięciu klawisza spacji. Wyłączenie tego
ustawienia jest zaznaczone na zrzucie ekranu poniżej.
Discord
1. Nacisnąć symbol ustawień znajdujący się po prawej od
awatara użytkownika.
PL PL
24 25

2.W zakładce Głos i wideo należy rozwinąć listę Urządzenie
nagrywania. Wybrać „USB Microphone”
• Komunikację głosową w trakcie rozmowy można włączyć
przy pomocy przycisku lub wykrywania głosu. Odpowiednią
opcję można zaznaczyć w sekcji Tryb wprowadzania.
. Przewinąć w dół do sekcji Ustawienia wideo.
4. Z listy Kamera należy wybrać „HD 2MP WEBCAM”. Poland
Prawidłowe usuwanie produktu
(zużyty sprzęt elektryczny i elektroniczny)
Oznaczenie umieszczone na produkcie lub w odnoszących się do
niego tekstach wskazuje, że po upływie okresu użytkowania nie należy
usuwać z innymi odpadami pochodzącymi z gospodarstw domowych. Aby
uniknąć szkodliwego wpływu na środowisko naturalne i zdrowie ludzi
wskutek niekontrolowanego usuwania odpadów, prosimy o oddzielenie
produktu od innego typu odpadów oraz odpowiedzialny recykling w celu
promowania ponownego użycia zasobów materialnych jako stałej praktyki.
W celu uzyskania informacji na temat miejsca i sposobu bezpiecznego dla
środowiska recyklingu tego produktu użytkownicy w gospodarstwach
domowych powinni skontaktować się z punktem sprzedaży detalicznej, w
którym dokonali zakupu produktu, lub z organem władz lokalnych.
Użytkownicy w firmach powinni skontaktować się ze swoim dostawcą i
sprawdzić warunki umowy zakupu. Produktu nie należy usuwać razem z
innymi odpadami komercyjnymi.
Wyprodukowano w CHRL dla LECHPOL ELECTRONICS Sp. z o.o. Sp.k.,
ul. Garwolińska 1, 08-400 Miętne.
PL PL
26 27

INSTRUCȚIUNI PRIVIND SIGURANȚA
1. Feriți dispozitivul de apă, umiditate și alte lichide. Evitați
utilizarea/depozitarea aparatului la temperaturi extreme. Nu
îl expuneți la lumina directă a soarelui.
2.Conectați dispozitivul la un port USB funcțional. Conectarea
dispozitivului la un port USB deteriorat poate duce la
rezultate necorespunzătoare sau la deteriorarea
dispozitivului.
. Nu lăsați dispozitivul să cadă sau să fie lovit.
4. Nu utilizați acest produs în locuri unde este interzisă
utilizarea produselor electronice.
5.Nu utilizați dispozitivul dacă este deteriorat sau dacă are
defecțiuni.
6.Nu încercați să reparați singur produsul. În caz de
deteriorare, contactați un service autorizat pentru verificare
sau reparații.
7. Deconectați întotdeauna produsul de la sursa de alimentare
înainte de curățare.
8.Utilizați un material textil uscat pentru a curăța acest produs.
DESCRIEREA PRODUSULUI
1. Senzor cameră
2.Microfon
. Suport
4. Indicator alimentare (doar pentru modelul KOM1056)
5.Indicator activitate (doar pentru modelul KOM1056)
MONTAREA PE MONITOR
1. Deschideți suportul.
3
2
15 4
3
21
KOM1055 KOM1056
2.Puneți camera pe marginea monitorului.
. Fixați camera pe spatele monitorului.
FUNCȚIONARE
1. Coenctați mufa USB la port-ul USB compatibil al unui
calculator.
2.Conectați mufa jack de ,5 mm la intrarea microfonului (doar
pentru modelul KOM1055).
. Sistemul de operare va detecta automat camera. După un
timp, camera este gata de utilizare.
4. Asigurați-vă că aplicația de comunicare este configurată
corect.
CONFIGURARE PENTRU APLICAȚII DE COMUNICARE
Skyp
1. Apăsați pe pictograma cu trei puncte.
2.Apăsață butonul Settings (Setări).
RO RO
28 29

. Accesați fila ”Audio & Video”.
4. În secțiunea ”Camera” selectați ”HD 2MP WEBCAM”.
5.În secțiunea ”Microphone” (Microfon) selectați ”USB
Microphone” (Microfon USB).
RO RO
0 1
Microsoft T ams
1. Apăsați avatarul/inițialele utilizatorului.
2.Apăsați butonul Settings (Setări).

. Accesați fila Devices (Dispozitive).
4. În secțiunea ”Microphone” (Microfon) selectați ”USB
Microphone” (Microfon USB).
5.În secțiunea ”Camera” selectați ”HD 2MP WEBCAM”.
Zoom
1. Apăsați pictograma Settings (Setări) de sub avatarul/
inițialele utilizatorului.
RO RO
2
2.Accesați secțiunea Video și extindeți lista Camera. Selectați
“HD 2MP WEBCAM”.
. Accesați secțiunea Audio și extindeți lista Camera. Selectați
“USB Microphone”.
• Notă: setarea implicită a activării vocale este apăsarea
butonului spațiu. Pentru a o dezactiva, debifați caseta
marcată pe captura de ecran.

Discord
1. Apăsați butonul User Settings (Setări utilizator) de lângă
avatarul utilizatorului.
2.În fila ”Voice & Audio” extindeți lista dispozitivelor de intrare.
Selectați “USB Microphone”.
• Comunicarea vocală poate fi activată cu un buton sau cu
activitatea vocală. Bifați caseta de lângă opțiunea
selectată.
RO RO
4 5
Romania
Reciclarea corecta a acestui produs
(reziduuri provenind din aparatura electrica si electronica)
Marcajale de pe acest produs sau mentionate in instructiunile sale de
folosire indica faptul ca produsul nu trebuie aruncat impreuna cu alte
reziduuri din gospod arie atunci cand nu mai este in stare de functionare.
Pentru a preveni posibile efecte daunatoare asupra mediului inconjurator
sau a san ata tii oamenilor datorate evacuarii necontrolate a reziduurilor, vă
rugăm să separați acest produs de alte tipuri de reziduuri si să-l reciclati in
mod responsabil pentru a promova refolosirea resurselor materiale.
Utilizatorii casnici sunt rugati să ia legatura fie cu distribuitorul de la care au
achizitionat acest produs, fie cu autoritatile locale, pentru a primi informatii
cu privire la locul si modul in care pot depozita acest produs in vederea
reciclarii sale ecologice. Utilizatorii institutionali sunt rugati să ia legatura cu
furnizorul și să verifice condițiile stipulate in contractul de vanzare. Acest
produs nu trebuie amestecat cu alte reziduuri de natura comerciala.
Distribuit de Lechpol Electronic SRL, Republicii nr. 5, Resita, CS, ROMANIA
. Derulați în jos până la secțiunea Video settings (Setări
video).
4. Extindeți lista Camera. Selectați “HD 2MP WEBCAM”.

www.rebelelectro.com
This manual suits for next models
1
Table of contents
Languages: