Recon JET User manual

RECON JET
Owner’s Manual
ReconOS4.2.1 and up
Assembled in USA

I
SAFETY INFORMATION
IMPORTANT SAFETY INFORMATION
READ BEFORE USING RECON JET
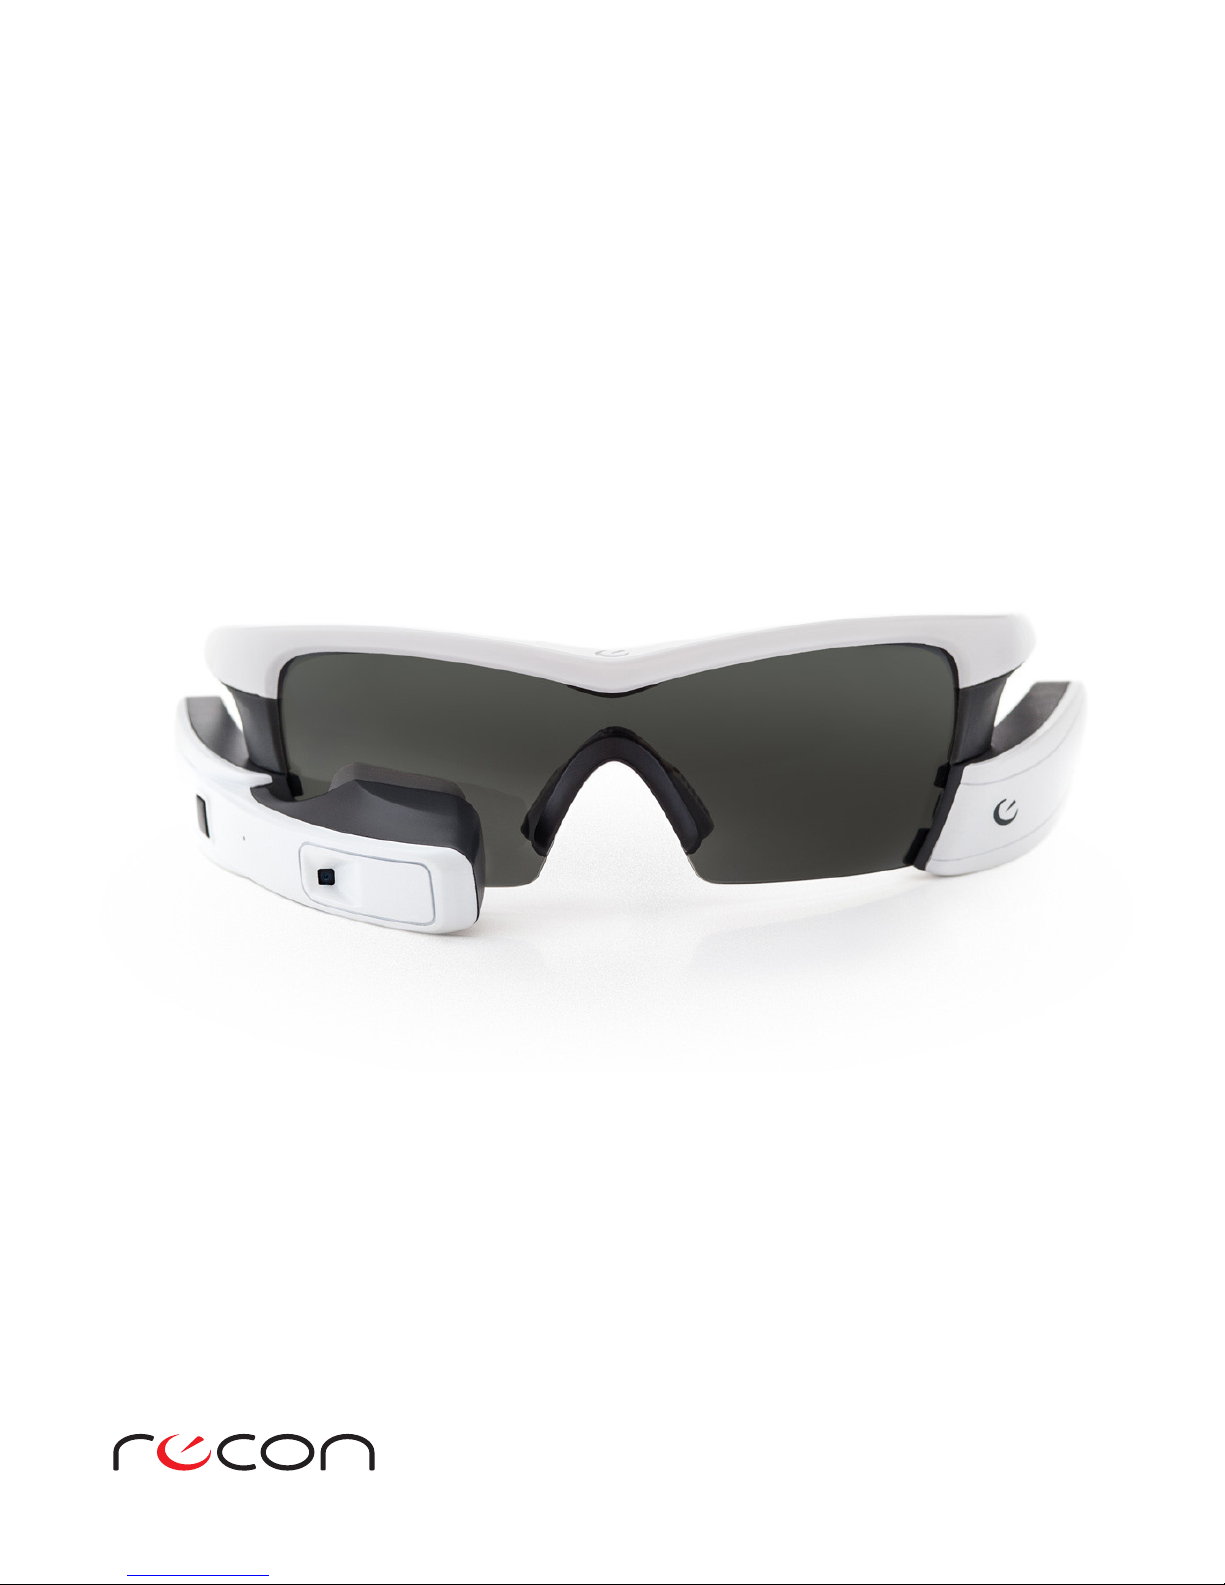
Jet is designed to enhance your sports and tness experience. If used improperly (e.g. when cycling without paying attention
to the road), Jet may cause you to get in an accident that could result in property damage, serious injury, or death. Always pay
attention to the road. Do not focus on Jet’s display and become distracted from your surroundings. Ride safe and have fun.
Please read and understand these warnings before using Jet. If you have any questions about how to use Jet safely, contact
Recon Customer Support at [email protected]om, or call us at 1.877.642.2486. Support hours are 6:00am to
5:30pm PST, 7 days a week.
1. Don’t get distracted. Keep your eyes on the road. Jet’s display sits just below your right eye, but that does not mean you
can stare at it and still see everything on the road. Focusing on the display may cause you to miss cars, road debris, and other
hazards, which may reduce or eliminate your ability to avoid an accident. Jet’s display and the information delivered on it
are designed for quick access. Glance at Jet’s display quickly, in the same way you would glance at your car’s dashboard or
rearview mirror, and do so only when you are sure that you are safe from traic and other hazards.
Jet displays dierent types of information than your cycling computer or other tness tracking devices. For example, Jet may
display text notications and alerts during your activity. Jet apps developed by third parties may add features like e-mail
notications, as well. Be aware that focusing on such information can compromise your safety and the safety of those around
you. Use sound judgment, and keep your attention focused on your surroundings, not Jet’s display.
Don’t let Jet’s map and navigation features distract you from the road. Those features are intended to be accessed with a
glance, not stared at or studied during your activity. Be aware of your surroundings at all times. If you need to focus on maps
or other features, stop in a safe area to ensure your safety and the safety of those around you.
2. Attention tunneling. Attention tunneling is a phenomenon whereby your brain focuses on some inputs to the exclusion
of others. For example, focusing on Jet’s display may cause your brain to ignore other inputs, such as oncoming cars, even
though your eyes may see them. Attention tunneling can cause you to miss hazards or to have delayed reaction times. Avoid
attention tunneling by keeping your focus on the road and glancing at the display quickly when you know you are safe from
cars and other hazards.
3. Increased reaction time. Viewing the display, even for a split second, may increase the time it takes to notice and react to
hazards. Only glance at the display when you are clear of traic, pedestrians, and road hazards.
4. Blind spot. Jet’s display sits slightly below your right eye so that you can glance at it easily. Be aware that the display
creates a blind spot in your eld of view. Be aware of the position of Jet’s display, and scan for hazards in order to see objects
in the blind spot.
Due to its position on the right side of the face, Jet’s display aects your view when looking to your right. Users in countries
where cars drive on the le side of the road, or users in situations where traic is on the right, need to be especially aware of
the blind spot when shoulder-checking for hazards.
5. Reduced peripheral vision. Jet’s battery and engine may reduce your peripheral vision and your ability to detect hazards
coming from behind you or from the side. Be aware of this risk and scan for hazards accordingly.
6. Jet is not a set of safety goggles. Jet’s lenses are impact-resistant, but they may not protect you from all impacts. If
engaging in activities for which eye protection is required or advisable, do not use Jet. Instead, use certied safety glasses.
7. Face injury. Impacts to Jet can cause injuries to the face. This applies to any eyewear or device worn on the face. Be mindful
of this risk.
8. When cycling, keep your hands on the handlebars at all times. Your hands must be on the handlebars in order for you to
control the bike. Don’t lose control and cause an accident by ddling with Jet while riding. Set up your preferences before the
ride so that Jet displays the desired information without requiring you to take your hands o the bars. If you have to change
settings or interact with Jet mid-ride, stop in a safe place before doing so.

II
9. Wear a properly tted helmet. Protect your brain. Wear a helmet that ts your head. Make sure Jet ts properly and does
not interfere with your helmet. Wearing a helmet improperly can compromise its ability to protect your head in an accident.
Follow the helmet manufacturer’s directions for proper t. If you cannot wear Jet and your helmet together, try a new helmet
or return Jet.
10. Motion sickness. Some people are more susceptible to motion sickness than others. In rare cases, looking at the display
even for a second may cause nausea, dizziness, or other discomfort. If you experience any of these symptoms, stop using Jet.
11. Overheating. Jet should not overheat or cause thermal discomfort during normal use. If Jet causes any thermal
discomfort or seems hotter than normal, stop using it and contact Recon for assistance. Wearing overheating electronics can
cause skin damage.
12. Don’t overcharge the battery. Don’t overcharge Jet’s battery. Overcharging the battery can damage it, which can lead to
re or explosions. Read the instructions on proper battery charging carefully. If the battery exhibits any visible damage, or if it
overheats during charging, stop using Jet immediately and unplug the charger.
13. Don’t use a leaking battery. The battery could leak if punctured or damaged, which could result in a re or in the rapid
release of pressurized gas. Stop using Jet immediately if you see any signs of battery damage. Do not use Jet again until the
battery is replaced or repaired.
14. Avoid electric shock. Water and electricity don’t mix. Only plug Jet into an electrical source or computer when Jet, the
USB cable, the AC adapter, the computer, and YOU are dry. If you or any components are wet, you may experience an electric
shock. Electricity can hurt or kill you.
15. Allergies to plastic. If you have plastic allergies, the plastic used on Jet’s surfaces (including the frame, ear stems,
nosepiece, electronics, and battery module) may cause an allergic reaction or skin irritation. If you have a plastic allergy,
consult your doctor before using Jet. If you have an allergic reaction when using Jet, stop using it immediately and see
your doctor.
16. Binocular rivalry. Jet’s display shows an image to one eye only. If you look at the display for extended periods of time,
you may develop “binocular rivalry,” which manifests as eye strain. Glance at the screen for only very brief periods of time.
Do not stare at the screen. If you feel eye strain or discomfort, stop using Jet immediately. If the condition persists, see your
doctor.
17. Don’t take unnecessary risks. Enjoy Jet responsibly. Having instant access to performance data and activity information
is motivating. Manage your motivation and exercise responsibly. Obey all traic regulations and speed limits. Do not take
unlawful or ill-advised risks. Always maintain control. Be aware of your surroundings, your safety, and the safety of others.
Failure to use Jet responsibly could result in accident, injury, or death for you or others.
18. Lens warnings and important safety instructions. Recon Instruments eyewear should not be used to look directly at
the sun or at strong articial light sources. Unless tted with lter category 0 lenses, the eyewear should not be used in dimly
lit environments, especially at dawn, at dusk, or at night. Spectral lenses (e.g. Spectral Red) and lter category 4 lenses are
designed for performance applications and may make traic signals hard to recognize. Those lenses are therefore not suitable
for road use. If the eyewear obstructs your normal eld of vision, do not wear it while driving. While Recon Jet eyewear meets
or exceeds relevant impact resistance safety standards, it should not be used for high-risk impact sports or in industrial
environments where eye protection is required.

III
CONTENTS
SAFETY INFORMATION I
WELCOME 1
JET SYSTEM FEATURES (ENGINE) 1
WHAT’S IN THE BOX 1
SETTING UP JET 2
ADJUSTINGTHEEARSTEMS ........................................................................3
ADJUSTINGTHENOSEPIECE ........................................................................3
ADJUSTINGTHEDISPLAY ...........................................................................3
PARTS ASSEMBLY 4
BATTERY .........................................................................................4
LENS ............................................................................................4
NOSEPIECE.......................................................................................5
MAINTENANCE 6
EYEWEAR AND COSMETIC SURFACES .................................................................6
STORINGYOURDEVICE.............................................................................6
GET STARTED / ACTIVATE YOUR JET 6
GET CONNECTED - RECON ENGAGE 7
GET CONNECTED - RECON ENGAGE MOBILE APP 7
ACTIVITYFEED ....................................................................................8
FRIENDTRACKING.................................................................................8
SMARTPHONECONNECTION ........................................................................8
USING JET 9
FEATURES........................................................................................9
HOMEMENU......................................................................................9
SHORTCUTS .....................................................................................10
CUSTOMIZATION..................................................................................10
TRACKINGANEWACTIVITY.........................................................................10
VIEWING AND SAVING AN ACTIVITY IN PROGRESS. . . . . . . . . . . . . . . . . . . . . . . . . . . . . . . . . . . . . . . . . . . . . . . . . . . . . .11
DASHBOARDANDMYAPPS ........................................................................11
SENSORS 12
CONNECTANANT+DEVICE ........................................................................12

IV
TROUBLESHOOTING 13
GPS.............................................................................................13
ASSISTEDGPS(AGPS).............................................................................13
SCREENBRIGHTNESS ............................................................................13
BATTERY ........................................................................................13
FACTORYRESET..................................................................................14
FIRMWAREUPDATES..............................................................................14
SUPPORT 14
WARRANTY 14
BATTERY DISPOSAL INFORMATION 15
DEVICE INFORMATION 15
TECHNICALSPECIFICATIONS.......................................................................15
COMPLIANCE INFORMATION 16

1
WELCOME
Recon Jet is smart eyewear for your active
lifestyle. Jet delivers real-time information
instantly, eortlessly, and unobtrusively
via its integrated computer and widescreen
display, positioned just below your right eye.
Our companion web platform and mobile
app allow you to track, compare, and share
your outdoor adventures.
WHAT’S IN THE BOX
1 x Recon Jet smart eyewear including:
• 1 x Jet frame
• 1 x Jet engine
• 1 x Jet battery
• 1 x Micro-USB cable
• 1 x Microber cloth
• 1 x Hangar carry case
Optical Touchpad
• Use the optical touchpad to navigate Jet.
• Swipe forward and back on the optical touchpad to
navigate horizontal menu items.
• Explore vertical menus by swiping up and down on
the optical touchpad.
SELECT Button
• Use the SELECT button to interact with screens and
menus.
• Press and hold the SELECT button for 3 seconds to
open the Quick Nav menu.
BACK/POWER Button
• Use the BACK/POWER button to go to the previous
screen.
• Press and hold the BACK/POWER button for 3 seconds
to power Jet on. Hold for 7 seconds to power Jet o.
• Press and hold the BACK/POWER button for 3
seconds to access the Options menu.
JET SYSTEM FEATURES (ENGINE)
Micro-USB Port
Open the cover to access Jet’s Micro-USB port and to
connect Jet to a computer or charger.
Status Indicator LED
Red indicates Jet is powered o and charging. White
indicates Jet is powered on. Pink indicates Jet is
powered on and charging.
Display Control Column
Use the Display Control Column to make sure the
display is positioned optimally.
Display
Jet’s display appears as a 30” screen at a distance of 7
feet (2 m). It presents all your essential information at
a glance.
HD Camera
Take pictures and record video on the go with Jet’s
built-in camera.
1
1
2
2
3
3
4
4
5
5
6
6
7
7
8
8

2
SETTING UP JET
IMPORTANT
Before going for your rst ride or run with Jet, be sure to spend time familiarizing yourself with the device so that it does not
distract you once you get moving. Jet presents information at a glance. Access this information when it’s safe and convenient
to do so. It’s essential that you become familiar with Jet’s user interface and features, such as Quick Nav, so that you can easily
use the device. For your own safety and the safety of those around you, always be aware of your surroundings.
1. REMOVE THE BATTERY PROTECTOR TAB
To start your Jet experience, remove the white battery
protector tab. Pinch the tab with one hand while securing
Jet with the other. Pull the tab straight up.
2. CHARGE JET
Connect Jet to your computer using the included Micro-
USB cable. The status indicator LED will turn red to indicate
your Jet is charging. The LED will turn o when Jet is fully
charged. It takes about one hour to charge Jet fully.
WARNING:
• Do not attempt to charge Jet with the battery and/or
engine removed.
• Be sure to cover Jet’s Micro-USB port aer charging to
prevent moisture from entering Jet.
4. ACTIVATE YOUR JET
a. Visit reconinstruments.com/getstarted. Create your
Recon Engage account, download the Recon Uplink
desktop app, and get the latest soware for Jet.
b. Download the Recon Engage mobile app to complete
your experience. The app is available from the iOS App
Store and from Google Play.
5. COMPLETE STARTUP TUTORIAL
When using Jet for the rst time, you will be prompted
to watch a short video that will introduce you to Jet’s
interface.
6. TURN OFF JET
To turn Jet o, bring up the Options menu by pressing the
BACK/POWER button for 3 seconds, then select Shutdown.
Alternatively, press and hold the BACK/POWER button until
Jet powers o.
WARNING: Do not attempt to remove Jet’s battery or engine
prior to a complete shutdown. This may damage your Jet
permanently.
3. TURN ON JET
To turn Jet on, press and hold the BACK/POWER button for
about three seconds. Jet’s status indicator LED will turn
white, and the screen will activate aer about ve seconds.

3
ADJUSTING THE DISPLAY
Located on the underside of Jet’s engine is the display
control column, which allows you to adjust Jet’s display
for optimal visibility.
Before adjusting the display, make sure you are wearing
Jet and that the display is on. Then, grip the front of
the engine tightly between your thumb and forenger,
ensuring your thumb is on the display control column.
To adjust the display’s vertical position, push the display
control column forward and back. You should see
the image move up and down. To adjust the display’s
horizontal position, press rmly on the display control
column while twisting it on its axis. You should see the
image move from side to side.
ADJUSTING THE NOSEPIECE
Adjust the nosepiece so that Jet sits comfortably on your
face, with the display just below your line of sight. If you
nd that Jet is sitting too high or too low, you can widen
or narrow the nosepiece accordingly.
ADJUSTING THE EAR STEMS
The so rubber ear stems on Jet’s frame can be adjusted to
the exact contour of your head for a completely secure and
comfortable t.
WARNING:
• Do not attempt to twist the display control column all the way around. The display control column only needs to rotate
a few degrees to adjust the display’s horizontal position. It is not designed to rotate further.
• Jet should not be worn over or under prescription glasses.
• Consult your doctor before wearing Jet if you have any allergies to plastic.
• Adjust Jet’s t so that neither the engine nor the battery is in direct contact with your skin. Failure to do so may cause bruising.
• Do not wear Jet if the lens is broken. Doing so may cause facial injury.
• Using Jet in extreme temperatures (above 1040F/400C or below -40F/-200C) may damage your device permanently.
• Jet is resistant to rain and sweat but is not waterproof. Avoid exposure to very heavy and prolonged rain, as it might damage
the device.
Push in and twist
Push forward and back

4
PARTS ASSEMBLY
Your Jet smart eyewear comes as a pre-assembled unit. This section shows how to safely detach Jet’s components: the
engine, battery, lens, and nosepiece.
WARNING: When removing Jet’s engine or battery, always take care to avoid damaging the frame and the other components.
BATTERY
REMOVING THE ENGINE AND BATTERY
1. Gently push the release tab forward with your thumb.
2. With the release tab pushed forward, swing the battery
or engine inward to release it from the frame.
WARNING: Removing the engine or battery while Jet is on or
charging may cause permanent damage.
RE-ATTACHING THE ENGINE AND BATTERY
1. Hold the engine or battery with one hand. Hold the
frame with your other hand.
2. Line up the groove on the engine or battery with the
corresponding lip on the frame.
3. Gently swing the engine or battery outward until
the release tab snaps into the corresponding slot
on the frame.
LENS
REMOVING THE LENS
1. Make sure you remove Jet’s engine and battery before
removing the lens. (See above).
2. There is a release tab at the center of Jet’s frame. Using
your ngernail, gently pull the release tab all the way
back. This will open the lens release mechanism.
3. Hold the center of the frame with one hand. With your
other hand, grip the nosepiece and nose bridge, then
pull straight down to remove the lens from the frame. If
you have trouble removing the lens, check the release
tab to make sure it’s pulled all the way back.
5mm

5
NOSEPIECE
REMOVING THE NOSEPIECE
1. Hold the lens by its top and bottom edges.
2. Using your other hand, grip one side of the nosepiece
between your thumb and forenger. Make sure you grip
both the nose pad and the plastic clip.
3. Pull the nosepiece outward in a swiveling motion.
REPLACING THE NOSEPIECE
Align the nosepiece with the gap at the bottom of the lens,
and then gently push the nosepiece in. The nosepiece should
snap into place.
REPLACING THE LENS
1. Make sure Jet’s lens release tab is fully extended.
2. Insert the lens into Jet’s frame, starting with the side
closest to you. Insert only one side at a time, and make
sure the middle part of the lens is all the way in before
you continue.
3. Be careful not to unseat the electric circuit that runs
along the edge of the lens. If the circuit comes loose,
press it back into place.
4. Secure the lens by pushing in the release tab until it sits
ush with the frame.

6
MAINTENANCE
Your new Recon Jet is supplied with a woven microber cloth specially designed for storage and cleaning purposes.
EYEWEAR AND COSMETIC SURFACES
Eyewear and cosmetic surfaces should be wiped with the supplied microber cloth and cleaned with fresh water.
Avoid harsh detergents or cleaning uids. Aer cleaning Jet, let it dry in a well-ventilated place or gently blot it dry
using the supplied cloth.
ELECTRICAL CONTACTS (COPPER PINS AND PADS)
If water or moisture gets on the electrical contacts between the lens and the battery and/or engine, power o your Jet, remove
the battery and/or engine, and dab the contacts dry with a tissue or so cloth. Store your Jet with the battery and/or engine
removed to allow the moisture to dry o.
Periodic cleaning of the contacts with rubbing alcohol will ensure there is no buildup of contaminants. If you notice corrosion,
you can clean it o using rubbing alcohol and a so cloth or cotton swab.
Note: Be sure to inspect the contacts before charging, as well.
STORING YOUR DEVICE
Before storing Jet for an extended period of time, make sure the battery is fully charged and detached from the frame.
This will help prolong the life of your battery. Always store Jet in a cool, dry place. The ideal long-term storage temperature
for Jet is between 50°F and 68°F (10°C and 20°C).
WARNING:
• Storing Jet in suboptimal conditions may shorten the battery life and, in some cases, damage Jet permanently.
• Always store your Jet in its original case. Failure to do so may cause the frame to warp.
GET STARTED / ACTIVATE YOUR JET
Before taking your Jet for that rst run or ride, you will need to activate it and link it to your Recon Engage account.
To get started, rst visit reconinstruments.com/getstarted.
You will be walked through the following steps to activate and link your Jet:
1. Register for a Recon Engage account.
2. Download and install the Recon Uplink desktop app on your computer.
3. Power on your Jet and connect it to your Mac or PC.
4. Link Jet to your Engage account. You will be prompted to do this by Recon Uplink.
5. Once you have installed the latest soware version, you’re done. Start piloting your Jet!
Keep track of your activities with the Recon Engage website and Recon Engage mobile app. Check your activity history,
compare your all-time bests, track your friends, and share your unique experiences.

7
GET CONNECTED - RECON ENGAGE
With Jet, your experiences don’t end when you nish your
activity. By connecting Jet to your computer with Recon
Uplink, you can upload your activities to your Recon Engage
account. The Engage website allows you to analyze, relive,
and share your activities. Activities can be shared to social
networks like Facebook and to services like Strava.
Visit engage.reconinstruments.com to learn more, to create
your account, and to get started.
SYSTEM REQUIREMENTS
To activate Jet and keep its soware up-to-date, download
Recon Uplink to a Mac or PC running the following:
• OS X v10.8 or later.
• Windows 7 or later.
GET CONNECTED - RECON ENGAGE MOBILE APP
Additionally, you can pair Jet with your iPhone or Android
smartphone and use the Engage mobile app to enjoy
features like real-time friend tracking, incoming text and
call notications, and automatic activity uploading, all
while on the go.
You can download the Engage mobile app for iOS and
Android from the iOS App Store and Google Play.
OPERATIONAL NOTE: Connecting Jet to your smartphone
via the Recon Engage mobile app before beginning any
activity will ensure Jet’s clock is set to the right time, and it
will initiate Assisted GPS (AGPS), which will make it easier
for Jet to achieve a GPS lock. Using AGPS will prolong battery
life, too.
SYSTEM REQUIREMENTS
To view your activities on the go, install the Recon
Engage mobile app on your smartphone. Engage
supports the following:
• Apple iPhone 4S or later running iOS 7 or higher.
• Any Android smartphone running Android 4.1 or higher.

8
ACTIVITY FEED
The Activity Feed provides an overview of your recent activities as well as your friends’ recent activities.
FRIEND TRACKING
From Live View, enable Friend Tracking to see your friends’ locations and activities in real time.
SMARTPHONE CONNECTION
1. Download the free Recon Engage mobile app from either the iOS App Store or Google Play.
2. On your smartphone, ensure Bluetooth is turned on.
3. On Jet, access the Quick Nav menu by pressing and holding the SELECT button for 3 seconds, then choose Smartphone.
4. Choose your smartphone type, then follow the on-screen instructions to pair your smartphone.
RECONNECT YOUR SMARTPHONE
Once Jet is turned o, or the Recon Engage mobile app has been closed, Jet will disconnect from your smartphone.
To reconnect:
1. On your smartphone, ensure Bluetooth is turned on, and then open the Recon Engage mobile app.
2. On Jet, select Reconnect from the smartphone menu.

9
USING JET
FEATURES
The Home menu is the launchpad for Jet’s main features. Jet also has two shortcut menus, Quick Nav and Options, which
oer instant access to some of Jet’s most important features.
Use the optical touchpad to navigate through each of the following screens. (For more details, see below.)
HOME MENU
Spend time familiarizing yourself with Jet before heading out for a run or ride. Jet’s user interface delivers information at a
glance; your attention should always be focused on the road or trail, not on Jet’s screen. In the same way that you don’t stare
at the dashboard of your car, don’t stare at Jet’s display. Become familiar with Jet’s user interface, how to navigate through
screens, and how to use Quick Nav before going for a run, bike ride, or any other activity.
For your own safety and the safety of those around you, always be aware of your surroundings.
My Apps is where you can personalize your Jet. Start with pre-loaded apps such as Music
Player, Maps, Compass, Gallery, Camera. Additional apps*, including any third party-apps, are
also accessible here. To learn how to download third-party apps, please read the FAQs.
*Note: third-party app developers are responsible for the provision and maintenance of their
apps.
You can view your activities and personal bests in My Records. You can also review your
metrics and locations via the Engage website and mobile app.
Notication Center is where you can review all your texts, missed calls, and other
notications.
Start your activity by choosing New Activity (Cycling or Running).
Settings is where you can customize your Jet. For example, you can enable Glance Detection
and adjust the display brightness there.

10
SHORTCUTS
Use these shortcuts to access features like the camera and smartphone pairing quickly.
CUSTOMIZATION
CUSTOMIZABLE DASHBOARD
To customize Jet’s dashboard with the information that is most important to you, visit the Recon Engage website and go to
DEVICES > MANAGE HUD. For more details, please visit the FAQs.
MAPS MANAGER
Customize the maps on your Jet to ensure you have the right ones at the right time. Visit the Recon Engage website and go to
DEVICES > MANAGE HUD to select the maps you want. For more details, please visit the FAQs.
TRACKING A NEW ACTIVITY
To start a new activity, choose New Activity and press SELECT. Then, choose your activity type: either Running or Cycling.
Once you have acquired a GPS x on your Jet (note: you need to be outside to do this), press SELECT to start recording your
activity.
Whether Running or Cycling, Jet provides you with relevant metrics.
Quick Nav can be accessed by pressing and holding Jet’s SELECT button. From this menu,
you can quickly access frequently used features such as the camera, notications, and
smartphone pairing.
Options is another shortcut menu. You can use it to turn o the display or shut down your Jet
quickly. To access Options, press and hold the BACK/POWER button.

11
VIEWING AND SAVING AN ACTIVITY IN PROGRESS
To view an activity in progress, pause it by pressing the SELECT button.
You will be asked whether you would like to resume the activity or stop. Swipe down to access your metrics.
You will then be taken to the Activity In Progress screen. From there, you can see all the stats from your current activity.
To nish your activity, press SELECT while on the Activity In Progress screen. You will be asked to conrm whether you have
nished your activity. Here, you can choose to Save, Share, or Discard your activity.
DASHBOARD AND MY APPS
WARNING: Do not remove the battery when Jet is on. To replace Jet’s battery, pause your activity and turn Jet o rst. You will be
able to resume your activity aer restarting Jet.
Once your activity is complete, you can save it and share it to Facebook or Twitter. Follow the on-screen instructions to share
your completed activity.
Jet’s Metrics Dashboard provides real-time, direct-to-eye performance information including
speed, distance, time, power, and cadence. You can change what metrics are shown by
customizing your dashboard.
Use Jet’s optical touchpad to scroll down and access alternative dashboard options.
You can access Jet’s Camera in one of three ways: by swiping backward from the Metrics
Dashboard, by opening up the Quick Nav menu from anywhere in ReconOS, or by navigating
to My Apps in the Home menu.
The Maps app allows you to see your location in real time. Swipe forward when in the
Metrics Dashboard to launch Maps. Visit the FAQs for more information on how to download
maps on Jet.

12
SENSORS
CONNECT AN ANT+ DEVICE
Jet supports the following ANT+TM proles
for third-party device connectivity:
To connect an ANT+ TM sensor to your Jet:
1. Turn the ANT+ device on
2. On Jet:
a. Go to Settings > Sensors.
b. Select Add Sensors.
c. Choose the sensor type you would like to connect.
d. Select the sensor from the Sensor Found screen to connect and save it.
e. Jet will automatically connect to your ANT+ sensors when you go to your Metrics Dashboard.
Heart Rate
Monitors
Bike Speed
Bike Power
(including CTF)
Bike Cadence Bike Speed
& Cadence

13
TROUBLESHOOTING
GPS
GPS technology works best in open spaces, when you have a clear view of the sky. Obstacles such as buildings and trees can
degrade the signal. If you are outside when starting an activity, your Jet will automatically acquire a GPS x. You will notice
a blinking red GPS logo on your Jet display. When a GPS x is achieved, that logo will turn into a solid triangle.
If you have trouble acquiring a GPS x, it may be because:
• Your Jet is trying to acquire a x for the rst time.
• Your Jet has not been used for an extended period of time.
• Your Jet is being used indoors.
• You have traveled a long distance with your Jet turned o.
If you encounter any of these issues, try connecting Jet to your smartphone through the Recon Engage mobile app. This will
enable Assisted GPS and allow Jet to get an initial location x.
ASSISTED GPS (AGPS)
Assisted GPS (AGPS) helps locate satellites in your area, allowing Jet to get a GPS x more quickly.
To activate AGPS, either connect your Jet to your smartphone through the Recon Engage mobile app, or connect your Jet to
you computer and run the Recon Uplink desktop app.
SCREEN BRIGHTNESS
If Jet’s display appears too bright or too dim, navigate to Settings, then navigate to Display and scroll down to Brightness.
You can adjust the brightness level by swiping le and right on the Brightness settings screen.
BATTERY
CHARGING USING A COMPUTER
1. Make sure your computer is turned on and is not in standby mode.
2. Connect Jet to your computer using the included Micro-USB cable.
3. Make sure Jet’s status indicator LED is red. This indicates that Jet is charging.
4. Charge Jet until the status indicator LED turns o. This indicates that Jet is fully charged.
5. If your computer does not recognize your Jet, try disconnecting and then reconnecting the Micro-USB cable.
NOTE: Under optimal conditions, Jet can achieve an 80% charge aer being connected to your Mac or PC for one hour. The charging
time may vary depending on your computer conguration.
WARNING:
• Using a Micro-USB cable other than the one provided may shorten battery life and may, in some cases, damage your Jet permanently.
• Do not attempt to charge your Jet with the battery and/or engine removed. This will cause permanent damage.
• Do not let your Jet overheat. This may cause thermal runway or explosions.
• Do not charge your Jet in excessively hot or cold environments (below 32°F/0°C or above 104°F/40°C).
• Aer charging your Jet, close the USB protection cap tightly to prevent water damage. If the battery looks damaged or inated, stop
using your Jet immediately.
CHARGING USING AN AC WALL CHARGER
Alternatively, you can charge Jet using an AC wall charger with an output of 1A and 5V.
MAXIMIZING BATTERY LIFE
Running the Maps app for a prolonged period of time, using the camera, searching for a GPS x, and running some third-party
apps may negatively impact Jet’s battery life. Low temperatures are also detrimental to Jet’s battery life.

14
FACTORY RESET
A factory reset clears all data Jet has recorded. Performing a factory reset will clear your settings, uninstall any third-party
apps, and restore Jet to its default settings.
Note: Before performing a factory reset, make sure your Jet is fully charged. Also, make sure you back up any les stored on
Jet to your Mac or PC.
FACTORY RESET INSTRUCTIONS
You may need to perform a factory reset if your Jet ever becomes unresponsive and other troubleshooting steps fail.
Note that, if you need help with your Jet, you can always reach Recon Customer Support at 1.877.642.2486 or e-mail
us at support@reconinstruments.com.
To perform a factory reset, navigate to Settings on your Jet, scroll down to Advanced, and select Factory Reset.
If you can’t access Settings, follow the instructions below to perform a hard factory reset:
Please read the instructions below carefully before starting. Each step needs to be completed to ensure a hard factory
reset is initiated. If you miss any steps, please start again from the beginning.
1. Shut down your Jet and unplug the USB cable (if attached).
2. Press the BACK/POWER button until the status indicator LED is blinking white.
3. Let go of the BACK/POWER button and wait until the blinking stops.
4. Press the SELECT button until the status indicator LED is blinking white again.
5. Let go of the SELECT button and wait until the blinking stops.
6. Press the BACK/POWER button until the status indicator LED is blinking white once more.
7. Let go of the BACK/POWER button and wait until the blinking stops.
8. Press the SELECT button until the status indicator LED is blinking white, which will be faster this time.
9. Let go of the SELECT button and wait until the blinking stops.
10. Your Jet should have undergone a hard factory reset. It can now be turned on again.
WARNING: Performing a factory reset will erase all data on your Jet.
FIRMWARE UPDATES
Each time Jet is connected to your Mac or PC, Recon Uplink automatically updates it to the latest available soware version.
Recon Uplink noties you if any new updates are available.
SUPPORT
For service and support, tutorials, and FAQs, please visit reconinstruments.desk.com or email
support@reconinstruments.com.
WARRANTY
Find the terms and conditions of Jet’s warranty at www.reconinstruments.com/warranty.

15
DEVICE INFORMATION
TECHNICAL SPECIFICATIONS
BATTERY DISPOSAL INFORMATION
For the Recon Jet technical specications, please visit www.reconinstruments.com/products/jet/tech-specs/.
Visit the following link below for Jet battery disposal information:
www.reconinstruments.desk.com/customer/portal/articles/843025
Jet is powered by a lithium-ion battery. If you are done using the device, it should be taken to a recycle
center for proper and safe disposal.
Other manuals for JET
1
Table of contents