RECOUP EASYFIT+ User manual

passively recovering waste HEAT energy WITH EVERY shower
RETROFT installation PROCESS IN PICTURES
Shower Waste Water Heat Recovery System
IMPORTANT NOTE – Please Read
This picture guide is supplementary and does not replace the installation instruction manual supplied
with the Easyt+. Before starting installation please read all content provided with the Easyt+.
Before starting check section 3 of the installation instructions supplied with the Recoup Easyt+ for pre-installation
guidance on locating a suitable area for installation.
The Recoup Easyt+ needs to be installed horizontally under the bath or the shower tray. Installation should take
place on a at surface capable of supporting the WWHRS. The location should allow for access to all parts and allow
routine maintenance (E.g. Cleaning) to be carried out with relative ease.
The Recoup Easyt+ must be located within the heating envelope of the building.
The Easyt+ must be installed with consideration to the most recent ‘Approved document – Part H of the
Building Regulations’ for preventing the ingress of foul sewer gases.
Before starting the installation make sure you know which installation method is to be used. In a retrotted installation
System B is the most common and will be the method primarily shown here. The Easyt+ can also be installed with
the System A or System C installation method.
Use the images and instructions on the following pages to assist you with the installation process. Work down each
column following the numbered text below each corresponding image. An installation video can also be found on our
website to assist, www.recoupwwhrs.co.uk.
Page 1
IMPORTANT NOTE
To ensure SAP compliance check buildings spec for
correct installation method (System A, B or C)
1 - RECOUP Easyt+ WWHRS unit 2 - Installation instructions
3 - NCM (SAP) identier label for nearby water or service cupboard.
Installation contents
23
1

Page 2
PREHEATED
WATER
Installation with bath / shower drain at
the same end as the SVP soil waste
Installation with bath / shower drain at
the opposite end to the SVP soil waste
SOIL
WASTE
SOIL
WASTE
Double check valve
(Not supplied)
Double check valve
(Not supplied)
Shut o valve
(Not supplied)
Shut o valve
(Not supplied)
Shut o valve
(Not supplied)
Shut o valve
(Not supplied)
MAINS COLD
WATER
MAINS COLD
WATER
PREHEATED
WATER
SHOWER
WASTE
SHOWER
WASTE
Easyt+
Easyt+
Cold mains
water pipework
Cold mains
water pipework
Preheated
water pipework
Preheated
water pipework
30 - 40mm
higher
30 - 40mm
higher
Installation diagrams & Drawings

Page 3
Installation with bath / shower drain at
the opposite end to the SVP soil waste
Installation with bath / shower drain at
the same end as the SVP soil waste

Page 4
1. To retrot the Recoup Easyt+ below the shower system
installed must have a thermostatic mixer. This can be either
be deck mounted onto the bath or wall mounted above it.
2. To start retrotting the Recoup Easyt+ remove the bath
panel from the side of the bath along with any structure
supporting the panel that restricts access.
SETTING UP TO RETROFIT THE RECOUP EASYFIT+
5. If required remove part of the added support to allow access
during the installation.
6. Look at the water and waste pipe connections and identify
the waste water trap, the waste water out pipe, the hot water
pipe to the shower and the mains cold water pipe to the shower.
3. If the bath has a central foot installed this will need to be
removed to accommodate the Easyt+.
4. If a central supporting foot is removed, then alternative
raised support should be installed that will bridge over the
area where the Easyt+ needs to be positioned.
7. Disconnect the waste water trap from the bath along with
the waste water pipes to where they connect to the SVP
soil pipe.
8. Ensure that the mains cold water has been switched o at
the stopcock then separate the pipe for the mains cold water
to the shower.

Page 5
9. Connect a full ow shut o valve (not supplied) and a double
check valve (not supplied) to the mains cold water pipe.
Ensure all xings are fully tightened and joints sealed.
10. Unbox the Recoup Easyt+. Included within the box is
the Easyt+ main unit, four height adjustable feet, the
installation documents and SAP identier label.
13. Position the Easyt+ under the bath.
14. Adjust the feet so that the end of the Easyt+ furthest from
the SVP soil connection is 30mm to 40mm higher than the
other end. This is so that the shower waste water ows
through the unit from one end to the other.
11. The Easyt+ incorporates symmetrical connections at
either end. Orientate the unit whichever way best suits for
the position of the mains cold water and waste water pipe
connections under the bath.
12. Screw the height adjustable feet into the threaded inserts
in the corners of the Easyt+ unit. Use the longer threads
on the higher edge of the Easyt+.
15. Ensure that the unit is horizontal at both ends perpendicular
to the ow of shower waste water.
16. Even packing under each adjustable foot may be required
if the waste water outlet at the lower end of the Easyt+ is
not higher than the connection to the soil pipe.

Page 6
17. The ow of mains cold to preheated water needs to run
in the opposite direction to the ow of the shower waste
water.
18. Connect a female half inch BSP connector (not supplied)
to the half inch BSP male connection at the lower end of
the Easyt+ unit.
21. Connect a second female half inch BSP connector (not
supplied) to the half inch male connection for the preheated
water at the higher end of the Easyt+.
22. Connect a full ow shut o valve (not supplied) to assist
with easy removal and maintenance.
19. Connect the opposite end of the female half inch BSP
connector to the double check valve and full ow shut o
valve previously connected to the mains cold water.
20. Ensure all xings are fully tightened and joints sealed.
23. Connect the preheated water output to what was the mains
cold water connection on the showers thermostatic mixer.
24. Ensure all xings are fully tightened and joints sealed.
CONNECTING THE MAINS COLD & PREHEATED WATER

Page 7
25. This setup creates the system B installation method
supplying preheated water to the shower only. For system
A installations a T joint would be required to also send the
preheated water to the water heater.
26. Using 40mm push t, or 43mm solvent weld pipe, connect
the warm shower water in to the bath shower trap. The
warm shower water in is the highest end of the Easyt+.
29. Ensure the cold mains water is turned back on at the
stopcock. Open the full ow shut o valve on the mains
cold water feed to start the cold water ow into the Easyt+.
30. Open the full ow shut o valve on the preheated water pipe
to start the ow from the Easyt+
27. When the highest point is at the opposite end to bath trap
the pipes can be run above the lower prole section of the
Easyt+.
28. Using 40mm push t or 43mm solvent weld pipe, connect
the waste water out at the lower end of the Easyt+ unit
to the SVP soil pipe. Ensure all xings are fully tightened
and sealed.
31. Replace any bath supports removed to allow access to
install the Recoup Easyt+
32. Replace the bath panel and any supporting structure.
CONNECTING THE SHOWER WASTE
COMMISIONING THE EASYFIT+

Page 8
33. Please check and complete the following important points:
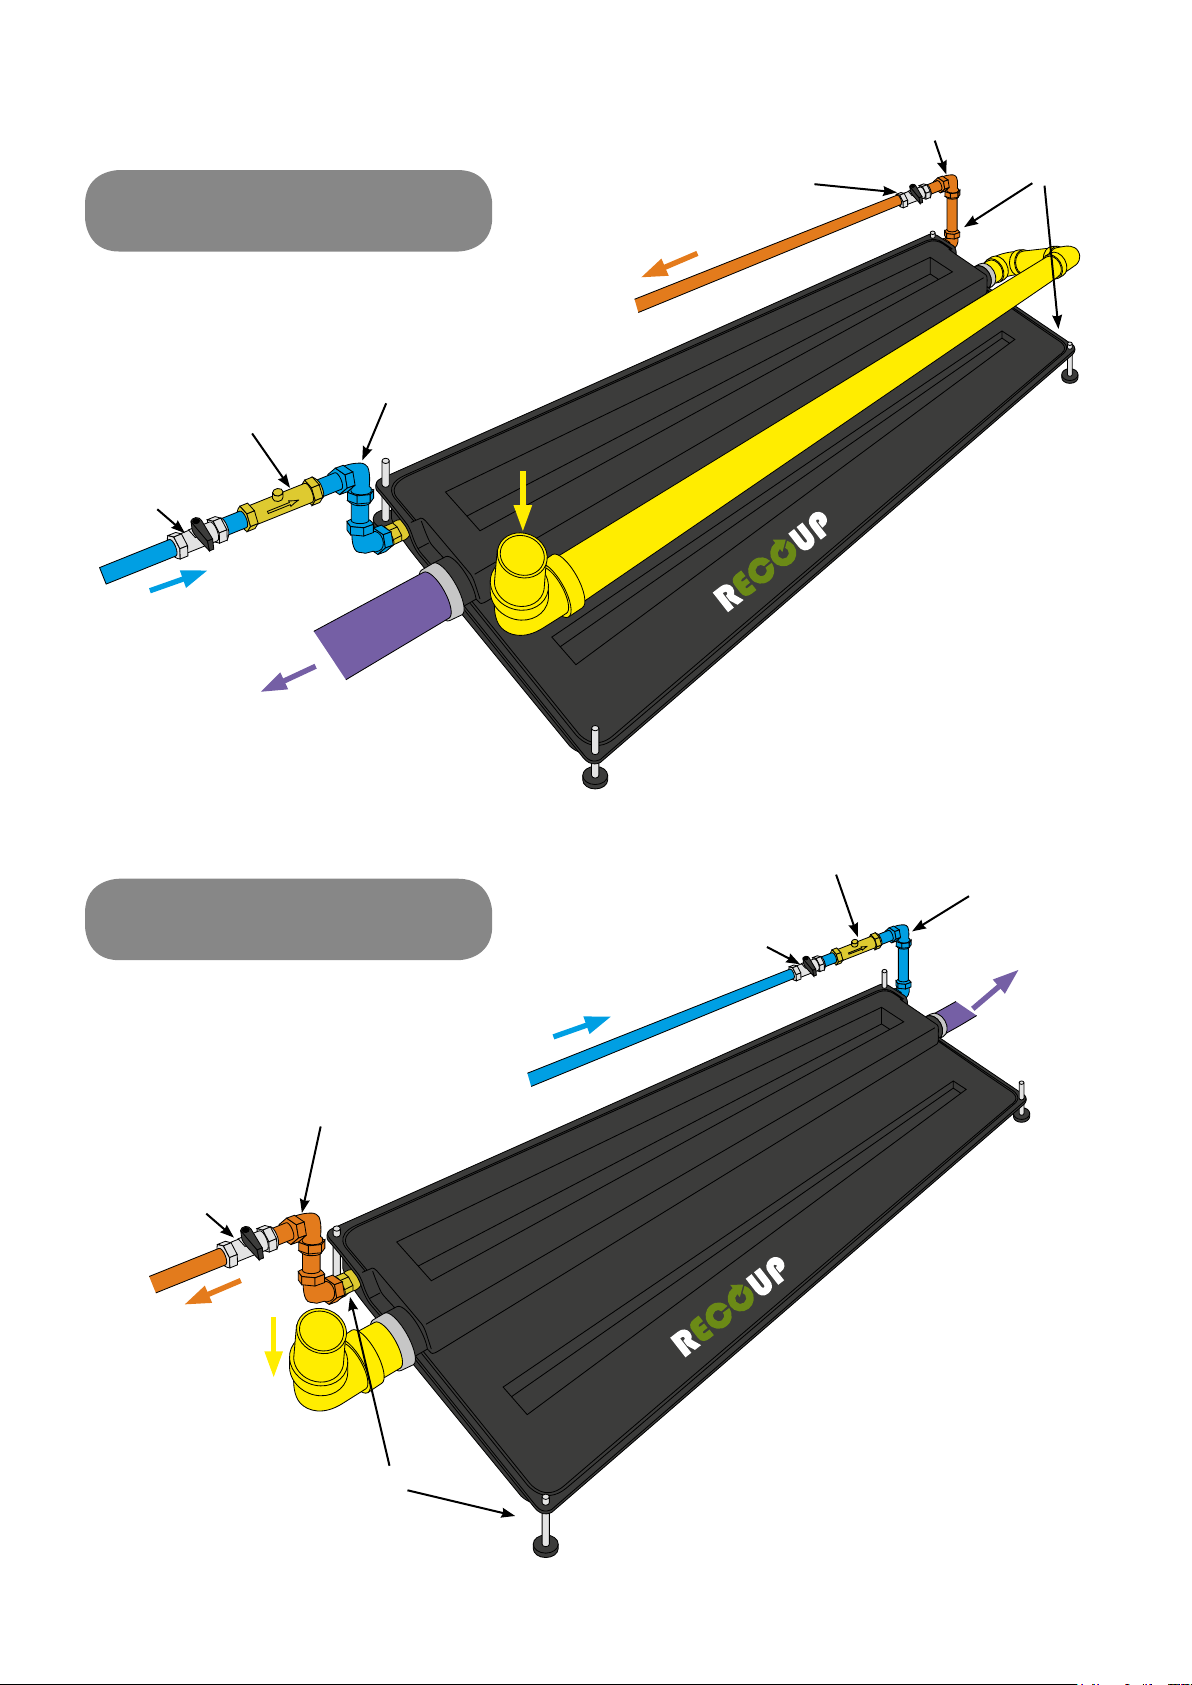
a) Ensure the preheated water supply is only feeding the DHW water heater and the
cold water inlet of the shower’s thermostatic mixing valve (System A), the cold inlet
of the shower’s thermostatic mixing valve only (System B) or the water heater only
(System C).
b) The preheated water supply from the RECOUP Easyt+ is clearly labelled to avoid
future connections of other services. Preheat supply tape is available for this.
c) Pipework between the RECOUP Easyt+ and the water heater and/or cold
water inlet of the thermostatic mixing valve is insulated.
d) When the complete system is being checked and pressure tested, the
RECOUP Easyt+ must be isolated if the system testing is to proceed above
10 bar.
e) Ensure the SAP label supplied correctly identies the System installed and is
applied near to the water heater in the property (Part 3).
f) Complete the design and installation checklist or register the installation.
Visit the RECOUP Easyt+ product page on our website for more installation support. Visit easyt.
recoupwwhrs.co.uk or scan this QR code.
For all technical or installation queries, please contact RECOUP directly. For product related
issues, please contact your place of purchase.
Preheat supply tape
(Not supplied)
water heater SAP identier label
3
Maintenance
The maintenance required for the RECOUP Easyt+ is very minimal, however, it is recommended to clean the unit
periodically to avoid any reduction in eciency. This cleaning will remove any build-up of soap and dirt residue on the
outside of the copper pipe where the waste water passes.
The following maintenance procedure is suggested:
A hair ltering device as part of the bath / shower trap is recommended to reduce the amount of hair that gets into
the RECOUP Easyt+.
Every 2 months, use 1-2 litres of hot water up to 70°C (re-use waste water from boiling potatoes or pasta to save
energy) and apply into the bath / shower-tray drain in 2 stages, with around 5 minutes between. (This will help
dissolve soap residues on the copper pipes in the RECOUP Easyt+). Use the shower shortly after to make sure
any debris is ushed away. It is possible to use chemical agents sold for declogging as a cleaning agent if required.
If no maintenance is carried out, the RECOUP Easyt+ will work, but the eciency may decrease over time.
Warranty
The RECOUP Easyt+ comes with a 2 year warranty unless agreed otherwise. This starts from either
the date of invoice from Recoup Energy Solutions Ltd or the date of installation recorded on the received
SAP documentation in line with the SAP Design and Installation Checklist.
This warranty is conditional on the product being installed in accordance with these instructions (Installation
and ALL requirements for SAP, if product is to be recognised for Energy eciency calculations), correct
plumbing practices and Building Regulations.

Page 9
Visit registration.recoupwwhrs.co.uk or scan the QR code to download our Apple or Android
registration App, or download and print the paper based design and installation checklist.
Post completed paper based manual documents to...
Recoup Energy Solutions Ltd, PO Box 365, Eye, IP22 9BH
Registration
The installation of a WWHRS should be registered to comply with SAP requirements. Registration can be completed
by lling in a downloadable paper based design and installation checklist, returning it to RECOUP with copies
completed for the homeowner and your records. Alternatively, you can download the RECOUP WWHRS App which
provides customers and installers with an easy to use and access registration facility.
Visit our website registration page or scan the QR code
registration.recoupwwhrs.co.uk
Table of contents
Popular Plumbing Product manuals by other brands

Geberit
Geberit Pluvia Installation notes

Moen
Moen Brushed Nickel T6305BN Illustrated parts list

BorMann
BorMann Elite BTW5021 manual

Lefroy Brooks
Lefroy Brooks K1-4202 Installation, operating, & maintenance instructions

Glacier bay
Glacier bay HD67389W-8004 Installation and care guide

MIYAWAKI
MIYAWAKI ES10 user manual

Bathlife
Bathlife TASS manual

Hans Grohe
Hans Grohe Raindance Select S Handshower 120 3-Jet Powder Rain, 1.75 GPM ADA... Installation/User Instructions/Warranty

ZUCCHETTI
ZUCCHETTI ON ZON455 Instruction for the installation

Oras
Oras Optima 7160 Installation and maintenance guide

Hansa
Hansa TWEN 4020 2283 Mounting and operating instructions

Symmons
Symmons Hydapipe 1-901Series installation instructions