Assembly instructions
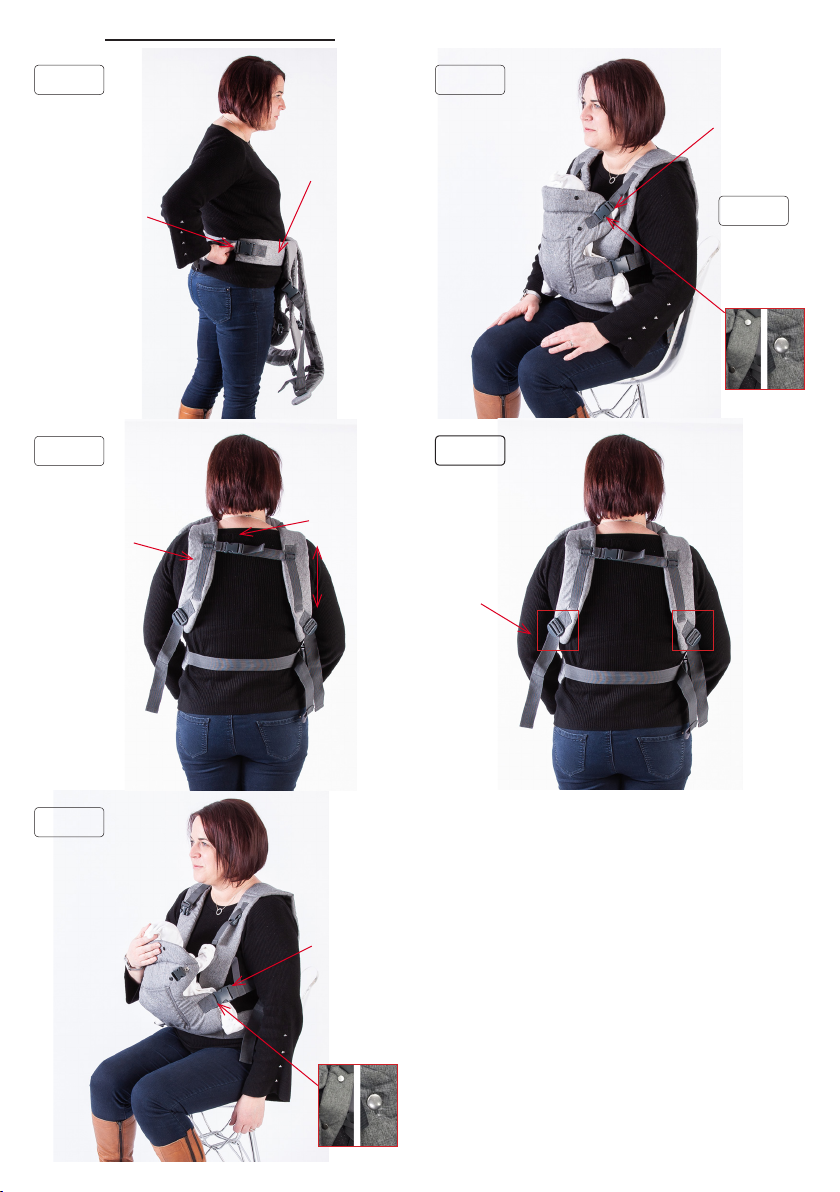
MODE 1 Parent facing (inward)
From birth
1 Pass the lumbar straps around your waist and use the buckles to secure it. Adjust the straps so it’s a snug comfortable t. Fig 1.
2 Pass the padded straps over your shoulders and connect the upper back buckles together
so it’s a snug comfortable t. Adjust as necessary. Fig 2.
3 Sitting down, open the carrier on your knees and place baby into the carrier.
Whilst still seated, bring baby and carrier towards you and attach the leg opening buckles(g 3) and buttons on both sides. Fig 3a.
4 Whilst still seated in a comfortable and secure seated position, attach the remaining upper buckles ( g 4 ) and buttons. Fig 4a.
5 Adjust the shoulder strap buckles by pulling on the loose ends so the back support is secure and comfortable around baby. Fig 5.
Loose ends of the straps can be rolled and secured with the elastic on the ends.
IMPORTANT: ALWAYS test the clips and buttons are securely locked by tugging each strap BEFORE putting
baby in the carrier.
IMPORTANT: If baby is riding too high or too low against your body, remove baby from the carrier and
re-adjust the straps for a better t.
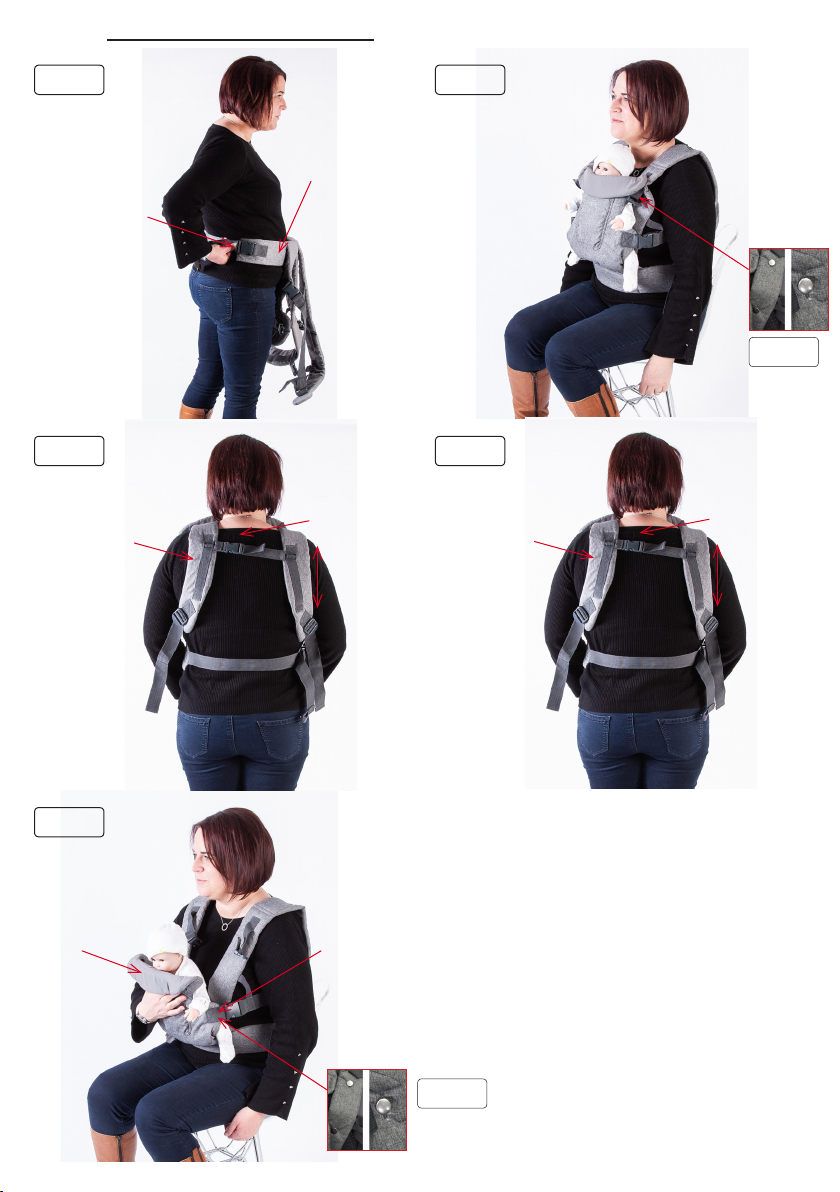
MODE 2 Facing forward (outward)
From approximately 4 months (or when baby can independently support his / her head).
IMPORTANT: Baby must be able to support their own head before using the carrier in this position.
6 Pass the lumbar straps around your waist and use the buckles to secure it. Adjust the straps so it’s a snug comfortable t. Fig 6.
7 Pass the padded straps over your shoulders and connect the upper back buckles together
so it’s a snug comfortable t. Adjust as necessary. Fig 7.
8 Sitting down, open the carrier on your knees and place baby into the carrier. Fold down the padded head support and secure in
place with the press studs and then bring baby and carrier towards you. Attach the buckles (g 8)and buttons just above the leg
openings on both sides of the carrier. Fig 8a.
9 Whilst still seated, attach the remaining upper buckles (g 9) and buttons. Fig 9a. Adjust all buckle straps to ensure a correct t.
10 Adjust the shoulder strap buckles by pulling on the loose ends so the back support is secure and comfortable around baby. Fig 10.
Baby should be upright and their weight evenly distributed in the carrier. Loose ends of the straps can be rolled and secured with the
elastic on the ends.
IMPORTANT: ALWAYS test the clips and buttons are securely locked by tugging each strap BEFORE
putting baby in the carrier.
IMPORTANT: If baby is riding too high or too low against your body, remove baby from the carrier and
re-adjust the straps for a better t.
MODE 3 Back Carrier
From approximately 4 months (or when baby can independently support his / her head).
IMPORTANT: Baby must be able to support their own head before using the carrier in this position.
11 Lay the open carrier on a at surface, place baby in and attach all buckles and buttons. Fig 11. Fig 11a.
12 With someone holding carrier and baby on your back, pass the straps over your shoulders and attach the chest buckle. Pass the
lumbar support around your body and connect at the front with the buckles. Fig 12.
Adjust all straps until it is comfortable and baby is upright with their weight evenly distributed. Fig 13.
The carrier has specially designed straps to help with hip dysplasia.
On the lumbar strap there are three Velcro sections (g 14), coloured white, grey and black. Attach the straps (g 15) so that when your
child is in the carrier, their bottom and legs create an “M” shape that is appropriate to their weight. Fig 16.
IMPORTANT: ALWAYS test the clips and press studs are securely locked by tugging each strap BEFORE
putting baby in the carrier.
IMPORTANT: If baby is riding too high or too low against your body, remove baby from the carrier and
re-adjust the straps for a better t
WHITE Small Birth - 4 months
GREY Medium 4 months - 9 months
BLACK Large 9 months - 15kg
ADJUSTMENT GUIDE