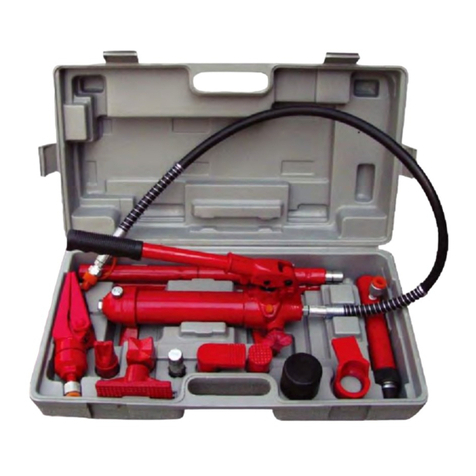
RED LABEL RLBRK10 User manual

Jul-18 Product Code: RLBRK10
Made in China to TQB Brands Pty Ltd specifications
Visit us at www.tqbbrands.com.au
OWNER’S MANUAL
PRODUCT CODE: RLBRK10
AUTO BODY REPAIR KIT
10,000KG

Product Code: RLBRK10
Made in China to TQB Brands Pty Ltd specifications Page 2
Visit us at www.tqbbrands.com.au
WARNING INFORMATION
IMPORTANT: READ ALL INSTRUCTIONS BEFORE USE
WARNING
The instructions and warnings contained in this manual should be read and understood before
using or operating this equipment. Do not allow anyone to use or operate this equipment until
they have read this manual and have developed a thorough understanding of how this
equipment works. Failure to observe any of the instructions contained in the manual could result
in severe personal injury to the user or bystanders, or cause damage to the equipment and
property. Keep this manual in a convenient and safe place for future reference.
Whilst every effort has been made to ensure accuracy of information contained in this manual,
the Red Label policy of continuous improvement determines the right to make modifications
without prior warning.
CONTENT
WARNING INFORMATION ....................................................................................................... 2
CONTENT ............................................................................................................................... 2
SAFETY INSTRUCTIONS ........................................................................................................... 3
ASSEMBLY, OPERATION & PREVENTATIVE MAINTENANCE....................................................... 5
TROUBLESHOOTING ............................................................................................................. 12
PARTS LIST ........................................................................................................................... 13
WARRANTY .......................................................................................................................... 15

Product Code: RLBRK10
Made in China to TQB Brands Pty Ltd specifications Page 3
Visit us at www.tqbbrands.com.au
SAFETY INSTRUCTIONS
SAFETY OPERATING INSTRUCTIONS
- Safety related decals must be maintained and replaced if they become hard to read.
- Wear eye protection that meets approved standards.
- This equipment is designed for vehicle body / frame applications. Using this
equipment in an application for which it is not designed could result in overloading,
reduced load capacity, reduced stability and /or system failure.
- Do not overload the hydraulic system; creating pressure beyond the rated capacity of
the pump and ram may result in personal injury. Overloading is indicated by bowing
extension tubes or slipping attachments.
- Some components in this set do not match the maximum pressure rating of the pump
and ram. USE A PRESSURE GAUGE IN THE SYSTEM TO MONITOR HYDRAULIC
PRESSURE (not included). Refer to the instructions in this document for typical
applications and load capacity.
- Do not over extend the hydraulic arm, over extending the spreader ram may force the
plunger out of the ram, causing damage.
- Before working on a vehicle always set the parking brake and chock the wheels.
- Attachments and extension tubes must be aligned and fully engaged so ram force is
straight, avoiding an off centre load condition.
- When servicing, use only Red Label identical replacement parts. Use of any other parts
will void the warranty.
- Use the right product for the job. There are certain applications for which the hydraulic
body repair kit was designed. Do not modify the hydraulic body repair kit and do not
use the Hydraulic body repair kit for a purpose for which it was not intended.
Ram Safety Instructions:
- Ram must be on a stable base which is able to support the load while pushing or
lifting. Use shims, friction material or constraints to prevent slippage of the base or
load. Ensure ram is fully engaged into/onto adapters & extension accessories.
- Centre load on ram. Distribute load evenly across the entire saddle surface. Do not
allow off-centre loads on a ram as this may cause the load to tip or the ram to kick
out.
- Completely retract the ram before opening the filler screw on the pump to add
hydraulic fluid. An overfill can cause personal injury due to excess reservoir pressure
created when rams are retracted.

Product Code: RLBRK10
Made in China to TQB Brands Pty Ltd specifications Page 4
Visit us at www.tqbbrands.com.au
Hose Safety Instructions:
- Before operating the pump, tighten all hose connections using the correct tools. Do
not over tighten; connections need only be secure and leak free. Over tightening can
cause premature thread failure or high pressure fittings to split at pressures lower
than their rated capacity.
- Should a hydraulic hose ever rupture, burst, or need to be disconnected, immediately
shut the pump OFF, and open the control valve to release all pressure. Never grasp a
leaking, pressurised hose with your hands; the force of escaping hydraulic fluid could
cause serious injury.
- Do not subject the hose to any potential hazard such as fire, extreme cold or heat,
sharp surfaces, or heavy impact. Do not allow the hose to kink, twist, curl, or bend so
tightly that the fluid flow within the hose is blocked or reduced. Do not use the hose
to move attached equipment. Periodically inspect the hose for wear, because any of
these conditions can damage the hose and result in personal injury.
- Hose material and coupler seals must be compatible with the hydraulic fluid used.
Hoses must not come in contact with corrosive materials.
Coupler Valves
- KEEP COUPLER VALVES PROTECTED WHEN NOT IN USE. Dust caps are included for all
Coupler Valves and should be screwed in when not in use to keep equipment clean.
Keep couplers and valves debris, dirt and dust free

Product Code: RLBRK10
Made in China to TQB Brands Pty Ltd specifications Page 5
Visit us at www.tqbbrands.com.au
ASSEMBLY, OPERATION & PREVENTATIVE MAINTENANCE
1. FEATURES
The Red Label 10,000kg Hydraulic Auto Body Repair Kit is an auto body repair kit that
features extension tubes with a snap lock design for quick and easy assembly.
The flex head features a permanently moulded rubber pad, interlocked to prevent
separation. The complete kit included a variety of auto body, frame repair and construction
components for lifting, pushing, bending and spreading.
2. ASSEMBLY
1. Unscrew and save the end plugs located on
the ends of the hose and hydraulic ram.
2. Securely screw the hose into the hydraulic ram.
3. Insert the pump handle into the
receptacle located at the top of the
pump unit.
4. To attach the head, the extension bars, the male connector, and the flat base to the
hydraulic ram.

Product Code: RLBRK10
Made in China to TQB Brands Pty Ltd specifications Page 6
Visit us at www.tqbbrands.com.au
5. To attach the spreader wedge to the pump unit.
6. For other attachment combinations.

Product Code: RLBRK10
Made in China to TQB Brands Pty Ltd specifications Page 7
Visit us at www.tqbbrands.com.au
3. BEFORE USE
Conduct a thorough visual inspection checking for leaks and any abnormal conditions, such
as cracked welds, and damaged, loose, or missing parts.
Bleeding Air from the System
Air can accumulate in the hydraulic system during the initial setup or after prolonged use,
which can cause the hydraulic ram to respond slowly or operate in an unstable manner or
even leak hydraulic fluid.
To remove the air;
1. Position the hydraulic ram so that it is at a lower level than the hydraulic pump unit,
with the piston end pointing down (see illustration below).
The objective is to "float the air bubbles up the ram, then up the hose and back into the hydraulic
pump.
2. Close the release valve and pump the handle on the hydraulic pump unit rapidly.
3. Without putting load on the hydraulic system this should quickly extend the ram.
4. When fully extended, open the release valve fully to allow the ram piston to retract.
Air bubbles will then be carried back up to the pump reservoir.
5. Repeat this process 3-4 times.
6. Then with the ram fully retracted, ensure the hydraulic pump unit is positioned
horizontally level.
7. Remove the hydraulic pump units filler screw to release trapped air from the hydraulic
pump unit.
8. Check oil level. If necessary top up the hydraulic pump reservoir with good quality
hydraulic jack oil until the fluid level is within 13mm of the filler screw hole.
Important: Repeated changing of hoses may result in loss of hydraulic oil and/or air
bubbles entering the hydraulic ram unit. This will adversely affect the rams performance
and can cause hydraulic ram fluid leakage as the seals may not be under sufficient pressure
to operate effectively. In this circumstance always "Bleed Air from System" and "Check
Hydraulic Oil Level" to restore normal operation.

Product Code: RLBRK10
Made in China to TQB Brands Pty Ltd specifications Page 8
Visit us at www.tqbbrands.com.au
4. OPERATION
Prior to each use always conduct a visual inspection checking for leaks and any abnormal
conditions, such as cracked welds, and damaged, loose, or missing parts.
The hydraulic pump may be operated in a horizontal position, or in a vertical position with
the head pointing down as shown.
1. Assemble the hose between the pump and ram.
2. Determine the appropriate attachment for your application; assemble the attachment
to the ram piston.
3. Turn the pump unit release valve clockwise to a closed position.
4. Work the pump handle up and down to send oil through the hose to the ram, causing
the piston to extend from the ram to the work piece.
5. The pump is equipped with an overload valve that will bypass oil back into the pump
reservoir in an overload situation (when the system meets maximum pressure). In this
case, continued pumping will have no effort on the system. If an overload situation
commonly occurs, a higher capacity set is needed.
6. To release pressure, slowly turn the release valve counter clockwise. The release
speed is controlled by how far the valve is opened.
When offset attachments are used, the rated capacity of the hydraulic system is reduced
by 50%. For each extension tube used in the setup, the rated capacity is reduced another
50%. When using two or more extension tubes together, always position the shortest tube
farthest away from the ram.

Product Code: RLBRK10
Made in China to TQB Brands Pty Ltd specifications Page 9
Visit us at www.tqbbrands.com.au

Product Code: RLBRK10
Made in China to TQB Brands Pty Ltd specifications Page 10
Visit us at www.tqbbrands.com.au
5. MAINTENANCE
Inspection: Inspect the product for damage, wear, broken or missing parts and that all
components function before each use.
- Tighten connections as needed. Use pipe thread sealing compound when servicing
connections.
- Only use a high quality hydraulic jack oil. Do not mix different liquids and NEVER USE
brake fluid, turbine oil, transmission fluid, motor oil or glycerine. Improper fluid can
cause premature failure of the ram and the potential for sudden and immediate loss
of load. This will also void warranty.
- Check the oil level by placing the pump in a level upright position.
Cleaning: Periodically check the pump piston and ram for signs of rust or corrosion. Clean
as needed and wipe with an oily cloth.
Note: Never use sandpaper or abrasive material on these surfaces.
Lubrication: Application of a coating of light lubricating oil to pivot points and hinges will
help to prevent rust and assure that pump assemblies move freely.
Adding Oil:
1. With ram fully retracted, set pump unit in its normal, level position. Locate and
remove oil filler screw.
2. Fill until oil is within 13mm of the oil filler screw hole opening, re-install oil filler
screw.
3. Do not overfill. Overfill can cause personal injury due to excess reservoir pressure
created when ram is fully retracted.
Changing Oil:
For best performance and increased system life, replace the complete fluid supply at least
once per year
1. With ram fully lowered, remove oil filler screw from the pump reservoir as above.
2. Lay the pump on its side and drain the fluid into a suitable container.
3. Set pump in its level upright position.
4. Fill with good quality jack oil to within 13mm of the oil filler screw hole opening. Re-
install oil filler screw.

Product Code: RLBRK10
Made in China to TQB Brands Pty Ltd specifications Page 11
Visit us at www.tqbbrands.com.au
6. STORAGE
This Hydraulic Auto Body Repair Kit should always be stored in a dry location with the pump
piston and ram fully retracted on a level surface. Coupler valves should always be screwed
in when not in use to keep equipment clean. Always keep couplers and valves debris, dirt
and dust free.
7. SERVICE & REPAIR
Any Hydraulic Auto Body Repair Kit found damaged in any way, or found to be worn or
operates abnormally should be removed from service until repaired by an authorised
service agent. Owners and / or operators should be aware that repair of this product may
require specialised equipment and knowledge. Only authorised parts, labels, decals shall
be used on this equipment. Annual inspection of the hydraulic auto repair kit is
recommended and can be made by an authorised repair facility to ensure that your
equipment is in optimum condition and that the equipment has the correct decals and
safety labels specified by the manufacturer.

Product Code: RLBRK10
Made in China to TQB Brands Pty Ltd specifications Page 12
Visit us at www.tqbbrands.com.au
TROUBLESHOOTING
Problem
Cause
Solution
Erratic Action
Air in system or pump
cavitations.
External leakage in ram.
Ram sticking or binding.
Bleed the system
Contact service centre
Contact service centre
Ram will not extend, or
respond to pressurised fluid
Overload condition.
Loose / Faulty couplers
Oil level in pump is low
Remedy overload condition
Tighten/replace couplers
Fill and bleed the system
Ram extends only partially
Oil level in pump is low
Overload condition
Ram is sticking or binding
Pump malfunction
Fill and bleed the system
Remedy overload condition
Contact service centre
Contact service centre
Ram moves slower than
normal
Air in system or pump
cavitations.
Loose connection or coupler
Restricted hydraulic line or
fitting
Pump not working correctly
Ram seals leaking
Bleed the system
Tighten connection or
coupler
Clean and replace if
damaged
Check pump's operating
instructions
Contact service centre
Ram responds to
pressurised fluid, but
system does not maintain
pressure.
Overload condition
Pump malfunctioning
Ram seals leaking
Remedy overload condition
Contact service centre
Contact service centre
Oil leaking from ram
Air in system
Worn or damaged seals
Bleed the system
Contact service centre
Ram will not retract or
retracts slower than normal
Malfunctioning coupler,
damaged application
Pump reservoir over filled
Ram damaged internally
Secure load by other means.
Depressurise pump and
hoses, remove application
and replace coupler. Secure
load by other means.
Depressurise pump and
hoses, remove application,
then
Poor performance
Oil level in pump is low
Air trapped in system
Ensure proper oil level
Bleed the system

Product Code: RLBRK10
Made in China to TQB Brands Pty Ltd specifications Page 13
Visit us at www.tqbbrands.com.au
PARTS LIST
Part
#
Description
QTY
Part #
Description
QTY
1
Moulded Case
1
36
Nylon Sealing Ring
1
2
Tube Set (4 piece)
1
37
Screw
1
3
Flat Base
1
38
O-Ring Seal
1
4
Angled Toe
1
39
Piston
1
5
Plate Head
1
40
Hinge Pin
1
6
Wedge Head
1
41
Circlip
1
7
Square V-Hand
1
42
Pivot Pin
1
8
Male Connector
1
43
Handle Socket
1
9
Serrated Cap
1
44
Operating Handle
1
10
Rubber Head
1
45
Handle Grip
1
11
Valve Body
1
46
Ram Cylinder
1
12
Oil Filter
1
47
Ram Cylinder
1
13
O-Ring
1
48
Screw Cover
1
14
Oil Reservoir
1
49
Screw M6
1
15
Seal Ring
1
50
Connecting Nut
1
16
Thumb Nut
1
51
Cylinder Screw
1
17
Sealing Ring
1
52
O-Ring
1
18
Tie Rod
1
53
Dust Cover
1
19
O-Ring
1
54
Tension Spring
1
20
Pump Foot
1
55
Circlip
1
21
Hydraulic Hose
1
56
Nylon Sealing Ring
1
22
Coupling
1
57
Bushing
1
23
Dust Seal
1
58
O-Ring
1
24
Steel Ball
1
59
Piston Rod
1
25
O-Ring
1
60
Piston End Cover
1
26
Hand Release Valve
1
61
Fixed Jaw
1
27
Sealing Ball
1
62
Small Piston
1
28
Spring
1
63
Piston Ring
1
29
Screw
1
64
O-Ring
1
30
Steel Ball
1
65
Screw Cover
1
31
Ball Cup
1
66
Moving Jaw
1
32
Spring
1
67
Circlip
1
33
Screw
1
68
Hinge Pin
1
34
Screw Protector
1
69
Spring
1
35
O-Ring
1

Product Code: RLBRK10
Made in China to TQB Brands Pty Ltd specifications Page 14
Visit us at www.tqbbrands.com.au

Product Code: RLBRK10
Made in China to TQB Brands Pty Ltd specifications Page 15
Visit us at www.tqbbrands.com.au
WARRANTY
Red Label products have been carefully tested and inspected before shipment and are
guaranteed to be free from defective materials and workmanship for a period of 12 months
from the date of purchase except where tools are hired out when the guarantee period is ninety
days from the date of purchase.
Should the equipment develop any fault, please return the complete tool to your nearest
authorised warranty repair agent or contact TQB Brands Pty Ltd Warranty team –
warr[email protected].
If upon inspection it is found that the fault occurring is due to defective materials or
workmanship, repairs will be carried out free of charge. This guarantee does not apply to normal
wear and tear, nor does it cover any damage caused by misuse, careless or unsafe handling,
alterations, accident, or repairs attempted or made by any personnel other than the authorised
TQB Brands Pty Ltd repair agent.
This guarantee applies in lieu of any other guarantee expressed or implied and variations of its
terms are not authorised.
Your TQB Brands Pty Ltd guarantee is not effective unless you can produce upon request a dated
receipt or invoice to verify your proof of purchase within the 12 month period.
Consumer Guarantee
Our goods come with a guarantee that cannot be excluded under the Australian Consumer Law.
You are entitled to a replacement or refund for a major failure and compensation for any other
reasonably foreseeable loss or damage. You are also entitled to have the goods repaired or
replaced if the goods fail to be of acceptable quality and the failure does not amount to a major
failure.
Table of contents
Other RED LABEL Power Tools manuals
Popular Power Tools manuals by other brands
Interchange
Interchange CN565-15 Operator's manual
Festool
Festool Domino XL DF 700 EQ Original operating manual
Scheppach
Scheppach DP16SL Translation from the original instruction manual
EINHELL Expert
EINHELL Expert GE-CG 10,8 Li Original operating instructions
Jetting
Jetting MJet V2 User Guide and Safety Manual
Umarex
Umarex EBOS Owner's operation manual

Ingersoll-Rand
Ingersoll-Rand QA1L High Torque Series Maintenance information

Milwaukee
Milwaukee M12 CHZ Original instructions
Maclan
Maclan SSI-065 user manual
AEG
AEG OMNI-RH Original instructions
yellow jacket
yellow jacket 60242 Flaring Instructions
TE Connectivity
TE Connectivity 1213819-1 Customer's manual
