Redgum TARANTO User manual

redgumbrand.com.au
TARANTO
FABRIC 4 MOTOR LIFT CHAIR
LC0401-2
USER MANUAL
Please read and keep these instrucons
EDITION 1

redgumbrand.com.au
REDGUM Brand owns the copyright to the TARANTO LIFT CHAIR user manual.
Any informaon contained in this user manual shall not be photocopied, reproduced or
translated into any other languages without the prior wrien consent of REDGUM Brand.
REDGUM Brand strives to provide the highest quality products possible.
Products are subject to change without noce.
© Copyright REDGUM Brand 2021
REDGUM Brand is part of FOR-DE Group Pty Ltd

redgumbrand.com.au
CONTENTS
1. INTRODUCTION - INTENDED USE
2. PRODUCT OVERVIEW - FEATURES / SPECIFICATIONS
3. ASSEMBLY - UNPACK and INSPECT SUPPLIED PARTS
4. ASSEMBLY - ATTACH BACKREST TO CHAIR BASE
5. ASSEMBLY - ATTACH WINGS TO BACKREST
6. ASSEMBLY - ATTACH CASTORS
7. ASSEMBLY - HANDSET CONNECTION
8. ASSEMBLY - CABLE CONNECTION
9. ASSEMBLY - BATTERY BACKUP
10. ASSEMBLY - TRANSFORMER CONNECTION
11. USAGE GUIDELINES - CHAIR POSITIONING
12. USAGE GUIDELINES - HANDSET CONTROLS
13. USAGE GUIDELINES - DO’s + DON’Ts
14. PRODUCT CARE - INSPECTIONS / CLEANING
15. WARRANTY
16. REDGUM BRAND PRODUCT RANGE

redgumbrand.com.au
INTRODUCTION
Thank you for purchasing this quality REDGUM Brand product.
If you have any issues or quesons about the
TARANTO Li Chair please contact
your local distributor or REDGUM Brand direct:
T: +61 8 9248 4180
E: sales@for-de.com.au
A: 1 Business Way, Malaga Western Australia 6090
INTENDED USE
This product has limitaons and should be used in accordance to these guidelines.
Failure to follow these guidelines may result in damage to the product and injury
to the user. It is the responsibility of the user to ensure the suitability of this product
for its intended use. The user should consult their appropriate healthcare
professional if unsure of the correct product usage for their unique circumstances.
Only use your Taranto Li Chair for the purpose for which it is
intended, which is as a single seang armchair that can li, rest and recline.
Read and follow all instrucons, warnings and notes in this manual and all other
accompanying literature before aempng to operate this product for the rst me.
In addion, your safety depends upon you, as well as your dealer, carer or
healthcare professional in using good judgement.
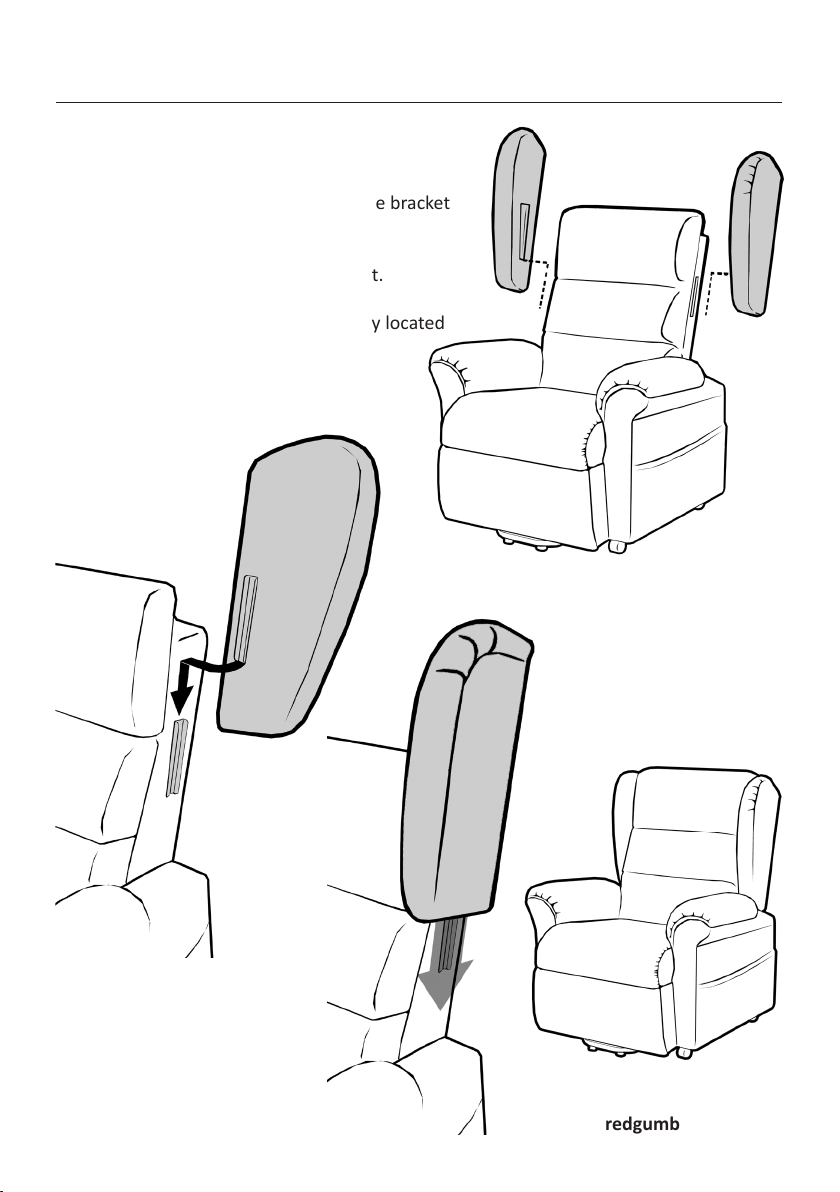
IMPORTANT NOTE
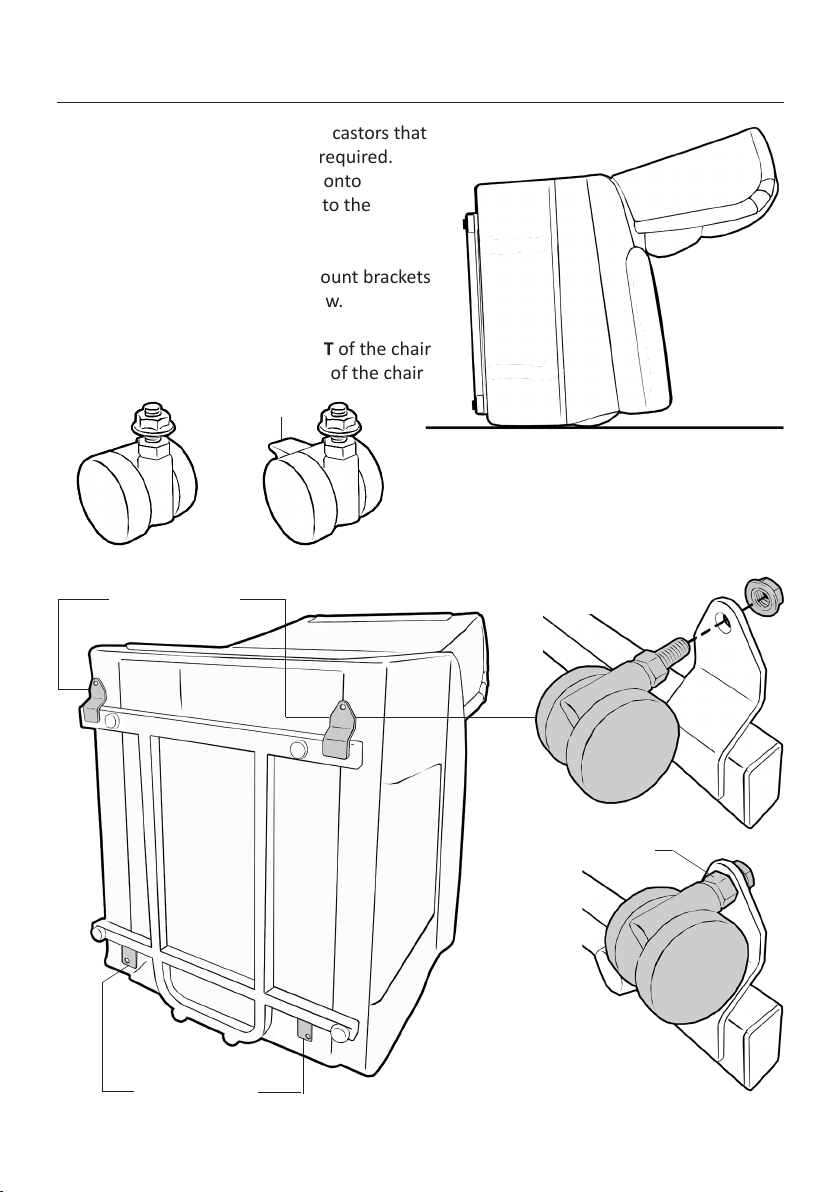
This equipment MUST be assembled
by a competent person.
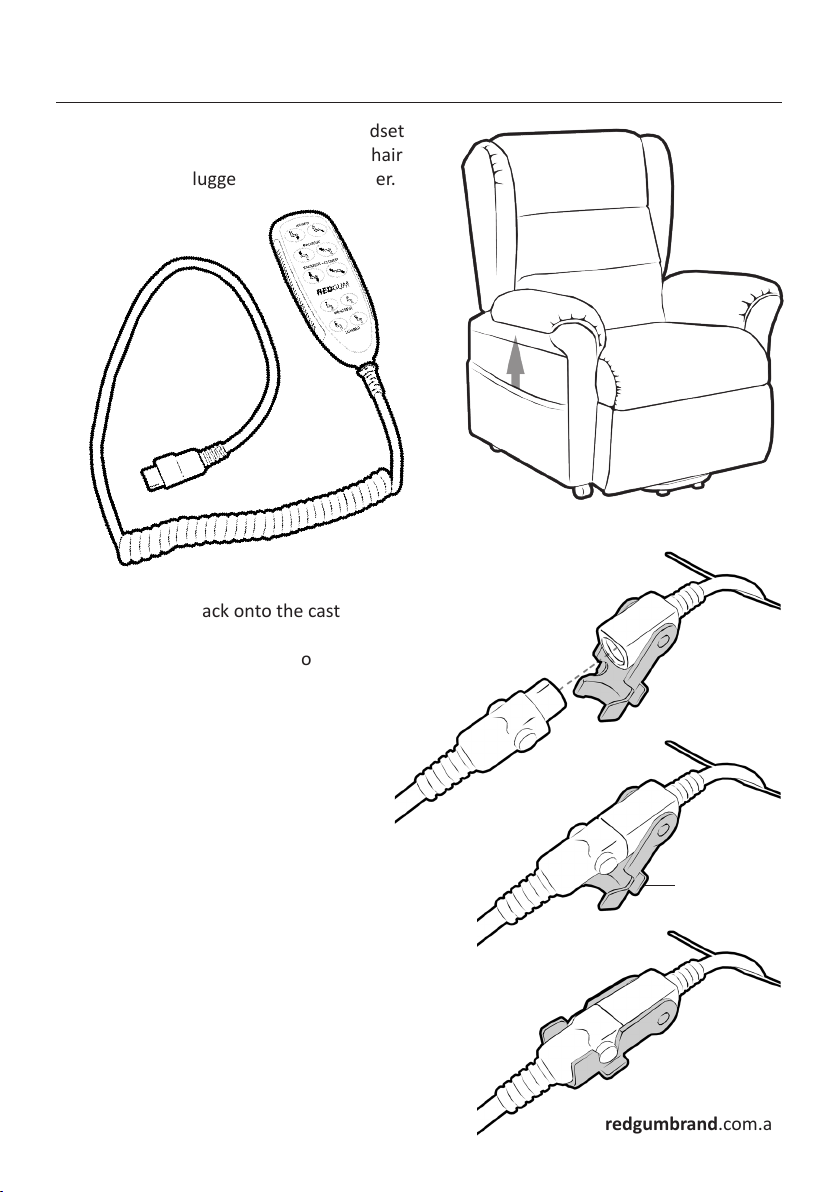
It is recommended that a second person
is used to assist with connecng the
backrest onto the chair.
1.

redgumbrand.com.au
PRODUCT OVERVIEW
FEATURES
Li / Rest / Recline armchair
Seat raise and lt funcon
Backrest recline funcon
Legrest elevaon funcon
Lumbar adjustment funcon
Headrest angle funcon
Comfortable and stylish
Available in a range of colours (refer to product sheet)
Fabric Upholstery
Quality German Okin electric actuators
Baery back up
Ergonomic handset with large backlit buons
Strong lightweight construcon
SPECIFICATIONS
(All specicaons may vary (+/- 10mm) as each chair is handcraed)
Overall (Sing): 905mm (W) - 940mm (D) - 1080mm (H)
Seat: 470mm (W) - 500mm (D) - 500mm (H) - 93° (Angle)
Armrest: 210mm (W) - 500mm (L) - 170mm (H)
Backrest: 560mm (Between wings) - 670mm (H) - 93 - 180° (Angle range)
Legrest: 620mm (W) - 430mm (L) - 90 - 180° (Angle range)
Lumbar: 450mm (W) - 220mm (H) - approx. 75mm (Adjustment depth range)
Headrest: 580mm (W) - 260mm (H) - 0 - 45° (Angle range)
Required distance from wall: 650mm
Maximum User Weight: 160kg
Product Weight: Base - 50kg / Backrest - 15kg / Combined - 65kg
Please contact REDGUM Brand if you would like any further informaon.
2.

redgumbrand.com.au
ASSEMBLY- UNPACK and INSPECT SUPPLIED PARTS
Ensure you have been supplied with the following parts:
PARTS:
TOOLS REQUIRED:
(Not Supplied)
2 x 13mm FLAT SPANNERS
IMPORTANT NOTE
Check the product for any visible damage. If you see any damage or suspect a fault, DO NOT
USE YOUR PRODUCT and contact your supplier for support.
3.
1 x CHAIR BASE
1 x BACKREST
1 x HANDSET
1 x TRANSFORMER
4 x CASTORS
- 2 x Braked
- 2 x Swivel)
1 x POWER CORD
1 x LEFT WING
1 x RIGHT WING
BATTERIES REQUIRED:
(Not Supplied)
2 x 9 Volt

redgumbrand.com.au
4.
ASSEMBLY- ATTACH BACKREST TO CHAIR BASE
Please follow these steps to aach the backrest
to the chair base:
1. Posion the chair base as shown
2. Align the backrest over the chair base with the
padded front facing toward front of chair base.
3. Fit the backrest to the chair base by sliding the
mounng brackets located on either side of
the backrest onto the mounng plates
located inside the arm rests at the
rear of the chair base.
4. Push down on the backrest unl you
hear two loud ‘Clicks’ indicang
that BOTH connecon points are
locked in posion.
5. Pull up on the backrest to check that
it is securely locking down in place.
Note:
To remove the backrest:
Li the triggers on either
side of the backrest and
pull up on backrest to
release the lock and
allow for removal.
4 x CASTORS
- 2 x Braked
- 2 x Swivel)
BACKREST
MOUNTING
BRACKET
CHAIR BASE
MOUNTING
PLATE

redgumbrand.com.au
5.
ASSEMBLY- ATTACH WINGS TO BACKREST
Please follow these steps to aach the wings
to the backrest:
1. Align the bracket on the wing with the bracket
on the side of the backrest.
2. Slide the wing down onto the bracket.
3. Push wing all the way down unl fully located
onto side of backrest.
4. Repeat process for other wing.

redgumbrand.com.au
ASSEMBLY- ATTACH CASTORS
The Taranto Li Chair comes with castors that
can be ed to the chair base if required.
The li chair needs to be ipped onto
its front as shown to gain access to the
underside of base frame.
Bolt the relevant castor to the mount brackets
on the base frame as shown below.
- 2 x SWIVEL castors at the FRONT of the chair
- 2 x BRAKED castors at the REAR of the chair
6.
BRAKED CASTOR
Mount Points
SWIVEL CASTOR
Mount Points
NOTE:
Use 2 x 13mm at spanners
to hold lower nut in posion
and ghten upper nut.
Lower nut
Brake

redgumbrand.com.au
7.
ASSEMBLY- HANDSET CONNECTION
The Taranto li chair comes with a handset
that needs to be connected to the li chair
PRIOR to being plugged into mains power.
Flip the li chair back onto the castors.
Reach into the pocket located on the side
of the chair and pull out the cable.
Align the pins on the plug of the
handset with the corresponding holes
in the cable end
(Flat surfaces on plugs to be inline).
Firmly push cables together.
Rotate the cable lock clip up unl you
hear a loud ‘Click’ indicang that cable
ends are now locked together.
Important Note:
Always store the handset and cable
in the storage pocket when not in use
to avoid any accidental damage.
Cable lock clip

redgumbrand.com.au
ASSEMBLY- CABLE CONNECTION
The Taranto li chair has two cables
located at the rear of the chair behind
the cover that require connecon prior
to the chair being plugged into mains power.
1. Locate the two cables as shown.
2. Match cables with markings together.
3. Align the pins with the corresponding holes
in the cable end.
4. Firmly push cables together.
5. Rotate the cable lock clip up unl you hear a loud ‘Click’
which indicates that cable ends are now locked together.
8.
Cable lock clip
Match cables with
markings

redgumbrand.com.au
ASSEMBLY- BATTERY BACKUP
The Taranto Li Chair is ed with baery backup as standard. This allows for the
li / rest / recline / headrest / lumbar funcons to sll operate if the mains power is
disrupted. It is recommended that main power is always used to operate the li chair
and the baery backup is only used to return the chair to a sing posion so the
occupant can remove themselves from the li chair.
To enable the baery backup please follow these steps:
1. Ensure the mains power is NOT plugged in.
2. Slide the cover on the transformer up to access the baery compartment.
3. Aach 2 x 9V baeries (NOT included) to the connecon wiring.
4. Fit baeries inside cavity and ret cover.
9.
2 x 9V Baeries
Important Note:
Remove the baeries if the chair is not plugged into mains power and in use.
The li chair will draw power from the baeries even when not in use.
Connecon
wiring

redgumbrand.com.au
10.
ASSEMBLY- TRANSFORMER CONNECTION
The Taranto Li Chair comes with a transformer
that needs to be connected to the li chair.
1. Locate the cable found at the rear
of the li chair on the underside.
2. Align the pins on the plug from the chair with the
corresponding holes in the cable end (Flat surfaces on plugs to be inline).
3. Firmly push cables together and rotate the cable lock clip up
unl you hear a loud ‘Click’ indicang that cable ends
are now locked together.
4. Plug transformer cable into transformer
as shown below.
5. Plug cable into mains power (240V).
Cable
lock clip
Important Note:
Always keep cables clear of base frame
to avoid any potenal damage.

redgumbrand.com.au
11.
USAGE GUIDELINES - CHAIR POSITIONING
Prior to using the Taranto Li Chair please follow these steps
to set up the chair in a safe manner:
- Posion the chair on a at and level oor.
- The li chair should be placed near a power point.
(We recommend that the chair be plugged
directly into the power source where possible)
- Allow sucient room in front and behind the chair
for reclining backrest and extending legrest:
- 650mm from wall
- 500mm + in front
- Try to maintain at least 1 metre between li chair and other furniture.
- Avoid placing the chair in the direct sun (Material colour will fade over me with sunlight).
- DO NOT use li chair outdoors (Indoor use only).
- Plug li chair into mains power - LED indicator on transformer will show green.

redgumbrand.com.au
12.
USAGE GUIDELINES - HANDSET CONTROLS
The Taranto Li Chair comes with a backlit handset that controls the movement of the
backrest, legrest, headrest, lumbar and overall chair posion.
Depress the relevant buon to achieve the required movement:
LOWER
Legrest
LIFT
Chair
RAISE
Legrest
LOWER
Chair
RAISE
Backrest
LOWER
Backrest
RAISE
Backrest + Legrest
LIFT
Chair
LOWER
Backrest + Legrest
LOWER
Chair
RAISE
Headrest
LOWER
Headrest
RAISE
Lumbar
LOWER
Lumbar

redgumbrand.com.au
USAGE GUIDELINES - DO’S + DON’TS
Please follow these guidelines to get the
opmal benet from your Taranto Li Chair.
Failure to follow these guidelines may result in
damage to the li chair and put the user at risk:
Maximum User Weight is 160kg.
Do not overload li chair!
- Ensure areas behind and in front of the li chair are clear at all mes.
- Adjust the base frame feet if the li chair is not level on the ground.
- Only the occupant or a qualied carer should operate the li chair.
- Always leave the li chair in the upright posion when not in use.
- Ensure that only ONE person uses the li chair at a me.
- Do not allow anyone to sit on the legrest when raised or on backrest when reclined.
- Always store the handset in the side pocket when not in use.
- Do not expose the li chair to excessive heat, humidity or dust.
- When moving the li chair hold from the base - not backrest or armrests.
If you are unsure about any of these precauons please contact your local distributor
or REDGUM Brand direct for further informaon.
13.
IMPORTANT NOTE:
PINCH POINTS EXIST ON LIFT CHAIRS
Keep clear of the li and recline
mechanisms at all mes !
KEEP
CLEAR

redgumbrand.com.au
PRODUCT CARE - INSPECTIONS / CLEANING
INSPECTIONS
We suggest that you visually check your Taranto Li Chair periodically for signs of
damage or wear prior to use. Pay parcular aenon to the following areas:
- Cabling
- Handsets
- Transformer and baery backup
- Actuators (motors)
- Coverings (look for pulls / tears / gaps / stch fraying)
Overall check that no components are loose or worn.
Stop using li chair immediately if you suspect damage or any other fault.
If in any doubt, please do not issue or use, but immediately contact your
local distributor or REDGUM Brand direct for advice and service support.
CLEANING
Clean your li chair coverings using
a non-abrasive cleaner or mild detergent
with a so cloth.
Spot clean any spills as soon as possible to reduce
the amount of ingress into fabric seams.
Abrasive cleaners or abrasive cleaning pads
could damage the li chair coverings
and should not be used.
DO NOT expose any of the electrics to any moisture:
- Actuators
- Handsets
- Cabling.
Keep these components dry at all mes
and away from any temperature extremes.
14.

redgumbrand.com.au
15.
WARRANTY
Your REDGUM Brand:
TARANTO FABRIC 4 Motor Li Chair (LC0401-2)
is covered by the following warranes from the date of purchase:
- FRAME (including mechanisms): 5 years
- ELECTRONICS: 2 years
- FABRICS: 2 years
If the product has any manufacturing faults during this period contact the place of
purchase for assessment. Failures as a result of ACCIDENTAL MISUSE, MODIFICATION
OR WEAR AND TEAR ARE NOT COVERED BY THIS WARRANTY.
Our goods come with guarantees that cannot be excluded under the Australian
Consumer Law. You are entled to a replacement part for a major failure and for
compensaon for any other reasonably foreseeable loss or damage. You are entled
to have the goods repaired or replaced if the goods fail to be of acceptable quality
and failure does not amount to major failure.
If you have any issues or quesons about your li chair
please contact your local distributor or REDGUM Brand direct on:
T: +61 8 9248 4180
E: sales@for-de.com.au
A: 1 Business Way, Malaga
Western Australia 6090
Please keep this User Manual
in a safe place for future reference.

redgumbrand.com.au
REDGUM BRAND PRODUCT RANGE
REDGUM Brand oer a comprehensive range of products including:
LOUNGE CHAIR PROTECTIVE COVER (LCCOVER)
Ideal way to protect your li chair from accidental stains
Other relevant products include:
Over bed chair tables
Cushions: Air / Foam
Exercisers
Seat Walkers
Walking Frames
Wheelchairs
Walking Scks + Quads
Crutches
Reachers
Shower / Bathroom products
Toilet products
Electric Beds
Portable / Fixed Aluminium Ramps
Personal Alarms
REDGUM Brand stock a large range of
Spare Parts for all REDGUM brand products.
Please contact REDGUM Brand
for further informaon:
T: +61 8 9248 4180
E: sales@for-de.com.au
A: 1 Business Way, Malaga
Western Australia 6090
W: redgumbrand.com.au
16.

redgumbrand.com.au
DISTRIBUTOR:
Proudly Australian Owned and Operated
This manual suits for next models
1
Table of contents
Other Redgum Indoor Furnishing manuals
Popular Indoor Furnishing manuals by other brands

Furniture of America
Furniture of America Bulle CM2669 Assembly instructions

Bausman & Company
Bausman & Company 3058 Assembly guide

Extremis
Extremis Anker ASSEMBLY INSTRUCTIONS, HOW TO USE, USEFUL TIPS

Ethnicraft
Ethnicraft 50032-U Assembly instructions

Walker Edison
Walker Edison V42Y78B Assembly Diagram

SEI
SEI MS877400TX Assembly instruction