Redroad G10 User manual

Quick Start Guide
Guide de démarrage rapide
Schnellstartanleitung
Guida rapida
Guía de inicio rápido
Skrócona instrukcja włączenia produktu
Краткое руководство
Hızlı Başltma Kılavuzu
빠른 시작 가이드
1
4
7
10
13
16
19
22
25


1. Pick below items from the package
2. Connect the self-cleaning station to the power cord
1
Power cord × 1
Place the self-cleaning station against the wall and connect the power cord.
Notes:
• Do not expose the self-cleaning station to direct sunlight.
• Please ensure a space of at least 0.5m on both the left and right sides of the self-cleaning station, and a space
of at least 1.5m in front of it.
• Pay attention to the power cord, otherwise it may be dragged by the robot, causing the self-cleaning station to
move or power off.
• The clean water tank, dirty water tank, and dirty water filter must be installed in place.
Vacuum-mop × 1
>0.5m
>0.5m
>1.5m
Self-cleaning station × 1

3. Power on and charging
4. Download App and configure the network
2
②When the machine is powered on, press
and hold the “ ” and “ ” buttons for 7s
at the same time, and then enter the network
configuration mode after hearing the prompt.
When using for the first time, please move the vacuum-mop to the charging pole piece and
align it with the charging shrapnel of the self-cleaning station to charge.
Note: The vacuum-mop will start up automatically after connected to the self-cleaning station, and cannot be
shut down during charging.
Recharging cleaning button:
In in-station stand-by, press for a short period of time, start cleaning.
In in-station cleaning, press for a short period of time, stop cleaning.
Outside-station, press for a short period of time, recharge.
In in-station stand-by, press for a long period of time, start air drying.
In in-station air drying, press for a long period of time, stop air drying.
Sweeping/mopping button:
In stand-by, press for a short period of time,
start cleaning.
In cleaning, press for a short period of time,
pause cleaning.
In recharging, press for a short period of time,
stop recharging.
①Scan the QR code below or search for
“Redroad” in the App store to download and
install the App.
③Add the machine in the App interface and
enter the Wi-Fi password to connect.
Note: Only Wi-Fi network in 2.4GHz band is supported.
WiFi-2.4G
Password

5. Execute cleaning task
3
④ Device connection
⑤Network configuration
Androidiso
Note: The contents of this guide start manual might be updated without prior notice.
Turn on smartphone, go to“ Setting-WLAN ”,
choose“Redroad-G10-XXXXXX” network connection,
when connection is done, re-open the App.
App in network connection status, and wait for the network configuration to finish.
Follow what the APP indicates, choose and connect
device network.
After the network configuration is successfully completed, start button to build the map
firstly, and then start the cleaning after the map is built.
Note: Please tidy up the wires on the floor to avoid tangling before the robot start cleaning. Do not enter
water areas.
Set up Wirdess lan
Wirdess lan
Choose a Network...
Network configuration
Set up Wirdess lan
Wirdess lan
Choose a Network...
Redroad-G10-XXXXXX
Redroad-G10-XXXXXX
Select a device
Unprovision Refresh List
Select a device
Unprovision Refresh List
Redroad-G10-XXXXXX
Redroad-G10-XXXXXX
Redroad-G10-XXXXXX
Redroad-G10-XXXXXX

1. Récupération des articles ci-dessous dans l'emballage
4
Cordon d'alimentation × 1
Placez la station d'autonettoyage contre le mur et branchez le cordon d'alimentation.
Remarques:
• N'exposez pas la station d'autonettoyage à la lumière directe du soleil.
• Veuillez respecter un espace d'au moins 0,5 m sur les côtés gauche et droit de la station d'autonettoyage, et
un espace d'au moins 1,5 m devant celle-ci.
• Faites bien attention au cordon d'alimentation, sinon il risque d'être traîné par l'aspirateur et de provoquer ainsi
le déplacement ou la mise hors tension de la station d'autonettoyage.
• Le réservoir d'eau fraîche, le réservoir d'eau sale et le filtre d'eau sale doivent être mis en place.
Aspirateur × 1
>0,5 m
>0,5 m
>1,5 m
Station d'auto-nettoyage × 1
2. Connexion de la station d'auto-nettoyage au cordon
d'alimentation

3. Mise sous tension et chargement
4. Téléchargement de l'application et configuration du réseau
5
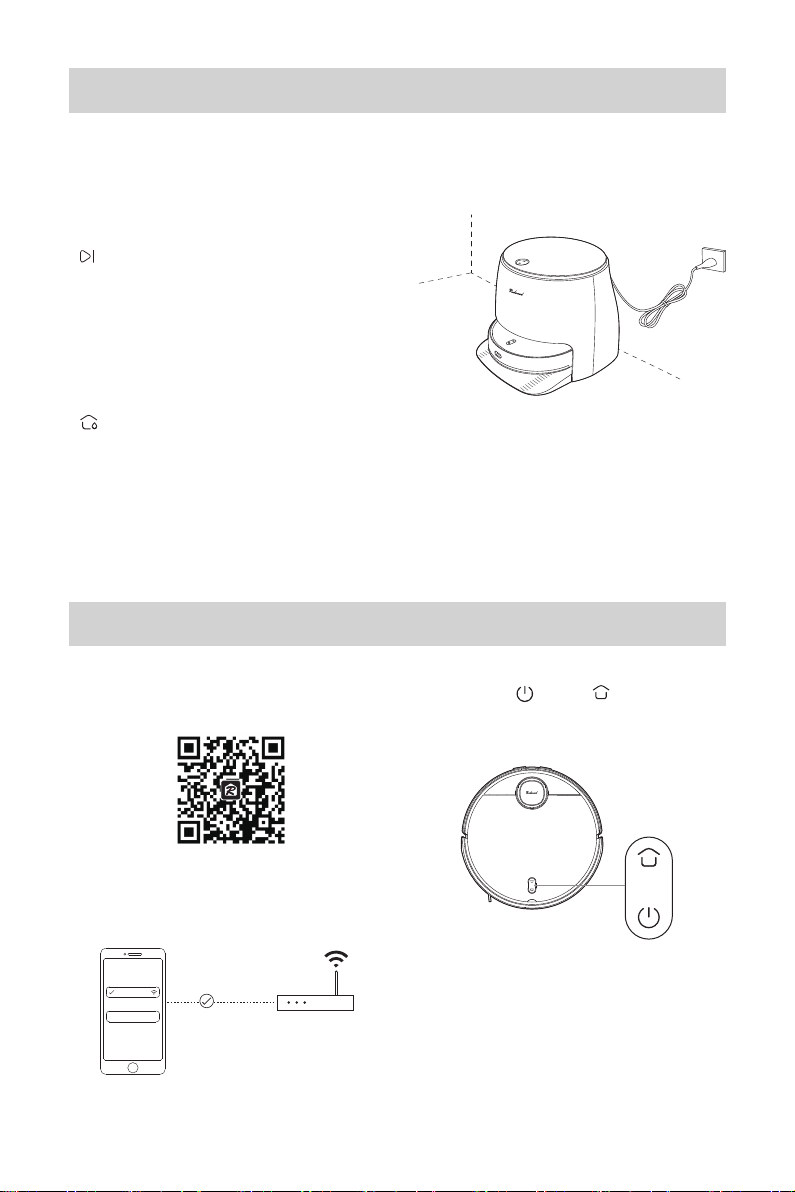
②Lorsque la machine est sous tension,
appuyez simultanément sur les boutons " "
et " " pendant 7s, puis entrez dans le
mode de configuration du réseau après avoir
entendu l'invite.
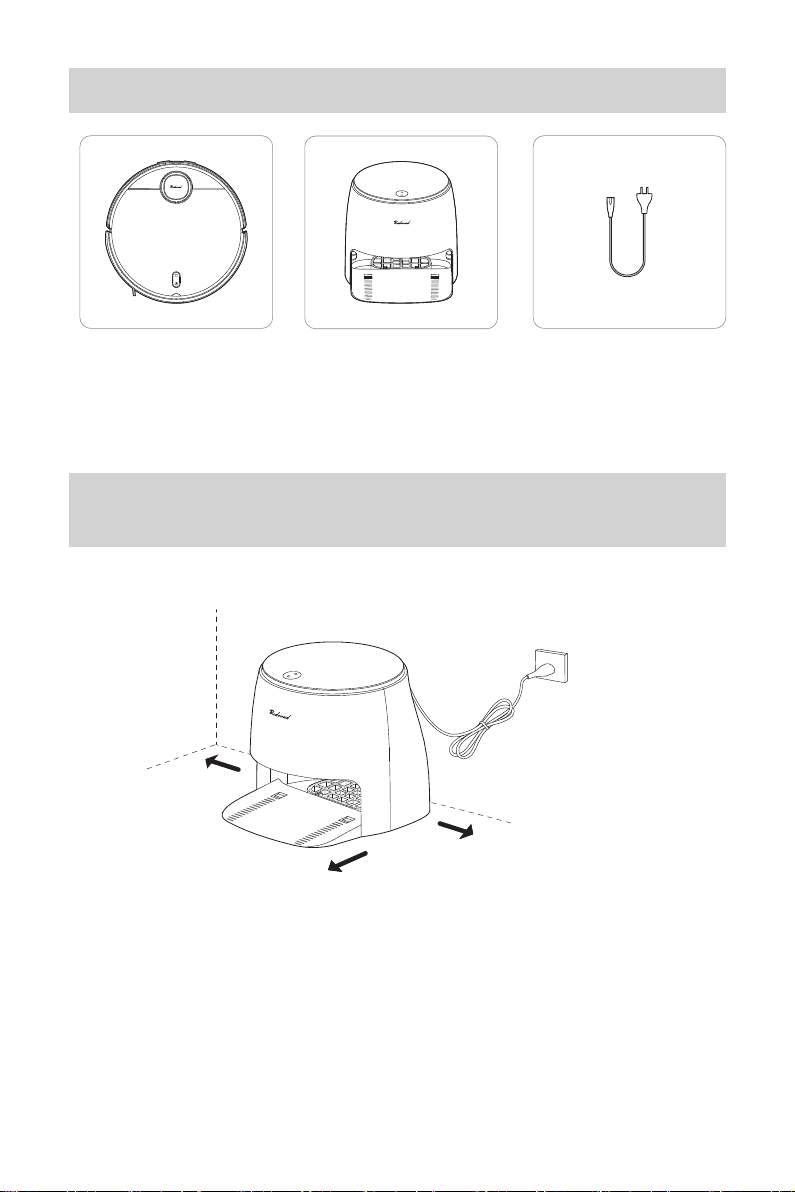
Lors de la première utilisation, placez l'aspirateur sur la perche de chargement et alignez-le
avec les éclats de chargement de la station d'auto-nettoyage pour le charger.
Remarque: L'aspirateur-balai se met automatiquement en marche une fois connecté à la station
d'auto-nettoyage et ne peut pas être arrêté pendant la charge.
Bouton de nettoyage de la recharge :
En veille en station, appuyer pendant une courte période, pour commencer le nettoyage.
En mode de nettoyage en station, appuyez pendant une courte période, pour arrêter le nettoyage.
En dehors de la station, appuyez pendant une courte période de temps, pour recharger.
En mode veille en station, appuyez pendant une longue période, pour commencer le séchage à l'air.
En mode de séchage à l'air en station, appuyez pendant une longue période, pour arrêter le
séchage à l'air.
Bouton de nettoyage/balayage :
En veille, appuyer pendant une courte période,
pour lancer le nettoyage.
En nettoyage, appuyez pendant une courte
période, pour mettre le nettoyage en pause.
En recharge, appuyez pendant une courte
période, pour arrêter la recharge.
① Scannez le code QR ci-dessous ou
recherchez "Redroad" dans l'App store pour
télécharger et installer l'application.
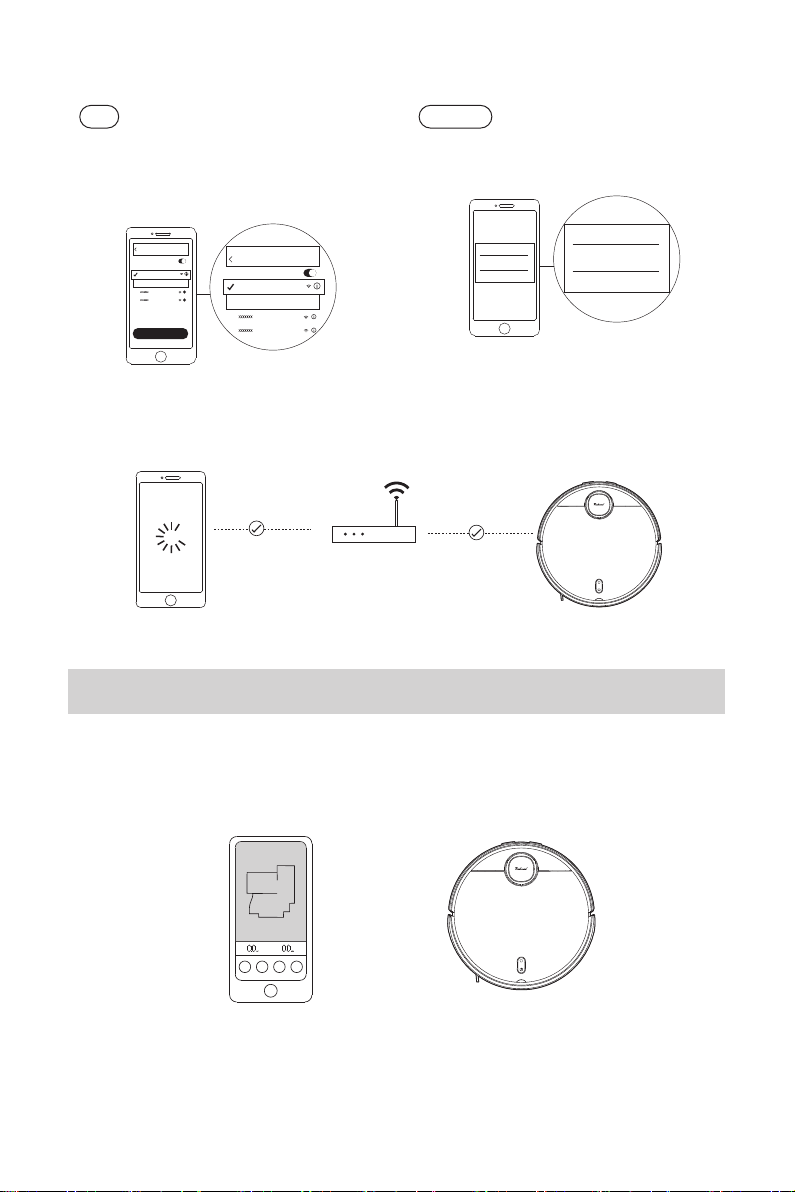
③ Ajoutez la machine dans l'interface App et
entrez le mot de passe Wi-Fi pour vous
connecter.
Remarque: seul le réseau Wi-Fi en bande 2,4 GHz est
pris en charge.
WiFi-2,4G
Mot de passe

5. Exécution de la tâche de nettoyage
6
④Connexion de l'appareil
⑤Configuration du réseau
Androidiso
Remarque : Le contenu de ce guide de démarrage peut être mis à jour sans préavis.
Allumez le smartphone, allez dans "Setting-WLAN",
choisissez la connexion réseau
"Redroad-G10-XXXXXX", lorsque la connexion est
réalisée, ouvrez à nouveau l'App.
App en état de connexion réseau, puis attendez que la configuration réseau se termine.
Suivez les indications de l'APP, choisissez et
connectez le réseau de l'appareil.
Une fois la configuration du réseau terminée, appuyez sur le bouton de démarrage pour
réaliser la carte dans un premier temps, puis lancez le nettoyage une fois la carte réalisée.
Remarque : Veuillez ranger les fils sur le sol pour éviter qu'ils ne s'emmêlent avant que l'aspirateur ne
commence à nettoyer. Évitez les zones d'eau.
Configuration Réseau local sans fil
Réseau local sans fil
Choix d’un réseau…
Configuration du réseau
Configuration Réseau local sans fil
Réseau local sans fil
Choix d’un réseau…
Redroad-G10-XXXXXX
Redroad-G10-XXXXXX
Sélectionnez un appareil
Sans provision Rafraîchir la liste
Sélectionnez un appareil
Sans provision Rafraîchir la liste
Redroad-G10-XXXXXX
Redroad-G10-XXXXXX
Redroad-G10-XXXXXX
Redroad-G10-XXXXXX

2. Verbinden Sie das Netzkabel an der Selbstreinigungsstation
7
1 x Selbstreinigungsstation
Platzieren Sie die Selbstreinigungsstation an der Wand und stecken Sie das Netzkabel in die
Steckdose.
Hinweise:
• Setzen Sie die Selbstreinigungsstation keinem direkten Sonnenlicht aus.
• Achten Sie darauf, dass links und rechts von der Selbstreinigungsstation ein Freiraum von mindestens 0,5 m
und vor der Station ein Freiraum von mindestens 1,5 m eingehalten wird.
• Achten Sie auf das Netzkabel, da es ansonsten vom Saugroboter eingezogen werden kann und die
Selbstreinigungsstation verschieben oder deaktivieren könnte.
• Der Frischwassertank, Schmutzwassertank und der Schmutzwasserfilter müssen in Position installiert sein.
1 x Wisch- und Saugroboter
>0,5 m
>0,5 m
>1,5 m
1 x Selbstreinigungsstation
1. Entnehmen Sie die unten angegebenen Teile aus der
Verpackung

3. Einschalten und Aufladen
4. Laden Sie die App herunter und konfigurieren Sie das Netzwerk
8
②Wenn das Gerät eingeschaltet ist, halten
Sie gleichzeitig die Tasten „ “ und “ “
für 7 s gedrückt und wechseln Sie dann in
den Netzwerkkonfigurationsmodus, nachdem
die Eingabeaufforderung ertönt.
Bei der Erstinbetriebnahme, bewegen Sie den Wisch- und Saugroboter bitte zum
Ladeschacht und richten Sie ihn zum Aufladen am Ladekontakt der
Selbstreinigungsstation aus.
Hinweis: Der Wisch- und Saugroboter schaltet sich automatisch ein, nachdem er in die Selbstreinigungsstation
gestellt wurde und kann während des Ladevorgangs nicht abgeschaltet werden.
Lade-/Reinigungstaste:
Wenn sich der Roboter im Standby-Modus in der Station befindet, kurz drücken, um die Reinigung
zu starten.
Beim Selbstreinigungsmodus des Roboters innerhalb der Station, kurz drücken, um die Reinigung
zu stoppen.
Wenn sich der Saugroboter außerhalb der Station befindet, kurz drücken, um den Ladevorgang zu
starten.
Wenn sich der Saugroboter im Standby-Modus in der Station befindet, lange drücken, um die
Lufttrocknung zu starten.
Bei Lufttrocknung in der Station, lange drücken, um Lufttrocknung zu stoppen.
Kehren-/Wischen-Taste:
Im Standby-Modus kurz drücken, um die
Reinigung zu starten.
Im Reinigungsmodus kurz drücken, um die
Reinigung zu unterbrechen.
Im Lademodus kurz drücken, um den
Ladevorgang zu beenden.
①Scannen Sie den unten stehenden
QR-Code ein oder suchen Sie nach „Redroad“
im App-Store, um die App herunterzuladen und
zu installieren.
③ Fügen Sie das Gerät in der App-Schnittstelle
hinzu und geben Sie das WLAN-Passwort ein,
um eine Verbindung herzustellen.
WiFi-2,4G
Passwort
Hinweis: Es werden nur WLAN-Netzwerke im
2,4-GHz-Band unterstützt.

5. Ausführen einer Reinigungsaufgabe
9
④ Die Geräteverbindung ist hergestellt
⑤ Netzwerkkonfiguration
Androidiso
Hinweis: Der Inhalt dieser Schnellstartanleitung kann ohne vorherige Ankündigung aktualisiert werden.
Schalten Sie das Smartphone ein, gehen Sie auf
„Einstellungen - WLAN“, wählen Sie die
Netzwerkverbindung „Redroad-G10-XXXXXX“ aus.
Öffnen Sie die App erneut, sobald die Verbindung
hergestellt ist.
App befindet sich im Netzwerkverbindungsstatus. Warten Sie, bis die Netzwerkkonfiguration
abgeschlossen ist.
Folgen Sie den Anweisungen in der APP, wählen
und verbinden Sie sich mit einem Gerätenetzwerk.
Nachdem die Netzwerkkonfiguration erfolgreich abgeschlossen wurde, klicken Sie auf die
Schaltfläche Start, um zunächst die Karte zu erstellen. Starten Sie die Reinigung, nachdem
die Karte erstellt wurde.
Hinweis: Vor dem Reinigungsbeginn des Staubsaugers, entfernen Sie bitte alle Kabel vom Boden, um ein
Verheddern zu vermeiden. Lassen Sie den Staubsauger nicht auf nasse Bodenflächen fahren.
Einrichten Wireless-LAN
Wireless-LAN
Wählen Sie ein Netzwerk …
Netzwerkkonfiguration
Einrichten Wireless-LAN
Wireless-LAN
Wählen Sie ein Netzwerk …
Redroad-G10-XXXXXX
Redroad-G10-XXXXXX
Wählen Sie ein Gerät
Nichtbereitstellung Liste aktualisieren
Wählen Sie ein Gerät
Nichtbereitstellung Liste aktualisieren
Redroad-G10-XXXXXX
Redroad-G10-XXXXXX
Redroad-G10-XXXXXX
Redroad-G10-XXXXXX

1. Scegliere tra gli articoli dal pacchetto
2. Collegare la stazione autopulente al cavo di alimentazione
10
Cavo di alimentazione × 1
Posizionare la stazione di autopulizia contro il muro e collegare il cavo di alimentazione.
Note:
• Non esporre la stazione autopulente alla luce solare diretta.
• Si prega di garantire uno spazio di almeno 0,5 m su entrambi i lati sinistro e destro della stazione autopulente,
e uno spazio di almeno 1,5 m di fronte ad essa.
• Prestare attenzione al cavo di alimentazione, altrimenti potrebbe essere trascinato dal aspirapolvere,
causando lo spostamento o lo spegnimento della stazione autopulente.
• Il serbatoio di acqua pulita, il serbatoio di acqua sporca e il filtro dell'acqua sporca devono essere installati sul
posto.
Aspirapolvere × 1
>0,5 m
>0,5 m
>1,5 m
Stazione autopulente × 1

3. Accensione e ricarica
4. Scaricare l'App e configurare la rete
11
② Quando la macchina è accesa, tieni
premuti i pulsanti " " e " " per 7s allo
stesso tempo, e poi entra nella modalità di
configurazione della rete dopo aver sentito il
prompt.
Quando si usa per la prima volta, si prega di spostare l'aspirapolvere sul pezzo dell'asta di
ricarica e di allinearlo con i punti di ricarica della stazione autopulente per caricare.
Nota: L'aspirapolvere si avvia automaticamente dopo essere stato collegato alla stazione autopulente e non può
essere spento durante la ricarica.
Pulsante di ricarica per la pulizia:
In stand-by, premere per un breve periodo di tempo, avviare la pulizia.
Nella pulizia in loco, premere per un breve periodo di tempo, fermare la pulizia.
Stazione esterna, premere per un breve periodo di tempo, ricaricare.
In stand-by, premere per un lungo periodo di tempo, avviare l'asciugatura ad aria.
Nell'asciugatura ad aria in loco, premere per un lungo periodo di tempo, fermare l'asciugatura ad aria.
Pulsante per la pulizia/lavaggio:
In stand-by, premere per un breve periodo di
tempo, avviare la pulizia.
Nella pulizia, premere per un breve periodo di
tempo, mettere in pausa la pulizia.
Nella ricarica, premere per un breve periodo di
tempo, fermare la ricarica.
① Scannerizza il codice QR qui sotto o cerca
"Redroad" nell'App store per scaricare e
installare l'App.
③Aggiungete la macchina nell'interfaccia App
e inserite la password Wi-Fi per la connessione.
Nota: solo la rete Wi-Fi in banda 2,4GHz è supportata.
WiFi-2.4G
Password

5. Eseguire l'attività di pulizia
12
④ Connessione del dispositivo
⑤ Configurazione della rete
Androidiso
Nota: Il contenuto di questa guida potrebbe essere aggiornato senza preavviso.
Accendi lo smartphone, vai a" Impostazione-WLAN ",
scegli la connessione di rete "Redroad-G10-XXXXXX",
quando la connessione è fatta, riapri l'App.
App in stato di connessione alla rete, e aspetta che la configurazione della rete finisca.
Segui ciò che indica l'APP, scegli e collega la rete
del dispositivo.
Dopo che la configurazione di rete è stata completata con successo, avviare il pulsante per
costruire la mappa in primo luogo, e quindi avviare la pulizia dopo che la mappa è stata
costruita.
Nota: Si prega di riordinare i fili sul pavimento per evitare grovigli prima che l'aspirapolvere inizi la pulizia. Non
entrare nelle zone con acqua.
Impostare Wirdess lan
Wirdess lan
Scegli una rete...
Configurazione della rete
Impostare Wirdess lan
Wirdess lan
Scegli una rete...
Redroad-G10-XXXXXX
Redroad-G10-XXXXXX
Selezionare un dispositivo
Sblocca Aggiorna elenco
Selezionare un dispositivo
Sblocca Aggiorna elenco
Redroad-G10-XXXXXX
Redroad-G10-XXXXXX
Redroad-G10-XXXXXX
Redroad-G10-XXXXXX

1. Retire los siguientes artículos del embalaje
13
Cable de corriente x 1
Coloque la estación de autolimpieza contra la pared y conecte el cable de corriente.
Notas:
• No deje la estación de autolimpieza directamente expuesta a la luz solar.
• Asegúrese de dejar un espacio mínimo de 0,5 m a izquierda y derecha de la estación de autolimpieza y un
espacio mínimo de 1,5 m al frente de ella.
• Preste atención al cable de corriente, de lo contrario podría arrastrarlo con la aspiradora, provocando que se
mueva o se apague la estación de autolimpieza.
• El tanque de agua fresca, el tanque de agua sucia y el filtro de agua sucia deberán estar colocados en su sitio.
Aspiradora x 1
>0,5 m
>0,5 m
>1,5 m
Estación de autolimpieza x 1
2. Conecte la estación de autolimpieza mediante el cable de
corriente

3. Encendido y carga
4. Descargue la App y configure la red
14
②Mantenga presionados al mismo tiempo
los botones « » y « » por 7 segundos
y luego ingrese al modo de configuración de
red tras oír el aviso.
Al usar la aspiradora por primera vez, muévala a la pieza de carga y alinéela con la pieza
de carga de la estación de autolimpieza para cargarla.
Nota: La aspiradora se encenderá automáticamente una vez conectada a la estación de autolimpieza y no será
posible apagarla durante la carga.
Botón de limpieza y recarga:
Presione por un período breve cuando la aspiradora esté en la estación en modo de espera para
iniciar la limpieza.
Presione por un período breve cuando la aspiradora esté en la estación limpiando para detener la
limpieza.
Presione por un período breve cuando la aspiradora esté fuera de la estación para recargar.
Presione por un período prolongado cuando la aspiradora esté en la estación en modo de espera
para iniciar el secado al aire.
Presione por un período prolongado cuando la aspiradora esté en la estación realizando secado al
aire para detener el secado al aire.
Botón de barrido/fregado:
Presione por un período breve en modo de
espera para iniciar la limpieza.
Presione por un período breve mientras está
limpiando para pausar la limpieza.
Presione por un período breve mientras está
recargando para detener la recarga.
①Escanee el siguiente código QR o busque
«Redroad» en la App Store para descargar e
instalar la App.
③ Añada la máquina en la interfaz de la App e
ingrese la contraseña de Wi-Fi para conectar.
WiFi-2.4G
Contraseña
Nota: Solamente se admiten redes Wi-Fi en la banda 2,4 GHz.

5. Ejecutar la tarea de limpieza
15
④ Conexión del dispositivo
⑤Configuración de red
Androidiso
Nota: Los contenidos de esta guía rápida podrán recibir actualizaciones sin mediar previo aviso.
Encienda el teléfono, diríjase a «Configuración de
WLAN», escoja la conexión a la red
«Redroad-G10-XXXXXX», una vez se haya
conectado, vuelva a abrir la App.
Estado de la conexión en la App y aguarde a que la configuración de red finalice.
Siga lo indicado en la App, escoja y conecte el
dispositivo a la red.
Una vez que efectivamente haya finalizado la configuración de red, presione primero el
botón de inicio para construir el mapa y luego inicie la limpieza una vez construido el mapa.
Nota: Organice los cables sobre el piso antes de que la aspiradora empiece a limpiar para que esta no se enrede
con ellos. No ingresar a áreas mojadas.
Configurar Red inalámbrica
Red inalámbrica
Escoja una red...
Configuración de red
Configurar Red inalámbrica
Red inalámbrica
Escoja una red...
Redroad-G10-XXXXXX
Redroad-G10-XXXXXX
Seleccione un dispositivo
Desprovea Actualice la lista
Seleccione un dispositivo
Desprovea Actualice la lista
Redroad-G10-XXXXXX
Redroad-G10-XXXXXX
Redroad-G10-XXXXXX
Redroad-G10-XXXXXX

1. Wyciągnij z opakowania poniższe elementy
2. Podłącz stację samoczyszczącą do przewodu zasilającego
16
Przewód zasilający × 1
Umieść stację samoczyszczącą przy ścianie i podłącz przewód zasilający.
Uwagi:
• Nie należy wystawiać stacji samoczyszczącej na bezpośrednie działanie promieni słonecznych.
• Należy zapewnić co najmniej 0,5 m wolnej przestrzeni po lewej i prawej stronie stacji samoczyszczącej oraz co
najmniej 1,5 m wolnej przestrzeni przed nią.
• Należy zwrócić uwagę, aby odkurzacz nie pociągnął przewodu zasilającego, co może spowodować przesunięcie
się stacji samoczyszczącej lub jej wyłączenie.
• Zbiornik świeżej wody, zbiornik na brudną wodę i filtr brudnej wody muszą być zainstalowane na swoim miejscu.
Odkurzacz-mop × 1
>0,5 m
>0,5 m
>1,5 m
Stacja samoczyszcząca × 1

3. Włącz zasilanie i ładuj
4. Pobierz aplikację i skonfiguruj sieć
17
② Gdy urządzenie jest włączone, naciśnij i
przytrzymaj jednocześnie przyciski " " i
" " przez 7 s, a następnie wysłuchaj
komunikat i przejdź do trybu konfiguracji
sieci.
Przy pierwszym użyciu należy przysunąć odkurzacz-mop do słupka ładującego i ustawić
go w linii ze stykiem ładowania stacji samoczyszczącej w celu naładowania.
Uwaga: Odkurzacz-mop uruchomi się automatycznie po podłączeniu do stacji samoczyszczącej i nie można go
wyłączyć podczas ładowania.
Przycisk ładowania/czyszczenia:
W trybie czuwania w stacji samoczyszczącej naciśnij i przytrzymaj krótko, aby rozpocząć
czyszczenie.
W trybie czyszczenia w stacji samoczyszczącej naciśnij i przytrzymaj krótko, aby wstrzymać
czyszczenie.
Poza stacją naciśnij i przytrzymaj krótko, aby rozpocząć ładowanie.
W trybie czuwania w stacji samoczyszczącej naciśnij i przytrzymaj długo, aby rozpocząć suszenie.
W trybie suszenia w stacji samoczyszczącej naciśnij i przytrzymaj długo, aby zatrzymać suszenie.
Przycisk odkurzania/mopowania:
W trybie czuwania naciśnij i przytrzymaj krótko,
aby rozpocząć czyszczenie.
W trybie czyszczenia naciśnij i przytrzymaj
krótko, aby wstrzymać czyszczenie.
W trybie ładowania naciśnij i przytrzymaj krótko,
aby zatrzymać ładowanie.
① Zeskanuj poniższy kod QR lub wyszukaj
"Redroad" w sklepie z aplikacjami, aby pobrać
i zainstalować aplikację.
③ Dodaj urządzenie w interfejsie aplikacji i
wprowadź hasło Wi-Fi, aby się połączyć.
Uwaga: Obsługiwana jest tylko sieć Wi-Fi w paśmie 2,4 GHz.
WiFi-2.4G
Hasło
Other manuals for G10
2
Table of contents
Languages:
Other Redroad Vacuum Cleaner manuals