Refine PT-X User manual

1
Dental Scaler Instruction Manual
Precautions
Warning: If you neglect these precautions, it might cause personal injury such as electric shock, fire or damage to the product.
1. This product is not a home appliance. It is only applicable for hospitals and dental clinics. The use of the product must comply with
the requirements of the relevant operating specifications and relevant laws and regulations of the medical department. The user must
be a professionally trained and qualified dentist or technician. Adequate protection (such as goggles, mask, etc.) should be equipped
during operation to prevent cross-infection.
2.Please use an independent power outlet with protective grounding. Do not unplug the power cord with wet hands.
3. Please fully insert the power plug of the device into the power socket, please do not use other power source other than the
specified voltage.
4. Do not damage, modify, pull, bend or twist the power cord excessively, and do not place heavy objects on the power cord.
5. After using the machine, turn off the power switch and pull out the power plug.
6. When the equipment recovers after power off, please await the equipment to be stable before stepping on the pedal. The operator
should release the pedal in time when the power is off.
7. Please do not place the product on an unstable workbench, such as a swaying table, an inclined surface, or a location subject to
vibration.
8. This equipment is a reusable product. Keep the equipment clean before and after use. Before each use, the handpieces, tips, torque
wrench etc. must be disinfected and sterilized. It is suggested to disinfect and sterilize according to the recommended method in
Chapter 5 of this manual.
9. Do not knock or scrape the handpiece. Do not pull the cable forcefully during the use of the equipment to avoid damages.
10. Do not bend or polish the tips. The tips must be screwed to the handpiece with a torque wrench, and water spray must be
generated during operation.
11. Before each operation, you should work outside the patient's mouth for more than 10 seconds under the condition of water to
drain the water in the pipeline at the back of the handpiece
12. When the tip is damaged or worn out, the vibration intensity might decrease. The operator should replace a new tip in time
according to the clinical situation. It is not recommended to use the tip after the abrasion of tip exceed 2mm or more. You can use the
tip comparison indicator to check. If the length is out of the first line, the power remains the same; if it is between the first and second
line, the power would decreased to 80%; if it reaches or surpass the second line, the power would drop massively, on the occasion,
replacement of tip is recommended.
13. Do not screw or unscrew the tip while stepping on the foot switch, or when the machine is on working.
14. The inner thread of the tip manufactured by certain manufacturers are rough, rusty and might break the thread system, which will
cause irreparable damage to the scaler. Please use corresponding tips of Refine brand.
15. Choose the appropriate power according to different types of tips. See Annex Tip power chart There are recommended power and
water volume for different types of tip in the system. You can double -click the current mode to choose the tip.
16. Do not use unclean water
17. Improper cleaning and treatment of titanium implants, porcelain restorations, etc. can easily cause loosening of the adhesive,
cracking of the porcelain restorations, or even cracking of the porcelain. The cleaning or treatment of the oral cavity of such patients
should be carefully considered.
18. Noise will be generated during the scaling process. Those who are sensitive to noise can wear earplugs by themselves.
19. We will be responsible for the safety only when the maintenance, repair and modification of the machine are carried out by the
company or its authorized distributors, the replacement parts are from the company, and the operation is on the basis of instruction
manual.

2
20. This equipment has electromagnetic interference. Do not use it around electronic surgery, and be cautious in an environment with
strong electromagnetic interference when using this equipment.
21. This equipment does not contain toxic or hazardous substances, and it can be discarded in accordance with the relevant laws and
regulations on discarded medical devices.
22. Do not step on the foot pedal when the cable of the air polish handpiece is removed from the main unit.
23. Before using the ultrasonic handpiece, please make sure that the cable of the air polish handpiece is correctly placed on the handle
bracket; similarly, before using the air polish handpiece, please make sure that the cable of the ultrasonic handpiece is correctly placed
on the ultrasonic handle bracket.
24. The tip must be tightened.
25. The air polishing handpiece nozzle should not be aimed at people.
26. There might be injury if the powder accidentally sprays into the eyes. We strongly recommend that all personnel (doctors, nurses,
patients) wear goggles during air polishing treatment.
27. Please do not unload the powder tank when stepping on the pedal or when the machine is working.
28. Before replacing the air polishing handpiece or the nozzle, please use a syringe to blow the moisture at the joints at both ends
(especially the gas interface) to prevent moisture from entering the gas path and avoid clogging of the powder in the pipeline.
Contraindications
1. The hemophilia patient is forbidden to use this equipment 2 . The patients or the doctors with heart pacemaker are forbidden to
use this equipment. 3. Heart disease patients, pregnant women and children should be cautious to use the equipment. 4. Patients
with respiratory diseases such as asthma and chronic bronchitis are not allowed to use this device.
Symbol Instruction
Symbol Implication Symbol Implication Symbol Implication
Trademark See instruction mannual Grounding protection
Warning and important
notes! See the attached
documents
Anti-drip equipment Sterilizable spare parts under
high temperature
Recycling Manufacturer Indoor only
Date of manufacture BF type applied part Alternating current
Power-on button Power-off button ON/OFF Power switch
IPXO Ordinary equipment Power adjustment Foot pedal plug
Storage condition,
temperature limit: -20℃
- +40℃
Storage condition, air pressure
limit: 70kPa - 106 kPa
Storage condition, humidity
limit: 10% - 93%
Keep dry Fragile
Compliance with WEEE
directive, Discarded as per
regulations
Boost mode Anhydrous mode Clean mode
Forward
Guilin Refine Medical Instrument Co., Ltd. is a high-tech enterprise integrating R&D, production and sales of dental products, with a
complete quality assurance system.
1 Product Introduction
1.1 Brief introduction
PT X dental scaler combines ultrasound scaler and air polishing scaler. The main features are:
1) According to the selected handpiece, automatically switch the working mode.
2) Touch LCD screen.
3) Special chemical solutions such as hydrogen peroxide, sodium hypochlorite and chlorhexidine can be used to improve the clinical
treatment effect.
4) LED handpiece enables convenient Clinical operation.
5) The automatic frequency tracking system for the best working condition, which brings more stable performance of device.
6) Detachable ultrasonic handpiece and air polishing handpiece can be sterilized under high temperature of 134 and high pressure
of 0.22MPa.
1.2 Model: PT X
1.3 Scope of application
This product includes an ultrasonic system and an air polish system. The ultrasonic system is used for periodontal treatment in oral
clinical treatment to remove tartar and plaque, root canals cleaning; Air polish system is used to remove plaque and pigment, it can
also used for implants maintenance.
1.4 Device conguration
Please refer to the packing list for device configurations.
1.5 Structure and components
The machine consists of main unit, handpiece (ultrasonic handpiece, air polishing handpiece), cable, bottle, tips, dental air polishing
powder, torque wrench and foot pedal, Power cord.
1.6 Replacement instruction for main accessories.
Name Model Replacement instruction
Air polishing andpiece XP-1 / XP-2
Reusable and Durable; Please change a new handpiece when the handpiece is
blocked and cannot be dredged, or the sealing performance is reduced, or the
ventilation pipe is seriously worn out

3
Ultrosonic handpiece HY-2L Reusable and Durable; Please change a new handpiece when the output power
drops significantly or does not work.
Power cord / Reusable and Durable; Please replace the power cord when it is cracked or
non-conductive
Water pipe / Reusable and Durable; Please change a new pipe when the water pipe is cracked
and leaked.
Tips refer to the packing
list
Please change a new tip when it is worn out. For details, see point 12 of the Safety
Precautions.
Torque wrench / Reusable and Durable. Please change a new one as per Instruction Manual when
its broken.
Foot pedal RFS05 Reusable and Durable. Please change a new one as per Instruction Manual when
its broken.
Water bottle / Reusable and Durable. Please change a new one as per Instruction Manual when
its broken
Powder tank / Reusable and Durable. Please change a new one as per Instruction Manual when
its broken.
1.7 Device safety classication
1) Classified by operation mode: Continuous operating device
2) Type of protection against electric shock: Class I
3) Degree of protection against electric shock: BF type
4) Degree of protection against harmful ingress of water: Ordinary equipment (IPX0). Foot pedal is anti-drip device (IPX1)
5) Degree of safety application in the presence of a flammable anesthetic mixture with air, oxygen, or nitrous oxide: Equipment
cannot be used in the presence of a flammable anesthetic mixture with air, oxygen, or nitrous oxide.
1.8 Main technical specication
Specification PT X
Main Unit Size (mm)
Length*Wideth*Height 320mm330mm120mm
Main unit weight 4.0kg
Handpiece model HY-2L / XP-1 / XP-2
Control mode Touch control
Water supply mode Water supply
Power adapter input 100VAC - 240VAC 50Hz/60Hz
Input power 200VA
Main unit fuse T1.6AL 250V
Foot pedal shell protection
Level IPX1
Tip output features Frequency: 30kHz5kHz; Output main vibration offset of tip 1μm~200μm; Semi-offset force 0.1-5N;
Output power of tip 3W-20W
Water inlet pressure 0.1bar-5bar (0.01MPa-0.5MPa)
Air inlet pressure 5.5bar-7.5bar (0.55MPa-0.75MPa)
Water temperature ≤ 45℃
1.9 Operation Environment
Environmental temperature: +5℃ - +40℃ , Relative humidity: 30% - 75%, Atmospheric pressure: 70kPa - 106kPa, Cooling water
temperature: +5℃ - +25℃
2 Installation
2.1 Main Unit Diagram
Figure 1 Front view Figure 2 Back view
2.2 Touch panel
Figure 3 Touch panel diagram

4
Symbol Implication
Symbol Implication Symbol Implication Symbol Implication
Tip currently in use Scaling mode Periodontal mode
Endo mode Air polishing mode CCleaning mode
Data storage function Setting Water hitting switch
Turn down water vol-ume/
power/air pressure
Turn up water vol-ume / power
/ air pressure
2.4 Schematic diagram of handpiece
Figure 4 Ultrasonic handpiece Figure 5 Air polishing handpiece (supergingival)
Figure 6 Air polishing handpiece (subergingival)
2.5 Schematic diagram of tip installation
2.6 Installation procedures
2.6.1 Open the package, check whether the equipment is complete as per the packing list, and place the main unit on a solid place,
facing the operator.
2.6.2 8 Plug the external air pipe connector into the air intake connector on the back of the main unit(as showed in Figure 8).
2.6.3 Fill the water bottle with an appropriate amount of water, and fix the water bottle into the sink seat directly above the main
unit (it is recommended to smear a layer of petroleum jelly on the O-ring at the bottom of the water bottle to facilitate the plugging
and unplugging of the water bottle)
2.6.4 Match the pedal( Wired or wireless) as per personal preference.
1) Wired mode: Connect one end to the foot pedal port of the foot pedal, and the other end to the foot pedal port on the main
unit.
2) Wireless mode: Remove the pedal battery cover and install 2 AA batteries. Switch on the main unit and the foot pedal can be
connected and controlled (when leaving the factory, the Bluetooth foot pedal and the main unit have been paired and connected.
If you change the foot pedal, please enter the "System Settings" to match the Bluetooth foot pedal.)
2.6.5 Connect the ultrasonic handpiece and the air polishing handpiece into the corresponding cables, and place the handpiece on
the brackets on both sides of the main unit. The ultrasonic handpiece is on the left and the air polishing one is on the right.
2.6.6 wer switch, connect the power cord with the power port on the back of the main unit, and then plug in the 220VAC power, as
shown in Figure 2.
Warning 1: When the power cord is connected to the network power supply, it must be connected to a protective ground;
When the power cord is connected to the network power supply, do not place or install the product where it is difficult to
disconnect the network power supply.
3 Function and Operation
3.1Multi-functional foot pedal
3.1.1 Choose the mode of foot pedal according to 2.6.4, place it in the flat ground
3.1.2 The pedal and its functions are shown below:
Button Operating mode Function
Ultrasonic system Air polishing system
A Standard Vibration + Water AirPowder + water
B No-water mode Vibration Air only
C(A+) Boost mode 5-Level increase in Power 5-Level increase in air pressure
D Cleaning mode Water only Water + Air
Note: Under Boost mode, Power or air pressure would be increased by 5 grades, the maximum is the 12th grade. After releasing button

5
C, it will automatically return to the previously set grade.
Figure 9
Schematic diagram of multi-function foot pedal
3.2 Ultrasonic system
3.2.1 Scaling
1) Turn on the power switch and pick up the ultrasonic
handpiece, afterwards the panel will automatically shift
to Ultrasonic mode.
2) Press the G button to enter Scaling mode.
3) Select the tip and tighten it on the handpiece by
torque wrench.
4) When stepping on the button A, tip vibrates with LED
on and water emits; Release the button, vibration and water stop, LED will be off 10 seconds later.
5) The handpiece is generally held in a pen-holding position.
6) The frequency is extremely high when the machine is on working. It can remove the tartar with the tips softly stroke on the teeth
surface like erasing motion. DO NOT stay long or put overmuch pressure on the teeth.
7) Vibrating intensity: Adjust the vibrating intensity according to your need. The setting power is level 3, please adjust the vibrating
intensity according to the teeth sensitivity and hardness of calculus during clinical application.
8) Water volume: Please adjust the volume on the panel.
9) During clinical scaling, please keep the side of the tip adapt to the tooth surface horizontally, with light lateral pressure to allow the
tip vibrate freely.
10) After operation, please keep device working for 30s with water to flush the handpiece and tips; Remove the tip and get it sterilized.
3.2.2 Periodontal treatment
1) Use a torque wrench to tighten the periodontal treatment tip to the ultrasonic handpiece. Click the P button on panel to enter the
periodontal treatment mode.
2) The operation and adjustment methods are similar to Scaling mode.
3.2.3 Endodontic irrigation
1) Tighten the endo file to the handpiece by endo wrench.
2) Click on the E button and enter the Endo mode.
3) The default power is level 1 under Endo mode, operator can adjust the power according to the need in clinical treatment.
4) Select the appropriate Endo file and slowly place it into the root canal of the patients teeth. Step on the foot pedal to start
ultrasonic endodontic irrigation.
5) During clinical cleansing, the file should not be pressed too tightly when it is in the root canal
6) Do not step on the pedal before the file is in the root canal.
7) The suggested power range for endodontic irrigation is level 1-level 5.
3.3 Air polishing system
1) Add appropriate amount of powder to the powder tank (the amount of powder added should be between "Max" and "Min" marked
on the the tank), then tighten the upper cover of the powder tank, and fix the powder tank on the main unit.
2) Pick up the Air polishing handpiece, afterwards the panel will automatically shift to Air polishing mode.
3) Adjust the water volume and air pressure, aim the nozzle at a pool, press the foot button A, and confirm that the nozzle can spray
gas, powder and water spray normally before use.
4) Before Air polishing treatment, please wear goggles and veil on the face of the patient. Users should wear goggles or a protective
mask.
5) The handpiece is generally held in a pen-holding position.
6) Adjust the water volume and air pressure to an appropriate level. The recommended water volume starts at level 5 and the air
pressure starts at level 3. According to the sensitivity of the patient's teeth and hardness of the dental plaque, adjust the water
volume and air pressure at any time during the clinical process; increasing the air pressure will enhance cleaning effect, but will
weaken the polishing effect; increasing the amount of water will enhance the polishing effect, but will weaken the cleaning effect.
7) The nozzle should be aligned with the tooth surface during the cleansing, but avoid direct contact. Keep the nozzle and the tooth
surface at a distance of 3-5mm at 30-60 angle. The smaller the angle, the larger the cleaning area; during the cleansing, please
Perform a small circular motion on the surface of the tooth.
8) The air/powder mixture reflected from the tooth surface should be evacuated by using a strong suction device on the dental unit
during treatment.
9) After treatment, adjust the water volume to the maximum level, and polish the surface of teeth.
3. 4 Cleaning Mode
It is recommended to flush and disinfect the pipeline of the device every day. "Cleaning" mode allows cleaning and disinfection of the
pipeline to reduce the accumulation of crystals and the number of bacteria in the pipeline.
1) Fill a water bottle with distilled water or demineralized water.
2) Pick up the ultrasonic handpiece, point the handpiece at the sink, click the Cleaning button on the screen, and press the button D
on foot pedal to start cleaning the pipeline. Then, the pedal can be released.
3) After cleaning for 30 seconds, the device will automatically stop the Cleaning mode. You can also press the button D on foot pedal
again in the Cleaning mode or click Purge on the screen to stop cleaning.
4) After cleaning, put the ultrasonic handpiece back into the bracket. And then, pick up the air polishing handpiece, point the
handpiece nozzle at the pool, and click the Cleaning button again, so that the device will automatically blow out the residual powder
in the pipeline and release the high pressure gas in powder tank.
5) After cleaning for 20 seconds, the device will automatically exit the Cleaning mode. You can also click Purge on the screen to stop
cleaning.
3.5 Setting
1) Click "ON" /"OFF" to turn on or off the heating function. (According to the actual water output, the water temperature is different).
2) Click the "Settings" button at the bottom right corner of the screen to enter the "System Settings" interface
3) Click Calibration button, the system will automatically calibrate the air pressure to the value set in the program
4) The Bluetooth pedal has been matched to the machine, any subsequent replacement of foot pedal or main unit needs to make
new pair.

6
4 Troubleshooting
4.1 Troubleshooting
Fault Possible cause Solutions
The tip does not vibrate and no water
comes out after powering on and
stepping on the foot switch
Poor contact of power plug Plug the power supply well
Poor contact of pedal switch Plug the foot pedal plug well.
The fuse is broken. Replace a T1.6AL 250V fuse
Out of battery under wireless pedal mode Replace a new battery
Poor connection under wired pedal mode Connect the wire and screw it well
Main unit fault Contact local distributor or the manufacturer.
The tip does not vibrate and there is
water spray after power on and
stepping on the foot pedal.
Loose tip Tighten the tip
The connection between the tail wire and
the circuit board is loose. Contact local distributor or the manufacturer.
Handpiece fault Contact local distributor or the manufacturer.
cable fault Contact local distributor or the manufacturer.
The tip vibrates but there is no water
spray after power on and stepping on the
foot pedal.
The resistance of the diaphragm pump
becomes larger, and the torque of the low
water retaining capacity is insufficient
Turn up the water volume.
Impurity in the solenoid valve Contact local distributor or the manufacturer.
Water line clogging Contact local distributor or the manufacturer.
After power-off, there is still water spray. Impurity in the solenoid valve Contact local distributor or the manufacturer.
Handpiece heating Water volume is too small Turn up the water volume.
Device fault Contact local distributor or the manufacturer.
Water spray is too small
Water volume is too small Turn up the water volume
Water line clogging Contact local distributor or the manufacturer.
Weakened tip vibration
Tip is not tightened. Tighten the tip
Tip is loose Tighten the tip
Broken tip Note1 Replace the tip
Outlet water temperature is too high (over
45° C) Thermocouple fault Contact local distributor or the manufacturer.
The Endo file does not vibrate The nut is not tightened Tighten the nut
There is no air spray and water spray
after power on and stepping on the foot
pedal.
Loose contact of power supply plug. Plug the power supply plug well.
Poor connection under wired pedal mode Connect the wire and screw it well
Out of battery under wireless pedal mode Replace a new battery
The nozzle does not spray gas but
there is water spray after power on and
stepping on the foot pedal.
Nozzle clogging Dredge the nozzle
Handpiece clogging Dredge the handpiece
Clogging of handpiece tail cord Remove the tail cord from the
main unit, dredge the tail cord or replace it.
Solenoid valve fault Contact local distributor or the
manufacturer.
There is air flow but no water spray after
power on and stepping on the foot pedal.
The resistance of the diaphragm pump
becomes larger, and the torque of the low
water retaining capacity is insufficient
Turn up the water volume
Impurity in the solenoid valve Contact local distributor or the manufacturer.
Water line clogging Contact local distributor or the manufacturer.
Leaking air of powder tank
The O-ring on base of powder
tank is broken
Unscrew the powder tank base, take out the
damaged O-ring, replace the O-ring of the
same specification attached, and screw on
the powder tank base
Broken O-ring Replace the O-ring
There is powder residue at the thread, so
that the screw is not in place.
Remove the residual powder at the thread
part.
The upper cover of powder tank is broken. Replace the upper cover of powder tank.
The thread of powder tank is broken so
that the screw is not in place. Replace a powder tank
Water leakage of
handpiece Broken O-ring of handpiece Replace the O-ring
The air powder scaling efficiency is
reduced.
The powder in tank is not enough. Add powder to the tank.
Powder residue in pipe, handpiece, or
nozzle passage
Clean the passage with a fine needle and
blow it off with compressed air.
Touch panel pops up prompt message
No powder tank Check the powder tank and reinstall.
Air pressure is too high or too low
Increase the external air pressure input,
Input air pressure range requirements:
5.5bar-7.5bar(0.55Mpa-0.75MPa)
Pick up two handpieces at a time Before stepping on the pedals, please pick
up only one handpiece
no handpiece has been picked up Before stepping on the pedals, please pick
up only one handpiece
The handpiece does not match the mode
configuration
Please select the correct handpiece and
mode
Note: if the problems cannot be solved, please contact local distributor or the manufacturer.

7
4.2 Notes
Note1 If the tip is surely tightened and there is water mist spray, the tip is considered to be damaged with the following phenomena:
1) The vibration intensity of the tip and the degree of water atomization are significantly weakened.
2) The tip makes a harsh click sound during operation.
5 Cleaning, disinfection, and sterilization
5.1 Initial processing
5.1.1 Processing principles
It is only possible to carry out effective sterilization after the completion of effective cleaning and disinfection. Please ensure that,
as part of your responsibility for the sterility of products during use, only sufficiently validated equipment and product-specific
procedures are used for cleaning/disinfection and sterilization, and that the validated parameters are adhered to during every cycle.
Please also observe the applicable legal requirements in your country as well as the hygiene regulations of the hospital or clinic,
especially with regard to the additional requirements for the inactivation of prions.
5.1.2 Post-operative treatment
The post-operative treatment must be carried out immediately, no later than 30 minutes after the completion of the operation. The
steps are as follows:
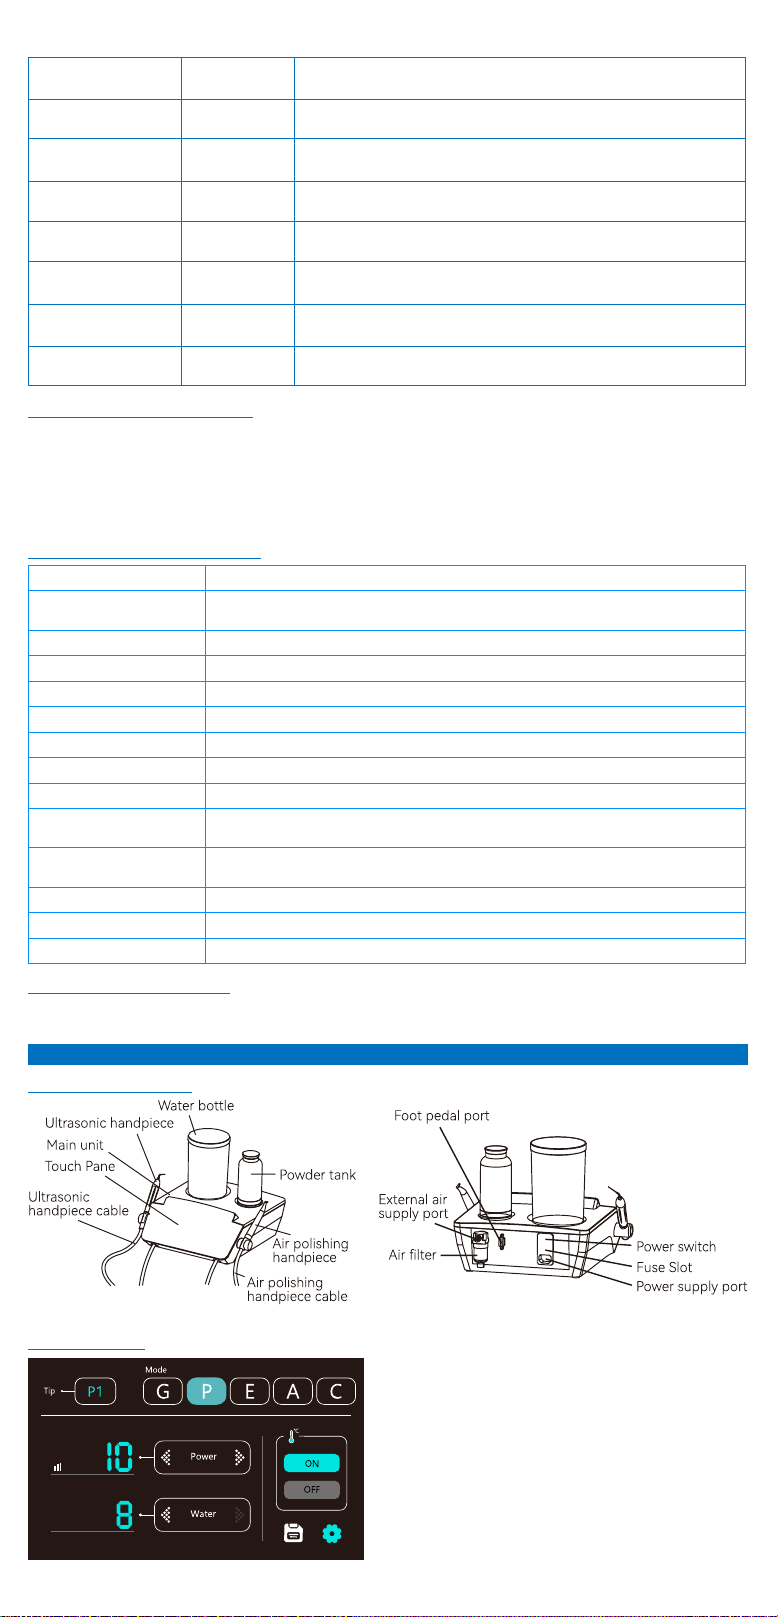
Let the device works for 20-30 seconds at maximum water volume to separately
flush the Ultrasonic handpiece, tip, Air polishing handpiece, and nozzle;
Remove the handpieces from the device and rinse away the dirt on the surface of handpieces and their accessories (tip, nozzle and
torque wrench) with pure water (or distilled water/deionized water);
Dry the handpieces and its accessories with a clean, soft cloth and place it in a clean tray.
Precautions:
The water used here must be pure water, distilled water or deionized water.
5.2 Cleaning
The cleaning of handpiece and its accessories should be performed no later than 24 hours after the operation.
The cleaning can be divided into automated cleaning and manual cleaning. Automated cleaning is preferred if conditions permit.
5.2.1Automated cleaning
△ The cleaner is proved to be valid by FDA, CE certification or in accordance with EN ISO 15883.
△ There should be a flushing connector connected to the inner cavity of the product. The cleaning procedure is suitable for the
handle, and the flushing period is sufficient. But ultrasonic cleaning is not allowed for Ultrasonic handpiece.
△ It is recommended to use a washer-disinfector in accordance with EN ISO 15883. For the specific procedure, please refer to the
automated disinfection section in the section Disinfection.
Precautions:
1) The cleaning agent does not have to be pure water. It can be distilled water, deionized water or multi-enzyme. But please ensure
that the selected cleaning agent is compatible with the handpiece.
2) The water temperature should not exceed 45, otherwise the protein will solidify and it is difficult to remove.
5.2.2 Manual cleaning
△ Soak the handpieces and its accessories in a cleaning agent (such as multi-enzyme). The soaking time and concentration should
at least reach the time and concentration specified by the detergent manufacturer;
△ Carefully clean the surface of the handpieces and its accessories with a disposable
soft cloth or soft brush to remove any visible dirt on the surface;
△ Rinse the handpieces and its accessories under clean running water (desalted water, distilled water or deionized water) for at least
5 times with duration of no less than 60 seconds for each time.
△ Check whether the cleaned parts are clean or damaged. If the cleaning is not complete, repeat the previous cleaning procedures.
△ The intrinsic suitability of the handpieces and its accessories for effective cleaning using the above procedure was verified by a
validated facility.
Precautions:
1) The cleaning agent used here must be compatible with the handpieces and only freshly prepared solutions can be used.
2) The water temperature should not exceed 45, otherwise the protein will solidify and it is difficult to remove.
5.3 Disinfection
Disinfection must be performed no later than 2 hours after the cleaning phase. Auto- mated disinfection is preferred if conditions
permit.
5.3.1Automated disinfection
If possible, the disinfection cycle should be in accordance with EN ISO 15883. Plea- se ensure that the following standards are met
when selecting a sterilizer system:
△ The sterilizer is FDA approved, CE certified or in accordance with EN ISO 15883.
△ Use high temperature disinfection function. The temperature does not exceed 134 ℃ . The temperature cannot exceed 20 minutes.
△ The sterilizer has a flush connecting piece that is connected to the interior of the handpiece.
△ The cleaning procedure is suitable for the handle and the flushing cycle is sufficient (5-10 minutes).
△ Only distilled or deionized water with a small amount of microorganisms (<10 cfu/ml) can be used for all rinsing steps. (For
example, pure water that is in accordance with the European Pharmacopoeia or the United States Pharmacopoeia).
△ The air used for drying must be filtered by HEPA.
△ Regularly repair and inspect the disinfector.
Cleaning and disinfecting steps by using Washer-disinfector
Carefully place the handpieces and its accessories in the disinfection basket. Fastening of the handpieces and its accessories if only
permissible of they are freely moveable in the fixture. The handpieces and its accessories are not permitted to make contact with one
another.
Use a suitable rinsing adaptor, and attach the handpieces to the rinsing connections of the washer-disinfector so that the surface
and internal water lines can be flushed du- ring cleaning process.
Start the program. After the program is finished, remove the handpieces and its accessories from the washer-disinfector, inspect
(refer to section Inspection and Maintenance) and packaging (refer to chapter Packaging). Dry the handpieces and its accessories
repeatedly if necessary (refer to section Drying).
The intrinsic suitability of the handpieces and its accessories for effective cleaning and disinfection using the above automated
cleaning and disinfection procedures was verified by a certified facility.
Precautions:
1) Before use, you must carefully read the operating instructions provided by the equipment manufacturer to familiarize yourself with
the disinfection process and pre- cautions.
2) With this equipment, cleaning, disinfection and drying will be carried out together.
3) Cleaning: (a) The water temperature should not exceed 45, otherwise the protein will solidify and it is difficult to remove. (b) The
solution used can be pure water, distilled water, deionized water or multi-enzyme solution, etc., and only freshly prepared solutions
can be used. (c) The cleaning agent must be compatible with the handpiece. Please follow the concentration and contact time
provided by manufacturer.

8
5.3.2 Manual disinfection
Tools: containers for disinfectant, water guns, air guns, trays
Place the handpieces and its accessories in a disinfectant (e.g.75% medical alcohol or 2% glutaraldehyde solution) for at least the
time specified by the manufacturer.
Remove the handpieces and its accessories from the disinfectant and rinse it with purified water, distilled water or deionized water
for at least 5 times for not less than 60 seconds of each time.
Dry the handpieces and its accessories with filtered compressed air (maximum pressure: 3 bar).
After the program is finished, remove the handpieces and its accessories from the washer-disinfector, inspect (refer to section
Inspection and Maintenance) and packaging (refer to chapter Packaging). Dry the handpieces and its accessories repeatedly if
necessary (refer to section Drying).
Verification of the fundamental suitability of the handpieces and its accessories for effective manual cleaning and disinfection was
provided by a verified testing laboratory.
Precautions:
1) The disinfectant used to configure the disinfectant must be compatible with the handpieces and cleaning agent, and must be tested
effective (e.g., DGHM, FDA approved or CE certified).
2) The disinfectant must be used in accordance with the concentration and contact
time specified by manufacturer.
3) The disinfectant used must be freshly prepared solutions and no foaming is allowed.
5.4 Drying
If your cleaning and disinfection process does not have an automatic drying function, dry it after cleaning and disinfection.
Methods:
1) Spread a clean white paper (white cloth) on the flat table, point the handpieces and its accessories against the white paper (white
cloth), and then dry the handpieces and its accessories with filtered dry compressed air (maximum pressure 3 bar). Until no liquid is
sprayed onto the white paper (white cloth), the drying is completed.
2) It can be dried directly in a medical drying cabinet (or oven). The recommended drying temperature is 80 - 120 and the time
should be 15 - 40 minutes.
Precautions:
1) The drying of product must be performed in a clean place.
2) The drying temperature should not exceed 138;
3) The equipment used should be inspected and maintained regularly.
5.5 Inspection and maintenance
1) Check the handpieces and its accessories. If there is still visible stain on the handpieces and its accessories after cleaning/
disinfection, the entire cleaning/disinfection process must be repeated.
2) Check the handpieces and its accessories. If it is obviously damaged, smashed, detached, corroded or bent, it must be scrapped
and not allowed to continue to be used.
3) Check the handpiece. If the structural parts (O-ring, LED light, light guide, etc.) are broken, please replace it before use. But the
replaced parts must be cleaned, disinfected and dried.
4) If the service time (number of times) of the Ultrasonic handpiece reaches the specified service life (number of times), please
replace it in time.
5) Do not use the machine when the machine is being cleaned/disinfected/sterilized.
5.6 Packaging
The disinfected and dried handpieces and their accessories are assembled and quickly packaged in a medical sterilization bag (or
special holder, sterile box).
Precautions:
1) The package used conforms to ISO 11607;
2) It can withstand high temperature of 138 and has sufficient steam permeability;
3) The packaging environment and related tools must be cleaned regularly to ensurecleanliness and prevent the introduction of
contaminants;
4) Avoid contact with parts of different metals when packaging.
5.7 Sterilization
Use only the following steam sterilization procedures (fractional pre-vacuum procedure*) for sterilization, and other sterilization
procedures are prohibited:
The steam sterilizer complies with EN13060 or is certified according to EN 285 to comply with EN ISO 17665;
The highest sterilization temperature is 138;
The sterilization time is at least 4 minutes at a temperature of 132 / 134 and a pressure of 2.0 bar - 2.3 bars.
Allow a maximum sterilization time of 20 minutes at 134.
Verification of the fundamental suitability of the products for effective steam sterilization was provided by a verified testing
laboratory.
Precautions:
1) Only products that have been effectively cleaned and disinfected are allowed to be sterilized;
2) Before using the sterilizer for sterilization, read the Instruction Manual provided by the equipment manufacturer and follow the
instructions.
3) Do not use hot air sterilization and radiation sterilization as this may result in da mage to the product;
4) Please use the recommended sterilization procedures for sterilization. It is not recommended to sterilize with other sterilization
procedures such as ethylene oxide, formaldehyde and low temperature plasma sterilization. The manufacturer assumes no
responsibility for the procedures that have not been recommended. If you use the sterilization procedures that have not been
recommended, please adhere to related effective standards and verify the suitability and effectiveness.
Fractionation pre-vacuum procedure: a procedure for steam sterilization by repeating pre-vacuum, the procedure used here is steam
sterilized by three pre-vacuums.
6 Transpo, storage and maintenance
6.1 Transpor
6.1.1 Excessive impact and shake should be prevented during transport. Lay it care fully and lightly.
6.1.2 Do not put it together with dangerous goods during transport.
6.1.3 Avoid being exposed to sun, rain, and snow during transport.
6.2 Storage
6.2.1 The device should be handled carefully and lightly. Be sure that it is far from the vibration, and installed or kept in a cool, dry,
and ventilated place.
6.2.2 Do not store the machine together with articles that is poisonous, combustible, caustic, or explosive.
6.2.3 This machine should be stored in a room where the relative humidity is 10% - 93%, atmospheric pressure is 70kPa - 106kPa, and

9
the temperature is-20℃ - +40℃ .
6.2.4 When the device is not in use, turn off the power supply and unplug the power plug. If it is not used for a long time, it should
be energized and connect to water and air once a month for five minutes.
6.3 maintenance
6.3.1 Air filter
1) When water accumulate in the filter, turn the knob at the bottom of the filter counterclockwise to drain the water, and tighten the
knob clockwise.
2) Replacement of the filter element: Use a filter wrench to unscrew the transparent cover of the air filter, then use the wrench to
unscrew the black nut at the lower end of the filter element, remove the white filter element and discard it into the trash can, re-
place it with a new filter element, and reinstall the black nut and transparent shell. It is recommended to replace the filter element
every 24 months, and the spare filter element is included in the accessory.
Figure 10 Schematic diagram of filter element replacement
7 Environmental Protection
The instrument contains no hazardous components and can be disposed of and destroyed in accordance with the relevant local
regulations.
Part Toxic or harmful substances or elements
Pb Hg Cd Cr6+ PBB PBDE
Main unit ○ ○ ○ ○ ○ ○
andpiece ○ ○ ○ ○ ○ ○
Tip ○ ○ ○ ○ ○ ○
Nozzle Foot pedal ○ ○ ○ ○ ○ ○
Mechanical elements, including bolts,
nuts, washers, etc. ○ ○ ○ ○ ○ ○
○:Indicates that the content of the toxic substance in all homogeneous materials of the part is below the limit requirement
stipulated in SJ/T-11363-2006 Limit Requirements for Toxic and Hazardous Substances in Electronic Information Products.
X:indicates that the content of the toxic substance in at least one of the homogeneous
materials of the part exceed the limit requirement specified in SJ/T-11363-2006. Please dispose according to the local laws or
consult with dealer from whom you purchased it about waste disposal.
8 After seice
8.1 After the equipment is sold, the manufacturer will be responsible for quality problem according to the warranty card. For specific
items, please refer to the warranty instructions in the warranty card.
8.2 This product does not contain self-maintaining parts. All maintenance, adjustment, calibration, and modification of technical
parameters of the product can only be carried out by the technicians or special repair shops. If the customer needs to repair by
himself, the manufacturer can provide circuit diagrams, component lists, legends, calibration rules, or other information necessary to
help the user's qualified technicians repair the equipment parts designated by the manufacturer, but the manufacturer will not bear
the consequences arising therefrom.
8.3 The user must use the original accessories, please contact your local dealer or the manufacturer to purchase. It is forbidden to use
accessories of other brands to avoid damage to the equipment or other dangers.
8.4 After the handpiece, tips and other accessories are damaged, users should not repair them by themselves. Please purchase new
parts and replace them before use. If you need relevant information, please contact the manufacturer.
9 EMC-Declaration of conformity
Notice:1) Without the express consent of Guilin Refine Medical Instrument Co., Ltd., unauthorized changes or modifications to the
equipment may cause electromagnetic compatibility problems of this equipment or other equipment.
2) The design and test of the PT X dental scaler conform to the operating regulations of electromagnetic compatibility. Its basic
performance is: the tip installed at the front end will vibrate when working, water will spray out, and the front end of the handpiece
will emit light at the same time .
3) Note: During the electrical fast transient burst test, there may be situations in which the power cannot be adjusted due to the
interference of the touch buttons. This situation will not affect the power output of the whole machine, and it can be restored by
itself after the test is completed. Consultation A clinician with professional training experience and field including the use of special
equipment or systems to determine that the risk is acceptable.
Warning:
1) The equipment or system should not be used close to or stacked with other equipment. If it must be used close or stacked, it should
be observed to verify that it can operate normally under the configuration used.
2) The operation of the PT X dental scaler at a value lower than the minimum amplitude or minimum value specified in this manual may
lead to inaccurate consequences.
3) Except for transducers and cables sold by equipment or system manufacturers as spare parts of internal components, the use of
accessories, transducers and cables outside the regulations may result in increased emission of the equipment or system or reduced
immunity.
4) The use of accessories, transducers or cables outside of the regulations together with equipment and systems may result in an
increase in the emission of the equipment or system or a decrease in immunity.
Guidance and manufacturer’s declaration of electromagnetic emissions
The model PT X is intended for use in the electromagnetic environment specified
below. The customer or the user of the model PT X should assure that it is used in such an environment.
Emissions test Compliance Electromagnetic environment - guidance
RF emissions CISPR 11 Group 1
The model PT X uses RF energy only for its internal function.
Therefore, its RF emissions are very low and are not likely to cause
any interference in nearby electronic equipment.

10
RF emissions CISPR 11 Class B
PT X is suitable for being used in domestic establishment and in
establishment directly connected to a low voltage power supply
network which supplies buildings used for domestic purposes
Harmonic emissions IEC 61000-3-2 Complies
Voltage fluctuations/ flicker emissions IEC
61000-3-3 Complies
Guidance & Declaration - electromagnetic immunity
The model PT X is intended for use 1n the electromagnetic environment specified
below. The customer or the user of the model PT X should assure that It is used in such an environment.
Immunity test IEC 60601 test level Compliance level Electromagnetic environment
guidance
Electrostatic
discharge (ESD) IEC
61000-4-2
± 6 kV contact
± 8 kV air
± 6 kV contact
± 8 kV air
Floors should be wood, concrete
or ceramic tile If floors are covered
with synthetic material, the relative
humidity should be at least 30 %.
Electrical fast
transient burst IEC
61000-4-4
± 2 kV for power supply lines
± 1 kV for Input/Output lines
± 2 kV for power supply lines,
± 1 kV for interconnecting cable
Mains power quality should be that
of a typical commercial or hospital
environment.
Surge
IEC 61000-4-5
± 1 kV line to line
± 2 kV line to earth ± 1 kV line to line
Mains power quality should be that
of a typical commercial or hospital
environment.
Voltage dips, short
interruptions and
voltage variations on
power supply input
lines IEC 61000-4-11
<5% UT (>95% dip in UT) for 0.5
cycle
40% Ur (60% dip in UT) for 5 cycles
70% UT (30% dip in UT ) for 25
cycles
<5% UT (>95 % dip 1n UT ) for 5
sec
<5% UT (>95% dip in UT .)
for 0.5 cycle
40% UT (60% dip in UT for 5
cycles
70% UT (30% dip in UT for 25
cycles
<5% UT (>95 % dip in UT)
for 5 sec)
Mains power quality should be that
of a typical commercial or hospital
environment If the user of the model
PT X require continued operation
during power mains interruptions, it
is recommended that the model PT X
be powered from an uninterruptible
power adapter or a battery.
Power frequency
(50/60 Hz)
magnetic field
IEC 61000-4-8
3A/m 3A/m
Power frequency magnetic fields
should be at levels charactenstic
of a typical location in a typical
commercial or hospital environment
NOTE Ur is the ac mains voltage prior to application of the test level.
Guidance & Declaration - Electromagnetic immunity
The model PT X is intended for use in the electromagnetic environment specified below. The customer or the user of the model PT X
should assure that it is used in such an environment.
Immunity test IEC 60601 test level Compliance level Electromagnetic environment - guidance
Conducted RF IEC
61000-4-6
Radiated RF IEC
61000-4-3
3Vrms
150kHz - 80MHz
3V/m
80MHz - 2.5GHz
3Vrms
3V/m
Portable and mobile RF communications equipment should
be used no closer to any part of the model PT X, including
cables, than the recommended separation distance
calculated from the equation applicable to the frequency of
the transmitter.
Recommended separation distance
d=[3,5/V1]×P1/2
d=1.2×P1/2 80 MHz - 800 MHz
d=2.3×P1/2 800 MHz - 2.5 GHz
Where P is the maximum output power rating of the
transmitter In watts (W) according to the transmitter
manufacturer and d Is the recommended separation distance
in meters (m).
Field strengths from fixed RF transmitters, as determined by
an electromagnetic site survey, ª should be less than the
compliance level in each frequency range. b
interference may occur In the vicinity of equipment marked
with the following symbol:
NOTE 1 At 80 MHz - 800 MHz, the higher frequency range applies.
NOTE 2 These guidelines may not apply in all situations. Electromagnetic propagation is affected by absorption and reflection from
structures, objects and people.
A) Field strengths from fixed transmitters, such as base stations for radio (cellular/ cordless) telephones and land mobile radios,
amateur radio, AM and FM radio broadcast and TV broadcast cannot be predicted theoretically with accuracy. To assess the
electromagnetic environment due to fixed RF transmitters, an electromagnetic site survey should be considered. If the measured
field strength in the location in which the model PT X is used exceeds the applicable RF compliance level above, the model PT X
should be observed to verify normal operation. If abnormal performance is observed, additional measures may be necessary, such
as reorienting or relocating the model PT X.
B) Over the frequency range 150 kHz to 80 MHz, field strengths should be less than 3V/m.
Recommended separation distances between
portable and mobile RF communications equipment and the model PT X
The model PT X is intended for use in electromagnetic environment in which radiated RF disturbances is controlled. The customer or
the user of the model PT X can help prevent electromagnetic interference by maintaining a minimum distance between portable and
mobile RF communications equipment (transmitters) and the model PT X is recommended below, according to the maximum output
power of the
communications equipment.
Rated maximum output power
of transmitter W
Separation distance according to frequency of transmitter m
150kHz ~ 80MHz d =1.2 80MHz ~ 800MHz d =1.2 800MHz ~ 2.5GHz d =2.3
0.01 0.12 0.12 0.23
0.1 0.38 0.38 0.73

11
1 1.2 1.2 2.3
10 3.8 3.8 7.3
100 12 12 23
For transmitters rated at a maximum output power not listed above, the recommended separation distance d in meters (m) can be
estimated using the equation applicable to the frequency of the transmitter, where P is the maximum output power rating of the
transmitter in watts (W) accordable to the transmitter manufacturer.
NOTE I At 80 MHz - 800 MHz, the separation distance for the higher frequency range
applies.
NOTE Ⅱ These guidelines may not apply in all situations. Electromagnetic propagation is affected by absorption and reflection from
structures, objects and people.
PT X has been tested and homologated in accordance with EN 60601-1-2 for EMC. This does not guarantee in any way that this
device will not be affected by electromagnetic interference Avoid using the device in high electromagnetic environment.
10 Statement
Refine reserves the right to modify the product technology, accessories, instruction manual and product packaging content at any
time without notice. The product is subject to the actual product, and the pictures are for reference only. The final interpretation right
belongs to Guilin Refine Medical Instrument Co., Ltd.
(Refer to the product packaging label for the product production date.)
After service and warranty instruction
1 Period validity:
Five year’s free repair for the main unit, one year's free repair for the handpiece from the date of purchase. Lifetime maintenance.
2 Range of warranty:
Within the warranty period of validity, we are responsible for any troubles caused by quality problems or products technique and
structure.
3 The followings are beyond our warranty:
1) The damage caused by disobeying the operation instruction or lack of the needed condition.
2) The damage caused by unsuitable operation or disassembly without authorization.
3) The damage caused by unadvisable transportation or preservation.
4) There isn’t the seal of distributor or the warranty card isn’t filled in completed.
After service and Warranty Instruction
Name of Customer
Address
Post Code
Tel
E-mail
Purchase Date
Distributor
Model
Product No.
Handpiece No.
Production Date
Guilin Refine Medical Instrument Co., Ltd.
No.8-3, Information Industrial Park, High-Tech Zone, Qixing District, Guilin, Guangxi, 541004, P.R. China
Website: http://www.refine-med.com
MedNet EC-REP GmbH
Borkstrasse 10 · 48163 Muenster · Germany
Table of contents
Other Refine Dental Equipment manuals