REIZEN RE-435 User manual

REIZEN
RE-435 Amplified Telephone
with Caller ID
Item#: 73435
™
USER’S MANUAL

2
INTRODUCING RE-435 AMPLIFIED TELEPHONE
• Large, lighted keypad makes it easy for those with low vision
• Powerful adjustable amplifier allows incoming volume up to 43 db
• Super Bright LED Ringer Light allows you to see your phone is
ringing
• Amplified Super Loud Ringer with adjustable volume up to 95 db
• 2-way speakerphone with adjustable volume control
• 100-Entry Memory/Phonebook
• Adjustable Tone Control allows you to adjust the tone of incoming
sound to enhance clarity and to help you distinguish between similar
sounding words
• Amplify / Hold / Voice Mail Waiting / Speakerphone indicators
• Redial / Pause / Flash buttons
• 3 programmable emergency buttons for police, fire & EMS
• Handset is compatible with hearing aids with T-Coil
• 3.5 mm audio jack for a headset, neckloop or other assistive-listening
device
• On-hold music
• Desk or wall-mounted
• Ideal for home or office use
• Large Digital Caller ID Display w/Backlight & Call-Waiting Caller ID

3
TABLE OF CONTENTS
Contents Check List.......................................................................................................
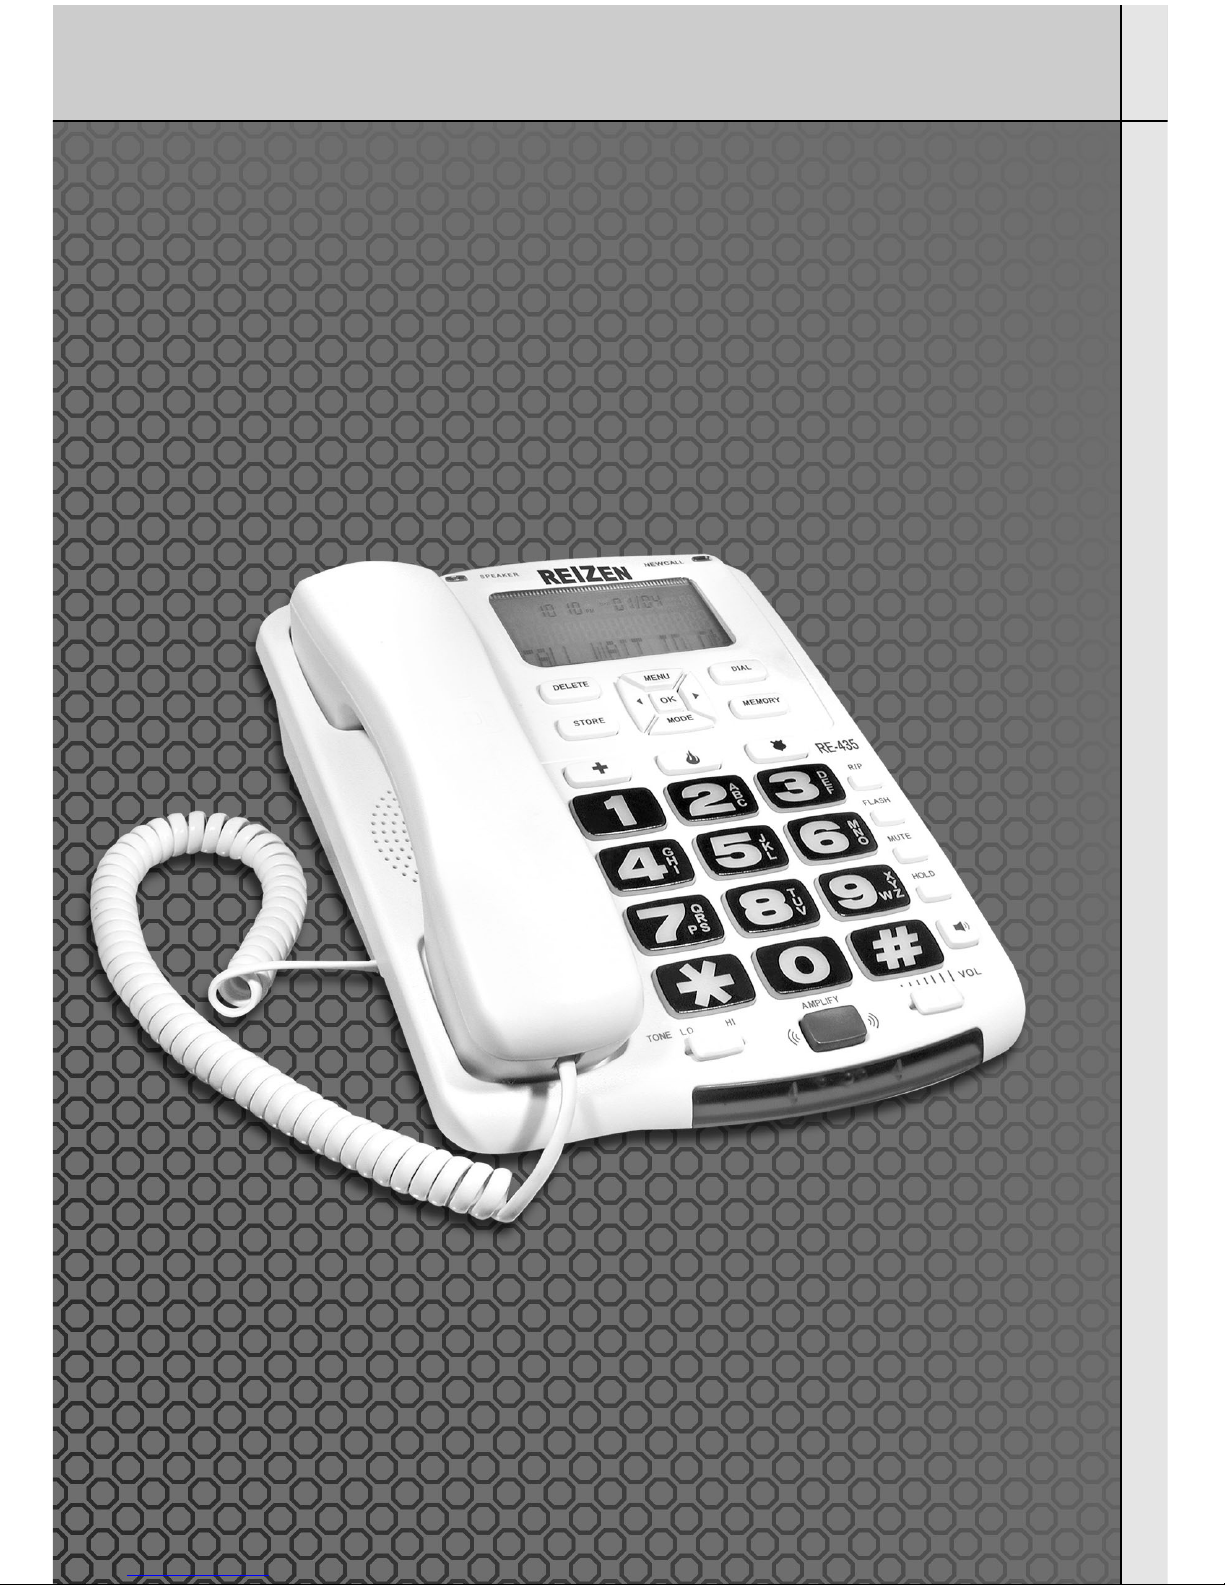
Telephone Features.......................................................................................................
Installation
Desk/Table Installation...................................................................................................
Wall Mount Installation...................................................................................................
Setting the Dialing Mode................................................................................................
Operation
TELEPHONE OPERATION
Making a Call....................................................................................................
Answering a Call...............................................................................................
Speakerphone...................................................................................................
Call Timer..........................................................................................................
LCD Backlight Display......................................................................................
Placing a Call On Mute....................................................................................
Placing a Call On Hold.....................................................................................
Music On Hold..................................................................................................
Using Flash.....................................................................................................
Using Tone Services On a Pulse Line............................................................
Programming the Emergency Buttons............................................................
AMPLIFICATION FEATURES
Incoming Voice Volume...................................................................................
Incoming Voice Tone.......................................................................................
Ringer Volume.................................................................................................
Speakerphone Volume Control.......................................................................
Handset Volume .............................................................................................
Handset Tone .................................................................................................
Adjusting Ringer Tone.....................................................................................
MEMORY
Storing An Entry...............................................................................................
Pause..............................................................................................................
Review A Number From The Memory.............................................................
Dialing A Numbers From The Memory............................................................
Using The One-Touch Emergency Buttons.....................................................
Changing a Speed Dial Number......................................................................
Cloning a Speed Dial Number.........................................................................
Deleting a Speed Dial Number........................................................................
Deleting All Memory Entry...............................................................................
Redial..............................................................................................................
5
6
7
7
7
8
8
8
8
9
9
9
9
10
10
10
11
11
11
12
12
12
12
13
14
14
14
15
15
15
16
16
16

4
TABLE OF CONTENTS
CALLER ID/MEMORY
Using Caller ID................................................................................................
Setting The Long Distance Code....................................................................
Setting The Area Code....................................................................................
Caller ID On Call Waiting ...............................................................................
Caller ID Summary .........................................................................................
Call Review .....................................................................................................
Missed Call......................................................................................................
Phone Record..................................................................................................
Answered Call..................................................................................................
Dialed Number..................................................................................................
Deleting a Call From The Call History..............................................................
Deleting All Calls..............................................................................................
Transfering a Caller ID Number To Speed Dial Memory.................................
Speed Dialing From The Caller ID List............................................................
Different Area Code ........................................................................................
Same Area Codes...........................................................................................
Display Information..........................................................................................
Call Display Messages....................................................................................
Reviewing The Call Forwarding Information...................................................
ADVANCED USER OPERATIONS MENU
VIP...................................................................................................................
VIP Alert On/Off...............................................................................................
Name Tagging.................................................................................................
Setting The Language.....................................................................................
LCD Contrast...................................................................................................
Time/Date........................................................................................................
Call Wait ID On/Off..........................................................................................
Resetting The Phone.......................................................................................
Additional Information
Warranty.......................................................................................................................
Specifications...............................................................................................................
Important Information...................................................................................................
17
17
17
18
18
18
18
18
19
19
19
19
20
20
20
20
21
21
22
23
23
23
23
24
24
24
24
25
26
27

5
CONTENTS CHECK LIST
Parts Check List:
1. Base Unit
2. Handset
3. Handset Coil Cord
4. Telephone Line Cord
5. AC Power Adaptor
6. Wall Mounting Bracket
7. User’s Manual
Handset Base Unit
Wall Mounting Bracket AC Power Adaptor
Telephone Line Cord
Handset Coil Cord
User’s Manual

6
FEATURES
HANDSET
Compatible with
hearing aids with
T-Coil 3.5MM AUDIO JACK
for a headset, neckloop or
other assistive-listening device
SPEAKERPHONE VOLUME
adjusts the volume of the
speakerphone up to 20 db
RINGER SWITCH
Amplified super loud
ringer with adjustable
volume up to 95 db
SUPER BRIGHT LED
RINGER LIGHT
allows you to see
when your phone is
ringing
ADJUSTABLE TONE
CONTROL
allows you to adjust the tone
of incoming sound to
enhance its clarity.
Also helps you to distinguish
between similar-sounding
words
INCOMING VOLUME
CONTROL
Powerful adjustable
amplifier allows
incoming volume up to
43 db
DIGITAL CALLER ID
Lighted LCD Display
RINGER TONE
SWITCH
Lo-Hi Selectable
Tone Control
EMERGENCY BUTTONS
3 programmable Emergency
buttons for Police, Fire & EMS
2-WAY SPEAKER
PHONE BUTTON
HOLD BUTTON
MUTE BUTTON
FLASH BUTTON
KEYPAD
Large lighted keypad
buttons, makes it easy for
those with low vision
INDICATORS for:
- Amplify
- Hold
AMPLIFIER
SWITCH
On/Off switch for
amplifier
REDIAL/PAUSE
Speakerphone LED
Call/Voice-Mail
Indicator

7
INSTALLATION
Desk/Table Set-up
1. Plug one end of the line cord into the jack marked LINE in the rear of the unit,
and the other end into the telephone wall jack.
2. Insert the DC adaptor's barrel plug into the DC power jack on the rear of the
unit, and plug the adaptor into a standard outlet.
Wall Mount
1. Align the tabs of the phone bracket with the
notches on the bottom of the phone (figure 1).
Press inward and downward firmly on the bracket
until it clicks into place.
2. Remove the handset "tooth" from the unit's
cradle (figure 2). Reverse its position so that it
points upward and will hold the receiver when the
phone is mounted.
3. Align the mounting slot on phone bracket with
the wall mount fixture that will hold the phone.
Slide the unit down to secure it.
4. Plug one end of the line cord into the jack
marked LINE in the rear of the unit,
and the other end into the telephone wall jack.
5. Insert the DC adaptor's barrel plug into the DC
power jack on the rear of the unit, and plug the
adaptor into a standard outlet.
Setting the Dialing Mode
1. At the back of the unit (figure 3), switch Selector
tab to "T" for Tone Dialing Mode,
or to "P" for Pulse Dialing Mode.
Figure 3
Figure 1
Figure 2

8
TELEPHONE OPERATION
Making a Call
1. Pick up the Handset from the base.
2. Dial the desired number.
3. Hang up upon completion of the call.
Answering a Call
1. You will be alerted to an incoming call by both the ringer and the red ring flasher.
2. Pick up the Handset from the base and speak.
3. Hang up upon completion of the call.
Speakerphone
You can place a call on Speakerphone mode anytime by pressing the SPEAKER key
(figure 5) during a call, then place the Handset on the base. Also, you can transfer a call
to the Handset anytime during a call by simple picking up the Handset. During the
speakerphone mode, the display will show SPEAKERPHONE, (figure 4) and the
SPEAKER LED will light up. During the handset display, the display will show == TALK
== and (will appear.
To make a call using the Speakerphone (figure 5) key in desired telephone number and
press dial (The phone goes to Speakerphone mode automatically). To hang up, press
SPEAKER key.
To receive a call in Speakerphone mode press the speaker key, then speak. To hang up,
press the speaker key again.
NOTES:
- While the making a call, the DIAL KEYPAD LED will light up
- While the phone is ringing, the RING Flasher and DIAL KEYPAD LED will light up
Call Timer
When the handset is picked up or the SPEAKER is pressed, the call counter will begin
and show the elapsed time XX-XX on the display.
Figure 4 Figure 5

9
TELEPHONE OPERATION
LCD Backlight Display
The LCD has a backlight that will turn on under the following conditions:
• Any incoming call
• Picking up the handset
• Pressing any button/key
NOTE:
The backlight will switch off automatically approximately 15 seconds after the last activity.
The AC Adaptor must be plugged into the unit to enable BACKLIGHT to work.
Placing a Call On Mute
Press MUTE to turn off the handset microphone, allowing private conversations in the
same room without the other party hearing. Press MUTE (figure 7) again to resume the
conversation with the calling party.
NOTE: During the mute condition, the display will show < MIC MUTE >. (figure 6)
Placing a Call On Hold
1. To place a call on hold, press HOLD (figure 9) and hang up. The HOLD LED will light
up; the display will show <CALL ON HOLD> (figure 8).
2. To begin conversation again, pick up the handset or press SPEAKER or pick up an
extension phone (if available) and the hold will then be automatically released.
Music On Hold
When a call is placed on hold, the telephone will play a computer melody to reassure
your caller that the call has not been disconnected.
Figure 6 Figure 7
Figure 8 Figure 9

10
TELEPHONE OPERATION
Using Flash
Press FLASH to gain access to special services, such as Call Waiting.
For example, if you have Call Waiting, press FLASH to take an incoming call without
disconnecting the current call. Press FLASH again to return to the first call.
NOTES:
- If you do not have special phone services, pressing FLASH might disconnect the
current call.
- During the memory storage procedure, you may wish to press FLASH to insert a flash;
a 'F' will show on the LCD between numbers.
Using Tone Services On a Pulse Line
If you have pulse service, you can still use special services that require tone signals, such
as bank-by-phone, by following these steps.
1. Be sure T/P is set to P (figure 10)
2. Dial the service's main number.
3. When the service answers, press *and any additional numbers you dial are sent as
tone signals.
4. After you complete the call and hang up, the phone resets to pulse dialing.
Programming the Emergency Buttons
3 emergency numbers are provided as one touch speed dial and can be stored. To save
precious time in an emergency, store the numbers of your local police, fire department
and EMS services on the Emergency Speed-Dial buttons (figure 11), so that you can
automatically dial them.
1. Pick up the handset or press the Speaker button.
2. Program these numbers by pressing the STORE button, then the Emergency Button.
3. Enter the phone number you wish to assign to the Emergency Button.
4. Press STORE twice. (keypad will not emit any tones while in memory store mode)
5. Repeat in turn for each emergency service.
NOTE:To call any of your three local emergency services, simply lift the handset or
press the Speaker button. Press the corresponding speed-dial button.
Figure 10
Figure 11

11
AMPLIFICATION FEATURES
Incoming Voice Volume
You can adjust the volume of incoming calls by simply
sliding the VOL control (figure 12). This gives you up to
18 dB. If you want more amplification, follow the directions
below.
1. While using the handset, press AMPLIFY (figure 14) to turn
the incoming voice amplifier on or off. When amplifier is on, the
))) icon appears and AMPLIFY LED comes on.
2. Adjust the volume in the earpiece by moving the VOL slide
control. With the amplifier on, incoming volume will be up to
43 dB louder. In standard use, the amplifier turns off whenever
you hang up the telephone. This is a useful feature if many
people use the phone. If you want the amplifier to always remain
on, slide the AUTO/MANUAL switch (figure 13) underneath the
phone to AUTO.
NOTE: The amplifier will turn off when you switch to Speakerphone mode
Incoming Voice Tone
The product provides extra amplification at the sound
frequency you need to boost. To the sound frequency range
that best suits your need, follow these steps:
1. When using the handset while speaking with someone,
press AMPLIFY (figure 14).
2. Adjust the TONE slide control to suit you hearing.
Figure 12
Figure 14
Figure 13

12
AMPLIFICATION FEATURES
Ringer Volume
While the phone is ringing, you can adjust the ringer volume of your
telephone by moving the RINGER VOL (figure 15). switch, located at
the right side of the telephone, to the desired OFF/LO/HI position.
Speakerphone Volume Control
While on a call, press VOLUME + or -, located at the right
side of the telephone (figure 16), to the desired level.
Handset Volume
While on a call, adjust the VOL switch, (figure 17) located at
the front side of the telephone, to the desired level.
Handset Tone
While on a call, adjust the TONE switch (figure 18), located at
the front side of the telephone, to the desired tone level.
Adjusting Ringer Tone
While the phone is ringing, you can adjust the ringer tone of your
telephone by moving the RINGER TONE switch (figure 19), located
at the right side of the telephone, to the desired HI/LO position.
Figure 18
Figure 19
Figure 16
Figure 15
Figure 17

NOTE: 100 phone numbers can be programmed into the MEMORY of your telephone.
Each memory location can store a maximum of 32 digits and 15 letters.
- You must complete each step within 15 seconds.
Storing An Entry
Ex: To program REIZEN telephone number, 0295993577 into memory
1. Press STORE (Display shows STORE TO?) (figure 20)
2. Press either a one-touch emergency location or MEMORY (Display shows
NUMBER?) (figure 21)
3. Enter the phone number 0 2 9 5 9 9 3 5 7 7 using the keypad
4. Press STORE or OK (Display shows NAME?) (figure 22) If you do not want to
store a name, skip steps 4&5.
5. Enter the name R E I Z E N using the keypad (777 33 444 9999 33 66)
6. Press STORE or OK, the phone will beep and display will show STORED.
(figure 23)
NOTES: To add a space before another word, press number 1 once. If you make a
mistake press to move the cursor right; press to move the cursor left and press
DELETE to delete the letter. Letters are always inserted to the left of the cursor.
Always store the area code together with the telephone numbers. (Useful for CID
purposes)
13
MEMORY OPERATION
Figure 20 Figure 21
Figure 22 Figure 23

14
MEMORY OPERATION
Pause
During the memory storage procedure, you may wish to press R/P
(figure 24) to insert a pause between numbers. (This is sometimes
useful for accessing a switchboard, telephone banking or long distance
dialing). Pressing R/P more than once will increase the pause between
digits.
Each time R/P is pressed, a 'P' will show on the LCD to indicate a 2 second pause in
the dialing sequence. Each pause counts as one digit.
NOTE: When you press *, an upper o appears; When you press #, a lower o appears
Review A Number From The Memory
Press MEMORY (Display shows ITEM -XX-, XX is the
number of memories stored in the MEMORY - figure
25), enter the first letter of the name (e.g. "R" for
REIZEN): Press number 7 three times and scroll with
until the display shows the name and number that you
want to review.
NOTE: If the number is longer than 15 digits, the number will shift left (1 second)
automatically until the end of the number has been reached. The phone will exit
automatically approximately 15 seconds after the last activity.
Dialing A Numbers From The Memory
There are three different ways to dial a stored speed dial number, depending on your
preference.
Method 1: Pick up the handset and follow the above directions for 'REVIEW A
NUMBER FROM THE MEMORY' until the display shows the name and number that
you want to dial and then press DIAL.
Method 2: Press SPEAKER and choose the desired name in MEMORY (as shown in
Method 1) and then press DIAL.
Method 3: Choose the desired name in MEMORY (as shown in Method 1), and check
the LCD shows the correct information. Press DIAL (the phone enters speakerphone
mode and dials the displayed number).
Figure 24
Figure 25

15
MEMORY OPERATION
Using The One-Touch Emergency Buttons
There are two ways to dial a number saved to a one-touch Emergency Button
Method 1: Press the one-touch emergency key. The display will show the emergency
number that you want to review or dial out. Press DIAL to begin your call
Method 2: Pick up the handset or press SPEAKER, then press a one-touch
emergency key. The phone will dial the number that is saved automatically for you.
Changing a Speed Dial Number
1. During one-touch emergency or MEMORY review.
2. Press OK, the display shows NUMBER? and the cursor prompt will be on the right
of the last digit
3. Move the cursor to the number you would like to edit by using or
4. Press DELETE to delete the number then key-in the desired number using the
keypad
5. Press STORE or OK, and the display will show the name and the cursor prompt will
be on the right of the last letter
6. Move the cursor to the letter to be edited by using or
7. Press DELETE to delete the letter then key-in the desired letter using the keypad
8. Press STORE or OK, the phone will beep and the display will show STORED
Cloning a Speed Dial Number
1. During one-touch emergency or MEMORY review, bring up the # you wish to clone
2. Press STORE, the display shows STORE TO?
3. Press the one-touch emergency location where you wish to store the number
4. The display shows NUMBER? and the cursor prompt will be on the right of the
last digit
5. Move the cursor to the number you would like to edit by using or
6. Press DELETE to delete the number then key-in the desired number using the
keypad
7. Press STORE or OK, the cursor prompt will be on the right of the last letter
8. Move the cursor to the letter to be edited by using or
9. Press DELETE to delete the letter then key-in the desired letter using the keypad
10. Press STORE or OK, the phone will beep and the display will show STORED
NOTE: One-touch emergency locations accept duplicate phone numbers, but the
MEMORY does not. If the number that matches the one stored in MEMORY, the
phone will show REPLACE? Press STORE or OK, the phone
will beep and the display will show STORED

16
MEMORY OPERATION
Deleting a Speed Dial Number
1. During one-touch emergency or MEMORY review.
2. Press DELETE (Display shows DELETE?)
3. Press the DELETE or OK
4. The phone beeps and the display shows DELETED.
Deleting All Memory Entry
1. Press MEMORY (Display shows ITEM -XX-)
2. Press DELETE (Display shows CLEAR MEMORY?)
3. Press DELETE or OK to confirm your choice and the phone beeps and the display
shows DELETED.
Redial
If you want to redial the last number dialed:
Method 1: Press R/P and the display will show the latest dialed number. Then press
the DIAL; the telephone will redial the last number dialed (the phone enters
speakerphone mode and dials the displayed number). Method 2: Pick up the handset
or press SPEAKER. Press R/P, the telephone will redial the last number dialed.
NOTES: The redial memory stores the first 32 digits of any number dialed. If the
number you dialed exceeds 32 digits, the redial memory will store the first 32 digits
only.
Assuming you subscribe to a Caller ID service, the time and date will be automatically
updated when the first call is received.
If you do not subscribe to a Caller ID service, or you wish to set the
TIME/DATE: (see section on time/date). When you plug the phone in, the phone
will beep and the display will show SET TIME /DATE. After 10 seconds the display
will show the number of calls received MISSED -00- & ANSWER -00- (figure 26)
NOTE: If the telephone line is being used by another phone, the display on your
RE-435 will show EXTENSION USE. (figure 27)
Figure 26 Figure 27

17
CALLER ID/MEMORY
Using Caller ID
To make use of these features, you must first subscribe to phone company's Caller ID
Service. There is usually a fee for this service, and may not be available in all areas.
Setting The Long Distance Code
The Long Distance Code has a default setting of 1.
You can change the code to "9" if you use a PBX telephone system or "0" if your
telephone system requires operator assistance to make a long distance call.
NOTE: If you do not complete each step within 15 seconds, the phone exits setup.
Start again at Step 1,
1. Press MENU until -1- and "SET LDS CODE"
appear and the 1flashes (figure 28).
2. Repeatedly press or to set the long
distance code to 1, 9, or 0.
3. Press OK or MENU to complete the setting
and go to next setting, or press DELETE to
complete the setting and return to standby mode,
or you can do nothing and wait for 15 seconds to
complete the setting and return to standby mode.
Setting The Area Code
NOTE: If you do not complete each step within 15 seconds, the phone exits setup.
Start again at Step 1.
1. Repeatedly press MENU button until -000- and
"SET AREA CODE" appears. The first 0flashes
2. Press to increase the setting, to decrease the setting. Or use the keypad
buttons to set the code manually
following the cursor position.
3. Press OK to move between the different settings.
4. Press MENU to complete the setting and go to next setting, or press DELETE to
complete the setting and return to
standby mode, or you can do nothing and wait for 15 seconds to complete the setting
and return to standby mode.
NOTE: The default AREA CODE Setting is 000
Figure 28

Caller ID On Call Waiting
This feature allows you to see the number of the calling party (unless the call is
blocked or is from a silent number) and a CW icon appears on the display while you
are on call. However, you must first subscribe to your telephone company's Caller ID
Service and activate your call waiting service.
Caller ID Summary
The display will show the caller ID summary (MISSED -XX-, ANSWER -XX-) in
standby (where XX is the missed (or answered) number of calls stored in the
memory)
Call Review
To review call information, you can press MODE. This menu provides functions as
MISSED CALL, ANSWERED CALL, DIALED NUMBER. During review, you can use
function key to call, store or delete related phone number.
Missed Call
1. Press the MODE, until the display will show
primary function MISSED CALL -XX-
(figure 29).
2. Use the or to view the missed calls. The new
call LED will flash if there are new missed call store
in the call history
Phone Record
When you use this telephone with the Caller ID service, you will see the number of
the calling party (unless the call is blocked or is from a silent number) before you
answer the phone. This telephone will store and display information for the last 50
missed calls received and the last 50 answered calls received. Each call is numbered
in the call history, together with the time and date the call was received. When the
memory is full, the oldest call information is deleted to make room for new incoming
call information. This telephone also stores and display information about the last 10
dialed numbers (max 11 digits)
18
CALLER ID/MEMORY
Figure 29

19
CALLER ID/MEMORY
When all missed calls have been reviewed, the new call LED will stop flashing.
Answered Call
1. Press the MODE, until the display will show
primary function ANSWERED CALL -XX-.
(figure 30)
2. Use the or to view the answered calls
Pressing MODE can return the phone to standby
Deleting a Call From The Call History
To delete a call from the call history:
1. Use the or until the screen displays the information you wish to delete.
2. Press the DELETE once and the display will show the DELETE?
3. Press the DELETE or OK. The phone will beep once, the displayed call record will
be deleted and the display will show DELETED.
Deleting All Calls
To delete all calls from the three primary functions individually, the display must be
showing one of the primary functions MISSED CALL, ANSWERED CALL or DIALED
NUMBER
1. Press the DELETE once and the display will show DELETE ALL?
2. Press the DELETE or OK. The phone will beep once, all call records will be deleted
and the display will show DELETED.
NOTE: New missed calls cannot be deleted until they have been reviewed.
Dialed Number
10 dialed numbers can be stored into the redial
memory. When the redial memory is
full, the oldest dialed information is dialed to make
room for new dialed information
1. Press the MODE button until the display will
show primary function DIALED NUMBER -XX-
(figure 31)
2. Use the or to view the dialed calls
Figure 30
Figure 31

20
CALLER ID/MEMORY
Transfering a Caller ID Number To Speed Dial Memory
1. Use the or to scroll through the call history.
2. When you locate the number you wish to transfer - Press STORE when the
number displayed is correct. The display will show STORE TO?
NOTE: If the number format is not correct, press OK to change the dial format.
3. Press either a one-touch emergency location or MEMORY, whichever place you
wish to store the number
4. Press STORE twice, the phone will beep once, and the display will show STORED.
NOTE: One-touch emergency locations accept duplicate phone numbers, but the
MEMORY does not. If the number that matches the one stored in MEMORY, the
phone will show REPLACE? Press STORE or OK, the phone will beep and the
display will show STORED
The OK (figure 32) button also provides dialing options for different
phone systems allowing you to select the correct dialing selection
for a phone number before you press DIAL.
Speed Dialing From The Caller ID List
Different Area Code
When the phone number's area code does not match the area code you stored, the
phone provides two different dialing number selections. Press OK once and the
display first shows the ten-digit number (three digits of the area code plus seven
digits of the phone number, for example, 818-555-1212). Press OK again and 1
appears before the ten-digit number (1-818-555-1212).
Same Area Codes
If the phone number's area code matches the area code you stored, the phone
provides four different numbers. Repeatedly press OK and the phone cycles through
and displays four patterns for dialing numbers.
• Seven-digit number-for example, 555-1212.
• Eight-digit number ("1" plus the phone number) - for example, 1-555-1212.
• Ten-digit number-for example, 817-555-1212.
• Eleven-digit number ("1" plus the area code plus the phone number) -for example,
1-817-555-1212.
Figure 32
Table of contents
Other REIZEN Telephone manuals