Remington Garden Wizard 109312-01 User manual

®
IMPORTANT: Read and understand this manual before assembling or operat-
ing this tiller. Improper use of tiller can cause severe injury. Keep this manual
for future reference.
MODEL 109312-01
GARDEN WIZARD®
ELECTRIC TILLER
OWNER’S MANUAL

www.remingtonpowertools.com 2
STOP
STOP
PARA
PARA
ARRÉ
ARRÉ
T
T
NE RETOURNEZ PAS LE PRODUIT AU DÉTAILLANT
FAITES LE 1 800 626-2237 POUR OBTENIR
DE L’ASSISTANCE TECHNIQUE
Pour plus de détails, visitez le www.remingtonpowertools.com.
Conservez votre reçu d’achat pour obtenir le service sous garantie.
Ce manuel vous guide pour utiliser les cisailles à
cultivateur
en toute sécurité et de
façon appropriée.
CONSERVER CES DIRECTIVES
DO NOT RETURN PRODUCT TO STORE.
CALL 1-800-626-2237 FOR TECHNICAL ASSISTANCE
For more information, visit www.remingtonpowertools.com
This manual is your guide to safe and proper operation of the tiller.
SAVE THESE INSTRUCTIONS.
Keep your purchase receipt for warranty coverage.
PARA AYUDA TÉCNICA LLAME AL 1-800-626-2237
NO DEVUELVA EL PRODUCTO A LA TIENDA
Para más información, www.remingtonpowertools.com
Guarde su recibo de compra para cobertura de la garantía.
Este manual es su guía para la operación correcta y segura de cultivador
GUARDE ESTAS INSTRUCCIONES.

3www.remingtonpowertools.com
ENGLISH
IMPORTANT SAFETY INFORMATION ................................................................ 4
Before Operating Tiller...................................................................................................................................4
While Operating Tiller.....................................................................................................................................4
Maintenance and Storage .............................................................................................................................5
Unpacking......................................................................................................................................................5
PRODUCT IDENTIFICATION ............................................................................... 6
ASSEMBLY........................................................................................................... 7
OPERATING Tiller................................................................................................ 9
Extension Cords.............................................................................................................................................9
Circuit Breaker Protection..............................................................................................................................9
Staring Tiller...................................................................................................................................................9
Basic Tiller Operations.................................................................................................................................10
Extension Cord Mangement ........................................................................................................................10
Clearing Tines..............................................................................................................................................10
MAINTENANCE AND CLEANING ......................................................................11
Cleaning Tiller ..............................................................................................................................................11
Transmission Lubricant................................................................................................................................11
REPLACEMENT PARTS .................................................................................... 12
TROUBLE SHOOTING....................................................................................... 12
TECHNICAL SERVICE ....................................................................................... 12
REPAIR SERVICE .............................................................................................. 12
Warranty Service .........................................................................................................................................12
Non-Warranty Service..................................................................................................................................12
WARRANTY INFORMATION.............................................................................. 13
ILLUSTRATED PARTS BREAKDOWN.............................................................. 40
PARTS LIST........................................................................................................ 41
PARTS CENTRALS............................................................................................ 42
CONTENTS
If you have a question or problem, CALL TOLL FREE 1-800-626-2237
or visit www.remingtonpowertools.com

www.remingtonpowertools.com 4
SAFETY WARNINGS
BEFORE OPERATING TILLER
1. Do not operate tiller near underground
electric cables, telephone lines, pipes,
or hoses. If in doubt contact your util-
ity company to locate underground
services. You may also contact the
National One Call referral number,
1-888-258-0808, for local contact
information concerning underground
utilities.
2. Watch what you are doing. Use com-
mon sense. Do not operate tiller when
you are tired.
3. Only well-instructed adults should
operate tiller. Never allow children to
operate tiller.
4. Do not use the tiller for any job except
that for which it is intended.
5. Use only electrical voltage noted on
model plate of tiller.
7. Ground Fault Circuit Interrupter
(GFCI) protection should be provided
on the circuit(s) for use with this tiller.
Receptacles are available with built-in
GFCI protection and may be used for
additional measure of safety.
8. Avoid Dangerous Environments. Do
not operate tiller
• while under the influence of alcohol,
medication, or drugs.
• in rain or in damp or wet areas.
• where highly flammable liquids or
gases are present.
• if tiller is damaged, or not fully and
securely assembled.
9. Always wear eye protection which
meets or exceeds the requirements of
ANSI Z87.1.
10. Always use face or dust mask if operat-
ing tiller in dusty conditions.
11. Always dress properly. Wear the fol-
lowing clothing while using tiller:
• Use of rubber gloves and substantial
footwear is recommended.
• Wear protective hair covering to
contain long hair.
• Avoid wearing loose clothing or
jewelry that could get caught in the
rotating tines.
12. Thoroughly inspect area where the til-
ler is to be used and remove all foreign
objects.
WHILE OPERATING TILLER
1. Stay alert. Use common sense while
operating tiller.
2. Be aware of extension cord while operat-
ing tiller. Be careful not to trip over cord.
Keep cord away from tines at all times.
3. Keep all children, animals, and by-
standers away from tiller and extension
cord. Keep the area of operation clear
of all persons and pets.
4. Grip handlebar firmly with both hands.
Never operate tiller with one hand.
5. Be aware that tiller may unexpectedly
bounce upward or jump forward if the
tines should strike extremely hard,
packed soil, frozen ground, or buried
obstacles such as large stones, roots,
or stumps.
6. Do not over reach. Maintain proper
footing and balance at all times.
7. Do not operate tiller on a slope that is
too steep for safe operation. When on
slopes, slow down and make sure you
have good footing.
8. IMPORTANT: you can stop the tines
by releasing the trigger lever.
9. Before starting tiller, make sure tines
are not touching foreign objects.
10. Do not allow hands or any body part or
clothing near the rotating tines.
11. Move tiller from one place to another
• with tiller stopped and unplugged.
• by rolling on attached wheel assem-
bly in the down “transport” posi-
tion.
• by holding carrying handle. Never
use handlebars, tines, tine shaft, or
fender to carry tiller.
12. Do not abuse power cord. Never carry
tiller by power cord or yank it to dis-
connect from receptacle. Keep power
cord from heat, oil, and sharp edges.
13. Do not force tiller. It will do the job
better and with less likelihood of a risk
of injury at the rate for which it was
designed.
WARNING: When using elec-
tric gardening appliances, basic
safetyprecautionsshouldalways
be followed to reduce the risk of
fire, electric shock, and personal
injury.
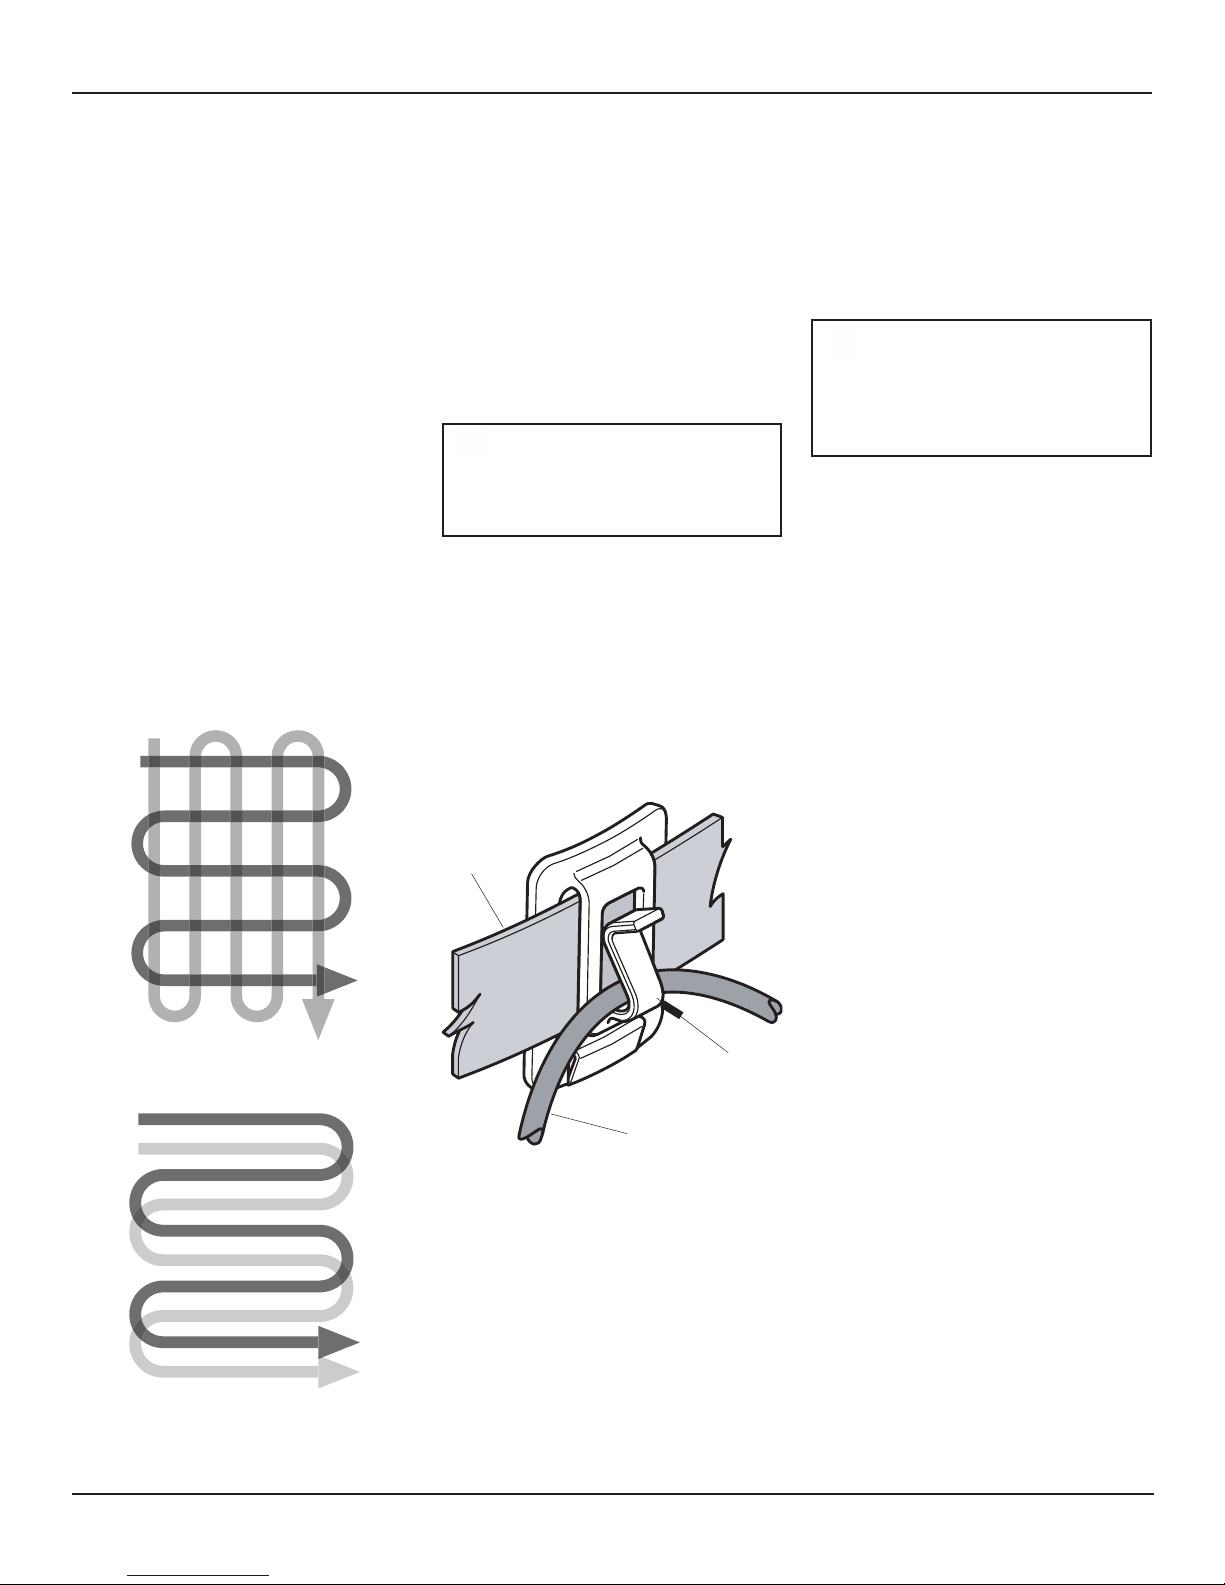
6. Extension Cord - Make sure your exten-
sion cord is in good condition. When
using an extension cord, be sure to use
one heavy enough to carry the current
your product will draw. An undersized
extension cord will cause a drop in line
voltage resulting in loss of power and
overheating. The table below shows the
correct size to use depending on cord
length and nameplate ampere rating. If
in doubt, use the next heavier gage. The
smaller the gage number, the heavier the
cord. To reduce the risk of disconnection
of tiller cord from the extension cord dur-
ing operation use the cord hitch and belt
clip described in this manual.
WARNING: To reduce the risk
of electric shock, use only with an
extensioncordintendedforoutdoor
use, such as an extension cord of
cord type SW-A, SOW-A, STW-A,
STOW-A, SJW-A, SJOW-A, SJTW-
A, or SJTOW-A.
Total Length of Cord
Volts in Feet
120 25 50 100 150
Ampere
Rating AWG
10-12 16 16 14 12
WARNING: This product
contains chemicals known to
the State of California to cause
cancer or birth defects, or other
reproductive harm.
IMPORTANT SAFETY IMFORMATION

5www.remingtonpowertools.com
ENGLISH
MAINTENANCE AND STORAGE OF
TILLER
1. Unplug tiller from power source
• when not in use.
• before moving from one place to
another.
• before servicing.
• before assembling or removing tines
or other attachments.
2. Inspect tiller before and after each use.
Check for any damage that may affect
operator safety or operation of tiller.
Check for broken or damaged parts. Do
not use tiller if damage affects safety
or operation. Have damage repaired by
authorized service center.
3. Maintain tiller with care.
• Never expose to rain or water.
• Keep handlebar dry, clean, and free
of oil or grease.
• Keep all screws and nuts tight.
• Inspect power cord often. If dam-
aged, have repaired by authorized
service center.
• Inspect extension cords often and
replace if damaged.
4. When servicing, use only identical
replacement parts.
5. To reduce the risk of electric shock, this
tiller has a polarized plug (one blade is
wider than the other) and will require
the use of a polarized extension cord.
The tiller plug will fit into a polarized
extension cord only one way. If the plug
does not fit fully into the extension cord,
reverse the plug. If the plug still does not
fit, obtain a correct polarized extension
cord. A polarized extension cord will
require the use of a polarized wall outlet.
This plug will fit into the polarized wall
outlet only one way. If the plug does not
fit fully into the wall outlet, reverse the
plug. If the plug still does not fit, contact
a qualified electrician to install the proper
wall outlet. Do not change the tiller plug,
extension cord receptacle, or extension
cord plug in any way.
6. Store idle tiller indoors - when not
in use, tiller should be stored in dry,
locked place - out of reach of chil-
dren.
SAVE THESE
INSTRUCTIONS.
UNPACKING
1. Remove all items from carton.
2. Check all items for any shipping dam-
age. If you find any damage or if any
parts are missing, promptly inform
dealer where you bought tiller or call
1-800-626-2237.
IMPORTANT SAFETY IMFORMATION

www.remingtonpowertools.com 6
PRODUCT IDENTIFICATION
Wheel
Assembly
Handle
Grip
Carrying
Handle
Retaining
Clip
Wheel Mounting
Bracket
Rear
Housing
Lock-off
Lever
Switch
Housing
Nameplate
Decal
Trigger
Lever
Handlebar
Handlebar
Adjustment
Knob
Front
Housing
Fender
Tines Transmission
Tine
Shaft
Lower
Handlebar
Support
Circuit
Breaker
Cord
Hitch
Power
Cord

7www.remingtonpowertools.com
ENGLISH
UNFOLDING AND ADJUSTING
HANDLEBAR
Unfolding Handlebar
1. Loosen handlebar adjustment knobs.
Rotate the handlebar into the operat-
ing position (see Figure 1). Do not
force handlebar. If there is binding,
continue to loosen adjustment knobs.
Be careful not to pinch power cord
between handlebar and lower handlebar
support.
2. Tighten handlebar adjustment knobs.
Folding Handlebar For Storage
1 Loosen handlebar adjustment knobs.
Rotate the handlebar forward and down
over the tiller housing (see Figure 3).
Do not force handlebar. If there is
binding, continue to loosen knobs. Be
careful not to pinch power cord be-
tween handlebar and lower handlebar
support.
2 Tighten handlebar adjustment knobs.
Adjusting Height of Handlebar
The handlebar has two possible height set-
tings.Thetillerisshipped withthehandlebar
mounted in the standard height or lowest
position. If this height is too short, adjust
the height of the handlebar to the extended
height or highest position.
1. Loosen and remove handlebar adjust-
ment knobs, washers, and saddle bolts
from handlebar.
2. Position handlebar so that the bottom
holes in the handlebar line up with the
holes in the lower handlebar supports
(see Figure 2). Insert the saddle bolts
through the holes and reinstall the
washers and handlebar knobs.
3. Tighten handlebar adjustment knobs.
Figure 1 - Unfolding Handlebar Figure 2 - Adjusting Handlebar Height
Figure 3 - Folding Handlebar Down
Handlebar
Handlebar
Adjustment
Knob
Lower
Handlebar
Support
Handlebar
Handlebar
Adjustment
Knob
Lower
Handlebar
Support
Handlebar
Adjustment
Knob
Extended Height
Adjustment Hole
Standard Height
Adjustment Hole
Saddle
Bolt
Washer
ASSEMBLY

www.remingtonpowertools.com 8
ADJUSTING WHEEL ASSEMBLY
Adjusting the Wheel Assembly for
Transport
1. Remove retaining clip and clevis pin
from wheel assembly mounting bracket
(see Figure 4).
2. Rotate the wheel assembly down so that
the hole in the wheel assembly lines up
with the center hole in the mounting
bracket as shown in Figure 5.
3. Insert the clevis pin through the hole as
shown in Figure 5, and insert the retain-
ing clip in the clevis pin. The wheels are
now mounted in the transport position.
Adjusting the Wheel Assembly for
Tilling
1. Remove the retaining clip from the
clevis pin and remove the clevis pin
from the mounting bracket and wheel
assembly.
2. Rotate the wheel assembly up and for-
ward as shown in Figure 6 until the hole
in the wheel assembly lines up with the
upper hole in the mounting bracket.
3. Insert the clevis pin through the aligned
holes and insert the retaining clip into
the clevis pin. The wheels are now
mounted in the tilling position.
TINE REMOVAL AND
INSTALLATION
Tine Removal and Installation
1. Remove the retaining clips from the
end of the tine shaft.
2. Remove outer tine set from tine shaft.
3. Remove inner tine set from tine shaft.
4. Reinstall the retaining clips onto tine shaft
to prevent them from being misplaced.
5. Reverse above steps to install tines.
IMPORTANT:Thetillerhas4differ-
ent sets of tines. For proper per-
formance, the tines must always
be installed correctly as shown
in Figure 7. When assembled cor-
rectly, the angled cutting edge of
tines should rotate towards the
front of the tiller. The blades of all
thetinesshouldbepointingtoward
the transmission. The tine hubs of
theinnerandoutertinesetsshould
be facing each other as shown in
Figure 8.
WARNING:Alwaysunplugthe
tiller before placing hands near
the tines. Always wear gloves to
protectyourhandsfromthesharp
edges of the tines.
Tine Shaft
Inner Tine Set
Retaining Clip
Figure 7 - Tine Removal and Installation
Clevis Pin
Figure 4 - Removing Retaining Clip and
Clevis Pin
Figure 5 - Adjusting Wheel Assembly to
Transport Position
Figure 6 - Adjusting Wheel Assembly to
Tilling Position
Retaining Clip
Rotation of Tines
During Operation
Cutting
Edge
Tine Hub
Tine
Blade
Outer
Tine Set
Tine Hubs
Toward Transmission
ASSEMBLY

9www.remingtonpowertools.com
ENGLISH
CIRCUIT BREAKER PROTECTION
This tiller is equipped with a circuit breaker
located in the top of the switch housing (see
Figure9).Thecircuitbreakerprovides over-
current protection to the tiller motor should
the tines become jammed or locked by a
stone, root, or other obstruction.
If the circuit breaker should trip during use,
the white circuit breaker button will pop up
out of the case and the electric motor and
the tines will stop rotating.
Resetting the Breaker
1. Fully release the trigger lever.
2. Unplug the tiller power cord from the
extension cord.
3. Dislodge or remove any obstacles
from the tines which caused the tines
to jam.
4. Press the white circuit breaker button
back into the housing to reset (see Figure
9). The button should stay depressed
when released. Plug the tiller power cord
back into the extension cord.
5. Firmly grasp the tiller grip area on the
handlebar, and resume tilling.
WARNING:Alwaysunplugthe
tiller before placing hands near
the tines. Always wear gloves to
protectyourhandsfromthesharp
edges of the tines.
Figure 9 - Circuit Breaker Button
Circuit
Breaker
Set Circuit
Breaker
Tripped
OPERATING TILLER
WARNING: Read and under-
stand this owners manual before
operating this tiller. Make certain
you read and understand all
Safety Warnings. Improper use
of this tiller can result in severe
injury or death from fire, electri-
cal shock, or body contact with
moving parts.
EXTENSION CORDS
Always use proper extension cords with
this tiller. Use only extension cords marked
for outdoor use. The cord must be marked
with suffix W or W-A following the cord
type designations. Example: SJTW-A or
SJTW.
Use proper sized cord with this tiller. Cord
must be heavy enough to carry current
needed. An undersized cord will cause
voltage drop at tiller. Tiller will lose power
andoverheat.Followcordsize requirements
listed below.
Cord Length AWG Cord Size
25 feet 16 AWG
50 feet 16 AWG
100 feet 14 AWG
150 feet 12 AWG
Keep cord away from rotating tines. Inspect
cord often. Replace damaged cords.
RETAINING EXTENSION CORD
The switch housing has an extension cord
hitchmadefromaseries ofalternatinghooks
(see Figure 8). This feature can be used to
secure the receptacle end of the extension
cordtothetillerhandletopreventaccidental
disconnection from the power cord. A belt
clip is also included to help manage the cord
bykeeping it at the usersside and away from
the tiller tines.
Securing Extension Cord to Tiller
1. Start at approximately 6 inches from
receptacle end of extension cord and
weave the cord between the hooks on
the switch housing as shown in Figure
8, so that the receptacle is hanging
below the switch housing.
2. Begin weaving the extension cord on
top of the bottom hook and alternate
under and over hooks so that the cord
is ultimately on top of the last hook.
3. Plug the tiller power cord into the ex-
tension cord.
Figure 8 - Securing Extension Cord to
Tiller STARTING TILLER
1. Grasp grip area on handlebar firmly
with both hands.
2. Use your thumb to slide the lock-off
lever all the way to the right (see Figure
10). This releases the trigger lever.
3. Squeeze the trigger lever all the way
in (see Figure 10). The motor will start
and the tines will begin to rotate. Once
the tiller is started, the lock-off lever
can be released.
4. IMPORTANT: To stop the tiller, re-
lease the trigger lever. The motor will
shut off and the tines will stop rotating.
The trigger lever is now locked off
again.
Figure 10 - Lock-off Lever and Trigger
Lever
2
1
Lock-off Lever
Trigger
Lever

www.remingtonpowertools.com 10
CLEARING TINES OF FOREIGN
OBJECTS
During use, a stone or root could become
lodgedinthetines,or tallgrassorweedsmay
become wrapped around the tine shaft.
To clear the tines, release the trigger lever.
Unplugthetiller,anddislodgeorremoveany
obstacles from the tines or tine shaft.
To ease removal of tall grass or weeds that
are wrapped around the tine shaft, remove
one or more of the tines from the tine shaft.
See Tine Removal and Installation.
When you have cleared the tines, reinstall
tines onto tine shaft. Plug the tiller power
cordintotheextensioncord.Firmlygraspthe
grip area of the handlebar with both hands
and resume normal tilling operation.
WARNING:Alwaysunplugthe
tiller before placing hands near
the tines. Always wear gloves to
protectyourhandsfromthesharp
edges of the tines.
BASIC TILLER OPERATION
Usethetiller forbreakingsod,preparing seed
beds, and for cultivating gardens and flower
beds. The tiller can also dig small holes for
planting saplings or potted plants.
Let the tiller do most of the work. The tines
will pull the tiller forward during operation.
By pulling tiller back towards yourself,
the tines will dig deeper and more aggres-
sively.
Forbreakingsodordeeptilling,allowthetines
topullthetillerforwardtotheendofyourarm’s
reach, then firmly pull the tiller back towards
you. By repeatedly allowing the tiller to move
forward and then pulling the tiller back to you,
the tiller will be most effective.
If the tiller digs deep enough to stay in one
spot,gently rock thetiller side toside to start
the tiller moving forward again.
For preparing seed beds, we recommend
using one of the tilling patterns shown in
Figure 11.
Figure 11 - Suggested Tilling Patterns
Tilling Pattern One - Make two passes over
area to be tilled, the second at a right angle
to the first.
Tilling Pattern Two - Make two passes over
area to be tilled, the second overlapping
the first.
EXTENSION CORD MANAGEMENT
Aswithanyelectriclawnandgardenappliance,
you willdevelopa commonsenseapproach to
keepingtheextensioncordinasafeandlogical
location as you are using the tiller.
A convenient belt clip is included with the
tiller to enable you to attach the extension
cord to your waist and ease cord manage-
ment(seeFigure12).Itis recommended that
the belt clip and extension cord be attached
to your right side. Maintain enough slack
between the tiller and the belt clip for easy
maneuvering.
Figure 12 - Extension Cord Belt Clip
WARNING: Be aware of exten-
sion cord while operating tiller. Be
careful not to trip over cord. Keep
cord away from tines at all times.
Outer
Hook
Belt
Extension Cord
If tilling rows, start with the row that is clos-
est to the household outlet you are using as
an electrical power source. Begin tilling the
row in a direction which will keep the exten-
sion cord on your right side. When the tiller
reaches the end of the row, turn to position
the tiller in the opposite direction for the next
row. Remember, keeping the extension cord
behind you and on your right side will make
it easier to manage the extension cord.
OPERATING TILLER

11 www.remingtonpowertools.com
ENGLISH
Figure 13- Grease Filler Screw
Grease Filler
Screw
CHECKING TRANSMISSION
LUBRICANT
1. Unplug tiller from power source.
2. Locate the grease filler screw located
above the tine shaft on the right side of
the transmission (see Figure 13).
3. Lay the tiller on its left side. Remove
the right side tine sets for easy access
to grease filler screw. See Tine Removal
and Installation.
4. Clean the transmission to prevent dirt and
debris from entering the transmission.
5. Using a Phillips head screwdriver, re-
move the grease filler screw from the
transmission case.
6. If grease is not visible in the hole,
add a high-quality, automotive-grade,
petroleum-based grease using standard
grease gun. Place the nozzle of the
grease gun firmly against the rim of
the hole and add grease until it begins
to seep out around the edge of the
nozzle.
7. Reinstall the grease filler screw and
wipe away any excess grease.
8. Reassemble the tine sets. See Tine
Removal and Installation.
CLEANING TILLER
1. To clean front and rear cover and
fender, use a soft cloth dampened with
a mild soap and water mixture. Do not
spray or pour water directly onto the
front or rear cover. Wipe the front and
rear covers and fender with the damp-
ened cloth.
2. To remove soil and debris from the
tines and transmission, use a stiff brush
or a dampened cloth. Do not spray or
pour water directly onto tiller.
3. For easier cleaning, remove the tines
from the tine shaft. See Tine Removal
and Installation.
4. Once cleaned, wipe the tine shaft dry
and apply a light coat of oil to the shaft
before reinstalling the tines.
WARNING: When cleaning
tiller:
• Do not submerge tiller in any
liquids.
• Do not use products that
contain ammonia, chlorine, or
abrasives.
• Donotusechlorinatedcleaning
solvents, carbon tetrachloride,
kerosene, or gasoline.
WARNING: Unplug tiller from
power source before cleaning or
servicing. Severe injury or death
could occur from fire, electrical
shock, or body contact with mov-
ing tines.
CLEANING AND MAINTENANCE
OTHER SUGGESTED
LUBRICATION POINTS
Handlebar Adjustment Knobs: Oc-
casionally spray a silicone type lubricant
around the saddle bolts.
Tine Shaft: After each use, remove the
tines,cleanthetineshaftwith fine sandpaper
and apply a light coat of oil to the tine shaft.
This will make future tine installation and
removal easier.

www.remingtonpowertools.com 12
TROUBLESHOOTING
Note: For additional help, visit our technical service web site at www.remingtonpowertools.com.
WARNING: Unplug tiller from power source before servicing. Severe injury or death could occur from fire,
electrical shock, or body contact with moving tines.
REPAIR SERVICE
Note: Only use original replacement parts.
Thiswillprotectyourwarrantycoveragefor
parts replaced under warranty.
Each Authorized Service Center is indepen-
dently owned and operated.
For additional Service Center or warranty
information, call 1-800-626-2237or visit
our Technical Service web site at www.
remingtonpowertools.com.
Warranty service
If product requires warranty service, return
it to nearest Authorized Service Center.
You must show proof of purchase. If faulty
materials or workmanship caused damage,
we will repair or replace product without
charge. Note: Normal wear, misuse, abuse,
neglect,oraccidental damage is not covered
under warranty.
Non-warranty service
Ifproductrequires service,returnitto nearest
Authorized Service Center. Repairs will be
billed to you at regular repair list prices.
TECHNICAL SERVICE
You may have further questions about as-
sembling, operating, or maintaining this
product. If so, you can visit our Technical
Servicewebsiteatwww.remingtonpow-
ertools.comor contact our Technical Ser-
viceDepartmentat1-800-626-2237(English
Only). You may also write to:
DESA Power Tools
ATTN: Technical Service
P.O. Box 90004
Bowling Green, KY 42102-9004
When contacting DESA Power Tools, have
ready
• Your Name
• Your Address
• Your Phone Number
• Model Number of Product
• Date of Purchase (Include copy of receipt
for written requests).
Always specify model number when writ-
ing the factory.
We reserve the right to amend these specifi-
cations at any time without notice. The only
warranty applicable is our standard written
warranty. We make no other warranty,
expressed or implied.
OBSERVED FAULT POSSIBLE CAUSE REMEDY
Motor does not run when you squeeze
trigger lever
1. Lock-off lever not pressed to release
trigger lever
2. Extension cord connection is loose
3. Circuit breaker is tripped on tiller
4. Household circuit breaker is tripped or
open line fuse
5. Bad motor brushes
6. Open wiring on Pole Trimmer
1. Fully depress lock-off lever before
squeezing trigger lever (see Starting
Tiller)
2. Check cord connections
3. Check circuit breaker on tiller (see
Circuit Breaker Protection)
4. Check circuit breaker or line fuse (see
Circuit Breaker Protection)
5. See authorized service center
6. See authorized service center
Motor runs, but tines do not move Gear train failure Call for Technical Service
Tiller smokes Tiller damaged. Do not use tiller Call for Technical Service
REPLACEMENT PARTS
AND ACCESSORIES
For original replacement parts and acces-
sories, contact your nearest Authorized
DealerorAuthorizedServiceCenterforthis
product. If they can not supply the part or
accessory,contactyournearest PartsCentral
listed on page 42. Each Authorized Dealer,
AuthorizedServiceCenter, andPartsCentral
is independently owned and operated.
See pages 40-41 for an Illustrated Parts List.
If you need additional referral information,
contact our Technical Service Department
(see Technical Service).
In Canada call 1-800-561-3372 for parts
information.

13 www.remingtonpowertools.com
ENGLISH
P.O. Box 90004
Bowling Green, KY 42102-9004
www.remingtonpowertools.com
Model _________________
Date Purchased _________________
82 Akron Road
Toronto, Ontario
M8W 1T2
1-800-561-3372
Fax: 1-800-561-8003
REMINGTON BRAND ELECTRIC TILLER
LIMITED WARRANTIES
NEW PRODUCTS
Standard Warranty
DESA Power Tools warrants this new product and any parts thereof to be free from defects in material and workmanship for a period of two (2) years from the date of first
purchase from an authorized dealer provided the product has been maintained and operated in accordance with DESA Power Tools’ warnings and instructions.
FACTORY RECONDITIONED PRODUCTS
Limited Warranty
DESA Power Tools warrants factory reconditioned products and any parts thereof to be free from defects in material and workmanship for 90 days from the date
of first purchase from an authorized dealer provided the product has been installed, maintained and operated in accordance with DESA Power Tools’ warnings and
instructions.
TERMS COMMON TO ALL WARRANTIES
The following terms apply to all of the above warranties:
• Always specify model number when contacting the manufacturer. To make a claim under this warranty the bill of sale or other proof of purchase must be
presented.
• This warranty is extended only to the original retail purchaser when purchased from an authorized dealer.
• This warranty covers the cost of part(s) required to restore this product to proper operating condition and an allowance for labor when provided by a DESA Power
Tools Authorized Service Center. Warranty parts must be obtained through authorized dealers of this product and/or DESA Power Tools who will provide original
factory replacement parts. Failure to use original factory replacement parts voids this warranty.
• Travel, handling, transportation, diagnostic, material, labor and incidental costs associated with warranty repairs, unless expressly covered by this warranty, are
not reimbursable under this warranty and are the responsibility of the owner.
• Excluded from this warranty are products or parts that fail or become damaged due to misuse, accidents, lack of proper maintenance, tampering, or alterations.
• Excluded from this warranty are products purchased for commercial, industrial or rental usage.
• This is DESA Power Tools’ exclusive warranty, and to the full extent allowed by law; this express warranty excludes any and all other warranties, express or
implied, written or verbal and limits the duration of any and all implied warranties, including warranties of merchantability and fitness for a particular purpose
to two (2) years on new products and 90 days on factory reconditioned products from the date of first purchase. DESA Power Tools makes no other warranties
regarding this product.
• DESA Power Tools’ liability is limited to the purchase price of the product, and DESA Power Tools shall not be liable for any other damages whatsoever under
any circumstances including indirect, incidental, or consequential damages.
• Some states do not allow limitations on how long an implied warranty lasts or the exclusion or limitation of incidental or consequential damages, so the above
limitation or exclusion may not apply to you.
• This warranty gives you specific legal rights, and you may also have other rights which vary from state to state.
For information about this warranty contact:
WARRANTY INFORMATION

www.remingtonpowertools.com 14
NOTES/NOTAS_____________________________
__________________________________________
__________________________________________
__________________________________________
__________________________________________
__________________________________________
__________________________________________
__________________________________________
__________________________________________
__________________________________________
__________________________________________
__________________________________________
__________________________________________
__________________________________________
__________________________________________
__________________________________________
__________________________________________
__________________________________________
__________________________________________
__________________________________________
__________________________________________

®
IMPORTANTE:Antes de ensamblar y operar este cultivador lea y entienda
este manual. El uso inadecuado de este cultivador puede ocasionar le-
siones graves. Guarde este manual para futuras referencias.
MODELO 109312-01
GARDEN WIZARD®
MANUAL DEL PROPIETARIO DEL
CULTIVADOR ELÉCTRICO
15
ESPAÑOL

16
www.remingtonpowertools.com
EL CONTENDO
INFORMACIÓN IMPORTANTE DE SEGURIDAD............................17
Antes de operar el cultivador ..................................................................................................................17
Mientras opera el cultivador....................................................................................................................17
Mantenimiento y almacenamiento del cultivador ................................................................................18
Desembalaje................................................................................................................................................18
IDENTIFICACIÓN DEL PRODUCTO................................................19
ENSAMBLAJE..................................................................................20
OPERACIÓN DEL CULTIVADOR.....................................................22
Cordones de extensión............................................................................................................................22
Protección con disyuntor .........................................................................................................................22
Arranque del cultivador............................................................................................................................22
Operación básica del cultivador .............................................................................................................23
Manejo del cordón de extensión ............................................................................................................23
Retiro de objetos extraños de las púas........................................................................................................23
LIMPIEZA Y MANTENIMIENTO .......................................................24
Limpieza del cultivador ............................................................................................................................24
Revisión del lubricante de la transmisión .............................................................................................24
DIAGNÓSTICO Y RESOLUCIÓN DE PROBLEMAS.......................25
PIEZAS DE REPUESTO...................................................................25
SERVICIO TÉCNICO ........................................................................25
SERVICIO DE REPARACIÓN ..........................................................25
Servicio de garantía .................................................................................................................................25
Servicio fuera de la garantía...................................................................................................................25
INFORMACIÓN DE GARANTÍA.......................................................26
DESGLOSE ILUSTRADO DE PARTES ...........................................40
LISTA DE PIEZAS.............................................................................41
CENTRAL DE PIEZAS .....................................................................42
Si tiene preguntas o problemas, LLAME GRATIS al 1-800-626-2237 (sólo en inglés)
o visite el sitio www.remingtonpowertools.com

17 www.remingtonpowertools.com
ESPAÑOL
12. Inspeccione completamente el área en
donde va a usarse el cultivador y retire
cualquier objeto extraño.
MIENTRAS OPERA EL
CULTIVADOR
1. Manténgase alerta. Use el sentido co-
mún mientras opera el cultivador.
2. Esté atento al cordón de extensión
mientras opera el cultivador. Tenga
cuidado de no tropezarse con el cable.
Mantenga siempre al cordón de exten-
sión lejos de las púas.
3. Mantenga lejos del cultivador y del cor-
dón de extensión a todos los niños(as),
animales y curiosos. Mantenga el área
de operación libre de personas y mas-
cotas.
4. Agarre firmemente el manubrio con
ambas manos. Nunca opere el cultiva-
dor con una mano.
5. Esté alerta ya que el cultivador puede
rebotar inesperadamente hacia arriba o
saltar hacia adelante si las púas golpean
un suelo extremadamente duro, com-
pactado, congelado o con obstáculos
enterrados como piedras grandes, raí-
ces o tocones.
6. No sostenga la máquina extendiendo
mucho los brazos. Mantenga siempre el
equilibrio y la estabilidad en los pies.
7. Por seguridad no opere el cultivador
en una pendiente demasiado empinada.
Cuando esté en pendientes, disminuya
la velocidad y asegúrese que sus pies
estén bien estables.
8. IMPORTANTE: Las púas pueden
detenerse soltando la palanca de accio-
namiento.
9. Antes de arrancar el cultivador, ase-
gúrese que las púas no estén tocando
objetos extraños.
10. Tenga cuidado en no acercar las manos,
cualquier parte del cuerpo o la ropa a
las púas giratorias.
11. Para mover el cultivador de un lugar a
otro:
• Apáguelo y desenchúfelo.
• Hágalo rodar utilizando el conjunto
de ruedas acopladas y en posición
hacia abajo o de “transporte”.
• Sostenga el mango de transporte.
Nunca use los manubrios, púas,
eje de las púas o guardabarros para
transportar el cultivador.
LEA TODAS LAS INSTRUCCIONES
ANTES DE OPERAR EL
CULTIVADOR
1. No opere el cultivador cerca de elemen-
tos subterráneos como cables eléctricos,
líneas telefónicas, tuberías o mangueras.
Si tiene duda sobre la ubicación de estos
elementos, póngase en contacto con su
compañía de servicios. Para obtener
información local de los servicios
subterráneos puede también ponerse
en contacto con el número de consulta
Llamada Nacional Unica al 1-888-258-
0808.
2. Observe lo que está haciendo. Use el
sentido común. No opere el cultivador
cuando esté cansado(a).
3. El cultivador debe ser manejado solamen-
te por adultos bien instruidos. No deje que
los niños manejen el cultivador.
4. No use el cultivador para ningún otro
trabajo excepto para el que fue desti-
nado.
5. Use solamente el voltaje eléctrico indicado
en la placa del modelo del cultivador.
6. Cordón de extensión _ Asegúrese que
su cordón de extensión esté en buenas
condiciones. Cuando lo use, esté se-
guro de utilizar uno suficientemente
grueso para que transporte la corriente
absorbida por su máquina. Un cordón
de extensión subdimensionado oca-
sionará caídas de voltaje en la línea lo
cual producirá pérdidas de potencia y
sobrecalentamiento. La tabla a conti-
nuación le indica el tamaño correcto
de cordón que debe usar de acuerdo
a la longitud de la extensión y a la ca-
pacidad nominal de corriente indicada
en la placa. Si tiene duda use el calibre
mayor siguiente. A menor número de
calibre, más grueso es el cordón. Para
reducir, mientras funciona, el riesgo de
desconexión del cordón del cultivador,
use el gancho del cordón y la presilla
ADVERTENCIA: Cuando use
electrodomésticos para jardine-
ría, deben acatarse las precau-
ciones básicas sobre seguridad
parareducirelriesgodeincendio,
sacudida eléctrica, o lesión al
personal.
ADVERTENCIA: Para reducir
el riesgo de sacudida eléctrica,
use solamente cordón de exten-
sión destinado para uso exterior,
por ejemplo cordón de extensión
del tipo SW-A, SOW-A, STW-A,
STOW-A,SJW-A,SJOW-A,SJTW-
A ó SJTOW-A.
Longitud total del
Voltaje cordón en pies
120 25 50 100 150
Capacidad
en amperios AWG
10-12 16 16 14 12
de la correa descritas en este manual.
7. El circuito a usarse con el cultivador debe
tener, como protección, cortacircuitos
de falla a tierra (GFCI). Se disponen de
tomacorrientes con protección GFCI
incorporada que pueden utilizarse como
medida adicional de seguridad.
8. Evite ambientes peligrosos. No opere
el cultivador:
• Cuando se halle bajo la influencia del
alcohol, medicamentos o drogas.
• En la lluvia o en áreas húmedas o
mojadas.
• En sitios donde están presentes líqui-
dos o gases altamente inflamables.
• Si el cultivador está dañado o no está
ensamblado completamente y bien.
9. Use siempre protección visual que
cumpla o exceda los requerimientos de
ANSI Z 87.1
10. Si opera el cultivador en condiciones
de polvo, use siempre máscara facial
o para polvo.
11. Vístase siempre adecuadamente. Mien-
tras utilice el cultivador se recomienda
usar lo siguiente:
• Guantes de caucho y calzado robus-
to.
• Para sostener cabellos largos use un
cobertor y protector de cabellos.
• Evite usar ropas flojas o joyas que
podrían quedar atrapadas en las púas
giratorias.
ADVERTENCIA:Esteproducto
contiene substancias químicas
conocidas en el estado de Cali-
fornia como causas de cáncer o
de defectos al recién nacido o de
otros daños de reproducción.
ADVERTENCIAS SOBRE
SEGURIDAD
INFORMACIÓN IMPORTANTE DE SEGURIDAD

18
www.remingtonpowertools.com
4. Cuando realice servicio, use solamente
partes de repuesto idénticas.
5. Para reducir el riesgo de sacudida eléc-
trica, este cultivador tiene un enchufe
polarizado (una hoja es más ancha que
la otra) por lo que se requerirá el uso
de un cordón de extensión polarizado.
El enchufe del cultivador se adaptará
al cable de extensión polarizado sola-
mente de una forma. Si el enchufe no
se acopla completamente en el cable
de extensión, invierta el enchufe. Si
el enchufe aún no se adapta, consiga
el correcto. Un cordón de extensión
polarizado requerirá el uso de un to-
macorriente de pared polarizado. Esta
clavija se adaptará al tomacorriente
polarizado solamente de una forma. Si
el enchufe no se adapta completamente
al tomacorriente de pared invierta el
enchufe. Si aún así el enchufe no se
adapta, póngase en contacto con un
electricista calificado para instalar el
tomacorriente de pared apropiado. No
cambie de ninguna forma el enchufe
del cultivador, la toma o el enchufe del
cordón de extensión.
6. Guarde el cultivador inactivo bajo techo.-
cuando no lo use, el cultivador debe ser
almacenado en un lugar seco y bajo llave-
fuera del alcance de los niños.
12. No maltrate el cordón de alimentación.
Nunca transporte el cultivador halán-
dolo de este cable ni tampoco lo hale
para desconectarlo del tomacorriente.
Mantenga el cordón de alimentación
lejos del calor, aceites o de bordes
cortantes.
13. No fuerce al cultivador. Este hará mejor
el trabajo y con menor probabilidad
de riesgo de una lesión si lo usa a la
velocidad para la que fue diseñada.
MANTENIMIENTO Y
ALMACENAMIENTO DEL
CULTIVADOR
1. Desenchufe el cultivador de la fuente
de alimentación
• Cuando no se lo use.
• Antes de moverlo de un lugar a
otro.
• Antes de darle servicio.
• Antes de ensamblarlo, o antes de retirar
las púas giratorias u otros aditamen-
tos.
2. Inspeccione el cultivador antes y después
de cada uso. Revise cualquier daño que
pueda afectar la seguridad del operador o
el funcionamiento del cultivador. Revise
partes rotas o dañadas. No use el cultiva-
dor si el daño afecta a la seguridad o a la
operación. Haga reparar el daño en un
centro de servicio autorizado.
3. Mantenga cuidadosamente al cultiva-
dor
• Nunca lo exponga a la lluvia o al
agua.
• Mantenga el manubrio seco, limpio
y libre de aceite o grasa.
• Mantenga todos los tornillos y tuer-
cas ajustadas.
• Inspeccione a menudo el cordón de
alimentación. Si está dañado hágalo
reparar en un centro de servicio au-
torizado.
• Inspeccione a menudo los cordones
de extensión y reemplácelos si están
dañados.
GUARDE ESTAS
INSTRUCCIONES.
DESEMBALAJE
1. Retire todos los elementos del cartón.
2. Revise cualquier daño que en el trans-
porte pudo ocasionar a estos elemen-
tos. Si encuentra algún daño o si falta
alguna parte, informe con prontitud al
distribuidor en donde compró su culti-
vador o llame al 1-800-626-2237.
INFORMACIÓN IMPORTANTE DE SEGURIDAD

19 www.remingtonpowertools.com
ESPAÑOL
IDENTIFICACIÓN DEL PRODUCTO
Palanca de
accionamiento
Manubrio
Guardabarros
Púas
Transmisión
Eje de la púa
Soporte del
manubrio
inferior
Disyuntor
Gancho
del cordón
Cordón de
alimentación
Caja
frontal
Perilla de
regulación
del manubrio
Agarradera
del mango
Mango de
transporte
Presilla de
retención
Consola de montaje
de la rueda
Conjunto
rueda
Caja
posterior
Palanca de traba
en apagado
Caja del
interruptor
Calcomanía de la placa
de características

20
www.remingtonpowertools.com
DESDOBLAMIENTO Y
REGULACIÓN DEL MANUBRIO
Desdoblamiento del manubrio
1. Afloje las perillas de regulación del ma-
nubrio. Gire el manubrio a la posición de
operación (vea la figura 2). No fuerce el
manubrio. Si se nota un endurecimiento,
continúe aflojando las perillas de regu-
lación. Tenga cuidado que el cordón de
alimentación no quede apretado entre el
manubrio y su soporte inferior.
2. Apriete las perillas de regulación del
manubrio.
Doblamiento del manubrio para
almacenarlo
1. Afloje las perillas de regulación del
manubrio. Gire el manubrio hacia ade-
lante y hacia abajo por sobre la caja del
cultivador (Vea la figura 3). No fuerce el
manubrio. Si se nota un endurecimiento,
continúe aflojando las perillas de regu-
lación. Tenga cuidado que el cordón de
alimentación no quede apretado entre el
manubrio y su soporte inferior.
2. Apriete las perillas de regulación del
manubrio.
Regulación de la altura del
manubrio
El manubrio tiene dos ajustes disponibles
para la altura. El cultivador es transportado
con el manubrio colocado en la posición
estándaro de menoraltura. Si laaltura es de-
masiado corta, regule la altura del manubrio
a su posición extendida o más alta.
1. Afloje y retire del manubrio las perillas
de regulación, arandelas y pernos tipo
montura.
2. Coloque el manubrio de modo que
sus orificios inferiores alineen con los
orificios de los soportes inferiores del
manubrio (Vea la figura 2). Inserte los
pernos tipo montura por los orificios y
vuelva a instalar las arandelas y perillas
del manubrio.
3. Apriete las perillas de regulación del
manubrio.
Figura 2 – Desdoblamiento del
manubrio Figura 2 – Regulación de la altura del
manubrio
Figura 3 – Doblamiento hacia abajo del
manubrio
Manubrio
Perilla de
regulación
del manubrio
Soporte inferior
del manubrio
Manubrio
Perilla de
regulación
del manubrio
Soporte
inferior del
manubrio
Perilla de
regulación
del manubrio
Orificio de
regulación de la
altura extendida
Orificio de
regulación de la
altura estándar
Perno tipo
montura
Arandela
ENSAMBLE
Other manuals for Garden Wizard 109312-01
1
Table of contents
Languages:
Other Remington Tiller manuals