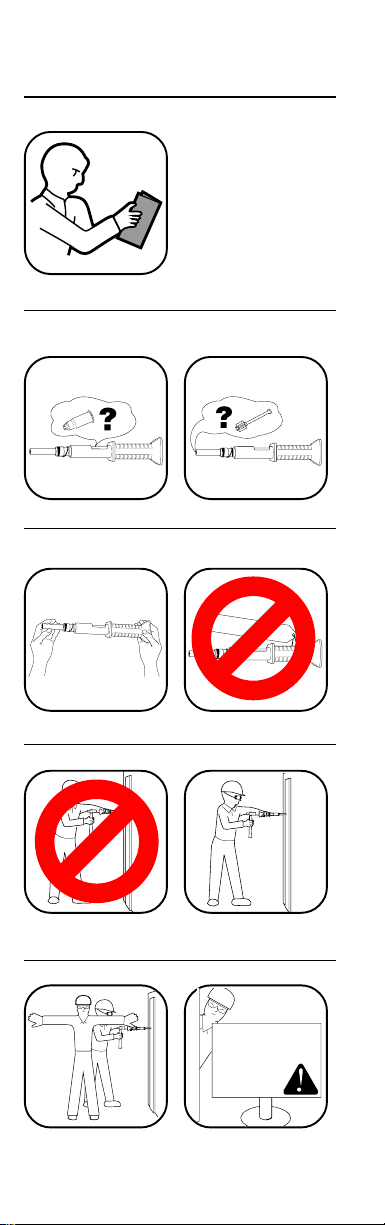
Remington 476 User manual

REMINGTON®
POWERHAMMER
Model 476
Operating
Instructions
The Remington POWERHAMMERis
designed for use with Remington 22
caliber,TypeAcrimpedpowerloadsand
Remington Power Fasteners which are
no longer than 68mm (2 11/16").
Remington Power Fasteners are manu-
factured from special steel and heat
treated to produce a very hard, yet duc-
tile, fastener.
CAUTION:
Readthismanualandalllabelscarefully
before operating your powder actuated
tool.This manualshould alwaysaccom-
pany the tool and be transferred with it
upon change of ownership.
WARNING ICON G 001
WARNING: This tool is de-
signed only for use by qualified opera-
tors. Qualification is obtained through a
thorough understanding of the
Safety
Warnings
and operating instructions as
defined in this operating manual.

2
WARNING:
Safety Precautions
BEFORE USING
1. ALWAYS handle the tool as if it
were loaded. Before starting work,
check that the tool is unloaded and
the muzzle is clear. NEVER load a
tool unless it is going to be used.
2. ALWAYS inspect to make sure the
tool is working properly. If the tool
does not work properly or is dam-
aged remove from service and tag
DEFECTIVE.
3. Operators and bystanders must
ALWAYS wear goggles and hear-
ingprotectionwhichmeetorexceed
the accepted standards for ad-
equateprotectioninyourcountry.In
the U.K., refer to BSI standards.
4. ALWAYS clearthe workareaon all
sides and post appropriate warning
signs on job sites.
The following pages contain detailed
warnings, cautions, and rules of safe
operation. Read carefully and become
familiar before operating to avoid seri-
ous injury. We expressly disclaim any
liability for any injury to persons or dam-
age to property which result from your
failureto taketheprecautions contained
in this manual.

3
Safety Precautions
DEFECTIVE
WARNING
POWDER
ACTUATED
TOOLS
IN USE!
G 018
G 018

4
Safety Precautions
HANDLING THE TOOL
1. NEVER place your hand over the
muzzle. Accidental discharge can
cause serious injury.
2. ALWAYS store UNLOADED pow-
der actuated tool and loads in a
lockedcontainer.Keeppowerloads
ofdifferentpowerlevelsinseparate
containers.
3. NEVERcarryorpassaloadedpow-
der actuated tool. NEVER point a
powder actuated tool at anyone.
4. ALWAYStakeprecautionstomain-
tain your balance while operating a
powder actuated tool.
5. An operator taking medication
shouldtake extra precautions while
handling the tool. NEVER drink al-
coholic beverages or take medica-
tions which impair your vision, bal-
ance or judgement before using a
powder actuated tool.

5
Safety Precautions
POWDER
LOADS
POWD
LOAD
G 018
G 018
G 018
G 018
G 018

6
3.NEVER make fastenings in spalled
or cracked areas.
Safety Precautions
KNOW YOUR FASTENING BASE
MATERIAL
1. ALWAYS know the thickness and
typeofbasematerialintowhichyou
are fastening. NEVER GUESS.
Test the base material by using the
Center Punch Test. The Center
PunchTestis performed by using a
hammer to test drive the particular
fastener to be used into the mate-
rial. If the point penetrates easily,
the material is too soft. If the point
becomes blunt, the material is too
hard. If the material fractures,
cracks or shatters, the material is
too brittle. Test fastenings should
always be made starting with the
lowest power load (Gray-Level 1)
and proceeding with the order
shown. ALWAYS wear approved
goggles.
2. NEVER attempt to drive fasteners
into very hard or brittle materials
including, but not limited to cast
iron,glass,tile,stone,brick,orhard-
ened steel. Materials of this type
tend to shatter and create hazard
from flying particles.

7
Safety Precautions
?
?
?
?
CENTER
PUNCH TEST
Sinks in
with
average
hammer
blow
TOO SOFT TOO HARD
Point
flattens
Surface
shatters
Start
3
GREEN
2
BROWN
4
YELLOW
CAST
IRON GLASS TILE BRICK
1
GRAY
TOO BRITTLE
G 018
G 018
G 018
G 018 G 018
G 018

8
Safety Precautions
4. NEVER drive fasteners into thin or
easily penetrated materials unless
it is backed by concrete or steel.
When in doubt, such as when base
material is concealed, conduct a
CenterPunchTest.Checkcontinu-
ally to avoid fastening into unsuit-
able material, especially in older
buildings.
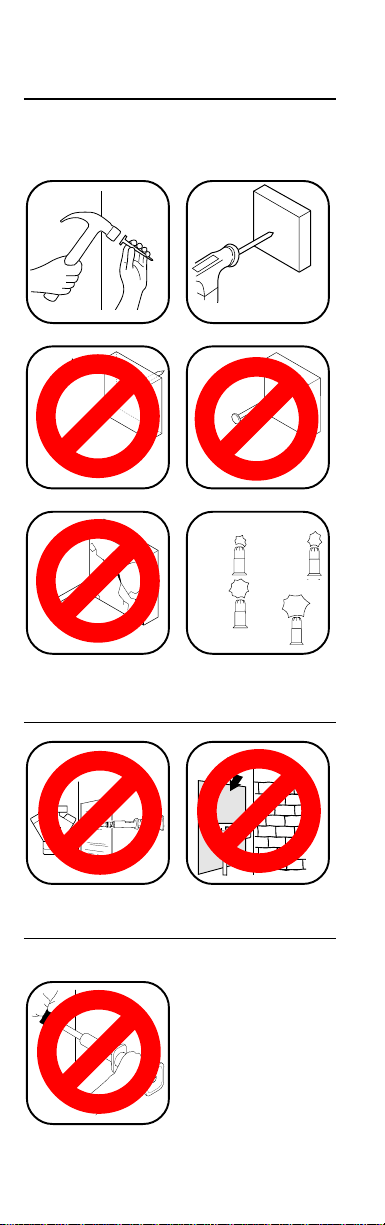
5. DO NOT fasten thru or within
12.7mm (1/2") of predrilled or pre-
punched holes.
6. DO NOT drive fasteners into con-
crete less than three times as thick
as the intended fastener penetra-
tion, within 76mm (3") of the edge,
within 76mm (3") of another fas-
tenerorwithin76mm(3") ofafailed
fastener.
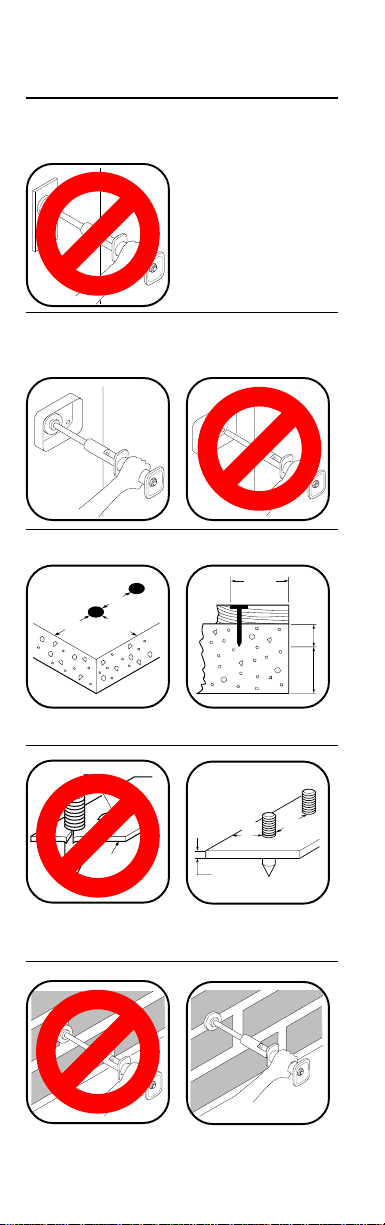
7. DO NOT drive fasteners into steel
base material less then 4.8mm
(3/16") thick, within 51mm (2") of a
weld, within 12.7mm (1/2") of the
edgeorwithin25mm(1")ofanother
fastener.
8. Whenfasteningintomasonrywalls,
always drive into horizontal mortar
joints, NEVER into vertical mortar
joints. BE CAREFUL, a poorly laid
joint may permit too much penetra-
tion, and/or unsatisfactory holding
power.

9
Safety Precautions
4.8 mm MIN
3/16"
25 mm
1"
12.7 mm
1/2"
76 mm
3"
3X
1X
TOO THIN
WELD
76mm
3" 76mm
3"
76mm
3"
NO YES
G 018
G 018
G 018
G 018

10
OPERATING THE TOOL
1. ALWAYSholdtoolperpendicularto
work surface.
2. Should the tool fail to fire, hold the
muzzle firmly against the work sur-
face for 30 seconds. Then remove
the tool, eject the load and safely
discard the misfired load into water
or oil. Return misfired power loads
to SGB Youngman or an approved
distributor.
3. ALWAYSusethespallshieldwhen
driving directly into concrete or
steel. ALWAYS wear approved
goggles.
4. NEVERusea powderactuated tool
inanexplosiveorflammableatmos-
phere or when non sparking tools
are required.
POWER LOADS AND
FASTENERS
1. NEVER leave unfired power loads
on floors or work surfaces.
Safety Precautions

11
;;
;;
;;
GAS
LINE GASOLINE
482-49
POWDER
LOADS
482-51
POWDER
LOADS
Safety Precautions
;;
;;
;;
90°
;;
;;
;;
;
;;;
;;
30
;;
;;
;;
WATER
Spall
Shield
G 018G 018
G 018G 018
G 018

12
6. Fasteners are a permanently in-
stalled fixture. An act of demolition
isrequired fortheir removal.Appro-
priate safety precautions must be
taken.
Safety Precautions
2. Remington Power Loads are avail-
ableinfourpower levelswithgray(1)
beingthe lowestpower leveland yel-
low(4)beingthehighestpowerlevel.
Always start with the lowest power
level (gray-level 1) and increase until
a proper fastening is made.
CAUTION: Always use Remington
power loads or loads manufactured
tospecificationsoutlinedinP.A.T.M.I.
“TechnicalDataPertainingtopowder
loads(Boosters)”.Use of other loads
willcauseloadejectionproblemsand
may damage the tool.
3. NEVER use power loads in fire-
arms.
4. NEVER carry fasteners or other
hard objects in the same pocket or
container with power loads.
5. Acolorblindpersonmusttakeextra
precautions to prevent the chance
ofmixingthepowerloadsofvarious
levels.
WARNING ICON G 001

13
POWDER
LOADS
482-54
POWDER
LOADS
482-55
YELLOW?
BROWN ?
GREEN ?
GRAY ?
NOTE: Failure to start with the lowest power level can
result in overdrive condition and will result in damage
to tool.
Safety Precautions
Start
3
GREEN
2
BROWN
4
YELLOW
1
2
3
456789
10
11
12
1
22
L
E
K
C
I
N
B
R
A
S
S
482-53
C
A
L
I
B
E
R
1
GRAY
POWER
LOADS
ONLY!
G 018 G 018
G 018
G 018

14
Safety Precautions
Why A Fastener Holds
7. NEVER use fasteners longer than
68mm(211/16").NEVERusecom-
mon nails. Remington Power Fas-
teners are manufactured from spe-
cial steel and heat treated to pro-
duce a very hard, yet ductile fas-
tener. Remington tools drive flat-
headed fasteners. The use of
dome-headed fasteners can dam-
age your tool.
8. NEVER pry a load out of the cham-
ber. Prying can discharge the load
causing serious injury.
9. ALWAYS insert the fastener first,
thenthe power load.If work is inter-
rupted for any reason, ALWAYS
remove the power load before re-
moving the fastener.
CONCRETE:
Asa general rule, penetration should be
approximately 22mm (7/8") to 32mm
(1 1/4") into the base concrete. Make
sure the concrete is at least three times
as thick as the intended fastener pen-
etration. Never have the fastener point
protude thru the concrete.
NOTE: Concrete needs to cure for 28
daysbeforemaximumfastening holding
power will be achieved.
STEEL:
In steel, the point of the fastener must
penetrate completely through for high-
est holding power. If not, the spring
action of the steel pushes back on the
pointandtendstoforcethe fastenerout.
Recommendedapplicationarebetween
4.8mm (3/16")-8mm (5/16") steel.

15
Safety Precautions
Overdriven Fasteners
An overdriven fastener results when too
strong of a power load is used causing
the piston to extend past the muzzle.
Move to the next lightest power load.
Repeated overdrive will damage your
tool. By avoiding overdrive, you can ex-
tend the life of your tool considerably.
NOTE: NEVER fire the tool without a
fastener. This can damage the tool and/
or cause possible injury to the operator.
IMPORTANT: If the tool does not open
after firing and the piston is overdriven,
see
Piston Overdrive
, page 18.
➀➁
LOAD UNLOAD
➁➀
Shank
Plastic
Flute
Head
G 018
G 018
Dome-headedFlat-headed

16
LOADING THE POWERHAMMER
1. Insert the proper fastener into the
muzzle, round metal head first. Push
fasteneruntilthepointisevenwiththe
end of the muzzle.
2. Grabthemuzzleandpullforwarduntil
it stops. This sets the piston and
opens the chamber area.
3. Insert the proper Remington Power
Loadinto the chamber, whileholding
the muzzle downward. Be sure to
keep holding the muzzle downward
and away from you. The power load
will not seat fully.
4. Push the barrel into the housing until
itstopsandholdintheclosedposition
keeping the muzzle pointed down.
Thiskeepsthepowerloadfromfalling
out of the chamber.
FIRING THE POWERHAMMER
1. Place the muzzle of the tool against
theworksurface,hold at90°,DoNot
Tilt.
2. Holdthegripwithonehandandpush
down, compressing the spring. The
groovearoundthebarrelandoutside
of the housing at the chamber area
MUST line up (as shown) for the tool
tooperateproperly.IfthegroovesDO
NOT line up, check that the power
loadhasnotfallenoutofthechamber.
3. ALWAYSkeepthechamberopening
away from the wrist to avoid contact
from escaping gas.
4. Usingaonepoundhammer,HITTHE
FIRING PIN SQUARELY WITH A
SHARP, STRONG BLOW. Hold the
hammer as close as you can to the
tool head to improve your accuracy.
Forbestresults,workatalevelbelow
shoulder height.
5. Ifthepowerloaddoesnotfirewiththe
first blow, wait 30 seconds, eject the
power load and start over again. Re-
turn misfired power loads to SGB
Youngmanoranapproveddistributer
NOTE: A LIGHT HAMMER BLOW
WILL JAR THE DRIVE PISTON
OUT OF PROPER POSITION
CAUSING LESS POWER AND
PENETRATION OF THE FAS-
TENER.
Operation

17
Operation
Spring
Must Be
Compressed
Firing
Pin
Line Up
Grooves
Muzzle Firing
Pin
Grip
Barrel
Chamber
LOADING
FIRING
EJECTING
Continued

18
NOTE: The labor regulations of many
communitiesrequire thatthe operatorof
this tool on a job site be thoroughly
trained and certified for compentence
prior to operating this tool. Contact SGB
Youngman or the nearest distributor for
trainings.
6. Afterthefasteningismade,remove
thetoolfromtheworksurface.Grab
the barrel and pull forward rapidly.
This ejects the spent load and sets
the piston in the firing position.
7. NOTE: THE TOOL CANNOT BE
FIRED IN THE OVERHEAD POSI-
TION.
PISTON OVERDRIVE
If the tool does not open after firing
andthepistonis12.7mm(1/2"),ormore
out of the muzzle:
1. Place the muzzle end of the tool
against wooden work surface and
hold grip with one hand.
2. Hitthefiringpinwithahardhammer
blow several times and force piston
back into muzzle.
3. Ejectthe power load.(See step 6 of
Firing The POWERHAMMER
).
OVERDRIVE
Operation
Accessories
Part No. Description
56485 Brush, .25
56415 Goggles
TA4090 Shield, Spall
CARE OF YOUR POWERHAMMER
Clean your Powerhammer after
each day’s use. Clean chamber with
accessory wire brush, part number
56485. Apply good quality penetrating
lubricant spray (such as WD-40) spar-
ingly and wipe dry.

19
SGB Youngman warrants this Remington
Model 476 POWERHAMMERagainst defects
in materials and workmanship for a period of 30
days from the date of purchase. This warranty
extends only to the original purchaser of the
POWERHAMMERand only applies if the
POWERHAMMERisusedfor suitabledomes-
tic applications and not heavy industrial repeti-
tive fastening.
If within 30 days from the purchase date
this POWERHAMMERfails due to a defect in
material or workmanship, SGB Youngman will
repair or replace the tool at SGB Youngman’s
option. However, this warranty does not cover
failurescausedbymisusingorabusingtheprod-
uct (for proper use of this product, read and
understand the operating instructions in this
owner’smanual).Inordertoobtainserviceunder
this warranty, the purchaser must return the
POWERHAMMERwith proof of purchase to:
SGB Youngman at the address listed below.
If inspection shows the repairs required
were caused by defective material or workman-
ship, SGB Youngman will repair or replace the
tool without charge. Repairs made necessary
because of misuse, abuse, negligence or acci-
dent will be charged for at regular repair prices.
This express and limited warranty is the
only warranty on this product, and there are no
warranties, including warranties of merchanta-
bility and/or fitness for a particular purpose, ex-
press or implied, which extend beyond this ex-
press and limited warranty.
In no event will the liability of SGB
Youngman for economic injury, property dam-
ageoranyotherdamageswhatsoever,including
consequential and incidental damages, arising
from the sale or use of this product exceed the
purchase price of this product.
Somecommunitiesdonotallowalimitation
on how long an implied warranty lasts, or an
excludion or limitation of incidental or conse-
quential damages, so the above limitation of
implied warranties, or exclusion or limitation on
damages may not apply to you.
This warranty gives you specific legal
rights,andyoumayhaveadditionalrightsinyour
community.
For information about this warranty or technical
assistance contact:
Distributed in the U.K. by:
SGB Youngman
Stane Street
Slinfold, West Sussex, RH13 7RD
Tel: 01403 790456
Limited Warranty

102837-01
Rev. C
8/96
IMPORTANT
This tool is designed to use 22
caliber neck-down crimped loads,
power levels 1 (gray) through 4
(yellow).
15.9 mm
5/8"
Straight Wadded
Power Load
Neck-Down
Crimped Power
Load
2701 Industrial Drive
P.O. Box 90004
Bowling Green, KY 42102-9004
WARNING ICON G 001
CAUTION
Do not use any load other
than the 22 caliber neck-down
crimped power load. Other
types of power loads will
cause load-ejection problems.
G 018
PRINTED IN USA
Other manuals for 476
1
Table of contents