manuals.online logo
Brands
  1. Home
  2. •
  3. Brands
  4. •
  5. Ryobi
  6. •
  7. Tools
  8. •
  9. Ryobi A90FP01 User manual

Ryobi A90FP01 User manual

Other Ryobi Tools manuals

Ryobi SC164VS Quick setup guide

Ryobi

Ryobi SC164VS Quick setup guide

Ryobi R18TR2 User manual

Ryobi

Ryobi R18TR2 User manual

Ryobi A24NK01 User manual

Ryobi

Ryobi A24NK01 User manual

Ryobi RDT1840 User manual

Ryobi

Ryobi RDT1840 User manual

Ryobi R18XSEC20 User manual

Ryobi

Ryobi R18XSEC20 User manual

Ryobi EXPAND-IT P20104 User manual

Ryobi

Ryobi EXPAND-IT P20104 User manual

Ryobi CSB134L Quick setup guide

Ryobi

Ryobi CSB134L Quick setup guide

Ryobi A25RT02 User manual

Ryobi

Ryobi A25RT02 User manual

Ryobi RT100 User manual

Ryobi

Ryobi RT100 User manual

Ryobi JM82K Configuration guide

Ryobi

Ryobi JM82K Configuration guide

Ryobi P29016 User manual

Ryobi

Ryobi P29016 User manual

Ryobi YN250FSD User manual

Ryobi

Ryobi YN250FSD User manual

Ryobi A90PG02 User manual

Ryobi

Ryobi A90PG02 User manual

Ryobi P3410 User manual

Ryobi

Ryobi P3410 User manual

Ryobi CSB134L User manual

Ryobi

Ryobi CSB134L User manual

Ryobi 4730301 User manual

Ryobi

Ryobi 4730301 User manual

Ryobi EPN6082C User manual

Ryobi

Ryobi EPN6082C User manual

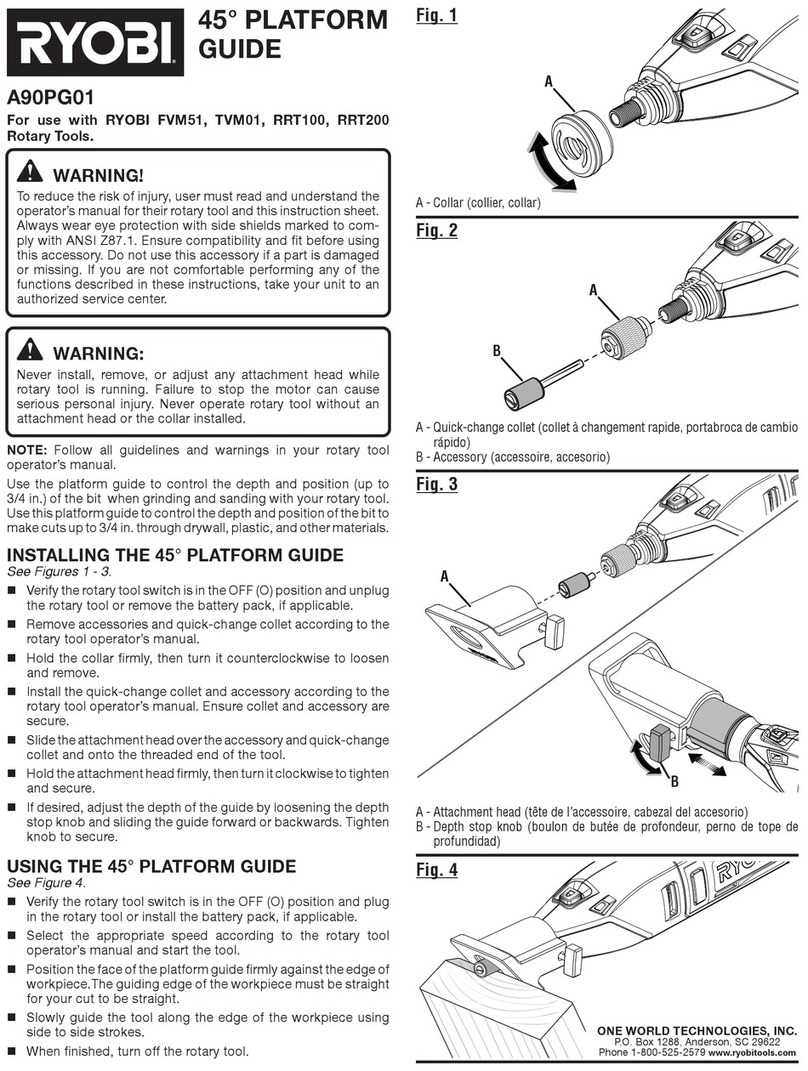
Ryobi A90PG01 Assembly Instructions

Ryobi

Ryobi A90PG01 Assembly Instructions

Ryobi AG403 User manual

Ryobi

Ryobi AG403 User manual

Ryobi P2903 User manual

Ryobi

Ryobi P2903 User manual

Ryobi RMT1801 User manual

Ryobi

Ryobi RMT1801 User manual

Ryobi R18CPS User manual

Ryobi

Ryobi R18CPS User manual

Ryobi RWB001 User manual

Ryobi

Ryobi RWB001 User manual

Ryobi RSTSJ150 User manual

Ryobi

Ryobi RSTSJ150 User manual

Popular Tools manuals by other brands

AGI Westfield MKX16 Assembly manual

AGI

AGI Westfield MKX16 Assembly manual

GYS HAND-DUCTION 056923 Translation of the original instructions

GYS

GYS HAND-DUCTION 056923 Translation of the original instructions

Grizzly H7583 instruction manual

Grizzly

Grizzly H7583 instruction manual

Sealey VS0462.V2 instructions

Sealey

Sealey VS0462.V2 instructions

Makita HR2650 instruction manual

Makita

Makita HR2650 instruction manual

Forza 1100H Series manual

Forza

Forza 1100H Series manual

Aventics EBS-PI operating instructions

Aventics

Aventics EBS-PI operating instructions

Martor SECUNORM 175 quick start guide

Martor

Martor SECUNORM 175 quick start guide

jbc N4473 instruction manual

jbc

jbc N4473 instruction manual

FEINMETALL FZWZ-SET-001 quick start guide

FEINMETALL

FEINMETALL FZWZ-SET-001 quick start guide

Worx Professional Sonicrafter WU676 Original instructions

Worx Professional

Worx Professional Sonicrafter WU676 Original instructions

Gage Bilt GB713SH Original instructions

Gage Bilt

Gage Bilt GB713SH Original instructions

Hilti DX 9-ENP Original operating instructions

Hilti

Hilti DX 9-ENP Original operating instructions

norbar NORTRONIC 34399 Operator's manual

norbar

norbar NORTRONIC 34399 Operator's manual

BGS technic 8578 manual

BGS technic

BGS technic 8578 manual

axing BWZ 5-02 Operation instructions

axing

axing BWZ 5-02 Operation instructions

Makita DHR241 instruction manual

Makita

Makita DHR241 instruction manual

Motor Guard JMB-1250 instructions

Motor Guard

Motor Guard JMB-1250 instructions

manuals.online logo
manuals.online logoBrands
  • About & Mission
  • Contact us
  • Privacy Policy
  • Terms and Conditions

Copyright 2025 Manuals.Online. All Rights Reserved.

FOOT PEDAL
A90FP01
For use with RYOBI PCL480 and PBLRT01 Rotary Tools.
WARNING!
To reduce the risk of injury, user must read and understand the
operator’s manual for their rotary tool and this instruction sheet.
Always wear eye protection with side shields marked to comply
with ANSI Z87.1. Ensure compatibility and fit before using this
accessory. Do not use this accessory if a part is damaged
or missing. If you are not comfortable performing any of the
functions described in these instructions, take your unit to an
authorized service center.
WARNING:
Never install, remove, or adjust any attachment while rotary
tool is running. Failure to stop the motor can cause serious
personal injury.
NOTE: Follow all guidelines and warnings in your rotary tool
operator’s manual.
Use the foot pedal to accurately control the speed of your rotary
tool while in use.
INSTALLING THE FOOT PEDAL
See Figures 1 - 2.
Verify the switch on the rotary tool is in the OFF (O) position
and remove the battery pack, if applicable.
Open the foot pedal port cover on the front of the rotary tool
console.
Insert the foot pedal cord into the foot pedal port on the rotary
toolconsoleasshown.Routecordandplacethepedalcautiously
to avoid trip or snag hazards.
USING THE FOOT PEDAL
See Figure 3.
Verify the rotary tool switch is in the OFF (O) position and install
the battery pack, if applicable.
Rotate the rotary tool’s speed control dial fully
counterclockwise to the “foot pedal” position.
Turn the rotary tool on.
When the dial is in the “foot pedal” position and the foot pedal
is not being depressed, the rotary tool will run at low speeds
(approximately 1000 RPM). This is normal and does not indicate
a problem.
Using your foot, move and hold the lock-out button forward.
This makes the foot pedal operational.
To increase the speed of the rotary tool, apply downward
pressure on the foot pedal.
To decrease speed, reduce the pressure on the foot pedal.
When finished, lift your foot off the foot pedal before turning off
the rotary tool.
A - Foot pedal cord (cordon de pédale, cable de pedal de pie)
B - Foot pedal port (port de pédale, puerto del pedal)
A - Foot pedal (pédale, pedal de pie)
B - Lock-out (verrou, bloqueo)
Fig. 2
Fig. 3
Fig. 1
ONE WORLD TECHNOLOGIES, INC.
P.O. Box 1288, Anderson, SC 29622
Phone 1-800-525-2579 www.ryobitools.com
A
B
A
B
998000793
11-4-21 (REV:01)
PEDAL DE PIE
A90FP01
Para usar con herramientas giratorias RYOBI PCL480, y
PBLRT01.
¡ADVERTENCIA!
Para reducir el riesgo de sufrir lesiones, el usuario debe leer y
entender el manual del operador para su herramienta rotatoria
y esta hoja de instrucciones. Use siempre protección ocular
con protecciones laterales con la marca de cumplimiento de la
norma Z87.1 del ANSI. Asegúrese de que la compatibilidad y
el ajuste sean correctos antes de usar este accesorio. No use
este accesorio si está dañado o si falta alguna pieza. Si no se
siente preparado para realizar alguna de las funciones que se
describen en estas instrucciones, lleve la unidad a un centro
de servicio autorizado.
ADVERTENCIA:
Nunca instale, retire ni ajuste ningún cabezal de accesorio
mientras la herramienta giratoria esté en funcionamien-to.
Si no se detiene el motor, podría sufrir lesiones personales
graves. Nunca opere la herramienta giratoria sin un cabezal de
accesorio o el collar instalados.
NOTA:Sigatodaslaspautas y advertencias del manual del operador
de su herramienta giratoria.
Use el pedal de pie para controlar con precisión la velocidad de la
herramienta giratoria mientras está en uso.
INSTALACIÓN DEL PEDAL DE PIE
Vea las figuras 1 et 2 en el otro lado.
Verifique que el interruptor esté en la posición de APAGADO (O)
y desenchufe la herramienta giratoria o retire la batería, si
corresponde.
Abra la tapa del puerto del pedal de pie en la parte delantera
de la consola de la herramienta giratoria.
Inserte el cable del pedal de pie en el puerto del pedal en la
consola de la herramienta giratoria como se muestra en la
imagen. Enrute el cable y coloque el pedal de pie con cuidado
para evitar tropiezos o enganches.
USO DEL PEDAL DE PIE
Vea la figura 3 en el otro lado.
Verifique que el interruptor de la herramienta giratoria esté en
la posición de APAGADO (O) y enchufe la herramienta giratoria
o instale la batería, si corresponde.
Gireelselectordecontroldevelocidaddelaherramientagiratoria
completamente hacia la izquierda hasta la posición de “pedal
de pie” (foot pedal).
Encienda la herramienta giratoria.
Cuando el selector está en la posición de “pedal de pie” y no se
presionaelpedal,laherramientagiratoriafuncionaavelocidades
bajas (aproximadamente 1000 RPM). Esto es normal y no indica
un problema.
Con el pie, mueva y mantenga presionado el botón de bloqueo
hacia adelante. Esto hace que el pedal de pie funcione.
Para aumentar la velocidad de la herramienta giratoria, aplique
presión hacia abajo sobre el pedal.
Para disminuir la velocidad, reduzca la presión sobre el pedal.
Cuando termine, levante el pie del pedal antes de apagar la
herramienta giratoria.
Français Español
PÉDALE
A90FP01
Conçu pour être utilisé avec les outils rotatifs PCL480 et
PBLRT01 RYOBI.
AVERTISSEMENT!
Pour réduire les risques de blessures, l’utilisateur doit lire et
veiller à bien comprendre le manuel d’utilisation pour le outil
rotatif ainsi que cette feuille d’instruction. Toujours porter une
protection oculaire munie d’écrans latéraux certifiée conforme
à la norme ANSI Z87.1. Assurez-vous de la compatibilité et de
l’ajustement avant d’utiliser cet accessoire. Ne pas utiliser cet
accessoire si des pièces sont endommagées ou manquantes.
Si vous n’êtes pas à l’aise pour effectuer l’une ou l’autre des
tâches décrites dans les présentes instructions, confiez l’unité
à un centre de réparations agréé.
AVERTISSEMENT:
Ne jamais installer, retirer ou régler une tête de l’accessoire
lorsque l’outil rotatif est en fonction. Le fait de ne pas arrêter
le moteur peut causer des blessures graves. Ne jamais
faire fonctionner l’outil rotatif sans avoir installé une tête de
l’accessoire ou un collier au préalable.
NOTE : Suivre toutes les directives et les avertissements du manuel
d’utilisation de votre outil rotatif.
Utiliser la pédale pour contrôler avec précision la vitesse de l’outil
rotatif pendant son utilisation.
INSTALLER LA PÉDALE
Voir les figures 1 y 2 de l’autre côté.
Vérifier que l’interrupteur sur l’outil rotatif est en position
d’ARRÊT (O) et débrancher l’outil rotatif ou retirer le bloc-pile,
le cas échéant.
Ouvrir le couvercle du port de pédale à l’avant de la console
de l’outil rotatif.
Insérer le cordon de pédale dans le port de pédale sur la console
de l’outil rotatif comme illustré. Acheminer le cordon et placer la
pédale avec précaution pour éviter les risques de trébuchement
ou d’accrochage.
UTILISER LA PÉDALE
Voir le figure 3 de l’autre côté.
Vérifierquel’interrupteurest en position d’ARRÊT (O) et brancher
l’outil rotatif ou installer le bloc-pile, le cas échéant.
Tourner le cadran de contrôle de vitesse de l’outil rotatif à fond
dans le sens contraire des aiguilles d’une montre jusqu’à la
position « pédale » (foot pedal).
Allumer l’outil rotatif.
Lorsque le cadran est en position « pédale » (foot pedal) et que
la pédale n’est pas enfoncée, l’outil rotatif fonctionnera à basse
vitesse (environ 1000 RPM). Ceci est normal et n’est pas un
signe de problème.
À l’aide de votre pied, déplacer et maintenir le bouton de
verrouillage vers l’avant afin de rendre la pédale opérationnelle.
Pouraugmenterlavitessedel’outilrotatif,appliquerunepression
vers le bas sur la pédale.
Pour diminuer la vitesse, réduire la pression sur la pédale.
Lorsque le travail est terminé, retirer le pied de la pédale avant
d’éteindre l’outil rotatif.