Renesas ZSSC3240 User manual

Manual
ZSSC3240
Cyclic Mode and Sequencer Operation
R12UM0047ED0100 Rev.1.00
Jul 7, 2022
Page 1
© 2022 Renesas Electronics
This document describes the Cyclic Mode and the Sequencer operation and relevant set up procedures through
EVK GUI for the ZSSC3240 resistive sensor conditioner.
It is highly recommended to read the following documents before using this manual:
■ZSSC3240 Datasheet: ZSSC3240 - High-End 24-Bit Sensor Signal Conditioner with Analog and Digital Output
| Renesas.
■ZSSC3240 SSC Evaluation Kit User Manual: ZSSC3240 - High-End 24-Bit Sensor Signal Conditioner with
Analog and Digital Output | Renesas.
■SSC Communication board - SSCCOMMBOARDV4P1C: SSC Communication Board.
Contents
1. User Computer Requirements and Setup............................................................................................... 3
1.1 Computer Requirements................................................................................................................... 3
1.2 Evaluation Software Installation and Setup....................................................................................... 3
2. Hardware Requirements and Setup ........................................................................................................ 3
2.1 Boards ............................................................................................................................................. 3
2.2 Evaluation Board Jumpers Setup...................................................................................................... 4
2.3 Overall System Assembly................................................................................................................. 4
3. Cyclic Mode.............................................................................................................................................. 5
3.1 Setup ............................................................................................................................................... 5
3.2 Exit................................................................................................................................................... 6
3.3 EOC Signal...................................................................................................................................... 6
3.4 Measurement Time Slot.................................................................................................................... 7
3.5 Analog Output Settings..................................................................................................................... 8
4. Scheduler GUI Control............................................................................................................................. 8
5. Scheduler Operation................................................................................................................................ 9
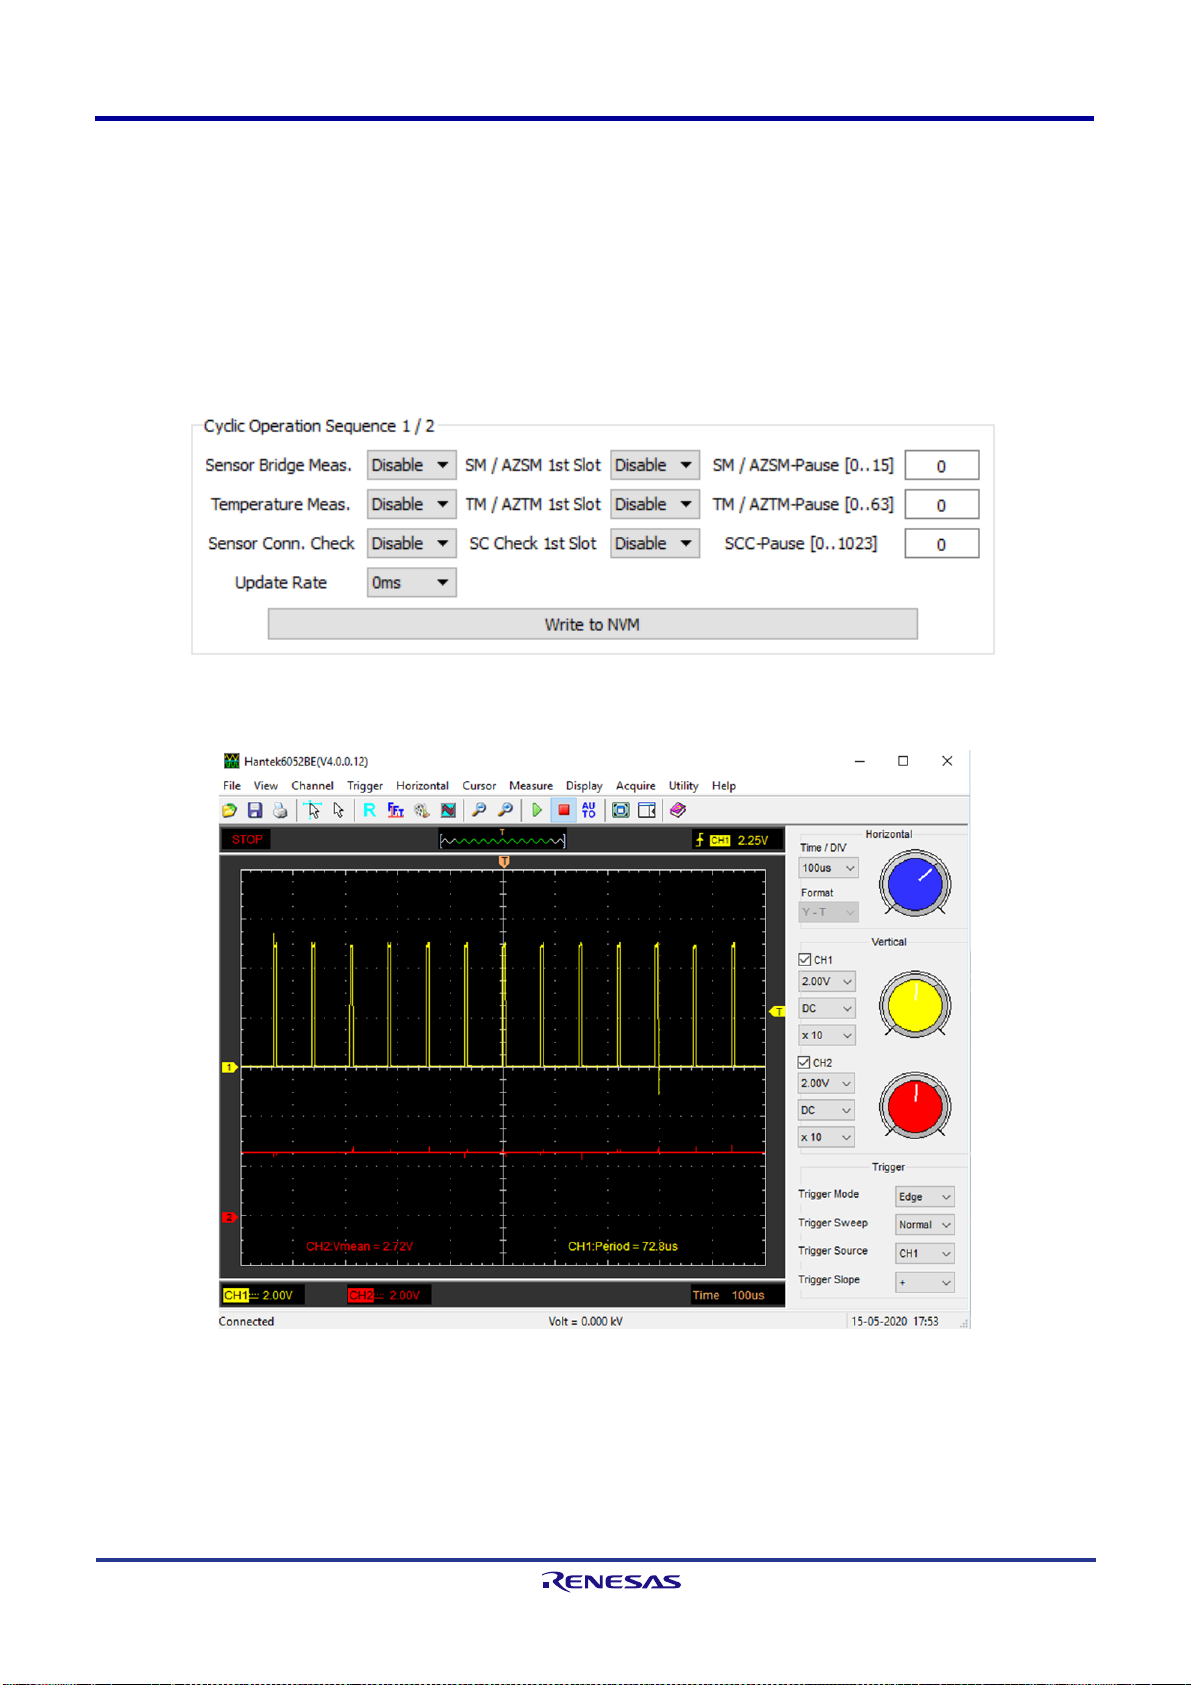
5.1 Scheduler without Configured Measurements................................................................................... 9
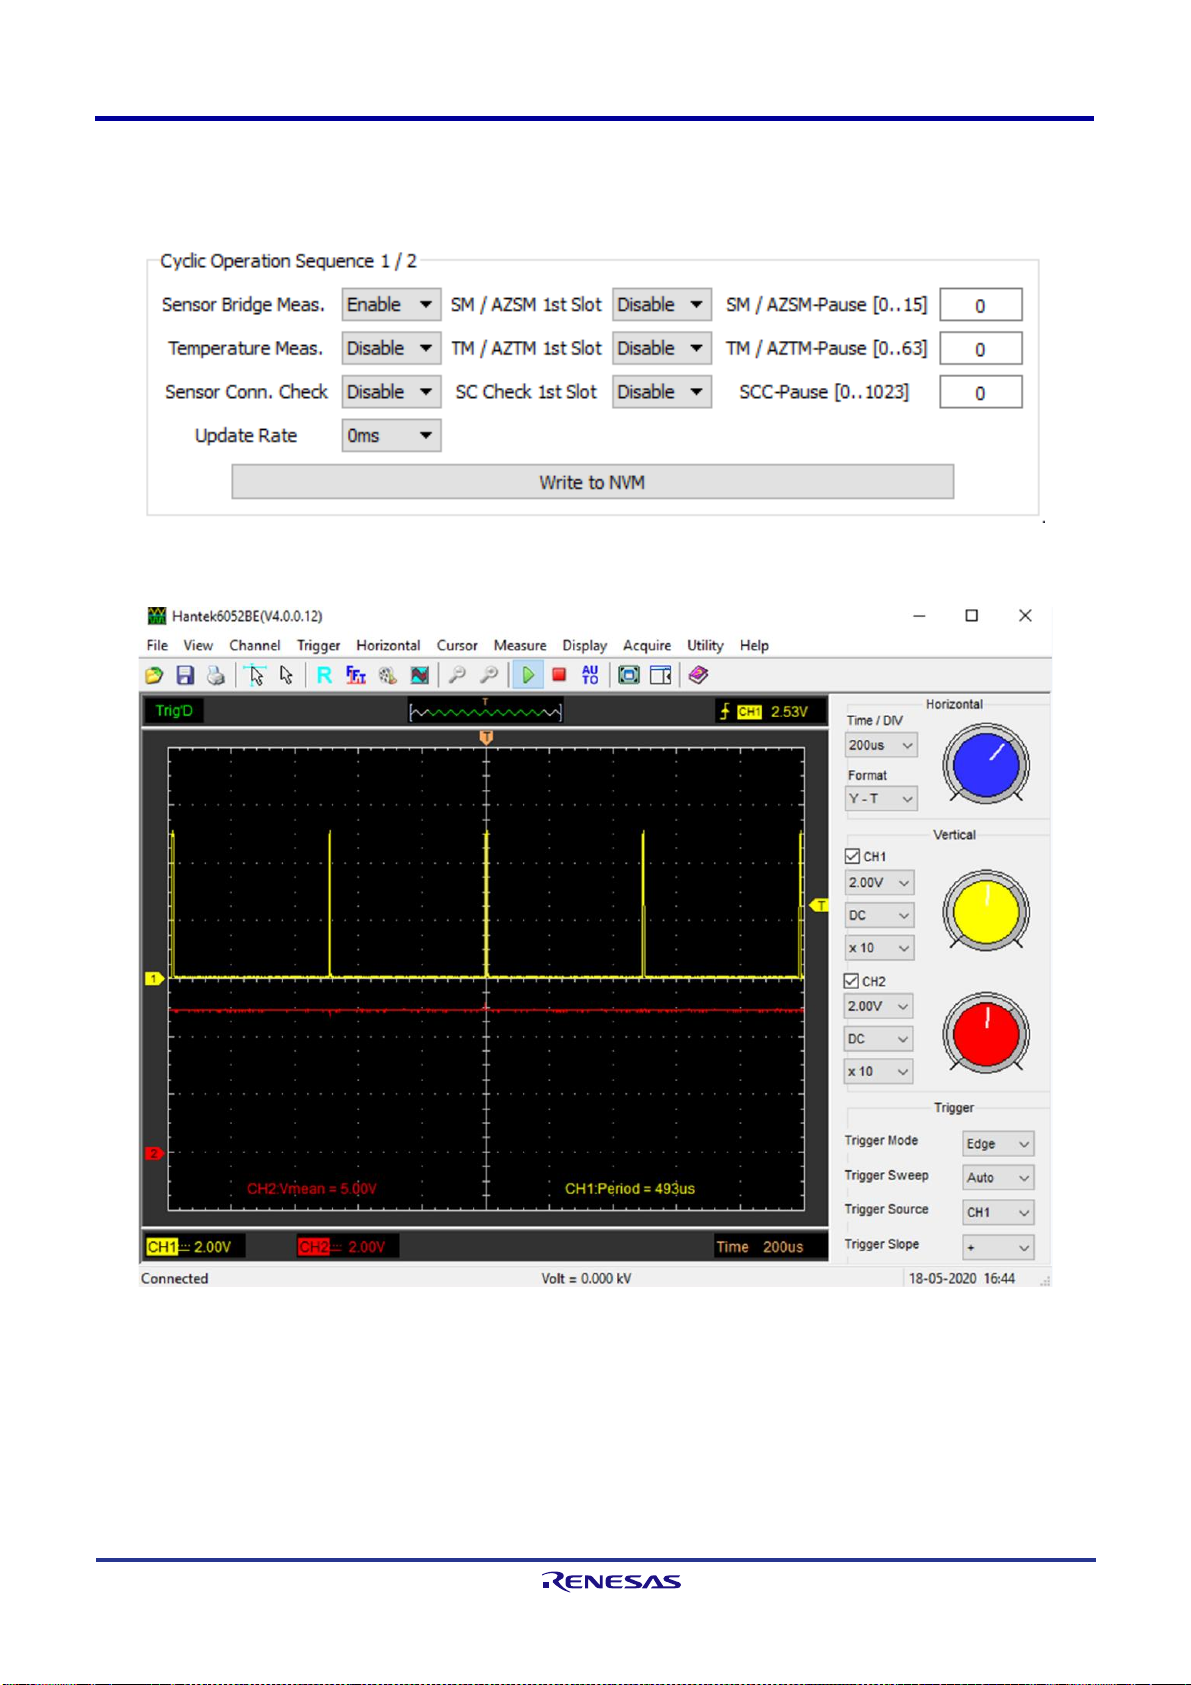
5.2 Scheduler with Activated SM.......................................................................................................... 10
5.3 Scheduler with AZSM + SM............................................................................................................ 11
5.4 Scheduler with External AZTM + TM............................................................................................... 11
5.5 Scheduler with AZSM, SM, AZTM and TM...................................................................................... 12
5.6 Sensor Connection Check.............................................................................................................. 13
5.7 Update Rate................................................................................................................................... 14
6. Scheduler Operation Examples............................................................................................................. 15
6.1 Example 1...................................................................................................................................... 15
6.2 Example 2...................................................................................................................................... 16
6.3 Example 3...................................................................................................................................... 18
7. Glossary ................................................................................................................................................. 19
8. Revision History..................................................................................................................................... 19

ZSSC3240 Cyclic Mode and Sequencer Operation Manual
R12UM0047ED0100 Rev.1.00
Jul 7, 2022
Page 2
Figures
Figure 1. EVB Jumper Settings.......................................................................................................................... 4
Figure 2. Overall System.................................................................................................................................... 4
Figure 3. Mode Setting....................................................................................................................................... 5
Figure 4. Cyclic Mode at Start Up....................................................................................................................... 6
Figure 5. Entering Command Mode.................................................................................................................... 6
Figure 6. EOC and AOUT Signal........................................................................................................................ 7
Figure 7. AAHEX Command for Full Measurement Sequence............................................................................ 7
Figure 8. AOUT Data Selection.......................................................................................................................... 8
Figure 9. Scheduler for Cyclic Operation............................................................................................................ 8
Figure 10. Cyclic Mode and AZs on the NVM Tab of the GUI ............................................................................. 8
Figure 11. Scheduler Settings no Measurements............................................................................................... 9
Figure 12. EOC Pin Output, no Measurements................................................................................................... 9
Figure 13. Scheduler Settings SM.....................................................................................................................10
Figure 14. EOC Pin Output, SM........................................................................................................................10
Figure 15. Scheduler Settings AZSM + SM.......................................................................................................11
Figure 16. EOC Pin AZSM + SM.......................................................................................................................11
Figure 17. Scheduler Settings AZSM + SM + AZTM + TM.................................................................................12
Figure 18. EOC Pin AZSM + SM + AZTM + TM.................................................................................................12
Figure 19. Summary of Measured EOC Timings ...............................................................................................13
Figure 20. Scheduler Settings SC Check and Checks Selection........................................................................13
Figure 21. Update Rate Setting.........................................................................................................................14
Figure 22. 1ms Update Rate Delay ...................................................................................................................14
Figure 23. Measurements Slots with 1ms Delay................................................................................................14
Figure 24. Example 1 Sequence.......................................................................................................................15
Figure 25. Example 1 GUI Settings...................................................................................................................15
Figure 26. Example 1 Slot Timings....................................................................................................................16
Figure 27. Example 2 Sequence.......................................................................................................................16
Figure 28. Example 2 GUI Settings...................................................................................................................17
Figure 29. Example 2 Slot Timings....................................................................................................................17
Figure 30. Example 3 Sequence.......................................................................................................................18
Figure 31. Example 3 GUI Settings...................................................................................................................18
Figure 32. Example 3 Slot Timings....................................................................................................................18

ZSSC3240 Cyclic Mode and Sequencer Operation Manual
R12UM0047ED0100 Rev.1.00
Jul 7, 2022
Page 3
1. User Computer Requirements and Setup
A Windows®-based computer is required for interfacing with the Evaluation Kit and configuring the ZSSC3240.
1.1 Computer Requirements
Note: The user must have administrative rights on the computer to download and install the ZSSC3240
Evaluation Software for the kit.
The computer must meet the following requirements:
■Windows® 7, 8, 8.1, 10
■Microsoft® .NET Framework 4.0 or higher
■Supported architecture: x86 and x64
■USB port
■Internet access to download the install setup
1.2 Evaluation Software Installation and Setup
The latest version of ZSSC3240 Evaluation Software, which is required for the kit, must be downloaded from the
Renesas web site at ZSSC3240 - High-End 24-Bit Sensor Signal Conditioner with Analog and Digital Output |
Renesas. The Evaluation Software and all drivers, libraries are transferred within a single exe-file.
Note: FTDI USB drivers are needed only for backwards compatibility with older Renesas communication
hardware. If these drivers are not already installed on the user’s computer, the software automatically installs the
correct drivers after user confirmation.
Follow these procedures to install the Evaluation Kit Software on the user’s computer:
1. Downloading and extract the contents of the zip file to the user’s computer.
2. Start the ZSSC324X_Evaluation_SW_vX.XX.exe file, the ‘X.XX’ marks the revision number.
Note: running the file could take considerable time, the process could be additionally slowed down by an
anti-virus software.
2. Hardware Requirements and Setup
2.1 Boards
The following boards are needed:
■SSC Communication Board: SSCCOMMBOARDV4P1C
■ZSSC3240 Evaluation Board: ZSSC3240EVB

ZSSC3240 Cyclic Mode and Sequencer Operation Manual
R12UM0047ED0100 Rev.1.00
Jul 7, 2022
Page 4
2.2 Evaluation Board Jumpers Setup
Remove all jumpers and ensure that J21, J22 (SPI side), J12 (5V side) are in place as per Figure 1.
Figure 1. EVB Jumper Settings
2.3 Overall System Assembly
Connect the Communication Board to the ZSSC3240EVB through the dedicated connector, and attach the
Communication Board to the host PC via a USB cable (see Figure 2).
Figure 2. Overall System

ZSSC3240 Cyclic Mode and Sequencer Operation Manual
R12UM0047ED0100 Rev.1.00
Jul 7, 2022
Page 5
3. Cyclic Mode
Single measurements requests to the ZSSC3240 (for example, the AAHex command) trigger the following
sequence of basic measurements:
1. auto-zero-sensor measurement
2. sensor measurement
3. an auto-zero-temperature measurement and a temperature measurement
4. post acquisition correction
5. measurements are available to the user
For the complete list of commands for single measurements requests, refer to the ZSSC3240 Datasheet
document. The ZSSC3240 can be configured for cyclic measurements, such that the host microcontroller is
relieved to issue single measurement requests when the signal conditioner is configured with analog output.
3.1 Setup
ZSSC3240 powers up in Cyclic Mode if the Default Mode dropdown is set to Cyclic Mode on the NVM tab of the
Main page of the GUI, see Figure 3.
Note: NVM has to be saved (by the Write NVM button) and reset before the IC powers up in Cyclic Mode, see
Figure 4.
Figure 3. Mode Setting

ZSSC3240 Cyclic Mode and Sequencer Operation Manual
R12UM0047ED0100 Rev.1.00
Jul 7, 2022
Page 6
Figure 4. Cyclic Mode at Start Up
3.2 Exit
In Cyclic Mode the IC status is Busy, signifying that the ZSSC3240 is continuously measuring and converting the
sensed signals. To exit Cyclic Mode click the ‘Start Command Mode’button (see Figure 5) and enter the next
user command.
Figure 5. Entering Command Mode
3.3 EOC Signal
The output is provided at the AOUT pin (analog output) in Cyclic Mode. If the analog output is not activated in
the device configuration, the microcontroller can monitor the EOC pin for updated data. The EOC signal is a
pulse signalizing the effective end of conversion, i.e. the availability of the corrected measurement from the SSC
calculation unit. With the default configuration (register 02HEX -> INT_setup = 00BIN) the End of Conversion pulse
is indicating that a new measurement result is available in the output registers. It could be fetched by a reading
sequence of the configured digital interface (SPI, I2C, OWI).

ZSSC3240 Cyclic Mode and Sequencer Operation Manual
R12UM0047ED0100 Rev.1.00
Jul 7, 2022
Page 7
Figure 6 displays the EOC signal on the CH1 track and the AOUT level (0-5V range) on the CH2 track when the
bridge provides an input signal that is converted to 2V66 output. The cycle is composed by AZSM, SM, AZTM
and TM.
Figure 6. EOC and AOUT Signal
The end of conversion signal is issued after the AAHex command is received and the full sequence of AZSM,
SM, AZTM and TM (including the correction calculation) is executed. Figure 7 shows the sequence of event
started by the AAHex command.
Figure 7. AAHEX Command for Full Measurement Sequence
The configurations analyzed in section 5 show how the EOC signal is issued in complex measurements
schemes defined by the scheduler.
3.4 Measurement Time Slot
A measurement time slot denotes the time needed to complete a predefined set of measurements and update
the ZSSC3240 output. Pauses between the slots must be defined by the update period (CYC_period). The first
slot in a predefined sequence is defined as slot 0.

ZSSC3240 Cyclic Mode and Sequencer Operation Manual
R12UM0047ED0100 Rev.1.00
Jul 7, 2022
Page 8
3.5 Analog Output Settings
Figure 8 shows the GUI options configuration to select the desired sensor data at the AOUT pin (sensor or
temperature measurements).
Figure 8. AOUT Data Selection
4. Scheduler GUI Control
Follow these steps to configure the measurement scheduler on the GUI (Diagnostic Tab):
1. Set the Cyclic Operation Sequence according to Figure 9 and save the configuration clicking the “Write to
NVM” button.
Figure 9. Scheduler for Cyclic Operation
2. Set the smart sensors according to Figure 10 to use Cyclic Mode and the Auto-Zero measurements.
Figure 10. Cyclic Mode and AZs on the NVM Tab of the GUI
The displayed typical timing diagrams depend on the used device configuration, such as the ADC resolution (see
Figure 4).

ZSSC3240 Cyclic Mode and Sequencer Operation Manual
R12UM0047ED0100 Rev.1.00
Jul 7, 2022
Page 9
5. Scheduler Operation
The scheduler operation can be analyzed by probing the EOC signal. In the scope plots displayed in section 5
and 6, the channel CH1 is monitoring the EOC pin. The channel CH2 is generally used to monitor the AOUT pin
and the analog output presence (Sensor or Temperature) with no specific goal of relating it with the input signal.
Numbers shown in this section represent typical values for the relevant configurations.
5.1 Scheduler without Configured Measurements
The first scheduler configuration analyzed is with no measurements active as per Figure 11.
Figure 11. Scheduler Settings no Measurements
The scope plot shows the EOC signal behavior, see Figure 12.
Figure 12. EOC Pin Output, no Measurements
A fixed interval between two adjacent time slots is present amounting to about 73µs. Since no measurements
are configured for any time slot (not reasonable in practice), the time between the pulses is due to the
processing duration performed by digital math core block, which is always active.

ZSSC3240 Cyclic Mode and Sequencer Operation Manual
R12UM0047ED0100 Rev.1.00
Jul 7, 2022
Page 10
5.2 Scheduler with Activated SM
To enable the output at AOUT of the signal measurement, the settings are shown in Figure 13. Monitoring the
EOC shows the timing in Figure 14.
Figure 13. Scheduler Settings SM
Figure 14. EOC Pin Output, SM
The SM measurement takes approximately 493µs - 73µs = 420µs.

ZSSC3240 Cyclic Mode and Sequencer Operation Manual
R12UM0047ED0100 Rev.1.00
Jul 7, 2022
Page 11
5.3 Scheduler with AZSM + SM
To add and enable the AZ signal measurement, use the settings shown in Figure 15. Monitoring the EOC, the
timing is shown in Figure 16.
Figure 15. Scheduler Settings AZSM + SM
Figure 16. EOC Pin AZSM + SM
The timing accounts for 420µs (AZSM) + 420µs (SM) + 73µs = 913µs.
5.4 Scheduler with External AZTM + TM
Data can be collected for the external temperature sensor. Summary of the measurements (not included for
brevity) shows the same behavior as the SM.
The timing accounts for 419µs (AZTM) + 419µs (TM) + 73µs = 911µs.

ZSSC3240 Cyclic Mode and Sequencer Operation Manual
R12UM0047ED0100 Rev.1.00
Jul 7, 2022
Page 12
5.5 Scheduler with AZSM, SM, AZTM and TM
The full set of measurements is achievable with the settings in Figure 17.
Figure 17. Scheduler Settings AZSM + SM + AZTM + TM
Figure 18. EOC Pin AZSM + SM + AZTM + TM

ZSSC3240 Cyclic Mode and Sequencer Operation Manual
R12UM0047ED0100 Rev.1.00
Jul 7, 2022
Page 13
Summary of measured EOC timings is provided in Figure 19.
Figure 19. Summary of Measured EOC Timings
5.6 Sensor Connection Check
The diagnostic checks available in the ZSSC3240 are one component of the tasks that can be included by the
scheduler, in addition to the sensor and temperature measurements. “Cyclic Operation Sequence 1 / 2” part of
the GUI settings are dedicated to show these measurements, see Figure 20. The set of the checks to be
performed can be defined using the selection boxes of the “On-Chip Diagnostic” section in the Diagnostic Tab of
the GUI.
Figure 20. Scheduler Settings SC Check and Checks Selection
The amount of time (time between two consecutive EOC pulses) for the sole SC check depends on the number
of check selected and spans about from 80µs and 347µs (all checks active).

ZSSC3240 Cyclic Mode and Sequencer Operation Manual
R12UM0047ED0100 Rev.1.00
Jul 7, 2022
Page 14
5.7 Update Rate
The scheduler allows the introduction of a selectable delay between the measurement slots, as shown in Figure
21.
Figure 21. Update Rate Setting
The selection of 1ms delay in a AZSM+SM+AZTM+TM sequence with 1 slot pause for the temperature
measurement is shown in Figure 22.
Figure 22. 1ms Update Rate Delay
The result of the above setting is displayed in Figure 23. It shows a slot with AZSM+SM+1ms delay
(approximately 0,92ms + 1ms ~ 1,98ms) and a slot with AZSM+SM+AZTM+TM+1ms delay (1,84ms + 1ms ~
2,826ms).
Figure 23. Measurements Slots with 1ms Delay

ZSSC3240 Cyclic Mode and Sequencer Operation Manual
R12UM0047ED0100 Rev.1.00
Jul 7, 2022
Page 15
6. Scheduler Operation Examples
6.1 Example 1
The desired measurements slots sequence is displayed in Figure 24.
Figure 24. Example 1 Sequence
In Figure 25 the required GUI settings are described.
Figure 25. Example 1 GUI Settings
The result, after activation of the Cyclic Mode, is visible in Figure 26, the slots are identified by the red arrows.

ZSSC3240 Cyclic Mode and Sequencer Operation Manual
R12UM0047ED0100 Rev.1.00
Jul 7, 2022
Page 16
The “no measurements” slot, math core operation time, lasts about 73µs.
Figure 26. Example 1 Slot Timings
6.2 Example 2
The desired measurements slots sequence is displayed in Figure 27.
Figure 27. Example 2 Sequence

ZSSC3240 Cyclic Mode and Sequencer Operation Manual
R12UM0047ED0100 Rev.1.00
Jul 7, 2022
Page 17
In Figure 28 the required GUI settings are described.
The “no measurements” slot, math core operation time, lasts about 73µs.
Figure 28. Example 2 GUI Settings
The result, after activation of the Cyclic Mode, is visible in Figure 29, the slots are identified by the red arrows.
Figure 29. Example 2 Slot Timings

ZSSC3240 Cyclic Mode and Sequencer Operation Manual
R12UM0047ED0100 Rev.1.00
Jul 7, 2022
Page 18
6.3 Example 3
The desired measurements slots sequence is displayed in Figure 30.
Figure 30. Example 3 Sequence
In Figure 31 the required GUI settings are described.
Figure 31. Example 3 GUI Settings
The result, after activation of the Cyclic Mode, is visible in Figure 32, the slots are identified by the red arrows.
Figure 32. Example 3 Slot Timings

ZSSC3240 Cyclic Mode and Sequencer Operation Manual
R12UM0047ED0100 Rev.1.00
Jul 7, 2022
Page 19
7. Glossary
Term
Description
AZ
Auto Zero
AZSM
Auto Zero Sensor Measurement
AZTM
Auto Zero Temperature Measurement
SM
Sensor Measurement
TM
Temperature Measurement
SC
Sensor Connection
GUI
Graphical User Interface
IC
Integrated Circuit
NVM
Non Volatile Memory
PC
Personal Computer
SSC
Sensor Signal Conditioner
EOC
End of Conversion
MC
Math Core
8. Revision History
Revision
Date
Description
1.00
Jul 7, 2022
Initial release.

© 2020 Renesas Electronics Corporation. All rights reserved.
Notice
1. Descriptions of circuits, software and other related information in this document are provided only to illustrate the
operation of semiconductor products and application examples. You are fully responsible for the incorporation or any
other use of the circuits, software, and information in the design of your product or system. Renesas Electronics
disclaims any and all liability for any losses and damages incurred by you or third parties arising from the use of these
circuits, software, or information.
2. Renesas Electronics hereby expressly disclaims any warranties against and liability for infringement or any other
claims involving patents, copyrights, or other intellectual property rights of third parties, by or arising from the use of
Renesas Electronics products or technical information described in this document, including but not limited to, the
product data, drawings, charts, programs, algorithms, and application examples.
3. No license, express, implied or otherwise, is granted hereby under any patents, copyrights or other intellectual
property rights of Renesas Electronics or others.
4. You shall be responsible for determining what licenses are required from any third parties, and obtaining such licenses
for the lawful import, export, manufacture, sales, utilization, distribution or other disposal of any products incorporating
Renesas Electronics products, if required.
5. You shall not alter, modify, copy, or reverse engineer any Renesas Electronics product, whether in whole or in part.
Renesas Electronics disclaims any and all liability for any losses or damages incurred by you or third parties arising
from such alteration, modification, copying or reverse engineering.
6. Renesas Electronics products are classified according to the following two quality grades: “Standard” and “High
Quality”. The intended applications for each Renesas Electronics product depends on the product’s quality grade, as
indicated below.
“Standard”:Computers; office equipment; communications equipment; test and measurement equipment; audio and
visual equipment; home electronic appliances; machine tools; personal electronic equipment; industrial robots; etc.
“High Quality”:Transportation equipment (automobiles, trains, ships, etc.); traffic control (traffic lights); large-scale
communication equipment; key financial terminal systems; safety control equipment; etc.
Unless expressly designated as a high reliability product or a product for harsh environments in a Renesas
Electronics data sheet or other Renesas Electronics document, Renesas Electronics products are not intended or
authorized for use in products or systems that may pose a direct threat to human life or bodily injury (artificial life
support devices or systems; surgical implantations; etc.), or may cause serious property damage (space system;
undersea repeaters; nuclear power control systems; aircraft control systems; key plant systems; military equipment;
etc.). Renesas Electronics disclaims any and all liability for any damages or losses incurred by you or any third
parties arising from the use of any Renesas Electronics product that is inconsistent with any Renesas Electronics
data sheet, user’s manual or other Renesas Electronics document.
7. No semiconductor product is absolutely secure. Notwithstanding any security measures or features that may be
implemented in Renesas Electronics hardware or software products, Renesas Electronics shall have absolutely no
liability arising out of any vulnerability or security breach, including but not limited to any unauthorized access to or
use of a Renesas Electronics product or a system that uses a Renesas Electronics product. RENESAS
ELECTRONICS DOES NOT WARRANT OR GUARANTEE THAT RENESAS ELECTRONICS PRODUCTS, OR ANY
SYSTEMS CREATED USING RENESAS ELECTRONICS PRODUCTS WILL BE INVULNERABLE OR FREE FROM
CORRUPTION, ATTACK, VIRUSES, INTERFERENCE, HACKING, DATA LOSS OR THEFT, OR OTHER SECURITY
INTRUSION (“Vulnerability Issues”). RENESAS ELECTRONICS DISCLAIMS ANY AND ALL RESPONSIBILITY OR
LIABILITY ARISING FROM OR RELATED TO ANY VULNERABILITY ISSUES. FURTHERMORE, TO THE EXTENT
PERMITTED BY APPLICABLE LAW, RENESAS ELECTRONICS DISCLAIMS ANY AND ALL WARRANTIES,
EXPRESS OR IMPLIED, WITH RESPECT TO THIS DOCUMENT AND ANY RELATED OR ACCOMPANYING
SOFTWARE OR HARDWARE, INCLUDING BUT NOT LIMITED TO THE IMPLIED WARRANTIES OF
MERCHANTABILITY, OR FITNESS FOR A PARTICULAR PURPOSE.
8. When using Renesas Electronics products, refer to the latest product information (data sheets, user’s manuals,
application notes, “General Notes for Handling and Using Semiconductor Devices” in the reliability handbook, etc.),
and ensure that usage conditions are within the ranges specified by Renesas Electronics with respect to maximum
ratings, operating power supply voltage range, heat dissipation characteristics, installation, etc. Renesas Electronics
disclaims any and all liability for any malfunctions, failure or accident arising out of the use of Renesas Electronics
products outside of such specified ranges.
Table of contents
Other Renesas Recording Equipment manuals