Renschler Picolario2 single User manual

Picolario2 single
the new speaking Vario from

©2014 Uwe & Thomas www.picolario.de info@thommys.com 2
Table of contents
Connectors................................................................................................................................. 3
Mounting :................................................................................................................................. 3
First operation of the Pico2 at 433 MHZ LPD:.......................................................................4
TX frequency channel selection .............................................................................................. 4
The receiver battery voltage monitor:....................................................................................... 4
Vario function:.......................................................................................................................... 4
Automatic altitude mode at middle position (50m or 100 ft automatic:.................................. 5
Request of an altitude annoucement or voltage announcement and time automatic mode:. 5
Programmierablauf................................................................................................................... 6
Einstellung der Parameter........................................................................................................ 7
Bewährte Einstellungen............................................................................................................ 8
Technische Daten:..................................................................................................................... 9
CE-Konformitätserklärung....................................................................................................... 9
EG Konformitätserklärung .................................................................................................... 11
Betrieb am Futaba/Robbe SBUS Telemetrieempfänger........................................................ 12
Softwareupdate :...................................................................................................................... 13
Picolario2 433 Mhz Schnelleinstieg....................................................................................... 16

©2014 Uwe & Thomas www.picolario.de info@thommys.com 3
Dear Customer,
Congratulations to your new Picolario 2. You have
chosen an up to date future proof telemetry system,
which is manufactured by Renschler Instruments in
germany.
The Picolario2 is the successor of the Picolario. It can
be used in the 433 Mhz LPD band and also at the back
channel of your 2.4 Ghz telemetry radio control.
Currently 4 backchannel protocols are supported:
Futaba/ Robbe (S-Bus), Multiplex (MSB), Jeti and
Graupner Hott.
The new stainless steel housing protects the sensitive
electronic optimal. The split of the vario and the high
frequency modul allows space saving mounting in the
model.
Connectors
At the frontside of the Pico2-Moduls you find :
1. MicroUSB-Connector for update
2. 4 colour LED for status indication
3. TEK-connector (without tube)
4. 2.pressure port (tube) *only DUO
Mounting :
For optimum mounting, use the velcros delivered with
your Picolario. If you use the 433 Mhz LPD modul, then
ensure, that no metalic or carbon parts or wires are close
to the antenna.
For the 433 Mhz modul are 2 options. One like the
picture beside, with integrated patch antenna. The
antenna is at the black plastic cover. If you are using a
carbon glider, then the known good 433 Mhz lamda/4
wire antenna is recommended.
Simply drill a whole into the carbon part and let the
antenna outside.
Although we couldn t detect any impact to the range of
the radio control, we recommend to do a range check, before first usage of the Picolario, with every
model you are using it !
We believe that this is good model practise and also valid for all new electronic components in a
model.

©2014 Uwe & Thomas www.picolario.de info@thommys.com 4
First operation of the Pico2 at 433 MHZ LPD:
Plug the vario into a free channel of your receiver. This channel supplies the Pico2
with power and is used to request information. The voltage the Pico2 talks about, is
exactly this voltage. Assign a switch (3 positions) or a slider to this channel. Ensure
that it has a +-100% range.
This switch is necessary to control the Pico2. You need it also to change parameter of
the Pico2. The following table shows the logical assignement of the switch and it s
practical impact.

©2014 Uwe & Thomas www.picolario.de info@thommys.com 5
Switch/Slider During flight (set mode6 option 1) During
programming
100 %
middle
position
-100%
Request of altitude/voltage time
time automatic alt mode
vario signal and altitude and voltage
automatic.
No vario signal, TX switched of only
power supply monitor
Increase value
-
decrease value
If you have no more free receiver channel, then you can supply only power to the Picolario.
Then it behaves like the switch/slider is programmed in the 100% request position.
TX frequency channel selection
You can select the channel/frequency of the 433 Mhz TX modul with the 6 position DIL-switch. See
the table beneath the relation between switch position and channel number. Select at your LPD
transceiver the same channel, like you have set on the TX modul.
The receiver battery voltage monitor:
The receiver accumulator voltage is measured by the Picolario. Only if it decreases its value a voltage
announcement will occur. This allows the usage of 2 batteries connected through a switch unit. Again
you are only told the voltage automatically, if it has decreased by another 0.1 Volt step. If you want to
know the current voltage then you can request this information at every time with the 3 position switch.
The Pico2 measures much more often the voltage and will detect also short undervoltage conditions.
Example: the voltage drops from 5.4 V to 5.3 V, which leads to the announcement „voltage five point
three volt“. If the voltage recovers to 5.4 V, this is not automatically announced. If you request a
voltage announcement by switch and 5.4 V is then announced, then the next voltage drop to 5.3 Volt
is again announced automatically.
The voltage of the accumulator changes to several reasons. Very important is the time interval within
the automatic announcements occur. A full accumulator will drop at the beginning fast and the
intervals will get longer, When it reaches the nominal voltage and there are several announcements
within a short time, then it is a good idea to land savely and check the power.
Vario function:
The vario shows climbing and sinking by a frequency and interval modulated tone. Climbing is
indicated by increasing beeps with shorter intervals. Sinking is indicated by a deeper continouse tone.
The lower the frequency the more sinking.
If there is no climbing/sinking, then it is quiet.
Automatic altitude mode at middle position (50m or 100 ft automatic:
The Picolario automatically zeros itself during turn on. So if you switch it on at 1234 meter altitude, it
will subtract this value from all future measured values. If you climb 2 meters to 1236 metes, then the
vario calculates 1236 minus 1234 = 2 meter and this is the altitude it will tell you. The altitude
automatic (only in middle position) will tell you every 50 m (100 feet in the imperial version)
automatically (without a request) the altitude. So if you climb till 120 m you will hear „50m“ and „100m“
without request. If you sink afterward from 120 m the next information will be „50 m“. The reason for
that is that is is not easy to decide voice output, if your altitude varies close to 100 m in 1 m steps (99
m →101 m →99 m)
Request of an altitude annoucement or voltage announcement and time
automatic mode:
Additionally to the automatic announcement of the altitude, the precise altitude could be requested at
any time. To do that the switch must be for a short time in the 100% position. Then you get a precise
announcement of the current altitude. f.e. „altitude sixty nine meter“. If you leave your switch in the

©2014 Uwe & Thomas www.picolario.de info@thommys.com 6
100% position during the announcement, the voltage information will follow. If you leave your switch in
this position for a longer period of time, then after a programmable interval an announcement will
occur. f.e. Every 10 seconds. This announcement has no „altitude“ in front of it and simply tells
„124m“. you can program this time interval in set mode 4 between 10 and 60 seconds in 10 second
steps.

©2014 Uwe & Thomas www.picolario.de info@thommys.com 7
Programmierablauf

©2014 Uwe & Thomas www.picolario.de info@thommys.com 8
Parameter settings:
You can set the delay time, the sink tone level, the acoustic scale range and the time interval for the
time automatic.
This allows you to setup your Picolario2 optimal for different models and weather conditions.
At very calm conditions at flatlands you can select 2 or 4 m/s (400 or 800 ft/min) as acoustic scale in
set mode 3. For all other conditions in the mountains a value of 8 m/s (1600 ft/min) is recommend.
The automatic mode (0 and default setting) is very sensitve at light conditions and automatically gets
less sensitive, when there is more climbing. So you can hear the difference between 0.10 and 0.15
m/s very good, but not the difference between 8.10 and 8.15 m/s. This gives you at calm conditions
the maximum sensitivity, without limiting the range where everything sounds the same.
To program a parameter set the control switch/slider into the middle position. You enter programming
mode by pressing the red button WHILE the program version is announced. Please note that this is
different than in earlier Picolarios. The Pico2 allows the user to update his software over USB and you
get into this update/programming mode, if you press the RED button IMMEDIATELY when power is
supplied.
So you have to wait a while, until the Pico2 starts talking, f.e. „version one point three five“. Then
press the red button and the Pico2 will say „set mode 1“ (LED will be blue). Now you can select one of
the 4 set modes with your switch (up or down). If you have reached the set mode you want to change
another press of the red button will lead you to the corresponding value setting. (LED becomes red)
Then you can change the value with the 3 pole switch and store it by pressing a third time the red
button on the Pico2. You can see also a LED color change in set mode. When you are done with
parameter programming, simply disconnect the power.
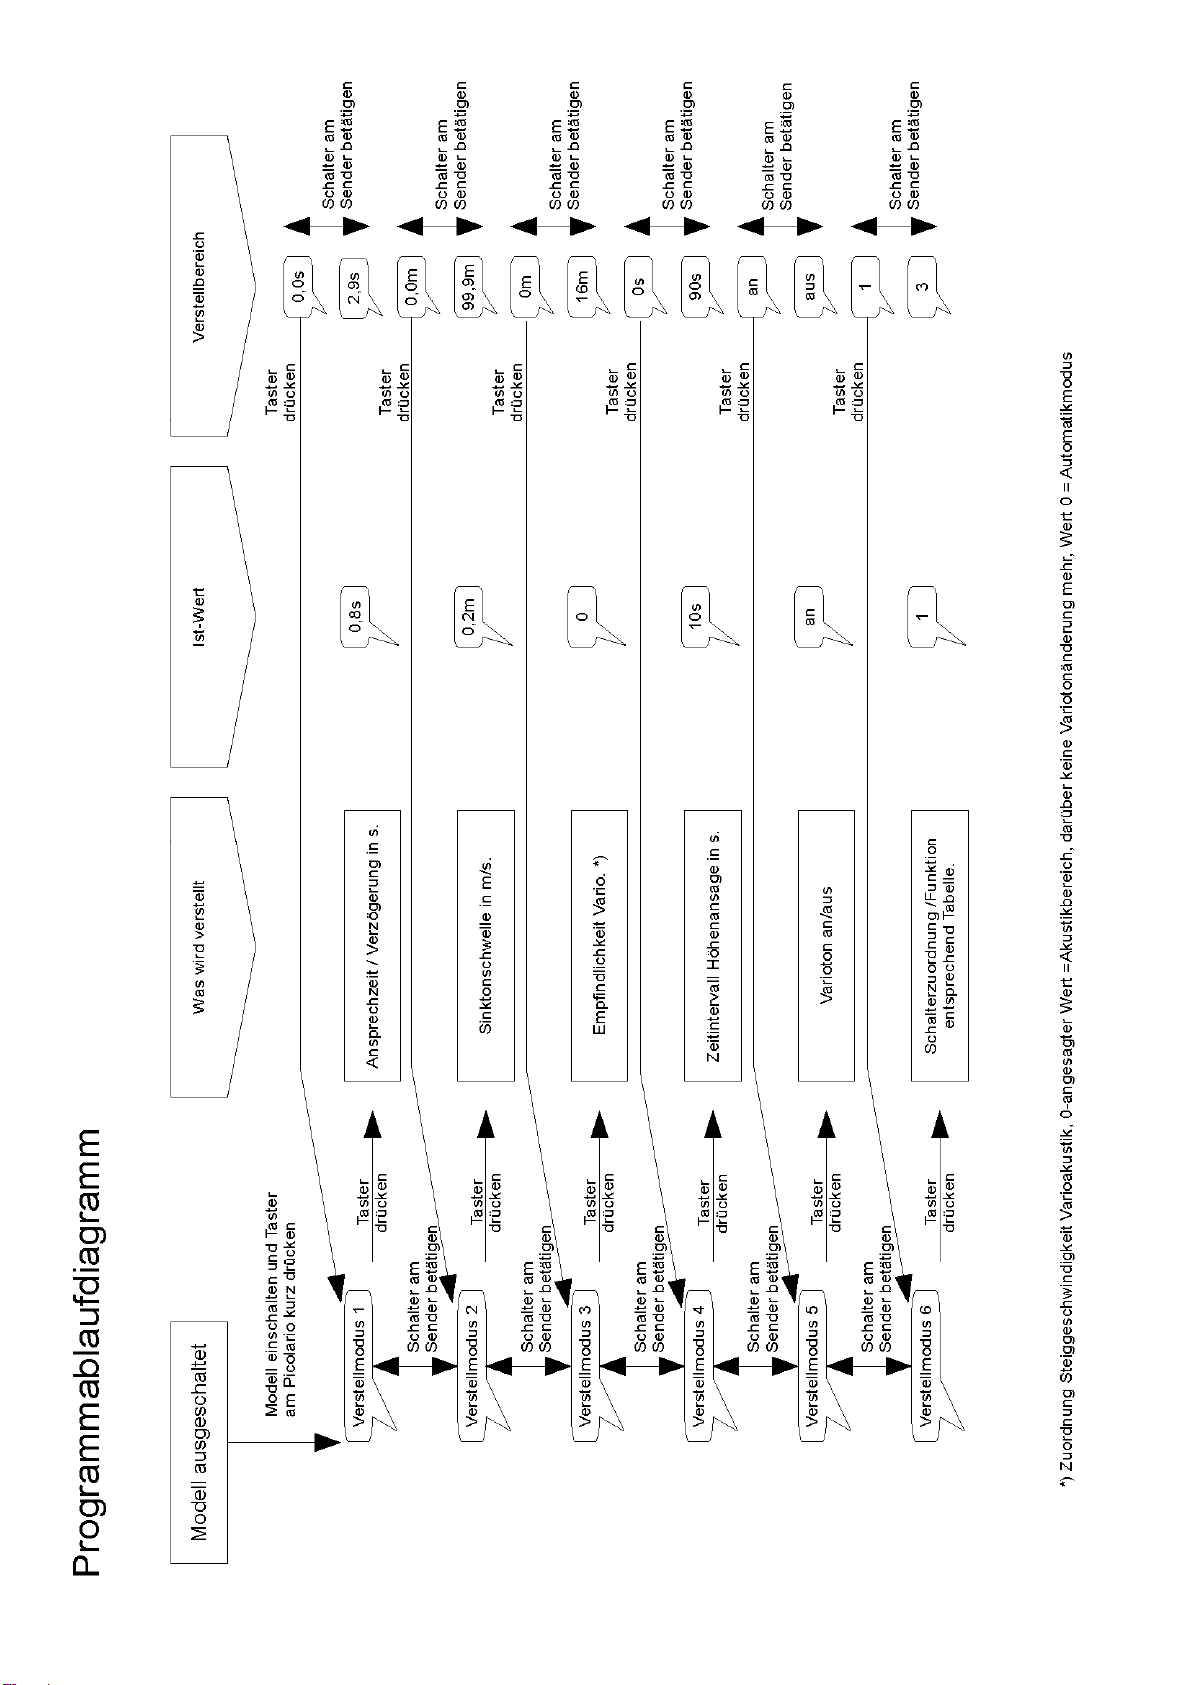
The following summarizes the parameters you can change. (see also the diagram „Programming the
Picolario“:
1. delay time (set mode 1): The delay time is the time from entering a thermal until the first beep. If
you have set this f.e to 1 second, then the airplane model has first to fly 1 second in a thermal until
the first beep.
2. Sink tone level (set mode 2)
is the sink rate in m/s (or ft/min on imperial units) before a continous tone signals descending. This
level is programmed very often to a little bit more than the sink rate of your glider. This gives you a
quite zone flying in calm air. Only if the air is also sinking makes the sink tone appear. The default
value is 0.2 m/s.
3. Acoustic scale range / sensitivity (set mode 3)
You can set the range where the frequency of the tone changes. If you set this to a small value (f.e
4 m/s) then small changes in climbing leads to a big change in frequency/ interval modulation.
Values greater than 4 m/s could not be distinguished any more, so you cannot hear a difference
between 6 and 7 m/s.
If you select in set mode 3 as value 0, then you have the variable sensitivity. At zero you get
maximum sensitivity, and you can hear the difference between 0.10 and 0.15 m/s. The more
thermal the less sensitivity in sound. So the difference betwen 8,10 and 8,15 m/s could not be
distinguished, cause they both have the same tone. This gives you a full 16 m/s (3200 ft/min)
range, while still having the high sensitivity of the 2 m/s range.
4. Time interval for the automatic altitude announcement (set mode 4 )
5. Set mode 5 = Vario sound On/off
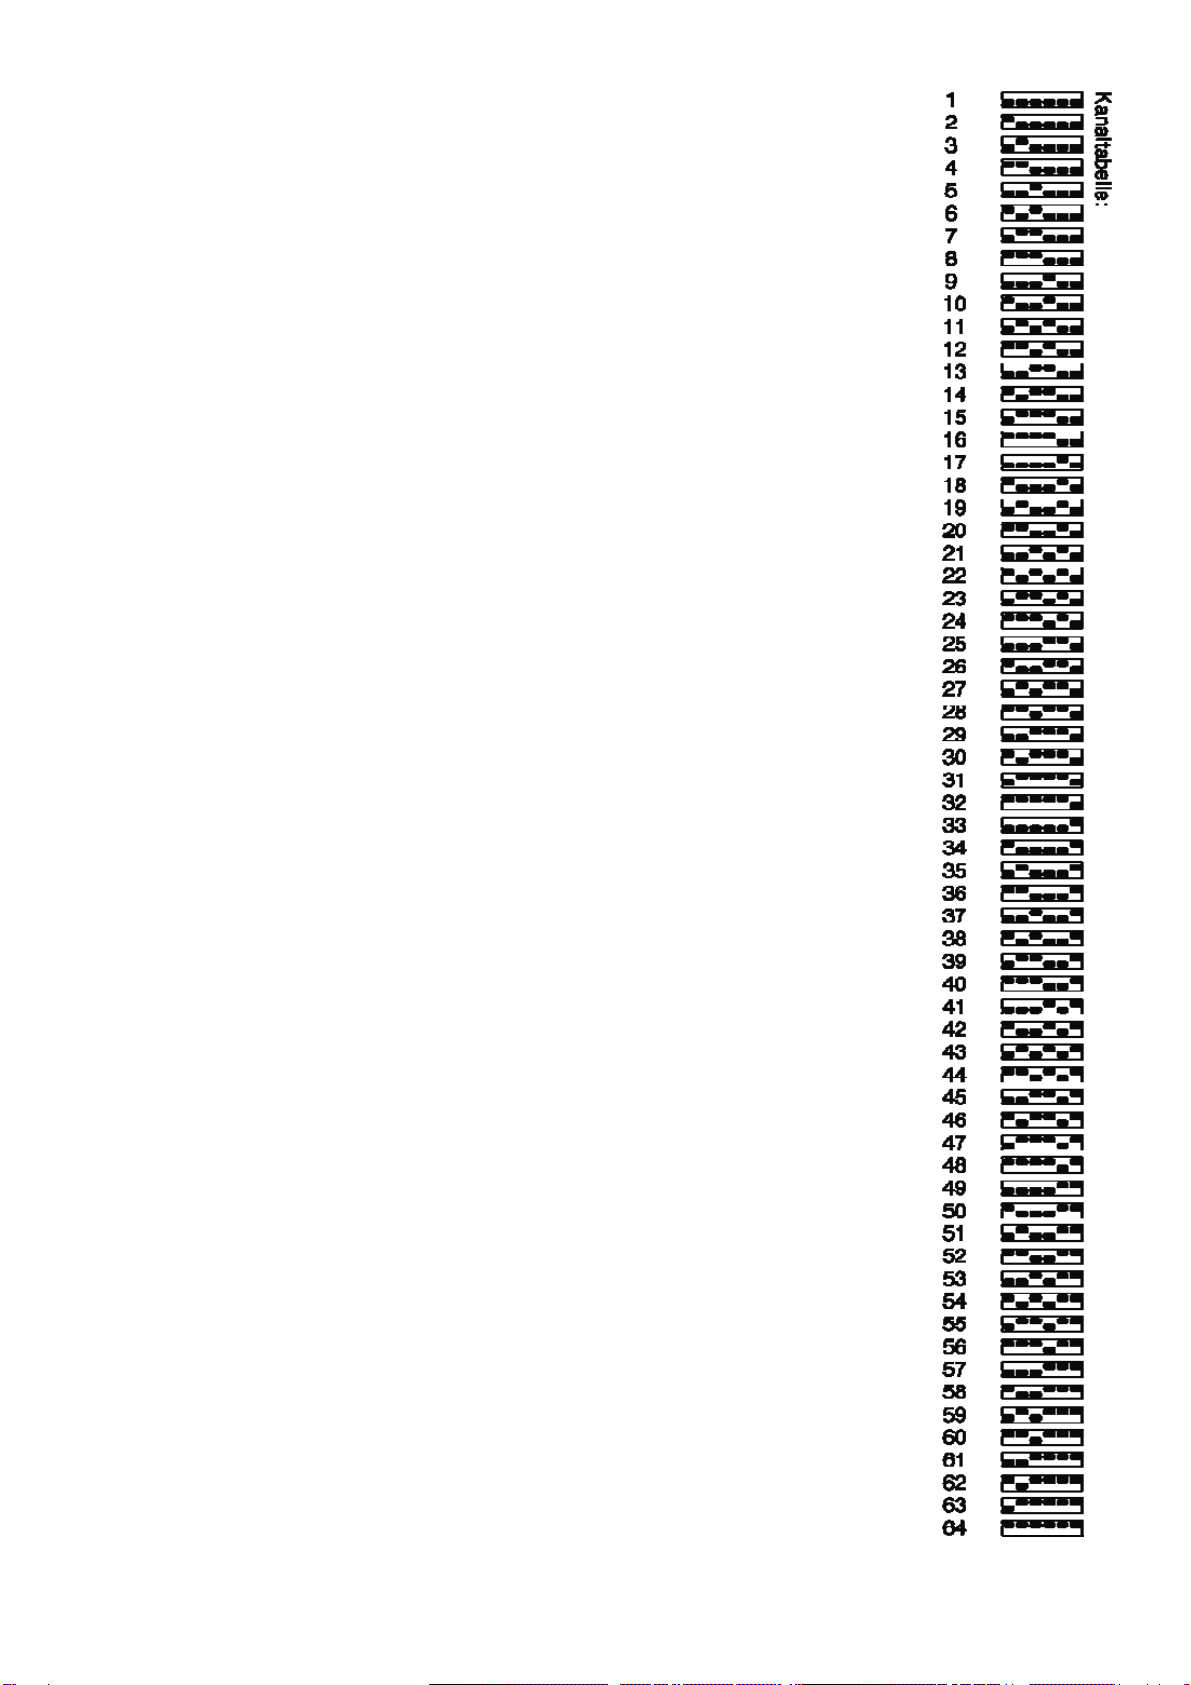
6. Set mode 6 = programs the switch/slider functions.
The 3 position switch can have different behaviour, depending on set mode 6 settings. For the
middle position 2 different behaviours are possible, depending from the previous position. This
allows f.e in mode 2 to get in the middle position an altitude announcement every 50 m.
Alternatively you can get the value of the integration vario announced, if you enter the middle
position from the low /off position.

©2014 Uwe & Thomas www.picolario.de info@thommys.com 9
Table1: set mode 6 settings
Mode Middle position reached from
high/ upper position
Middle position reached
from low position
Lower position (short
pulse)
1 Altitude every 50m Altitude every 50m Off
2 Altitude every 50m Integral vario intervall Off
3 Altitude every 50m Altitude every 50m Integral vario intervall
Approved settings
With the introduction of the automatic mode (set mode 3 is 0), we recommend an acoustic
delay time (set mode 1) of 0.6 seconds. This gives you in most conditions the best acoustic.
The sink tone level, could be programmed to the sink value of your glider, plus 0.2 m/s. Then you hear
a sink tone only, if there is descending air. If your sound feels too nervous for you, you can increase
the acoustic delay time (set mode 1) and decrease the sensitivity (f.e set mode 3 = 16).
Some words about using the Picolario in a model plane.
1.) The altitude measurement is based on an air pressure measurement, which is very sensitive.
If you have your model inside a building pressure changes of up to 0.5 m/s (100 ft/min) are
possible. You can see that also, if you simply open or close a door and the vario starts
beeping. If the weather changes, it is also possible that the zero altitude from takeoff, changes
by up to 30 meters. At thunderstroms or cold fronts this could be even more.
If you already have owned a vario, it takes some flights to get used to the new acoustic sound. All
acoustics sound a little bit different. Also the usage of the altitude announcement takes some
familiarsation, and is best done by using a switch, which could be reached easily.
2.) Usage of the altitude information.
The altitude information has several useful applications. If you have to land not directly close to you,
the altitude could be very useful, if you have done some pre peasurements. If you know the altitude
difference between your place and the landing place, the altitude gives you an indication when it is
time to think about a landing appreach. If you already have lost 180 from 230 meters, baybe some
thoughts about landing direction would be helpful.
Also at light thermals the altitude information is great. If you have in one part of the circle climbing and
in the other sinking the the altitude information will tell you, if it is worth staying there or not. With the
altitude annoucnement you also can stay at places where you only make 30 m in 10 minutes. There a
normal vario is at it 's limits. During competitions it is also very useful to bring all pilots to esactly 200
meters.
3.) usage in electric gliders. The impact of the ventilation openings common at electric models
are in most cases less than feared. Generally you should try to have apressure which has
minimum variation with speed. Sometimes it is possible that you can hear motor sounds
through the Picolario. This is due to high frequency pulses on the power supply line.
4.) problems at big models with only few free receiver channels.
Very often big models anve an insufficient amount of free channels at the receiver. You can use the
vario together with a V wire, which splits the operation with other functions. The vario is operated in
parallel. Ensure that no servo is operated above it 's limits. There is also sometimes a limitation due to
the paralleling.

©2014 Uwe & Thomas www.picolario.de info@thommys.com 10
Technical data:
sensitivity : ca. 1cm/s
resolution altimeter : 1m (or 1 ft on the imperial units)
operating range : -500m to 9000m NN
temperature : -20°C to + 50°C
dimensions: 82 x 24 x 14 mm
weight: ca. 24 g
power supply: 4,6V to 12.V through RC receiver
current consumption : 45mA
TX frequencies : 64 channels in the 433 Mhz-Band
Set modes:: delay time, sink tone level, acoustic scale range.
Functions : Vario signal, announcement of altitude and voltage
If you have constructive feedback let us know.
Sales and information : Manufacturer :
Thommys Modellbau Renschler Instruments
Rebenweg 27 Kirchtalstr. 30
73277 Owen - Teck 70435 Stuttgart
Tel. +49 (0)7021-726669 www.renschler.de
Internet : www.picolario.de
CE-Declaration:
The Picolario2 is compliant with the EG EMV specification 89/336/EWG, 91/263/EWG
and 92/31/EWG.
It has been RFI tested regarding EN61000-4-2(Electrostatic discharge ESD), EN61000-
4- (Radiated electromagn. immunity) and EN55014 Radio Frequency Dist. Elect. Tools
Importand legal notice:
This system is designed for use in Germany and the European community. The use in
Germany is legal and license free. If you use the Picolario and/or LPD in other
countries than Germany, you have to make sure, that it is legal in these countries. You
will use it on your own risk.

©2014 Uwe & Thomas www.picolario.de info@thommys.com 11
Declaration of conformityin accordance with the Radio and Telecommunications
Terminal eyuipment Act (FTEG) and Directive 1999/5/EG (R&TTE)
We
Renschler instruments
Kirchtalstr. 30
D – 70435 Stuttgart
Tel. 0711 879462
Declare, that the product
Picolario2
(Datecode DC 1203) with the intended purpose as data telemetry transmitter for models complies with
the essential requirements of §3 and the other relevant provisions of the FTEG, when used for ist
intende purpose.
Harmonised standards applied:
ETSI EN 300 220 – 1V1.2.1 (1997-11)
Renschler Instruments
Stuttgart, den 12.3.2012 Uwe Renschler
Additionally we herewith confirm the compliance oft he Picolario and PicoDuo with the EMV
specifications 89/336/EWG, 91/263/EWG and 92/31/EWG.
This declaration declares the confirmity with the mentioned directives. The security hints in this
owners manual have tob e carefully read and applied.
warranty:
We have 24 months warranty for this product.
In case of service: Send the device directly to the supplier together with your phone number
and email address. Please make a detailed failure description. The better the description, the
better the service.
Service address:
Renschler Instruments
Kirchtalstr. 30 (street)
70435 Stuttgart (zip code, city)
Germany

©2014 Uwe & Thomas www.picolario.de info@thommys.com 12
Operation with Futaba/Robbe SBUS telemetry receiver
Without connected 433 MHz RF modul the Pico2 is compatibel to the TEK-Vario 1672 from
Robbe/Futaba. To use the Pico2 at the Sbus2, you have first connect it to your remote control (f.e.
Futaba T-18) and register it. Follow the instructions for that from your T-18 or other Futaba telemetry
unit.
If you use a T-18 then a receiver accu is necessary for connecting the Pico2. The power can be
supplied using the second connector of the Pico2. Ensure correct polarity. The housing has a sticker,
which shows, where minus is.
After the Pico2 is angemeldet, it can be connected to the SBUS2 connector of a telemetry receiver.
For possible altitude, vario and other parameter settings please refer to the owners manual of your 2.4
GHz transceiver.

©2014 Uwe & Thomas www.picolario.de info@thommys.com 13
Softwareupdate :
The Pico 2 has a micro USB connector, which can be used to download new software with a
Windows PC. You can also download the software for various other protocols f.e Jeti, MSB or
Hott versions. It is also possible to download german or english language using this tool.
You can find this program together with a manual, how to install it, and all software updates at
: http://www.thommys.com/downloads
The Pico uses a STM32 processor and you find the upload program also at www.st.com if you
look for DFUSE.
To update your Picolario2, you first have to install the update software DFUSE Demo on your PC.
Update is done like following::
1.) start the DfueSE Demo program
2.) Press the red button oft he Picolario2 and then connect it to Micro USB connector. The key
must be pressed WHILE connecting the USB cable.

©2014 Uwe & Thomas www.picolario.de info@thommys.com 14
3.) In the section UPGRADE „Upgrade or Verify Action“ click on Choose to select the file, which
shouold be downloaded to the Pico2. You can select then a Picoxxx.dfu file for updating.
4.) Then in the section „Upgrade or Verify Action“ click on Upgrade and a new window appears.
There confirm with YES to downloadt o your Pico2..

©2014 Uwe & Thomas www.picolario.de info@thommys.com 15
5.) A green bar indicates the upload progress. First old data will be erased and then the new
program is downloaded to your Pico2. If the download succeeded, the following will be
displayed: Target00: Upgrade successful see picture below
Finally disconnect the Pico2 from the micro USB connector.

©2014 Uwe & Thomas www.picolario.de info@thommys.com 16
Picolario2 433 Mhz short reference quick start :
1. Select the same channel at the Picolario and the Transceiver according to the
table on the backside. (see right)
2. Mount your Pico2 with the Velcro.
3. Connect your Picolario to a free channel of your receiver
4. Program to this channel a 3 position switch or slider
Switch /Slider
During flight During
programming
100 %
Middle
position
-100%
Request of altitude/ voltage
time automatic alt mode
Vario signal and altitude and
voltage automatic
No vario signal, TX switched of
only power supply monitor
Increase value
-
Decrease value
5. Switch it on and do a range check. Then you can start.
Setting of the paramters
1. Bring the switch into the midlle position. The red button must be pressed,
WHILE the version message is announced. The LED then turns blue.
This is different compared to the old Picolario. If you press IMMEDIATELY
during turn on the red button, you are in software update mode.
2. Change values according to programming plan in the middle of this manual.
Change with the switch/slider and acknowledge with the red button.
set mode 1 = acoustic delay time (default = 0.6 sec)
set mode 2 = sink tone level (default = 0.2 m/s or 40 ft/min)
set mode 3 = acoustic scale range (default = 0)
set mode 4 = time interval of the automatic altitude announcements
set mode 5 =Vario sound on / off
set mode 6 = mode of operation, see table page 8
3. To get out of programming mode, just switch off the power.
Table of contents