RENY RETRO User manual

INSTALLATION AND
USER MANUAL
FREE STANDING WOODSTOVE
TYPE:
RETRO

Foreword
Congratulations on the purchase of your new RENY stove. Your choice proves that you care about qual-
ity and a functional design.
RENY was founded in 1975 and spent the first years specializing in the classic fireplaces. Since 1981
fireplace inserts and freestanding stoves have been manufactured. RENY is unique compared to other
companies because of its innovative developments, which are always achieved using the latest techno-
logy. Everything is manufactured in our own factories, which guarantees that you, as a client, receive a
product of the highest possible quality.
In this era of rapid developments and frenetic lifestyle, there is an increasing need for a central location
in houses, used for people to relax. This is why the ancient custom of using a wood stove is experiencing
a true revival. In addition, heating using wood is a very sound choice environmentally. Heating using
wood is CO2 neutral. When incinerated, the wood releases the same substances that the tree extracted
from the air. A cycle in balance with nature. In addition to an atmospheric appearance, a stove also
creates heat in every season, exactly where it’s required. This also results in significant energy savings.
In order for your stove to provide you pleasure and heat for a long period of time, we recommend that
you read this installation- and user manual carefully. It contains important directions and useful tips.
1v.201305

Table of Contents
FOREWORD 1
TABLE OF CONTENTS 2
1 DESCRIPTION 3
1.1 Construction 3
1.2 SGI-System 3
1.3 Heat transfer 3
1.4 The RETRO soapstone 3
1.5 Attention to the environment 3
2 INSTALLATION 4
2.1 Dimensions 4
2.2 Chimney 4
2.3 Converting from top to rear connection 4
2.4 Installation 5
3 USE 6
3.1 Fuel 6
3.2 Ventilation 6
3.3 First time stoking 6
3.4 Lighting 6
3.5 Stoking 7
3.6 Optimal stoking 7
3.7 Fuel consumption 8
3.8 Safety 8
4 MAINTENANCE 9
4.1 Seals 9
4.2 Bottom grid and ash tray 9
4.3 Out of use 9
4.4 Rotating parts 9
4.5 Warranty 9
4.6 Glass 9
4.7 Coating 9
4.8 Smoke channel 9
4.9 Vermiculite panels 9
Attachment 1: CROSS-SECTION STOVE 10
Attachment 2: TECHNICAL DETAILS 11
Attachment 3: WARRANTY CERTIFICATE 13
WARRANTY PROVISIONS 14
Attachment 4: ECO LABEL 15
2

1 Description
The RENY RETRO combines comfort and an efficient heat release. During development, very high quality
materials were used. It’s not for nothing that RENY offers no less than 5 years of warranty regarding
her products. This is reflected in a solid and functional construction with sublime finishing. Simplicity,
soundness and the appealing design are the foundation of the pure enjoyment of the extreme comfort
associated with an ambient wood fire.
1.1 Construction
The extremely robust construction of the stove is composed out of boiler steel. The way RENY applies
boiler steel is unique and far ahead of its time. This material, mainly used in heavy industrial applica-
tions, addresses all future demands with regard to wood stoves. In order to achieve an extremely
efficient and clean heat release, the inside of the incineration compartment is covered with vermiculite
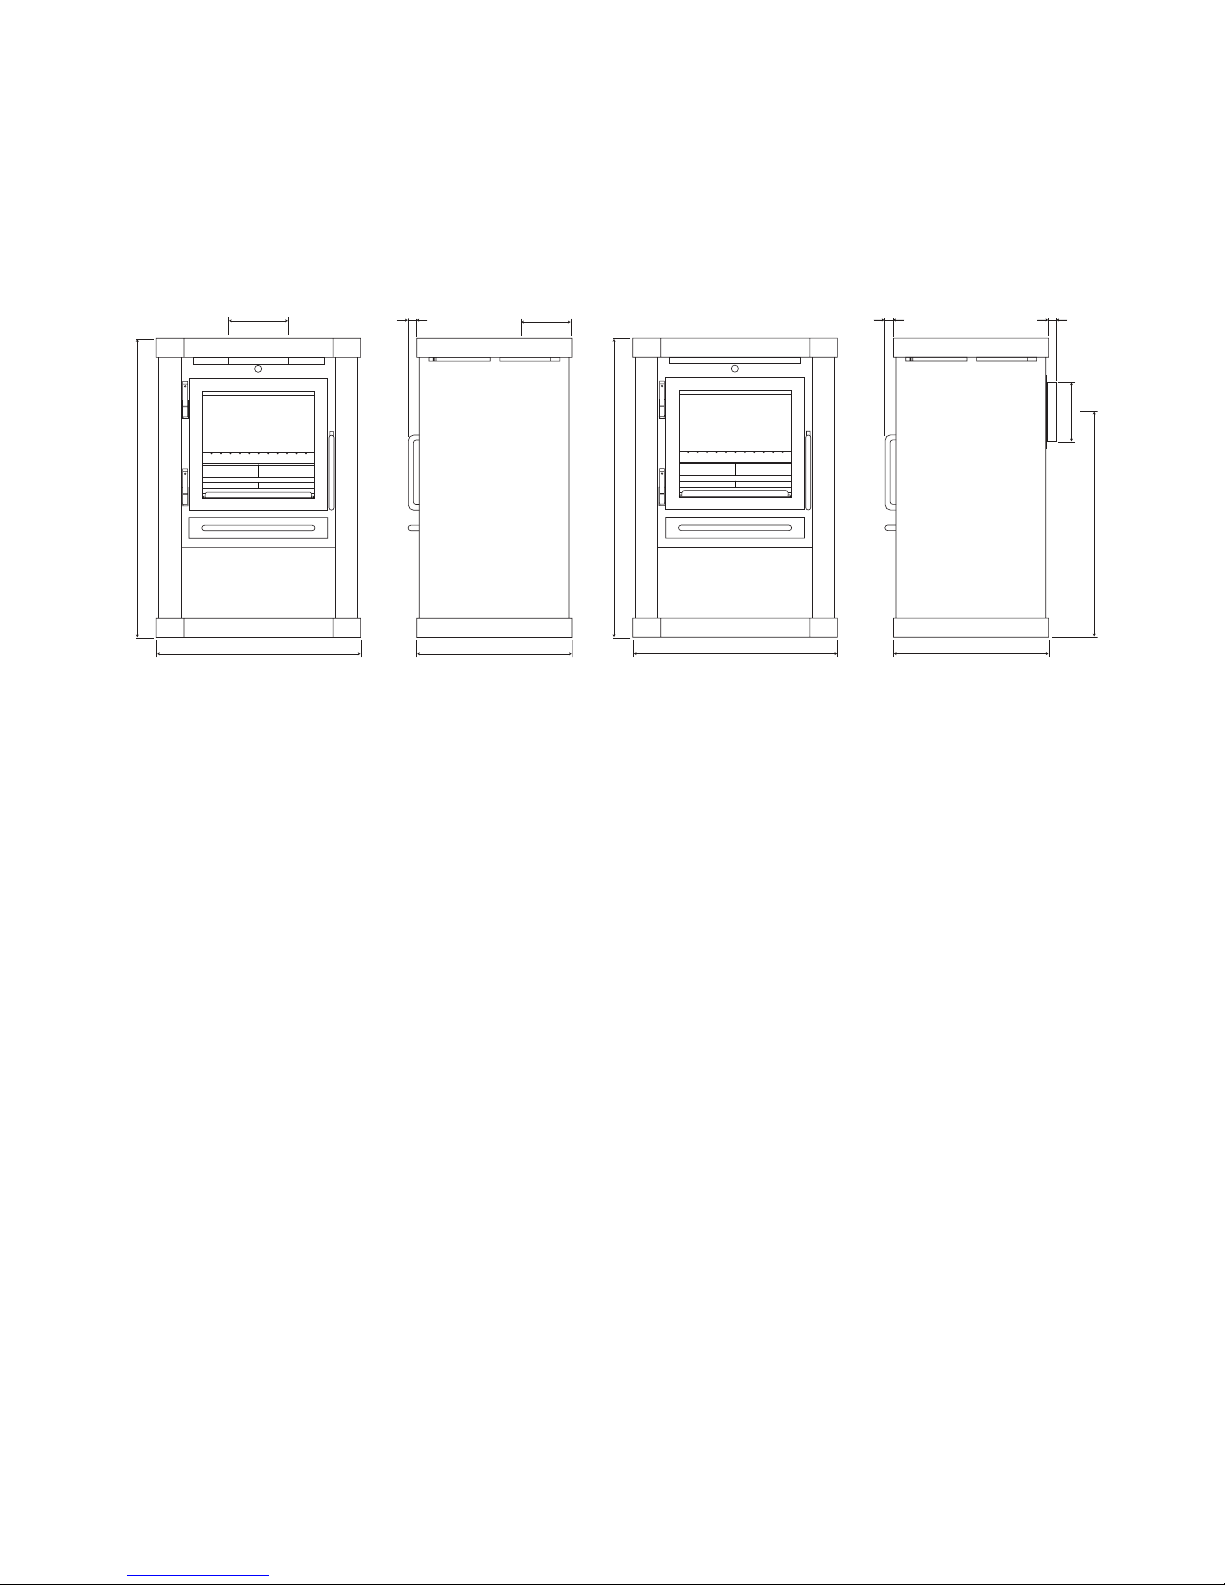
panels and an extra thick steel bottom grid. The flue system has a diameter of 150mm. The stove can be
equipped both with a top connection and a rear connection. (see paragraph 2.3). The stove can easily
be operated using the stainless steel handle. This handle was designed in such a way that there is only
a minimal absorption of heat. This ensures maximal ease of use. The coating of the stove consists of a
heat resistant coating (Anthracite, color code 930). The stove was manufactured completely in our own
factory using the most modern techniques. A team of professionals has constructed, manufactured and
verified the stove with the greatest possible care. This guarantees the high quality you’ve come to expect
of RENY.
1.2 SGI-system
RENY was the first manufacturer to introduce the Schoon Glas Injectie (Clean Glass Injection) system.
The stove has been designed in such a way that airflow is created just alongside the windowpane. This
creates optimal burning at that location, which prevents windows from becoming charred and instead
keeps them extremely clean. This allows you to keep enjoying the atmospheric flame interaction. How-
ever, soot can not always be prevented. Staining depends on a number of factors, such as:
• Operation
• Chimney draught
• Weather conditions
• Wood quality.
1.3 Heat transfer
The transfer of heat by the stove consists of convection- and radiation heat. The convection heat is
caused by cold ambient air that flows in the double walled circuit between the outer sheath and the
incineration compartment through the wood storage at the front of the stove. The heated air is released
into the environment through convection gaps in the top of the stove. The radiation heat is released
through the heated glass surface and the optionally available soapstone.
1.4 The Retro Soapstone
edition is a luxury variant to the basic Retro. While the basic Retro can only be supplied with a Soap-
stone top, the Retro soapstone is coated with Soapstone entirely. The soapstone coating has the capabil-
ity to accumulate heat. The main advantage, apart from the handsome looks, is that the Retro soapstone
keeps radiating the accumulated heat to the environment for an extended period of time after usage.
Also, the convection heat is maintained in this model. This ensures that all the energy is fully used.
1.5 Attention to the environment
Heating with wood is a responsible choice. When properly and optimally burnt, wood doesn’t affect the
environment in a more negative way than if it would have died in a natural way. During the incineration
of wood, the amount of CO2released is equal to the tree’s air consumption. A cycle in balance with
nature, that doesn’t contribute to the greenhouse effect. The RENY incineration system aims for optimal
incineration using primary, secondary and tertiary aeration. The specially designed incineration com-
partment is in compliance with the strictest standard for wood stoves in Europe. This means efficiency
class A and CO emission class 1
3

2 Installation
Have your stove installed by a recognized installer only. He is able to assess your specific situation and
provide you with an appropriate advice.
2.1 Dimensions
Top connection Rear connection
2.2 Chimney
One of the main components of the stove is the chimney. Together with the chimney, the stove is one unit.
The stove can only perform properly if the stove and the chimney have been aligned correctly. Therefore
you should have these inspected by the installer in advance. In addition, the chimney should be clean
and leak-proof and have a minimal diameter of Ø 150 mm over the entire length. Optimal performance
is achieved with a chimney draw of 12 Pa. A properly functioning chimney prevents a lot of issues such as:
• Poor heat transfer
• Soot on the windows
• Smoke in the room
• Chimney fires.
In case of a chimney fire you need to immediately seal all air supply channels (primary and secondary).
Then, you should immediately call the fire department. After the fire has been extinguished, the stove and
the chimney should be inspected again by your installer.
2.3 Converting from top to rear connection
The stove is equipped with a top connection in the factory. The construction of the stove allows an easy
conversion to a rear connection. Attachment 1 shows plans that will further explain the different compo-
nents. The conversion is done as follows:
1. Remove the wood collector.
a. Slide the wood collector up in the doorway.
b. Then the wood collector can be easily removed by rotating it 90°.
2. Remove the bottom grid.
a. The bottom grid is not attached and can be removed without problems.
3. Remove the vermiculite panels
a. First slide the panels on the side downwards.
b. Then rotate these 90° to be able to remove them through the doorway.
c. Now the rear panels can be removed.
4. Remove the cover
a. Slide the cover upwards so that it can be removed from the outer sheath.
4
800
544 414
Ø150 136
23
Ø150
604
800
544 414
23 19

5. Remove the lid of the outer sheath
a. Unscrew four M6 hexagon socket head cap screws
b. Remove the lid
6. Remove the seal plate in the incineration compartment
a. Unscrew seven M6 hexagon socket head cap screws
b. Remove the seal plate and the reinforcement plate
7. Remove the smoke channel in the incineration compartment
a. Unscrew seven M6 hexagon socket head cap screws
b. Remove the smoke channel and the reinforcement ring
8. Remove the inner disc from the lid outer sheath.
a. Break loose the three micro joints
b. Remove the disc.
c. Mount the smoke channel.
9. Mount the smoke channel.
a. Place the smoke channel through the incineration compartment at the rear.
b. Place the reinforcement ring on the outside of the incineration compartment.
c. Note that the fiberglass rope is positioned correctly so that it creates proper sealing.
d. Screw down the seven M6 countersunk hexagon screws.
10. Mount the seal plate
a. Place the seal plate through the incineration compartment at the top.
b. Place the reinforcement plate on the outside of the incineration compartment.
c. Note that the fiberglass rope is positioned properly so that it creates proper sealing.
d. Screw down the seven M6 countersunk hexagon screws.
11. Place the cover
a. Place the cover on top of the outer sheath
b. Carefully lower the cover
12. Place the lid cover
a. Place the lid cover at the top in the opening of the cover
b. Press it tight so that it is at the same level of the cover
13. Mount the lid of the outer sheath
a. Screw four M6 hexagon socket head cap screws
14. Place the vermiculite panels back into position
a. First place the bottom panels at the rear
b. The top rear panel is no longer required
c. Afterwards, the sides can be placed back into position
15. Place the bottom grid back in position
a. The bottom grid can be placed back in position loosely
16. Place the heat shield
a. Place the heat shield on the strip above the tertiary aeration
b. Subsequently, tilt the front of the heat shield towards the first two hooks at the top of the interior
container
17. Place the wood collector back in position
a. See Appendix 1 for the correct positioning
18. The conversion is complete and the stove is ready for use.
2.4 Installation
To ensure correct placement of the stove, the following points needs to be observed:
• The stove must to be placed in compliance with national fire safety regulations.
• The stove is not suitable for connection to a combined flue system.
• Have the chimney swept and checked for quality and dimensions (diameter at least Ø 150 mm).
• In order to allow the stove to perform properly, a sufficient amount of oxygen is of great importance to
the incineration. Mainly in case of well isolated houses with mechanical exhausts and / or air
heating, this may cause problems. Therefore we recommend that you have a recognized installer
assess your situation and take proper measures.
5

• When placing the stove, a distance of at least 1 meter should be observed at the front. The walls next
to and behind the stove cannot be made of inflammable material. In addition they also cannot be
covered with such materials, unless the distance is more than 30 centimeters on the side and more
than 20 centimeters at the rear.
• A surface underneath the stove made of inflammable material such as wood, cork or carpet needs to
be protected by a floor plate made of nonflammable material such as ceramic, stone, glass or metal.
The floor plate needs to extend 50 centimeters at the front and 30 centimeters at both sides.
3 Use
3.1 Firewood
The incineration system was developed for burning deciduous wood in the form of split logs. It is impor-
tant to burn only purely wind dry wood (moisture level 12 - 15 %). Never use waste, other flammable
materials and / or flammable liquids. This will seriously damage your stove and chimney. Below you will
find the various wood types with their average drying time.
Wood type Drying time
Pine, Poplar 1 year
Lime, Willow, Spruce, Birch, Ash, Awl 1,5 years
Fruit tree, beech 2 year
Oak 2,5 years
3.2 Ventilation
Incineration requires air. Make sure you have sufficient supply of fresh air. For every kg of wood you
burn (with the device door closed), you need an additional 10 m³ - 15 m³ of air. This means about
an additional 30 m³ per hour. Therefore ample aeration from the outside or through an other room or
hallway is required.
3.3 First time stoking
A new woodstove needs to be put to use gradually. During the first two stokings, you need to limit opera-
tion to a tempered fire. This helps you prevent the following problems:
• Tearing of the vermiculite;
• Damaging the coating
• Deforming the material
• The rope seals getting stuck.
During the first stokings it is possible that you will notice some pungent odor and smoke. If this happens,
make sure that you properly ventilate the area. During the next stokings, the stove can be used to its full
extent. The ex works soft, scratch sensitive coating has now been completely hardened and burnt in
completely.
3.4 Lighting
When lighting and burning, the stove will be extremely hot and needs at least two hours to cool down
after the fire has been extinguished. Therefore you should not touch the stove without protection when its
burning and two hours after. Always operate the stove using a glove. The lighting process is as follows:
1. Fully open the air supply.
a Primary aeration; slightly open the ashtray.
b Secondary aeration; push the tube above the door completely into the stove.
c Tertiary aeration; this will automatically be fully opened.
2. Build an airy stack of wind dry, pure wood with a few clots of paper around it and some kindling.
3. Light everything.
4. Leave the door slightly open (3 – 5 min).
5. When the wood is burning properly, the door can be closed. The fire should now be burning
brightly and intensely.
6. Let the fire warm up properly and then adjust the incineration control.
6

3.5 Stoking
As soon as the stove has warmed up (after about 15 minutes) the incineration can be controlled. The
following points are important:
• The primary aeration can be closed. This additional full air supply is only required during the lighting
of the stove. Push the ashtray completely into the stove. Continuous stoking with the primary air supply
open causes a fiercely white-hot fire that can damage the stove. Prevent white glow and over-firing.
• The secondary aeration provides the stove with the SGI system. This should never be fully closed
during the incineration, in order to prevent soot on the windows. In addition this slide allows for the
provision of less or more air.
• The tertiary aeration controls the afterburning process. This aeration ensures that the unburnt gasses,
emerging from the wood, are provided with additional oxygen. At higher temperatures, up from
± 550°C these gasses are additionally afterburnt. This considerably improves the efficiency of the
stove. This aeration is not adjustable and is always fully opened.
• When controlling the incineration it is important that there will be no incomplete incineration. An
incomplete incineration occurs if oxygen is supplied insufficiently, due to the fact that the primary,
secondary and tertiary air supply controllers have been closed too soon. An incomplete incineration
can be identified by:
- An increase of smoke development in the incineration compartment;
- The fire going out;
- Soot on the window.
The flue from the chimney also tells something about the incineration: white or colorless smoke
indicates a proper incineration. If the smoke is grey, grey blue or black, the incineration is incomplete.
Avoid overloading (white burning glow), caused by lengthy burning with primary air fully open or by
burning too much wood in one go. The stove can then become overheated. This may damage the stove.
3.6 Optimal stoking
Burning with wood is highly environmentally responsible and also most efficient if you have a hot but
quietly burning fire. The ash should mildly glow red and orange, and should certainly not be glowing as
bright as a blacksmith’s fire. A solid fire burns fast and fiercely which allows no time for full incineration.
You achieve maximum efficiency if:
• You don’t burn during foggy and windless weather.
• You make sure that you use pure dry wood.
• You only burn with the door closed. This increases the temperature in the incineration compartment,
which leads to better incineration.
• You take care of a regular incineration. To this end you burn with a completely closed primary air
regulation. The ashtray is completely sealed. Fully open the secondary aeration by pushing the tube
above the door completely into the stove. The tertiary aeration is not adjustable and it is always fully
opened.
• You ensure there is a significant ash layer (2 to 3 centimeters) on the bottom grid. Not only does this
form protection, it also leads to a significant decrease of the wood consumption and an easier ignition
of the added wood.
• You take care of a homogenous wood bed. Place the blocks loosely, well distributed and horizontally on
the ash bed, separated from each other and a few centimeters away from the walls. This way
the incineration process is able to better obtain the required oxygen.
• In case of a nominal capacity of 7 kW 1,5 kg beech wood suffices for a burning time of about 45
minutes. Refill only when the charcoal phase has been achieved. Keep the door open for a short period
of time during this.
7

3.7 Firewood consumption
The table below indicates the heating value of the different wood types. This concerns pure wind dry
wood with a moisture level between the 12% and 15%.
Wood type Heating value/kg (kWh)
Birch 4,3
Beech 4,0
Oak 4,2
Ashen 4,2
Larch 4,4
Robine 4,1
Fir 4,5
Spar 4,5
The details above combined with the efficiency and power of the stove, allows for a calculation of the
wood consumption. Below you will find a more extensive example based on the use of beech wood.
Calculation example:
Heating value 1 kg beech = 4,0 kWh.
Efficiency Retro = 78,5%.
Rated power = 7,0 kW.
Efficiently utilized heating value = 4,0 x 0,785 = 3,14 kWh.
Wood consumption per hour = 7,0 / 3,14 = 2,2 kg.
3.8 Safety
With a RENY wood stove, you have purchased a comfortable and safe heat source. The fire safety starts
with a proper installation and a correctly working chimney. In addition the following points are important
when it comes to to safe heating:
• Do not place any inflammable objects within 80 cm in the radiation area of the device. Be careful
with regard to decoration close to the stove.
• For safe operation, a distance of 20 cm between the side and wall and 15 cm between rear and
wall needs to be observed.
• In case of an inflammable floor, a fire proof heating plate must be applied underneath the
device. Towards the front and side, one must observe a minimal distance for the heating plate of
respectively 50 and 30 cm with regard to the stove.
• When using your stove, the outside will get hot. When operating the stove you should use the glove
included. Protect yourself and others (children!) from getting burnt. Don’t leave children alone with a
burning stove.
• Be careful regarding to clothing. Synthetic clothing in particular may easily catch fire and burn
intensely.
• Prevent inflammable materials or liquids from being placed in the vicinity of the device. Working with
solvents, glues etc in the area where the stove is burning, may be very dangerous.
• Know the condition of your smoke channel. Tears in the channel may cause critical moisture, pollution
of the walls, penetration of smoke, but it can also impede the drainage of flue. Please request profes-
sional advice from your dealer or a specialized company.
• Prevent chimney fire. Have the smoke channel swept clean at least once a year, and more often
if it is used intensely. Prevent excessive soot within the channel, therefore never burn freshly chopped
wood, but always clean and dry split wood.
• Never use the stove as a barbecue. This causes (flammable) grease deposit in the channel and
accelerates the process of the channel getting silted up. Prevent pollution of the channel (bird nests
etc), by placing a proper hood on the chimney.
• Follow the directions of the local fire department. The stove can only be used if all national and local
installation directives, directives of the local fire department and the necessary architectural
provisions have been met.
8

4 Maintenance
4.1 Seals
The applied seals consist of ceramic fiberglass tape and cord. Aggressive detergents may corrode these
materials. Depending on the frequency of use, these components will wear out. The fiber seals can burn
away and / or come loose which may lead to the stove priming ‘false air’. Take care of a timely replace-
ment of these seals to allow the stove to remain functioning optimally.
4.2 Bottom grid and ash tray
Empty the ashtray regularly. Prevent that the amount of ash ending up in the ashtray is so large that the
ash touches the bottom of the bottom grid, since it would lead to the bottom grid being unable to cool
down, which instead may cause it to burn. Swipe the ashtray housing clean regularly. Please observe
that the removal of the ash from the ashtray is done only when it has cooled down. The color and
nature of the ash also is a good indication of the incineration process. During an optimal incineration,
fine white ash is created. A dark color indicates an incomplete burning process. Always leave a few cen-
timeters of ashes lying at the bottom of the incineration compartment. During the heating process of the
stove, this starts to glow and helps the stove to warm up more easily.
4.3 Out of use
When the stove will not be used for a longer period of time, it needs to be preserved to prevent bad
performance and corrosion of the stove. Ventilate the stove and, if necessary, place moisture absorbers
in the fireplace.
4.4 Rotating parts
All rotating parts, such as the hinges and lock need to be mildly lubricated at least once a year. This can
be done with graphite or copper grease.
4.5 Warranty
When purchasing the stove, make sure that is has been equipped with a completely filled out warranty
certificate. This certificate contains the explanations associated warranty provisions. (see attachment 3).
When replacing the parts, only the use of original components is allowed. Warranty lapses when
non-original components are used.The device cannot be modified. Also, the warranty lapses in case of
modification of whatever nature.
4.6 Glass
Do not wait too long with regard to cleaning the glass when there is soot on it. This way you prevent the
soot from burning in. The glass can be cleaned using a moist cloth, non-scratching detergent or special
window detergent available at your retailer. To prevent cracking, the glass can only be cleaned when it
has cooled down.
4.7 Coating
Damage and / or discolorations to the stove and / or smoke channel can be remedied using special
heat resistant coating. These spray cans are available at your dealer. Standard delivered ex works in
color anthracite color code 930.
4.8 Smoke channel
Have the smoke channel inspected and cleaned by a recognized chimneysweeper at least once a year.
4.9 Vermiculite panels
The vermiculite panels can be cleaned with a brush. Check the cover for possible damage. Cracks are
no problem, as long as they fit together nicely. If pieces of a part of the cover are missing, this part
must be replaced immediately. Make sure that the construction of the stoke compartment
remains well protected!!
9

Attachment 1: Cross-section stove
REAR CONNECTION
TOP CONNECTION
10
Lid cover
Seal plate of the smoke channel
Smoke channel Ø150mm
Heat shield
Tertiary aeration
Vermiculite panel
Convection air
Secondary aeration control
SGI-Spoiler
Heat shield
Incineration chamber
Wood collector
Doorhandle
Primary aeration control
Woodstock
Smoke channel Ø150mm
Cover of outer sheath
Bottom grid
Ash tray

Attachment 2: Technical details
Technical details
Thermal output 7,1 kW
Flue system Ø150 mm
Content incineration compartment 0,04 m³
Surface bottom incineration compartment 0,11m²
Weight 110 kg / 180 kg
Firewood (beech wood)
Filling 1,5 kg
Primary air 0%
Secondary air 100%
Tertiary air 100%
Burning time firewood 45 min.
Flue value
Flue amount 4,7 g/s
Flue temperature 461 °C
Vacuum 12 Pa
Efficiency 78,5%
CO at 13% O2 0,10 vol%
11

12

Attachment 3: Warranty Certificate
Stove / hearth
Type: ………………………………………………………………………………………………………………………………
Serial number: ………………………………………………………………………………………………………………………………
Date of purchase: ……………………………………………………………………………………………………………………………
Dealer
Name: ………………………………………………………………………………………………………………………………
Street/No.: ………………………………………………………………………………………………………………………………
ZIP code: ………………………………………………………………………………………………………………………………
City: ………………………………………………………………………………………………………………………………
Country: ………………………………………………………………………………………………………………………………
Telephone: ………………………………………………………………………………………………………………………………
Fax: ………………………………………………………………………………………………………………………………
E-mail: ………………………………………………………………………………………………………………………………
Signature: ………………………………………………………………………………………………………………………………
User
Name: ………………………………………………………………………………………………………………………………
Street/No.: ………………………………………………………………………………………………………………………………
ZIP code: ………………………………………………………………………………………………………………………………
City: ………………………………………………………………………………………………………………………………
Country: ………………………………………………………………………………………………………………………………
Telephone: ………………………………………………………………………………………………………………………………
Fax: ………………………………………………………………………………………………………………………………
E-mail: ………………………………………………………………………………………………………………………………
Signature: ………………………………………………………………………………………………………………………………
13

Warranty provisions
RENY Openhaardenindustrie b.v. guarantees a proper operation of the complete device for a period of
5 years. The device needs to be placed and installed by a recognized installer. The installation must be
executed in compliance with the national directives or the installation and user manual attached.
Complaints can only be processed when they have been submitted through the dealer to RENY, together
with the fully completed warranty certificate and the purchase receipt. We will handle your damage case
with care and we will determine whether a warranty claim can be made. If, despite normal use in
accordance with the installation and user manual a malfunction occurs during the set warranty period,
which is the result of a material and or manufacturing error, the defective component is replaced with a
new one through the dealer. For those materials that are covered by warranty, no wages and material
costs are charged. Any transportation costs will not be compensated. Repairs will be executed at our
factory.
The components listed below have a deviating warranty period:
• Glass no warranty;
• Coating no warranty;
• Electrical components 1 year;
• Vermiculite 1 year;
• Ceramic fiber seals 1 year;
Warranty lapses if:
• The conditions listed above have not or only partly been met
• The installation was not performed in compliance with the national directives or the installation and
user manual attached
• The device has been neglected or treated roughly
• The directions of the installation and user manual were not followed
• Wrong fuel was used
• The stove / hearth was not installed by a Reny selected dealer.
14

A A
B
C
D
E
F
Class 1
Class 1
Class 2
Class 3
Class 4
Output
Capacity and CO-emission
Manufacturer:
Model:
Nominal capacity:
Output classes
High output
Low output
CO-emission
Low emission
High emission
Foundation capacity shield hearth and stove
Ede - The Netherlands
Woodstove
Reny
Retro
7,1 KW
≥75%
70 - 75%
65 - 70%
60 - 65%
50 - 60%
<50%
15
Attachment 4: ECO label
RENY
Openhaardenindustrie B.V.
20130803
Table of contents
Popular Wood Stove manuals by other brands

Lopi
Lopi M-520 owner's manual

Osburn
Osburn OB01700 owner's manual

Bronpi
Bronpi Air Series Installation, operating and servicing instructions

Drolet
Drolet Gemini 1200 installation manual

Regency
Regency Cassic F2450M Owners & installation manual

Heta
Heta SCAN-LINE 10 Operating and installation instructions

Ecomaxx
Ecomaxx HT-2000 Operating & installation instructions

KASTOR
KASTOR SAGA-27PK Installation and usage manual

Morso
Morso 1400 Instructions for installation and use

Forno Venetzia
Forno Venetzia TORINO 300 Assembly guide

Nordica
Nordica ROSA REVERSE UL-C Installation and operating instructions

LA NORDICA
LA NORDICA TERMOROSSELLA PLUS EVO DSA 4.0 user manual