manuals.online logo
Brands
  1. Home
  2. •
  3. Brands
  4. •
  5. Renzetti
  6. •
  7. Fishing Equipment
  8. •
  9. Renzetti Traveler 2200 Series User manual

Renzetti Traveler 2200 Series User manual

Renzetti Traveler 2200 Series
Clouser Cam Travele
r
Model #C2102 C-Clamp Vise
Note:
Cam
C2102
Description
End Cap
Crank Arm (Trav.)
Rotary Tension Screw
Clouser rotary shaft
Nylon Flat Washer
Rotary Head (Trav.)
C2102 Parts List
12
10
11
9
290-40271
290-40842
110-00005
8
7
5
6
4
Primary Knob
290-40840
Part No.
290-40269
120-01658
3
2
1
Item
Vise Assembly
1
1
1
25
23
24
22
19
20
21
17
18
16
Item
1
2
1
Qty
Part No.
13
14
15
Rotate
23
Detail 1
22
24
21
Made in the U.S.A. 10/15
25
O-Ring
17
Ball Bearing
2
Description
1
Qty
20
18
19
Lubricate all threads and parts as needed.
Patent #: 5,169,079;6,564,494132;
R#:2,551,441; 2,567,674 TM#: 2,535,148
2
1
16
10
This screw is for setting the
drag. It is not intended to
lock the rotary shaft. Do
not overtighten
4
3
5
2
6
7
15
8
14
9
13
12
11
C-Clamp frame
assembly
Stem
Rotary shaft
Traveler C-Clamp
Lock knob
Cradle support
tension screw
Cradle
Cradle arm
Center line
Cradle support
Cradle arm lock screw
Cradle support collar
Lube O-Ring
Jaw O-Ring
130-03016
Cradle Arm Lock Screw
Cradle Support Collar Assembly
Cradle Support Tens. Screw
1
1
120-01628
110-00006
130-03038
290-40263
110-00003
250-40000
251-40057
290-40264
290-40255
120-01147
Flat washer
Lock knob
Jaw Spring
Cradle Assembly
C-Clamp Frame Assembly
C-Clamp Stem
1
1
1
1
1
1
1
1
Cradle Support
1
1
120-01455
Jaw Mounting Screw
1
110-00042
Jaw Adjusting Screw
1
Primary Jaw
Secondary Jaw
1
Set
130-03018
290-40337
290-40336
290-40313
130-03024
1
220-22030
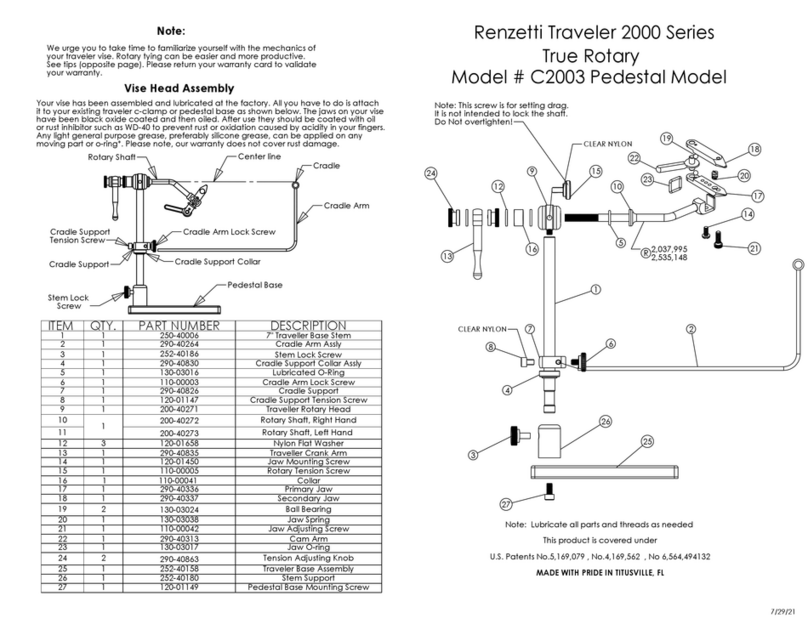
We urge you to take time to familiarize yourself with the mechanics of your
traveler vise. Rotary tying can be easier and more productive. See tips
(opposite page). Please return your warranty card to validate your warranty.
Your vise has been assembled and lubricated at the factory. All you have to do is assemble the
bobbin cradle and attach the vise to the stem. The jaws on your vise have been black oxide
coated and then oiled. After use they should be coated with oil or rust inhibitor such as WD-40
to prevent rust or oxidation caused by acidity in your fingers. Any light general purpose grease,
preferably silicone grease, can be applied on any moving parts or o-ring *.
Please note, our warranty does not cover rust damage.
1. Slide the cradle support collar onto the c-clamp stem with the flat side up as
shown in the diagram.
2. Slide the cradle support onto the c-clamp stem as shown. Use the cradle
support tension screw to add drag to the cradle support as needed.
3. Attach the vise to the c-clamp stem and tighten. Be careful not to cross the
threads when attaching the vise.
4. Slide the cradle arm into the hole in the cradle support and tighten the
cradle arm lock screw to secure the cradle arm. If the cradle is not in a
comfortable position hold the cradle arm firmly and rotate the cradle to the
desired position. See detail 1.
5. Slide the cradle support collar and cradle support up or down so that the
cradle is on or just below the center line of the rotary shaft.
O-ring groove
End cap
4/14 C2100 Back Page
1. When applying dubbing remember to use your rotary action, this allows you to always
be in eye-contact with the area you are wrapping.
2. The secret to palmering a hackle by rotary is the half hitch. After tying in the hackle,
wrap your thread to the point at which you wish to stop the hackle. Then apply a half
hitch. Hang the bobbin from the bobbin cradle. As the hackle is palmered the thread
will roll with the hook. At the end of the palmer let your hackle pliers hang. Pick up the
bobbin, swing the cradle out of the way and tie off the hackle.
3. Remember that a rotary vise makes all sides of your fly viewable by using the rotary
feature of your vise.
For more rotary tying techniques ask your retailer for the Renzetti Rotary Tying Tips video.
Improper Hook Placement
Voids Warranty
1. The most important step of rotary tying is proper positioning
of the hook in the jaw.
2 Always place the hook in the jaw so that the shank of the
hook rotates on the center line of the rotary shaft as shown
in detail 1, detail 2, and detail 3.
3. As hook size increases be sure to place the hook deeper in
the jaws as shown in detail 2 and detail 3
.
3. Never try to hold large hooks at the extreme tip of the jaw
as shown in detail 4. This practice will cause premature
failure of the jaw clamping faces.
4. By placing the shank of the hook close to the center line of
the vise an even distribution of materials is possible.
Back & sides of minnow
Belly of minnow
CENTER LINE
Center Line
Correct
Hook Placement in Jaw
Rotary shaft
Rotary head
Detail 9
Crank arm
Primary Knob
Rotary tension screw
Detail 10
Detail 2
Center Line
Detail 3
Detail 4
Jaw gap
Jaw adjusting
screw
Rotary Tension Adjustment
If desired you can change the amount of drag
against the rotary motion of your vise.
Refer to detail 9.
1. Hold the rotay shaft and the primary knob
closest to the rotary head in one hand.
2. With the other hand loosen the outer most
primary knob a little bit.
3. Either tighten the primary knob closest to the
rotary head to increase tension, or loosen
the knob to decrease tension.
4. Again hold the rotary shaft and the primary
knob closest to the rotary head in one hand
and tighten the end cap.
5. Use the rotary tension screw to stop rotation.
Tips on True Rotary Tying
Maximum clamping position
Incorrect
For the complete line of Renzetti products
and accessories. Please visit our website:
www.renzetti.com
Cam
Cradle
Center Line
Rotary Shaft
Detail 1
Clamp
Detail 5
1: Be sure the cam is fully released. See detail 5.
2: Use the jaw adjusting screw to adjust the gap until the desired hook just slips into the jaws.
See detail 6.
3: To clamp the hook swing the cam to the clamp position. See detail 5.
Note
: There is no need
to exert alot of force on the cam. Simply clampthe hook and test to see if it moves. If it does,
apply a little more force on the cam. Over clamping of hooks can cause the hook to break.
Setting the Jaw Gap
Release
Jaw Adjustment
Correct
Incorrect
Detail 6
O-ring
Note: Do not rotate cam more than 90 Deg. to the jaws(see detail 10) this will
result in less holding power and make it difficult to release the hook.

This manual suits for next models

1

Other Renzetti Fishing Equipment manuals

Renzetti Presentation True Rotary 3000 Series User manual

Renzetti

Renzetti Presentation True Rotary 3000 Series User manual

Renzetti 2000 Series User manual

Renzetti

Renzetti 2000 Series User manual

Popular Fishing Equipment manuals by other brands

Avet Reels Fishing Reel MXJ - 5.8:1 parts list

Avet Reels

Avet Reels Fishing Reel MXJ - 5.8:1 parts list

Clam Dave Genz YUKON THERMAL XT manual

Clam

Clam Dave Genz YUKON THERMAL XT manual

Fisherman's Habit 93719 operating instructions

Fisherman's Habit

Fisherman's Habit 93719 operating instructions

Aquapro Fish Feeders ADF-150DX Product information guide

Aquapro Fish Feeders

Aquapro Fish Feeders ADF-150DX Product information guide

Milwaukee M18 FPFT30 Operator's manual

Milwaukee

Milwaukee M18 FPFT30 Operator's manual

Jiffy 4GLite operating manual

Jiffy

Jiffy 4GLite operating manual

Aqua-Vu Micro Revolution 5.0 user manual

Aqua-Vu

Aqua-Vu Micro Revolution 5.0 user manual

Crivit Outdoor TA-1346 Instructions for use

Crivit Outdoor

Crivit Outdoor TA-1346 Instructions for use

WFT ELECTRA Pro 700 SUPER COMFORT manual

WFT

WFT ELECTRA Pro 700 SUPER COMFORT manual

Eskimo QUICKFISH 4 Assembly and use instructions

Eskimo

Eskimo QUICKFISH 4 Assembly and use instructions

Shimano Calcutta 200B Insruction guide

Shimano

Shimano Calcutta 200B Insruction guide

VEXILAR FL Series owner's manual

VEXILAR

VEXILAR FL Series owner's manual

SKARP S60 user guide

SKARP

SKARP S60 user guide

Cannon DIGI-TROLL 10 owner's manual

Cannon

Cannon DIGI-TROLL 10 owner's manual

Fish-Skull Articulated Shank Getting started

Fish-Skull

Fish-Skull Articulated Shank Getting started

Cannon UNI-TROLL 10 STX-TS user manual

Cannon

Cannon UNI-TROLL 10 STX-TS user manual

Fox Mini Micron user guide

Fox

Fox Mini Micron user guide

Clam Jason Mitchell 200XT PRO THERMAL manual

Clam

Clam Jason Mitchell 200XT PRO THERMAL manual

manuals.online logo
manuals.online logoBrands
  • About & Mission
  • Contact us
  • Privacy Policy
  • Terms and Conditions

Copyright 2025 Manuals.Online. All Rights Reserved.