Restek 22358 User manual

Electronic Crimping Tools
Models 22358
22359
22360
22362
Operation Guide
1

2 Restek Corporation
Notices
© Restek Corporation
Revision B
Printed in USA
Aug-2011
Restek Corporation
Bellafonte, PA
USA
Safety Notices
A CAUTION notice warns of a hazard. It calls
attention to an operating procedure, practice,
or the like that, if not correctly performed or
adhered to, could result in damage to the
product or loss of important data. Do not
proceed beyond a CAUTION notice until the
indicated conditions are fully understood and
met.
WARNING
A WARNING notice warns of a hazard. It
calls attention to an operating procedure,
practice, or the like that, if not correctly
performed or adhered to, could result in
personal injury or death. Do not proceed
beyond a WARNING notice until the
indicated conditions are fully understood
and met.
Recycling
For recycling contact Restek or
your local Restek distributor.
Sound Pressure
Sound pressure LpA = 70.1 dB(A)

Electronic Crimping Tools 3
Electronic Crimping Tools
Operations Guide
Contents
Warnings, Intended Use, Limits 4
Description and Setup 5
Operation 5
Storage and Shipping 9
Fault Conditions 9
Maintenance/Repair 10
This operation manual applies to the following products:
Model Number
11mm Electronic Crimper 22358
20mm Electronic Crimper 22359
11mm Electronic Decapper 22360
20mm Electronic Decapper 22361
Related Parts Item Number
6.4 Volt Lithium Ion Battery 22362

4 Restek Corporation
Warnings
Wear safety glasses when crimping or decapping!
The crimper or decapper jaws can pinch severely.
Never insert fingers into the crimper or decapper.
Use only the 7.5v DC Power Supply supplied with the crimper for battery charging.
Use only the specified 6.4 volt replacement battery pack, part number 22362
Use of other batteries may cause fire during charging or use
Special Battery Warnings:
Risk of burns; battery may explode or catch fire if mishandled.
Do not disassemble or dispose of in fire.
Use only the manufacturer-supplied 7.5 volt DC power supply and charge the
battery only in the crimping tool.
Do not heat above60
⁰
C or short circuit.
Do not crush or modify.
Disposal of Battery
Do not throw battery away. Recycle in accordance with local regulations.
Intended Use
Electronic Crimpers and Decappers are intended for use in a laboratory environment.
Prohibited Use
All other uses are prohibited.
Limits
Temperature 15ºC to 35ºC
Humidity not more than 75%
Pressure 0.75 to 1 bar

Electronic Crimping Tools 5
Description
The Electronic Crimping Tools can be used to crimp and decap standard crimp caps on
laboratory sample vials. A variety of jaw sets are offered to accommodate the most popular sizes.
Crimping Tool Setup
Please read through this entire manual to familiarize yourself with the operation of the instrument
before proceeding. Use the same degree of care as you would with any precision instrument.
Remove the instrument, power supply and cable from the shipping container.
Inspect the crimper or decapper. If there is any visible damage contact your supplier immediately.
Operation
Charging the Battery
The battery must be charged before the crimper or decapper can be used.
The 7.5 volt DC power supply comes with a set of clips to fit power outlets for most countries.
Slide the correct clip into the back of the power supply, and plug the supply into the power main.
Plug the power jack from the DC supply into the crimping tool. After a pause the Battery LED on
the front of the tool will begin blinking green, showing that the charging has started. After 1 to 2
hours the LED will display a steady green light, indicating that the charge is complete.
Disconnect the crimper from the charging supply.
Selecting Compatible Vials, Caps and Seals
Restek electronic crimping tools may not be used with all-steel caps. Aluminum caps or
two-part caps with aluminum sides and seals of standard size and thickness are
appropriate.
Battery LED

6 Restek Corporation
Adjusting Electronic Crimpers for Use
The electronic crimpers must be adjusted for the vials, caps and seals that will be used. The +
and - adjustment buttons on the top of the crimping tool set a stop position for the motor that drives
the tool.
The adjustment of the crimping tool is effectively a height adjustment. The setting determines the
amount of compression of the cap and is very accurate. There may be some drifting over time due
to stretching or wearing-in of components of the new crimper, but generally the reproducibility of
the crimp is as good as the consistency of the vials and seals.
Select 5 or so vials, caps, and seals for the purpose of setting the crimp. Place the seal and cap
on the vial and rest the crimper on top of the cap.
Squeeze the trigger switch lightly to engage the motor. This switch must be held down until the
crimp is complete. If the switch is released early the crimper will retract.
If the Status LED blinks amber after the cycle is complete a fault was detected. Two yellow blinks
means that the trigger button was released early. Three yellow blinks means that the crimper
stalled – it was not able to deliver enough power to reach the position requested in the setting.
Check the crimped vial for satisfactory form and tightness. If the cap spins easily, press the +
button two or three times. Try the new setting with a new vial and cap.
Crimping the same vial two times will not generally give the same results and sometimes will result
in vial breakage. See the section on “Troubleshooting” for more information.
Special considerations for 20mm Headspace vials. It is common practice to use the “twist test” to
check headspace vials for satisfactory crimps. In fact many sealing systems hold pressure
perfectly well so long as the seal is well compressed.

Electronic Crimping Tools 7
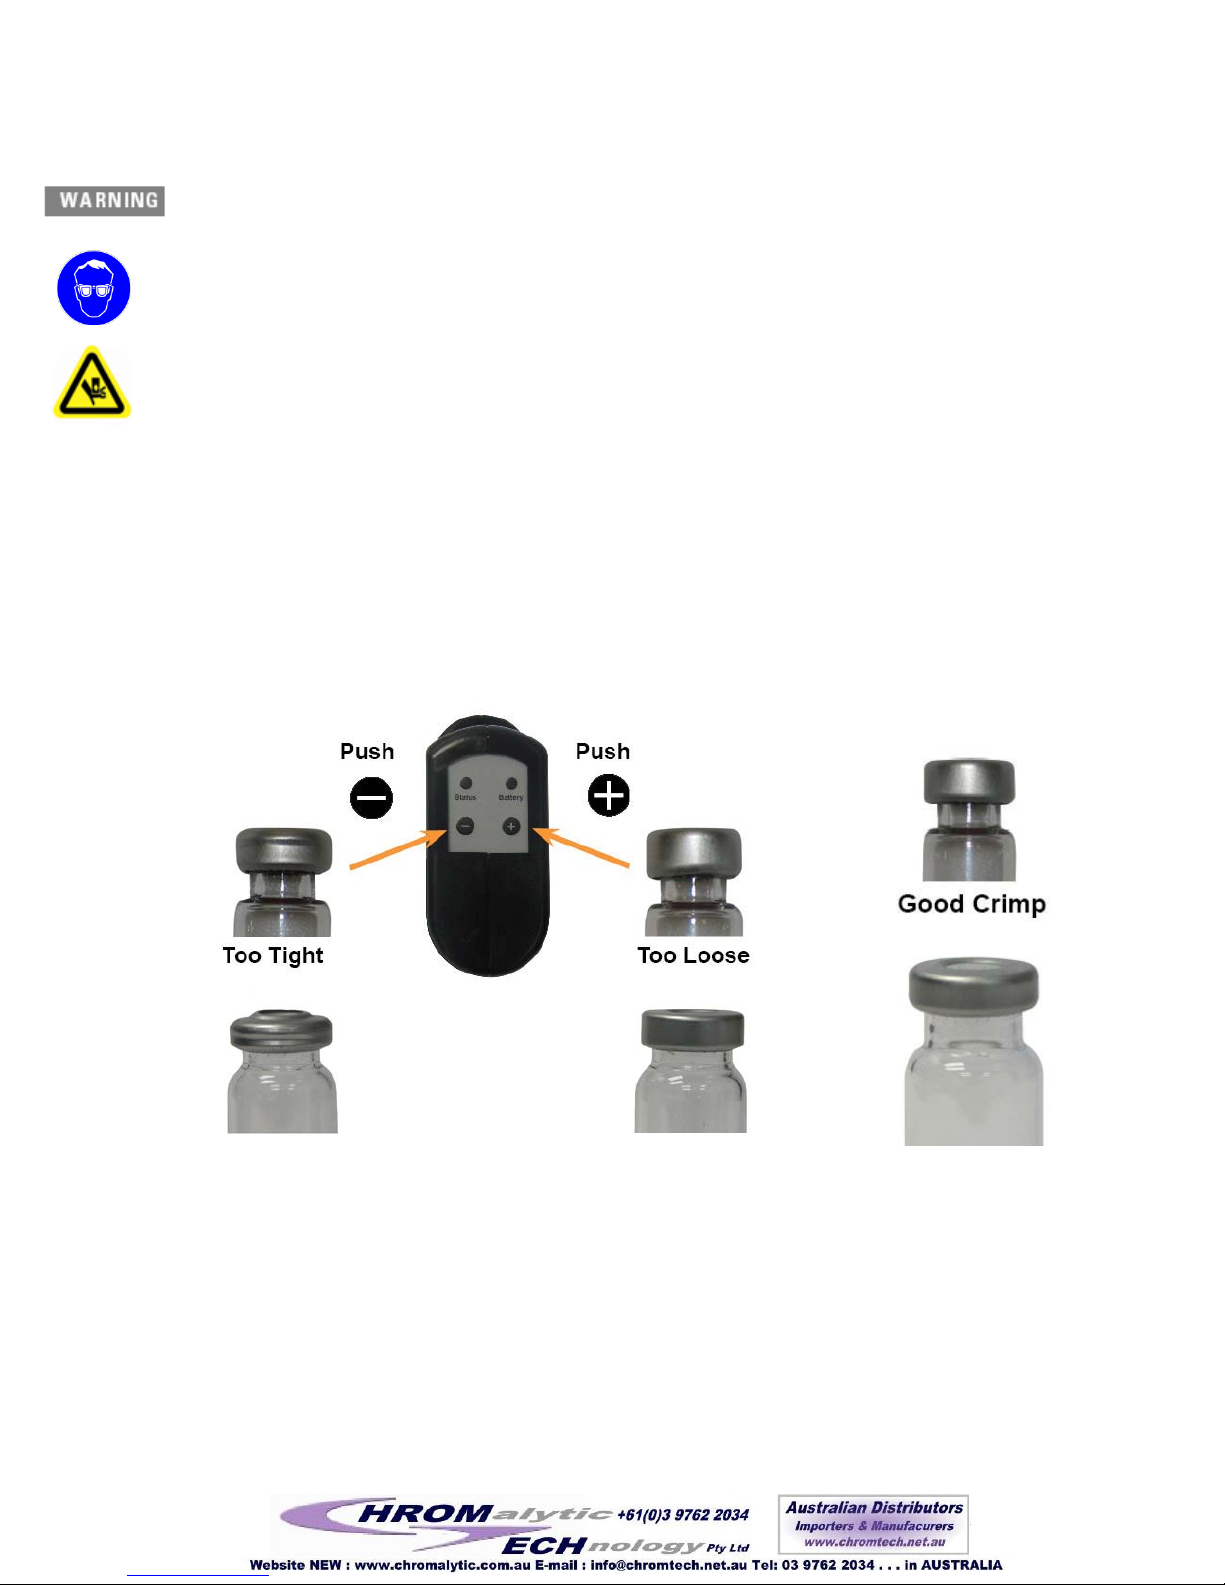
Adjusting Electronic Decappers for Use
The adjustment is not very important when decapping. As shipped from the factory the decapper
should remove a cap satisfactorily.
The 11mm decappers work by closing the jaws around the neck of the vial and stripping the cap
off. For the 11mm decapper to work the glass vial must be strong enough to resist the force
applied by the decapper. In the case of inferior or soft glass or if a vial is reused the lip of the vial
may break during decapping.
To adjust the 11mm decapper make sure that the stroke is long enough to remove the cap.
The 20mm decapper works by pinching the sides of the cap with the decapper jaws and pushing
out the glass. The pinching action starts to pull the cap off, and the force of the decapper does
the rest of the work.
To adjust the 20mm decapper, just make sure that the stroke is long enough to remove the cap.
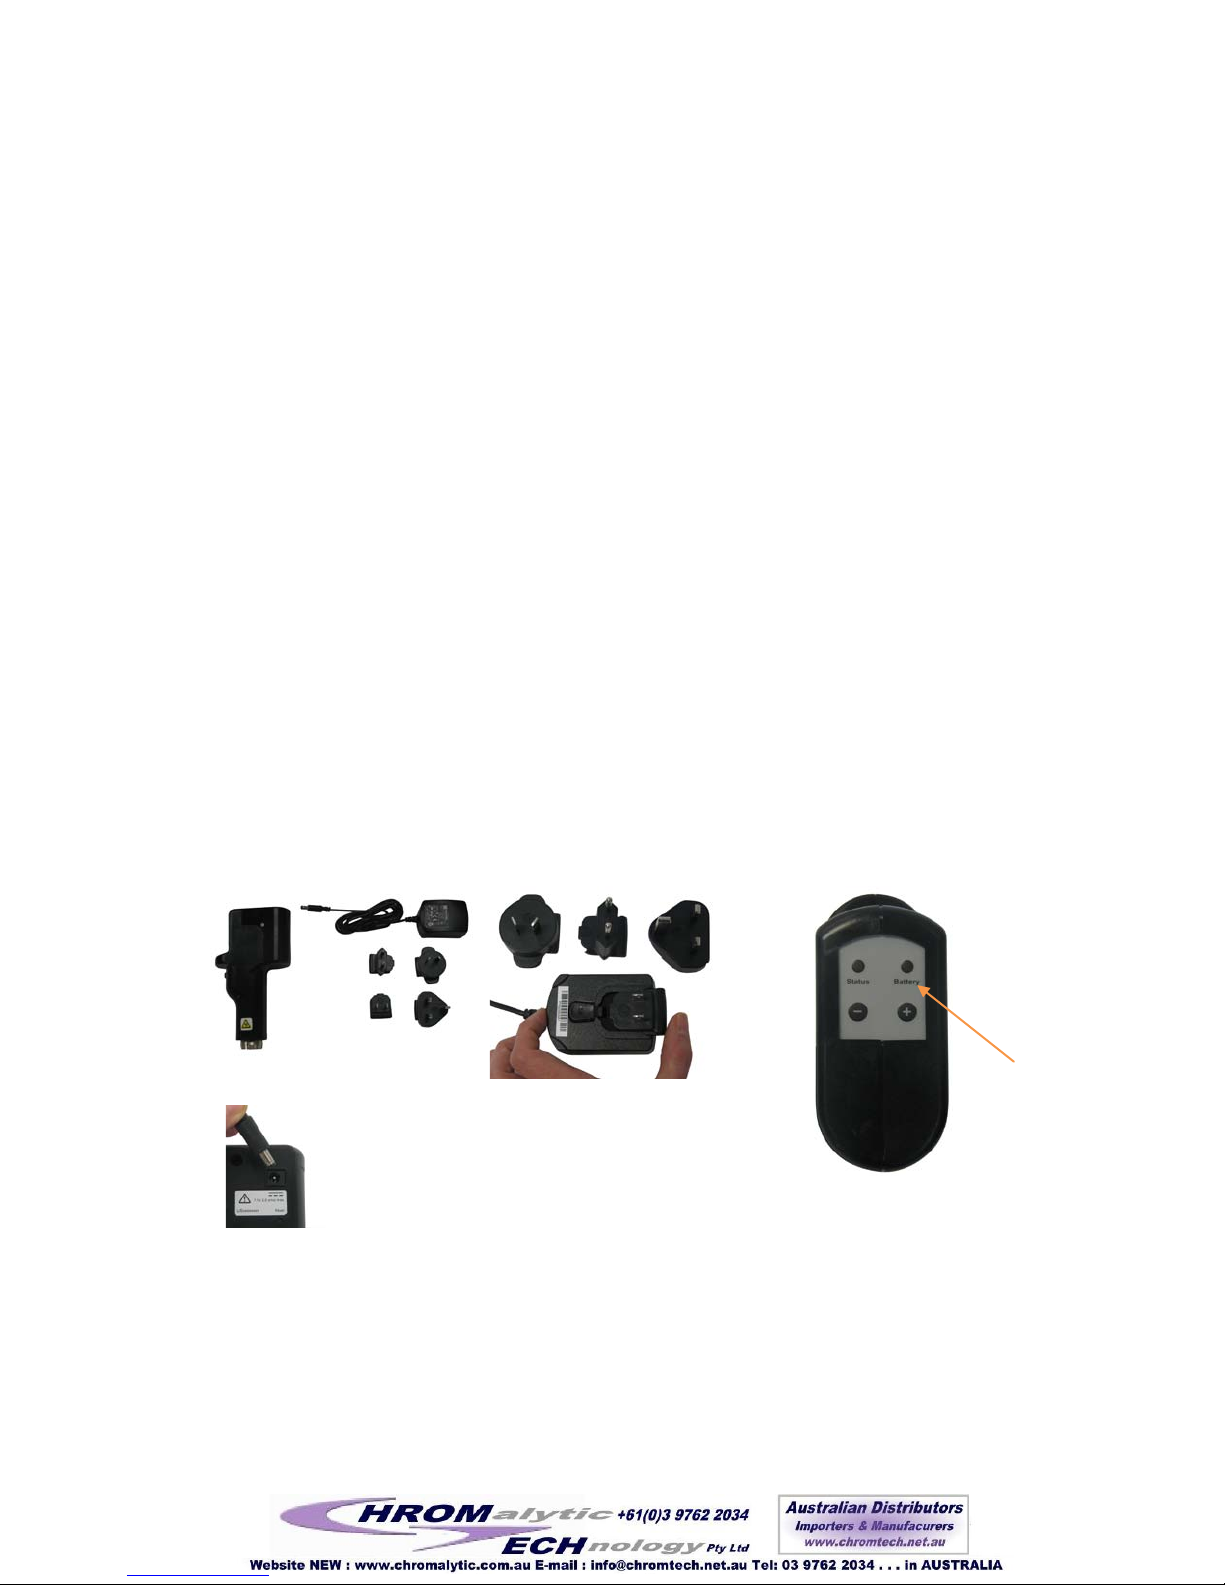
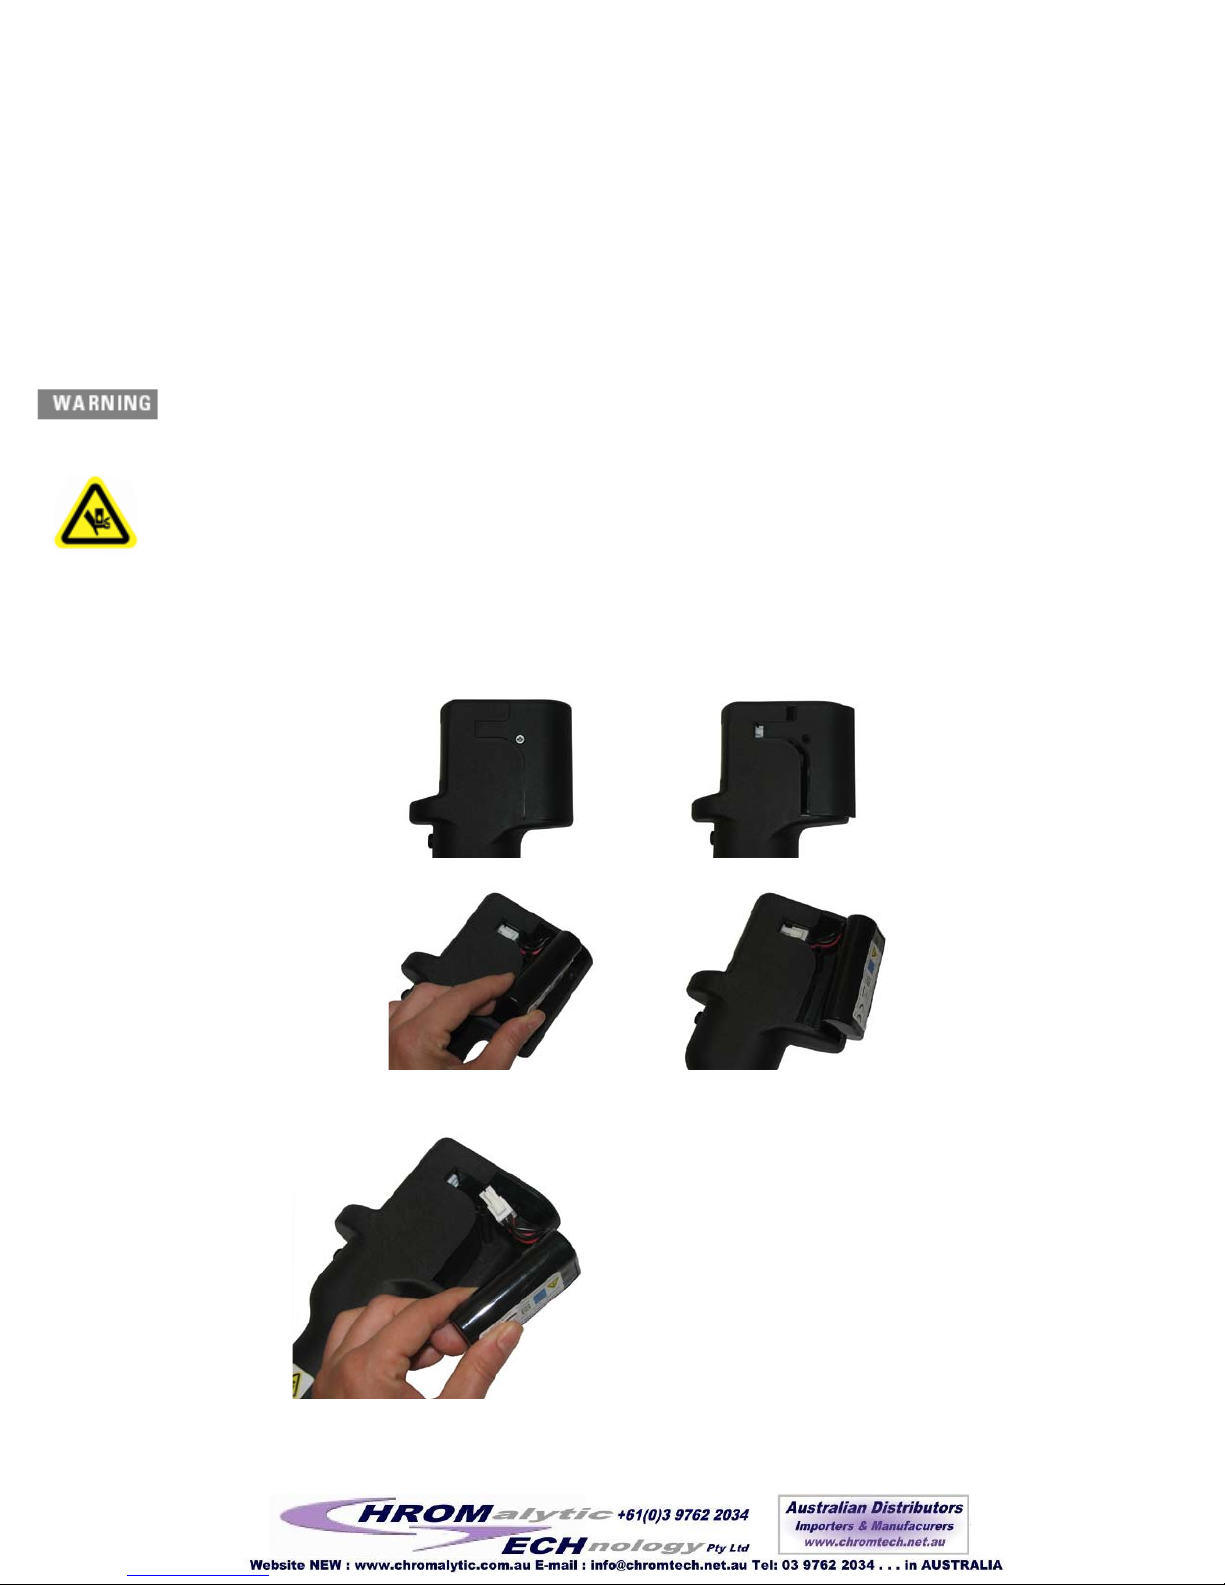
When to Recharge the Battery
The 6.4 volt battery pack for the electronic crimper uses lithium ion cells. After receiving a full
battery charge the electronic crimper or decapper will normally crimp several hundred vials,
depending on the age of the battery and the requirements of the seal and cap chosen.
Unless the crimper is used for a large number of vials each day it is not necessary to recharge
the battery every night. The lithium ion pack will retain its charge for many weeks without losing
its charge.
The Battery LED will blink amber during the crimp stroke if the battery needs charging.
The lithium ion battery pack is expected to last at least 1500 charges. The pack should not be
removed from the crimping tool unless it is due for replacement.
See the instructions on page 5, “Recharging the Battery” for further instructions.
Battery Status LED

8 Restek Corporation
Reset
To press the reset button use the end of a small tool to access the recessed button.
Single Reset: Pressing the reset button one time causes the position sensor to be set to zero
and resets the processor.
Factory Reset: This requires pressing the reset button while both the + and – buttons are also
down. The green LED will blink one time and the crimping tool is returned to the factory setting.
This is useful to find a consistent starting point for adjusting the crimping tool if it is far out of
adjustment.
Reset

Electronic Crimping Tools 9
Storage and Shipping
Place protective cap over the jaws to prevent accidental cycling when storing or
shipping the tool.
Fault Conditions
Major and minor faults are identified by LED signals, normally after a crimp cycle.
LED Fault Code Possible Cause Recommendation
Status
3 Amber
Blinks after
crimp
Stall Condition –
Crimp Setting is too
high.
Adjust crimper to a lower
crimp setting.
Stall Condition –
Battery does not have
sufficient charge.
Recharge battery.
Status
2 Amber
Blinks after
tool cycles
Early trigger release –
the tool retracted
before completing
cycle.
Try again, making sure to
hold the button down until
the tool is returning to the
home position.
Status
3 Amber
Blinks – but
tool does not
cycle.
Motor drive failure
See Maintenance / Repair
section for contact
information for warranty
and repair service
information
Battery
Continuous
amber blink
when charger
is plugged in
Charge Circuit Failure
See Maintenance / Repair
section for contact
information for warranty
and repair service
information
Battery
Amber blink
during crimp
cycle
Battery needs to be
charged
Charge battery
Battery
One blink after
Go button is
pressed (no
cycle occurs)
Battery is too low for
crimper cycle.
Charge battery

10 Restek Corporation
Troubleshooting, Maintenance, and Repair
General Maintenance
The electronic crimper tools do not contain user serviceable parts except for the battery pack.
When cleaning or replacing the battery make sure to keep fingers away from the jaws!
Cleaning
The crimping tool may not be immersed in water or solvent. The outside of the case may be
cleaned with an ordinary detergent and wiped off with a damp rag. Care should be taken not to
get the electronics, the battery, or the battery connections wet.
Avoid permitting metal parts of the crimping tool come into contact with corrosive material
during use. If they do, try to wipe them clean with a suitable mild neutralizing solution.
Battery Replacement
Use only the specified 6.4 volt replacement battery pack, part number 22362. Use of
other batteries may cause fire during charging or use
1) Remove screw holding
the battery cover in place,
4) Push down on
connector latch and
pull battery loose
from the board.
3) Pull battery out of case,
leaving wire connected.
5) Connect new battery to board, making sure the latch is
secure. Push battery into case, bending the wires if
necessary.
6) Slide the cover back into the case and replace the
retaining screw.
2) Remove battery cover

Electronic Crimping Tools 11
Troubleshooting
Condition Possible Cause Recommendation
Side of cap is indented.
Seal is deformed in
hole.
Crimp setting is too
high. The crimp is
too tight.
Adjust crimper to a lower crimp setting.
Cap spins easily.
Crimp setting is too
low. The crimp is
too loose
Adjust crimper to a higher setting by
pressing the plus button.
Cannot find a good
crimp setting.
The crimper is far
out of adjustment.
Return crimper to factory setting. See
“Reset” above.
Crimping is
inconsistent. Some
vials are good and
some are not.
Vials, caps or seals
are inconsistent. Check crimper by using some standard,
approved, vials caps and seals.
Electronic failure in
crimper.
Visit www.restek.com
for support information.
11mm decapper leaves
caps hanging on vials
Decapper
adjustment is too
low.
Adjust the decapper to a higher setting
by pressing the plus button.
Jaws are worn or
broken The decapper will have to be replaced or
repaired. Visit www.restek.com
for support information.
Motor does not come
on or moves in one
direction only.
Drive circuit failure.
Visit www.restek.com
for support information.
Battery Charging is too
short; battery does not
get a full charge
Early termination
by charging circuit.
Leave crimping tool on charger overnight.
Allow trickle current to bring battery to full
charge.
Battery is worn out
Replace battery. Battery is rated to
deliver 60% of capacity after 1500
charges.
Support and Repair
If the crimping tool is still in the warranty period, contact your dealer for support. If the warranty
period has expired, please visit www.restek.com for information about the crimper repair
service.
This manual suits for next models
3
Table of contents