Retevis RA26 User manual

RA26
Instruction Manual
Add: 7/F, 13-C, Zhonghaixin Science&Technology Park, No.12 Ganli
6th Road, Jihua Street, Longgang District, Shenzhen, China
Web: www.retevis.com
E-mail: [email protected]
Facebook: facebook.com/retevis
Shenzhen Retevis Technology Co.,Ltd.
RA26
EN
VHF Marine Radio

i
¾·ÄÁÏÅ˼ÅÈÆËȹ¾·É¿Ä½Ê¾¿É÷ȿĻȷº¿ÅƔÅËÍ¿ÂÂŰĺʾ»
professional and humanized design of the radio during using.
Please read all instructions carefully and completely before
using the radio.
It is a multifunctional and well-designed marine radio which
meets the IMO (International Maritime Organization) regula-
tion.
As adopting advance waterproof technology, the radio is with
½ÅÅºÍ·Ê»ÈÆÈÅżƻȼÅÈ÷Ĺ»Ƒ¹·ÄŲÅ·Ê·ÄºŲ·É¾·Â·ÈÃ;»Ä
drops into the water.
CAUTION
• The power supply of this radio is DC 3.7V. Please
Ëɻʾ»Â¿Ɩ¿Åĸ·ÊÊ»ÈϷɹÅÄŰ½ËÈ»ºƔ
• The radio should be charged by the configured
adaptor.
• Do not expose the radio to direct sunlight for a long
time. Do not place it in environment or near any
heating devices below -20°C or above +55°C.
• Stop using and contact the local dealer if the radio
emits strange odor or smoke.
• Do not transmit without antenna installed, or the de-
vices will be damaged.
• Please power off in flammable and explosive envi-
ronment.
• Keep the radio at least 1 meter away from your ves-
sel’s magnetic navigation compass.
• The radio meets IPX7 waterproof requirement. How-
ever, once the radio has been dropped, waterproof
protection cannot be guaranteed because of possi-
ble damage to the radio’s sealed structure.
• Make sure the radio antenna, earphone jack cover
and battery cover are dry before attachment. Or the
radio inner components will be damaged.

ii iii
SUGGESTION
Clean the radio thoroughly with fresh water after exposure to
salt water. Dry it before operating. Otherwise the radio keys
and control components may be unusable due to salt crystal-
lization.
DO NOT submerge the radio in water. The waterproof protec-
Ê¿ÅÄ÷ÏÄÅʸ»»Ů»¹Ê¿Ì»¿¼Ê¾»È·º¿ÅÈ˸¸»ÈȿĽż»·ÈƾÅÄ»
cover or DC jack cap is damaged in unexpected accident.
Please contact the local dealer if they are damaged.
FEATURES
Water-resistant and Float
The radio water-resistant protection meets IPX7 require-
ments. Can be 1 meter depth in water for 30 minutes. The
È·º¿Å¹·ÄŲŷʿļȻɾÅÈÉ·ÂÊÍ·Ê»ÈͿʾʾ»Éʷĺ·Èº·¹¹»É-
sories-battery, belt clip and antenna.
When a third-party battery, belt clip and antenna etc. are
used, the radio may sink.
Flash Alarm
The radio will float, make alarm sound and send out auto-
matic flash alarm when drops into the water. As the LED
¿½¾Êطɾ¿Ä½Ƒʾ»È·º¿Å¹·Ä¸»»·É¿ÂÏÈ»ÊÈ¿»Ì»ºÊÅÉËÆÆÅÈÊʾ»
emergent rescue. This function works even the radio is pow-
»È»ºÅŮƔ
Flash Warning
Light
Alarm Sound
Flash Warning Light
CONTENTS
PREPARATION
Standard Accessories..................................................1
Preparation....................................................................1
Charging the Battery Pack.........................................1
Install/Remove Antenna.............................................2
Install Belt Clip...........................................................2
GET AQUAINTED
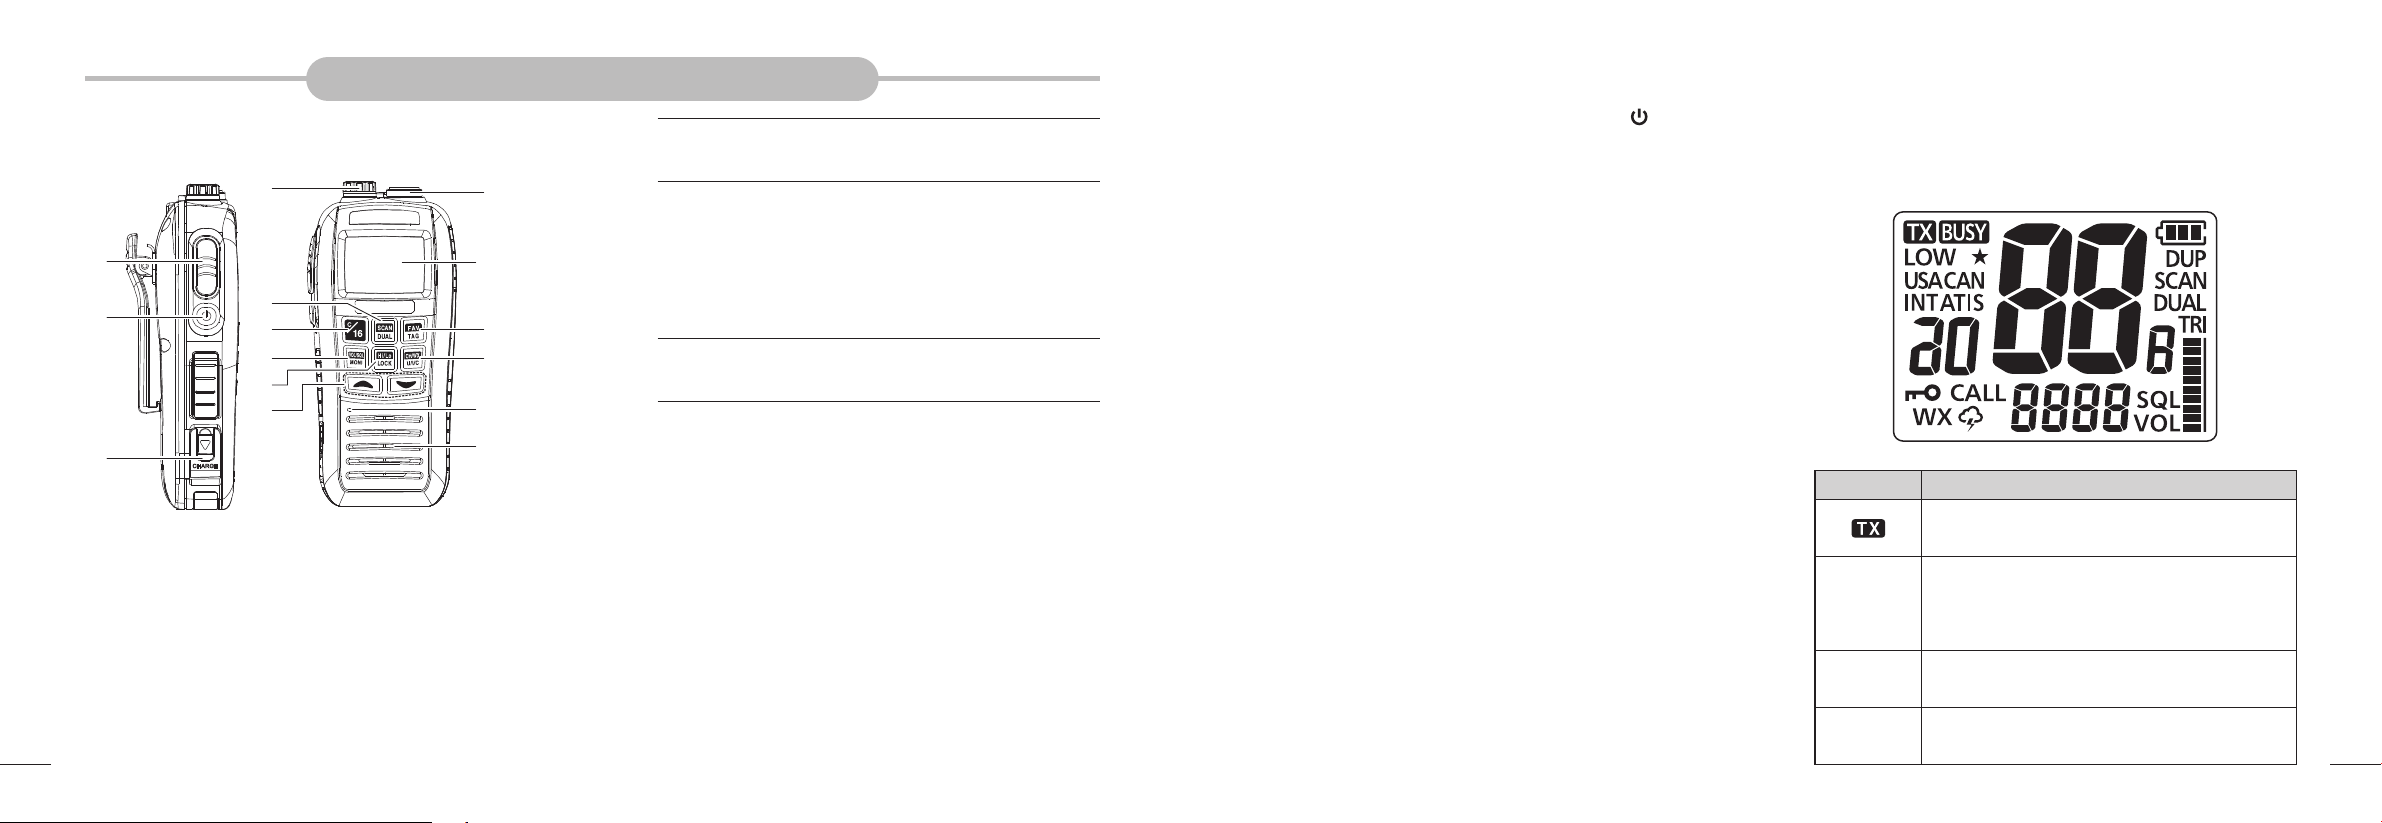
Appearance ...................................................................3
Display ...........................................................................4
BASIC OPERATION
Power ON/OFF...............................................................6
Adjust the Volume Level...............................................6
Adjust the Squelch Level .............................................6
Transmit and Receive ...................................................6
Transmit.....................................................................6
Receive .....................................................................6
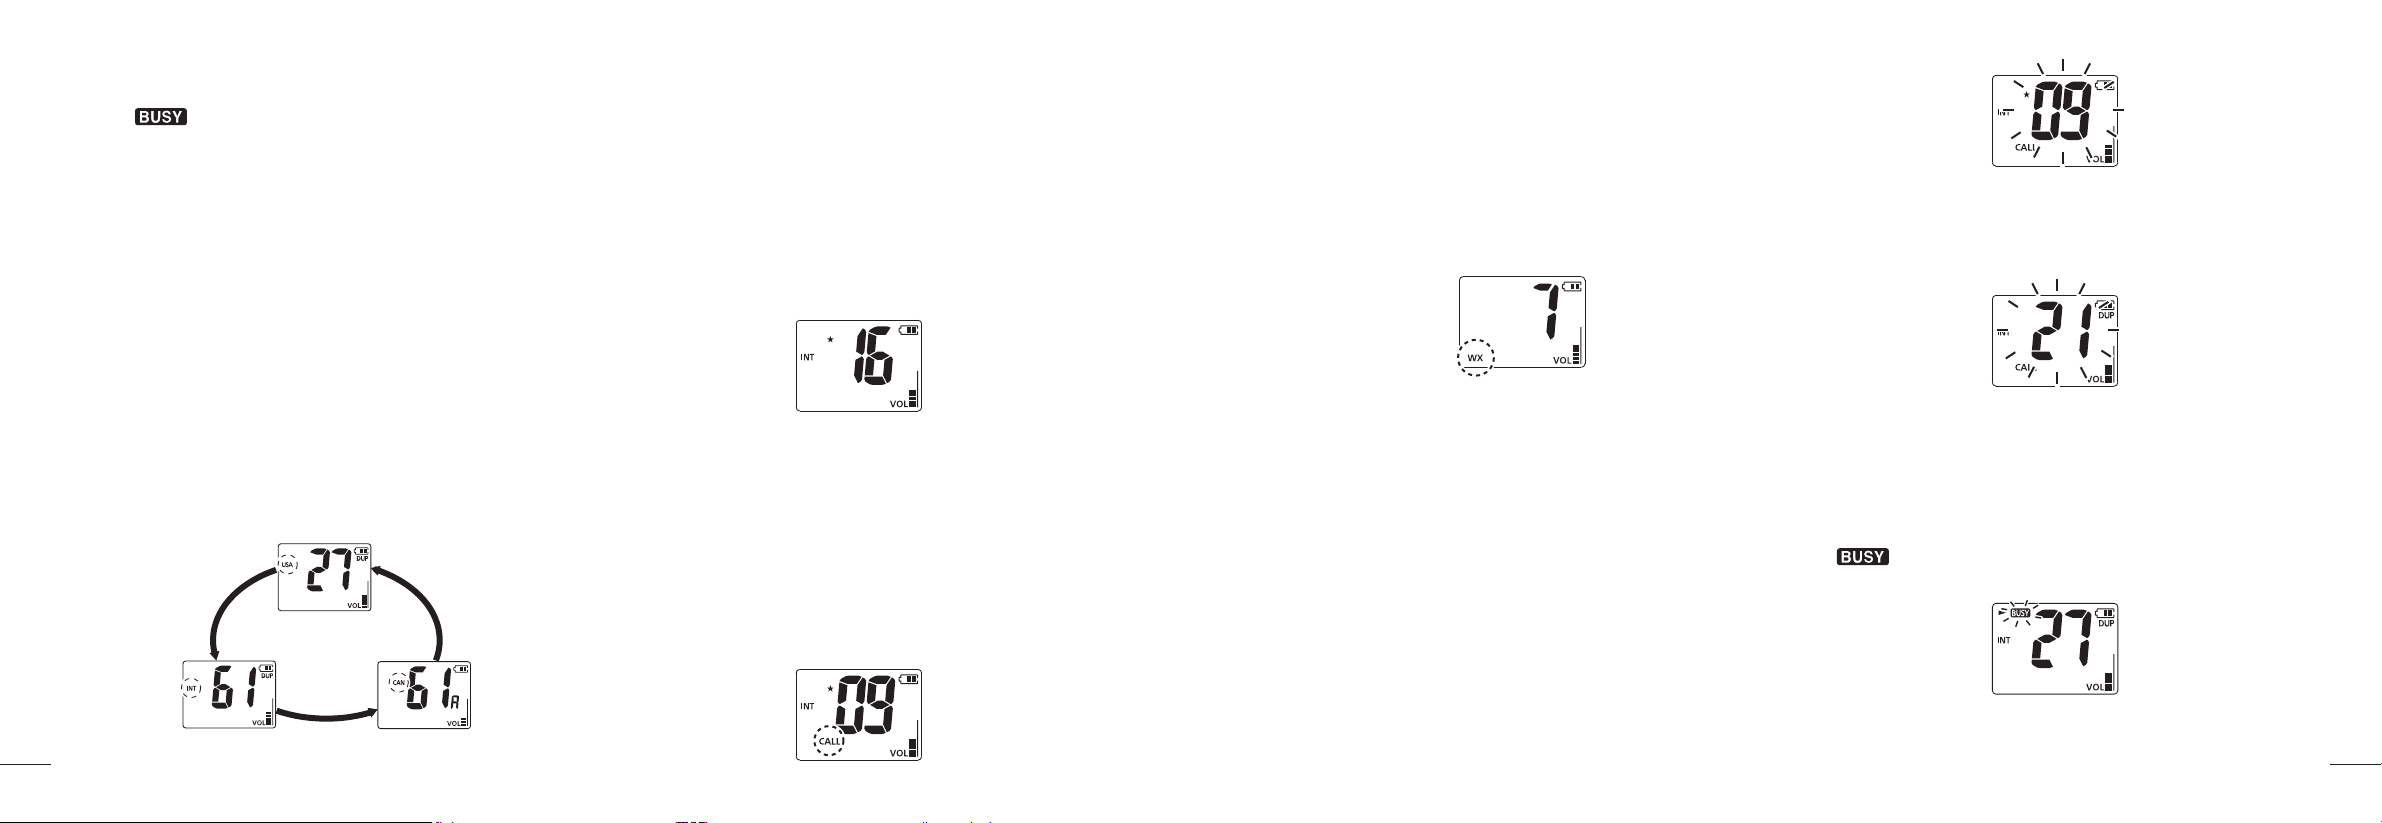
Select Channel Group ..................................................7
Select Channel..............................................................7
Channel 16 ................................................................ 7
CALL Channel ...........................................................7
Weather Channel.......................................................8
Edit CALL Channel ......................................................8
Monitor Function...........................................................8
Volume Maximum Function .........................................9
Volume Mute Function..................................................9
Automatic Backlight .....................................................9
Key Lock ........................................................................9
Vibration Water Draining Function..............................9
SCAN OPERATION
Scan Types ..................................................................10
Set TAG Channels .......................................................10
Set/Cancel Single TAG Channels ............................10
Set/Cancel All TAG Channels ..................................10
Scan Operation ...........................................................10
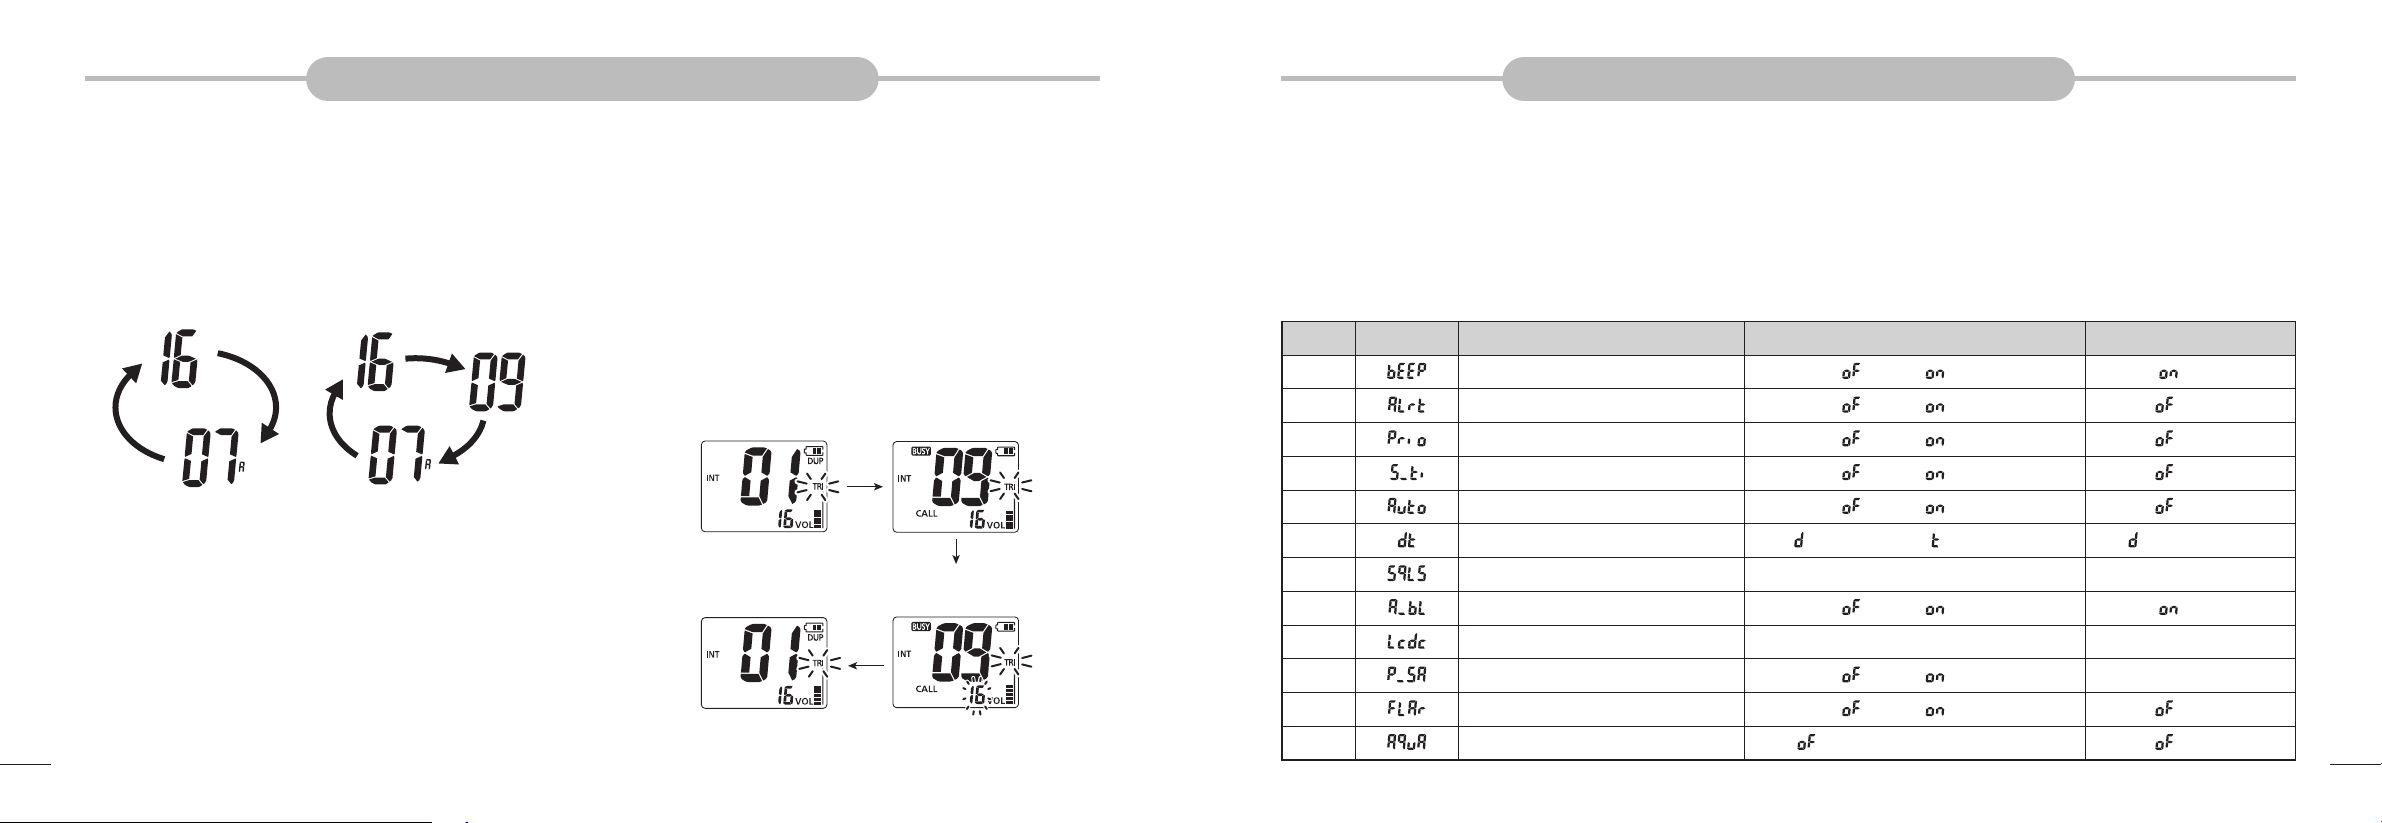
DUAL/TRI WATCH
Description..................................................................11
Operation.....................................................................11
SET MODE
Set Mode Operation....................................................12
Set Mode Items ...........................................................13
VHF Marine Channel List ...........................................15
SPECIFICATION ..........................................................16
TROUBLESHOOTING..................................................17

1 2
PREPARATION
■Standard Accessories
Carefully unpack the radio. We recommend that you identify
items listed in the following table before discarding the pack-
ing materials. If any item is missing or has been damaged,
please contact the dealer immediately.
Items Quantity
Antenna 1
AC Adaptor 1
Belt Clip (With Screws) 1
Hand Strap 1
Instruction Manual 1
■Preparation
DCharging the Battery Pack
1. Connect the adaptor to AC power.
2. Open the radio charging port cover. Connect the adaptor
with the radio USB charging port to start charging. LCD
appears “ ” indicates charging.
Power Adaptor
AC Outlet
Charging Port
3. If the battery is full charging, LCD appears “FL”. You
should remove the adaptor.
• If you do not insert the battery pack while charging, the
LCD appears “Er”.
4. Charge by Other Power Supplies
• Charge by computer USB port
NOTE: Few computers do not meet the voltage and cur-
rent as required.
Charging Port
Normal USB Cable(Micro-B)
• Charge by Micro-B adaptor
NOTE: The power supply output should be 5V/1A.
Charging
Port
Power Bank
AC Adaptor
Car Charger
DInstall/Remove Antenna
1. ÅÄÄ»¹Êʾ»ÉËÆÆÂ¿»ºŰη¸Â»·ÄÊ»ÄÄ·ÊÅʾ»·ÄÊ»ÄÄ·¹ÅÄ-
nector, rotate it clockwise until it is tight.
2. To remove it, rotate it counter clockwise.
DInstall Belt Clip
1. Attach the belt clip to radio rear cover. Ensure the screw
holes are aligned.
2. Screw tightly using Phillips screwdriver.

3 4
GET AQUAINTED
■Appearance
PTT
MI C
CH AR GE
Loudspeaker
Microphone
LCD Display
[PTT] Key
• Hold down [PTT] to transmit. Speak with normal tone.
• Release [PTT] to receive.
Power Key
• Hold down this key for 1 second to power on/off the
radio.
Charging Port
• Push down to open the charging port.
• The USB port is for charging only. Cannot support data
communications.
NOTE: Ensure the cover for the DC charging connector
¿É·ůλºÊ¿½¾ÊÂÏÊÅ·ÌÅ¿ºÍ·Ê»È¿Ä½È»ÉÉƔ
Earphone Jack (SP/MIC)
• External earphone/microphone jack.
• Revolve the jack counter clockwise to open. Revolve
clockwise to close.
• This jack can be connected with computer for data com-
munication through programming cable.
NOTE: ÄÉËȻʾ»¹Å̻ȼÅÈʾ»»·ÈƾÅÄ»À·¹Á¿É·ůλº
tightly to avoid water ingress.
[SCAN]/[DUAL]
• Press to start or stop scan mode (including normal and
priority scan).
• Hold on 1 second to enter the Dual or Tri-watch mode.
• Push to exit the watch mode.
• Hold this key and [HI/LO] key for 1 second to activate
the Vibration Draining Function.
[C/16]
• Press to select Channel 16.
• Hold for 1 second to select Call Channel.
• The factory default for Call Channel is Channel 9.
• When the Call Channel is selected, hold for 3 seconds
to enter the Call Channel programming mode.
• While in the set mode, press this key to exit.
[VOL/SQL]/[MONI]
• Press to enter the volume adjustment mode. Press again
to enter the squelch adjustment mode.
• Hold for 1 second to active the Monitor Function.
• źʾ¿ÉÁ»Ï;¿Â»ÆÅÍ»ÈÅŮƔÈ»ÉÉ[ ] at the same
time to power on and enter the set mode.
• While in the set mode, press to select set items.
• While holding this key, press [Z]to turn on the Volume
ËÊ»ËĹʿÅÄƔ»Æ»·Ê·½·¿ÄÊÅÊËÈÄÅŮʾ¿É¼ËĹʿÅÄƔ
[Hi/Lo]/[LOCK]
• Press to select high or low output power.
• ź¼ÅÈʸÉ»¹ÅĺÊÅÊËÈÄŹÁËĹʿÅÄÅÄÅÈÅŮƔ
[Y]/[Z]
• Press to select operation channel.
• While in the set mode, press to select the items.
• While in channel scan, press to change the scan direc-
tion.
Antenna Connector
• ÅÄÄ»¹ÊͿʾʼʷǣÉËÆÆÂ¿»º·ÄÊ»ÄÄ·Ɣ
[FAV]/[TAG]
• Press to sequentially select the favorite (TAG) channel
while ignoring untagged channel.
• Hold for 1 second to set or clear the TAG channel.
• Hold this key and power on to clear or set all TAG chan-
nels.
[CH/WX]/[U/I/C]
• Press this key to select normal channel or weather chan-
nel.
• Hold for 1 second to select USA Channel, International
Channel or Canada Channel.
■Display
There are several kinds of symbols on the LCD display. Each
symbol represent one meaning. Knowing these meaning
helps the operation.
ICON DESCRIPTION
Appear while transmitting.
LOW
Appear while selecting low power.
"LOWͲطɾ»É;»Ä¼Åȹ»ºÊÅɻ»¹ÊÂÅÍÆÅÍ-
er because of battery low voltage or radio high
temperature etc.
ATIS Appear while working in ATIS Channel.
USA Select USA Channel.
Table of contents
Other Retevis Marine Radio manuals