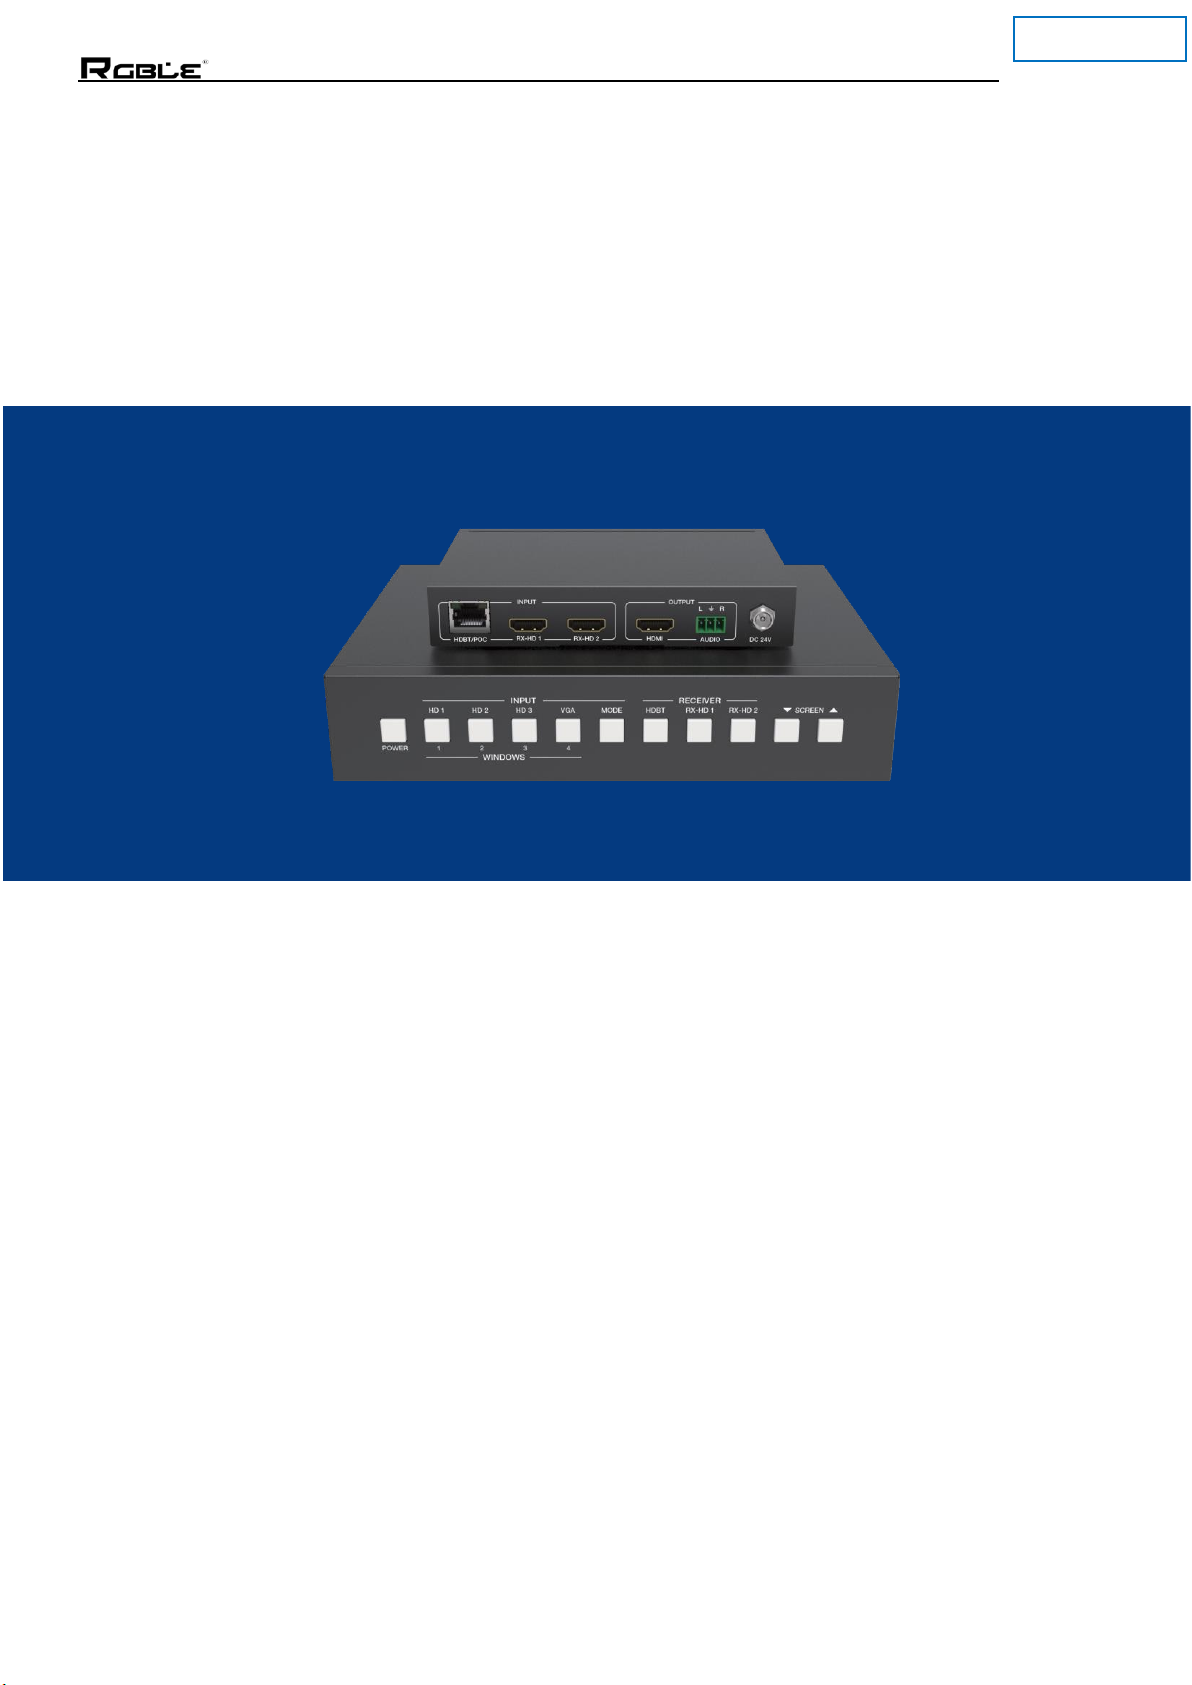
RGBLE S00303 User manual

Stock Code 873117 en.rgble.com 400-1661-021 0/ 29
P/N: S00303
6x2 4K30
Presentation Switcher
with Control and Video Processing
User Manual
VER 1.0

Stock Code 873117 en.rgble.com 400-1661-021 1/ 29
P/N: S00303
Thank you for purchasing RGBLE product
For optimum performance and safety, please read these instructions carefully before
connecting, operating or adjusting this product. Please keep this manual for future reference.
Surge protection device recommended
This product contains sensitive electrical components that may be damaged by electrical spikes,
surges, electric shock, lighting strikes, etc. Use of surge protection systems is highly
recommended in order to protect and extend the life of your equipment.
Table of Contents
1.
Introduction.
……………………………….………………………………………………………
2
2.
Features.
…………………………………….………………………………………………….…
2
3.
Package Contents.
………….……………………………………………………………………
3
4.
Specifications.
…………………………………………………………………………………….
3
5.
Operation Controlsand Functions.
………………………………………………………………
5
5.1
Transmitter Panel.
………………………………………………………………………………
5
5.2
Receiver Panel.
………………………………………………………………………………..
8
6.
Display Mode.
…………………………………………………………………………………….
9
7.
Web GUI User Guide.
……………………………………………………………………………
10
8.
API Control Command.
…………………………………………………………………………..
20
9.
Application Example.……………..
……………………………………………………….……..
27
10.
Product Images………………………………………………………………………….……..28

Stock Code 873117 en.rgble.com 400-1661-021 2/ 29
P/N: S00303
1. Introduction
HD Video/Audio Processor is a product that solves high-definition video / audio signal transmission,
switch and control with integration operation. This product can switch any of these six HDMI sources
to one HDMI display, and supports four sorts switch mode. It can extend HDMI / VGA HD signal,
USB, network and IR control signal up to 100 meters / 329ft distances via a single CAT 5e/6 cable
between transmitter and receiver, and realizes zero latency and uncompressed long-distance
transmission from source to display device. The HDMI and VGA video resolution are up to
4K2K@30Hz and 1920×1200 @60Hz separately.
This product has flexible combination, high compatibility, good scalability. It adopts integrated
design that supports HD video / audio signal input, control, transmission and system management.
The product is used more convenient than others product because it can control related peripherals
equipment synchronously such as display terminal switch, projector curtain, etc. to improve
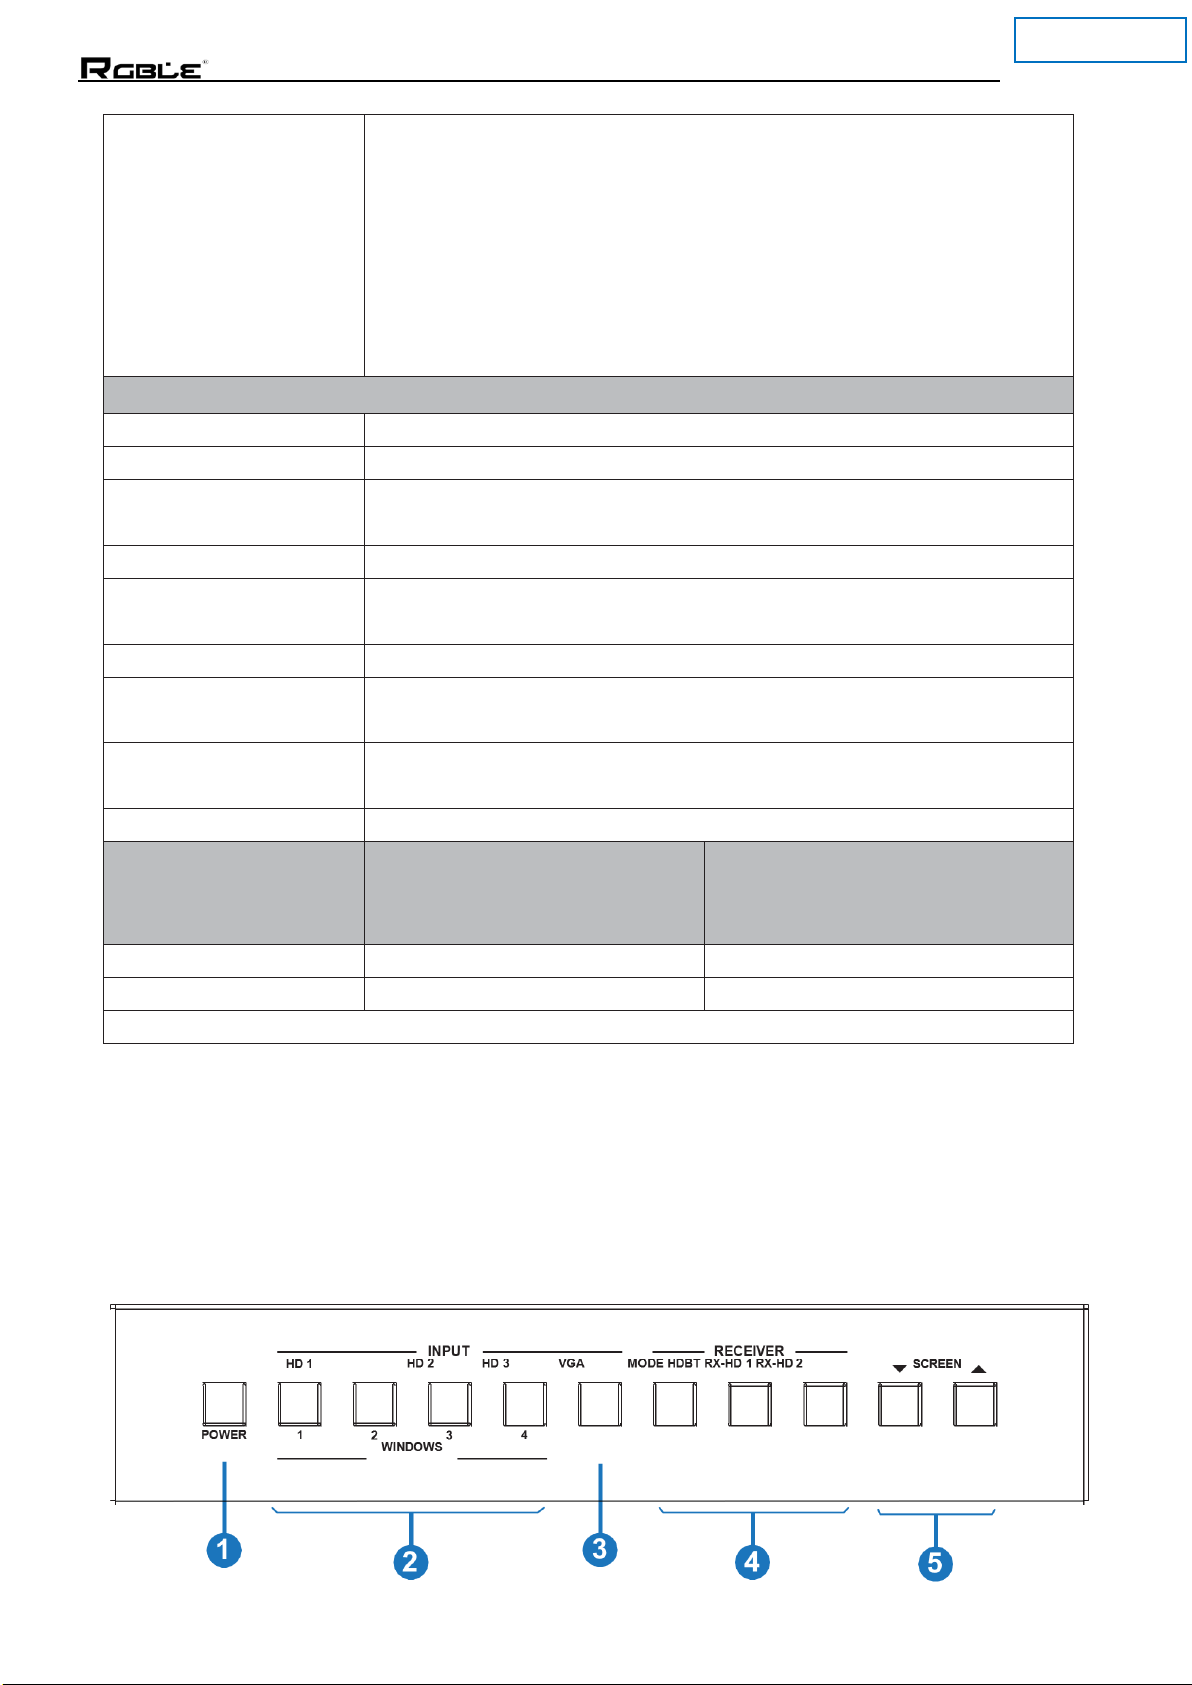
conference or work efficiency. The product supports front panel Keys,
RS-232 and Web GUI control.
2. Features
●
HDMI 1.4, HDCP 1.4 compliant
●
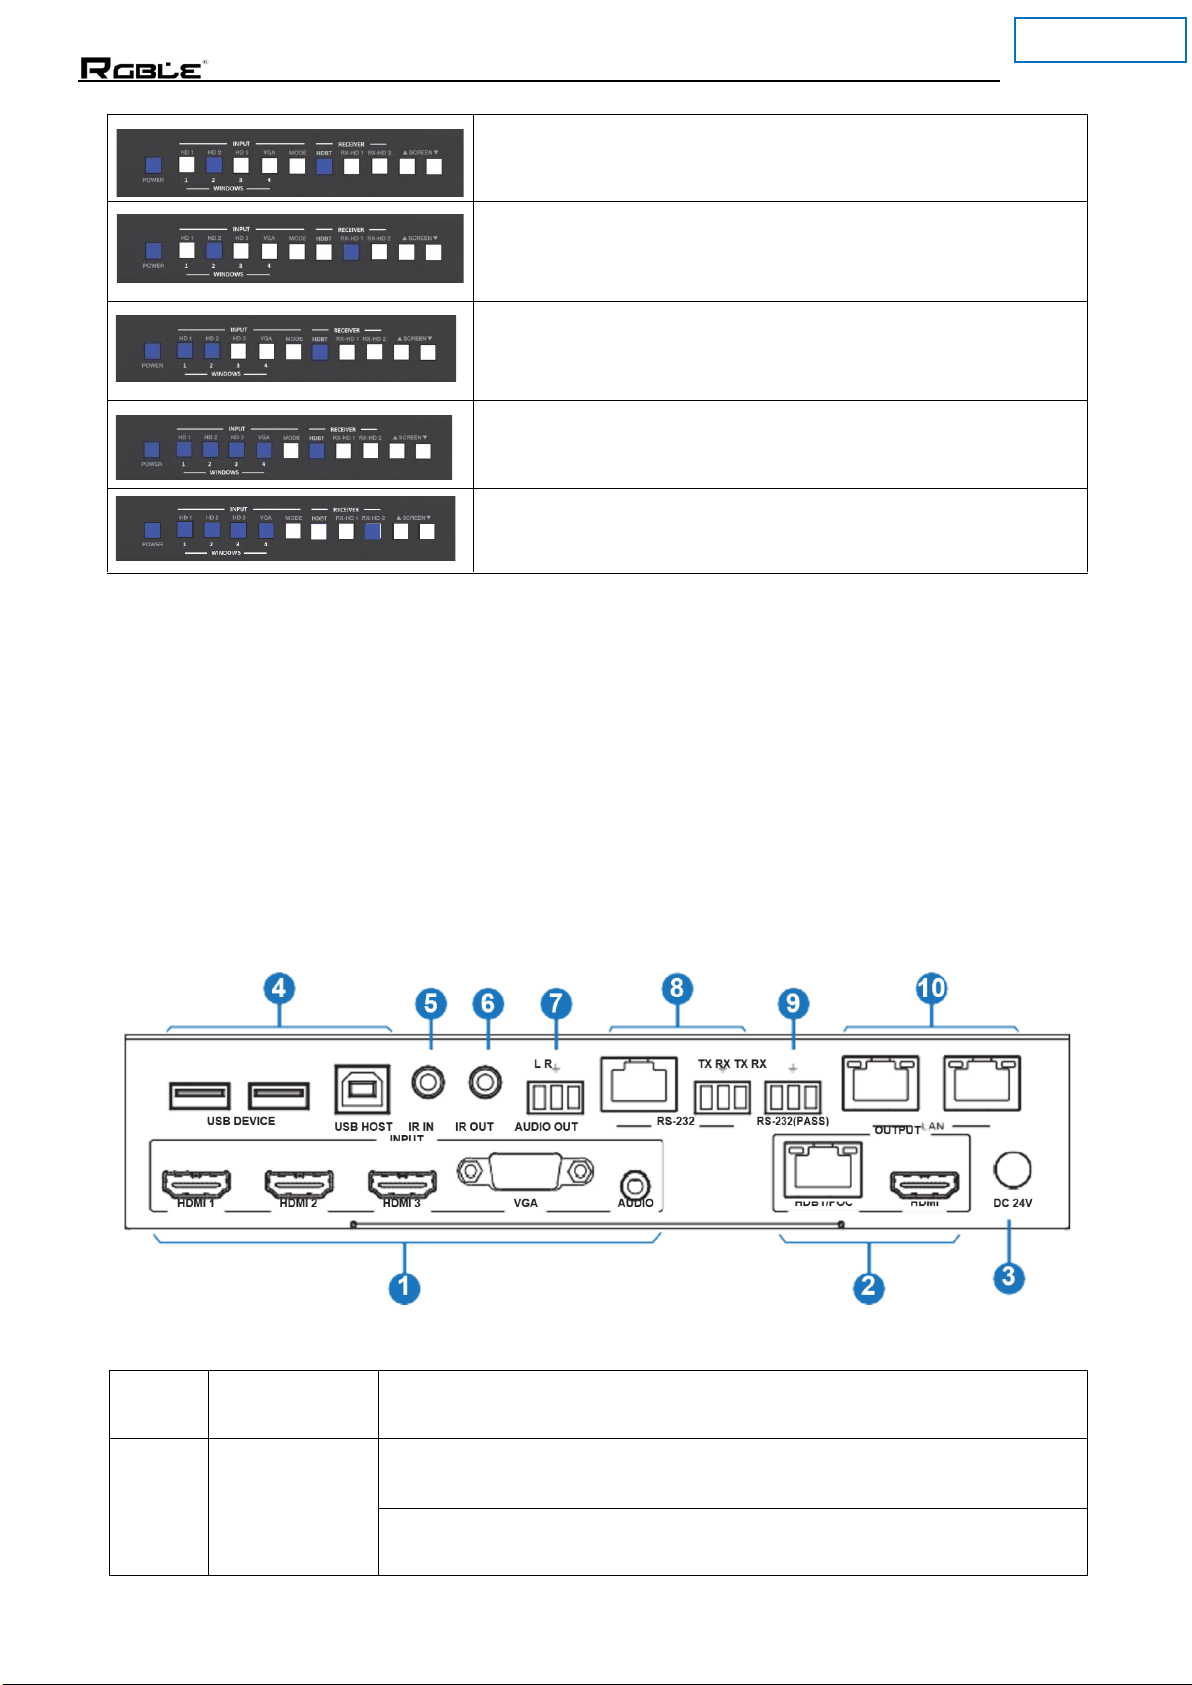
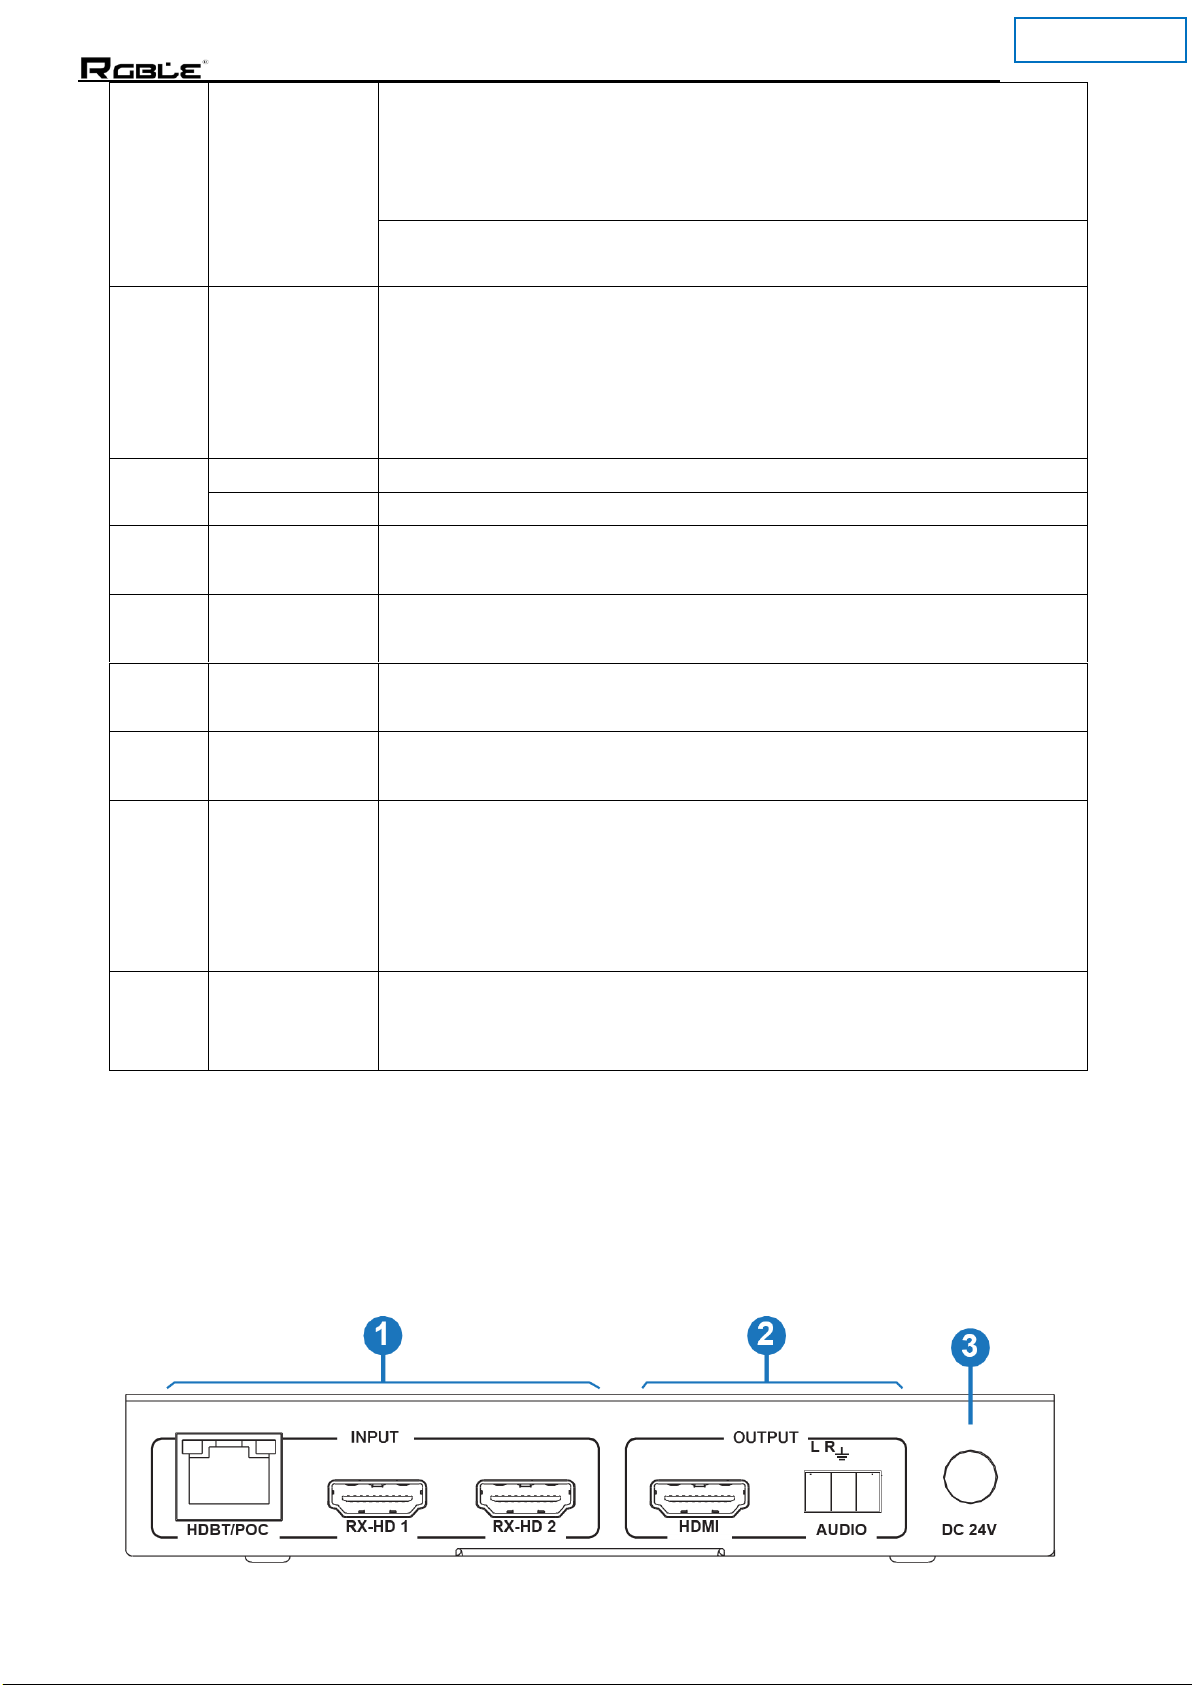
Transmitter supports 3 HDMI inputs, 1 VGA input and with 1 analog audio input
●
Receiver supports additional 2 HDMI inputs
●
Supports HDMI video resolution up to 4K2K@30Hz 4:4:4 and VGA video
resolution up to 1920×1200@60Hz
●
Supports signal input with seamless switch
●
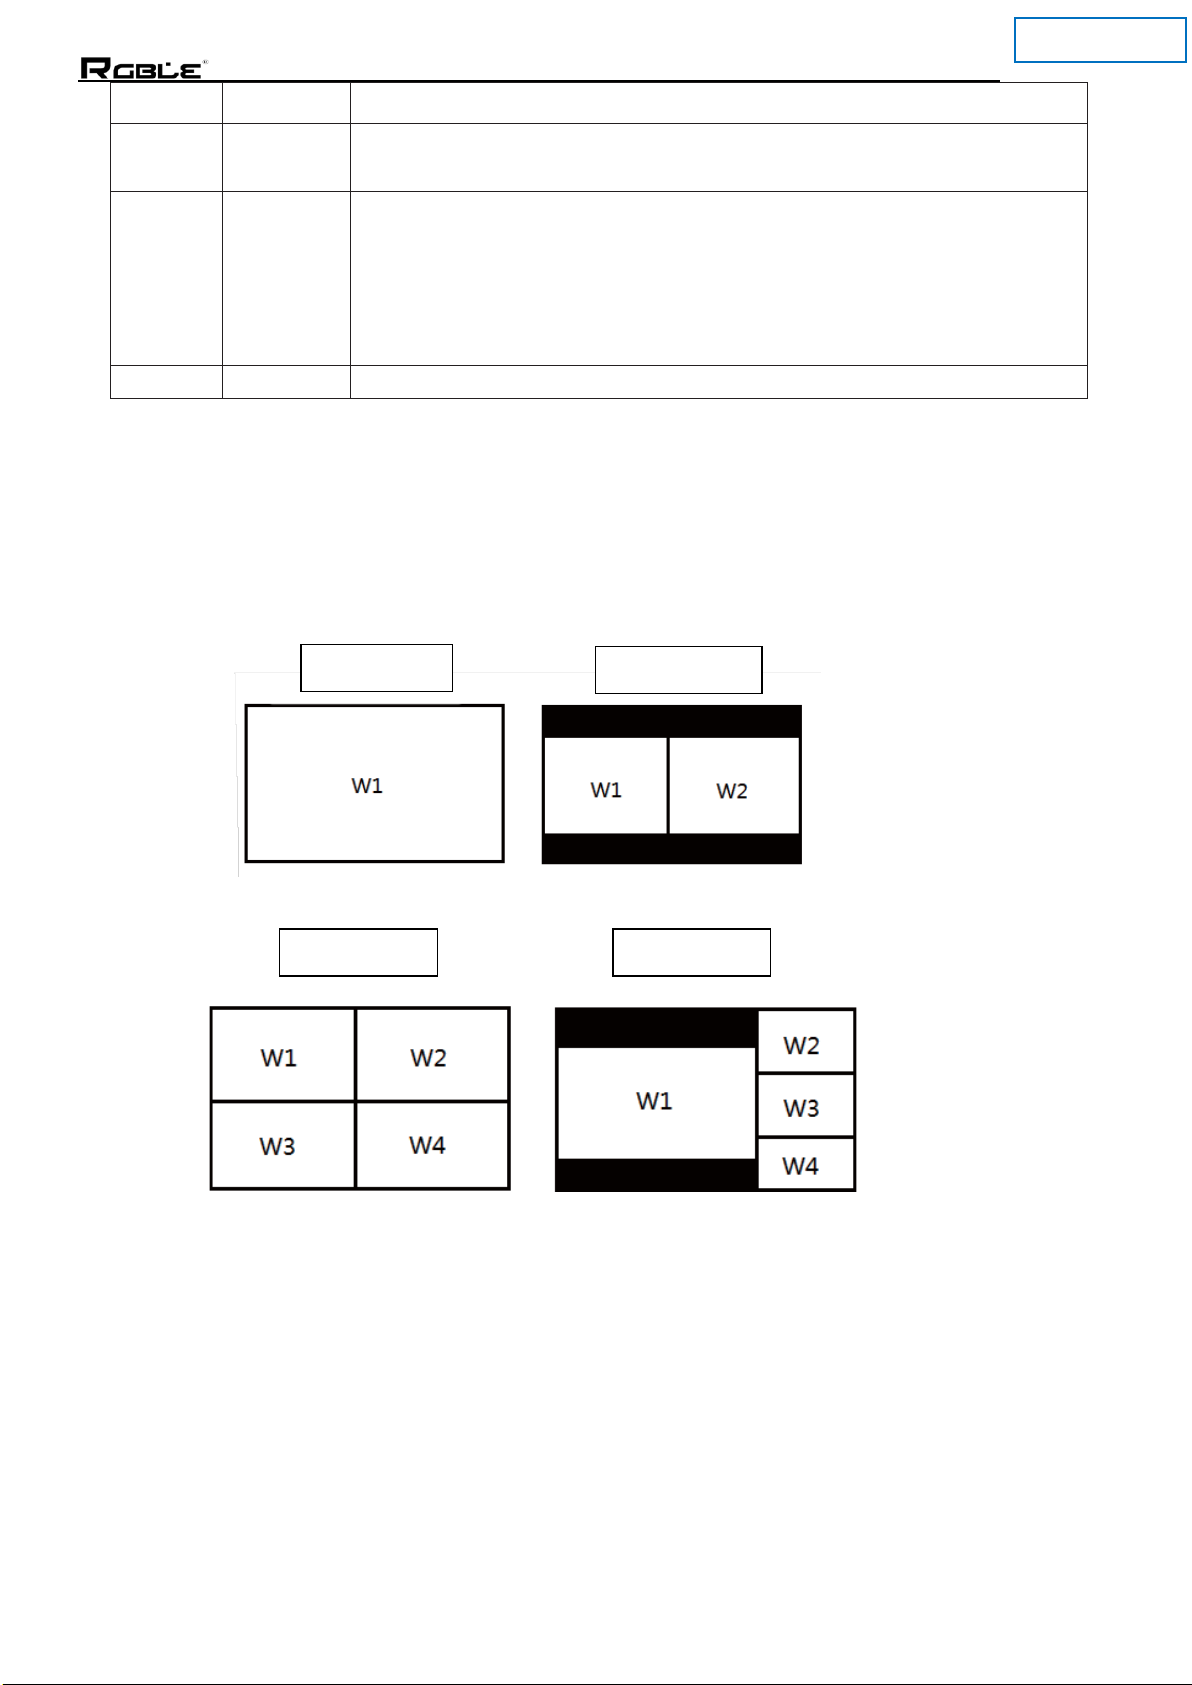
Supports 4 sorts switch mode including Full-screen, Side-by-side and
●
Quad-view mode
●
Supports signal input automatic recognition, zero latency, uncompressed
●
Supports smart EDID management, satisfied automatically the best match
from source to display device
●
Supports HDBT 2.0 transmission technology, the audio / video signal extend distance up to 100
meters / 328ft via CAT 5e/6 cable
●
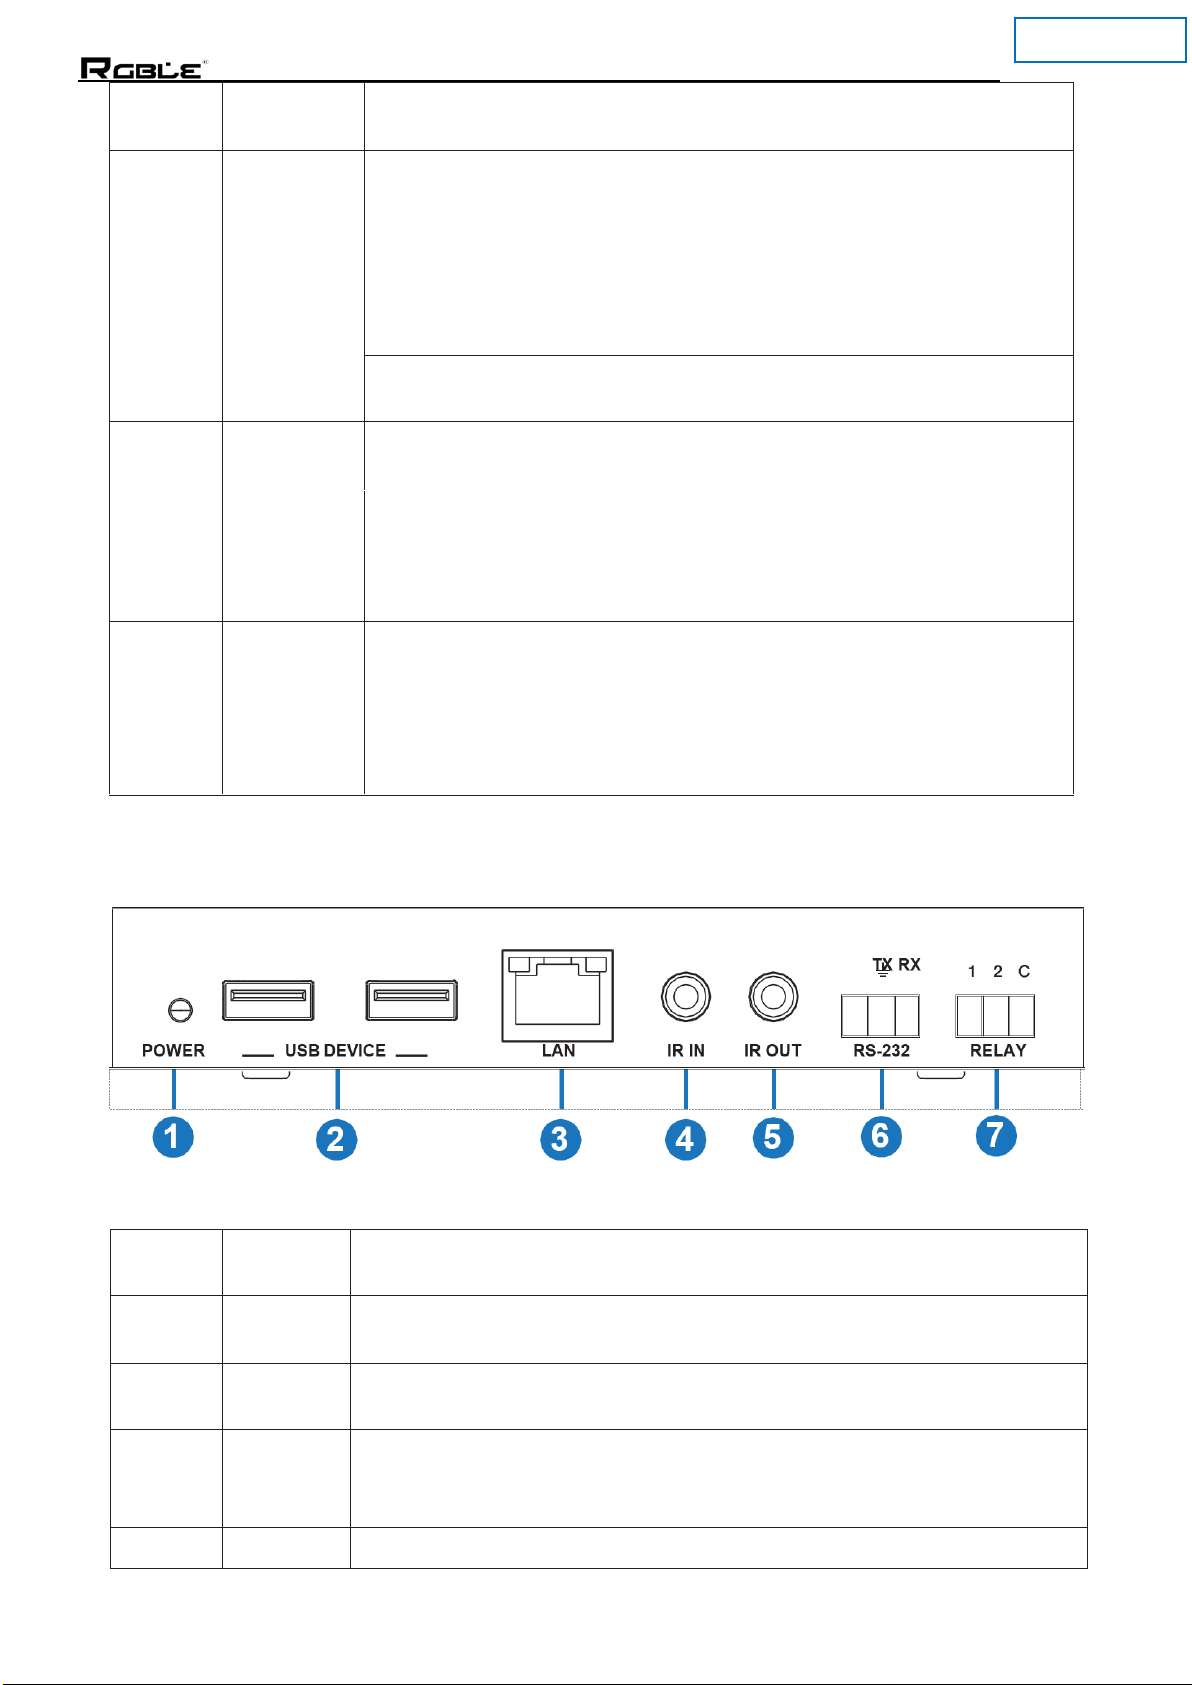
Supports USB2.0 bi-directional transmission function, it can connect USB device such as
smart whiteboard, touch-screen, camera, etc.
●
Supports network access function
●
Supports multiple control ways such as CEC, RS-232/IP, IR, Relay, etc.
●
Supports standby automatically and wakening function for video conference
system and the others control device
●
Supports Web GUI control
●
Supports POC (Power over Cable) function, it means that either transmitter
or receiver is powered supply by 24V/1A power adapter, the other doesn’t
need power supply
●
Control is via front panel Keys, RS-232 and LAN port

Stock Code 873117 en.rgble.com 400-1661-021 3/ 29
P/N: S00303
3. Package Contents
①
1×HD Video / Audio Processor (Transmitter)
②
1×HD Video / Audio Processor (Receiver)
③
1×24V/1.5A DC Power Adapter
④
1×IR Blaster cable (1.5 meters)
⑤
2×20~60KHz IR Receiver cable (1.5 meters)
⑥
2×Mounting Ears (Receiver)
⑦
2×Mounting Ears (Transmitter)
⑧
1×User Manual
4. Specifications
Technical
HDMI Compliance
HDMI 1.4
HDCP Compliance
HDCP 1.4
Video Bandwidth
297MHz (10.2Gbps)
Color Space
RGB, YCbCr 4:4:4, YCbCr 4:2:2
Color Depth
8-bit, 10-bit, 12-bit
Video Input
Resolution
HDMI: Up to 4K2K@30Hz (4:4:4)
VGA: 640x480@60Hz ~ 1920x1200@60Hz
Video Output
Resolution
HDMI / HDBT: 3840x2160@30, 1920x1200@60, 1920x 1080@60,
1280x720@60, 1280x800@60, 1360x768@60,
1024x768@60, 1680x1050@60, Auto
;
Audio Format
PCM2.0, 44.1kHz, 48kHz(24-bit)
ESD Protection
Human-body Model:
±8kV (Air-gap discharge), ±4kV (Contact discharge)
Connections
Transmitter
Input
:
3 x HDMI [Type A, 19-pin female] 1 x VGA [DE15 female]
x Audio [3.5mm mini-Jack]
x USB [Type A, 4-pin female]
Output: 1 x HDMI [Type A, 19-pin female]
1 x HDBT [RJ45 shielded]
1 x Audio [3-pin phoenix]
x USB [Type B, 4-pin female] Control: 2 x LAN [RJ45 shielded]
x RS-232 [3-pin phoenix]
1 x RS-232 [RJ45 shielded] 1 x IR in [3.5mm mini-Jack]
1 x IR out [3.5mm mini-Jack]

Stock Code 873117 en.rgble.com 400-1661-021 4/ 29
P/N: S00303
Receiver
Input: 2 x HDMI [Type A, 19-pin female] 1 x HDBT [RJ45
shielded]
2 x USB [Type A, 4-pin female] Output: 1 x HDMI [Type A, 19-pin
female]
1 x AUDIO [3-pin phoenix] Control: 1 x LAN [RJ45 shielded]
1 x RS-232 [3-pin phoenix] 1 x RELAY [3-pin phoenix] 1 x IR IN
[3.5mm mini-Jack]
1 x IR OUT [3.5mm mini-Jack]
Mechanical
Housing
Metal Enclosure
Color
Black
Dimensions
Transmitter: 160mm [W] x 215mm [D] x 44mm [H] Receiver:
98mm [W] x 144mm [D] x 25mm [H]
Weight
Transmitter:1.15Kg, Receiver: 420g
Power Supply
Input: AC100~240V 50/60Hz
Output: DC 24V/1A (US/EU standard, CE/FCC/UL certified)
Power Consumption
18 W
Operating
Temperature
0°C ~ 40°C / 32°F ~ 104°F
Storage
Temperature
-20°C ~ 60°C / -4°F ~ 140°F
Relative Humidity
20~90% RH (non-condensing)
Resolution /
Distance (Cable
Length)
4K30Hz - Meters
1080P60Hz - Meters
CAT 5e/6
328ft / 100M
328ft / 100M
HDMI IN / OUT
10M
15M
The use of “Premium High-Speed HDMI” cable is highly recommended.
5.
Operation Controls and Functions
5.1Transmitter Panel
Front Panel

Stock Code 873117 en.rgble.com 400-1661-021 5/ 29
P/N: S00303
Number
Name
Function description
1
POWER
Key
When the product is connected power supply, the Key lamp illuminates in
blue, and the Key lamp is off in standby mode.
Note: Through the power Key for controlling power on or standby,
simultaneously you need to use Web GUI setting to send corresponding
power on or standby command to transmitter.
2
INPUT Key
■Full-screen mode: Press MODE Key to select full-screen mode. Then press
HD1/HD2/HD3/VGA Key to select input source to output, corresponding Key
lamp is on;
■Side-by-side: Press MODE Key to select side-by-side mode. The HD1 and
HD2 Key lamp are always on, and the HD1 and HD2 Key correspond to window
1 and window 2. You can select HD1/HD2/HD3/VGA input source to Window
1 and Window 2 output by front-panel Key(e.g.: You wantto select VGA source
to Window 1, you need to continuously press HD1 Key.) or Web GUI.
■Quad view mode: Press MODE Key to select quad view mode. The HD1,
HD2, HD3 and VGA Key lamp are always on, and the HD1, HD2, HD3 and
VGA Key correspond to window 1, window 2, window 3 and window 4. You
can select HD1/HD2/HD3/VGA input source to Window 1 / Window 2 /
Window 3 / Window 4 output by front-panel Key (e.g.: You want to select VGA
source to Window 1, you need to continuously press HD1 Key.) or Web GUI.
Note: Press see the following “The example about Key lamp” description.
3
MODE Key
■Select HDMI/HDBT output full-screen/side-by-side/quad view display mode.
■Long press MODE Key is up to 3 seconds, the upper right corner of screen
will display current IP address and serial baudrate information. The information
will quit automatically after 5 seconds.
4
RECEIVER
Key
Select HDBT/RX-HD 1/RX-HD 2 input source to receiver output,
corresponding Key lamp is on;
■HDBT: The signal for the HDMI output port of receiver is the same as the
HDMI output port of transmitter.
■RX-HD 1: The signal for the HDMI output port of receiver is from RX-HD 1
input source of receiver.
■RX-HD 2: The signal for the HDMI output port of receiver is from RX-HD 2
input source of receiver.
Note: Please see the following “The example about Key lamp”
description.
5
SCREEN
Key
The SCREEN Key controls the RELAY output port of receiver. Normally,
it controls projector curtain lift up or down function. The Key lamp will flicker
when you press a SCREEN Key, the flicker time of the Key lamp can be set
by Web GUI.

Stock Code 873117 en.rgble.com 400-1661-021 6/ 29
P/N: S00303
The example about Key lamp:
full-screen mode TX HDMI: HD2 RX HDMI: HD2
full-screen mode TX HDMI: HD2
RX HDMI: RX-HD1
side-by-side mode:
TX HDMI: side-by-side RX HDMI: side-by-side
quad view mode:
TX HDMI: quad view RX HDMI: quad view
quad view and full- screen mode
TX HDMI: quad view RX HDMI: RX-HD2
Rear Panel
Nu
mber
Name
Function description
1
INPUT
HDMI 1~3: HDMI input port, connect to HDMI source device
such as PC or PS4 player with an HDMI cable.
VGA / AUDIO: VGA input port with embedding analog audio
input, connect to VGA source device such as desktop computer.

Stock Code 873117 en.rgble.com 400-1661-021 7/ 29
P/N: S00303
2
OUTPUT
HDBT/POC: The HDBT port is connected HDBT port of
receiver by CAT 5e/6 cable. It extends distance up to 100 meters
between transmitter and receiver, and the HDBT port supports
POC function simultaneously.
HDMI: HDMI output port, connect to HDMI display device
such as TV or projector with an HDMI cable.
3
DC 24V
Plug DC 24V/1A power supply into the unit and connect the
adapter to an AC outlet.
(Note: The product supports POC function, it means that either
transmitter or receiver is powered supply by 24V/1A power adapter,
the other doesn’t need power supply.)
4
USB DEVICE
Connect to USB device such as key board or mouse, etc.
USB HOST
Connect to computer or laptop.
5
IR IN
Connect to IR receiver cable. The IR signal will send to the IR
OUT port of receiver.
6
IR OUT
Connect to IR blaster cable. The IR signal is from the IR IN
port of receiver.
7
AUDIO OUT
Connect to audio output device such as speaker. The audio
output signal can be selected by Web GUI or API command.
8
RS-232
Connect to a PC or control system by 3-pin phoenix
connector to control the product.
9
RS-232
(PASS)
RS-232 serial channel. When the RS-232 setting is selected
“PASS-THROUGH” option on the Control page of Web GUI. This
RS-232 port and the RS-232 port of receiver is formed as pass-
through channel. Otherwise, this RS-232 port is a control port to
control the product.
10
LAN
■Connect to a PC to visit the Web GUI control page.
■10/100M network switch function.
■Reserved for video stream network interface function.
5.2Receiver Panel
Front Panel

Stock Code 873117 en.rgble.com 400-1661-021 8/ 29
P/N: S00303
Num
ber
Name
Function description
1
INPUT
HDBT/POC port: The port is connected the HDBT/POC port
of transmitter via a CAT 5e/6 cable, and extends distance up to
100 meters / 328ft between transmitter and receiver.
Note: The HDMI output port of transmitter and receiver will
output the same signal when the HDBT port is selected by Web
GUI, API or on the front panel of transmitter.
RX-HD 1/2: HDMI input port, connect to HDMI source device
such as DVD or PS4 with an HDMI cable.
2
OUTPU
T
HDMI: HDMI output port, connect to HDMI display device
such as TV or projector with an HDMI cable.
AUDIO: Analog audio output port, connect to audio output
device such as speaker.
Note: This audio port is the same as audio signal for the
HDMI output port.
3
DC 24V
Plug DC 24V/1A power supply into the unit and connect the
adapter to AC outlet.
(Note: The product supports POC function, it means that
either transmitter or receiver is powered supply by 24V/1A power
adapter, the other doesn’t need power supply.)
Rear Panel
Num
ber
Name
Function description
1
POWER
LED
Power LED indicator. The red LED will illuminate when the
product is connected power supply.
2
USB
DEVICE
Connect to USB device such as USB camera.
3
LAN
■Connect to a PC to visit the Web GUI control page.
■10/100M network switch function.
■Reserved for video stream network interface function.
4
IR IN
Connect to IR receiver cable. The IR signal will send to the IR

Stock Code 873117 en.rgble.com 400-1661-021 9/ 29
P/N: S00303
OUT port of transmitter.
5
IR OUT
Connect to IR blaster cable. The IR signal is from the IR IN port
of transmitter.
6
RS-232
RS-232 serial channel. When the RS-232 setting is selected
“PASS-THROUGH” option on the Control page of Web GUI. This
RS-232 port and the RS-232 (pass- through) port of transmitter is
formed as pass-through channel. Otherwise, this RS-232 port is a
control port to control the product.
7
RELAY
Connect to projector curtain.
6.
Display Mode
This product supports four sorts display mode including full-screen, side-by-side, quad view
1 and quad view 2. Please see figure 1 display mode.
Figure 1: Display mode
You can select display mode and input source about each of these windows via the front
panel Key, Web GUI or API command.
■Full-screen: Switch HD1/HD2/HD3/VGA input source separately, corresponding LED
indicator on the front panel illuminates.
■Side-by side: Switch HD1/HD2/HD3/VGA input source to window 1 and window 2 output.
The HD1 and HD2 LED indicator on the front panel always illuminate.
■Quad view: The quad view has two display modes (Quad view 1 and Quad view 2).
Switch HD1/HD2/HD3/VGA input source to window 1, window 2, window 3 and window 4
Full-
screen
Side-by-side
Quad view 1
Quad view 2

Stock Code 873117 en.rgble.com 400-1661-021 10 / 29
P/N: S00303
output. The HD1, HD2, HD3 and VGA LED indicator on the front panel always illuminate.
Note: If a window is selected no signal input source, the window will display factory default no
signal view. But you can replace the factory default no signal view via Web GUI setting. The
analog audio output of transmitter follows Window 1 by default.
7.
Web GUI User Guide
This product can be controlled by Web GUI. You have to know current IP address to
connect Web GUI. The default IP address is 192.168.1.254. You can get current IP address
of the product through pressing MODE Key on the front panel up to 3 seconds, and the
upper right corner of the HDMI output display device will display the product current IP
address information. After displaying 5 seconds, the information will automatically quit. The
Web GUI operation method is shown as below.
Step 1: The LAN port of transmitter or receiver is directly connected the net port of a PC.
Please see the following connection diagram.
Figure 2: Web GUI connection diagram of transmitter
Figure 3: Web GUI connection diagram of receiver
Step 2: On the PC, go to Control Panel > Network and Internet > Network Connections >
Local Area Connections, right click on it, choose Properties.

Stock Code 873117 en.rgble.com 400-1661-021 11 / 29
P/N: S00303
10
Double click Internet Protocol Version 4 (TCP/IPv4).
Choose “Use the following IP address”. For instance, input 192.168.1.200 as your PC’s IP
address, 255.255.255.0 as Subnet mask, and then click on OK, click on OK again.

Stock Code 873117 en.rgble.com 400-1661-021 12 / 29
P/N: S00303
Notice: The IP address of the PC and product should be in the same network segment. As
the product’s IP address is 192.168.1.254, the computer's IP should be set 192.168.1.X (X
contains 1~255 except 254).
Step 3: Input the product’s IP address into your browser on the PC to enter Web GUI page.
Then the login page will appear.
Select the Username from the list and enter the password. The default passwords are:
Username
Password
User
user
Admin
admin
■The function page of the username “Admin” is shown as below:
Status page
The Status page provides basic information about the product Model name, the installed
firmware versions and the network settings. This page is visible in both User and Admin modes.

Stock Code 873117 en.rgble.com 400-1661-021 13 / 29
P/N: S00303
The Keys at the top right of the web interface are always available and provide the
following functions:
■Clicking the Log out Key will disconnect the current user.
■The Power On Key changes the power status between On and Stand-by mode.
■The admin displays current login username.
Main Page
Transmitter:
•Full-screen: • Side-by-Side:

Stock Code 873117 en.rgble.com 400-1661-021 14 / 29
P/N: S00303
●Quad view 1: • Quad view 2:
●Window 1 / Window 2 / Window 3 / Window 4: Display Full-screen / Side-by-Side / Quad
view 1 / Quad view 2 mode and select HDMI1/HDMI2/ HDMI3/VGA input source to window 1 /
window 2 / window 3 / window 4.
●Audio Source: Select the AUDIO OUT port on the rear panel of the transmitter output audio
source including Default, HDMI1, HDMI2, HDMI3 and VGA. The Default means that the output
audio source follows Window 1.
●Auto switch: Detect input signal source.
Auto detect input signal of transmitter. The AUTO function is turned on:
▪If a new active input source is connected, it will directly jump to the new active input source.
▪If an active input source is pulled out, it will jump to the next active input port. The order is
HD1->HD2->HD3->VGA.
▪When this product is powered off or rebooted and these input signal sources have not been
changed. Then this product is powered on again, and it will remember input signal sources
before power off and reboot. If this product cannot detect input source before, it will follow the
order HD1->HD2->HD3->VGA to detect.
Auto detect input signal of receiver. The AUTO function is turned on:
a) Full-screen mode:
▪A new active input source is inserted when this product is working, it will directly jump to the
new active input source.
▪An active input source is pulled out when this product is working, it will detect all input signal
sources and order is HD1->HD2->HD3->VGA-> RX-HD1->RX-HD2.
▪When this product is powered off or rebooted and these input signal sources have not been
changed. Then this product is powered on again, and it will remember input signal sources
before power off and reboot. If this product cannot detect input source before, it will follow the
order HD1->HD2->HD3->VGA->RX-HD1->RX-HD2 to detect.
a) Side-by-side or quad view mode:
▪The auto function is only detected RX-HD1 and RX-HD2 input source.
A new active input active is inserted when this product is working, it will directly jump to the new
active input source.
▪An active input source is pulled out when this product is working, it will
follow the order RX-HD1->RX-HD2->HDBT to detect.
▪When this product is powered off or rebooted and these input signal sources have not been
changed. Then this product is powered on again, and it will remember input signal sources
before power off and reboot. If this product cannot detect input source before, it will follow the
order RX-HD1->RX-HD2->HDBT to detect.

Stock Code 873117 en.rgble.com 400-1661-021 15 / 29
P/N: S00303
Receiver
●Source: Select input source to the HDMI output port of receiver to output. The default is
selected HDBT source.
Setting page
●Brightness: Adjust output signal brightness. The range is from 0 to 100, and default is 50.
●Contrast: Adjust output signal contrast. The range is from 0 to 100, and default is 50.
●Color: Adjust output signal color. The range is from 0 to 100, and default is 50.
●Overscan: Adjust output picture overscan. The range is from -10 to 0, and default is 0. The
value 0 means that output picture is 100%.
●Output Resolution: Select output resolution. The resolution has 3840x2160 @30Hz,
1920x1200@60Hz, 1080p60Hz, 1080p50, 1280x800@60Hz, 720p 60Hz,
720p50Hz,1024x768@60Hz, Native (The Native means that compare transmitter with receiver
output resolution, and then transmitter and receiver will output the best resolution
simultaneously).
●Audio Volume: Adjust output volume for HDMI output port and analog audio output port of
transmitter. The range is from 0 to 50 (The value 50 means that the volume outputs 0 dB. Each
level will adjust -1 dB.). Clicking the icon will switch to mute or unmute output.
●Audio Delay: Adjust audio output delay time for HDMI output port and analog audio output
port of transmitter. The total has 10 level, each level will adjust 20ms. The maximum delay is up
to 200ms, and the default value is 0 ms.
EDID page
●Input Name / EDID: Modify input source device alias name and select EDID to input source
device. The EDID option has 4K2K30_2CH, 1080P_2CH, Copy Receiver HDMI out, Copy
Transmitter HDMI out, USER1 Memory, USER2 Memory, USER3 Memory.
●Load EDID to User memory: Upload EDID *.bin file format to User 1,
User 2 or User 3.
●Download EDID to your computer: Download INPUT-HDMI 1 / INPUT- HDMI 2 / INPUT-
HDMI 3 / INPUT-RX-HDMI 1 / INPUT-RX-HDMI2 EDID as file preserve.

Stock Code 873117 en.rgble.com 400-1661-021 16 / 29
P/N: S00303
System page
●Series baud rate: Select the serial port baud of transmitter. The default value is 19200.
●Sleep Timer: Select sleep time after no signal input for transmitter and receiver. The default
will enter sleep mode if no signal input within 10 seconds.
●Boot Logo Update: Upload boot and no signal input picture. The default is loaded *.jpg
format picture. Clicking the “Update” Key will upload picture and display progress
simultaneously. The product will automatically reboot when the upload is finished.
●SOC Update: Update software program. Clicking the “Update” Key will update software and
display progress simultaneously. The product will automatically reboot when the update is
finished.
●Factory Reset: Reset to factory default status.
●Reboot: Reboot the product.

Stock Code 873117 en.rgble.com 400-1661-021 17 / 29
P/N: S00303
Control page
This control page is used for controlling projector curtain lift up or down and switching display
device on/off.
●Auto Power Settings
◆Disable: No commands are sent.
◆Sync Detected: After the product is powered on, when detecting have input source
signal, you can send power on command to display device
through CEC RS-232/IR control. You can also control projector curtain lift up through RELAY
control. When detecting have no input source signal, you can send power off command to
display device through CEC
/RS-232/IR. You can also control projector curtain lift down through RELAY control.
◆Switch on/off: After the product is powered on, you can send power on command to display
device through CEC/RS-232/IR control. You can also control projector curtain lift up through
RELAY control. After the
product is in standby mode; you can send power off command to display device through
CEC/RS-232/IR control. You can also control projector curtain lift down through RELAY control.
◆RS-232 / CEC / IR: Send the command way of power on/off.
◆Power off timeout: Set the time of Power Off command send and click “Save” Key to save.
The range is from 0 to 1000s. The default sends
power off command after delay 300 seconds.
◆Power On Timeout: Set the time of Power On command send and click “Save” Key to save.
The range is from 0 to 1000s. The default sends power on command after delay 5 seconds.
●RS-232 Setting: Select send command format about HEX or ASCII and set the baud rate,
data bit, parity and stop bit value for the RS-232 port of receiver.

Stock Code 873117 en.rgble.com 400-1661-021 18 / 29
P/N: S00303
◆Power off: Input the command you need to send. After the product
standby, it can automatically send the command after set time of
according to Power Off Timeout. If the command is HEX format, the byte must be a even
format.
◆Power on: Input the command you need to send. After the product
boot, it can automatically send the command after set time of according
to Power on Timeout. If the command is HEX format, the byte must be a even format.
◆Test the command you need to send.
◆Click the “Save” Key to save command.
Note: When you select “PASS-THROUGH” option, the RS-232 (PASS) port
of transmitter and the RS-232 port of receiver is formed a pass-through channel.
●IR control setting
◆Display Name: Input an IR alias name.
◆Power Off: At first, the IR function need to study the command of power off. IR receiver
cable and IR blaster cable are insert to IR port. When the
product is working, click the “Study” Key, and then will display “study...”. Using the IR remote
sends power off command to IR receiver head, and then will display “Success” if the command
studies success and display “Fail” means that the study is failure. Finally, the power off
command has finished study and click the “Save” Key to save.
◆Power On: The Power On command has similar to operation method for Power Off.
●Relay control:
◆Disable: No commands are sent.
◆Enable: The commands are sent.
◆Screen On: Set the time of the Key lamp flicker on the front panel of transmitter when the
projector curtain is lifting up.
◆Screen Off: Set the time of the Key lamp flicker on the front panel of transmitter when the
projector curtain is lifting down.
◆Test the command you need to send.
◆Click the “Save” Key to save command.

Stock Code 873117 en.rgble.com 400-1661-021 19 / 29
P/N: S00303
Network page
●IP Settings:
◆Static: When you select Static mode, you can manually set IP address, Subnet Mask and
Gateway address. Then click “Save” Key to save
information.
◆DHCP: Obtain automatically IP address, Subnet Mask and Gateway address.
◆HTTP Port: Set http port value. The default value is 80.
◆Telnet Port: Set telnet port value. The default value is 23.
●Web Login Settings
Modify password function. After you selected username, please input correct old password.
Then input a new password and a confirm password (The confirm password means you need to
input the new password again.). Finally, click “Save” Key to save information.
Note: ▪ The new password cannot an empty.
▪The new password can not the same as the old password.
●Find Your Device: Clicking the “SHOW ME” Key, all lights on the front panel of transmitter
will flicker, clicking “HIDE ME” Key again, these lights on the front panel of transmitter will
normally display.
●Set Network Defaults: Click the “Set Network Default” Key to reset all network configuration
to factory default setting.
●Product Model: Modify the product model. The model will display on the Status page.
●Hostname: Modify the product hostname. The hostname will display on the Status page.
■When you use the username “user” login, the function page has only Status and Main page.
The Status and Main page have the same as function for the status and Main page of the
username “admin”.
Table of contents
Other RGBLE Switch manuals
Popular Switch manuals by other brands

Hawkeye Mfg
Hawkeye Mfg H958 installation guide

TRENDnet
TRENDnet TPE-S160 Specifications

Digitus
Digitus DN-95348-1 Quick installation guide

Extron electronics
Extron electronics DTP T SW4 HD 4K user guide

StarTech.com
StarTech.com DS81000 Instruction guide

Broadcast Pix
Broadcast Pix Slate 3000 Series Installation planning guide