IMPORTANT NOTICE:
Place all wooden parts on a clean and smooth surface such as a rug or carpet to avoid scratching the parts.
Check to be sure that you have all parts and hardware.
Remove all wrapping materials, including staples & packing straps before you start to assemble.
Keep all hardware parts and packaging out of reach of children.
Two person assembly recommended.
ASSEMBLY INSTRUCTIONS
Missing Parts? Assembly Questions?
MABP27BK
Kee Adjustable Leg, Black and Chrome (Set of 4)
OTA-BP27BK
Otto Adjustable Leg, Black and Chrome (Set of 4)
QTY: 28
Parts:
B: Adjustable Legs (4) C: Table Top*
A: Screws
Hardware:
Any problems or questions call Regency Oce Furniture at 1-866-816-9822 or email [email protected] IMPORTANT NOTICE:
• Place all wooden parts on a clean and smooth surface such as a rug or carpet to avoid scratching the parts.
• Check to be sure that you have all parts and hardware.
• Remove all wrapping materials, including staples & packing straps before you start to assemble.
• Keep all hardware parts and packaging out of reach of children.
MTBP27 ·Kee Post Table Legs INSTRUCTIONS
You will need 2 people for this assembly.
You will need a Phillips Head Screw Driver and a Tape Measure to Assemble.
Hardware :
A: Screws(24)
Parts :
B: Legs(4)
A
C
B
STEP 1 (Square Table Top): Place Table Top(C) on a clean at surface with desired table nish face down. Position
assembled legs as shown in Figure A.
Then, attach assembled Legs to Table Top using 6 Screws(A) per Leg.
C
Figure A
C: Table Top (may vary)
*NOTE: Place Legs at
least 1-inch away from
Edge Table*
*Shape May Vary
Any problems or questions call Regency Oce Furniture at 1-866-816-9822 or email [email protected] IMPORTANT NOTICE:
• Place all wooden parts on a clean and smooth surface such as a rug or carpet to avoid scratching the parts.
• Check to be sure that you have all parts and hardware.
• Remove all wrapping materials, including staples & packing straps before you start to assemble.
• Keep all hardware parts and packaging out of reach of children.
MTBP27 ·Kee Post Table Legs INSTRUCTIONS
You will need 2 people for this assembly.
You will need a Phillips Head Screw Driver and a Tape Measure to Assemble.
Hardware :
A: Screws(24)
Parts :
B: Legs(4)
A
C
B
STEP 1 (Square Table Top): Place Table Top(C) on a clean at surface with desired table nish face down. Position
assembled legs as shown in Figure A.
Then, attach assembled Legs to Table Top using 6 Screws(A) per Leg.
C
Figure A
C: Table Top (may vary)
*NOTE: Place Legs at
least 1-inch away from
Edge Table*
Tools Needed:
Phillips Screwdriver
Tape Measure
Any problems or questions call Regency Oce Furniture at 1-866-816-9822 or email [email protected] IMPORTANT NOTICE:
• Place all wooden parts on a clean and smooth surface such as a rug or carpet to avoid scratching the parts.
• Check to be sure that you have all parts and hardware.
• Remove all wrapping materials, including staples & packing straps before you start to assemble.
• Keep all hardware parts and packaging out of reach of children.
MTBP27 ·Kee Post Table Legs INSTRUCTIONS
You will need 2 people for this assembly.
You will need a Phillips Head Screw Driver and a Tape Measure to Assemble.
Hardware :
A: Screws(24)
Parts :
B: Legs(4)
A
C
B
STEP 1 (Square Table Top): Place Table Top(C) on a clean at surface with desired table nish face down. Position
assembled legs as shown in Figure A.
Then, attach assembled Legs to Table Top using 6 Screws(A) per Leg.
C
Figure A
C: Table Top (may vary)
*NOTE: Place Legs at
least 1-inch away from
Edge Table*
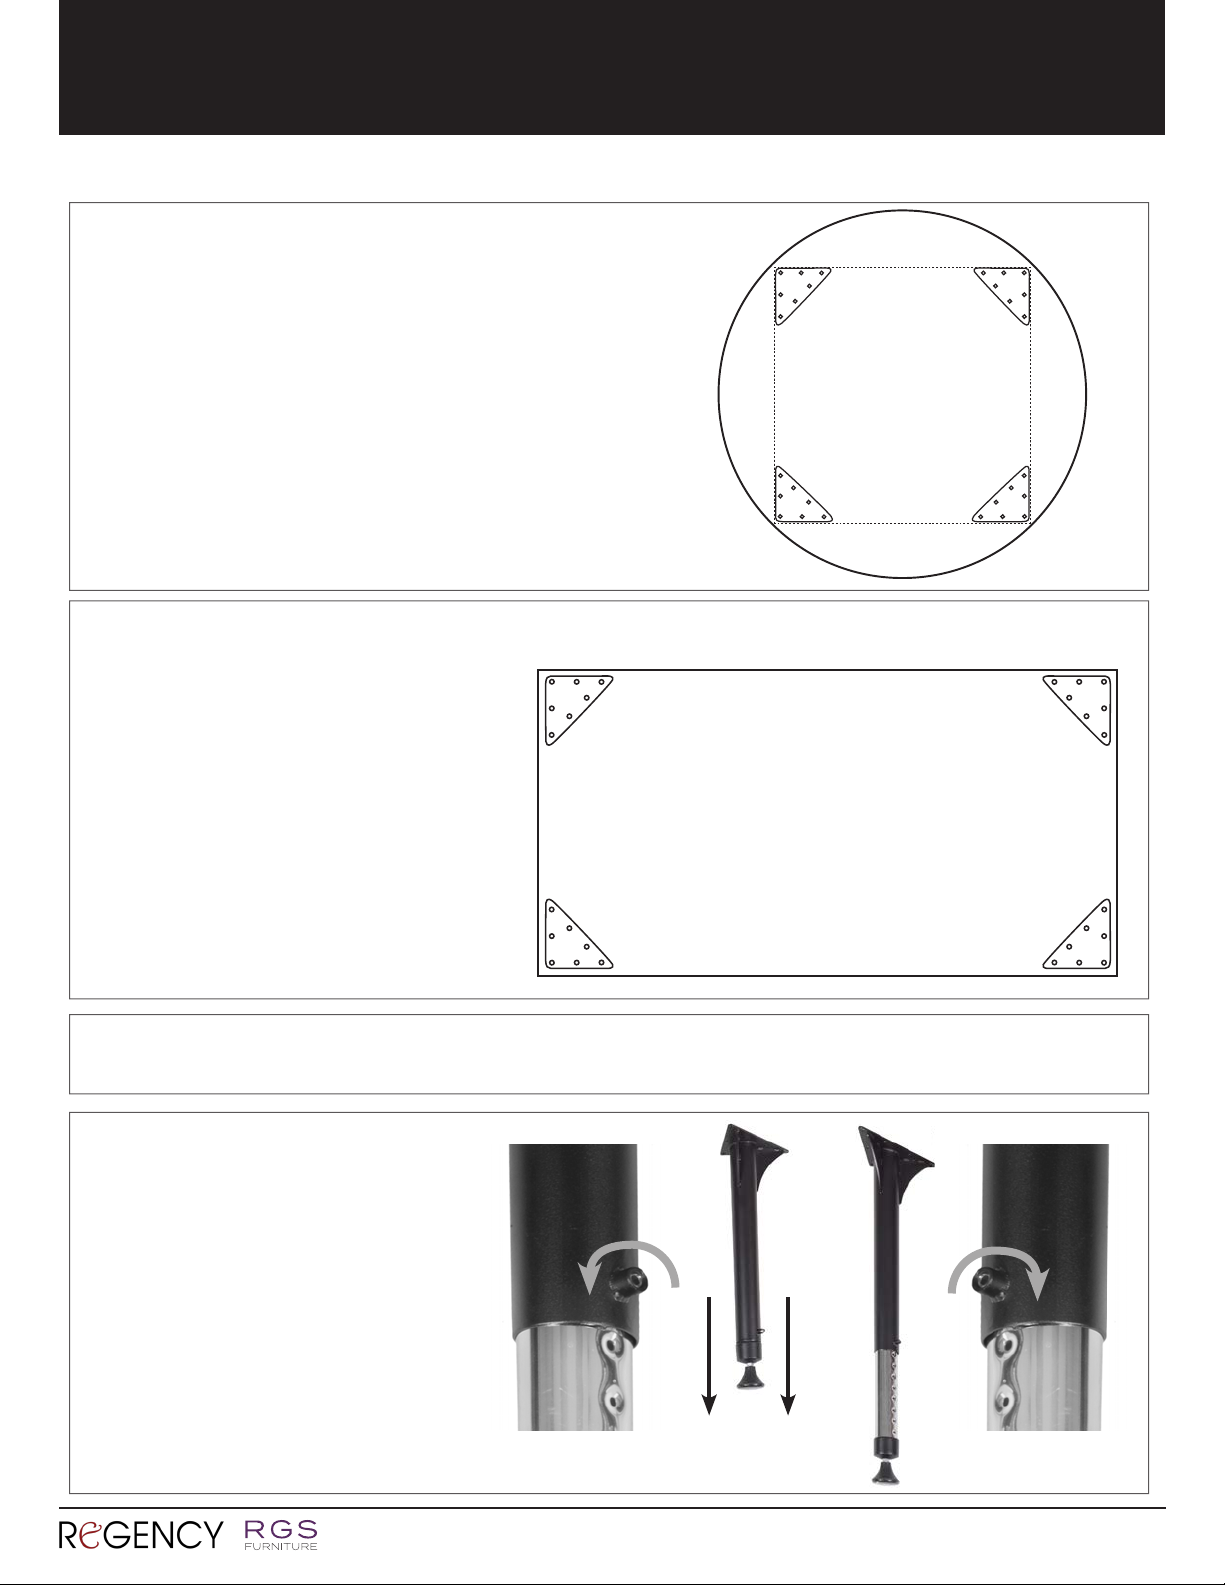
STEP 1 (Square Table Top):
Place Table Top (C) on a clean at surface with desired
table nish face down.
Position Adjustable Legs (B) as shown in Figure A.
Then, attach assembled Legs to Table Top using
7 Screws (A) per Leg.
*NOTE: Place Legs at
least 1-inch away from
Edge of Table*
Figure A
Any problems or questions call Regency Oce Furniture at 1-866-816-9822 or email [email protected] IMPORTANT NOTICE:
● Place all wooden parts on a clean and smooth surface such as a rug or carpet to avoid the parts from being scratched.
● Check to be sure that you have all parts and hardware.
● Remove all wrapping materials, including staples & packing straps before you start to assemble.
● Do not tighten all screws/bolts until completely assembled.
● Keep all hardware parts out of reach of children.
MABP27 ·Kee Adjustable Table Leg INSTRUCTIONS
You will need 2 person(s) for this assembly.
You will need a Phillips Head Screw Driver and a Tape Measure to Assemble.
Hardware :
A: Screws(28)
Parts :
B: Adjustable Leg (4) • C: Table Top (may vary) • D: Allen Wrench
A
C
D
B
STEP 1A (Square Table Top): Place Table Top(C) on a clean at surface with
desired table nish face down. Position Adjustable Legs(B) as shown in Figure A.
Then, attach assembled Legs to Table Top using 7 Screws(A) per Leg.
C
Figure A
*NOTE: Place Legs at
least 1-inch away from
Edge Table*
D: Allen Wrench
Any problems or questions call Regency Oce Furniture at 1-866-816-9822 or email [email protected] IMPORTANT NOTICE:
● Place all wooden parts on a clean and smooth surface such as a rug or carpet to avoid the parts from being scratched.
● Check to be sure that you have all parts and hardware.
● Remove all wrapping materials, including staples & packing straps before you start to assemble.
● Do not tighten all screws/bolts until completely assembled.
● Keep all hardware parts out of reach of children.
MABP27 ·Kee Adjustable Table Leg INSTRUCTIONS
You will need 2 person(s) for this assembly.
You will need a Phillips Head Screw Driver and a Tape Measure to Assemble.
Hardware :
A: Screws(28)
Parts :
B: Adjustable Leg (4) • C: Table Top (may vary) • D: Allen Wrench
A
C
D
B
STEP 1A (Square Table Top): Place Table Top(C) on a clean at surface with
desired table nish face down. Position Adjustable Legs(B) as shown in Figure A.
Then, attach assembled Legs to Table Top using 7 Screws(A) per Leg.
C
Figure A
*NOTE: Place Legs at
least 1-inch away from
Edge Table*