RHINO Arcadw M01632F User manual

Arcade
ASSEMBLY INSTRUCTIONS AND RULES
Askforourfulllineofexcitingbrandsandsportinggoods
productsatasportinggoodsretailernearyou.
TableTennisTables
PoolTables
Basketball
Darts
HockeyTables
SoccerTables
Multi-GameTables
Model# MO1632F 2
Customer Service Department
866.556.2759
Toll Free Fax 866.873.3531
foosball@escaladesports.com
Escalade®Sports • 817 Maxwell Ave. • Evansville, IN 47711 • 800.457.3373 • Fax 812.467.1245
All Rights Reserved. www.escaladesports.com ©2008Escalade®Sports
DateCode# M01632HG08
Date Code # M01632HG08

1For Customer Service Call 1-888-996-2729
© 2008 Escalade Sports
1-888-996-2729
FAX: 1-866-873-3535
arcadegames@escaladesports.com
We strive to ensure that our products are of the highest quality
and free of manufacturing defects or missing parts.However, if
you have any problems with your new product,
DO NOT RETURN IT TO THE STORE,
please contact us toll free @:
Or writ e t o:
Escalade Sports
Customer Service Department
P.O. Box 889
Evansville I N 47706
When contacting Escalade Sports please provide your model number, serial number (if
applicable), and part number if requesting a replacement part. These numbers are
located on the product, packaging, and in this owners manual.
Your Model Number
Please have your model number when inquiring about parts.
______________________
M01632F
Date Code # M01632HG08

2
IMPORTANT! READ THIS MANUAL ALL THE
WAY THROUGH BEFORE BEGINNING TO
PUT YOUR GAME TABLE TOGETHER! THEN
READ EACH STEP BEFORE STARTING
THAT STEP.
Philips Screwdriver
Furniture Polish and Cloth
Make sure you understand the following tips before you begin to assemble your Roll a score Table
1. When installing parts that have more than one bolt, start ALL the bolts in that part by
hand before tightening anything.
2. Some drawings or images in this manual may not look exactly like your product. Please
read and understand the text before starting each assembly step.
TWO (2)ADULTS ARE REQUIRED TO ASSEMBLE
THIS GAME TABLE
Assembly Tips
Tools Required:
READ AND FOLLOW ALL ASSEMBLY, OPERATION, AND
SAFETY INSTRUCTIONS CAREFULLY. AT LEAST TWO
ADULTS ARE NEEDED TO PUT THIS GAME TABLE
TOGETHER.
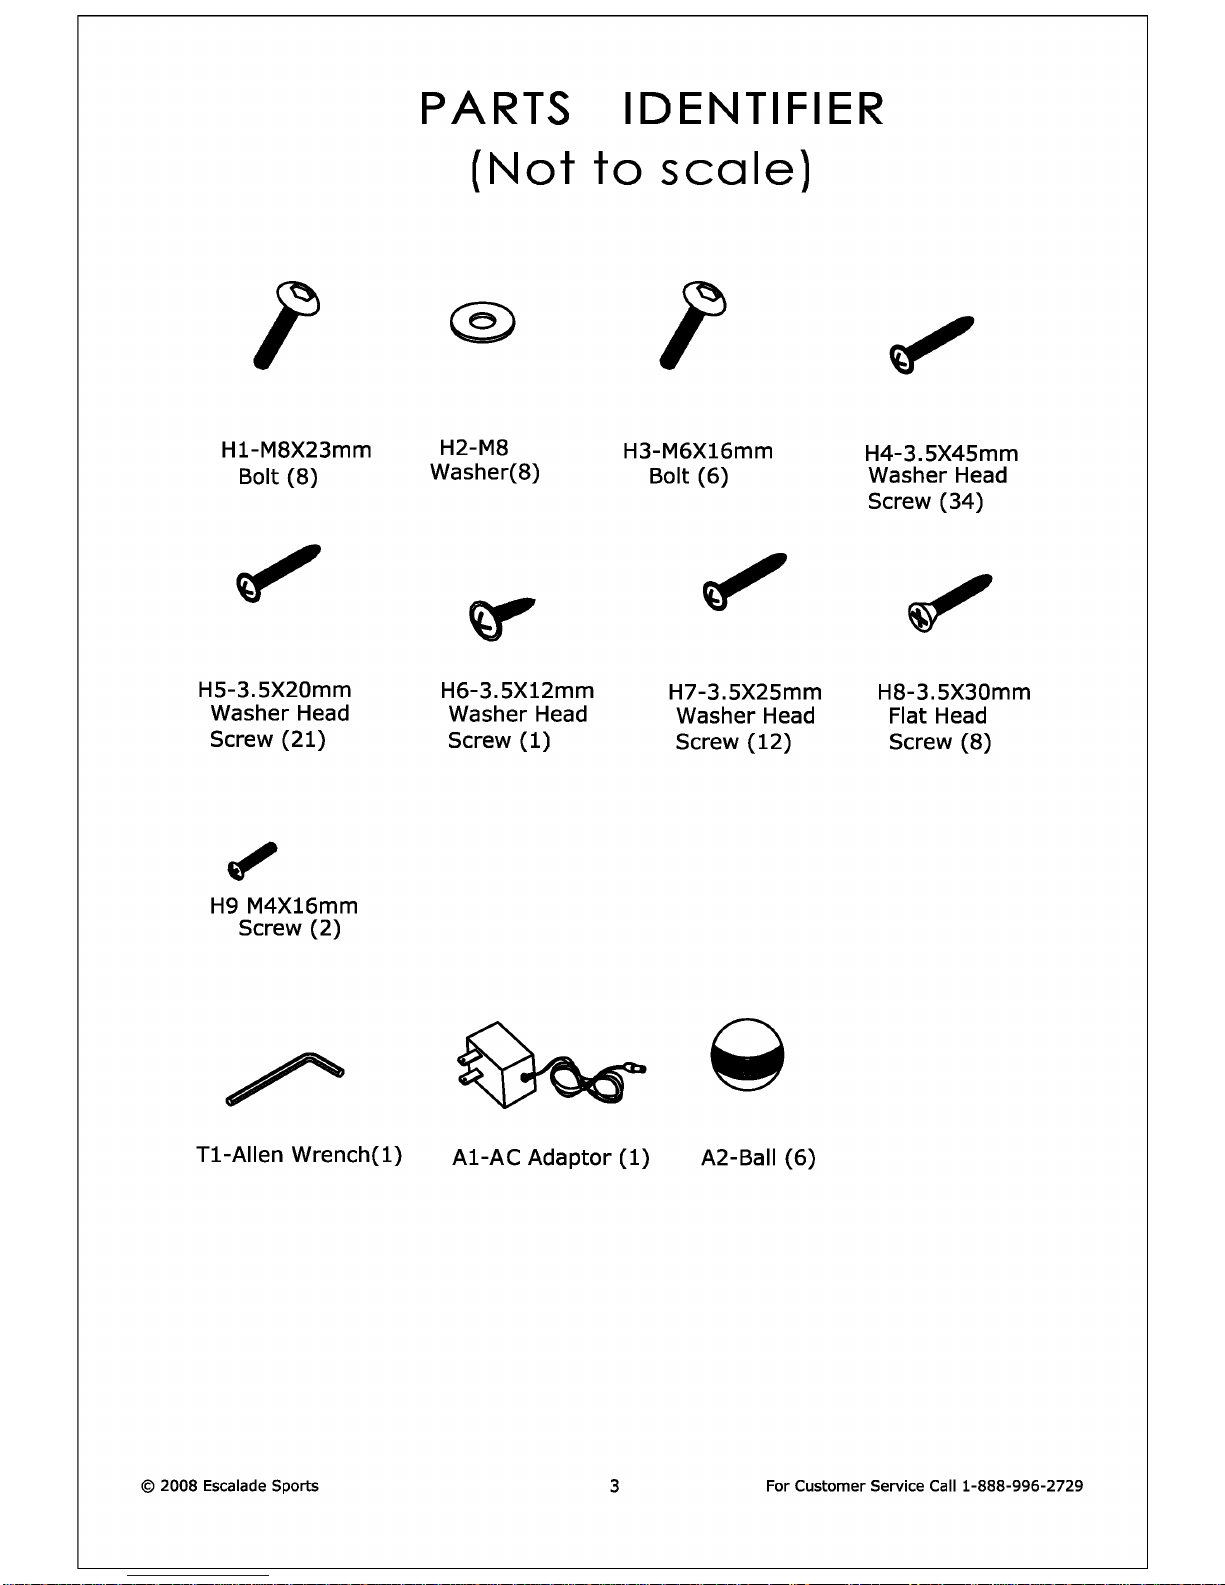
Allen Wrench T1 included with the Hardware Kit


Figure 1
Figure 2
Note:
Be sure to use this hole.
The front hole will be
used in a future Assembly
Carefully fold P23 Main Electronic Scoring Board, attach P24 End Panels
using H4 Screws.
Using H3 Bolts, attach P16 Right Side Cage to
P17 Top Cage. Complete the assembly by
attaching P15 Left Side Cage to P17 Top
Cage using H3 Bolts.

Figure 4
Figure 3
Lay P19 Ball Return Board flat with pilot holes facing up , then attach P21 Angle Board
as shown Fig.3 using H5 Screws.
Carefully fold P4 Right Front Leg as shown. Secure the leg using H4 Screws. Insert
P22 Bottom Leg Board and attach with H8 Screws. Find P5 Left Front Leg, P22
Bottom Leg Board, H4 and H8 Screws and repeat the above.

Figure 5
Figure 6
is
Note:
Attach P26
Protective
Cover on
front edge
UP
Switchwire
On a clean level place, lay P1 Left Leg Panel and P2 Right Leg Panel upside down. First,
place P9 Ball Stop Board into place on P2 Leg Panel. Insert P3 Playfield as shown.
Before installing P8 slat board, note location of cut out in each slat board for routing
switch wires. Install P8 Slat Boards using H4 Screws as shown. Next, attach P6
Front Leg Panel with H5 Screws .Feed wires as shown.
P2
P1
m

Figure 7
Figure 8
Attach P4 and P5 Leg Assemblies per Figure 7 using H1 Bolts with H2 Washers.
With help from another adult, place P13 Lower Front Cabinet Panel between P10 Left
Side Back Apron and P11 Right Side Back Apron, attach using H4 Washer Head Screws.
Next, Secure P23 Main Electronic
Scoreboard between P10 and P11
panels using H5 Washer Head
Screws.

Figure 9
Figure 10
Switch wires
With the help of another adult, turn the ramp assembly over and carefully place into panel
assembly. Secure the ramp to the
panels using H1 Bolts with Washers
H2. Next attach P7 Ramp Board
with H5 Washer Head Screw.
First, slide P19 Return Board into place from back side of cabinet. Next, slide P20
Target Board into cabinet as shown.

Figure 11
Figure 12
Note:Four connect:ons
1.PLAYER
2.RESET
3.SCORING SENSOR
4.AC ADAPTOR
Install P14 Back Top Panel from the
front side of the unit. Using pre-drilled
holes, secure the panel with H4
Screws. Next, connect all
wires to main processing unit.
Be sure all connections are secure.
Secure the P12 Back Cover Board to the frame using H7 Screws. Next, attach P25
Access Board with H6 Screw.
AC Adaptor
plugs in here

Figure 13
Figure 14
Note:
H5screws install
from inside.See pilot
noles for this installation
Attach Cage Assembly to panels as shown Figure 13 using Screws H5.
To complete the assembly, attach the P18 Front Cage as shown using Bolts H3 and Bolts H9.
Bolts H3, at top, may need
to be loosened for ease of
assembly.

Electronic Scorer Parts Identification

CA
ATTENTION
TO MOVE THIS ASSEMBLY, DO NOT LIFT FROM THE
SIDES. IF THE ASSEMBLY NEEDS TO BE MOVED, PICK
UP FROM FRONT AND BACK POSITION ONLY.
RE AND USE OF YOUR TABLE
1. Use spray furniture polish to clean all exterior surfaces of your game table.
2. Use mild soap and water to clean the playing surface of your game table.
3. Plug the adapter into a suitable 120v AC household outlet.
4. This product is intended for INDOOR use only.
5. DO NOT sit, climb or lean on the table.
6. DO NOT drag the table when moving it. This will damage the legs
Congratulations! You have now assembled your Arcade Roll-A-Score. Please note the
Care and Use Instructions below to insure many years of trouble free use of this product.
How to play roll a score:
1.Using two adults set the unit in its final resting place in your game room.
2.Upon first plugging in the adapter, you can press play button to choose one player and
two players. When you have all “zeros"showing on electronics,
you are ready to play game now.
3.Each player have roll six balls per game trying to reach the highest score possible. If
a ball is rolled and does not score, you may rol l the ball again. The player with the
highest score wins.
4.Press the reset button to play again.
5.Press both the red button and the green button at the same time for three seconds. The
power will be turn off.
6.Unplug the unit when not in use.
14

K1
M1
Hardware Kit
Owners manual

16
E
D
A
LA
C
S
E
yn
a
f
o
e
sa
hcru
p
r
e
mu
sn
o
c
l
a
n
i
g
i
r
oe
ht
o
t
s
d
n
e
t
xe
y
t
n
a
r
ra
w
r
e
m
usn
oc
s
i
h
T
.
)
"tc
u
do
r
P"
e
h
t
s
a
d
er
re
f
e
r
r
e
t
f
a
ni
e
r
eh
(
t
c
u
d
orPS
T
ROPS
:
NO
I
T
A
R
U
D
YT
NA
R
R
A
W-
ep
a
f
o
e
s
a
hcr
u
p
r
em
us
n
o
cl
anig
i
r
o
e
h
t
otd
e
t
n
arra
w
s
it
c
u
dor
Ps
i
h
T
.
e
s
a
h
c
r
u
p
lan
i
gi
roeh
tm
or
fs
y
a
d
0
9fo
d
o
i
r
:
E
G
AREVO
C
YT
N
A
R
R
AW r
esa
h
cru
Pr
e
m
u
s
n
oCl
a
n
igi
r
oehtotst
n
a
rr
a
wS
T
R
O
P
SE
D
A
L
AC
SE
d
e
s
u
nehw
p
ihs
n
am
k
r
o
wdna
l
a
i
r
e
tam
n
i
s
t
c
e
f
e
d
m
or
f
e
e
r
f
s
i
er
u
t
ca
f
u
n
am
s
t
ifotcu
d
o
r
P
y
n
a
taht
E
H
T
F
IDI
OV
SI
YT
N
A
R
R
A
W
S
I
HT
.
s
n
o
it
id
n
o
cd
na
e
su
l
am
r
o
nre
d
n
u
e
s
o
p
r
up
d
e
d
ne
t
ni
e
h
t
ro
f
,
E
CNEG
I
LG
E
N
,
E
S
UELB
A
N
O
S
A
E
R
N
U,
T
N
E
D
I
CCA
Y
B
D
EG
A
M
A
D
N
E
E
B
S
AHT
C
U
D
O
R
P
-
DO
R
P
EH
T
H
T
I
W
D
E
D
I
V
O
R
P
S
N
O
I
T
CU
R
T
S
N
I
WO
L
L
O
FO
T
E
RULI
A
F
,
EC
I
VR
E
SR
E
P
O
R
P
MI
-
N
A
M
KRO
W
D
N
A
L
A
I
R
ET
AM
N
I
S
T
C
E
F
EDFOT
U
O
GNIS
I
R
A
T
O
N
S
E
S
UACR
E
HTO
R
O
T
C
U
.
P
IH
S
:
EC
N
A
MR
O
F
R
EP
Y
T
NAR
R
AW E
D
A
L
A
C
S
E
,
d
o
ir
e
p
y
t
nar
r
a
wy
a
d
0
9ev
o
bae
h
t
g
nir
u
D
,
fo
e
r
e
ht
t
n
e
n
o
pm
o
cr
o,
t
c
u
d
o
r
P
dn
a,
l
e
do
me
l
ba
ra
p
m
oc
a
h
t
i
w
e
c
a
lp
e
r
r
ori
ape
r
l
l
ah
sST
RO
PS
l
lah
s
n
o
i
tan
i
m
a
x
e
ruo
h
c
i
hw
d
n
a
,
e
r
a
c
re
p
o
r
p
d
na
es
u
la
m
r
onr
e
dn
u
e
v
i
t
c
e
f
e
d
e
vo
r
p
y
a
m
h
cih
w
.tp
eD
yt
nar
ra
W
r
uot
c
a
t
n
o
c
e
s
a
e
l
p
,
evi
t
c
e
f
e
dsu
ht
e
b
o
tn
o
i
t
c
a
f
sit
a
s
r
u
o
o
te
s
o
l
c
si
d
/
9
272
-
6
9
9
-888-
1W.t
p
e
D
y
t
n
ar
ra
:
t
a
s
u
etirWrO
60
77
4
N
I
,
e
l
l
i
vs
n
a
v
E,
9
8
8
x
o
B
.O.
P
-.c
n
I
,
str
o
p
S®
e
d
alacs
E
.
t
peD
yt
na
r
r
a
W
:
n
t
tA
:t
a
s
u
l
i
a
m-ErO
mo
c
.s
trop
s
e
d
a
l
a
c
s
e@
-
ni
fo
t
n
e
m
e
c
a
l
p
err
ori
a
p
e
r
h
c
u
sr
of
e
d
a
m
e
bl
l
i
w
e
gr
a
h
c
o
n
s
t
n
e
m
e
ri
u
q
e
rg
ni
pp
i
h
s
n
a
h
tr
e
htO
r
of
d
er
u
s
n
i
s
i
t
cudo
r
P
e
h
t
t
a
h
t
sd
n
em
m
o
c
er
ylgn
o
r
ts
ST
R
O
PS
E
D
AL
A
C
SE
.
s
t
c
ud
or
P
y
t
n
arr
a
w
.
g
n
i
l
ia
mo
t
r
oi
r
p
e
u
l
av
:S
R
EM
IALC
S
IDY
T
N
A
R
RA
WFO
T
U
OG
NI
S
I
R
AS
E
I
T
N
A
R
RA
W
D
E
I
LP
M
IY
N
A
FOS
E
IT
N
A
R
R
A
W
D
E
I
LP
M
I
E
H
T
OT
DE
T
I
M
I
L
T
O
N
T
U
B
G
N
I
DUL
CN
I
,
E
LA
S
S
IH
T
-M
I
LE
R
A
,
E
S
O
P
R
UP
RA
L
UCITR
A
PA
ROFS
S
E
N
T
I
FDNAY
T
I
L
IB
A
TNA
HCR
EM
S
TR
OP
S
E
D
AL
A
C
S
E
.
D
O
I
R
E
PY
A
D
0
9
E
VO
BAEH
T
OT
N
O
I
TA
RU
D
N
I
D
E
T
I
REH
T
OR
OT
C
UDO
R
PEHT
F
O
E
S
UF
O
S
S
OLR
O
F
EL
BA
I
LEBT
O
NLL
A
H
S
-
N
I
S
E
GAMAD
RO
S
ES
NEPX
E
,
S
T
SO
C
LA
T
N
E
D
IC
NIROLAITNEUQESNOC
.
ES
U
R
EH
TOY
N
AF
O
RE
M
U
SN
O
CEHTY
B
D
E
R
R
UC
r
ol
a
i
t
n
e
uqe
sno
c
ros
e
i
tna
rra
w
d
e
i
l
pm
i
fo
n
o
i
t
a
t
im
i
lro
noisulc
x
eehtwo
l
laton
ods
e
t
ats
e
m
o
S
.
u
o
y
o
t
y
l
p
p
a
ton
ya
m
s
n
o
i
s
ul
c
xe
r
o
s
n
oi
t
at
i
mi
l
e
voba
e
h
t
o
s,segamadla
t
ned
i
cni
:SEI
DEM
E
RL
A
G
E
Lr
eh
t
oe
v
a
h
o
s
l
ay
a
m
uoydna
s
th
g
i
r
la
g
e
l
c
i
fi
c
e
p
su
oy
se
vi
gy
t
n
a
r
ra
ws
i
h
T
.e
t
a
t
s
o
t
et
a
ts
m
o
rf
y
r
avyamhc
ih
w
s
thg
i
r
YT
N
AR
R
A
W
D
ET
I
M
I
LY
A
D
0
9
arcadegames
This manual suits for next models
1
Table of contents
Other RHINO Game manuals
Popular Game manuals by other brands

Parker Brothers
Parker Brothers Big Boggle owner's manual

Hexbug
Hexbug BATTLEBOTS Arena 4.0 quick start guide

Amusement Machines of Guang Yang
Amusement Machines of Guang Yang Meteor Shower manual

Out-Front
Out-Front GameCycle user guide

Sharper Image
Sharper Image DUCK SHOOTING CARNIVAL GAME user guide

Tiger
Tiger Wheel of Fortune Deluxe Control guide