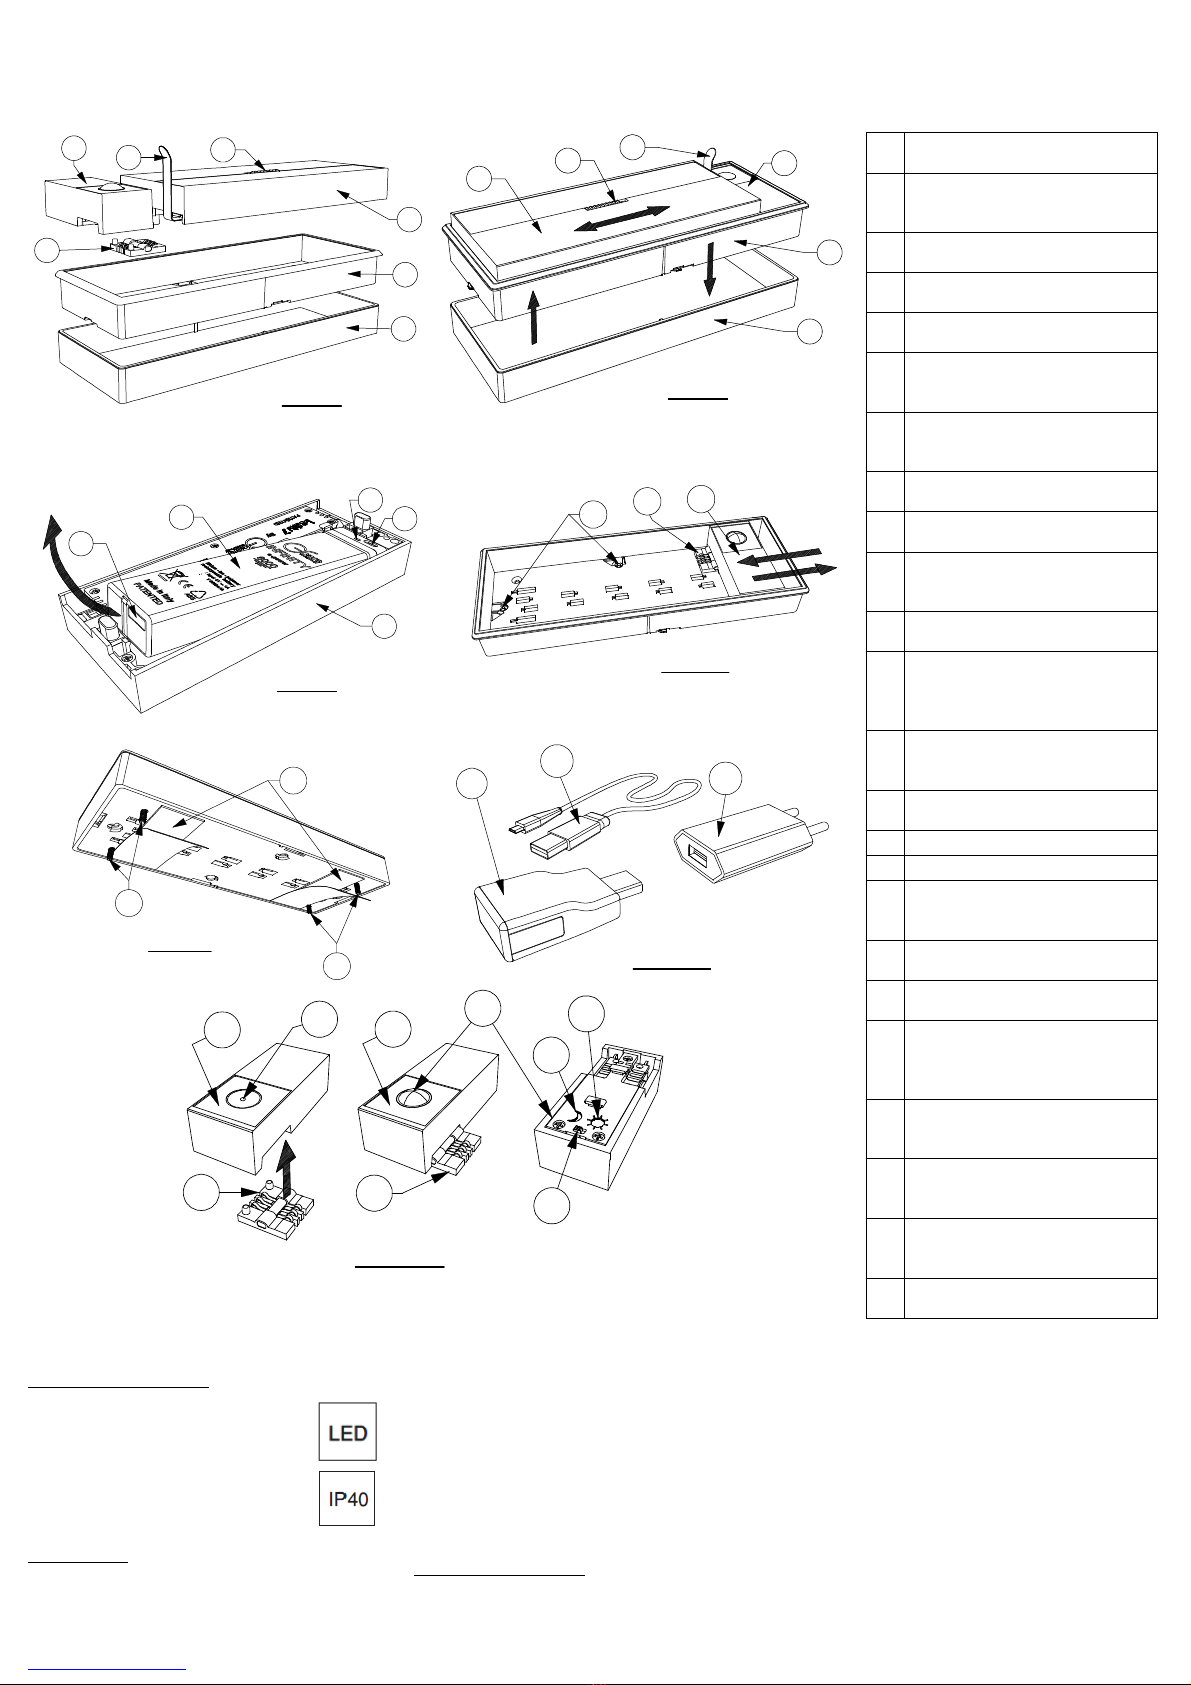
Move-m ster (21, fig.D): sensore di movimento con
selettore giorno/notte(17, fig. D). Per selezionare la
funzione del crepuscolare provvedere all’estrazione
del modulo slave seguendo la procedura descritta
sopra nel paragrafo “primo utilizzo” e procedere allo sgancio
del master (12, fig. E). Selezionare la funzione desiderata con il
selettore (17, fig. D). Riposizionare il sensore master (12, fig. E)
facendo attenzione prima di tutti ad inserire il connettore nero
negli appositi due perni (3, fig.D)
Funzione giorno (19, fig. D): una volta montato il
modulo slave, il sensore inizierà già a funzionare
perché rileva sempre la presenza.
Funzione notte (18, fig. D): una volta montato il
modulo slave, il sensore funzionerà solo in condizioni
di poca luce, al rilevamento della presenza per
economizzare l’energia delle atterie.
Numero accensioni :oltre 3800. Durata ciascuna accensione:
circa 30 secondi.
Consigli di utilizzo: armadio, ca ine armadio, li rerie,
guardaro a, corridoio, cucina, zona studio, soggiorno e camera
da letto.
Touch-m ster (20, fig.D): sensore touch a sfioramento
che si attiverà toccando il led lu.
Durata : con 4 accensioni giornaliere di 30 minuti
ciascuna, durata totale circa 1.800 minuti.
Consigli di utilizzo: camera am ini, zona studio, cucina.
Tele-m ster con sensore touch (20, fig.D) + USB con
tr smettitore (23, fig. G): utilizzato per la funzione
LAMPADA DI EMERGENZA in caso di interruzione di
corrente. Posizionare per prima cosa una us con trasmettitore
(in dotazione) (23,fig. G) in una presa elettrica della casa con
apposito alimentatore (in dotazione) (22, fig. G).
All’interruzione dell’energia elettrica la chiave USB inserita
nella presa di corrente manderà un segnale al tele-master che
farà accendere il modulo LEDDY 7. Una sola chiavetta USB può
attivare da uno a più moduli posizionati in diverse stanze
dell’a itazione fino a 20 mt di distanza.
Consigli di utilizzo: Ingresso, corridoio, soggiorno, cucina,
camera da letto, camera am ini, zona studio, ufficio.
POSSIBILI CONFIGURAZIONI:
Modulo LEDDY 7 singolo: un modulo slave (1, fig. A, B), una
ase singola (4, fig. A, B) ed un master a scelta (20,21) con
cornice singola (5,fig. A,B) o senza per l’incasso o semi-incasso.
Modulo LEDDY 7 doppio: due corpi illuminanti, una ase
doppia, un master a scelta con o senza cornice doppia per
l’incasso o semi-incasso
APPLICAZIONI:
In superficie: nessuna predisposizione necessaria, estrema
praticità. Posizionare i iadesivi in dotazione nella parte
posteriore e rimuovere la linguetta (14, fig. F) ed applicare. Si
possono utilizzare anche le viti in dotazione (13, fig F), secondo
preferenza.
A semi-inc sso: fissaggio rapido con eccentrici (in dotazione)
(16, fig. E), profondità 14mm.
Ad inc sso: fissaggio rapido con eccentrici (in dotazione)(16,
fig. E), incasso di 20 mm. Rimuovere la cornice esterna
sfilandola(5, Fig. B). Possi ilità di incasso nel cartongesso con
apposite molle e viti (da acquistare con Kit venduto a parte).
Misure :larghezza 75mmx lunghezza 201mm.
GARANZIA E SERVIZIO:
Il prodotto LEDDY 7 è garantito contro i difetti di fa ricazione,
in condizioni di uso normale. Se non dovesse funzionare come
dovuto a causa di difetti di materiale o di fa ricazione, il
prodotto verrà sostituito. Basta riportare il
prodotto e lo scontrino d’acquisto al
rivenditore, richiedendone la sostituzione
gratuita. Questa garanzia non copre difetti
dovuti a uso improprio, a uso o mancata osservanza delle
istruzioni. Ciò non compromette i diritti legali del consumatore.
N.B. LA DURATA DELLA GARANZIA E’ DIVERSA DA UN PAESE
AD UN ALTRO, FARE RIFERIMENTO ALLA GARANZIA
APPLICABILE NEL PAESE DI ACQUISTO DEL PRODOTTO.
ISTRUZIONE DI SICUREZZA GENERALI ED AVVERTENZE:
Leggi tutte le istruzioni. La mancata osservanza delle seguenti
istruzioni può causare malfunzionamenti fra i quali scosse
elettriche, incendi e/o danni seri. Conserva queste istruzioni di
sicurezza per ulteriori consultazioni.
Non tenere l b tteri nelle immedi te vicin nze di un fonte
di c lore e non esporre l b tteri temper ture superiori di
50°.
MANUTENZIONE:
Pulisci l’oggetto solo con un panno mor ido,
umido o asciutto. Non usare mai solventi o
prodotti agressivi.
Non tentare di aprire l’involucro del modulo slave e la atteria.
Non esporre il prodotto a neve e pioggia.
SALVAGUARDIA DELL’AMBIENTE:
Informazioni sullo smaltimento dei rifiuti di apparecchiature
elettriche ed elettroniche per uso domestico ai sensi della
Direttiva RAEE (Rifiuti di apparecchiature elettriche ed
elettroniche).
Questo sim olo, posto su apparecchi elettrici ed elettronici e
sulla documentazione di accompagnamento, indica che questi
prodotti non possono essere eliminati con i comuni rifiuti
domestici. I prodotti devono essere conferiti in centri di
raccolta appositamente attrezzati, che provvedono
gratuitamente allo smaltimento, alla lavorazione, al recupero e
al riciclaggio dei materiali.
Le atterie agli ioni di litio non contengono
mercurio, cadmio o piom o.
Non si possono smaltire con i rifiuti
indifferenziati. Controlla le norme sul
riciclaggio del tuo comune e se esistono
strutture per il riciclaggio nella tua zona.
Questo sim olo è valido solo all’interno
dell’Unione europea. Contatta le autorità locali o il rivenditore
per avere informazioni sul corretto metodo di smaltimento di
questo prodotto.
EN
PRINCIPAL CHARACTERISTICS:
Wireless lighting system with 12 low
consumption LED. Feeding via rechargea le ion-lithium-
polymer INFINITY atterywhich reduces the
energy consumption from 65% to 90 %. The
emitted light is white equal to 4500°K and has
1 W power. The light feels cold when switched
on.
Materials: ABS and polycar onate. Protection: IP 40.
FIRST USAGE:
Slide the locking cursor to the left for the opening of the
product (6, fig. A,B), lift the slave module (1, fig. A, B), remove
the protection film (7, fig. A, B) and extract the INFINITY attery
y hand (9, fig. C). Connect the micro-USB ca le (24, fig. G). to
the attery (10, fig. C) and connect the ca le to a USB source
(PC, 220V feeder supplied (22, fig. G) porta le USB charger). A
red LED will appear on the ody of the attery (11, fig. C), and
shows that the attery is charging. Ensure a full loading at the
first charging: advised loading time a out 6 hours. When the
attery is fully loaded, the red LED switches off. Reposition the
INFINITY attery in the housing of the light, y pressing it down
and slide the cursor to the right into locking position. (6, fig. B).
INFINITY BATTERY (8, Fig. C):
Latest generation rechargea le lithium-ion-polymer attery
with 3,7V operating current. The safety is guaranteed y the CE
standard and the Giesse Technology quality seal. The attery
can e recharged around 500 times, meaning that with a
recharging every two weeks, it will last for 20 years.
To recharge it, use the feeder and the ca le supplied with the
light or a feeder and a ca le with the same characteristics.
Empty b ttery sign l: when the attery is close to emptiness,
the window around the master module turns red (15, fig. D);
recharge the attery according to instructions of this
description under “FIRST USAGE”.
INFINITY 3.000 BATTERY: recharging time around 4 hours;
guaranteed supply of energy for at least 18 hours of constant
usage of light.
INFINITY 6.000 BATTERY: recharging time around 7 hours;
guaranteed supply of energy for at least 35 hours of constant
usage of light.
FUNCTION (depending on the light version
cquired):
Move-m ster (21, fig.D): movement sensor with
day/night selection (17, fig. D). To chose the right crepuscular
functioning, extract the slave module according to the
instructions given under “FIRST USAGE” and slide the master
module out with a sideways movement (12, fig. E). Chose the
required function y switching the selector on the rear side in
the required position (17, fig. D). Reposition the
master module (12, fig. E) not forgetting to place ack
also the lack connector in its position (3, fig.D)
D y function (19, fig. D): once reassem led, the light
will switch on every time it detects a presence in
whatever surrounding lighting condition.
Night function (18, fig. D): once reassem led, the light
switches on when detecting a presence only in poor light
conditions or darkness, in order to save energy. Example of
num er of cycles: more than 3800 of 30 second each.
Proposed us ge: wardro e, walk-in wardro e, li rary, home
entrance, corridor, kitchen, home office, living room,
sleeping room.
Touch-m ster (20, fig.D): touch sensor which will
ignite the light when touching the lue LED.
Duration : with 4 ignitions of 30 minutes each for example, the
charge will last around 1.800 minutes.
Proposed us ge: kiddy room, home office, kitchen, ed head
Tele-m ster with touch sensor (20, fig.D) + USB key with
tr nsmitter (23, fig. G): in this configuration, the lamp can e
used as emergency light in case of disruption of current supply.
First plug the little feeder with the USB key (23,fig. G) supplied
with the kit into a free mains socket. In case of disruption of
the main current supply, the USB key transmits a signal to the
LEDDY 7 light which switches on for the duration of the
disruption of current supply. One USB key can drive one or
more LEDDY 7 lights configured as emergency lighting within
20m distance.
Proposed us ge: entrance, corridor, living room, kitchen, stairs,
edroom, kiddy room, home office, office.
POSSIBLE CONFIGURATIONS:
Single LEDDY 7 unit: one lighting module (1, fig. A, B), one
single housing (4, fig. A, B) and one master type (20,21) with
single full frame (5,fig. A,B), half frame for partial insertion or
without frame for full insertion.
Double LEDDY 7 unit: two lighting modules, one dou le
housing, and one master type with single full frame, half frame
for partial insertion or without frame for full insertion.
INSTALLATION:
Flush: extremely practical application without any intervention,
thanks to wireless operation. Fix the supplied adhesive stripes
on the ottom of the housing, remove the safety strip from the
attery (14, fig. F) and press it into position where suita le.
Alternatively, the screws supplied (13, fig F) can e used to fix
the housing on adequate surface if preferred.
H lf inserted: the partial insertion is 14mm and a quick fixing
can e done thanks to integrated cams (16, fig. E).
Fully inserted: remove the frame around the housing and use
the cams for rapid fixing into the 20mm deep insertion hole.
With an optional kit (to e acquired separately), you can realize
an insertion into plaster oard or chip oard, with a spring
loaded mechanism.Size :Widht 75mmxLenght201mm.
WARRANTY & AFTER SALES SERVICE:
LEDDY 7 and the INFINITY attery are guaranteed against
production defaults under normal usage conditions. In the
unlikely case, that the system shouldn’t work ecause of
material or production defects, the product will e su stituted
y a valid one. To enefit from this guarantee, it is necessary to
ring the defectuous product together with the proof of
acquisition to your distri utor, who will replace it free of
charge. This guarantee doesn’t cover improper usage, a use or
non respect of the instructions provided. This guarantee
doesn’t su stitute the legal rights of consumers applica le in
the country of purchase.
N.B. THE DURATION OF THE WARRANTY CAN VARY AND IS
DEPENDING ON THE LEGAL TERMS APPLICABLE IN EACH
COUNTRY.
WARNINGS AND SAFETY INSTRUCTIONS:
Please read the full instruction. Not
respecting the instructions might lead to a
malfunction, like for example short circuits,
urning, explosion or other serious damage.
Please conserve these instructions for later referral.
DO NOT KEEP THE BATTERY NEAR A SOURCE OF HEAT AND
DON’T EXPOSE THE BATTERY TO TEMPERATURES SUPERIOR
TO 50° C.
MAINTENANCE:
Clean the lighting system with a dry or slightly
damp tissue. Don’t use solvents or aggressive
cleaning agents. Don’t spray cleaning products
onto the system. Don’t try to force opend the
housing of the light module or the hull of the attery. Don’t
expose the system to water, rain or snow.
SAVE THE ENVIRONMENT:
Chosing a LEDDY 7 lighting system, you are already making a
contri ution to reducing your car on footprint. At the end of
the life of this product, please ehave responsi ly. This
equipment is su ject to the European
standard for disposal of electric and electronic
equipment. The sym ol indicates that the
product cannot e thrown into the normal
domestic waste in, ut has to e disposed of
in a specialized waste treatment unit for
electric and electronic apparatus. The ion-
lithium polymer attery doesn’t contain any
mercury or lead. It has to e disposed of like every attery
according to your local legislation. The sym ol applies to the
EEC only. Ask your local distri utor for adequate advice on the
disposal of the product respecting the local legislation.