Ricoh D201 User manual

- 1 -
【RICOH EH Environment Sensor D201/D202】
User’s Manual Read this manual through before starting to use the product.

- 2 -
Table of Contents
1. Safety Considerations 5
1-1. Safety signs and symbols 5
1-2. Examples 5
1-3. Safety Instructions 6
2. Other Information Regarding the Sensors and Relay 9
2-1. Notes on handling 9
2-2. Notes on Radio Waves 9
2-3. Disposal and Recycling 9
3. Disclaimers 10
3-1. Information Security 10
3-2. Installation 10
3-3. Others 10
4. Product Overview 11
4-1. Product Components 11
4-2. Connection Modes and Communication Distances 11
4-3. Overview of the Products 12
4-4. Parts and Functions 12
4-5. Required Illumination and Charging Performance 13
4-5-1. Illumination required for different sensing intervals 13
4-5-2. Charging performance 13
4-5-3. Operating time in dark places 14
5. Datasheets 15
5-1. Datasheet for RICOH EH Environment Sensor D201/D202 15
5-2. Datasheet for RICOH EH Relay for Wi-Fi™ 16
5-3. Datasheet for the RICOH EH Environment Sensor App for Android™ 16
5-4. Datasheet for the RICOH EH Environment Sensor App for WindowsⓇ16
6. Using the Sensors—Direct Mode Using AndroidTM Device 17
6-1. Preparation 17
6-1-1. Required devices 17
6-1-2. Required features and verified AndroidTM devices 17
6-1-3. Installing the app on AndroidTM device 16
6-2. Overview of RICOH EH Environment Sensor App for Android™ 17
6-3. Sensor Registration 18
6-3-1. Sensor registration pane 18
6-3-2. Sensor search pane 19
6-3-3. App settings pane 19
6-3-3①. App settings pane (log data save area) 20
6-3-3②.App settings pane (log data format) 20
6-3-3③.App settings pane (alert notification) 20
6-3-3④.App settings pane (illuminance adjustment) 21

- 3 -
6-3-4. Sensor settings pane (Sensor search pane) 22
6-3-5. Sensor settings pane (Sensor settings pane) 23
6-3-6. Color settings pane 23
6-4. Sensor Reception 24
6-4-1. Received data pane 24
6-4-2. Graphs pane 25
6-4-3. Sensor graphs per parameter pane 26
6-4-4. Log data list pane 27
6-4-4①.Log data list pane (all data) 27
6-4-4②.Log data list pane (normal data) 27
6-4-4③.Log data list pane (abnormal data) 28
6-4-4④. Log file contents 28
6-4-5. Graph drawing settings pane 29
6-4-6. Select sensor to set color pane 30
6-4-7. Alert settings pane 30
6-5. Log Reading 33
6-5-1. Read log data pane 33
6-5-2. Log data pane (past CSV data) 34
6-5-3. Reception time list pane (past CSV data) 34
6-5-4. Graphs pane (past CSV data) 35
6-5-5. Sensor graphs per parameter pane (past CSV data) 36
6-5-6. Graph range setting pane (past CSV data) 37
6-5-7. Graph drawing settings pane (past CSV data) 37
6-5-8. Log data list pane (past CSV data) 38
6-5-8①. Log data list pane (all data) 38
6-5-8②. Log data list pane (normal data) 38
6-5-8③. Log data list pane (abnormal data) 39
7. Using the Sensors—Gateway Mode on Windows®40
7-1. Preparation 40
7-1-1. Required devices 40
7-1-2.WindowsⓇversion 40
7-1-3. Installing the app on Windows®40
7-2. Configuring the RICOH EH Relay for Wi-Fi™ 40
7-2-1. Relay hardware 40
7-2-2. Connecting the relay and the PC 41
7-2-3. Configuring the relay 42
7-2-4. Configuring the relay (when connecting only one relay) 44
7-2-5. Configuring the relays (when connecting multiple relays) 45
7-2-6. Checking the relay firmware revision 46
7-3. Overview of the RICOH EH Environment Sensor App for WindowsⓇ47
7-4. Sensor Registration 47
7-4-1. Relay registration pane (disconnected) 47

- 4 -
7-4-2. Relay registration pane (connected) 48
7-4-3. Sensor registration pane 49
7-4-4. Sensor search pane 50
7-4-5. App settings pane 50
7-4-5①. App settings (log data save area) 51
7-4-5②. App settings (log data format) 51
7-4-5③. App settings pane (illuminance adjustment) 52
7-4-6. Color settings pane 52
7-5. Data Reception 53
7-5-1. Received data pane (connecting) 53
7-5-2. Received data pane (connected) 54
7-5-3. Graphs pane 55
7-5-4. Sensor graphs per parameter pane 56
7-5-5. Log data list pane 57
7-5-5①.Log data list pane (all data) 57
7-5-5②.Log data list pane (normal data) 58
7-5-5③.Log data list pane (abnormal data) 59
7-5-5④. Log file contents 59
7-5-6. Graph drawing settings pane 60
7-5-7. Select sensor to set color pane 61
7-5-8. Alert settings pane 61
7-6. Log Reading 63
7-6-1. Read log data pane 63
7-6-2. Log data pane (past CSV data) 64
7-6-3. Reception time list pane (past CSV data) 64
7-6-4. Graphs pane (past CSV data) 65
7-6-5. Sensor graphs per parameter pane (past CSV data) 66
7-6-6. Graph range setting pane (past CSV data) 67
7-6-7. Graph drawing settings pane (Past CSV data) 67
7-6-8. Log data list pane (past CSV data) 68
7-6-8①. Log data list pane (all data) 68
7-6-8②. Log data list pane (normal data) 69
7-6-8③. Log data list pane (abnormal data) 69
7-7. App Settings File 70
8. Troubleshooting 71
9. If you have questions regarding the products 74

- 5 -
1.Safety Considerations
1-1. Safety signs and symbols
The following safety symbols are used in this manual:
Note the following signs and accompanying instructions in this manual and on the product. They are
intended to prevent you and others from personal injury or property damage.
Warning
Neglecting the instructions under this sign can cause death or severe injuries.
Caution
Neglecting the instructions under this sign can cause injuries or property damage.
1-2. Example
The following are examples of safety signs:
The triangle with an exclamation means you need to use
caution.
The circle with a slash means prohibition.
The pictogram in the circle displays what is prohibited.
(The left figure means “No disassembly).
Caution
Prohibition
No disassembly
Keep children away
General mandatory
action sign

- 6 -
1-3. Safety Instructions
For your safety, observe the instructions below when using or handling the products (sensors and relays):
■When using the products
Warning
Risk of explosion, fire, and burns. Do not use the products near flammable gas, solvents like
gasoline, benzine, or thinner, or their containers.
Risk of accidents. Do not use the products where their use is restricted or prohibited, for
instance, on an airplane.
Risk of explosion, fire, and injury. Do not use, store, or leave the products in a high-
temperature environment, for instance, near an open flame, under direct sunlight, or in a car
under the scorching sun.
Do not put the products in a microwave or pressurized vessel.
Do not spray volatile chemicals (such as benzine or thinner) or insecticide onto the products.
Do not use the products in the event of an unusual smell, smoke, or overheating. Immediately
switch off the products and contact RICOH or your local RICOH dealer.
When a foreign object (such as metal, water, or any other liquid) has entered the sensor,
immediately turn off the switch.
When a foreign object (such as metal, water, or any other liquid) has entered the relay,
immediately remove it from the AC adapter.
Contact RICOH and do not continue to use the sensor or relay.
The supplied AC adapter is for the RICOH EH relay for Wi-FiTM only. Do not use it with any
other product.
Use the supplied AC adapter only. Using any other AC adapter can cause fire or electric
shock.
Do not install or store the products and accessories where infants and young children can
reach.

- 7 -
Do not disassemble, repair, or modify the products. The sensor contains a lithium-ion cell.
When disconnecting the power cord from the wall outlet, always pull the plug, not the cord.
Pulling the cord can damage the power cord. Use of damaged power cords could result in fire
or electric shock.
Be sure to disconnect the AC adapter from the wall outlet at least once a year
and check for the following:
There are burn marks on the adapter.
The prongs on the adapter are deformed.
If you find any of the above, contact RICOH. Continuing to use the products can cause fire
or electric shock.
Remove the USB power cable from the AC adapter and inspect it for the following at least
once a year:
Exposed or disconnected core wire
Torn or dented sheath
Power turns on and off when the cable is bent
Heating in parts of the cable
Visible damage on the cable
If you find any of the above, contact RICOH. Continuing to use the products can cause fire or
electric shock.
Risk of a smoke, fire, or electric shock. When inserting the power plug into the electrical
outlet, make sure it is inserted all the way.
Watch out for leaks from the lithium-ion cell in the sensor. The leaking liquid can cause burns
when it comes in contact with the skin. In the event the liquid is on your skin, immediately
rinse it off with water, but do not use soap. Contact RICOH and do not continue to use the
sensor.
Be sure to locate the relay as close as possible to a wall outlet. This will allow easy
disconnection of the power cord in the event of an emergency.
<<Not applicable to the RICOH EH Environment Sensor D202>>
Risk of electric shock. Do not let the products get wet or operate the products with wet hands.
Do not place the relay near water like in front of an open window where rainwater may enter.
Fire or electric shock could result from spillage or if such objects or substances fall inside this
relay.

- 8 -
Caution
Be sure to disconnect the AC adapter from the wall outlet and clean the prongs and the area
around the prongs at least once a year.
Allowing dust to build up on the adapter constitutes a fire hazard.
Keep the relay away from humidity and dust. Otherwise a fire or an electric shock might
occur.
To prevent the products (sensors and relays) from malfunction, observe the instructions
below:
Do not apply a strong shock.
Do not use or store the products in unintended orientation (upside-down, for instance).
Use the products within the guaranteed operating temperature range.
Avoid low and high temperatures when storing the products.

- 9 -
2.Other Information Regarding the Sensors and Relay
2-1. Notes on Handling
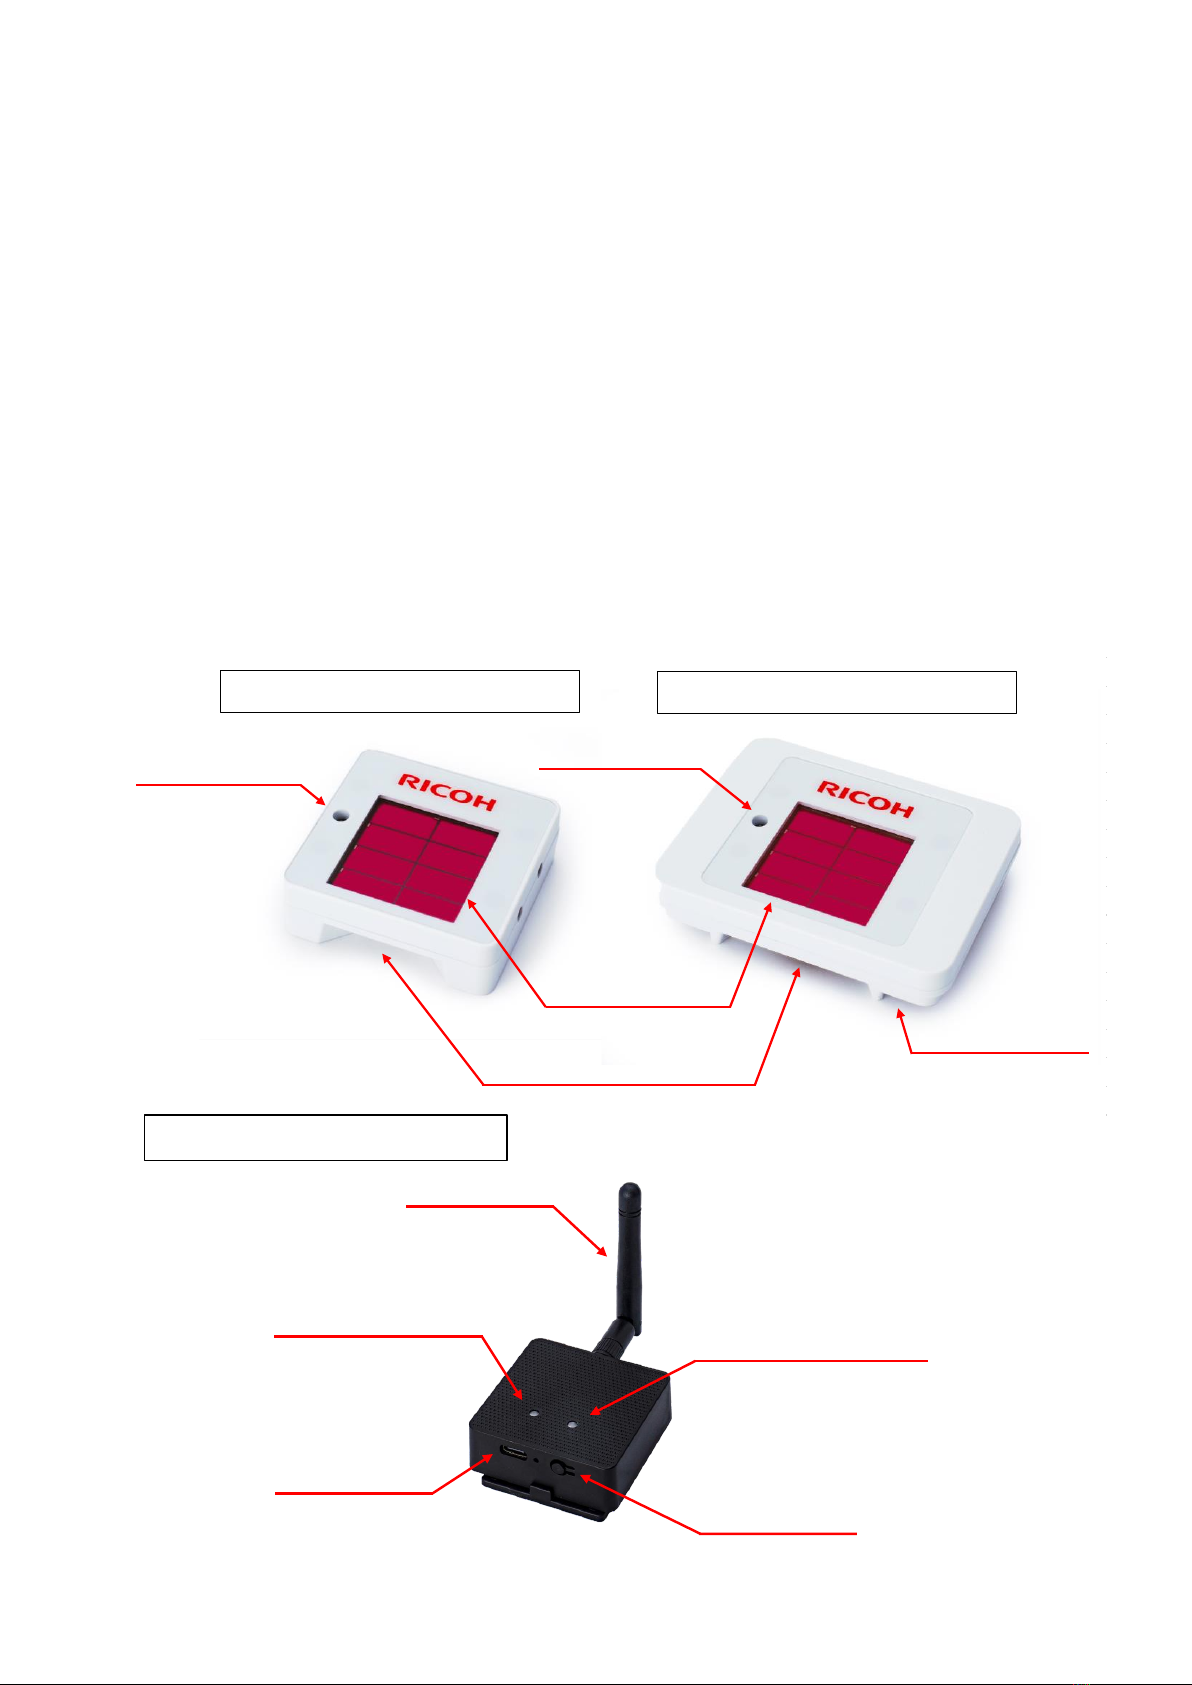
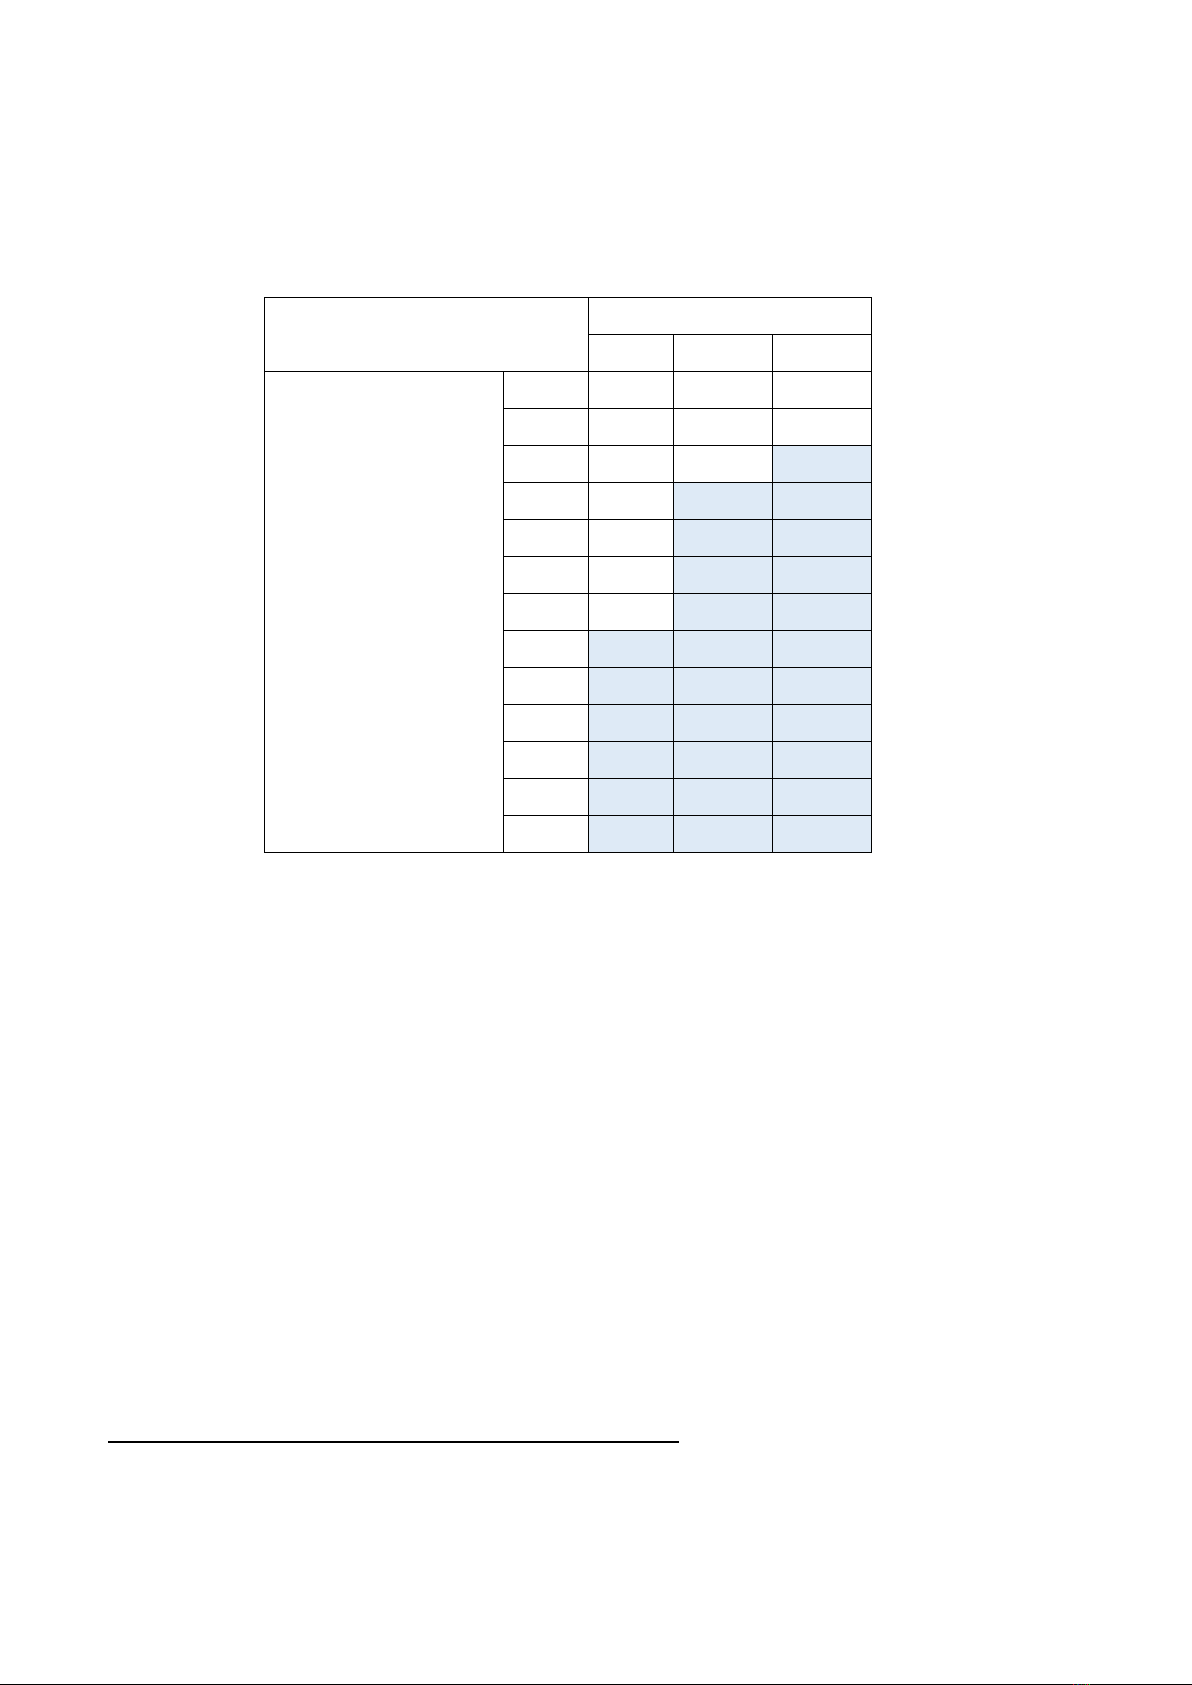
⚫The RICOH EH Environment Sensor 201 and the RICOH EH Relay for Wi-FiTM are not waterproof,
water resistant, or shock resistant.
⚫The RICOH EH Environment Sensor 202 is rated IP44 (waterproof and dustproof).
⚫A dirty surface of the solar cell can hinder power generation. If you find any foreign object on the light
receiving surface, immediately wipe it away.
⚫Do not rub the light receiving surface of the solar cell with force. When wiping off a foreign object, gently
do so.
⚫Do not press, bend, or twist the surface of the solar cell, as it can cause damage.
⚫The products are for indoor use only. Do not use them outdoors.
⚫Avoid direct sunlight. The recommended intensity of illumination is 1500 lx or less under LED or
fluorescent light.
⚫Do not install the relay with its AC adapter port facing upward.
⚫Do not use the products in an acidic or alkaline environment.
⚫When not in use, store the products in a dark place at room temperature (for instance, in a drawer or a
cardboard box).
⚫Do not apply a strong force on the switch. The switch is small and easily breaks.
⚫Make sure that the relay is connected to network equipment that is installed and managed properly.
Protect the relay from illegal alterations by a malicious third party. When using a PC to update the relay
or set it up via a web browser, do so on a dedicated network that allows the relay to be accessed only
by an eligible PC.
⚫The sensor contains a lithium-ion cell. Do not remove or replace the cell on your own.
2-2. Notes on Radio Waves
This section provides notes on the use of radio waves.
■ Notes on radio interference
The products can adversely affect other electronic components nearby (and vice versa). A nearby TV or
radio, in particular, can cause noise. If that is the case, take any of the following measures:
⚫Install the products as far away as possible from the TV or radio.
⚫Change the orientation of the TV or radio antenna.
⚫Connect the products to an AC outlet different from that used for the TV or radio.
2-3. Disposal and Recycling
For the disposal or recycling of the products, contact RICOH.

- 10 -
3.Disclaimers
3-1. Information Security
⚫Properly manage the password to the relay. Update them regularly.
RICOH shall not be responsible for any damage related to security key or password leaks.
3-2. Information Security
⚫RICOH shall not be responsible in any way for a fall or breakage of an environment sensor installed by
the user.
3-3. Others
⚫Do not disassemble or modify the products, nor remove any part from the products. All warranty shall be
void if the products are disassembled or modified or a part is removed.
⚫RICOH shall not be responsible in any way for damage due to the use of the products or inability to use
the products.
⚫Do not switch on the products where radio waves influence other equipment or where the use of radio
equipment is prohibited. For instance, do not switch on the products near a heart pacemaker, near
medical electronic instruments, on board a plane, or at a hospital. Radio waves from the products can
influence other equipment.
⚫Do not use the products as data acquisition tools for critical devices that require special quality and
reliability and whose breakdown or malfunction can risk human lives and physical injury (for instance,
space and aeronautical devices, atomic power control systems, traffic control equipment, transportation
equipment, combustion equipment, safety devices, and life-support devices).

- 11 -
4. Product Overview
4-1. Product Components
There are six product components:
1. RICOH EH Environment Sensor D201
2. RICOH EH Environment Sensor D202
3. RICOH EH Relay for Wi-FiTM
4. AC adapter for the relay and USB power cable
5. RICOH EH Sensor for AndroidTM
6. RICOH EH Sensor for Windows®10
*The apps are downloadable at the following URL:
https://industry.ricoh.com/en/dye-sensitized-solar-cell/
4-2. Connection Modes and Communication Distances
The products have two connection modes as described below. *The package does not include the
smartphone, tablet, and PC.
1. Direct mode (For AndroidTM devices. In this mode, an AndroidTM device directly receives data from the
sensor(s).)
2. Gateway mode (For WindowsⓇPCs. In this mode, a Windows PC receives data from the sensor(s)
via a relay.)
The maximum communication distance depends on the devices and modes:
1. Between an Android device and a sensor (Direct mode): Approx. 30 m without obstacles
2. Between a relay and a sensor (Gateway mode): Approx. 30 m without obstacles
3. Between a relay and a PC (Gateway mode): Approx. 50 m without obstacles
*The communication distances are affected by the environment, for instance, by obstacles.
*The above distances assume the following settings: 6 db signal intensity (maximum) and 3 consecutive
transmissions.
*A long distance between the devices can adversely affect communications, causing data to be lost.

- 12 -
4-3. Overview of the Products
RICOH EH Environment Sensor D201/D202 detects temperature, humidity, atmospheric pressure, and
ambient light, and sends the information to an Android device or Windows PC via Bluetooth®Low Energy
(BLE). The D201/D202 runs on a dye-sensitized solar cell (RICOH EH DSSC) and a built-in lithium-ion cell.
The AndroidTM or Windows®app displays the temperature, humidity, atmospheric pressure, and
illumination, as well as the voltage of the built-in lithium-ion cell, makes graphs, logs data, and issues an
alert in the event of an exceeded threshold.
In Direct mode, an AndroidTM device can receive data from up to 15 environment sensors.
In Gateway mode, a relay can receive data from up to 15 environment sensors, and up to 6 relays can be
connected to a Windows PC. (That is, a Windows PC can receive data from up to 90 environment sensors
via 6 relays.)
*The Bluetooth®wordmark and logotype are a registered trademark of Bluetooth SIG. Inc. Ricoh is licensed
to use the wordmark and logotype.
4-4. Parts and Functions
RICOH EH Environment Sensor D201
Sensor Switch(ON/SET/OFF
)
Illuminance Sensor
RICOH EH DSSC
Ventilation Filters
RICOH EH Environment Sensor D202
Illuminance Sensor
Reset button
USB Type-C®
5V power input
LED
:BLE status indicator
■
On:Find sensor in range
■Flash:BLE transmission happening
LED
:Wi-Fi
TM
status indicator
■
Green:Normally connected
■
Orange:Booting
■Red:Error
Antenna
RICOH EH Relay for Wi-Fi
TM

- 13 -
4-5. Required Illumination and Charging Performance
4-5-1. Illumination required for different sensing intervals
Under certain illumination, the D201/D202 sensor continues to operate without a drop in the voltage of the
lithium-ion cell. The required illumination depends on the sensing interval as listed in the table below.
Illumination required to retain
power balance
Sensing interval (sec)
5
60
300
24-H illumination (lx)
0
-
-
-
50
-
-
-
75
-
-
✓
100
-
✓
✓
125
-
✓
✓
150
-
✓
✓
200
-
✓
✓
250
✓
✓
✓
300
✓
✓
✓
400
✓
✓
✓
600
✓
✓
✓
800
✓
✓
✓
1000
✓
✓
✓
*The table above assumes the following settings: 6 dB signal intensity (maximum) and 3 consecutive
transmissions.
*The table above assumes room temperature. Higher illumination will be required for a higher
temperature.
4-5-2. Charging performance
When the voltage of the lithium-ion cell drops below the lower operating limit (approx. 1.8 V), the cell can
be recharged under the following conditions:
-200 lx: It takes approx. 4 hours until the cell can restart the sensor. It takes approx. 30 hours until the
cell voltage reaches 2.3 V.
-400 lx: It takes approx. 2 hours until the cell can restart the sensor. It takes approx. 15 hours until the
cell voltage reaches 2.3 V.
-It takes more than 150 hours under 1500 lx for the cell to be charged fully (approx. 2.7 V).
●Important: Set the sensor switch to OFF while charging.
The above hours are calculated assuming that the sensor switch is set to OFF. Once the voltage has
reached the lower operating limit, the battery cannot be sufficiently charged with the switch set to ON. (With
the switch set to ON, it would take more than five hours under 800 lx until the cell can restart the sensor.)

- 14 -
4-5-3. Operating time in dark places
The sensor is designed to last for the following periods in complete darkness:
Approx. 4 days when the initial voltage is 2.3 V
Approx. 13 days when the initial voltage is 2.4 V
Approx. a month or longer when the initial voltage is 2.7 V (full)
*The operating time depends on the settings, including sensing intervals and signal intensity.
*The above operating time is calculated assuming a 300 sec sensing interval, 6 dB signal intensity, and
3 consecutive transmissions.

- 15 -
5. Datasheets
This section provides the datasheets for the products.
5-1. Datasheet for RICOH EH Environment Sensor D201/D202
Item
Description
Model
RICOH EH Environment Sensor
D201
RICOH EH Environment Sensor
D202
Power supply
RICOH EH DSSC (28 mm × 32 mm)
Items measured
Temperature, humidity*, ambient light, atmospheric pressure, voltage of
built-in lithium-ion cell
*D202 is less responsive to abrupt changes in humidity than D201.
Measurement range
and resolution
Temperature: -30°C to 60°C, 0.1°C
Humidity: 0%RH to 100% RH, 0.1% RH
Atmospheric pressure: 300 hPa to 1100 hPa, 0.1 hPa
Ambient light: 0 lx to 10000 lx, 0.1 lx
Voltage: 1.70 V to 2.80 V, 0.01 V
Measurement
accuracy
Temperature: ±1°C
Humidity: ±3% RH
Atmospheric pressure: ±1 hPa
Ambient light: ±15% (for information only)
Voltage: ±0.1 V
Sensing interval
5 to 600 sec (as designated on AndroidTM app)
Wireless format
Bluetooth®Low Energy
Conditions for
continuous operation
8 hours/day under a 200 lx neutral white LED
(when the sensing interval is 300 sec)
Operating
environment
-30°C to 60°C
Indoor use only (1500 lx illumination or less)
Dimensions
W43mm × D41mm × H14mm
W60mm × D47mm × H14mm
Weight
19 g
23 g
Waterproofing and
dustproofing
None
IP44

- 16 -
5-2. Datasheet for RICOH EH Relay for Wi-Fi™
Item
Description
Power supply
AC adapter, USB Type-C®
Input voltage: 100 V/240 V 50-60 Hz
Output voltage: 5 VDC
Output current: 1A
Operating
environment
Relay unit: -20°C to 60°C
AC adapter: 0°C to 40°C
Wi-Fi™
802.11b/g/n (2.4 GHz band)
WPA/WPA2/WPA2 enterprise
Dimensions
W54 mm × D54 mm × H19 mm (not including external antenna)
Weight
54 g
Firmware version
IGS03W-RI-v1.0.9.0
*Note that the operating temperature range differs for the sensor, relay, and AC adapter.
5-3. Datasheet for the RICOH EH Sensor for Android™
Item
Description
Supported OS
AndroidTM OS 9.0 or later
Required function
Bluetooth®LE (Bluetooth®5.0) or higher
# of sensors
connected
Up to 15
Alert
Designated for each item sensed
Data capacity
Log data: 25 KB approx. (one day per sensor at 300 sec sensing interval)
*Can be stored in main memory or an SD card of the Android device
5-4. Datasheet for the RICOH EH Sensor for WindowsⓇ
Item
Description
Supported OS
Windows®10 Pro/Home
CPU
Intel®Atom™ x5-Z8350 or higher
# of sensors
connected
15 per relay (up to 6 relays, 90 sensors)
Alert
Designated for each item sensed
Data capacity
Log data: 25 KB approx. (one day per sensor at 300 sec sensing interval)

- 17 -
6. Using the Sensors—Direct Mode Using AndroidTM Device
6-1. Preparation
6-1-1. Required devices
To use Direct mode, prepare the following devices:
・RICOH EH Environment Sensor D201 or D202
・A tablet or smartphone with AndroidTM OS
6-1-2. Required features and verified AndroidTM devices
Operation in Direct mode requires AndroidTM OS 9.0 or later and Bluetooth®5.0 or later.
Operation has been verified on the following devices:
Tablets
・Lenovo Tab M8
・NEC LAVIE Tab E TE508
Smartphones
・SHARP sense4
・SHARP AQUOS sense 3
・SONY Xperia 8 Lite
6-1-3. Installing the app on AndroidTM device
1. Access the Environment Sensor Download website and download the RICOH EH Environment Sensor
App for Android™.
2. Copy the downloaded file to the AndroidTM device.
3. Open the copied downloaded file.
(On most Android devices, go to the Settings menu and use the Storage function.)
4. The installer starts and displays notes on installation. Tap [Continue] to proceed.
5. An installation confirmation message is shown. Tap [Install].
6. The app icon is created, and installation is completed.
6-2. Overview of RICOH EH Environment Sensor App for Android™
The app has three functions: sensor registration, sensor reception, and log reading.
When the app is used for the first time, the sensor registration function is automatically started because no
sensor has been registered.
*For more information, see Section 6-3, Sensor Registration; Section 6-4, Sensor Reception; and Section
6-5, Log Reading.

- 18 -
6-3. Sensor Registration
6-3-1. Sensor registration pane
①Tap the arrow to move to the Received data pane (see Section 6-4-1).
②Tap this button to move to the Sensor search pane (see Section 6-3-2).
③Tap this button to add a blank sensor settings field.
④Tap this button to move to the App settings pane (see Section 6-3-3).
⑤Tap this button to move to the Sensor settings pane (Sensor search pane) (see Section 6-3-4).
⑥Use this toggle switch to enable and disable common timeout.
The timeout function displays “Error” if no data has been received from any sensor in the designated
lapse of time.
When common timeout is enabled, the timeout time common to all sensors is set in ⑦.
When common timeout is disabled, the timeout time is independently set for each sensor in⑪.
⑦With ⑥enabled, “Error” will be displayed if no data has been received from any sensor in the
designated lapse of time.
⑧Use this toggle switch to enable and disable the registration on the Received data pane
(see Section 6-4-1).
⑨This field shows the sensor name. You can designate a unique name for each sensor.
⑩Designate the BD address of each sensor. An invalid BD address will be cleared when a different pane
is opened, and the registration will be invalidated.
*When typing a BD address directly, omit the colons (:).
*When a sensor is registered through a search for sensors, the BD address is automatically entered.
⑪With ⑥disabled, “Error” will be displayed if no data has been received from the sensor in the
designated lapse of time.
⑫Tap this button to move to the Color settings pane (see Section 6-3-6).

- 19 -
6-3-2. Sensor search pane
①Tap the arrow to move to the Sensor registration pane (see Section 6-3-1).
②Start search displayed: No sensor search is in progress. Tap the button to start searching for sensors.
Stop search displayed: Sensor search is in progress. Tap the button to stop the search.
③This field shows the device name (local name) and BD address of the environment sensors found
through the search (②).
④Tap and select sensors in the ③field, and tap this button to add them to the whitelist. When a sensor
is selected, the search will stop.
⑤This field shows the sensors registered to the whitelist (the list of sensors selected for data sensing).
⑥Tap and select sensors in the ⑤field, and tap this button to delete them from the whitelist.
⑦Tap this button to delete all the sensors in the ⑤field from the whitelist.
6-3-3. App settings pane
①Tap the button to move to the App settings pane (log data save area) (see Section 6-3-1①).
②Tap the button to move to the App settings pane (log data format) (see Section 6-3-1②).
③Tap the button to move to the App settings pane (alert notification) (see Section 6-3-1③).
④Tap the button to move to the App settings pane (illuminance adjustment) (see Section 6-3-1④).

- 20 -
6-3-3①. App settings pane (log data save area)
①Select this radio button to store the log file in the following folder in the internal storage of the Android
device: Android¥data¥jp.ricoh.RICOH_EH_ENV_SENSOR_APP.
②Select this radio button to store the log file on the SD card.
The default folder is ¥(SD card)¥Android¥data¥jp.ricoh.RICOH_EH_ENV_SENSOR_APP. You can
designate a different folder on the SD card.
6-3-3②. App settings pane (log data format)
①Select this radio button to open a dialogue and designate an arbitrary log storage interval.
*Saved log file name: yyyy_MM_dd_HH_start time_storage interval.csv
②Select this radio button to save logs at intervals of one day.
*Saved log file name: yyyy_MM_dd.csv
6-3-3③. App settings pane (alert notification)
①Use the toggle switches to enable and disable notifications.
②Tap to change notification sound settings.
This manual suits for next models
1
Table of contents
Other Ricoh Accessories manuals
Popular Accessories manuals by other brands

BERKSHIRE PRODUCTS
BERKSHIRE PRODUCTS 2010 user manual

Labnet
Labnet I-4001-HCS instruction manual

Endress+Hauser
Endress+Hauser NAR 300 operating instructions

ABB
ABB Wireless Proximity Switches Planning and Installation Guidelines

Eurotronic
Eurotronic Air Quality SensorZ-Wave Plus Installation & operation guide

QOLSYS
QOLSYS IQ MOTION-S installation manual