ricoo WM0623 User manual

100v ~ 240v100v ~ 240v-5°C ~ +40°C-5°C ~ +40°C 125kg125kg
275lbs275lbs
MAXMAX
Bx2
Ax1
Gx1 Ix2 Jx1
Kx8 Nx2 Qx3 Rx10 Sx1
Ox2 Px4
Lx8 Mx10
Hx1
Ex1
Fx1
Cx2 Dx2
IT
Attenzione: Non superare mai il peso massimo ammesso. La mancata
osservanza di questa precauzione può causare danni materiali o lesioni gravi!
ES
Precaución: Nunca exceda el peso máximo admisible de la carga. La inobservan-
cia de esta advertencia puede ocasionar daños materiales o lesiones graves!
FR
Attention: Ne dépasser jamais le poids de charge admissible. Le mépris de
ces consignes peut aboutir des dommages matériels; ou des blessures graves!
EN
Warning: Do not exceed listed load weight. Property damage oder serious
injury may occur!
DE
Achtung: Niemals das maximal zulässige Belastungsgewicht überschreiten.
Missachtung kann zu Sachschäden oder schweren Verletzungen führen!
v.21.11
Assembly Instructions
Instrucciones de montaje
Notice de montage
Instruzioni di montaggio
EN
ES
FR
IT
DE Montageanleitung
DE Die Durchnummerierung auf dem Plastikbeutel kann abweichen / komplett fehlen!
EN The numbering on the plastic bag may differ / missing completely!
FR La numérotation sur le sac plastique peut différer / manquer complètement!
ES Tenga en cuenta: La numeración de la bolsa de plástico puede variar / faltar completo!
IT La numerazione sul sacchetto di plastica potrebbe essere diversa / mancare completo!
E.N.Z. Engineering GmbH
Salzmatten 6
79341 Kenzingen
(Germany)
E-Mail: support @ ricoo.de
www.ricoo.eu
WM0623 DE EN FR ES IT
OK?
Lieferumfang
DE EN FR ES IT
Scope of delivery Volumen de entregaContenu de la livraison Volume di fornitura

2
ACHTUNG: LESEN SIE DIE GESAMTE BEDIENUNGSANLEITUNG DURCH, BEVOR SIE MIT DER MONTAGE BEGINNEN.
Bitte beachten: Bilder in dieser Montageanleitung stellen nur technische Darstellung des Produktes dar. Tatsächliches Produktdesign kann minimal abweichen. Beginnen Sie nicht mit der
Montage, bis Sie alle Anweisungen und Warnungen, welche in dieser Montageanleitung vorhanden sind, durchgelesen und verstanden haben. Wenn Sie Fragen zu den Anweisungen oder
Warnungen haben, kontaktieren Sie bitte Ihren Händler. Dieses Produkt darf NUR, wie in dieser Anleitung beschrieben, installiert und verwendet werden. Unsachgemäße Installation dieses
Produkts kann Schäden verursachen oder zu schweren Verletzungen führen. Dieser Artikel darf nur vom Fachpersonal montiert / installiert werden. Stellen Sie sicher, dass die Anbaufläche das
Gesamtgewicht von diesem Produkt inkl. aller angeschlossener Komponente sicher tragen kann. Verwenden Sie immer eine technische Vorrichtung oder lassen Sie sich von einer zweiten
Person unterstützen, wenn Sie die Konstruktion oder angeschlossene Komponente heben oder ausrichten möchten. Stellen Sie vor und während der Produktmontage sicher, dass weder Sie
noch andere Personen verletzt werden und keine Gegenstände beschädigt werden. Holen Sie sich im Zweifelsfall Beratung bei einem Fachmann.Dieses Produkt ist nur für den Innenbereich
gedacht. Verwendung dieses Produkts im Freien kann zu Produkt- und Personenschäden führen. Ziehen Sie die Schrauben fest an, jedoch nicht überziehen / überdrehen. Überziehung der
Schrauben kann zu Schäden an der Konstruktion führen und reduziert die Haltbarkeit der gesamten Konstruktion.
DE
NOTE: READ THE ENTIRE INSTRUCTION MANUAL BEFORE YOU START INSTALLATION AND ASSEMBLY
Please note: Images in these assembly instructions are only technical presentation of the product. Actual product design may vary minimally. Do not begin the installation until you have read
and understood all the instructions and warnings contained in this installation sheet. If you have any questions regarding any of the instructions or warnings, please contact your local distributor.
This product was designed to be installed and used ONLY as specified in this manual. Improper installation of this product may cause damage or serious injury. This product may only be
assembled / installed by the technical staff. Make sure that the supporting surface will safely support the combined weight of the equipment and all attached hardware and components. Always
use an assistant or mechanical lifting equipment to safely lift and position the equipment. Make sure that before and after the installation of the product neither you nor somebody else can be
injured and other objects can be damaged. In case of doubt request for help from an expert. This product is intended for indoor use only. Using this product outdoors could lead to product failure
and personal injury. Tighten screws firmly, but do not over tighten. Over tightening can cause damage the items, this greatly reduces their holding power.
EN
ATTENTION : LISEZ TOUTE LA NOTICE D’UTILISATION AVANT DE COMMENCER LE MONTAGE.
Veuillez noter : Les photos de cette notice de montage servent uniquement à l'illustration technique du produit. La conception réelle du produit peut diverger légèrement. Ne commencez pas le
montage avant d’avoir lu intégralement et compris toutes les instructions et avertissements présents dans cette notice de montage. Si vous avez des questions sur les instructions ou les
avertissements, veuillez contacter votre revendeur. Ce produit doit être UNIQUEMENT installé et utilisé tel que décrit dans cette notice. Une installation non conforme de ce produit peut entraîner
des dégradations ou des blessures graves. Cet article doit être uniquement monté / installé par le personnel technique. Assurez-vous que la surface de montage peut supporter en toute sécurité
le poids total de ce produit, avec tous les composants raccordés. Utilisez toujours un dispositif technique ou faites-vous assister par une seconde personne si vous souhaitez soulever ou orienter
la structure ou les composants raccordés. Assurez-vous avant et pendant le montage du produit que personne ne peut être blessé et qu’aucun objet ne peut être endommagé. En cas de doute,
faites-vous conseiller par un spécialiste. Ce produit est uniquement destiné à une utilisation en intérieur. L’utilisation de ce produit en extérieur peut entraîner des dégradations du produit et des
blessures physiques. Serrez les vis, ne les serrez et tournez cependant pas trop. Trop serrer les vis peut endommager la structure et réduit sa solidité.
FR
ATENCIÓN: LEA TODO EL MANUAL DE MANEJO ANTES DE COMENZAR CON EL MONTAJE.
Por favor, tenga en cuenta: las imágenes que contienen estas instrucciones de montaje solo describen el producto técnicamente. El verdadero diseño del producto puede presentar diferencias
mínimas. No comience con el montaje hasta que haya leído y comprendido todas las instrucciones y advertencias presentes en este manual de montaje. Si tiene preguntas relacionadas con las
instrucciones y advertencias, póngase en contacto con el distribuidor.Este producto SOLO puede describirse, instalarse y utilizarse como se explica en las presentes instrucciones. Una instalación
inadecuada de este producto puede provocar daños o lesiones graves.Este artículo solo puede montarlo/instalarlo personal autorizado para ello. Asegúrese de que la superficie de montaje pueda
soportar de forma segura el peso total de este producto, incluidos todos los componentes conectados.Utilice siempre un dispositivo técnico o déjese asesorar por una segunda persona cuando
desee elevar u orientar la construcción o el componente conectado. Antes y durante el montaje del producto asegúrese de que ni usted ni otras personas resulten heridas y que no se dañen los
objetos. En caso de duda, pida asesoramiento a un especialista. Este producto solo está pensado para el área interior. El empleo de este producto al aire libre puede provocar daños en los
productos y daños personales.
ES
ATTENZIONE: PRIMA DI PROCEDERE AL MONTAGGIO, LEGGERE ATTENTAMENTE QUANTO RIPORTATO NELLE ISTRUZIONI PER L’USO.
N.B.: le figure presenti nelle istruzioni di montaggio, sono solamente rappresentazioni grafiche del prodotto. Il design reale del prodotto potrebbe differire leggermente.Non iniziare il montaggio
prima di aver letto e inteso tutte le istruzioni e le avvertenze riportate nelle presenti istruzioni di montaggio. In caso di dubbi o domande, si prega di contattare il fornitore.Questo prodotto può
essere installato e utilizzato UNICAMENTE come descritto nelle istruzioni d’uso. Un’installazione impropria del prodotto potrebbe causare danni o gravi lesioni. Questo articolo deve essere
montato / installato solamente da personale tecnico qualificato. Assicurarsi che la superficie di montaggio sia in grado di sostenere il peso totale del presente prodotto, inclusi tutti i
suoicomponenti aggiuntivi. Utilizzare sempre degli appositi dispositivi tecnici o avvalersi dell’aiuto di una seconda persona quando si necessita di sollevare o di orientare la costruzione o i
componenti ausiliari. Prima di iniziare e durante il montaggio, assicurarsi che né lei né altre persone possano essere ferite e che nessun oggetto possa venire danneggiato. In caso di dubbi,
rivolgersi ad un professionista per un consulto. Questo prodotto è stato progettato esclusivamente per uso interno. L’utilizzo di questo prodotto in ambienti esterni potrebbe causare danni al
prodotto e lesioni alle persone. Serrare accuratamente le viti senza però superare il momento torcente/spanare le stesse. Serrare troppo le viti potrebbe causare danni alla costruzione e
ridurne la durata di vita utile.
IT

3
S
A
B
35(max) 35(max)30 3025 2520 2015 1510 105 50(min)
1
2
3

4
S
C
K
S
3mm
13mm (!)
4
5
6

5
HS
AC
L
S
D
O
E
F
J
G
M1&M2
7
8
9

6
II
I
P
H
I
10
11
12

7
R
M
N
II
I
Q
13
14
15

8
16
17
18
DE
Seite 9-10
EN
Page 11-12
FR
Page 13-14
ES
Página 15-16
IT
Pagina 17-18

9
Hinweis: Wenn das Bedienfeld zum ersten Mal verwendet wird, setzen Sie das System bitte vor dem Betrieb zurück.
Um das System zurückzusetzen, drücken und halten Sie die Tasten [ ▲ ] und [ ▼ ] gleichzeitig. Das Gerät gibt einen Piepton ab und auf
dem Display erscheint „ “ und der Schreibtisch beginnt sich nach unten und in die unterste Position zu bewegen. Lassen Sie die Tasten
niemals los, bis das Gerät wieder einen Piepton abgibt. Der Schreibtisch bewegt sich ein wenig nach oben und das Display zeigt die aktuelle
Schreibtischhöhe an. Der Rückstellvorgang ist beendet.
• Drücken und halten Sie die [ ▲ ] / [ ▼ ] - Taste, um den Schreibtisch auf die gewünschte Höhe anzuheben/abzusenken. Drücken Sie die Taste
und lassen Sie sie los, um den Schreibtisch präzise anheben/absenken.
• Drücken Sie die Taste [ T ] , um den Zeitraum einzustellen, nach welchem der Benutzer erinnert werden soll, aufzustehen. Jedes Drücken der
Taste [ T ] führt zu einer Erhöhung der Zeiteinstellung um 0,5 Stunden. Die maximale Einstellung der Zeit beträgt 2 Stunden. Nach der
Einstellung einer Zeitspanne blinkt die Anzeige für 1-2 Sekunden und kehrt automatisch zur Anzeige der aktuellen Höhe des Schreibtisches
zurück und die LED-Kontrollleuchte leuchtet konstant.
• Sobald die Zeit abgelaufen ist, ertönen 5 Pieptöne.
• Um die Timerfunktion abzubrechen, drücken Sie so oft auf die Taste [ T ], bis das Display die aktuelle Höhe anzeigt und die LED-Kontrollleuch-
te aus ist.
• Um die aktuelle Höheneinstellung in einen Speicherplatz zu speichern, drücken Sie die Taste [ M ] und im Display beginnt die Anzeige „ “
zu blinken. Während „ “ angezeigt wird, drücken Sie die Taste [ 1 ], [ 2 ] oder [ 3 ].
• Um eine gespeicherte Position aufzurufen, drücken Sie die Speichertaste [ 1 ], [ 2 ] oder [ 3 ], und das System beginnt, sich auf die gewünsch-
te Speicherposition zu bewegen. Während der Fahrt zur gespeicherten Speicherposition wird im Display die aktuelle Höhe angezeigt. Um die
Bewegung zu stoppen, drücken Sie eine beliebige Taste.
• Aus Sicherheitsgründen verfügt dieses Bedienfeld über eine Sperrfunktion. Um die Sperrfunktion zu aktivieren/deaktivieren, folgen Sie den
Anweisungen in Abschnitt „Benutzerdefinierte Programmierung: Einstellungen der Bildschirmsperre“.
• Zum Sperren der Bedienung, drücken Sie [ M ] - Taste 3 Sekunden lang. Wenn die Bediensperre aktiv ist, leuchtet eine Anzeige „ “ im
Display.
• Um Sperre der Bedienung zu deaktivieren, drücken Sie [ M ] - Taste 3 Sekunden lang. Die aktuelle Höhe wird im Display angezeigt. Die
Bediensperre ist für 1 Minute deaktiviert. Wenn innerhalb von 1 Minute keine Taste gedrückt wird, wird die Bediensperre erneut aktiviert.
• Wenn über 10 Minuten keine Taste gedrückt wird, wechselt das System in den Energiesparmodus und das Display wird dunkel.
• Drücken Sie eine beliebige Taste, um das Display/System wieder zu aktivieren.
• Zum wechseln zwischen „CM“ und „INCH“ Einstellung, drücken Sie [ T ] - Taste mindestens 3 Sekunden lang.
DEUTSCH DEUTSCHBEDIENFELD FUNKTIONIEN
FEHLERBEHEBUNG
D-1
D-2
D-3
D-4
D-5
D-6
D-7
D-1 : Timer / zurück / abbrechen
D-2 : Speicher / Bediensperre / weiter / speichern
D-3 : Nach unten
D-4 : Nach oben
D-5 : Speicherslot 1 / 2 / 3
D-6 : LCD-Display
D-7 : LED-Kontrollleuchte
FEHLER BESCHREIBUNG
E01 / E07
Es ist ein elektrisches Problem aufgetreten. Ziehen Sie den Netzstecker und schließen Sie ihn wieder an.
HOT
Das System ist überhitzt. Stellen Sie den Betrieb ein und lassen Sie den Schreibtisch ca. 18 Minuten lang im Leerlauf stehen.
Diese Reparaturanleitung soll Ihnen dabei helfen, kleinere Probleme zu erkennen und zu beheben, die durch ungewöhnliche Funktionsweisen des
elektrischen Systems unseres Steh-Sitz-Tisches verursacht werden.
Wenn die folgenden Anleitungen nicht helfen, die Probleme zu lösen, wenden Sie sich bitte an Ihre Verkaufsstelle, um den Service zu erhalten
und das Zubehör zu ersetzen.
DAS SYSTEM ZURÜCKSETZEN:
HÖHENEINSTELLUNG:
TIMERFUNKTION:
EINSTELLUNG DES POSITIONSSPEICHERS (SPEICHER-SLOT):
DISPLAYSPERRE / BEDIENSPERRE:
ZWISCHEN „CM“ UND „INCH“ UMSCHALTEN:
ENERGIESPARMODUS:
E02
Die Standbeine fahren asynchron. Setzen Sie das System zurück.
E04
Das Bedienfeld ist nicht angeschlossen. Überprüfen Sie die Verbindung. Ziehen Sie den Netzstecker und schließen Sie ihn wieder an.

10
DEUTSCH DEUTSCHFEHLERBEHEBUNG
FEHLER BESCHREIBUNG
E15 / E25
Kurzschluss. Ersetzen Sie die Motoren oder Standbeine. E15 entspricht dem Stecker M1 und E25 entspricht dem Stecker M2.
E18 / E28
Es ist eine Überlastung aufgetreten. Entfernen Sie die Gegenstände von der Arbeitsfläche und setzen Sie das System zurück.
E43
Ausfall des Kollisionsvermeidungssystems. Tauschen Sie das Steuergerät aus.
E05
Das Kollisionsvermeidungssystem wurde aktiviert. Entfernen Sie alle Gegenstände innerhalb des Bewegungsbereichs.
E06
E08
Ein elektrisches Problem ist aufgetreten. Ziehen Sie den Netzstecker und stecken Sie ihn wieder ein. Wenn dies keine Abhilfe
schafft, tauschen Sie das Steuergerät aus.
E11 / E21
Die Motorkabel wurden getrennt. Überprüfen Sie die Verbindung oder tauschen Sie die Motorkabel aus. E11 entspricht dem
Stecker M1 und E21 entspricht dem M2-Stecker.
E12 / E22
Ein elektrisches Problem ist aufgetreten. Ziehen Sie den Netzstecker und stecken Sie ihn wieder ein. Wenn dies keine Abhilfe
schafft, tauschen Sie das Steuergerät aus.
E13 / E23
Die Verbindung zum Motor ist möglicherweise unterbrochen. Überprüfen Sie die Verbindung oder tauschen Sie die Motorkabel
aus. E13 entspricht dem Stecker M1 und E23 entspricht dem M2-Stecker.
E14 / E24
Die Kabelverbindung ist möglicherweise unterbrochen. Überprüfen Sie die Verbindung oder tauschen Sie die Motorkabel aus. E14
entspricht dem Stecker M1 und E24 entspricht dem M2-Stecker.
E16 / E26
Eine Überlastung führt dazu, dass der Motor nicht mehr läuft. Entfernen Sie die Gegenstände von der Arbeitsfläche und setzen Sie
das System zurück.
E17 / E27
Der Tisch bewegt sich in die falsche Richtung. Überprüfen Sie die Verbindung oder tauschen Sie die Motorkabel aus. E17
entspricht dem Stecker M1 und E27 entspricht dem M2-Stecker.
E42
Der Speicher kann nicht gelesen werden. Ziehen Sie den Netzstecker und stecken Sie ihn wieder ein. Wenn dies keine Abhilfe
schafft, tauschen Sie das Steuergerät aus.
> Das Kollisionsvermeidungssystem wurde aktiviert. Entfernen Sie alle Gegenstände innerhalb des Bewegungsbereichs.
> Das Steuergerät ist nicht richtig befestigt. Vergewissern Sie sich, dass das Steuergerät ordnungsgemäß am Tischrahmen
befestigt ist, wie in der Montageanleitung beschrieben ist.
> Die Stromkabel stecken nicht richtig im Steuergerät. Achten Sie darauf, dass die Kabel richtig an das Steuergerät angeschloßen
sind.
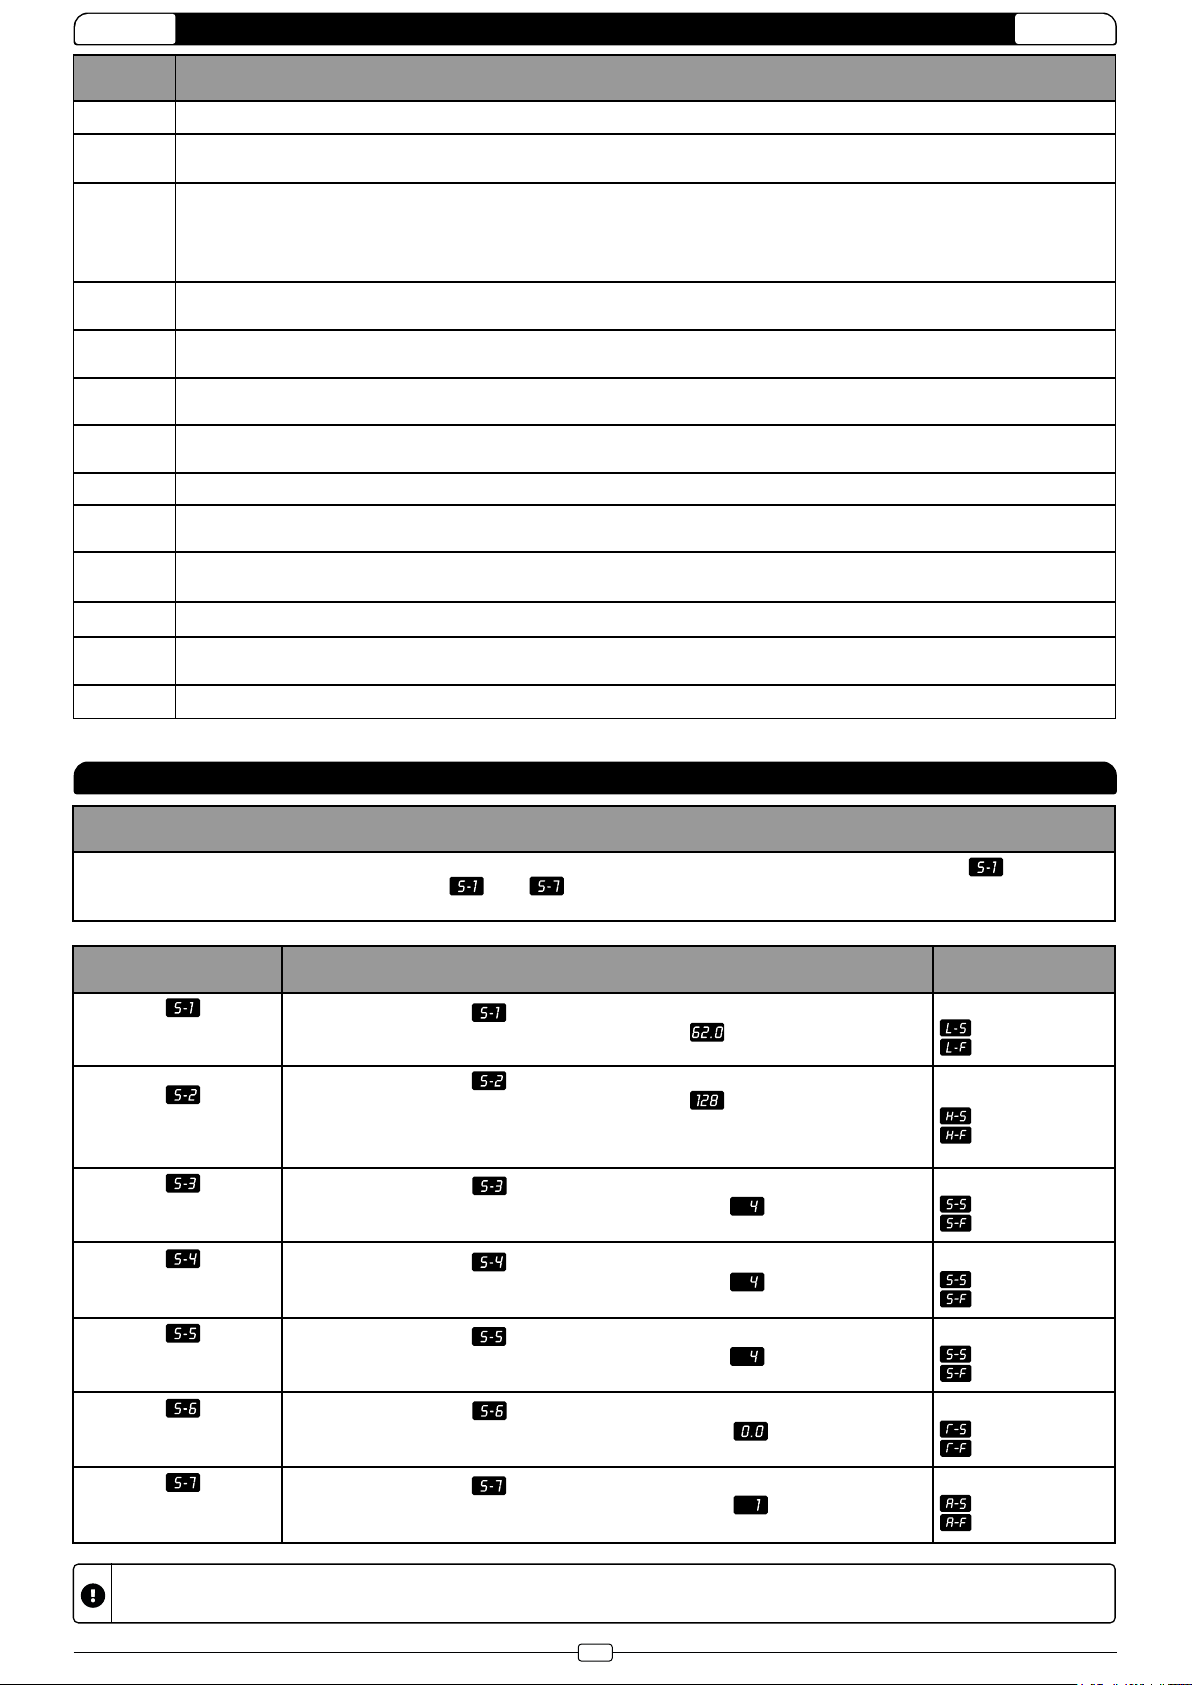
Anpassen der minimalen
Höhenbegrenzung
(62~118cm / 24.4”~46.4”)
Wenn die Anzeige blinkt „ “, drücken Sie die Taste [ M ] Taste einmal und die aktuelle
minimale Höhengrenze wird angezeigt (standardmäßig „ “ ). Drücken Sie dann [ ▲ ] /
[ ▼ ], um die gewünschte Höhe einzustellen.
[ M ] drücken: speichern.
- erfolgreich
- fehlgeschlagen
SCHRITT: 2 SCHRITT: 3
Drücken Sie die Tasten [ M ] und [ T ] gleichzeitig für etwa 5 Sekunden, bis das Gerät einen Piepton abgibt und die Anzeige „ “ blinkt.
Drücken Sie die Tasten [ ▲ ] / [ ▼ ], um zwischen „ “ bis „ “ zu wechseln. Der benutzerdefinierte Modus ist aktiv während die Anzeige
blinkt (etwa 10 Sekunden lang). Wenn jedoch innerhalb dieser Zeit keine Bedienung erfolgt, wird der benutzerdefinierte Modus beendet.
SCHRITT: 1
Anpassen der maximalen
Höhenbegrenzung
(72~112cm / 28.3”~50.4”)
Wenn die Anzeige blinkt „ “, drücken Sie die Taste [ M ] Taste einmal und die aktuelle
minimale Höhengrenze wird angezeigt (standardmäßig „ “ ). Drücken Sie dann [ ▲ ] /
[ ▼ ], um die gewünschte Höhe einzustellen.
(Hinweis: Aus Gründen des Anzeigebereichs wird das Display die Zahl nicht sofort angezeigen, wenn die [▲]/[▼]-
Tasten bei der Einstellung des metrischen Systems betätigt werden.)
[ M ] drücken: speichern.
- erfolgreich
- fehlgeschlagen
Antikollisionsempfindlichkeit
einstellen (Richtung aufwärts)
(Stufe 0 ~ Stufe 8)
Wenn die Anzeige blinkt „ “, drücken Sie die Taste [ M ] Taste einmal und die aktuelle
Antikollisions-Empfindlichkeit wird angezeigt (standardmäßig „ “ ). Drücken Sie dann
[ ▲ ] / [ ▼ ], um die gewünschte Stufe einzustellen.
[ M ] drücken: speichern.
- erfolgreich
- fehlgeschlagen
Antikollisionsempfindlichkeit
einstellen (Richtung abwärts)
(Stufe 0 ~ Stufe 8)
Wenn die Anzeige blinkt „ “, drücken Sie die Taste [ M ] Taste einmal und die aktuelle
Antikollisions-Empfindlichkeit wird angezeigt (standardmäßig „ “ ). Drücken Sie dann
[ ▲ ] / [ ▼ ], um die gewünschte Stufe einzustellen.
[ M ] drücken: speichern.
- erfolgreich
- fehlgeschlagen
Antikollisionsempfindlichkeit
einstellen (Gyrosensor)
(Stufe 0 ~ Stufe 8)
Wenn die Anzeige blinkt „ “, drücken Sie die Taste [ M ] Taste einmal und die aktuelle
Antikollisions-Empfindlichkeit wird angezeigt (standardmäßig „ “ ). Drücken Sie dann
[ ▲ ] / [ ▼ ], um die gewünschte Stufe einzustellen.
[ M ] drücken: speichern.
- erfolgreich
- fehlgeschlagen
Aktuelle Tischplattendicke
einstellen
(0~5cm / 0~1.9”)
Wenn die Anzeige blinkt „ “, drücken Sie die Taste [ M ] Taste einmal und die aktuell
eingestellte Tischplattendicke wird angezeigt (standardmäßig „ “ ). Drücken Sie dann
[ ▲ ] / [ ▼ ], um die gewünschte Tischplattendicke einzustellen.
[ M ] drücken: speichern.
- erfolgreich
- fehlgeschlagen
Bediensperre
ein- / ausschalten
(0: AUS / 1: EIN)
Wenn die Anzeige blinkt „ “, drücken Sie die Taste [ M ] Taste einmal und die aktuell
eingestellte Tischplattendicke wird angezeigt (standardmäßig „ “ ). Drücken Sie dann
[ ▲ ] / [ ▼ ], um die Bediensperre ein- / auszuschalten.
[ M ] drücken: speichern.
- erfolgreich
- fehlgeschlagen
- Um einen benutzerdefinierten Vorgang abzubrechen, drücken Sie die Taste
[ T ]
oder warten Sie ca. 8 Sekunden, bis das Display automatisch zur
Anzeige der Tischhöhe zurückkehrt.
- Die im benutzerdefinierten Modus angezeigte maximale/minimale Höhenbegrenzung schließt die Dicke der Arbeitsfläche nicht ein.
ANLEITUNG ZUR BENUTZERDEFINIERTEN PROGRAMMIERUNG

11
Note: When using the control panel for the first time, please reset the system before operation.
To reset the system, press and hold the [ ▲ ] and [ ▼ ] keys simultaneously. The device beeps and the display shows „ “ and the desk
starts to move down and to the lowest position. Never release the keys until the unit beeps again. The desk will move up a little and the
display will show the current desk height. The reset process is finished.
• Press and hold the [ ▲ ] / [ ▼ ] button to raise/lower the desk to the desired height. Press and release the button to raise/lower the desk
precisely.
• Press the [ T ] button to set the time period after which the user is to be reminded to get up. Each press of the [ T ] button will increase the time
setting by 0.5 hours. The maximum time setting is 2 hours. After setting a time period, the display flashes for 1-2 seconds and automatically
returns to displaying the current height of the desk and the LED indicator light is constantly on.
• Once the time is up, 5 beeps will sound.
• To cancel the timer function, press the [ T ] button repeatedly until the display shows the current altitude and the LED indicator light is off.
• To save the current height setting to a memory slot, press the [ M ] key and the display will start flashing „ “. While „ “ is displayed,
press the [ 1 ], [ 2 ] or [ 3 ] button.
• To recall a stored position, press the memory button [ 1 ], [ 2 ] or [ 3 ] and the system starts to move to the desired memory position. While
moving to the stored memory position, the display shows the current altitude. To stop the movement, press any button.
• For security reasons, this control panel has a lock function. To enable/disable the lock function, follow the instructions in section "Custom
programming: screen lock settings".
• To lock the operation, press [ M ] button for 3 seconds. When the operation lock is active, an indicator „ “ lights up in the display.
• To disable operation lock, press [ M ] button for 3 seconds. The current altitude is shown in the display. The operation lock is deactivated for 1
minute. If no button is pressed within 1 minute, the operation lock is reactivated.
• If no button is pressed for more than 10 minutes, the system switches to energy-saving mode and the display goes dark.
• Press any button to reactivate the display/system.
• To switch between „cm“ and „inch“ setting, press [ T ] button for at least 3 seconds.
ENGLISH ENGLISHOPERATING CONTROL PANEL
TROUBLESHOOTING GUIDE
D-1
D-2
D-3
D-4
D-5
D-6
D-7
ERROR DESCRIPTION
E01 / E07
An electrical problem has occurred. Unplug the power cord and plug it back in.
HOT
The system has overheated. Stop operation and allow the desk to idle for approximately 18 minutes.
These repair instructions are intended to help you identify and correct minor problems caused by unusual operation of the electrical system of our sit-stand
table.
If the following instructions do not help to solve the problems, please contact your place of purchase to get the service and replace the
accessories.
RESET THE SYSTEM:
HEIGHT ADJUSTMENT:
TIMER:
MEMORY SETTING (MEMORY-SLOT):
DISPLAY LOCK / OPERATION LOCK:
SWITCH BETWEEN „CM“ AND „INCH“:
ENERGY-SAVING MODE:
E02
The support legs move asynchronously. Reset the system.
E04
The control panel is not connected. Check the connection. Unplug the power cord and reconnect it.
D-1 : Timer / back / cancel
D-2 : Memory / Screen lock / next / save
D-3 : Downward
D-4 : Upward
D-5 : Memoryslot 1 / 2 / 3
D-6 : LCD-Display
D-7 : LED-Indicator light

12
ENGLISH ENGLISHTROUBLESHOOTING GUIDE
ERROR DESCRIPTION
E15 / E25
Short circuit. Replace the motors or stand legs. E15 corresponds to connector M1 and E25 corresponds to connector M2.
E18 / E28
An overload has occurred. Remove the objects from the work surface and reset the system.
E43
Failure of the collision avoidance system. Replace the control unit.
E05
The collision avoidance system has been activated. Remove all objects within the movement range.
E06
E08
An electrical problem has occurred. Unplug the power plug and plug it in again. If this does not remedy the problem, replace the
control unit.
E11 / E21
The motor cables have been disconnected. Check the connection or replace the motor cables. E11 corresponds to the M1
connector and E21 corresponds to the M2 connector.
E12 / E22
An electrical problem has occurred. Unplug the power plug and plug it in again. If this does not remedy the problem, replace the
control unit.
E13 / E23
The connection to the motor may be interrupted. Check the connection or replace the motor cables. E13 corresponds to the M1
connector and E23 corresponds to the M2 connector.
E14 / E24
The cable connection may be interrupted. Check the connection or replace the motor cables. E14 corresponds to the M1 connector
and E24 corresponds to the M2 connector.
E16 / E26
An overload will cause the motor to stop running. Remove the objects from the work surface and reset the system.
E17 / E27
The table moves in the wrong direction. Check the connection or replace the motor cables. E17 corresponds to the M1 connector
and E27 corresponds to the M2 connector.
E42
The memory cannot be read. Unplug the power plug and plug it in again. If this does not remedy the situation, replace the control
unit.
> The collision avoidance system has been activated. Remove all objects within the range of motion.
> The control unit is not properly attached. Make sure that the control unit is properly attached to the table frame as described in
the mounting instructions.
> The power cables are not properly plugged into the control unit. Make sure that the cables are correctly connected to the control
unit.
CUSTOM PROGRAMMING GUIDE
Adjusting the minimum height
limit
(62~118cm / 24.4”~46.4”)
When the display flashes „ “, press [ M ] buttononce and the current minimum
altitude limit will be displayed (by default „ “). Then press [ ▲ ] / [ ▼ ] key to set the
desired altitude.
[ M ] press: save.
- successful
- failed
STEP: 2 STEP: 3
Press the [ M ] and [ T ] keys simultaneously for about 5 seconds until the device beeps and the „ “ indicator flashes. Press the [ ▲ ] / [ ▼ ]
keys to toggle between „ “ to „ “. The custom mode is active while the display is flashing (for about 10 seconds). However, if no
operation is performed within this time, the user-defined mode is terminated.
STEP: 1
Adjusting the maximum
height limit
(72~112cm / 28.3”~50.4”)
When the display flashes „ “, press [ M ] button once and the current minimum
altitude limit will be displayed (by default „ “). Then press [ ▲ ] / [ ▼ ] key to set the
desired altitude.
(Note: For display range reasons, the display will not show the number immediately when the [▲]/[▼]buttons are
pressed when setting the metric system).
[ M ] press: save.
- successful
- failed
Set anti-collision sensitivity
(upward direction)
(Level 0 ~ Level 8)
When the display flashes „ “, press the [ M ] button once and the current anti-collision
sensitivity is displayed (by default „ “). Then press [ ▲ ] / [ ▼ ] key to set the desired
level.
[ M ] press: save.
- successful
- failed
Set anti-collision sensitivity
(downward direction)
(Level 0 ~ Level 8)
When the display flashes „ “, press the [ M ] button once and the current anti-collision
sensitivity is displayed (by default „ “). Then press [ ▲ ] / [ ▼ ] key to set the desired
level.
[ M ] press: save.
- successful
- failed
Set anti-collision sensitivity
(Gyrosensor)
(Level 0 ~ Level 8)
When the display flashes „ “, press the [ M ] button once and the current anti-collision
sensitivity is displayed (by default „ “). Then press [ ▲ ] / [ ▼ ] key to set the desired
level.
[ M ] press: save.
- successful
- failed
Set current table top
thickness
(0~5cm / 0~1.9”)
When the display flashes „ “, press the [ M ] button once and the currently set table
top thickness is displayed (by default „ “). Then press [ ▲ ] / [ ▼ ] key to set the
desired table top thickness.
[ M ] press: save.
- successful
- failed
Operation lock
Switch on / off
(0: OFF / 1: ON)
When the display flashes „ “, press the [ M ] button once and the currently set table
top thickness is displayed (by default „ “). Then press [ ▲ ] / [ ▼ ] key to turn the
operation/display lock on / off.
[ M ] press: save.
- successful
- failed
- To cancel a custom operation, press the [ T ] button or wait approx. 8 seconds until the display automatically returns to the table height display.
- The maximum/minimum height limit displayed in the user-defined mode does not include the thickness of the working surface.

13
Remarque: Lorsque vous utilisez le panneau de commande pour la première fois, veuillez réinitialiser le système avant de l'utiliser.
Pour réinitialiser le système, appuyez simultanément sur les touches [ ▲ ] et [ ▼ ] et maintenez-les enfoncées. L'appareil émet un bip et l'écran
affiche „ “ et le bureau commence à descendre et à se placer dans la position la plus basse. Ne relâchez jamais les touches jusqu'à ce que
l'appareil émette un nouveau bip. Le bureau se déplace un peu vers le haut et l'écran affiche la hauteur actuelle du bureau. Le processus de
réinitialisation est terminé.
• Appuyez et maintenez enfoncé le bouton [ ▲ ] / [ ▼ ] pour élever/abaisser le bureau à la hauteur souhaitée. Appuyez et relâchez le bouton
pour lever/abaisser le bureau avec précision.
• Appuyez sur le bouton [ T ] pour régler la période de temps après laquelle l'utilisateur doit être rappelé de se lever. Chaque pression sur le bouton [ T ]
augmentera le réglage du temps de 0,5 heure. La durée maximale est de 2 heures. Après avoir réglé une période de temps, l'écran clignote pendant 1
à 2 secondes et revient automatiquement à l'affichage de la hauteur actuelle du bureau et le témoin LED est constamment allumé.
• Une fois le temps écoulé, 5 bips retentissent.
• Pour annuler la fonction de minuterie, appuyez sur le bouton [ T ] de façon répétée jusqu'à ce que l'écran affiche l'altitude actuelle et que le témoin
lumineux DEL soit éteint.
• Pour enregistrer le réglage actuel de la hauteur dans un emplacement de mémoire, appuyez sur la touche [ M ] et l'écran commencera à
clignoter „ “. Pendant que „ “ est affiché, appuyez sur la touche [ 1 ], [ 2 ] ou [ 3 ].
• Pour rappeler une position mémorisée, appuyez sur le bouton de mémoire [ 1 ], [ 2 ] ou [ 3 ] et le système commence à se déplacer vers la
position de mémoire souhaitée. Pendant le déplacement vers la position mémorisée, l'écran affiche l'altitude actuelle. Pour arrêter le
mouvement, appuyez sur n'importe quel bouton.
• Pour des raisons de sécurité, ce panneau de commande dispose d'une fonction de verrouillage. Pour activer/désactiver la fonction de verrouillage,
suivez les instructions de la section „Programmation personnalisée : paramètres de verrouillage de l'écran“.
• Pour verrouiller le fonctionnement, appuyez sur la touche [ M ] pendant 3 secondes. Lorsque le verrouillage de l'opération est actif, un indicateur „ “
s'allume à l'écran.
• Pour désactiver le verrouillage des opérations, appuyez sur la touche [ M ] pendant 3 secondes. L'altitude actuelle est affichée à l'écran. Le verrouillage
de fonctionnement est désactivé pendant 1 minute. Si vous n'appuyez sur aucun bouton dans la minute qui suit, le verrouillage est réactivé.
• Si vous n'appuyez sur aucun bouton pendant plus de 10 minutes, le système passe en mode d'économie d'énergie et l'écran s'éteint.
• Appuyez sur n'importe quel bouton pour réactiver l'affichage/le système.
• Pour passer du réglage „cm“ au réglage „inch“, appuyez sur la touche [ T ] pendant au moins 3 secondes.
FRANÇAIS FRANÇAISPANNEAU DE CONTRÔLE OPÉRATIONNEL
GUIDE DE DÉPANNAGE
D-1
D-2
D-3
D-4
D-5
D-6
D-7
ERREUR DESCRIPTION
E01 / E07
Un problème électrique s'est produit. Débranchez le cordon d'alimentation et rebranchez-le.
HOT
Le système a surchauffé. Arrêtez le fonctionnement et laissez le bureau tourner au ralenti pendant environ 18 minutes.
Ces instructions de réparation sont destinées à vous aider à identifier et à corriger les problèmes mineurs causés par un fonctionnement inhabituel du
système électrique de notre table assis-debout.
Si les instructions suivantes ne vous aident pas à résoudre les problèmes, veuillez contacter votre lieu d'achat pour obtenir le service et
remplacer les accessoires.
RÉINITIALISER LE SYSTÈME:
RÉGLAGE DE LA HAUTEUR:
MINUTERIE :
LE RÉGLAGE DE LA MÉMOIRE (MEMORY-SLOT):
VERROUILLAGE DE L'AFFICHAGE / VERROUILLAGE DES OPÉRATIONS:
PASSEZ DE "CM" À "INCH":
MODE ÉCONOMIE D'ÉNERGIE:
E02
Les béquilles se déplacent de manière asynchrone. Réinitialisez le système.
E04
Le panneau de commande n'est pas connecté. Vérifiez la connexion. Débranchez le cordon d'alimentation et rebranchez-le.
D-1 : Minuterie / retour / annulation
D-2 : Mémoire / Verrouillage de l'écran / suivant / sauvegarder
D-3 : Vers le bas
D-4 : Vers le haut
D-5 : Mémoryslot 1 / 2 / 3
D-6 : Écran LCD
D-7 : Témoin lumineux LED

14
FRANÇAIS FRANÇAISGUIDE DE DÉPANNAGE
ERREUR DESCRIPTION
E15 / E25
Court-circuit. Remplacer les moteurs ou les pieds du stand. E15 correspond au connecteur M1 et E25 correspond au connecteur M2.
E18 / E28
Une surcharge s'est produite. Retirez les objets du plan de travail et réinitialisez le système.
E43
Défaillance du système de prévention des collisions. Remplacer l'unité de commande.
E05
Le système de prévention des collisions a été activé. Retirez tous les objets se trouvant dans la zone de mouvement.
E06
E08
Un problème électrique s'est produit. Débranchez la fiche d'alimentation et rebranchez-la. Si cela ne résout pas le problème,
remplacez l'unité de commande.
E11 / E21
Les câbles du moteur ont été débranchés. Vérifiez la connexion ou remplacez les câbles du moteur. E11 correspond au connec-
teur M1 et E21 correspond au connecteur M2.
E12 / E22
Un problème électrique s'est produit. Débranchez la fiche d'alimentation et rebranchez-la. Si cela ne résout pas le problème,
remplacez l'unité de commande.
E13 / E23
La connexion au moteur est peut-être interrompue. Vérifiez la connexion ou remplacez les câbles du moteur. E13 correspond au
connecteur M1 et E23 correspond au connecteur M2.
E14 / E24
La connexion du câble peut être interrompue. Vérifiez la connexion ou remplacez les câbles du moteur. E14 correspond au
connecteur M1 et E24 correspond au connecteur M2.
E16 / E26
Une surcharge entraîne l'arrêt du moteur. Retirez les objets du plan de travail et réinitialisez le système.
E17 / E27
La table se déplace dans le mauvais sens. Vérifiez la connexion ou remplacez les câbles du moteur. E17 correspond au connec-
teur M1 et E27 correspond au connecteur M2.
E42
La mémoire ne peut pas être lue. Débranchez la fiche d'alimentation et rebranchez-la. Si cela ne remédie pas à la situation,
remplacez l'unité de commande.
> Le système anti-collision a été activé. Retirez tous les objets se trouvant dans la zone de mouvement.
> L'unité de commande n'est pas correctement fixée. Assurez-vous que l'unité de commande est correctement fixée au cadre de la
table, comme indiqué dans les instructions de montage.
> Les câbles d'alimentation ne sont pas correctement branchés sur l'unité de commande. Assurez-vous que les câbles sont
correctement branchés à l'unité de commande.
GUIDE DE PROGRAMMATION PERSONNALISÉ
Ajustement de la limite de
hauteur minimale
(62~118cm / 24.4”~46.4”)
Lorsque l'écran clignote „ “, appuyez une fois sur la touche [ M ] et la limite d'altitude
minimale actuelle s'affiche (par défaut „ “). Appuyez ensuite sur la touche [ ▲ ] / [ ▼ ]
pour régler l'altitude souhaitée.
[ M ] appuyer : sauvega
- réussi
- échec
ÉTAPE: 2 ÉTAPE: 3
Appuyez simultanément sur les touches [ M ] et [ T ] pendant environ 5 secondes jusqu'à ce que l'appareil émette un bip et que le voyant „ “
clignote. Appuyez sur les touches [ ▲ ] / [ ▼ ] pour basculer de „ “ à „ “. Le mode personnalisé est actif tant que l'affichage clignote
(pendant environ 10 secondes). Toutefois, si aucune opération n'est effectuée pendant ce laps de temps, le mode personnalisé prend fin.
ÉTAPE: 1
Ajustement de la limite de
hauteur maximale
(72~112cm / 28.3”~50.4”)
Lorsque l'écran clignote „ “, appuyez une fois sur la touche [ M ] et la limite d'altitude
minimale actuelle s'affiche (par défaut „ “). Appuyez ensuite sur la touche [ ▲ ] / [ ▼ ]
pour régler l'altitude souhaitée.
(Remarque : pour des raisons de plage d'affichage, l'écran n'affiche pas immédiatement le nombre lorsque vous
appuyez sur les boutons [▲]/[▼]lors du réglage du système métrique).
[ M ] appuyer : sauvega
- réussi
- échec
Régler la sensibilité de l'anti-collisi-
on (direction vers le haut)
(Niveau 0 ~ Niveau 8)
Lorsque l'écran clignote „ “, appuyez une fois sur la touche [ M ] et la sensibilité
anti-collision actuelle s'affiche (par défaut „ “). Appuyez ensuite sur la touche [ ▲ ] / [
▼ ] pour régler le niveau souhaité.
[ M ] appuyer : sauvega
- réussi
- échec
Définir la sensibilité de l'anti-collisi-
on (direction vers le bas)
(Niveau 0 ~ Niveau 8)
Lorsque l'écran clignote „ “, appuyez une fois sur la touche [ M ] et la sensibilité
anti-collision actuelle s'affiche (par défaut „ “). Appuyez ensuite sur la touche [ ▲ ] / [
▼ ] pour régler le niveau souhaité.
[ M ] appuyer : sauvega
- réussi
- échec
Régler la sensibilité de
l'anti-collision (Gyrosensor)
(Niveau 0 ~ Niveau 8)
Lorsque l'écran clignote „ “, appuyez une fois sur la touche [ M ] et la sensibilité
anti-collision actuelle s'affiche (par défaut „ “). Appuyez ensuite sur la touche [ ▲ ] / [
▼ ] pour régler le niveau souhaité.
[ M ] appuyer : sauvega
- réussi
- échec
Définir l'épaisseur actuelle du
plateau de la table
(0~5cm / 0~1.9”)
Lorsque l'écran clignote „ “, appuyez une fois sur la touche [ M ] et l'épaisseur du
plateau de table actuellement réglée s'affiche (par défaut „ “). Appuyez ensuite sur la
touche [ ▲ ] / [ ▼ ] pour régler l'épaisseur du plateau de table souhaitée.
[ M ] appuyer : sauvega
- réussi
- échec
Verrouillage des opérations
Mise en marche/arrêt
(0: MARCHE / 1: ARRÊT)
Lorsque l'écran clignote „ “, appuyez une fois sur la touche [ M ] et l'épaisseur du
plateau de table actuellement réglée s'affiche (par défaut „ “). Ensuite, appuyez sur la
touche [ ▲ ] / [ ▼ ] pour activer / désactiver le verrouillage du fonctionnement/de
l'affichage.
[ M ] appuyer : sauvega
- réussi
- échec
- Pour annuler une opération personnalisée, appuyez sur le bouton [ T ] ou attendez environ 8 secondes jusqu'à ce que l'affichage revienne automatique-
ment à l'affichage de la hauteur de la table.
- La limite de hauteur maximale/minimale affichée en mode personnalisé n'inclut pas l'épaisseur de la surface de travail.

15
Nota: Cuando utilice el panel de control por primera vez, reinicie el sistema antes de utilizarlo.
Para reiniciar el sistema, mantenga pulsadas las teclas [ ▲ ] y [ ▼ ] simultáneamente. El aparato emite un pitido y la pantalla muestra „ “.
y el pupitre comienza a bajar y a situarse en la posición más baja. No suelte nunca las teclas hasta que el aparato vuelva a emitir un pitido. La
mesa se moverá un poco hacia arriba y la pantalla mostrará la altura actual de la mesa. El proceso de reajuste ha finalizado.
• Mantenga pulsado el botón [ ▲ ] / [ ▼ ] para subir/bajar el escritorio a la altura deseada. Pulse y suelte el botón para subir/bajar el escritorio
con precisión.
• Pulse el botón [ T ] para establecer el periodo de tiempo tras el cual se debe recordar al usuario que se levante. Cada vez que se pulsa la tecla
[ T ] se incrementa el ajuste de tiempo en 0,5 horas. El tiempo máximo es de 2 horas. Después de ajustar un período de tiempo, la pantalla
parpadea durante 1-2 segundos y vuelve a mostrar automáticamente la altura actual del escritorio y la luz indicadora LED está constantemente
encendida.
• Una vez finalizado el tiempo, sonarán 5 pitidos.
• Para cancelar la función de temporizador, pulse el botón [ T ] repetidamente hasta que la pantalla muestre la altura actual y la luz indicadora
LED se apague.
• Para guardar el ajuste de altura actual en una ranura de memoria, pulse la tecla [ M ] y la pantalla comenzará a parpadear „ “. Mientras se
muestra „ “, pulse la tecla [ 1 ], [ 2 ] o [ 3 ].
• Para recuperar una posición almacenada, pulse la tecla de memoria [ 1 ], [ 2 ] o [ 3 ] y el sistema comenzará a desplazarse a la posición de
memoria deseada. Mientras se mueve hacia la posición de memoria almacenada, la pantalla muestra la altitud actual. Para detener el
movimiento, pulse cualquier botón.
• Por razones de seguridad, este panel de control tiene una función de bloqueo. Para activar/desactivar la función de bloqueo, siga las instrucci-
ones del apartado "Programación personalizada: ajustes de bloqueo de pantalla".
• Para bloquear el funcionamiento, pulse el botón [ M ] durante 3 segundos. Cuando el bloqueo de funcionamiento está activo, se enciende un
indicador „ “ en la pantalla.
• Para desactivar el bloqueo de funcionamiento, pulse el botón [ M ] durante 3 segundos. La altitud actual se muestra en la pantalla. El bloqueo
de funcionamiento se desactiva durante 1 minuto. Si no se pulsa ningún botón en 1 minuto, el bloqueo de funcionamiento se reactiva.
• Si no se pulsa ningún botón durante más de 10 minutos, el sistema pasa al modo de ahorro de energía y la pantalla se oscurece.
• Pulse cualquier botón para reactivar la pantalla/sistema.
• Para cambiar entre el ajuste "cm" y "inch", pulse el botón [ T ] durante al menos 3 segundos.
ESPAÑOL ESPAÑOLPANEL DE CONTROL OPERATIVO
GUÍA PARA LA RESOLUCIÓN DE PROBLEMAS
D-1
D-2
D-3
D-4
D-5
D-6
D-7
ERROR DESCRIPCIÓN
E01 / E07
Se ha producido un problema eléctrico. Desenchufe el cable de alimentación y vuelva a enchufarlo.
HOT
El sistema se ha sobrecalentado. Detenga el funcionamiento y deje que la mesa esté inactiva durante aproximadamente 18 minutos.
Estas instrucciones de reparación están destinadas a ayudarle a identificar y corregir problemas menores causados por el funcionamiento inusual del
sistema eléctrico de nuestra mesa de bipedestación.
Si las siguientes instrucciones no ayudan a resolver los problemas, póngase en contacto con su lugar de compra para obtener el servicio y
sustituir los accesorios.
REINICIAR EL SISTEMA:
AJUSTE DE LA ALTURA:
TEMPORIZADOR:
AJUSTE DE LA MEMORIA (MEMORY-SLOT):
BLOQUEO DE PANTALLA / BLOQUEO DE FUNCIONAMIENTO:
CAMBIA ENTRE "CM" Y "INCH":
MODO DE AHORRO DE ENERGÍA:
E02
Las patas de apoyo se mueven de forma asíncrona. Reinicie el sistema.
E04
El panel de control no está conectado. Compruebe la conexión. Desenchufe el cable de alimentación y vuelva a conectarlo.
D-1 : Cronómetro / retroceder / cancelar
D-2 : Memoria / Bloqueo de pantalla / siguiente / guardar
D-3 : Hacia abajo
D-4 : Hacia arriba
D-5 : Ranura de memoria 1 / 2 / 3
D-6 : Pantalla LCD
D-7 : Luz indicadora LED

16
ESPAÑOL ESPAÑOLGUÍA PARA LA RESOLUCIÓN DE PROBLEMAS
ERROR DESCRIPCIÓN
E15 / E25
Cortocircuito. Sustituya los motores o las patas del soporte. E15 corresponde al conector M1 y E25 al conector M2.
E18 / E28
Se ha producido una sobrecarga. Retire los objetos de la superficie de trabajo y reinicie el sistema.
E43
Fallo del sistema anticolisión. Sustituya la unidad de control.
E05
Se ha activado el sistema anticolisión. Retire todos los objetos que se encuentren dentro del rango de movimiento.
E06
E08
Se ha producido un problema eléctrico. Desenchufe la clavija de alimentación y vuelva a enchufarla. Si esto no soluciona el
problema, sustituya la unidad de control.
E11 / E21
Los cables del motor se han desconectado. Compruebe la conexión o sustituya los cables del motor. E11 corresponde al conector
M1 y E21 al conector M2.
E12 / E22
Se ha producido un problema eléctrico. Desenchufe la clavija de alimentación y vuelva a enchufarla. Si esto no soluciona el
problema, sustituya la unidad de control.
E13 / E23
La conexión con el motor puede estar interrumpida. Compruebe la conexión o sustituya los cables del motor. E13 corresponde al
conector M1 y E23 al conector M2.
E14 / E24
La conexión de los cables puede estar interrumpida. Compruebe la conexión o sustituya los cables del motor. E14 corresponde al
conector M1 y E24 al conector M2.
E16 / E26
Una sobrecarga hará que el motor deje de funcionar. Retire los objetos de la superficie de trabajo y reinicie el sistema.
E17 / E27
La mesa se mueve en la dirección equivocada. Compruebe la conexión o sustituya los cables del motor. E17 corresponde al
conector M1 y E27 al conector M2.
E42
No se puede leer la memoria. Desenchufe la clavija de alimentación y vuelva a enchufarla. Si esto no soluciona la situación,
sustituya la unidad de control.
> Se ha activado el sistema anticolisión. Retire todos los objetos que se encuentren en la zona de movimiento.
> La unidad de control no está bien fijada. Asegúrese de que la unidad de control está correctamente fijada al bastidor de la mesa
como se describe en las instrucciones de montaje.
> Los cables de alimentación no están bien conectados a la unidad de control. Asegúrese de que los cables están correctamente
conectados a la unidad de control.
GUÍA DE PROGRAMACIÓN PERSONALIZADA
Ajuste del límite de altura
mínima
(62~118cm / 24.4”~46.4”)
Cuando la pantalla parpadee „ “, pulse la tecla [ M ] una vez y se mostrará el límite
de altitud mínima actual (por defecto „ “). A continuación, pulse la tecla [ ▲ ] / [ ▼ ]
para ajustar la altitud deseada.
[ M ] pulse: guardar.
- con éxito
- fallido
PASO: 2 PASO: 3
Pulse simultáneamente las teclas [ M ] y [ T ] durante unos 5 segundos hasta que el aparato emita un pitido y el indicador „ “ parpadee.
Pulse las teclas [ ▲ ] / [ ▼ ] para alternar entre „ “ y „ “. El modo personalizado está activo mientras la pantalla parpadea (durante unos
10 segundos). Sin embargo, si no se realiza ninguna operación dentro de este tiempo, el modo definido por el usuario se termina.
PASO: 1
Ajuste del límite de altura
máxima
(72~112cm / 28.3”~50.4”)
Cuando la pantalla parpadee „ “, pulse la tecla [ M ] una vez y se mostrará el límite
de altitud mínima actual (por defecto „ “ ). A continuación, pulse la tecla [ ▲ ] / [ ▼ ]
para ajustar la altitud deseada.
(Nota: Por razones de rango de visualización, la pantalla no mostrará el número inmediatamente cuando se pulsen los
botones [▲]/[▼]al ajustar el sistema métrico).
[ M ] pulse: guardar.
- con éxito
- fallido
Ajustar la sensibilidad
anticolisión (hacia arriba)
(Nivel 0 ~ Nivel 8)
Cuando la pantalla parpadee „ “, pulse la tecla [ M ] una vez y se mostrará la
sensibilidad anticolisión actual (por defecto „ “). A continuación, pulse la tecla [ ▲ ] /
[ ▼ ] para ajustar el nivel deseado.
[ M ] pulse: guardar.
- con éxito
- fallido
Ajustar la sensibilidad
anticolisión (hacia abajo)
(Nivel 0 ~ Nivel 8)
Cuando la pantalla parpadee „ “, pulse la tecla [ M ] una vez y se mostrará la
sensibilidad anticolisión actual (por defecto „ “). A continuación, pulse la tecla [ ▲ ] /
[ ▼ ] para ajustar el nivel deseado.
[ M ] pulse: guardar.
- con éxito
- fallido
Ajustar la sensibilidad
anticolisión (Girosensor)
(Nivel 0 ~ Nivel 8)
Cuando la pantalla parpadee „ “, pulse la tecla [ M ] una vez y se mostrará la
sensibilidad anticolisión actual (por defecto „ “). A continuación, pulse la tecla [ ▲ ] /
[ ▼ ] para ajustar el nivel deseado.
[ M ] pulse: guardar.
- con éxito
- fallido
Establecer el grosor actual
del tablero
(0~5cm / 0~1.9”)
Cuando la pantalla parpadee „ “, pulse la tecla [ M ] una vez y se mostrará el grosor
del tablero actualmente ajustado (por defecto „ “). A continuación, pulse la tecla [ ▲ ]
/ [ ▼ ] para ajustar el grosor del tablero deseado.
[ M ] pulse: guardar.
- con éxito
- fallido
Bloqueo de funcionamiento
Encendido / apagado
(0: APAGADO / 1: ENCENDIDO)
Cuando la pantalla parpadee „ “, pulse la tecla [ M ] una vez y se mostrará el grosor
del tablero actualmente ajustado (por defecto „ “). A continuación, pulse la tecla [ ▲ ]
/ [ ▼ ] para activar/desactivar el bloqueo de funcionamiento/pantalla.
[ M ] pulse: guardar.
- con éxito
- fallido
- Para cancelar una operación definida por el usuario, pulse el botón [ T ] o espere unos 8 segundos hasta que la pantalla vuelva automáticamente a la
visualización de la altura de la mesa.
- El límite de altura máxima/mínima mostrado en el modo definido por el usuario no incluye el grosor de la superficie de trabajo.

17
Nota: quando si usa il pannello di controllo per la prima volta, si prega di resettare il sistema prima dell'operazione.
Per resettare il sistema, tenere premuti contemporaneamente i tasti [ ▲ ] e [ ▼ ]. L'apparecchio emette un bip e il display mostra „ “ e il
tavolo inizia a muoversi verso il basso e nella posizione più bassa. Non rilasciare mai i tasti fino a quando l'apparecchio non emette
nuovamente un bip. Il tavolo si sposterà leggermente verso l'alto e il display mostrerà l'attuale altezza del tavolo. Il processo di reset è
terminato.
• Tenere premuto il pulsante [ ▲ ] / [ ▼ ] per alzare/abbassare il tavolo all'altezza desiderata. Premere e rilasciare il pulsante per alzare/abbassa-
re il tavolo con precisione.
• Premere il pulsante [ T ] per impostare il periodo di tempo dopo il quale si deve ricordare all'utente di alzarsi. Ogni pressione del pulsante [ T ]
aumenterà l'impostazione del tempo di 0,5 ore. Il tempo massimo impostabile è di 2 ore. Dopo aver impostato un periodo di tempo, il display
lampeggia per 1-2 secondi e torna automaticamente a visualizzare l'altezza corrente della scrivania e l'indicatore LED è costantemente acceso.
• Una volta che il tempo è scaduto, vengono emessi 5 bip.
• Per annullare la funzione del timer, premere ripetutamente il pulsante [ T ] fino a quando il display mostra l'altezza corrente e l'indicatore
luminoso a LED è spento.
• Per salvare l'impostazione corrente dell'altezza in uno slot di memoria, premere il tasto [ M ] e il display inizierà a lampeggiare „ “. Mentre
viene visualizzato „ “, premere il tasto [ 1 ], [ 2 ] o [ 3 ].
• Per richiamare una posizione memorizzata, premere il tasto di memoria [ 1 ], [ 2 ] o [ 3 ] e il sistema inizia a muoversi verso la posizione di
memoria desiderata. Durante il movimento verso la posizione di memoria memorizzata, il display mostra l'altitudine attuale. Per fermare il
movimento, premere un pulsante qualsiasi.
• Per ragioni di sicurezza, questo pannello di controllo ha una funzione di blocco. Per attivare/disattivare la funzione di blocco, segui le istruzioni
nella sezione "Programmazione personalizzata: impostazioni di blocco dello schermo".
• Per bloccare il funzionamento, premere il pulsante [ M ] per 3 secondi. Quando il blocco delle operazioni è attivo, un indicatore „ “ si
accende sul display.
• Per disattivare il blocco delle operazioni, premere il pulsante [ M ] per 3 secondi. L'altitudine attuale viene visualizzata sul display. Il blocco delle
operazioni è disattivato per 1 minuto. Se non viene premuto alcun pulsante entro 1 minuto, il blocco operativo viene riattivato.
• Se non viene premuto alcun pulsante per più di 10 minuti, il sistema passa alla modalità di risparmio energetico e il display si spegne.
• Premere un pulsante qualsiasi per riattivare il display/sistema.
• Per passare dall'impostazione „cm“ a quella „inch“, premere il pulsante [ T ] per almeno 3 secondi.
ITALIANO ITALIANOPANNELLO DI CONTROLLO OPERATIVO
GUIDA ALLA RISOLUZIONE DEI PROBLEMI
D-1
D-2
D-3
D-4
D-5
D-6
D-7
ERRORE DESCRIZIONE
E01 / E07
Si è verificato un problema elettrico. Scollegare il cavo di alimentazione e ricollegarlo.
HOT
Il sistema si è surriscaldato. Interrompere il funzionamento e lasciare la scrivania inattiva per circa 18 minuti.
Queste istruzioni di riparazione hanno lo scopo di aiutarvi a identificare e correggere i problemi minori causati da un funzionamento insolito del sistema
elettrico del nostro tavolo sit-stand.
Se le seguenti istruzioni non aiutano a risolvere i problemi, si prega di contattare il luogo di acquisto per ottenere il servizio e sostituire gli
accessori.
RESETTARE IL SISTEMA:
REGOLAZIONE DELL'ALTEZZA:
TIMER:
IMPOSTAZIONE DELLA MEMORIA (SLOT DI MEMORIA):
BLOCCO DEL DISPLAY / BLOCCO DELLE OPERAZIONI:
PASSA DA „CM“ A „INCH“:
MODALITÀ DI RISPARMIO ENERGETICO:
E02
Le gambe di supporto si muovono in modo asincrono. Resettare il sistema.
E04
Il pannello di controllo non è collegato. Controllare il collegamento. Scollegare il cavo di alimentazione e ricollegarlo.
D-1 : Timer / indietro / annullare
D-2 : Memoria / blocco dello schermo / successivo / salvare
D-3 : Verso il basso
D-4 : Verso l'alto
D-5 : Slot di memoria 1 / 2 / 3
D-6 : LCD-Display
D-7 : Luce di indicazione a LED

18
ITALIANO ITALIANOGUIDA ALLA RISOLUZIONE DEI PROBLEMI
ERRORE DESCRIZIONE
E15 / E25
Corto circuito. Sostituire i motori o le gambe del supporto. E15 corrisponde al connettore M1 e E25 corrisponde al connettore M2.
E18 / E28
Si è verificato un sovraccarico. Rimuovere gli oggetti dalla superficie di lavoro e resettare il sistema.
E43
Guasto del sistema anticollisione. Sostituire la centralina.
E05
Il sistema anticollisione è stato attivato. Rimuovere tutti gli oggetti all'interno del raggio di movimento.
E06
E08
Si è verificato un problema elettrico. Scollegate la spina di alimentazione e ricollegatela. Se questo non risolve il problema,
sostituire l'unità di controllo.
E11 / E21
I cavi del motore sono stati scollegati. Controllare il collegamento o sostituire i cavi del motore. E11 corrisponde al connettore M1 e
E21 corrisponde al connettore M2.
E12 / E22
Si è verificato un problema elettrico. Scollegate la spina di alimentazione e ricollegatela. Se questo non risolve il problema,
sostituire l'unità di controllo.
E13 / E23
Il collegamento al motore potrebbe essere interrotto. Controllare il collegamento o sostituire i cavi del motore. E13 corrisponde al
connettore M1 e E23 corrisponde al connettore M2.
E14 / E24
Il collegamento dei cavi potrebbe essere interrotto. Controllare il collegamento o sostituire i cavi del motore. E14 corrisponde al
connettore M1 e E24 corrisponde al connettore M2.
E16 / E26
Un sovraccarico causerà l'arresto del motore. Rimuovere gli oggetti dalla superficie di lavoro e resettare il sistema.
E17 / E27
La tavola si muove nella direzione sbagliata. Controllare il collegamento o sostituire i cavi del motore. E17 corrisponde al connetto-
re M1 e E27 corrisponde al connettore M2.
E42
La memoria non può essere letta. Scollegate la spina di alimentazione e ricollegatela. Se questo non risolve la situazione,
sostituire la centralina.
> Il sistema anticollisione è stato attivato. Rimuovere tutti gli oggetti nel raggio d'azione.
> L'unità di controllo non è fissata correttamente. Assicurarsi che l'unità di controllo sia fissata correttamente al telaio del tavolo
come descritto nelle istruzioni di montaggio.
> I cavi di alimentazione non sono collegati correttamente all'unità di controllo. Assicurarsi che i cavi siano collegati correttamente
all'unità di controllo.
GUIDA ALLA PROGRAMMAZIONE PERSONALIZZATA
Regolazione del limite minimo
di altezza
(62~118cm / 24.4”~46.4”)
Quando il display lampeggia „ “, premere una volta il tasto [ M ] e verrà visualizzato il
limite di altitudine minima corrente (di default „ “). Poi premere il tasto [ ▲ ] / [ ▼ ] per
impostare l'altitudine desiderata.
[ M ] premere: salva.
- riuscito
- fallito
PASSO: 2 PASSO: 3
Premere i tasti [ M ] e [ T ] simultaneamente per circa 5 secondi finché il dispositivo emette un bip e l'indicatore „ “ lampeggia. Premere i tasti
[ ▲ ] / [ ▼ ] per passare da „ “ a „ “. La modalità personalizzata è attiva mentre il display lampeggia (per circa 10 secondi). Tuttavia, se
non viene eseguita alcuna operazione entro questo tempo, la modalità personalizzata viene terminata.
PASSO: 1
Regolazione del limite
massimo di altezza
(72~112cm / 28.3”~50.4”)
Quando il display lampeggia „ “, premere una volta il tasto [ M ] e verrà visualizzato il
limite di altitudine minima corrente (di default „ “). Poi premere il tasto [ ▲ ] / [ ▼ ] per
impostare l'altitudine desiderata.
(Nota: per ragioni di intervallo di visualizzazione, il display non mostrerà immediatamente il numero quando si premono i
pulsanti [▲]/[▼] quando si imposta il sistema metrico).
[ M ] premere: salva.
- riuscito
- fallito
Impostare la sensibilità
anticollisione (verso l'alto)
(Livello 0 ~ Livello 8)
Quando il display lampeggia „ “, premere una volta il tasto [ M ] e viene visualizzata
l'attuale sensibilità anticollisione (di default „ “). Quindi premere il tasto [ ▲ ] / [ ▼ ]
per impostare il livello desiderato.
[ M ] premere: salva.
- riuscito
- fallito
Impostare la sensibilità
anticollisione (verso il basso)
(Livello 0 ~ Livello 8)
Quando il display lampeggia „ “, premere una volta il tasto [ M ] e viene visualizzata
l'attuale sensibilità anticollisione (di default „ “). Quindi premere il tasto [ ▲ ] / [ ▼ ]
per impostare il livello desiderato.
[ M ] premere: salva.
- riuscito
- fallito
Impostare la sensibilità
anticollisione (Gyrosensor)
(Livello 0 ~ Livello 8)
Quando il display lampeggia „ “, premere una volta il tasto [ M ] e viene visualizzata
l'attuale sensibilità anticollisione (di default „ “). Quindi premere il tasto [ ▲ ] / [ ▼ ]
per impostare il livello desiderato.
[ M ] premere: salva.
- riuscito
- fallito
Imposta lo spessore attuale
del piano del tavolo
(0~5cm / 0~1.9”)
Quando il display lampeggia „ “, premere una volta il tasto [ M ] e viene visualizzato
lo spessore del piano del tavolo attualmente impostato (di default „ “). Quindi premere
il tasto [ ▲ ] / [ ▼ ] per impostare lo spessore del piano desiderato.
[ M ] premere: salva.
- riuscito
- fallito
Blocco delle operazioni
Accendere / spegnere
(0: OFF / 1: ON)
Quando il display lampeggia „ “, premere una volta il tasto [ M ] e viene visualizzato
lo spessore del piano del tavolo attualmente impostato (di default „ “). Quindi premere
il tasto [ ▲ ] / [ ▼ ] per attivare/disattivare il blocco del funzionamento/display.
[ M ] premere: salva.
- riuscito
- fallito
- Per annullare un'operazione personalizzata, premere il pulsante [ T ] o attendere circa 8 secondi finché il display torna automaticamente alla visualizzazio-
ne dell'altezza del tavolo.
- Il limite massimo/minimo di altezza visualizzato nella modalità definita dall'utente non include lo spessore della superficie di lavoro.

19
iNotizen
DE EN FR ES IT
Notes NotasNotes Note

DE
EN
FR
ES
IT
Fertig!
Done!
Fait!
Hecho!
Fatto!
E.N.Z. Engineering GmbH, Salzmatten 6, 79341 Kenzingen (Germany)
Table of contents
Languages:
Other ricoo Indoor Furnishing manuals
Popular Indoor Furnishing manuals by other brands

IKEA
IKEA BESTA installation instructions

Julian Bowen
Julian Bowen NEW201 Assembly instructions

Leggett & Platt
Leggett & Platt Roger Series owner's manual

LuxaFlex
LuxaFlex Modern Roman Care and cleaning

Furniture of America
Furniture of America HFW-1476C4 Assembly instructions

HOMCOM
HOMCOM 820-305V00 manual

Puris
Puris STAR LINE Mounting instructions

Twin-Star International
Twin-Star International TRESANTI TC74-3952 manual

VIBO
VIBO EUK45F1 Assembling instructions

Safavieh Furniture
Safavieh Furniture Helen AMH4076A manual

Airone
Airone ANT081 user manual

KARE design
KARE design F-SP-GF470 Assembly and operating instructions