RIDGID WD4550 User manual

OWNERS MANUAL
WD4550
4.5 U.S. GALLONS/
15 LITERS
PRO PACK
WET/DRY VAC
For Your Safety:
Read all instructions carefully
Save this manual for future
reference
FOR QUESTIONS OR INFORMATION
CONTACT US AT
1-800-4-RIDGID (1-800-474-3443) OR
www.ridgidvacs.com
MAXIMIZE VACUUM PERFORMANCE
WITH A NEW FILTER
Part No. SP6609 Printed in Canada
SP6609 8/25/05 2:01 PM Page 1

2
Table of Contents
Section Page
Table of Contents . . . . . . . . . . . . . . . . . 2
Important Safety Instructions. . . . . . . . . 2
Safety Signal Words. . . . . . . . . . . . . . 2
Save These Instructions . . . . . . . . . . . . 3
Introduction . . . . . . . . . . . . . . . . . . . . . . 4
Unpacking and Checking
Carton Contents List . . . . . . . . . . . . . 5
Getting to Know Your Vac . . . . . . . . . . . 6
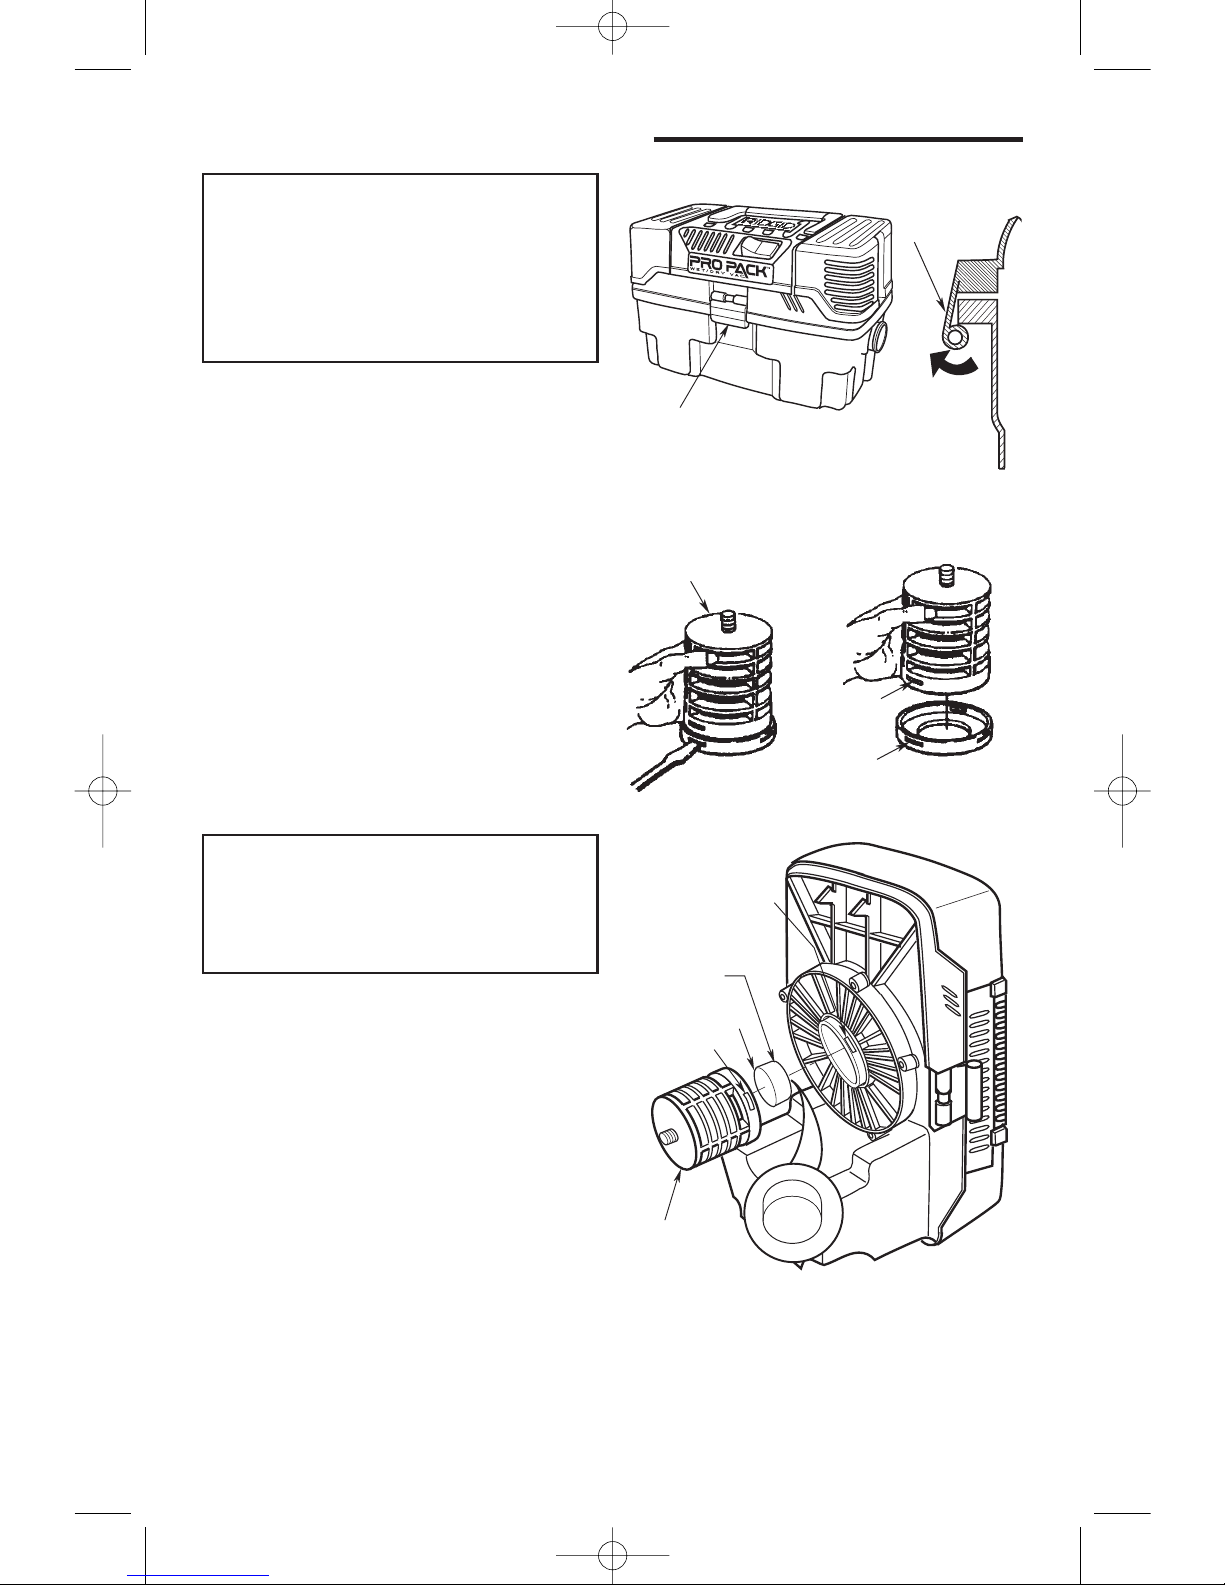
Float/Cage Replacement. . . . . . . . . . . . 7
Filter Assembly/Replacement . . . . . . . . 8
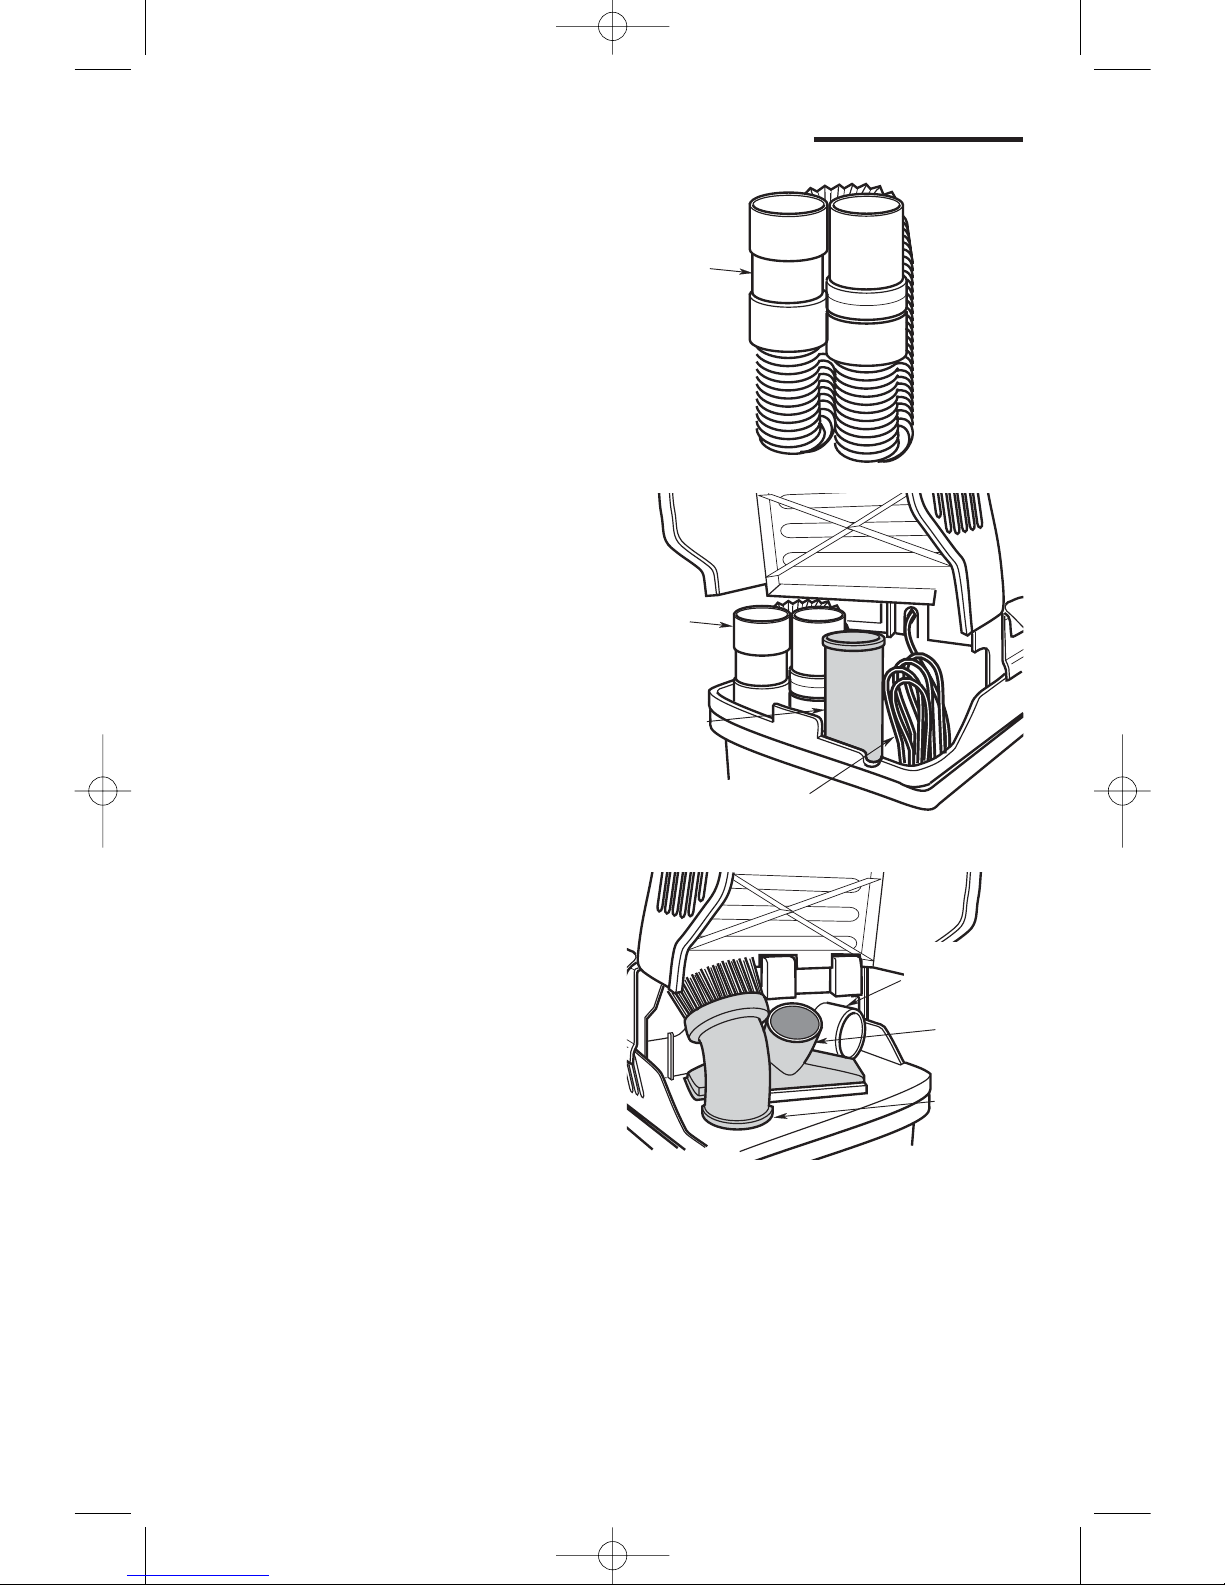
Cord, Hose & Accessory Storage . . . . . 9
Section Page
Operation. . . . . . . . . . . . . . . . . . . . . . . 10
Vacuuming Dry Materials . . . . . . . . . 11
Vacuuming Liquids . . . . . . . . . . . . . . 11
Emptying the Dust Drum . . . . . . . . . 11
Cord Storage . . . . . . . . . . . . . . . . . . 11
Blowing Feature . . . . . . . . . . . . . . . . 12
Maintenance . . . . . . . . . . . . . . . . . . . . 12
Cleaning Vac Filter . . . . . . . . . . . . . . 12
Removal . . . . . . . . . . . . . . . . . . . . . . 12
Cleaning A Dry Filter . . . . . . . . . . . . 13
Cleaning A Wet Filter . . . . . . . . . . . . 13
Installation . . . . . . . . . . . . . . . . . . . . 13
Cleaning and Disinfecting
the Wet/Dry Vac . . . . . . . . . . . . . . 13
Repair Parts. . . . . . . . . . . . . . . . . . . . . 14
Warranty . . . . . . . . . . . . . . . . . . . . . . . 16
IMPORTANT SAFETY INSTRUCTIONS
Safety is a combination of common sense,
staying alert and knowing how your vac
works. Read this manual to understand
the vac.
Safety Signal Words
DANGER: means if the safety information
is not followed someone will be seriously
injured or killed.
WARNING: means if the safety inform-
ation is not followed someone could be
seriously injured or killed.
CAUTION: means if the safety information
is not followed someone may be injured.
When using your Wet/Dry Vac, follow
basic safety precautions including the
following.
WARNING - To reduce the
risk of fire, electric shock, or injury:
Read and understand this owner's manual
and all labels on the Wet/Dry Vac before
operating. Use only as described in this
manual. To reduce the risk of personal
injury or damage to Wet/Dry Vac, use only
RIDGID recommended accessories.
Sparks inside the motor can ignite
flammable vapors or dust. To reduce the
risk of fire or explosion:
• Do not vacuum, or use this Wet/Dry
Vac, near flammable or combustible
liquids, gases, or explosive dusts,
like gasoline or other fuels, lighter
fluid, cleaners, oil-based paints,
natural gas, hydrogen, coal dust,
magnesium dust, grain dust, or gun
powder.
• Do not use Wet/Dry Vac as a sprayer.
• Do not vacuum anything that is
burning or smoking, such as
cigarettes, matches, or hot ashes.
• Do not vacuum drywall dust or cold
fireplace soot or ash with standard
wet/dry filter. This is a very fine dust
which will not be captured by the filter
and may cause damage.
• To reduce the risk of health hazards
from vapors or dusts, do not vacuum
toxic materials.
• Do not use or store near hazardous
materials.
• To reduce the risk of electric shock, do
not expose to rain. Store indoors.
SP6609 8/25/05 2:01 PM Page 2

• Do not direct air at bystanders.
• Keep children away when blowing.
• Do not use blower for any job except
blowing dirt and debris.
• Do not use Wet/Dry Vac as a sprayer.
• Do not store or stack items on top of
vac.
This Wet/Dry Vac is double-insulated,
eliminating the need for a separate
grounding system. Use only identical
replacement parts. Read the instructions
for Servicing Double-Insulated Wet/Dry
Vacs before servicing.
Observe the following warnings that
appear on the motor housing of your
Wet/Dry Vac.
3
• Do not allow to be used as a toy. Close
attention is necessary when used by or
near children.
• Do not use this Wet/Dry Vac with a torn
filter or without the filter installed except
when vacuuming liquids as described in
the operation section of this manual.
• Do not leave Wet/Dry Vac when plugged
in. Unplug from outlet when not in use
and before servicing. Turn off Wet/Dry
Vac before unplugging.
• Do not run Wet/Dry Vac unattended.
• To reduce the risk of injury from
accidental starting, unplug power cord
before changing or cleaning filter.
• Do not unplug by pulling on cord. To
unplug, grasp the plug, not the cord.
• Do not use with damaged cord, plug or
other parts. If your Wet/Dry Vac is not
working as it should, has missing parts,
has been dropped, damaged, left
outdoors, or dropped into water, return it
to an Authorized Service Center.
• Do not pull or carry by cord, use cord as
handle, close a door on cord, or pull
cord around sharp edges or corners. Do
not run Wet/Dry Vac over cord. Keep
cord away from heated surfaces.
• Do not handle plug or the Wet/Dry Vac
with wet hands.
• Do not put any object into ventilation
openings. Do not vacuum with any
ventilation openings blocked; keep free
of dust, lint, hair or anything that may
reduce air flow.
• Keep hair, loose clothing, fingers, and
all parts of body away from openings
and moving parts.
• To reduce the risk of falls, use extra care
when cleaning on stairs.
When using as blower:
• Direct air discharge only at work area.
SAVE THESE INSTRUCTIONS
WARNING: For your own safety, read
and understand owner’s manual.
Do not run unattended. Do not pick
up hot ashes, coals, toxic, flammable
or other hazardous materials. Do not
use around explosive liquids or
vapors.
WARNING: To reduce the risk of
electric shock - do not expose to rain
- store indoors.
DOUBLE INSULATED
GROUNDING NOT REQUIRED.
WHEN SERVICING USE ONLY
IDENTICAL REPLACEMENT PARTS.
WARNING: Do not step, stand or sit
on vacuum. Improper use may cause
injury.
WARNING: To reduce the risk of fire,
do not store foreign objects in this
compartment. Only store Vac
Accessories.
SP6609 8/25/05 2:01 PM Page 3

4
Introduction
This Wet/Dry Vac is intended for house-
hold use. It may be used for vacuuming of
wet or dry media and may be used as a
blower. This Wet/Dry Vac is supplied with
a three layer/high efficiency filter. It can be
used not only to pick up materials like
sawdust and gravel but also ultra fine
material like drywall dust and cold
fireplace ash. Material that is so small it
would pass through traditional filters.
Familiarize yourself with the following
product and features and read the entire
owner’s manual for specific usage of your
new wet/dry vac.
IMPORTANT NOTE
Please Read Carefully
Static Shocks Are Common - In dry
areas or when the relative humidity of the
air is low. To reduce the frequency of static
shocks in your home the best remedy is to
add moisture to the air with a humidifier.
The operation of any utility vac or blower
can result in foreign objects being blown
into the eyes, which can result in severe
eye damage. Always wear safety goggles
complying with ANSI Z87.1 (or in Canada
CSA Z94.3) before starting operation.
Everyday eyeglasses have only impact
resistant lenses. They are not safety
glasses. Safety Goggles are available at
many local retail stores. Glasses or
goggles not in compliance with ANSI or
CSA could seriously hurt you when they
break.
To reduce the risk of hearing damage,
wear ear protectors when using the vac for
extended hours or when using it in a noisy
area.
For dusty operations, wear dust mask.
Use only extension cords that are rated for
outdoor use. Extension cords in poor
condition or that are too small in wire size
can pose fire and shock hazards. When
using an extension cord, be sure it is in
good condition. Using any extension cord
will cause some loss of power. To keep the
loss to a minimum, use the following table
to choose the minimum wire size
extension cord.
Extension Cord Length Gauge A.W.G.
0-50 Ft. 14
50-100 Ft. 12
FORESIGHT IS
BETTER THAN
NO SIGHT
WEAR YOUR
SP6609 8/25/05 2:02 PM Page 4

Unpacking and Checking Carton Contents
5
Remove contents of carton. Check each
item against the Carton Contents List.
Contact 1-800-4-RIDGID (www.ridgid
vacs.com) if any parts are damaged or
missing.
Carton Contents List
Key Description Qty
A 4.5-Gallon PRO PACK Vac..........1
B* Float (Assembled)........................1
C* Filter Cage (Assembled) ..............1
D* Fine Dust Filter VF3500
(Assembled).................................1
E* Filter Plate (Assembled) ..............1
F* Filter Nut (Assembled) .................1
G* Crevice Tool .................................1
H* Dusting Brush ..............................1
J* Utility Nozzle ................................1
K* Superflex Hose ............................1
L Owners Manual............................1
* These items may come preassembled.
If they are not present in the carton,
check the vac power head to see if they
are preassembled.
A
THIS SIDE
TOWARD LID
B
C
D
E
F
G
H
J
L
K
OWNERS MANUAL
WD4550
4.5 U.S. GALLONS/
15 LITERS
PRO PACK
WET/DRY VAC
ForYourSafety:
Readall instructionscarefully
Savethis manualforfuture
reference
FOR QUESTIONS OR INFORMATIO N
CONTACT US AT
1-800-4-RIDGID (1-800-474-3443)
OR
www.ri dg id vacs.com
MAXIMIZEVACUUMPERFORMANCE
WITHANEWFILTER
PartNo. SP6609 Printedin Canada
SP6609 8/25/05 2:02 PM Page 5

6
Getting to Know Your Vac
1. Familiarize yourself with the controls and features of your vac before operating.
Drum Latch (2)
Drum
Left
Cover Right
Cover
Accessory
Storage Area
Blowing
Port
Handle
Cord & Hose
Storage Area
Vacuum
Port Inlet
Power Switch
Hose
Storage
Crevice
Tool
Storage
Power Cord
Storage
Dusting
Brush
Storage
Utility
Nozzle
Storage
Blowing
Port
SP6609 8/25/05 2:02 PM Page 6

NOTE: If filter cage or float ever have to
be replaced, follow the instructions below
for proper assembly:
1. Grasp the drum latches on both the right
and left side of the power head. Slowly
pull the drum latches away from the
drum. Lift the power head off the drum.
Place the lid assembly of the vac upside
down on a clean, dry surface.
2. Remove the filter nut and the filter.
3. Use a flat blade screwdriver and insert
the blade near one of the tabs between
the filter cage and the center ring of the
lid. Pry the tab out of the slot. Tilt the
cage and lift away from the lid.
4. Place the float over the opening in the
center of the lid with the words “This
side toward lid” laying face down over
the hole.
5. Line up filter cage tabs with the slots in
the center ring of the lid assembly. Push
on the filter cage until the tabs snap into
the slots for a secure fit.
7
WARNING: For your own safety,
never connect plug to power source
outlet until all assembly steps are
complete and you have read and
understood the safety and operation
instructions. Do not operate vac with
any parts damaged or missing.
WARNING: To avoid personal injury
or damage to vac be sure to keep
hands, fingers, or any other foreign
objects out of the center opening
when assembling the float .
Float/Cage Replacement
Filter
Cage
Slots (3)
Tabs (3)
Filter
Cage
Float
Labeled
End
Tabs (3)
Slots (3)
THIS SIDE
TOWARD LID
Drum Latches
(2)
Flexible
Locking
Tab
Pull
Out
And
Lift Up
SP6609 8/25/05 2:02 PM Page 7

1. Carefully slide the filter over the filter
cage, sliding filter down until the filter
stops against the lid.
2. Place the hole in the filter plate over the
threaded screw of the filter cage.
3. Gently push on the filter plate to seat the
rubber ring of the filter inside the circular
channel of the filter plate.
4. Place filter nut onto threaded screw and
tighten it down. Finger tighten only.
NOTE: Lever of filter nut should be away
from plate as shown.
IMPORTANT: Do not overtighten as this
may deform or crack the filter plate, filter
cage or filter.
5. To assemble the power head to the
drum, position power head over drum,
with drum latches lined up with recess in
drum. (The power head will only fit on
the drum one way).
6. Rotate the latches into the drum
recesses and press inward to secure lid
to drum.
7. Your vac is now ready to use. Read the
instructions on the following pages to
operate your vac safely.
Filter Assembly/Replacement
Filter Nut
Filter
Plate
Filter
Threaded
Screw Filter
Cage
8
SP6609 8/25/05 2:02 PM Page 8

Cord, Hose & Accessory Storage
1. Your vac has convenient locations to
store your power cord, vac hose, and
accessories.
2. Under the left cover of your Wet/Dry Vac
(as shown) is a storage location meant
to hold your superflex hose, crevice tool
and power cord. For ease of storage,
the hose should be folded as shown and
placed in the storage bin to the far left.
You will also notice a rectangular feature
in the bottom of this bin. The crevice tool
will easily store standing up in this
feature, tapered side down. Additionally,
the power cord will also fit in this bin to
the far right side. Fold or wrap the cord
in approximately 1-foot lengths until you
get within a foot of the storage bin. The
folded cord should now fit neatly into the
storage bin.
3. Under the right cover of your Wet/Dry
Vac (as shown) is a storage location for
the dusting brush and utility nozzle.
Each of these nozzles has a specific
location molded into the housing. Only
these two nozzles should be stored in
this location. Also located inside this
compartment is the blowing port. Please
see the “Blowing” section for blowing
directions.
Hose
Storage
Crevice
Tool
Storage
Power Cord
Storage
Dusting
Brush
Storage
Utility
Nozzle
Storage
Blowing
Port
9
Correct
Hose
Wrap for
Storage
SP6609 8/25/05 2:02 PM Page 9

Operation
WARNING
To reduce the risk of fire or explosion, do not operate this vac in areas with
flammable gases, flammable vapors such as lighter fluid, solvent type
cleaners, oil-base paints, gasoline, alcohol or explosive dusts such as coal,
magnesium, grain or gun powder. Do not vacuum explosive dust, flammable or
combustible liquids or hot ashes. Do not use this vac as a sprayer. To reduce
the risk of health hazards from vapors or dusts, do not vacuum toxic materials.
To reduce the risk of electrical shock, do not expose to rain. Store vac indoors.
Unplug power cord before changing or cleaning filter or emptying the dust
drum.
To reduce the risk of electric shock, this
appliance has a polarized plug (one blade
is wider than the other). This plug will fit in
a polarized outlet only one way. If the plug
does not fit fully in the outlet, reverse the
plug. If it still does not fit, contact a
qualified electrician to install the proper
outlet. Do not change the plug in any way.
After you plug the power cord into the
outlet, turn the unit on by pushing the
switch from position "O" to position "l". The
symbols used on the switch actuator are
international "On & Off" symbols. "O" is
the symbol for "OFF" and "l" is the symbol
for "ON".
=OFF =ON
NOTE: When using the unit in the
vacuuming mode, the accessory storage
lid can be used as an air diffuser by
closing this lid.
Familiarize yourself with the accessories
included with the vac. Each accessory
may be used in various ways for
vacuuming and blowing debris. Here is a
list of the accessories and their uses.
Dusting Brush - Use for sweeping up
areas with fine dust or debris. Great for
detailed cleaning.
Crevice Tool - Use to pick up debris in
hard to reach locations.
Utility Nozzle - General purpose nozzle for
most vacuuming applications.
Hose - Provides transfer of vacuum or
blowing capability to work site. Provides
the means of attaching accessories. Hose
includes suction relief valve to reduce
hose pull back when the inlet is blocked.
10
CAUTION: To reduce risk of hearing
damage, wear ear protectors when
using the vac for extended hours or
when using it in a noisy area.
WARNING: The operation of any
utility vac can result in foreign
objects being blown into the eyes,
which can result in severe eye
damage. Always wear safety
goggles complying with ANSI Z87.1
(or in Canada, CSA Z94.3) shown on
package before starting operation.
Safety Goggles are available at many
local retail stores.
When operating your vacuum with the
storage lids closed, take care to make
sure that the power cord is positioned
through the cord opening in the cover.
Left Cover
Power Cord
Opening
Drum Power
Cord Opening Power
Cord
SP6609 8/25/05 2:02 PM Page 10

WARNING: To reduce the risk of
injury from accidental starting,
unplug power cord before emptying
the drum.
Emptying the Dust DrumVacuuming Dry Materials
1. The filter must always be in correct
position at all times to avoid leaks and
possible damage to vac.
2. When using your vac to pick up very fine
dust, it will be necessary for you to
empty the drum and clean the filter at
more frequent intervals to maintain peak
vac performance.
NOTE: A dry filter is necessary to pick up
dry material. If you use your vac to pick up
dust when the filter is wet, the filter will
clog quickly and be very difficult to clean.
3. If your filter is wet but you need to use
the vac to pick up dry material, you can
quickly dry the filter by running the vac
without hose attached for about
10 minutes. The clean air rushing
through the vac will help dry the filter.
Vacuuming Liquids
1. When picking up small amounts of liquid
the filter may be left in place.
2. When picking up large amounts of liquid
we recommend that the filter be
removed. If the filter is not removed, it
will become saturated and misting may
appear in the exhaust.
3. When the liquid in the drum reaches a
predetermined level, the float mech-
anism will rise automatically to cut off
suction. You will know that the float has
risen because vac airflow ceases and
the motor noise will become higher in
pitch, due to increased motor speed.
When this happens, turn off the vac,
unplug the power cord, and empty the
drum.
4. After using the vac to pick up liquids, the
filter must be dried to avoid possible
mildew and damage to the filter.
IMPORTANT: To avoid damage to the vac,
do not run motor with float in raised
position.
1. To remove the power head to empty
contents of the dust drum, simply lift the
two drum latches on the front and rear
of the vac and lift the power head up
and off the dust drum and set to the
side.
Cord Storage
When vacuuming is complete, unplug the
cord and wrap it up as described in the
Cord, Hose & Accessory Storage section
shown on page 9.
Drum Latches
(2)
CAUTION: Do not remove the filter
cage or float. It is there to shut off
airflow when the drum is full of
liquids.
2. Set the power head upright in a clean,
dry area while emptying the drum.
3. Dump the drum contents into the proper
waste disposal container.
CAUTION: A partially unwrapped
cord may fall in coils near your feet.
You could trip. To reduce the risk of
tripping, always fully unwrap the
cord before plugging it in.
11
SP6609 8/25/05 2:02 PM Page 11

NOTE: The filter is made of high quality
paper designed to stop very small
particles of dust. The filter can be used for
dry pick up or small amounts of liquid.
Handle the filter carefully when removing
to clean or installing it. Creases in the filter
pleats may occur from installation but will
not affect the performance of the filter.
12
Maintenance
WARNING: To reduce the risk of
injury from accidental starting,
unplug power cord before changing
or cleaning filter.
Cleaning Vac Filter
Be sure to dry the filter before storing or
picking up dry debris.
IMPORTANT: After cleaning, check the
filter for tears or small holes. Do not use a
filter with holes or tears in it. Even a small
hole can cause a lot of dust to come out of
your vac. Replace the filter immediately.
CAUTION: Do not remove the filter
cage or float. It is there to shut off
airflow when the drum is full of
liquids.
Blowing Feature
Your wet/dry vac has the capability to be
used as a blower for yard work, patio
cleanup and workshop applications to
blow sawdust and other debris. Raise the
right cover and install the locking end of
the hose into the blower port.
WARNING: Always wear safety
goggles complying with ANSI Z87.1
(or in Canada, CSA Z94.3) before
using as a blower.
WARNING: To reduce the risk of
injury to bystanders, keep them clear
of blowing debris.
WARNING: Wear a dust mask if
blowing creates dust which might be
inhaled.
CAUTION: To reduce the risk of
hearing damage, wear ear protectors
when using the vac/blower for
extended hours or when using it in a
noisy area.
Operation (continued)
Right
Cover
Blowing
Port
Locking
End of
Hose
Removal
To remove the filter for cleaning or
replacement, unscrew the filter nut from
the filter cage, remove filter plate and lift
off filter.
IMPORTANT: To avoid damage to the
blower wheel and motor, always reinstall
the filter before using the vac for dry
material pickup.
SP6609 8/25/05 2:02 PM Page 12

13
WARNING: To assure product SAFETY
and RELIABILITY, repairs and
adjustments should be performed by
Independent Service Centers, always
using RIDGID replacement parts.
Cleaning A Dry Filter
NOTE: For best cleaning results due to
accumulated dust, clean the filter in an
open area. Cleaning SHOULD be done
outdoors and not in the living quarters.
1. Remove filter from vac. Gently tap the
filter against the inside wall of your dust
drum and the debris will loosen and fall.
2. For thorough cleaning of a dry filter with
fine dust (no debris) you may run water
through it as described in the “Cleaning
A Wet Filter” Section.
Cleaning A Wet Filter
After filter is removed, run water through
the filter from a hose or spigot. Take care
that water pressure from the hose is not
strong enough to damage filter.
Remember: To dry a filter quickly, reinstall
the filter on the vac and allow the unit to run
for approximately 10 minutes. The clean
air rushing through the filter will dry it.
IMPORTANT: After cleaning, check the
filter for tears or small holes. Do not use a
filter with holes or tears in it. Even a small
hole can cause a lot of dust to come out of
your vac.
IMPORTANT: If your filter is damaged or
worn, Replace the filter immediately.
Installation
Refer to "Filter Assembly/Replacement"
Section of this manual.
Allow the filter to dry before reinstalling
and storing the vac.
Cleaning and Disinfecting the
Wet/Dry Vac
To keep your Wet/Dry Vac looking its best,
clean the outside with a cloth dampened
with warm water and mild soap.
To clean the drum:
1. Dump debris out.
2. Wash drum thoroughly with warm water
and mild soap.
3. Wipe out with dry cloth.
Before prolonged storage or as needed
(i.e., waste water pick up) the drum should
be disinfected.
To disinfect the drum:
1. Pour 1 gallon of water and 1 teaspoon
chlorine bleach into the drum.
2. Let solution stand for 20 minutes,
carefully swishing every few minutes,
making sure to wet all inside surfaces of
the drum.
3. Empty drum after 20 minutes. Rinse
with water until bleach smell is gone.
Allow drum to dry completely before
sealing the motor on the drum.
SP6609 8/25/05 2:02 PM Page 13

WARNING
SERVICING OF DOUBLE-INSULATED WET/DRY VAC
In a double-insulated Wet/Dry Vac, two systems of insulation are provided
instead of grounding. No grounding means is provided on a double-insulated
appliance, nor should a means for grounding be added. Servicing a double-
insulated Wet/Dry Vac requires extreme care and knowledge of the system,
and should be done only by qualified service personnel. Replacement parts
for a double-insulated Wet/Dry Vac must be identical to the parts they replace.
Your double-insulated Wet/Dry Vac is marked with the words "DOUBLE
INSULATED" and the symbol (square within a square) may also be
marked on the appliance.
To reduce the risk of injury from electrical shock, unplug power cord before
servicing the electrical parts of the Wet/Dry Vac.
Repair Parts
RIDGID 4.5 Gallon PRO PACK Wet/Dry Vac
Model Number WD45500
RIDGID parts are available on-line at www.ridgidparts.com
Always order by Part Number - Not by Key Number
Key
No. Part No. Description
1 831388 Float
2 818977 Filter Cage
3 VF3500 Filter, Fine Dust
4 73317 Filter Plate
5 73316 Filter Nut
6 831327 Hose Assembly
7 VT1786 Crevice Tool
Key
No. Part No. Description
8 VT1785 Dusting Brush
9 VT1789 Utility Nozzle
10 831095 Right Cover
11 831094 Left Cover
12 831096 Handle
13 SP6609 Owners Manual
† These replacement parts may be available where you purchased your vac.
†
†
14
SP6609 8/25/05 2:02 PM Page 14

Repair Parts
RIDGID 4.5 Gallon PRO PACK Wet/Dry Vac
Model Number WD45500
RIDGID parts are available on-line at www.ridgidparts.com
Always order by Part Number - Not by Key Number
6
1
3
4
5
THISSIDE
TOWARDLID
2
7
8
9
12
11
13
10
OWNERSMANUAL
WD4550
4.5U.S.GALLONS/
15LITERS
PROPACK
WET/DRYVAC
ForYourSafety:
Readallinstructionscarefully
Savethismanual forfuture
reference
FORQUESTIONSORINFORMA
TION
CONTACTUSAT
1-800-4-RIDGID (1-800-474-3443)
OR
www.ridgidvacs.com
MAXIMIZEVACUUMPERFORMANCE
WITH ANEWFIL
TER
PartNo.SP6609PrintedinCanada
15
SP6609 8/25/05 2:02 PM Page 15

Part No. SP6609 Form No. SP6609 Printed in Canada 08/05
What is covered
RIDGID®tools are warranted to be free of defects in workmanship and material.
How long coverage lasts
This warranty lasts for the lifetime of the RIDGID®tool. Warranty coverage ends when the product
becomes unusable for reasons other than defects in workmanship or material.
How can you get service
To obtain the benefit of this warranty, deliver via prepaid transportation the complete product to
RIDGE TOOL COMPANY, Elyria, Ohio, or any authorized RIDGID®INDEPENDENT SERVICE
CENTER. Pipe wrenches and other hand tools should be returned to the place of purchase.
What we will do to correct problems
Warranted products will be repaired or replaced, at RIDGE TOOL’s option, and returned at no
charge; or, if after three attempts to repair or replace during the warranty period the product is still
defective, you can elect to receive a full refund of your purchase price.
What is not covered
Failures due to misuse, abuse or normal wear and tear are not covered by this warranty. RIDGE
TOOL shall not be responsible for any incidental or consequential damages.
How local law relates to the warranty
Some states do not allow the exclusion or limitation of incidental or consequential damages, so the
above limitation or exclusion may not apply to you. This warranty gives you specific rights, and you
may also have other rights, which vary, from state to state, province to province, or country to
country.
No other express warranty applies
This FULL LIFETIME WARRANTY is the sole and exclusive warranty for RIDGID®products.
No employee, agent, dealer, or other person is authorized to alter this warranty or make any other
warranty on behalf of the RIDGE TOOL COMPANY.
QUESTIONS OR COMMENTS? CALL
1-800-4-RIDGID (1-800-474-3443)
www.ridgidvacs.com
Please have your Model Number and Serial Number on hand when calling.
Professional Tools
Emerson Tool Company
A Division Of
Emerson Electric Co.
Stock No. WD4550
Model No. WD45500
Serial Number
Model and serial numbers may be found on the handle. You should record both
model and serial numbers in a safe place for future use.
c 2005 Emerson
SP6609 8/25/05 2:02 PM Page 16

MANUAL DEL USUARIO
WD4550
ASPIRADORA PARA
MOJADO/SECO
PRO PACK
DE 4,5 GALONES EE.UU./
15 LITROS
Para su seguridad:
Lea detenidamente todas las instrucciones.
Guarde este manual para referencia futura.
SI TIENE PREGUNTAS O DESEA INFORMACIÓN,
CONTÁCTENOS LLAMANDO AL
1-800-4-RIDGID (1-800-474-3443) O
CONECTÁNDOSE A www.ridgidvacs.com
No. de pieza SP6609 Impreso en Cánada
VF500VF5000
RECOMMENDRECOMMENDED
VF500
RECOMENDA
Conéctese a . . .
www.ridgidvacs.com
para hacerse miembro de nuestro
Club de Filtros y/o inscribirse en
nuestro Sorteo de Tarjetas de Regalo
de Home Depot por valor de 500 dólares.
MAXIMICE EL RENDIMIENTO DE LA ASPIRADORA
CON UN FILTRO NUEVO
Sorteo
de Tarjetas
de Regalo de
US$ 500
SP6609_SP 8/25/05 2:11 PM Page 17

18
Sección Página
Indice . . . . . . . . . . . . . . . . . . . . . . . . . . . . . . . . . . 18
Instrucciones de seguridad importantes . . . . . . . 18
Palabras de señal de seguridad . . . . . . . . . . . . 18
Guarde estas instrucciones . . . . . . . . . . . . . . . . . 19
Introducción . . . . . . . . . . . . . . . . . . . . . . . . . . . . . 20
Desempaquetado y comprobación del
contenido de la caja de cartón . . . . . . . . . . . . 21
Lista del contenido de la caja de cartón . . . . . . 21
Familiarización con la aspiradora . . . . . . . . . . . . 22
Reemplazo del flotador y la jaula . . . . . . . . . . . . . 23
Ensamblaje y reemplazo del filtro . . . . . . . . . . . . 24
Almacenamiento del cordón,
la manguera y los accesorios . . . . . . . . . . . . . 25
Funcionamiento . . . . . . . . . . . . . . . . . . . . . . . . . . 26
Recogida de materiales secos con la aspiradora . 27
Sección Página
Recogida de líquidos con la aspiradora . . . . . . 27
Vaciado del tambor para polvo . . . . . . . . . . . . . 27
Almacenamiento del cordón . . . . . . . . . . . . . . . 27
Dispositivo de soplado . . . . . . . . . . . . . . . . . . . 28
Mantenimiento . . . . . . . . . . . . . . . . . . . . . . . . . . . 28
Limpieza del filtro de la aspiradora . . . . . . . . . . 28
Remoción . . . . . . . . . . . . . . . . . . . . . . . . . . . . . 28
Limpieza de un filtro seco . . . . . . . . . . . . . . . . . 29
Limpieza de un filtro mojado. . . . . . . . . . . . . . . 29
Instalación . . . . . . . . . . . . . . . . . . . . . . . . . . . . . 29
Limpieza y desinfección de la aspiradora
para mojado/seco . . . . . . . . . . . . . . . . . . . . . . 29
Piezas de repuesto . . . . . . . . . . . . . . . . . . . . . . . . 30
Garantía . . . . . . . . . . . . . . . . . . . . . . . . . . . . . . . . 32
INSTRUCCIONES DE SEGURIDAD IMPORTANTES
La seguridad es una combinación de sentido
común, permanecer alerta y saber cómo funciona
la aspiradora. Lea este manual para entender la
aspiradora.
Palabras de señal de seguridad
PELIGRO: significa que si no se sigue la
información de seguridad, alguien resultará
herido gravemente o morirá.
ADVERTENCIA: significa que si no se sigue la
información de seguridad, alguien podría resultar
herido gravemente o morir.
PRECAUCION: significa que si no se sigue la
información de seguridad, alguien pudiera
resultar herido.
Al usar la aspiradora para mojado/seco, siga las
precauciones básicas de seguridad, incluyendo
las siguientes.
ADVERTENCIA- Para reducir el
riesgo de incendio, sacudidas eléctricas o
lesiones:
Lea y entienda el manual del usuario y todas las
etiquetas que están en la aspiradora para
mojado/seco antes de usarla. Utilícela única-
mente según se describe en este manual. Para
reducir el riesgo de lesiones personales o daños
a la aspiradora para mojado/seco, utilice única-
mente accesorios recomendados por RIDGID.
La chispas que se producen en el interior del
motor pueden incendiar los vapores inflamables
o el polvo. Para reducir el riesgo de incendios o
explosión:
• No recoja con la aspiradora para mojado/
seco líquidos inflamables o combustibles,
gases o polvos explosivos como gasolina u
otros combustibles, líquido encendedor,
disolventes para limpiar, pinturas a base de
aceite, gas natural, hidrógeno, polvo de
carbón, polvo de magnesio, polvo de
granos o pólvora, ni use la aspiradora cerca
de estos materiales.
• No utilice la aspiradora para mojado/seco
como un rociador.
• No recoja con la aspiradora nada que esté
ardiendo o humeando, como cigarrillos,
fósforos o cenizas calientes.
• No recoja con la aspiradora polvo de pared de
tipo seco ni hollín frío o ceniza fría de
chimenea con un filtro para mojado/seco
estándar. Este tipo de polvo es un polvo muy
fino que no será capturado por el filtro y podría
causar daños.
• Para reducir el riesgo de que se produzcan
peligros para la salud causados por vapores o
polvos, no recoja con la aspiradora materiales
tóxicos.
• No use ni almacene la aspiradora cerca de
materiales peligrosos.
• Para reducir el riesgo de sacudidas eléctricas,
no exponga la aspiradora a la lluvia. Guárdela
en un lugar interior.
• No permita que la aspiradora se utilice como
juguete. Se necesita prestar máxima atención
cuando sea utilizada por niños o cerca de
éstos.
Indice
SP6609_SP 8/25/05 2:11 PM Page 18

• No use el soplador para ningún trabajo que no
sea soplar suciedad o residuos.
• No use la aspiradora para mojado/seco como
rociadora.
• No almacene ni apile artículos sobre la
aspiradora.
Esta aspiradora para mojado/seco tiene
aislamiento doble, con lo que se elimina la
necesidad de un sistema de conexión a tierra
aparte. Utilice únicamente piezas de repuesto
idénticas. Lea las instrucciones para realizar
servicio de ajustes y reparaciones de aspiradoras
para mojado/seco con aislamiento doble antes de
realizar dicho servicio.
Siga las siguientes advertencias que aparecen en
la caja del motor de la aspiradora para
mojado/seco.
19
• No use esta aspiradora para mojado/seco con
un filtro roto ni sin el filtro instalado, excepto
para recoger líquidos según se describe en la
sección de funcionamiento de este manual.
• No abandone la aspiradora para mojado/seco
cuando esté enchufada. Desenchúfela del
tomacorriente cuando no la esté utilizando y
antes de realizar servicio de ajustes y
reparaciones. Apague la aspiradora para
mojado/seco antes de desenchufarla.
• No haga funcionar la aspiradora para
mojado/seco desatendida.
• Para reducir el riesgo de lesiones debidas a un
arranque accidental, desenchufe el cordón de
energía antes de cambiar o limpiar el filtro.
• No desenchufe la aspiradora tirando del
cordón. Para desenchufarla, agarre el enchufe
y no el cordón.
• No utilice la aspiradora cuando el cordón, el
enchufe u otras piezas estén dañados. Si la
aspiradora para mojado/seco no funciona
como debe, le faltan piezas, se ha caído, ha
sido dañada, se ha dejado al aire libre o se ha
caído al agua, devuélvala a un Centro de
Servicio autorizado.
• No tire de la aspiradora usando el cordón ni la
lleve por el cordón, ni use el cordón como asa,
ni cierre una puerta sobre el cordón, ni tire del
cordón alrededor de bordes o esquinas
afilados. No pase la aspiradora para mojado/
seco sobre el cordón. Mantenga el cordón
alejado de las superficies calientes.
• No maneje el enchufe o la aspiradora para
mojado/seco con las manos mojadas.
• No ponga ningún objeto en las aberturas de
ventilación. No recoja nada con la aspiradora
cuando cualquiera de las aberturas de
ventilación esté bloqueada; manténgalas libres
de polvo, pelusa, pelo o cualquier cosa que
pueda reducir el flujo de aire.
• Mantenga el pelo, la ropa holgada, los dedos y
todas las partes del cuerpo alejados de las
aberturas y de las piezas móviles.
• Para reducir el riesgo de caídas, tenga cuidado
adicional al limpiar en escaleras.
Cuando utilice la aspiradora como soplador:
• Dirija la descarga de aire solamente hacia el
área de trabajo.
• No dirija el aire hacia las personas que estén
presentes.
• Mantenga a los niños alejados cuando realice
operaciones de soplado.
GUARDE ESTAS INSTRUCCIONES
AISLAMIENTO DOBLE. NO SE REQUIERE
CONEXION A TIERRA.
AL REALIZAR SERVICIO DE AJUSTES Y
REPARACIONES, UTILICE SOLAMENTE PIEZAS
DE REPUESTO IDENTICAS.
ADVERTENCIA: Para reducir el riesgo de sacu-
didas eléctricas, no exponga la aspiradora a la
lluvia y guárdela en interiores.
ADVERTENCIA: No pise la aspiradora, no se
pare sobre ella ni se siente en ella. El uso
inapropiado puede causar lesiones.
ADVERTENCIA: Para reducir el riesgo de
incendio, no almacene objetos extraños en
este compartimiento. Almacene únicamente
los accesorios de la aspiradora.
ADVERTENCIA: Para su propia seguridad, lea y
entienda el manual del usuario. No tenga en
marcha la aspiradora desatendida. No recoja
cenizas calientes, brasas, materiales tóxicos,
materiales inflamables ni otros materiales
peligrosos. No use la aspiradora alrededor de
líquidos ni vapores explosivos.
SP6609_SP 8/25/05 2:24 PM Page 19

20
Introducción
La aspiradora para mojado/seco está diseñada
para uso doméstico. Se puede usar para recoger
medios mojados o secos y se puede usar como
soplador. Esta aspiradora para mojado/seco se
suministra con un filtro de tres capas de alta
eficiencia. La aspiradora se puede usar no sólo
para recoger materiales como aserrín y grava,
sino también material ultrafino, tal como polvo de
pared de tipo seco y cenizas de chimenea frías, es
decir, material tan pequeño que pasaría a través
de los filtros tradicionales. Familiarícese con el
producto y sus características, que se describen
a continuación, y lea todo el manual del usuario
para obtener información sobre el uso específico
de su nueva aspiradora para mojado/seco.
NOTA IMPORTANTE
Por favor, léala cuidadosamente
Las sacudidas de electricidad estática son
comunes en áreas secas o cuando la humedad
relativa del aire es baja. Para reducir la frecuencia
con que se producen sacudidas de electricidad
estática en su hogar, el mejor remedio es añadir
humedad al aire con un humidificador de
consola.
La utilización de cualquier aspiradora o soplador
puede hacer que se soplen objetos extraños hacia
los ojos, lo cual puede causar daños graves en
los ojos. Use siempre anteojos de seguridad que
cumplan con la norma ANSI Z87.1 (o en Canadá,
con la norma CSA Z94.3) antes de comenzar la
operación. Las gafas corrientes sólo tienen lentes
resistentes a los golpes. No son gafas de
seguridad. Se pueden conseguir anteojos de
seguridad en muchas de las tiendas minoristas
locales. Las gafas o los anteojos que no cumplan
con la norma ANSI o CSA podrían causarle
lesiones graves al romperse.
Para reducir el riesgo de daños a la audición, use
protectores de oídos cuando utilice la aspiradora
durante muchas horas seguidas o cuando la
emplee en un área ruidosa.
Para operaciones que generan polvo, use una
máscara antipolvo.
Utilice únicamente cordones de extensión que
estén clasificados para uso a la intemperie. Los
cordones de extensión que estén en malas condi-
ciones o cuyo tamaño de alambre sea demasiado
pequeño pueden conllevar peligros de incendio y
sacudidas eléctricas. Cuando utilice un cordón de
extensión, asegúrese de que esté en buenas
condiciones. La utilización de cualquier cordón
de extensión causará algo de pérdida de potencia.
Para mantener la pérdida al mínimo, utilice la
tabla que aparece a continuación para seleccionar
el cordón de extensión con el tamaño de cable
mínimo.
Longitud del cordón Calibre del cable
de extensión (A.W.G.)
0-50 pies 14
50-100 pies 12
SP6609_SP 8/25/05 2:11 PM Page 20
Table of contents
Languages:
Other RIDGID Vacuum Cleaner manuals

RIDGID
RIDGID 4000RV0 User manual

RIDGID
RIDGID WD1250 User manual

RIDGID
RIDGID HD06000 User manual

RIDGID
RIDGID HD14000 User manual

RIDGID
RIDGID 1610RV0 User manual

RIDGID
RIDGID WD1255BR0 User manual

RIDGID
RIDGID WD55000 User manual

RIDGID
RIDGID WD30500 User manual

RIDGID
RIDGID WD4075KR0 User manual

RIDGID
RIDGID RT06000 User manual

RIDGID
RIDGID WD2450 User manual

RIDGID
RIDGID RT06000 User manual

RIDGID
RIDGID HD1600C User manual

RIDGID
RIDGID 62703 User manual

RIDGID
RIDGID WD12800 User manual

RIDGID
RIDGID HD1280 User manual

RIDGID
RIDGID WD19560 User manual

RIDGID
RIDGID WD1276 Technical manual

RIDGID
RIDGID WD4050 User manual

RIDGID
RIDGID WD1665 User manual