RIHO Desire BD07005 User manual

Montageanleitung und Wartung von Akrylatbadewannen RIHO
Alle Badewannen der Marke RIHO werden aus Akrylat (PMMA) hergestellt und sind durch
Polyester mit Glasfaser verfestigt. Der Badewanneboden ist mit Sperrholz bewehrt. Akrylat ist
ein synthetischer Stoff im ganzen Schnitt durchgefärbt. Die Eigenschaften des Akrylates
gewähren einen maximalen Komfort bei der Badewannenbenutzung unter der Voraussetzung,
dass Sie sich nach den Anweisungen zur Installierung und den Forderungen zur Wartung der
Wanne richten werden.
VORGANG:
1) Vor Installierung entfernen Sie die Kartonverpackung und die dünne Schutzfolie von der
Badewanne und kontrollieren Sie, ob die Wanne nicht beschädigt ist, ob sie keinen Materialfehler
oder Produktionsfehler aufweist. Schützen Sie die Badewanne während der Installierung auf
geeignete Art (z. B. Karton, Decke, Blasenfolie,...). Nach der durchgeführten Installierung
bezieht sich die Garantie der Gesellschaft RIHO nur auf versteckte Materialfehler.
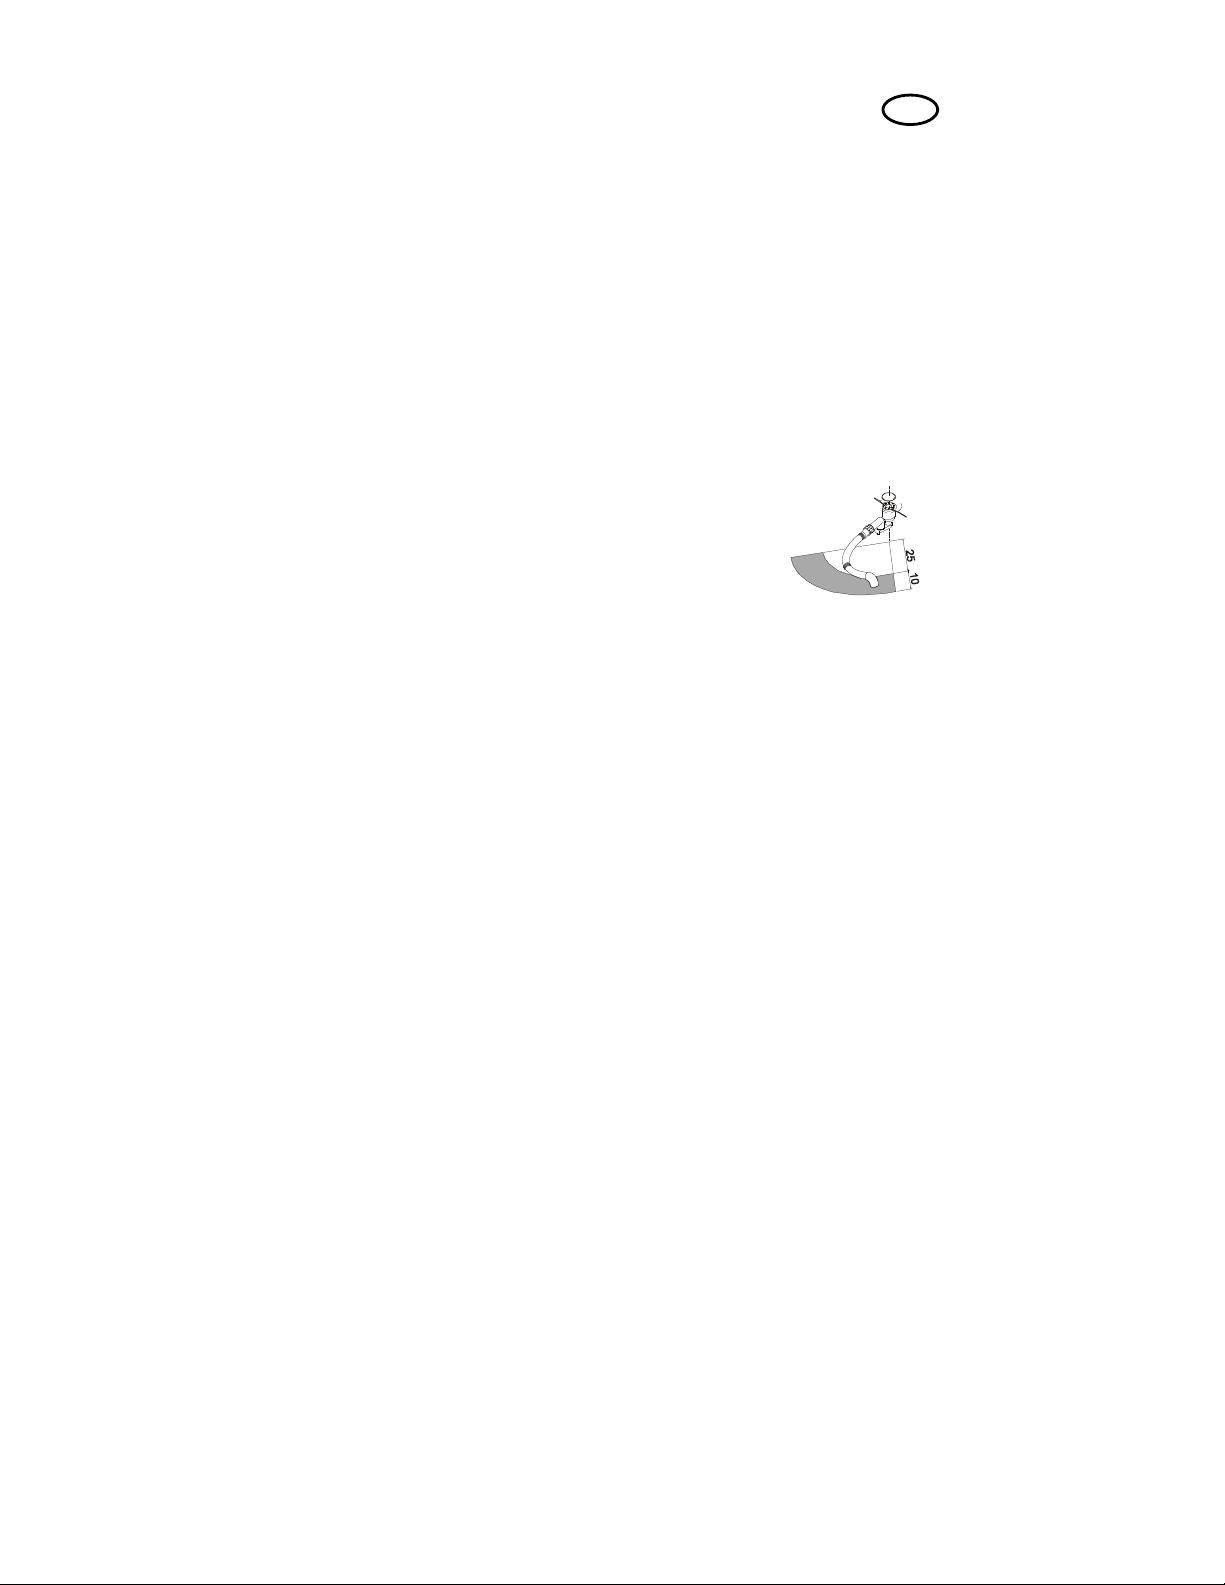
2) Vor der Installierung der Badewanne muss der Anschluss von Warm- und
Kaltwasser und der Abfluss installiert sein (siehe Bild mit
empfohlener Distanz).
3) Der Einbau der Badewanne muss in dem schon mit Verkleidung oder
Wandputz, der mindestens 10cm unter den Badewannenrand reicht,
fertiggestellten Raum durchgeführt werden. Die Badewannenkante kann mit einem
Dämmungsband versehen werden.
4) Der Fußboden unter der Badewanne aus harter nichtelastischer Oberfläche muss eben sein.
5) Die Badewanne muss mit den Originalstützen von RIHO installiert werden – gehen Sie nach
der Montageanleitung für die Montage der Stützen vor.
6) Montieren Sie das Überfall- und Abflusssystem.
7) Füllen Sie die Badewanne bis zum Überfall an, kontrollieren Sie die Dichtheit des
Abflusssystems, kontrollieren Sie den Standort der Badewanne und dichten Sie mit sanitärem
Silikonkittmasse oder Dichtungsband die Fugen um die Badewanne (max. 5 mm).
8) Die Seiten der Badewanne, die nicht an der Wand anliegen, kann man ausmauern oder man
kann Originaldeckplatten von RIHO benutzen. Man kann den gesamten Umfang der Badewanne
verkleiden oder nur einige Teile.
9) Nach dem Einbau muss die Badewanne ohne besondere Baueingriffe nachmontierbar bleiben.
WARTUNG:
Da es sich um ein Material handelt, das keine Poren hat und glatt ist, setzen sich daran praktisch
keine Unreinlichkeiten an. Es genügt, wenn Sie die Badewanne nach Benutzung mit nassem
Schwamm oder Lappen und mit flüssigem Reiniger (kein Scheuermittel) abwaschen.
REPARATUR KLEINER KRATZER UND SONSTIGER BESCHÄDIGUNGEN:
Handelt es sich um kleine Kratzer, genügt es Politur für Chrom und Lacke anzuwenden (ohne
Auflösungsmittel und Granulat). Ist das Ergebnis nicht zufriedenstellend, schleifen Sie die
beschädigte Stelle mit einem wasserfesten Schmirgelpapier der Körnung 600, und danach mit
einem feinen Papier der Körnung 1000. Zum Schluss benützen Sie noch Politur für Chrom und
Lacke und die Badewanne wird wie neu sein.
HINWEIS:
Wenn Sie sich entscheiden selbst die Badewanne zu reparieren, tun Sie dies auf eigene
Verantwortung! Die Möglichkeit der Reparatur ernsthafter Beschädigungen konsultieren Sie
immer mit dem RIHO-Servicecenter.
DER HERSTELLER TRÄGT KEINE VERANTWORTUNG, SOFERN DIE IN DIESER
ANLEITUNG ANGEFÜHRTEN ANWEISUNGEN NICHT EINGEHALTEN WURDEN.
D

The instructions for assembly and maintenance of the RIHO acrylate baths
All the baths of RIHO brand are manufactured from the acrylate (PMMA) and are reinforced with
polyester and fibre glass. The bath bottom is supported with shredded wood. The acrylate is a
synthetic material coloured throughout the whole cross section. The properties of the acrylate
provide maximum comfort in use of the bath provided that you will follow the instructions for
installing and requirements for maintenance of the bath.
PROCEDURE:
1) Before the installation you remove the cardboard packing and a thin protective foil from the
bath and make sure if the bath is not damaged, if it does not show material or production defects.
During the installation you protect the bath in an appropriate method (e.g. with a cardboard,
blanket, bubble foil, …) After the finished installation the company RIHO guaranty applies only
to hidden material defects.
2) Before the installation there must be installed the supply of hot and cold
water and the drain (see the Figure with recommended distances).
3) You must build in the bath into the space with finished wall tilling or
plaster, which overlaps by 10 cm under the bath’s edge. You can provide the
rim of the bath with a sound damping tape.
4) The floor under the bath, which has a firm and inelastic surface, must be in a plain.
5) The bath must be installed with original RIHO supports – follow the attached instructions for
the assembly of supports.
6) Mount the water overflow and drain set.
7) Fill in the bath with water as high as to the water overflow, check the tightness of the drain set,
control the bath’s position and make tight the joints on the bath’s perimeter (max. 5 mm) with
sanitary silicone filler or sealing tape.
8) The sides of the bath, which do not adjoin to the wall, can be lined with bricks and tilled or you
can use the original RIHO covering panel. It is possible to tile the whole circumference of the bath
or only some parts.
9) After the building in the bath must remain to be demountable without any special
constructional intervention.
MAINTENANCE:
As the material does not have any voids and it is smooth, no impurities practically deposit on it. It
is sufficient when after using the bath you wash it with a wet sponge or a cloth and liquid cleaner
(non-abrasive).
REPAIR OF SMALL SCRATCHES AND OTHER DAMAGE:
If it refers to small scratches, it is sufficient to use a polishing agent for chrome and varnish
(without solvent and granules). If the result is not satisfactory, you must grind the damaged place
with water resistant abrasive paper of grain size 600 and then with fine abrasive paper of grain
size 1000. Finally you will use the polishing agent for chrome and the bath will be as good as
new.
WARNING:
If you will decide to repair the bath by yourself, you will do it on your own responsibility! Always
consult the possibility of repairs of more serious damage with the RIHO service centre.
THE MANUFACTURER DOES NOT HOLD ANY RESPONSIBILITY ON CONDITION
WHEN THERE HAVE NOT BEEN OBSERVED THE INSTRUCTIONS GIVEN IN THESE
INSTRUCTIONS.
GB

Instructions de montage et d´entretien des baignoires acryliques RIHO
Toutes les baignoires de la marque RIHO sont fabriquées en acryl (PMMA) et sont solidifiées par
le polyester avec la fibre de verre. Le fond de la baignoire est renforcé par un panneau de bois.
L´acryl est une matière synthétique, colorée dans toute sa masse. Les caractéristiques de l´acryl
offrent le confort maximal lors de l´utilisation de la baignoire à condition que vous suiviez les
instructions d´installation et les exigences concernant l´entretien de la baignoire.
PROCEDE:
1) Avant l´installation, enlevé de la baignoire la robe de carton et le plastique mince de protection,
vérifiez si la baignoire n´est pas endommagée et ne présente pas de défauts de matière ou de
fabrication. Durant l´installation, protégez la baignoire d´une manière appropriée (p.ex. carton,
couverture, plastique à bulles, ...). Une fois l´installation faite, la garantie de la société RIHO ne
s´applique qu´à des vices cachés.
2) Avant la mise en place de la baignoire, il faut installer la conduite d´eau chaude et froide (voir
figure avec les distances préconisées).
3) La baignoire doit être encastrée dans l´espace avec le revêtement ou le
recouvrement muraux achevés, dépassant de 10 cm au minimum sous le bord
de la baignoire. Le bord de la baignoire peut être muni du ruban
amortisseur.
4) Le plancher rigide et non élastique sous la baignoire doit être de niveau.
5) La baignoire est à installer avec les supports originaux de RIHO – procédé selon les
instructions de montage ci-jointes.
6) Faites le montage des tuyaux de trop-plein et d´écoulement.
7) Remplissez le bain jusqu´au trop plein, faites le contrôle de l´étanchéité de l´équipement
d´écoulement, vérifié la position de la baignoire et l étancheité des joints sur le pourtour de la
baignoire avec le mastic de silicone sanitaire ou avec le ruban d´étancheité (5 mm au max.).
8) Les flancs de la baignoire ne touchant pas le mur peuvent être maçonnés et revêtus ou bien
garnis de panneaux de revêtement d’origin RIHO. Il est possible de revêtir toute la circonférence
de la baignoire ou bien certaines parties.
9) Une fois l´installation de la baignoire finie, celle-ci doit rester démontable sans interventions de
construction particulières.
ENTRETIEN:
Comme la matière est lisse et non poreuse, presque aucunes impuretés ne s´y déposent. Il suffit de
laver la baignoire après l´utilisation à l´aide d´une éponge ou d´un chiffon humides et au détergent
liquide (non abrasif).
RETOUCHES DE PETITES RAYURES ET D´AUTRES ENDOMMAGEMENT:
Dans le cas où il s´agit de petites écorchures, il suffit d´utiliser le brillant pour aciers au chrome et
pour vernis (sans diluant et granules). Lorsque le résultat n´est pas satisfaisant, polissé l´endroit
endommagé avec le papier à l’émeri résistant à l´eau d’une grosseur de grain 600 et ensuite avec
le papier à l´émeri fin d’une grosseur de grain 1000. A la fin, utilisé le brillant pour aciers au
chrome et pour vernis et la baignoire sera comme neuve.
ATTENTION:
Dans le cas où vous décidez de réparer votre baignoire vous-même, la réalisation de cette
réparation est faite à vos risques et périls! Les réparations des endommagements plus graves sont
toujours à consulter avec le centre de service agréé de RIHO.
LE FABRICANT N´ASSUME AUCUNE RESPONSABILITE LORSQUE LES
INSTRUCTIONS INDIQUÉES DANS CETTE NOTICE N´ONT PAS ETE RESPECTEES.
F
This manual suits for next models
1
Table of contents
Languages:
Other RIHO Bathtub manuals