RiMO alpha User manual

alpha users manual
Edition 02.2008

1.
2.
3.
4.
5.
6.
7.
7.1.
8.
8.1.
8.2.
8.3.
8.4.
8.5.
8.6.
8.7.
9.
10.
Content index
Explanation of specific vocabulary
Welcome
Using
First use
Safety instructions
Fueling
Maintainance and inspection periods
Daily, weekly and monthly inspections
Inspection procedures
Inspection Overview
Adjustment of chain belt
Tire inspection
Inspection of rim bearings
Inspection of tie rods
Inspection of stub axles
Inspection of brake system
Cleaning instructions
Elimination of disfunction
11.
12.
13.
13.1.
13.2.
13.3.
13.4.
14.
15.
15.1.
15.2.
15.3.
15.4.
15.5.
15.6.
15.7.
15.8.
15.9.
Protective clothing and equipment
Standard engines
Adjustments and usings
Engine
Mechanic brake
Hydraulic brake
Wheel Lead
Options
Reference address for RiMO Karts
RiMO - Germany
RiMO - Scandinavia
RiMO - USA
RiMO - Australia
RiMO - Nigeria
RiMO - Turkey
RiMO - Vietnam
RiMO - Russia
RiMO - United Kingdom
2
Copyright ©RiMO 2008
alpha

1. Explanation of specific vocabulary
Please read carefully all text which follow up to these symbols:
3
Attention: High risk of injury
Risk of injury
Important information
2. Welcome
Congratulations to your new kart!
Yo decided to buy a high-end quality product from RiMO. Live the fascination of karting!
3. Usage
This vehicle is to be used for business purposes only (e.g. rental business / pay and drive) or
for event purposes and only to be used on tracks with solid ground, e.g. concrete, asphalt).
4. First use
The vehicle is ready for use ex works. Oil and gas are not included: BEFORE starting the engine fill up
engine and clutch with the specified oil (see chapter 13.1, engine).
Attention: before starting the engine first time the fuel hoses/lines need to be fueld with MAXIMUM
one liter gas. In case of middle or side mounted tank a light pressure of max. 0.2 bar has to be
implemented to the tank, the reflux is to be closed by squeezing the fuel line. The fuel tap on the
carburetor has to be fixed in position „On“ (or - depending on the engine - in position „1“).
See chapter 11.11/11.12 for this. In case of using the engine manufacturers original tank
(above the engine) the above direction can be ignored. After executing above directions it is possible
to start the engine as described in the engine manufacturers manual.

4
Copyright ©RiMO 2008
alpha
5. Safety instructions
- Entering and leaving the vehicle is to be done from the left side (seen from drivers view)
- BEFORE starting the engine a driver MUST SIT IN THE KART
- Gas pedal is on the right side, brake pedal is on the left side
DO NOT USE BOTH PEDALS AT THE SAME TIME.
- Driving the kart requires a safety helmet and tight clothes
- Steering wheel is to be handled with both hands
- The vehicle has to be used only in karting areas, not in public ground
- The vehicle can be used only by one person at the same time.
- Maintenance, repairings and fuelings are to be done only when engine is off and cooled down.
6. Fueling
- Gas-driven engines are to be fueled only with benzol-free gas if used on indoor kart tracks.
- All fueling activity is to be done outdoors or in a ventilated room
(minimum of 5 complete air replacements per hour)
- For fueling activities only approved/licensed petrol cans are allowed
- The fueling area has to have a clear and plain ground in order to make sure that leaked
liquids are noticed quickly and can be eliminated. Two opposite sides of the fueling area are
to be equipped with a fire-extinguisher.
- The fueling area has to have information tables with following prohibitions:
SMOKING BAN!
STAFF ONLY!
FUELINGS ONLY WITH STOPPED AND COLD ENGINE!
NO PASSENGER ALLOWED IN THE VEHICLE WHILE FUELING!
FUELING IN ALLOWED AREA ONLY!
- All components of the ventilation in the fueling area are to be explosion proof according
„zone one“ specifications of german ElexV or similar national legal regulations.
- Fueling areas are to be equipped with a ventilation which is able to evacuate the
air-fuel-mixture leaking of the fuel tank while filling the tank.

Brake
Chain/Belt
Wheel
Tie rods
Stub axle
Wheel
bearing
Wheel
7.1. Daily, weekly and monthly inspections
Daily inspections:
Rollbars, rubber buffers and silentblocks, pedals, stub axles (see inspection procedure for stub axles) with stub axle
bearings, rim bearings (see inspection procedure for rim bearings), tire condition and tire pressure (see inspection
procedures for tires), steering wheel, tie rods (see inspection procedure for tie rods), function of brake system.
(see inspection procedure for brake system), cables and mechanic, oil-level in the engine.
5
RiMO suggests to complete the maintenance checklist carefully.
Weekly inspections:
Frame, front bumper, wheels, Tie rod ends, steering column, bodywork, fixations, seat with seat frame and optional
seat adjustment systems, chain wheels and chain or alternatively drive belt and drive belt discs (see inspection
procedures for belt/chain drive), exhaust and catalytic converter.
Monthly inspections:
Bearings, side pods, front spoiler, impermeability of hoses/lines, chain/belt drive protection.
8. Inspection procedures
8.1. Inspection overview
7. Maintainance and inspection periods
It is necessary that the maintainance is done regulary. RiMO suggests to use the maintenance checklist to guarantee
the regularly maintenances. Please check chapter 8 for the checklist.

1
2
1
2
6
Copyright ©RiMO 2008
alpha
8.2. Adjustment and inspection of belt drive
Remove axle cover as follows:
1. Untighten the 4 squeezer fasteners.
2. Pull the rear axle cover upwards at the sides to untighten the mountings.
- The belt should run in the middle of the belt disc. In case it´s not go ahead as follows:
1. Untighten the 2 bolts of the belt disc carrier.
2. Move the belt disc carrier axially while turning the belt disc until the
belt is centered.
3. Tighten the bolts again
In order to proof the belt tension touch the belt at the sides between the belt discs and try to twist the belt.
Maximum torsion shouldn´t exceed 90°.
In case of more torsion than 90° increase the tension of the belt.
Take care of your fingers while turning the belt discs to avoid contusion between belt and belt disc!

8.3. Maintenance and duration of tires
Check tires and rims regularly for disruptions, local bucklings, uneven abrasion or damages.
Duration of tires depends on the way of driving and the condition of the kart track.
The abrasion limit of the tire is reached when the mark is not obvious any more.
In this case the tire has to be replaced as soon as possible.
Abrasion mark
Be aware that the counter nut of the belt tensioner is fastened well, otherwise it´s possible that the belt
jumps off the belt discs.
- untighten counter nut (1)
- untighten fixing bolt of belt tensioner support (long bolt in adjustable lever) (2)
- untighten fixing bolt of belt tensioner swivel for chassis mounting (3)
- untighten fixing bolt of belt tensioner support (short bolt in pivot of adjustable lever) (4)
- adjust belt tension by screwing/unscrewing tension nut (Mutter 24 unten in Zeichnung) until tension power is correct
(see chapter 8.2)
- tighten counter nut (1)
- tighten all 3 fixing bolts of the belt tensioner (2,3,4)
Belt tension lever with adjusting
nut, counter nut and fixing bolt Fixing bolts for belt tensioner
DON´T remove the bolts, only untighten them
8.2.1 Adjustment of the tooth belt/chain tensioner system
1
1
2
2
34
The approach for chain drive equipped vehicles is identical.

Copyright ©RiMO 2008
alpha
8.6. Inspection of stub axles
Check the stub axles for visible damages.
Replace damaged stub axles immediately!
The steering is one of the most important safety factors in motor sport.
IT IS ABSOLUTELY IMPORTANT TO CHECK THE STEERING REGULARLY.
Check the stub axles for radial and axial clearance: there mustn´t be any clearance.
7
Never use a tire which exceeded the abrasion mark! The tire could collaps and cause an accident.
Check the tire pressure regularly. All tires should have an identical pressure of 0.9 to 2.5 bar dipending on the
local needs in cold condition.
Front wheels are to be checked for free rotation: lift the vehicle until the wheel to be tested is out of ground contact.
Rotate the wheel to proof the behaviour. If the wheel has a hard move untighten the wheel nut slightly and check again.
In case it´s not getting easier please check the rim bearings.
8.4. Inspection of rim bearings
- Check the rim bearings for visible damages
- Check the rim bearings for radial and axial bearing clearance: there mustn´t be any bearing clearance.
Check the tie rods for damages regularly.
Check the tie rod ends regularly.
In case of plastic deformation the tie rod has to be replaced.
8.5. Inspection of tie rods
Tie rod Steering sided mountingStub axle sided mounting

10. Elimination of disfunctions
No ignition:
- Check if the engine switches are (ON).
- Check if the fuel tap is (ON).
- Check spark plug and spark plug connector - if necessary replace the parts
Subfunction of fuel system
- Check if the tank is fueled
- Check if the fuel tap is (ON)
- Check function of fuel pump.
- Check the fuel line/hoses for leaks
Engine runs - but power is limited
- Check general function and adjustment of the gas cabling
Unsatisfying brake deceleration
- Check the general function of the brake system
- Check the brake pads for abrasion and control the adjustment (see chapter 13.2 /13.3)
8
- untighten the bolts of the brake lever guidances to reach the brake pad
- untighten the bolts of the brake pad carriers to reach the brake pads
- replace the old brake pads against new and reassemble the brake in reverted order
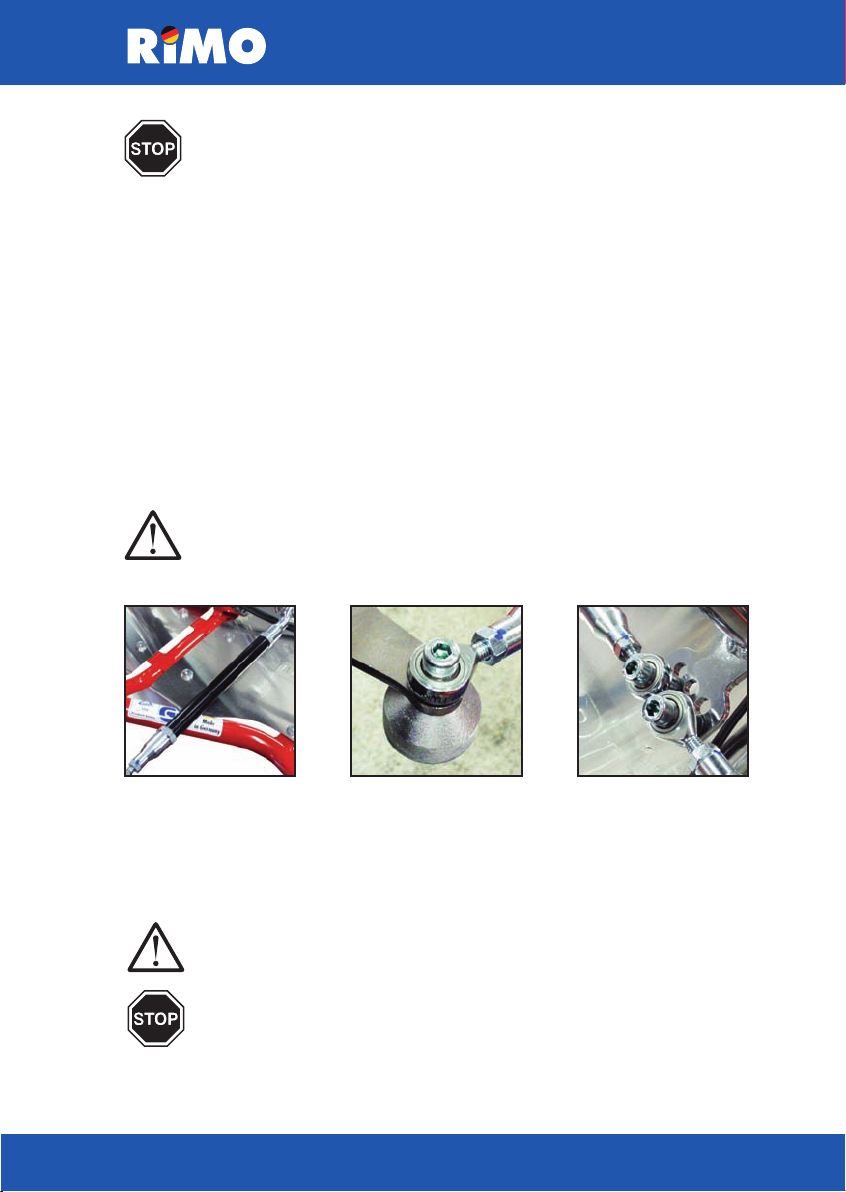
8.7. Inspection an maintenance of the mechanical brake system
The vehicle has to decelerate undelayed during actuation of brake pedal.
The effective pedal way until begin of braking effect shouldn´t exceed 3cm.
In case of unsatisfying brake results go ahead as follows:
9. Cleaning instructions
RiMO recommends regularly cleaning of the vehicle.
Tip: Use a steam blaster or simple purifier and a cleaning rag.
Never use detergents which content thinners or acetone: these detergents could cause damages on
the powder coated surface of the vehicle.
In case of using a steam blaster take care not to hit carburetor, starter, bearings rear axle or stickers.

10
Copyright ©RiMO 2008
alpha
In case of any problem with the engine please consult the engine users manual which is
delivered together with the vehicle.
12. Standard Engines
RiMO trusts in the excellent and well-known quality of the Honda GX engines.
These engines will guarantee a constant performance during an economic life time.
HONDA GX 160 4.0 KW (5.5 hp) RiMO Standard
HONDA GX 200 4.8 KW (6.5 hp) optional with 6.25 KW (8.5 hp)
HONDA GX 270 6.6 KW (9 hp) optional with 9.6 KW (13 hp)
- to drive the vehicle adequate clothing is necessary
- wearing wide clothing or long hair could result in danger of contacting rotating
parts of the vehicle
- it is necessary to use solid footwear. This avoid sliding from the pedals.
- It is obligatory to wear a closed safety helmet according ECE 22-03, ECE 22-04 or
ECE 22-05 in adequate size.
- it is recommended to use a ski mask for hygienic purposes.
11. Protective clothing and equipment

11
13.1. Engine
The gas cable system includes a protection spring to absorb excessive energy. This protects the system against
mechanical damages in case of an accident where the driver presses the gas pedal with a multiple of his own
weight while impacting. This spring is to be found below the cylinder head of the engine, see picture below.
The protection spring shouldn´t have any clearance when the gas pedal is not pressed
and should be tensioned a bit if the pedal is pressed.
13.2. Mechanic brake
The distance between the outer top edges of the brake levers should be 120-130mm in a relaxed
position.
Connector fittings Adjustment bolts
Mechanic brake
To adjust the brake levers distance to the correct amount:
- untighten the connector fittings on the brake cables
- press the brake lever together until the right distance
is reached
- re-tighten the connector fittings
After setting the distance use only the adjustment bolts to correct the grip (see picture). Whyle the adjusting
take care of free rotation of the brake disc.
The brake-system is the most important safety factor in the motor sport.
IT IS ABSOLUTALY IMPORTANT TO CHECK THE BRAKE-SYSTEM REGULARLY.
13. Adjustment and usage
Protection spring

12
Copyright ©RiMO 2008
alpha
Check the brake fluid level regularly.
13.3. Hydraulic Brake
This type of brake is selfadjusting and does not need any manual adjustments
The brake system is the most important safety factor in motor sports.
IT IS ABSOLUTELY IMPORTANT TO CHECK THE BRAKE SYSTEM REGULARLY.
13.4. Wheel lead / guidance
To adjust the wheel lead correctly it is necessary to use a setting jig which allows to set the reference center
of the vehicle.
- dismount the front wheels
- fix the setting jig in the stub axles using the included nuts (see mid picture)
- take care to mount the leading bar of the setting jig parallel to the tie rods (use a distancer, see right picture)
- the steering wheel is to be locked in the middle position
>>>
Setting jig Setting jig Leading bar of setting jig
In case of any doubt or any technical question please don´t hesitate to consult RiMO staff:
your technical questions will be answered competently.
Note: the right contact person is to be found in chapter 15 (RiMO representatives)

13
- to reach the reference center turn the tie rods to the left and the right until the wheel lead is confirmed by the
position of the indicator needles
- afterwards tighten all bolts and nuts carefully
- re-mount the front wheels (see chapter 8.3)
14. Options
- rollbar with harness
- head protection, padded
- belt drive
- Tillett seat, padded, sizes S, XL, XXL
- seat adjustment
- front rubber bumper
- reinforced side pods
- brake disc protection (outdoor)
- rear axle bearing with incorporated adapter sleeve
- upper clamp bearing aluminium with nylon inlet
- upper clamp bearing with incorporated adapter sleeve
- surround bumper with three tubes
- plastic surround bumper
- pedal extensions
- HJS silencer with catalythic converter, race look
- self-adjusting KC hydraulic brake
- hydraulic brake protection system HBPS
- Honda engine GX 200 4.8 KW (6.5 hp)
- Honda engine GX 200 6.25 KW (8.5 hp)
- Honda engine GX 270 6.6 KW (9.0 hp)
- SenDEC hour meter
- SenDEC hour meter with rev counter
- weight box for races
- pedals with built-in extensions
- LPG-powered engine
- handicapped accessible control interface (only with hydraulic brake)
- corrosion protected rear axle (outdoor)
Status 01.01.2007, modifications reserved

16. Reference address for RiMO Karts
16.1. RiMO - Germany
RiMO Transportgeräte (Deutschland)
Buchholz 4a
59846 Sundern
Telefon: +49-2933-9782-30
Website: rimo.de
E-Mail: [email protected]
16.2. RiMO - Skandinavia
Såt AB (Schweden, Dänemark,Finnland, Norwegen)
Box 25
342 21 Alvesta
Telefon: +46-472-13590
Website: raceland.se
E-Mail: [email protected]
16.3. RiMO - USA
RJV Enterprises, LLC (USA)
135 Wood Road
02184 Braintree
Telefon: +1-781-228-2134
Website: f1boston.com
E-Mail: [email protected]
16.4. RiMO - Australia
Fastline Group (Ozeanien)
20 Smith Street
3207 Port Melbourne / Victoria
Telefon: +61-3-9646-5811
Website: fastlinegroup.com
E-Mail: [email protected]
16.5. RiMO - Nigeria
Mohammed Abubakar Audu (Nigeria)
Justice Mamman Nasir
Plot 1469 Hon. Abuja-Nigeria
Telefon: 00234-9-314 6261
Website:
E-Mail: [email protected]
16.6. RiMO - Turkey
Dedkar Otomotiv (Türkei)
Tathkuyu Mh.
13155 Gebze
Telefon: +90-262641-03-90 & +49-175567-3640
Website: gebzekarting.com
E-Mail: [email protected]
16.7. RiMO - Vietnam
Fastline Group (Vietnam)
33A Pham Ngu Lao
Hoan Kiem, Hanoi
Telefon: +844-933-3235
Website: fastlinegroup.com
E-Mail:
16.8. RiMO - Russia
ООО «РоссоМаха»
Ул. Чистопольская, д.77/2
420133, Россия, Казань
Тел. +7 (843) 527 66 77
Факс +7 (843) 527 66 00
Website: www.rossomaha.ru
E-Mail: [email protected]
16.9. RiMO - United Kingdom
Fastline Group (Vereinigtes Königreich)
59 Cadogan Square
SW1X OHZ London
Telefon: +44-207-235-5408
Website: fastlinegroup.com
E-Mail:
14
Copyright ©RiMO 2008
alpha

Notes
15

Copyright ©RiMO 2008
alpha users manual
Table of contents
Other RiMO Utility Vehicle manuals