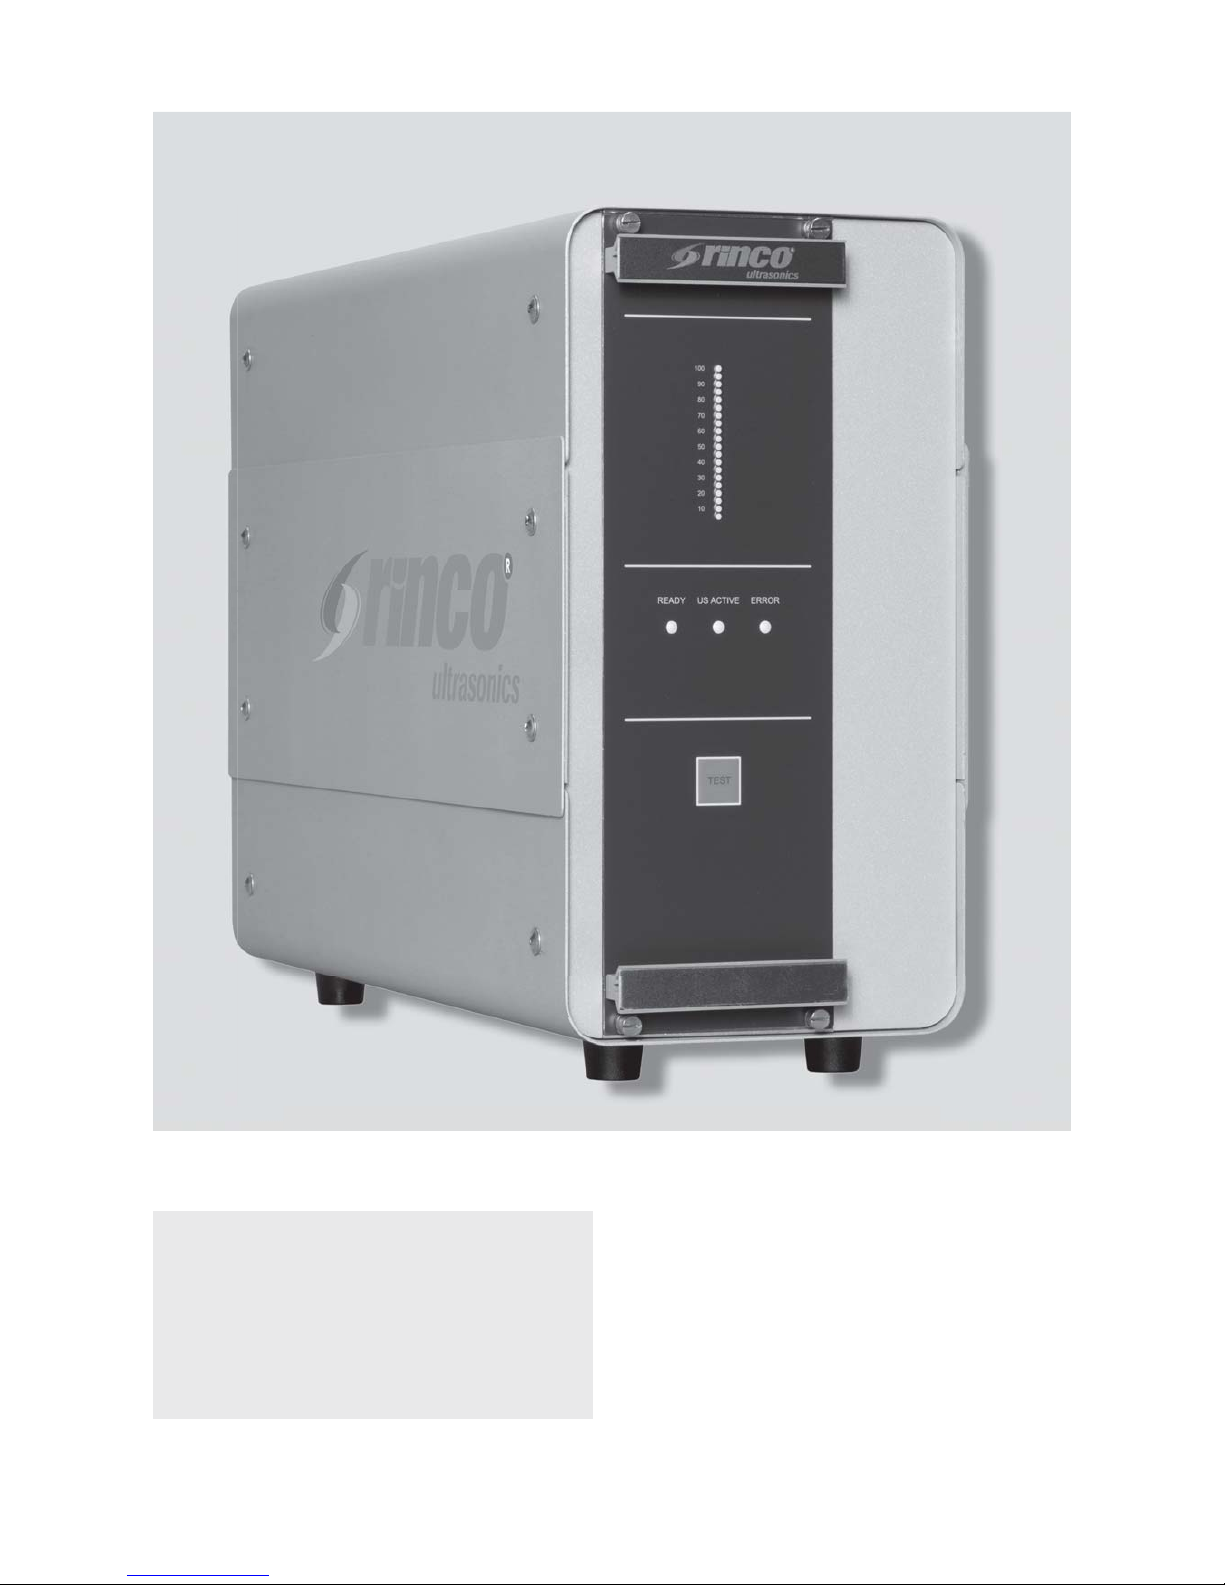
RINCO ULTRASONICS AG RDG20 User manual

Operating manual
Generator
RDG20/30/35/
40/70
English

Copyright by RINCO ULTRASONICS AG, Switzerland
Version 1.1, en, article no. 40417
Date of compilation: 12.10.2010
Release date: 22.11.2010
Disclaimer
The information contained in this manual corresponds to our current level of
knowledge. It cannot, however, be regarded as a guarantee for specific pro-
perties or suitability of the respective products for specific applications. Our
general contract conditions apply in this case, also with regard to liability. The
information contained in this manual does not grant the user any intellectual
property rights nor any licence assurances. Suitable agreements must be
made to this purpose. Suitability of the products for specific applications must
be examined in collaboration with our specialists. The German version of the
manual and the information it contains is binding.

Notes
This operating manual must be read and carefully
followed before unpacking and starting operation of
the device.
The device must only be used, serviced and repaired
by persons who are familiar with the operating manual
and the applicable health and safety regulations for
the prevention of accidents in the workplace.
Unit specifications
Representative

Table of Contents
1 Explanation of symbols and marks 6
2 Transport 7
2.1 Receipt of the shipment 7
2.2 Damage during transit 7
3 Technical data 8
3.1 Standards and conditions of use 8
3.2 Limit values, connected loads 8
4 Safety information 9
4.1 General information 9
4.2 Intended use 9
4.3 Requirements for use 9
4.4 Installation 9
4.5 Electrical connections 10
4.6 Operation 10
5 Installation 11
5.1 Mechanical installation 11
5.1.1 Dimensions and assembly 11
5.2 Ambient conditions 12
5.3 Electrical installation 13
5.3.1 Mains connection 13
5.3.2 Connection of the protective earth con-
ductor 14
5.3.3 Equipotential bonding 14
5.4 EMC compliant installation 14
5.4.1 Installation of a CE-typical
ultrasonic system 14
6 Operation 15
6.1 High voltage 15
6.2 Noise emissions 15
6.3 Vapours and dust emissions 15
6.4 Temperature 15
6.5 Guarantee statement 16
7 Product information 17
7.1 Brief overview of the key features 17
8 Available generators and their
variants 18
8.1 Power classes 18
9 Operating controls and indicators 19
10 Connection of the generator 20
10.1 Signals 20
10.2 Description of the signals 21
10.2.1 STO_0 21
10.2.2 STO_1 21
10.2.3 STO_2 21
10.2.4 STO_3 22
10.2.5 STO_5 23
10.2.6 STO_6 23
11 Operating modes 24
11.1 Welding mode 24
11.2 Power overload 24
11.3 Soft start and start amplitude 24
11.4 Ultrasonic test 24
11.5 Frequency lock-in range 25
11.6 Amplitude selection 25
12 Settings 26
12.1 Dip switches 26
12.2 Jumper J6 28
12.3 Jumper J9 / J10 28
13 Amplitude values 29
13.1 Amplitude values for 20 kHz generators 29
13.1.1 Amplitude diagram for 20 kHz
generators 29
13.2 Amplitude values for 30 kHz generators 30
13.2.1 Amplitude diagram for 30 kHz
generators 30
13.3 Amplitude values for 35 kHz generators 31
13.3.1 Amplitude diagram for 35 kHz
generators 31
13.4 Amplitude values for 40 kHz generators 32
13.4.1 Amplitude diagram for 40 kHz
generators 32
13.5 Amplitude values for 70 kHz generators 33
13.5.1 Amplitude diagram for 70 kHz
generators 33
14 Example applications 34
14.1 Starting and stopping ultrasonic operation 34
14.1.1 STO_2 34
14.1.2 STO_3 / STO_5 35
14.1.3 Time diagram 36
14.2 Amplitude selection 37
14.2.1 Time diagram 38
14.3 Power measurement 39
14.3.1 Time diagram 40
15 Technical data 41
15.1 Voltage supply 41
15.2 Generator fuses 41
15.3 Analogue and digital inputs and outputs 41
15.3.1 Overview of inputs and outputs 42
15.3.2 Analogue input and output 43
15.3.3 Digital time response
Inputs and outputs 44
16 Cleaning and maintenance 45
16.1 Periodic checks 45
17 Disposal 46
18 Error messages and error analysis 47
19 Troubleshooting 48
19.1 General errors 48
19.2 Generator error LED1 49
19.3 Converter and application error LED2 50
19.4 Limit error LED3 51
20 Service centre addresses 52

5
Introduction
Thank you for purchasing a RINCO product. We are
sure that you will achieve the highest possible econo-
mic benefits and product quality with the use of this
device.
The aim of this manual is to provide the purchaser
and user with all necessary information on handling,
assembly, operation and care of the device.
To ensure the constant operational availability of the
device it is necessary to observe and follow the notes
and instructions in this manual.
Important!
If you have any questions regarding your unit, please
state the exact type designation and the unit series
number.
This can be found on the type plate(A) on the rear of
the generator as well as on page two of this operating
manual .
The design and circuitry of these devices are subject
to constant further development and improvement and
are always in keeping with the state of the art.
RINCO ULTRASONICS AG
Romanshorn, Switzerland.
A

1 Explanation of symbols and marks
Pay special attention to text sections marked with the
following symbols:
Note!
Indicates important information or operational notes
for trouble-free operation.
Caution!
Indicates hazard warnings which can result in seri-
ous injury or damage to equipment if ignored.
Danger!
Indicates hazard warnings which can result in death
or very serious injury if ignored.
Danger -
High voltage!
This warns about dangerous voltages. Take great
care if you see this warning. Keeping a safe distance
is the best way to stay safe.
Instruction
Wear ear defenders. This indicates which protection
measures need to be followed at the corresponding
workstation.
6

7
2 Transport
Always follow the transport information provided on
the packaging.
2.1 Receipt of the shipment
The shipping container for machines and equipment
withstands normal stress and strain during transport by
road, rail and air.
After receipt of the consignment check that all parts
correspond with the packing list and that no damage is
visible. If damage is detected, inform the transport com-
pany immediately and keep the packaging as evidence.
2.2 Damage during transit
The transport company is responsible for damage
occurring during transport. A complete report descri-
bing the exact damage must be submitted to the trans-
port company; this will subsequently serve as the basis
for the claim for damages.
We must be notified immediately of any damage to or
loss of the goods we have supplied - this must be con-
firmed by a copy of the above-mentioned report.
If the consignment is sent free of charge by RINCO
ULTRASONICS or by CIF, the damaged shipment will be
replaced (if applicable) and claims will be submitted to
the relevant transport insurance company.

Type HF power HF power HF power Mains supply Standby
Peak Pulsed Continuous Voltage Input (max)
operation operation frequency power
(1); (4) (2); (4) (3); (4) (max.)
RDG20-2000P-230 2400 W 1600 W 1000 W 3800 VA
RDG20-1500P-230 1800 W 1200 W 700 W 2600 VA
RDG20-1000P-230 1200 W 1000 W 700 W 2200 VA
RDG30-1000P-230 1200W 1000 W 700 W 2000 VA
RDG30-500P-230 600 W 500 W 400 W 1100 VA
RDG35-4-900P-230 1080 W 700 W 500 W 2000 VA
RDG35-750P-230 900 W 650 W 500 W 1700 VA 60 VA
RDG35-4-750P-230
RDG35-400P-230 480 W 400 W 400 W 1100 VA
RDG35-4-400P-230
RDG35-4-200P-230 240 W 200 W 200 W 510 VA
RDG40-800P-230 960 W 700 W 500 W 1900 VA
RDG40-400P-230 480 W 400 W 400 W 1100 VA
RDG70-100P-230 120 W 100 W 100 W 320 VA
8
3 Technical data
3.1 Standards and conditions of use
3.2 Limit values, connected loads
Conformity: CE
Ambient conditions: - non-condensing, average relative humidity 20 - 90%
- 0 to 1000 over NN.
Temperature range: Transport / storage -20 to +70 degrees Celsius
(ambient temperature) Operation +10 to +50 degrees Celsius
Leakage current: > 10 mA to PE
Protective measures against: Short-circuit, overload, overtemperature in the output stage
(1) Max. peak power (in the range of milliseconds)
(2) Pulsed mode 1 to 9 (e.g. 1 s ON 9 s OFF)
(3) At 100% amplitude
(4) These values should be treated as non-guaranteed guide values for the RDG generator. The actual values for an
overall system may differ significantly from this.
L1/N PE 230V
+/- 10%
50 / 60 Hz

9
4 Safety information
4.1 General information
Some of the components in the ultrasonic system (HF
cables, converter, sonotrodes) may move or rotate as a
result of the way in which they are operated.
Unauthorised removal of the necessary covers,
improper use and incorrect installation or operation
can potentially cause serious personal injuries or
material damage.
All activities associated with transportation, installa-
tion, commissioning and servicing must only be per-
formed by qualified and trained experts (IEC 364 and
CENELEC HD 384, or DIN VDE 0100 and IEC Report
664, or DIN VDE 0110, as well as any pertinent nati-
onal health and safety legislation regarding accident
prevention must be complied with at all times).
In the context of this basic safety information, a "qua-
lified and trained expert" is a person who is familiar
with the installation, assembly, commissioning and
operation of the product. A qualified and trained per-
son also has the necessary qualifications required to
carry out the relevant activities.
4.2 Intended use
RDG generators and accessories are intended only for
the welding and cutting of suitable materials.
Depending on the material and application,
people working on the machine may in some cases
be exposed to harmful vapours, abraded material, high
temperatures on materials or tools and high levels of
noise. In these cases, make sure that adequate protec-
tive measures are in place (e.g. covers, soundproofing
cabins, fire extinguishing system) so that nobody who
is working on the machine can come to harm.
Please consult your material supplier for information
about potential hazards which can arise due to ultra-
sonic welding or cutting.
For more information about suitable materials please
contact RINCO ULTRASONICS AG.
4.3 Requirements for use
RDG generators are components (incomplete
machines) which are designed for installation in
electrical systems or machinery. They must not be
used as a standalone device. They are designed exclu-
sively for professional and commercial purposes in
accordance with EN 61000-3-2. This documentation
contains information on compliance with the standard
EN 61000-3-2.
When RDG generators are being installed in a larger
system, they must not be taken into operation (i.e.
started up in accordance with the specified operatio-
nal start-up procedure) until it has been demonstrated
that the machine complies with the requirements of
EC directive 98/37/EC (machinery directive) and that
the requirements of harmonised standard EN 60204
have been met.
Commissioning (i.e. start-up in accordance with the
specified start-up procedure) is only permitted if the
requirements of the EMC directive 89/336/EEC are
satisfied.
RDG generators satisfy the requirements of the low
voltage directive 73/23/EEC. The harmonised stan-
dards in the series EN 50178/DIN VDE 0160 are appli-
cable to the generator.
4.4 Installation
Ensure that everything is handled properly and avoid
any excessive mechanical stresses or strains. Avoid
bending components and changing insulation distan-
ces during transportation or when handling the unit.
Do not touch any electronic components or contacts.
RDG generators contain components which are sensi-
tive to electrostatic discharge. These components can
easily be damaged if the unit is not handled correctly.
Do not damage or destroy any electrical components
- this could be harmful to your health!

10
4.5 Electrical connections
If work needs to be carried out on RDG generators
while they carry a live voltage then the applicable
national health and safety legislation concerning the
prevention of accidents in the workplace (e.g. VBG
4) must be satisfied.
The electrical installation must be perfor-
med in accordance with the applicable
regulations (e.g. in terms of the required conductor
cross-sections, fuses, PE connections). Additional
information can be found in the documentation.
The documentation contains information about instal-
lation in accordance with the EMC guidelines.
(Shielding, earthing, filters and cables/wires).
4.6 Operation
Systems with RDG generators must be equip-
ped with additional monitoring and protec-
tion devices which meet the applicable standards
(e.g. standards for technical installations, accident
prevention regulations etc.).
Independently of this, the following MUST be pro-
vided: an EMERGENCY OFF circuit, a mains supply
disconnection device and all-phase fuses for the input
circuit.

5 Installation
5.1 Mechanical installation
5.1.1 Dimensions and assembly
The RDG generator weighs approx. 9.5 kg and has the
installation dimensions shown in the diagram below.
For more information please contact RINCO
ULTRASONICS AG.
11
285 mm
430 mm
150 mm

12
5.2 Ambient conditions
The RDG generators must not be installed in locations
in which they would be subjected to adverse ambient
conditions. This includes:
combustible, oily or harmful vapours or dust, excessi-
vely high humidity, extreme vibrations or temperatu-
res. For additional information please contact RINCO
ULTRASONICS AG directly.
Operation of the RDG generator is affec-
ted by the ambient temperature. The permissible
ambient temperature range is 10° C to 50° C. The RDG
generator must be installed in such a way that its
maximum permissible temperature is never exceeded.
The ambient temperature must be monitored.
In the event that the stated temperature limits are
exceeded, corresponding temperature control mea-
sures must be put in place (cooling etc.). Cooling
should generally be provided for applications involving
operation under high loads or for continuous or semi-
continuous operation.
RINCO ULTRASONICS AG will be happy to advise you
on selection of a suitable version.

13
5.3 Electrical installation
5.3.1 Power supply connections and other electrical
connections
Carry out the following steps to ready the unit for
operation:
• Connect the plug of the device to the outlet on
the generator.
- STO_3 Actuator (optional)
- STO_5 Start
- STO_2 Interface (optional)
- STO_4 Converter connection
- STO_0 Mains connection
- STO_3_1 No function
- STO_6 No function
- STO_1 No function
• Screw the equipotential bonding wire to the PE con-
ductor connection.
Please refer to sections 5.3.2 and 5.3.3.
Only use an earthed mains connection.
For more information about pin assignment refer to
section 10.1.
Attachment for the equipotential bonding

14
5.3.2 Connection of the protective earth conductor
The RDG generator must never be operated without
a PE conductor connected. In addition, a PE con-
ductor with a minimum cross-section of 2.5 mm²
must be connected from the RDG generator to every
ultrasonic converter.
5.3.3 Equipotential bonding
All components of an ultrasonic system must be con-
nected to one main potential. This connection can be
established e.g. via a mounting plate or a cable with a
minimum cross-section of 6 mm².
5.4 EMC compliant installation
RINCO ULTRASONICS AG has performed
conformity tests with the RDG-type generators
on specific, defined vibration units. Ultrasonic
systems which have been assessed
in this way are referred to as "CE-typical ultrasonic
systems" in the following.
5.4.1 Installation of a CE-typical ultrasonic system
The following points must be observed in order to
ensure that the connections are compliant with EMC
requirements:
• Apply ferrite on both sides to HF cables.
• DatacablesmustnotberoutedparalleltotheHFcable
or to the mains cable.
• Use cables which are shielded on both sides.

15
6 Operation
During installation of the RDG generator in machines,
it must not be taken into operation (i.e. started up
in accordance with the specified operational start-
up procedure) until it has been demonstrated that
the machine complies with the requirements of EC
directive 2006/42 EC (machinery directive) and that
the requirements of harmonised standard EN 60204-1
have been met.
6.1 High voltage
Caution!
While the unit is in operation, never pull out the
generator insert.
Danger!
High voltage inside the devices – risk of injury!
Please observe the following points:
• Never do anything which might be dangerous or
could jeopardise your safety.
• Only run the system if all safety devices and
safety-related equipment, for example removable pro-
tection devices and soundproofing, are fitted and fully
functional.
• Before switching on the unit, ensure that
no-one can be endangered as a result of the unit
starting up.
6.2 Noise emissions
Caution!
Limit values: according to the latest findings, ultra-
sound does not cause any damage if the maximum
level is below 140 dB and the average level is below
a linear value of 110 dB (based on 8 hours per day).
In the case of a 20 kHz application, the system integra-
tor must either instruct the operator to use ear defen-
ders by attaching a corresponding warning sticker to
the machine, or he must ensure that the operator is
protected against arising noise emissions through the
use of a sound enclosure.
Sound components in the audible range are
deemed to be potentially harmful to hearing if the
energy-equivalent continuous sound pres-
sure level Leq reaches a level of 88 dB(A)
or more (in relation to a representative working period of
8 h/day, max. 2000 h/year).
Energy-equivalent continuous
sound pressure levels Leq of 85
to 87 dB(A) per day or week and pulsed sound events
with a peak value LPeak in excess of 140 dB(C) are
deemed to be on the threshold of potentially causing
harm to hearing.
When certain materials are welded, noise levels can
exceed 70 dB (A).
Countermeasures:
• Wear ear defenders
• Install a sound protection hood (option)
(information taken from SUVA (Swiss Accident
Insurance Fund) publication no. 86048 d 4.94)
Additional measured values can be found in the
document "Noise Measurement Report for RINCO
Systems" (no. 920-3903/1.95).
6.3 Vapours and dust emissions
Depending on the material, harmful vapours or dust
can be generated during welding or cutting.
Countermeasures:
• Provide an extraction system
• Wear a dust mask
6.4 Temperature
Depending on the material, high temperatures may
be generated on the material and/or tool during
welding or cutting.
In these cases we recommend considering the instal-
lation of a fire extinguishing system.

16
The user should obtain the specifications (safety data
sheet) for every material which is processed and
check for potential hazards associated with ultrasonic
treatment.
The user is also responsible for ensuring proper dispo-
sal of any leftover material.
6.5 Guarantee statement
In supplying the device RINCO ULTRASONICS enters
into a guarantee obligation in compliance with
the regulations of the VSM (Swiss Association of
Machinery Manufacturers).
The requirements for fulfilment of the guarantee condi-
tions by RINCO ULTRASONICS include the following:
• The user must be familiar with the content of this
operating manual.
• The instructions and warnings contained in this
operating manual must be observed.
• Unauthorised modifications or conversions to parts
of the device, the oscillator system and the genera-
tor are not permitted.
If anything is unclear, RINCO ULTRASONICS
would be happy to help clarify any questions
by phone. Alternatively, we can also arrange
instruction sessions with our qualified experts.

17
7 Product information
7.1 Brief overview of the key features
Clear control concept for special purpose machines
• Flexible modular system with various inserts
• All control tasks and parameter inputs handled via
integral PLC
• Digital inputs and outputs for control
• Analogue amplitude selection (30 - 100%)
• Analogue power output (0 - 120%)
• 0 - 4 V
• 0 - 10 V
Increased process reliability thanks to active pro-
cess monitoring
• Digital open and closed-loop con
trol technology designed according
to the latest findings in the field of ultrasonic
welding technology
• Welding controlled via a digital signal
processor (DSP)
• Digital PLL for frequency control
• Amplitude control
• Power measurement with an accuracy of ± 1% of
the rated generator power output
Comprehensive protection for the generator
• Shutdown in the event of a fault or if the
limits are reached

18
8 Available generators and their vari-
ants
8.1 Power classes
The flexible and modular system allows users to choose
a perfectly well suited generator for any specific appli-
cation.
The following power classes are available:
20 kHz: 2000 W 1500 W 1000 W
30 kHz: 1000 W 500 W
35 kHz: 750 W 400 W
35(-4)*kHz: 900 W 750 W 400 W 200 W
40 kHz: 800 W 400 W
70kHz: 100 W
*for 4PZT converter
The vibration units and generators should only be
procured from RINCO ULTRASONICS AG.
For applications involving high loads the internal
cooling should be adapted to the ambient condi-
tions.
For more information, please con-
tact your nearest RINCO ULTRASONICS AG
service centre.

19
9 Operating controls and indicators
26 Handles
The generator insert module can be pulled out by
these handles if necessary.
Never pull out or insert the generator insert
module while the unit is connected to the mains.
27 Power bar
Indicates the power delivered during the welding
process.
The maximum power value for the last welding
process is indicated by an LED and then deleted
during the next welding process or if a fault occurs.
29 TEST button
The TEST button is used to:
• Activate ultrasonics for a maximum of 15 s
• Acknowledge error messages.
30 LEDs
• READY
This lights up when the generator is ready for
operation.
• US ACTIVE
This lights up when ultrasonic operation is
activated.
• ERROR
This lights up if a fault has occurred.
In order make troubleshooting easier, the
error type is indicated through flas
hing of LED 1 to LED 3 on the
power bar (see section 18).
33 The fixing screws of the genera-
tor insert are located above and beneath the
handles (26) and must be locked when the unit is
taken into operation.
27
26
33
30
29
26
33

20
10 Connection of the generator
The power supply connection, connections for control
via digital inputs/outputs and the connection for the
oscillator system are made via the connectors on the
rear panel of the generator.
Only original RINCO ULTRASONICS AG components
must be used for this. Otherwise the overall system
may fail to work properly.
10.1 Signals
All digital and analogue inputs and outputs can be
tapped via the connectors. In the process, the prescri-
bed wiring for the generator which is used must
always be adhered to.
Plug connection, rear panel
This manual suits for next models
4
Table of contents
Popular Portable Generator manuals by other brands

DeVilbiss Air Power Company
DeVilbiss Air Power Company D26968 Operator's manual

Valex
Valex EX 2300 quick start guide

TEKSAN
TEKSAN DIESEL GENERATOR SETS Operation and maintenance manual

Wacker Neuson
Wacker Neuson G 2.1A Repair manual

Smart Cover
Smart Cover ECC160 user manual

Curb Roller Manufacturing
Curb Roller Manufacturing Hydra-Pack HP1300 owner's manual

SMC Networks
SMC Networks EXA1 EN Series Operation manual

ALLPOWER
ALLPOWER APGG10000 owner's manual

ALLPOWER
ALLPOWER All-Power APG3004A owner's manual

NUTOOL
NUTOOL NPT1500 Original instructions

home diesel power
home diesel power 10 owner's manual

Power Stroke
Power Stroke PS907000P Series Operator's manual