Risco WL T33S User manual
WIRELESS SUPERVISED
PHOTOELECTRIC SMOKE
DETECTOR
MODEL: WL T33S
INSTALLATION INSTRUCTIONS

Wireless Supervisor Photoelectric Smoke Detector2

Wireless Supervisor Photoelectric Smoke Detector 3
EN
WIRELESS SUPERVISED
PHOTOELECTRIC SMOKE DETECTOR
Model: WL T33S
INSTALLATION INSTRUCTIONS

Wireless Supervisor Photoelectric Smoke Detector4
GENERAL DESCRIPTION
RISCO Group's smoke detector is single station, photoelectric smoke detector with
a built-in supervised wireless transmitter.
When sufficient smoke is detected, or the test feature is operated, the detector will
sound its alarm horn and the transmitter will send an ALARM message. The Alarm
output in the receiver will remain activated until the alarm condition clears.
The smoke alarm base lock discourages unauthorized removal of the smoke alarm
by requiring a screwdriver to remove the alarm from the base.
The smoke alarm provides the following signals to the control panel:
♦Alarm
♦Alarm restore
♦Low battery
♦Tamper
♦Supervision
WARNINGS:
This smoke detector is designed for use in a single residential unit only, which means that it
should be used inside a single family home or apartment. It is not meant to be used in
lobbies, hallways, basements, or another apartment in multi-family buildings, unless there are
already working detectors in each family unit. Smoke detectors, placed in common areas
outside of the individual living unit, such as on porches or in hallways, may not provide early
warning to residents. In multi-family buildings, each family living unit should set up its own
detectors.
This detector is not to be used in non-residential buildings. Warehouses, industrial or
commercial buildings, and special purpose non-residential buildings require special fire
detection and alarm systems. This detector alone is not a suitable substitute for complete fire
detection systems for places where many people live or work, such as hotels or motels. The
same is true of dormitories, hospitals; nursing homes or group homes of any kind, even if
they were once single - family homes. Please refer NFPA 101, the Life Safety Code,
NFPA71, 72A, 72B, 72C, 72D, and 72E for smoke detector requirements for fire protection in
buildings not defined as “households”.

Wireless Supervisor Photoelectric Smoke Detector 5
EN
SELECTING A LOCATION
Smoke detectors should be installed in accordance with the NFPA Standard 74
(National Fire Protection Association, Batterymarch Park, Quincy, MA 02169). For
complete coverage in residential units, smoke detectors should be installed in all
rooms, halls, storage areas, basements, and attics in each family living unit.
Minimum coverage is one detector on each floor and one in each sleeping area and
attics in each family living unit. Minimum coverage is one detector on each floor and
one in each sleeping area.
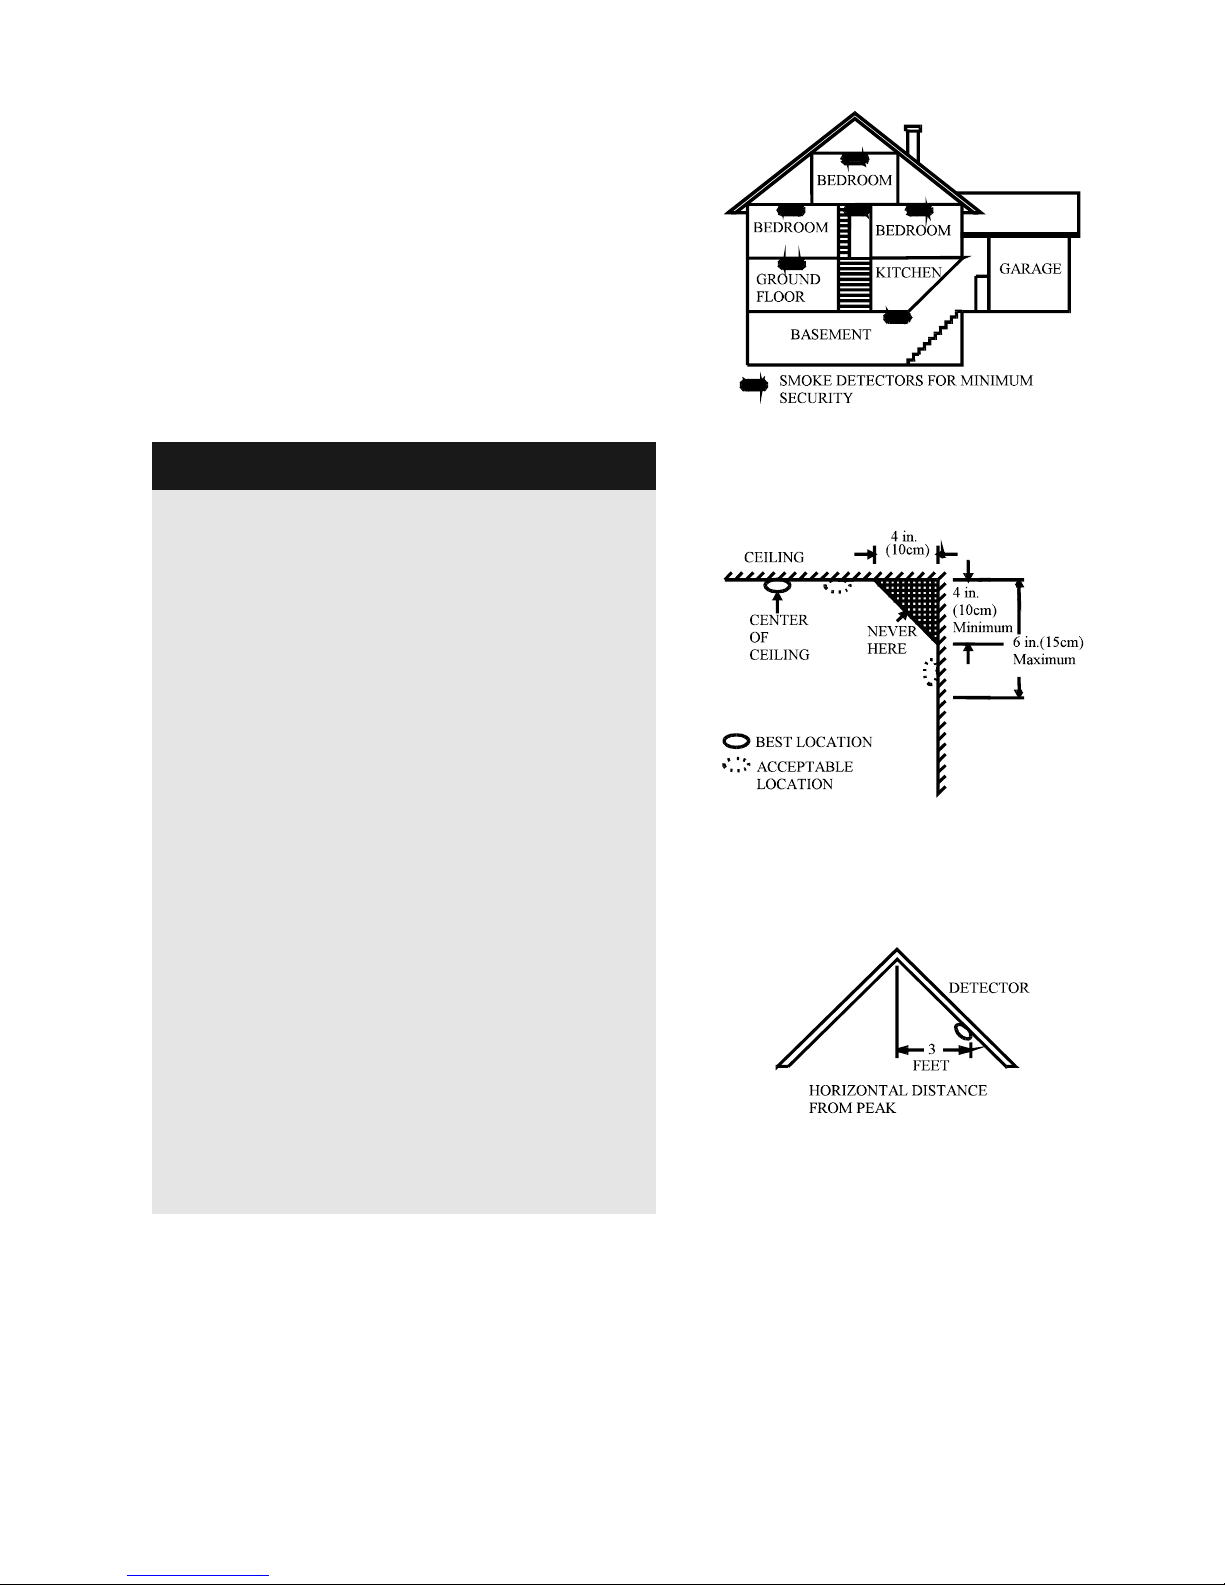
♦Install a smoke detector in the hallway
outside every separate bedroom area,
as shown in Figure 1. Two detectors are
required in homes with two bedroom
areas, as shown in Figure 2.
♦Install a smoke detector on every floor
of a multi-floor home or apartment, as
shown in Figure 3.
♦Install a minimum of two detectors in
any household.
♦Install a smoke detector inside every
bedroom.
♦Install smoke detectors at both ends of
a bedroom hallway if the hallway is
more than 40 feet (12 meters) long.
♦Install a smoke detector inside every
room where one sleeps with the door
partly or completely closed, since
smoke could be blocked by the closed
door and a hallway alarm may not wake
up the sleeper if the door is closed.
♦Install basement detectors at the bottom
of the basement stairwell.
♦Install second-floor detectors at the top
of the first-to-second floor stairwell.
♦Be sure no door or other obstruction
blocks the path of smoke to the
detector.
♦Install additional detectors in your living
room, dining room, family room, attic,
utility and storage rooms.
♦Install smoke detectors as close to the
center of the ceiling as possible. If this
is not practical, put the detector on the
ceiling, no closer than 4 inches (10 cm)
from any wall or corner, as shown in
Figure 4.
Figure 1: Locations for placing smoke
detectors for single residence with only
one sleeping area
Figure 2: Locations for placing smoke
detectors for single-floor residence with
more than one sleeping area
Wireless Supervisor Photoelectric Smoke Detector6
♦If ceiling mounting is not possible and
wall mounting is permitted by your local
and state codes, put wall-mounted
detectors between 4 and 6 inches (10 ~
15 cm) from the ceiling, also see Figure
4.
♦If some of your rooms have sloped,
peaked, or gabled ceilings, try to mount
detectors 3 feet (0.9 meter) measured
horizontally from the highest point of the
ceiling as shown in Figure 5.
CAUTION:
(As required by the California State Fire Marshall)
“Early warning fire detection is best achieved by the
installation of fire detection equipment in all rooms
and areas of the household as follows: (1) A smoke
detector installed in each separate sleeping area (in
the vicinity, but outside of the bedrooms), and (2)
Heat or smoke detectors in the living rooms, dining
rooms, bedrooms, kitchens, hallways, attics, furnace
rooms, closets, utility and, storage rooms, basements
and attached garages.”
For your information, NFPA Standard 74, Section 2-4
reads as follows:
“2-4.1.1 Smoke detectors shall be installed outside of
each separate sleeping area in the immediate vicinity
of the bedrooms and on each additional story of the
family living unit including basements and excluding
crawl spaces and unfinished attics.
The provisions of 2-4.1.1 represent the minimum
number of detectors required by this standard. It is
recommended that the householder consider the use
of additional smoke detectors for increased
protection for those areas separated by a door from
the areas protected by the required smoke detectors
under 2-4.1.1 above. The recommended additional
areas are living room, dining room, bedroom(s),
kitchen, attic (finished or unfinished), furnace rooms,
utility room, basement, integral or attached garage,
and hallways not included in 2-4.1.1 above. However,
the use of additional detectors remains the option of
the householder.” We recommend complete
coverage and use of additional smoke detectors.
Figure 3: Location for placing smoke
detectors for a multi-floor residence
Figure 4: Recommended best and
acceptable locations to mount
smoke detectors
Figure 5: Recommended location to
mount smoke detectors in rooms with
sloped, gabled, or peaked ceiling

Wireless Supervisor Photoelectric Smoke Detector 7
EN
Where to Install Your Smoke Detectors in Mobile
Homes and RVs
Mobile homes and RVs built after about 1978 were designed and insulated to be
energy-efficient. In mobile homes and RVs built after 1978, smoke detectors should
be installed as described above. Older mobile homes and RVs may have little or no
insulation compared to current standards. Outside walls and roofs are often made
of non-insulated metal, which can transfer thermal energy flow from outdoors. This
makes the air right next to them hotter or colder than the rest of the inside air.
These layers of hotter or colder air can keep smoke from reaching a smoke
detector. Thereby, install smoke detectors in such units only on inside walls. Place
them between 4 and 6 inches (10 ~ 15 cm) from the ceiling. If you are not sure how
much insulation is in your mobile home or RV, then install the detector on an inside
wall. If the walls or ceiling are unusually hot or cold, then install the detector on an
inside wall. Install one detector as close to the sleeping area as possible for
minimum security, or install one detector in each room for security. Before you
install any detector, please read the following section on “Where not to install your
smoke detectors”.
Where Not to Install Your Smoke Detectors
False alarms occur when smoke detectors are installed where they will not work
properly. To avoid false alarms, do not install smoke detectors in the following
situations:
♦Combustion particles are by-products of something burning. Do not install
smoke detectors in or near areas where combustion particles are present,
such as kitchens with few windows or poor ventilation, garages where there
may be vehicle exhaust, near furnaces, hot water heaters and space heaters.
♦Do not install smoke detectors less than 6 meters (20 feet) away from places
where combustion particles are normally present, like kitchens. If a 20-foot
distance is not possible, e.g. in a mobile home, try to install the detector as far
away from the combustion particles as possible, preferably on the wall. To
prevent false alarms, provide good ventilation in such places.
IMPORTANT:
Never try to avoid false alarms by disabling the detector.
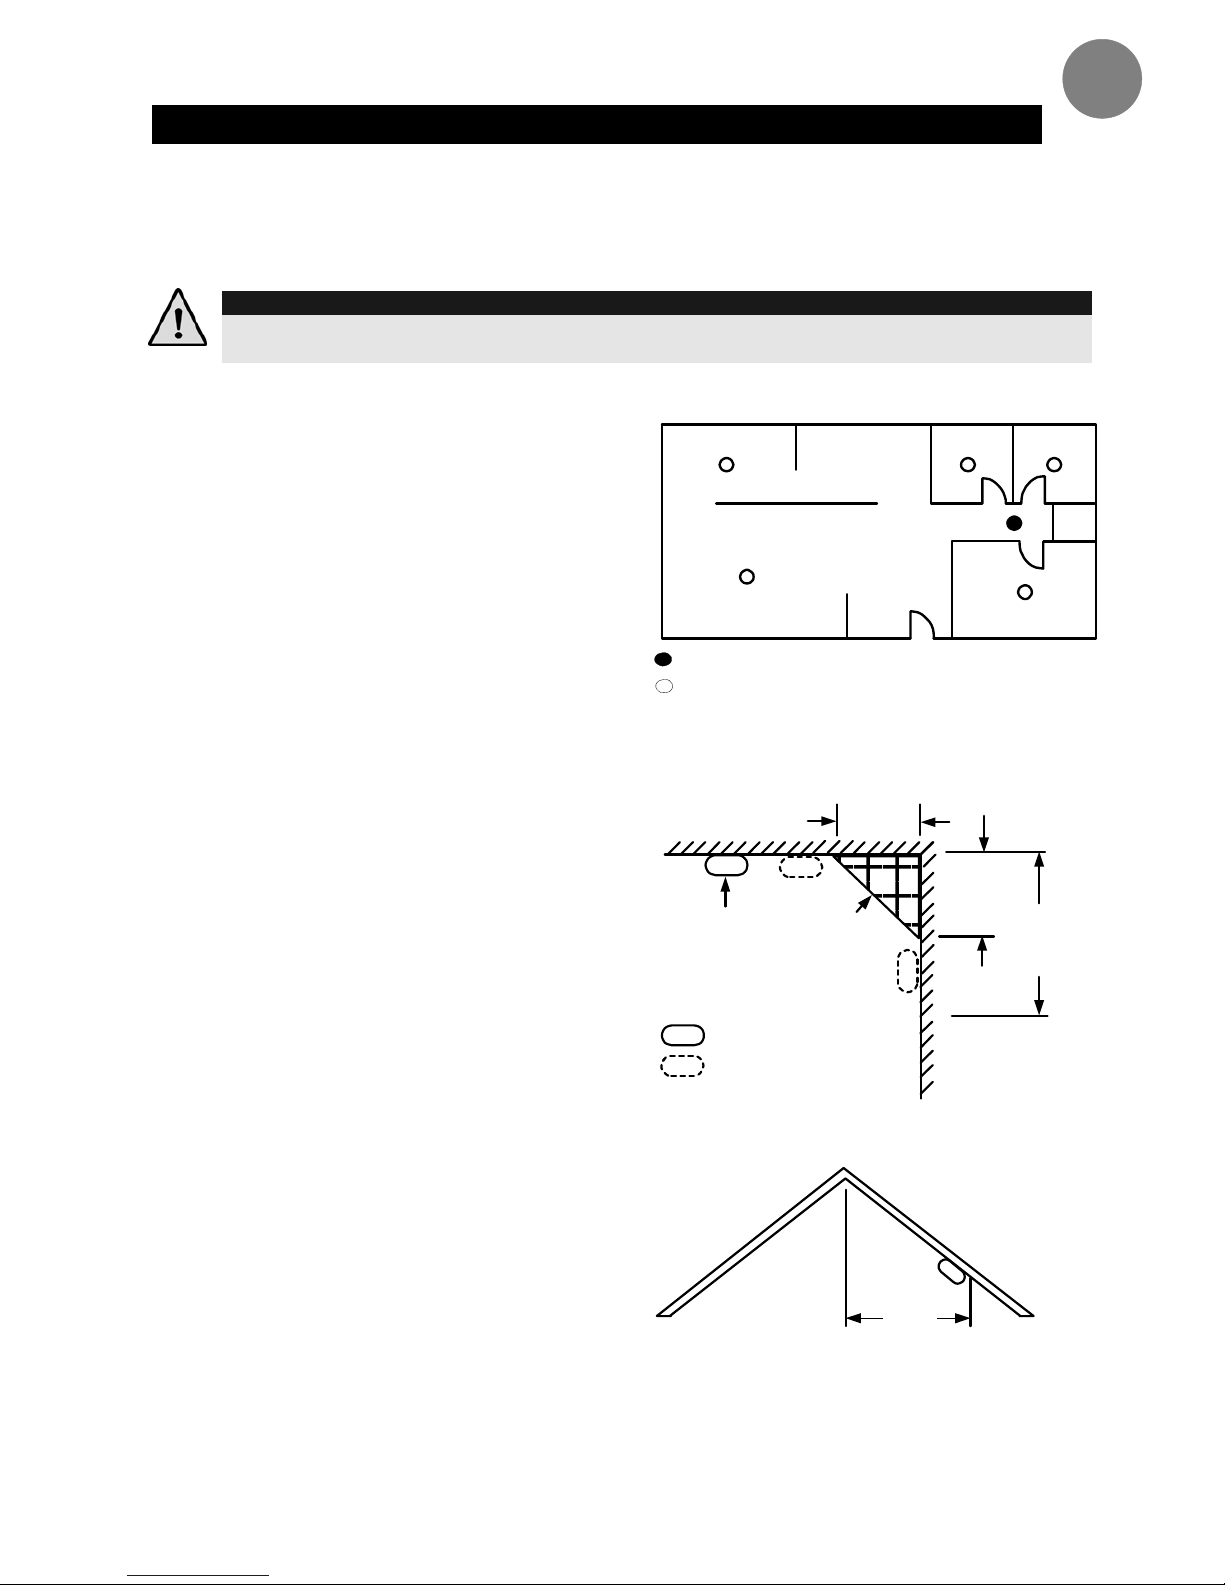
♦Do not mount smoke detectors in the path of fresh air intake. The flow of fresh
air in and out can drive smoke away from the smoke detector; thus reducing its
efficiency. Figure 6 indicates the correct and incorrect locations concerning
this problem.
♦Near paint thinner fumes.
♦In close proximity to an automobile exhaust pipe; this will damage the detector.
♦In damp or very humid areas or near bathrooms with showers. Moisture in
humid air can enter the sensing chamber, then turns into droplets upon
cooling, which can cause false alarms. Install smoke detectors at least 3
meters (10 feet) away from bathrooms.

Wireless Supervisor Photoelectric Smoke Detector8
♦In very cold or very hot areas, including unheated buildings or outdoor rooms.
If the temperature goes above or below the operating range of smoke detector,
it will not work properly. The temperature range for your smoke detector is 4°C
to 38°C (40°F to 100°F).
♦In very dusty or dirty areas, dirt and dust can build up on the detector's sensing
chamber, to make it overly sensitive.
♦Additionally, dust or dirt can block openings to the sensing chamber and keep
the detector from sensing smoke.
♦Near fresh air vents or very drafty areas like air conditioners, heaters or fans.
Fresh air vents and drafts can drive smoke away from smoke detectors.
♦Dead air spaces are often at the top of a peaked roof, or in the corners
between ceilings and walls. Dead air may prevent smoke from reaching a
detector. See Figures 8 and 9 for recommended mounting locations.
♦In insect-infested areas. If insects enter a detector's sensing chamber, they
may cause a false alarm. Where bugs are a problem, get rid of them before
putting up a detector.
♦Near fluorescent lights, electrical "noise" from fluorescent lights may cause
false alarms. Install smoke detectors at least 1.5 meters (5 feet) from such
lights.
Air EntryAir Return
Bath
Bedroom
Bedroom
Living
Room
Kitchen
Stove
Correct Location
Incorrect Location
Figure 6: Recommended Smoke Detector Locations
Wireless Supervisor Photoelectric Smoke Detector 9
EN
INSTALLATION
The smoke detector is to be mounted on the ceiling or on the wall, if necessary. Since
the smoke detector is a single-station type, it cannot be linked to other detectors.
WARNING:
Do not connect the smoke detectors to any other alarm or auxiliary device.
Connecting anything else to this detector will prevent it from working properly.
Read the “Where To Install Your Smoke Detector” and “Where Not To Install Your
Smoke Detectors”sections in this Manual before installing. To install the detector,
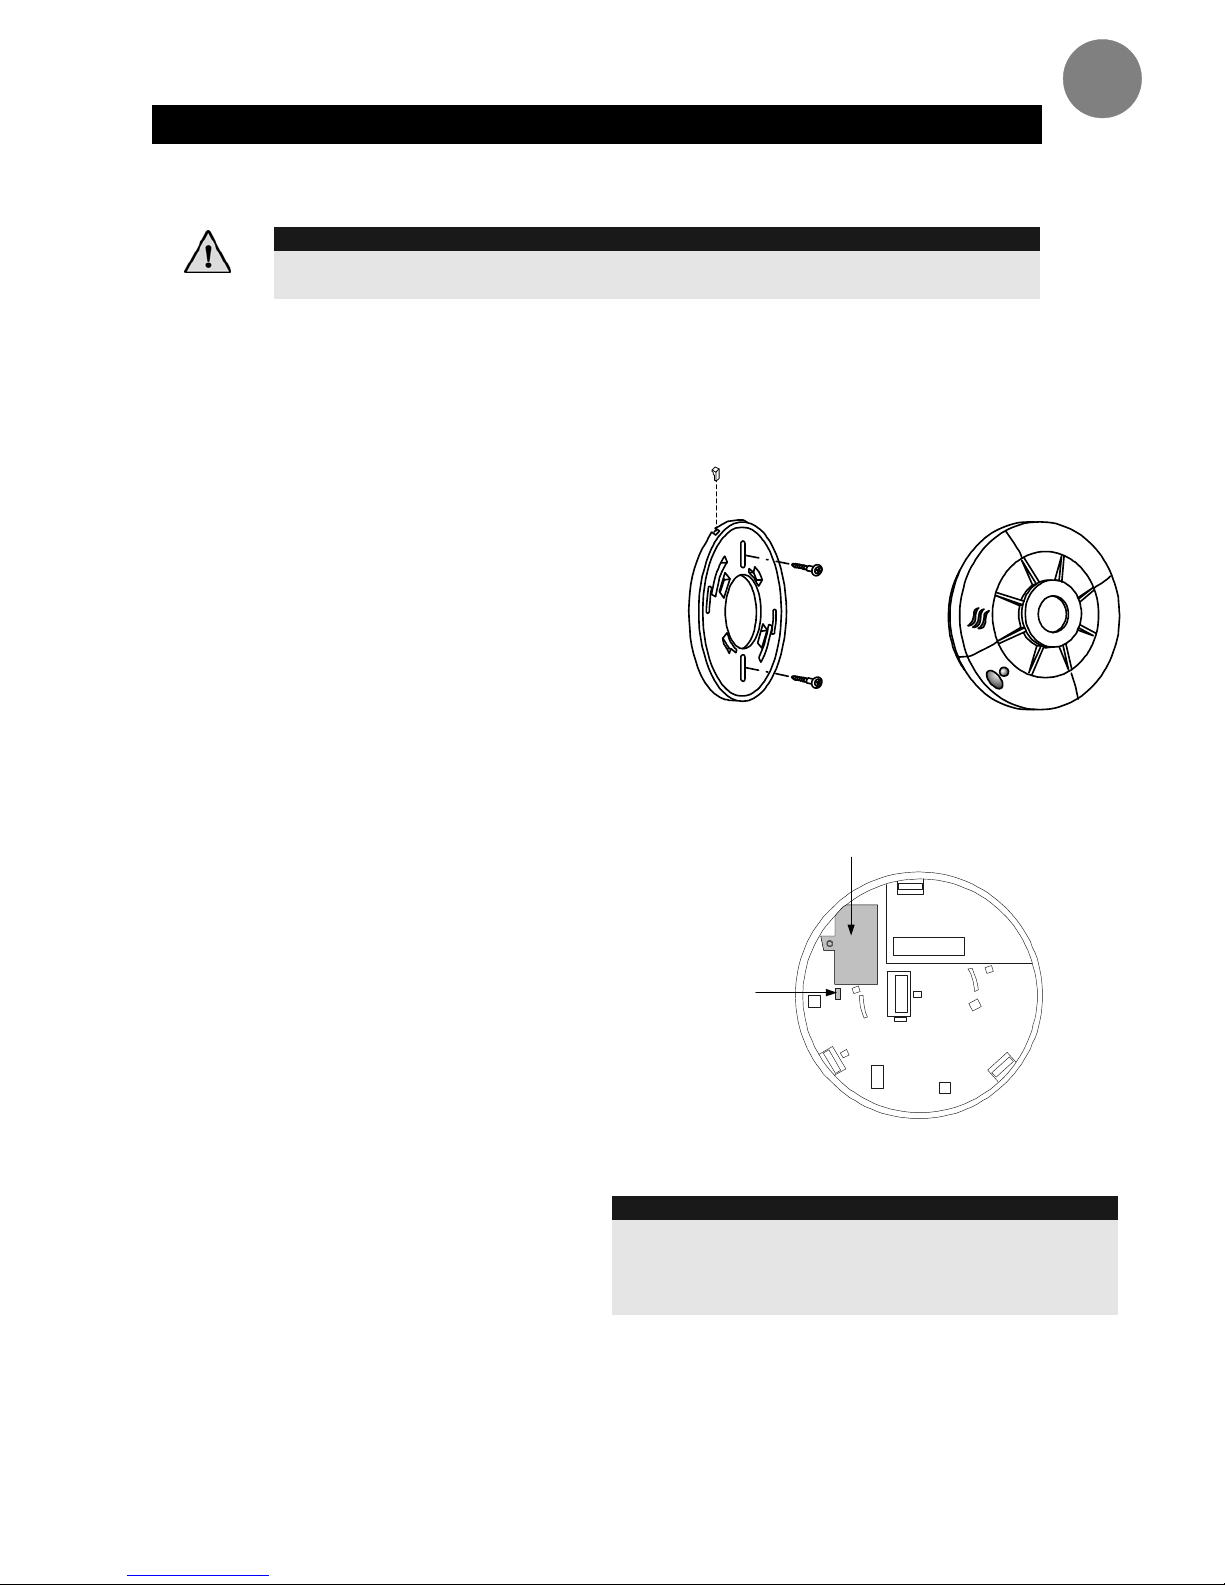
perform the following steps (see Figure 7).
♦Select the installation location.
♦Remove locking pin securing the
mounting bracket to the unit (see
Figure 7).
♦Remove the mounting bracket
from the unit by rotating it
counterclockwise.
♦Use the bracket as a template for
marking the mounting holes
♦Using an appropriate drill, drill two
holes at the marks and insert
anchors.
♦Using screws (supplied) attach the
bracket to the wall as in Figure 7.
♦Open the batteries compartment
cover (see Figure 8).
♦Observing proper polarity, insert a
2xCR123 3V Lithium batteries
(supplied) into the batteries
compartment and close the
compartment cover.
♦Write message is sent
automatically, 10 seconds after
placing the batteries, or by
pressing the detector’s tamper for
a period of 3 seconds.
♦Line up the side slot of the bracket
and the detector. Push the
detector onto the mounting
bracket and turn it clockwise to fix
it into place.
Insert the locking pin in order to
secure the mounting bracket to
the detector (see figure 7).
♦Pull the detector outward to make
sure it is securely attached to the
mounting bracket.
Bracket
Screws
Detector
Locking Pin
Figure 7: Smoke Detector Installation
Battery Compartment
Tamper
Figure 8: Batteries Compartment/Tamper
WARNING:
This detector is not suitable for installation in a
hazardous location, as defined in the national
electrical code. Do not use detector in an outlet
controlled by a wall switch.

Wireless Supervisor Photoelectric Smoke Detector10
RED INDICATOR
When the red LED indicator (see Figure 9) flashes once in 30 seconds, it indicates
the detector is under normal operation. When the red LED flashes very frequently
and an audible alarm sounds simultaneously, it indicates that the detector senses
smoke.
NOTE:
The red LED behaves according to one of the following set modes:
Mode 1: The red LED indicator will not reset automatically at the end of an alarm
event. This means that after the smoke chamber is cleared, the audible alarm
will stop automatically, but the red LED indicator will continue to flash, until it
is manually restored by the user. To restore – press the test button for 2-3
seconds, the LED will stop flashing.
Mode 2 (Default): The red LED will reset automatically at the end of an alarm event.
The user can check to which mode the detector is defined and switch between modes.
• To check the mode, press the Test button. The red LED will light up. If the red LED
lights up continuously the detector is in Mode 1. If the red LED is blinking the
detector is in Mode 2.
• To switch from one mode to another, press the Test button for 8 seconds. The
buzzer will sound and the red LED will change its behavior either from a continuous
light to a blinking light or from a blinking light to a continuous light.
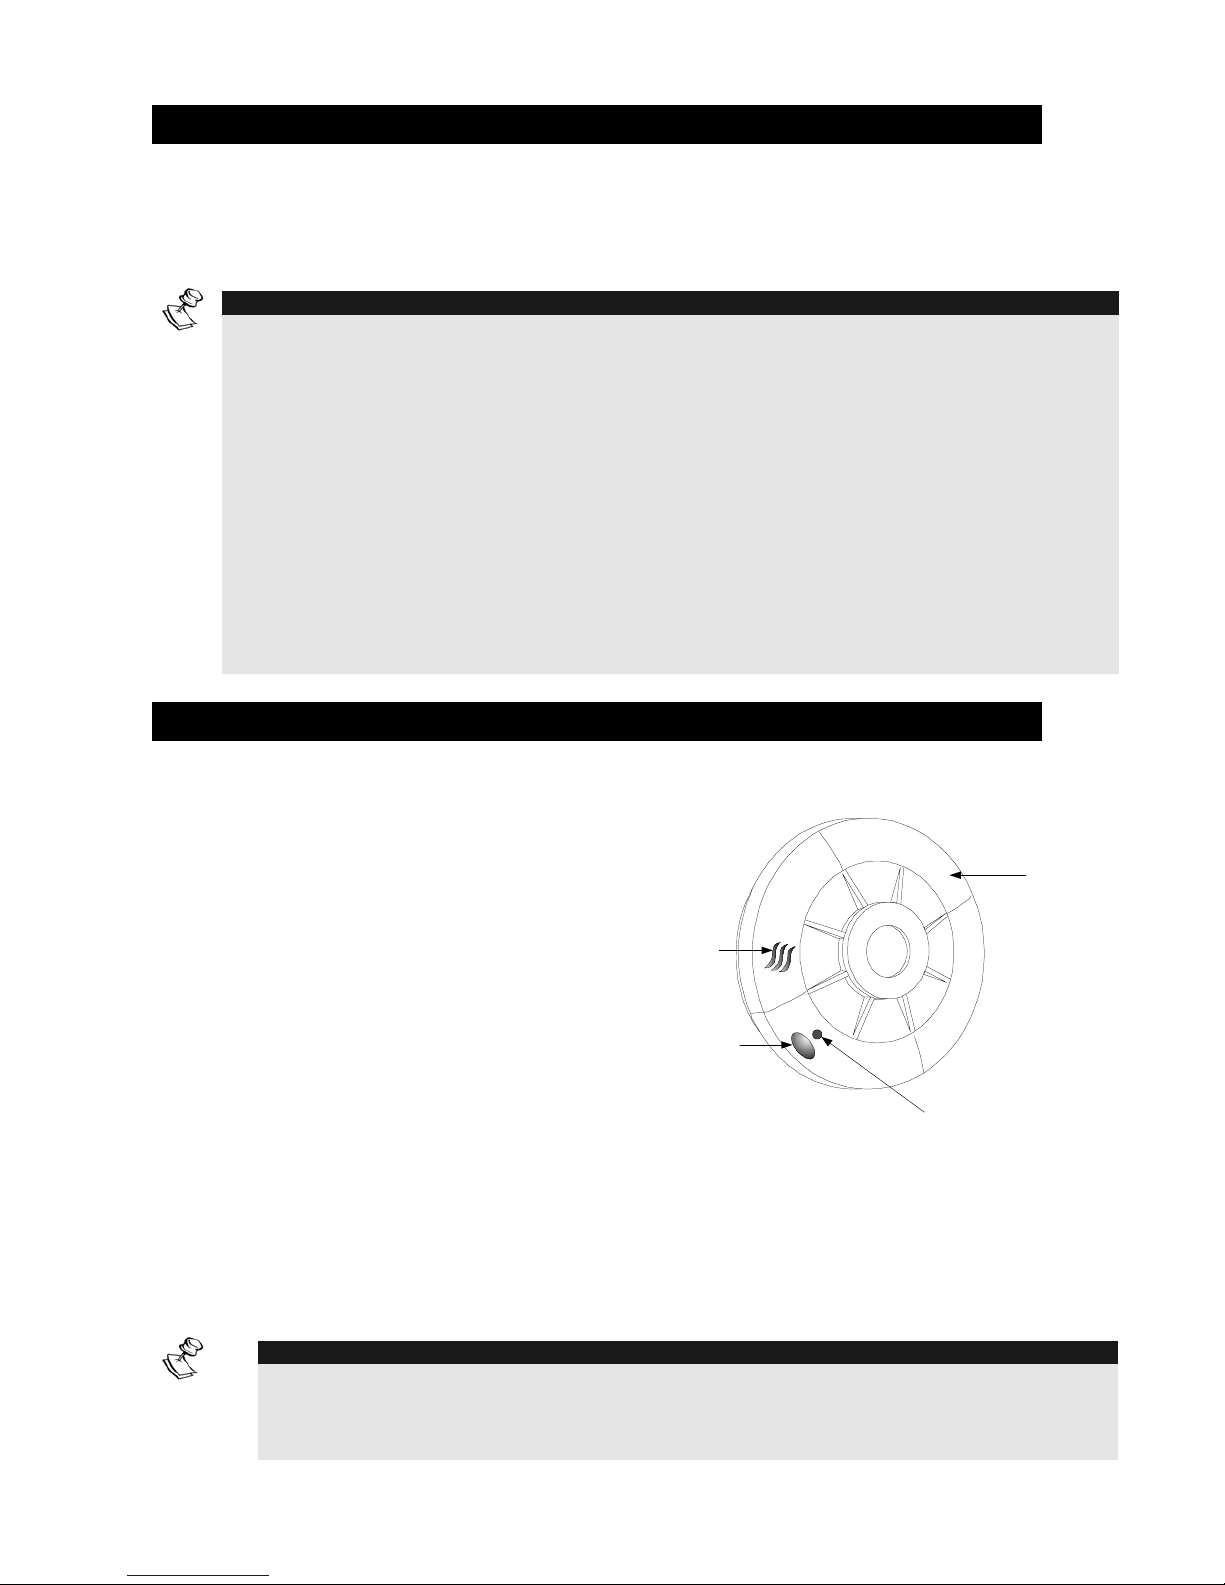
TESTING YOUR SMOKE DETECTOR
To be sure that detector is working
correctly test the detector weekly by
performing the following procedure:
Use your finger to firmly press the
test button. If the detector is
functioning correctly, the alarm horn
sounds. To stop the alarm horn,
press the test button again. If the
detector fails to test properly, have it
repaired or replaced immediately.
If the alarm horn begins to beep once
every 35 seconds, it means that the
detector’s batteries are weak.
Replace the batteries immediately.
Keep fresh batteries on hand for this
purpose.
Test / Silence
Button
LED Indicator (Red)
Detector
Buzzer
Openings
Figure 9: Smoke Detector Cover
NOTE:
Cooking smoke or a dusty furnace (sometimes called “friendly fires”)can cause the
alarm to sound. If this happens, open a window or fan the air to remove the smoke or
dust. The alarm will turn off as soon as the air is completely clear. Do not disconnect
the batteries from the detector. This will cancel your protection from fire.

Wireless Supervisor Photoelectric Smoke Detector 11
EN
TAKING CARE OF YOUR SMOKE DETECTOR
To keep your detector in good working condition, you must test the detector weekly,
according to the “Testing Your Smoke Detector” section.
CLEANING THE SMOKE DETECTOR
Clean the housing with a dry or damp cloth to remove dust and dirt. If necessary,
open the smoke chamber and clean the interior of the detector.
1. Remove the detector from the detector base.
2. Remove the batteries.
3. Using a flat screwdriver release the smoke detector cover.
4. Using a flat screwdriver lift the smoke chamber housing slightly.
5. Use a fine paintbrush to remove dirt from the chamber.
6. After cleaning, close the smoke chamber, fix the housing and remount the
detector on the ceiling.
DO NOT FORGET TO REPLACE THE BATTERIES!
BATTERY REPLACEMENT
Replace the detector batteries once a year or immediately when the low battery
“beep” signal sounds once every 35 seconds. The low-battery "beep" should last at
least 30 days before the batteries die out completely.
NOTE:
If false alarms keep coming from the detector, you should check whether the detector’s
location is adequate. Refer to section “WHERE TO INSTALL SMOKE DETECTORS.” Have
your detector moved if it is not located properly. Clean the detector as described above.
WARNING! LIMITATIONS OF SMOKE ALARMS
Wireless smoke alarms are very reliable, but may not work under all conditions. No fire
alarm provides total protection of life or property. Smoke alarms are not a substitute for life
insurance.
Smoke alarms require a source of power to work.
This smoke alarm will not operate and the alarm will not sound if batteries are dead or not
installed properly.
Smoke alarms may not be heard. A sound sleeper or someone who has taken drugs or
alcohol may not awaken if the alarm is installed outside a bedroom. Closed or partially
closed doors and distance can block sound. This alarm is not designed for the hearing
impaired.
Smoke alarms may not always activate and provide warning early enough. Smoke alarms
only activate when enough smoke reaches the alarm. If a fire starts in a chimney, wall,
roof, on the other side of closed doors, or on a different level of the property enough
smoke may not reach the alarm for it to alarm.
Smoke alarms are a significant help in reducing loss, injury and even death.
However, no matter how good a detection device is, nothing works perfectly under
every circumstance and we must warn you that you cannot expect a smoke alarm to
ensure that you will never suffer any damage or injury.

Wireless Supervisor Photoelectric Smoke Detector12
Specifications
Voltage: 6 volt
Typical Average Standby
Current: 0.010mA
Typical Test Current: 55mA
Typical Alarm Current: 55mA
Peak Trouble Pulse Current: 4.73mA
Peak Pulse Current: 0.074mA
Battery Life: At least 1 year under normal conditions
with Lithium Batteries
Battery Type: 2xCR123 3V Lithium battery
Low Battery Threshold: 5.2 Volt
Low Battery Beep rate: One beep every 30 seconds
Low Battery Life: At least 30 days from warning signal
Operating Temperature: -10°C to 40°C (14°F - 104°F)
Operating Humidity: 10% to 85% RH, no condensation or icing
Color: White
Dimensions: Diameter: 148 mm (5.83”)
Height: 53 mm (2”)
Alarm Sound Level: Exceeds 85dB at 3m (10 feet)
Transmitter Characteristics:
Nominal Center Frequency RWT33S86800A and 74015 : 868.65 MHz
RWT33S43300A: 433.92 MHz
Supervision Time 15 min. for 868.65 MHz /
65 min. for 433.92 MHz
In order to continue improving the product, RISCO Group reserves the right to
change specifications and/or designs without prior notice.

Rivelatore Fotoelettrico di Fumo Supervisionato 13
IT
RIVELATORE FOTOELETTRICO
DI FUMO SUPERVISIONATO
Modello: WL T33S
ISTRUZIONI DI INSTALLAZIONE

Rivelatore Fotoelettrico di Fumo Supervisionato14
DESCRIZIONE GENERALE
Il rivelatore di fumo è un sensore fotoelettrico alimentato a batteria che integra un
trasmettitore radio supervisionato.
Quando il rivelatore rileva fumo a sufficienza o quando viene premuto il pulsante di
test, il sensore attiva il suo cicalino interno e il trasmettitore trasmette un messaggio
di ALLARME. L’uscita d’allarme del ricevitore resterà attiva fino a quando la
condizione d’allarme non viene ripristinata e il rivelatore non rileva più fumo.
La base auto-bloccante del sensore scoraggia tentativi non autorizzati di rimuovere
il rivelatore poichè è necessario un cacciavite per effettuare questa operazione.
Il rivelatore di fumo segnala i seguenti eventi:
♦Allarme
♦Ripristino allarme
♦Basso livello batteria
♦Tamper
♦Supervisione
Rivelatore Fotoelettrico di Fumo Supervisionato 15
IT
SCELTA DELLA POSIZIONE PER L'INSTALLAZIONE
La scelta del posizionamento del sensore è molto importante per la corretta
rilevazione del fumo. Questa apparecchiatura dovrebbe essere installata in
conformità agli Standard vigenti relativi ai sistemi di rilevazione incendio.
Consultare l’esempio della Figura 1.
IMPORTANATE:
La regolamentazione riguardante i sistemi di rilevazione incendio varia da Paese a Paese.
Per maggiori informazioni contattare le Autorità locali.
Quelle che seguono sono alcune regole generali per il posizionamento dei rivelatori
di fumo.
♦Posizionare i rivelatori di fumo con
supporto da soffitto al centro della
stanza da proteggere o su di un
lato della stanza ma non più vicino
di 10 cm dalla parete, come
mostrato in Figura 2.
♦Posizionare i rivelatori con
supporto a parete a 10 - 15 cm di
distanza dal soffitto, come mostrato
in Figura 2.
♦Posizionare i rivelatori in un
ambiente che abbia le seguenti
caratteristiche:
Temperatura compresa tra
4°C e 38°C
Umidità compresa tra 0 e
95% senza condensa
♦Posizionare l’unità lontano da
condizionatori, ventilatori, o altre
apparecchiature che potrebbero
interferire con l’ingresso del fumo
all’interno della camera di
rilevazione del rivelatore.
♦Montare i rivelatori di fumo su
superfici fisse permanentemente.
♦Posizionare i rivelatori lontano da
grandi oggetti metallici, computer,
apparecchi televisivi che
potrebbero interferire con la parte
trasmittente dell’unità.
♦Se ci sono locali con soffitti
particolarmente inclinati,
posizionare il rivelatore a 90 cm
calcolati orizzontalmente dal punto
più alto del soffitto, come mostrato
in Figura 3.
Sala da Pranzo Cucina
Camera matrim.
Soggiorno
Sensori di Fumo per una minima protezione
Camera
Camera
Sensori di Fumo aggiuntivi per una maggiore
protezione
Figura 1: Posizionamento dei rivelatori di fumo
Massimo
15 cm
Soffitto
Minimo
10 cm
Minimo
10 cm
Qui
Mai
Centro del
Soffitto
Posizione perfetta
Posizione accettabile
Figura 2: Posizione perfetta e accettabile di
installazione dei rivelatori di fumo
Rivelatore
90
cm
Distanza orizzontale dal punto
più alto del soffitto
Figura 3: Posizione consigliata di installazione
dei rivelatori di fumo nei locali con soffitti
particolarmente inclinati

Rivelatore Fotoelettrico di Fumo Supervisionato16
DOVE NON INSTALLARE I RIVELATORI DI FUMO
I falsi allarmi possono avvenire se i rivelatori vengono installati dove non
funzionerebbero correttamente. Per evitare i falsi allarmi, non installare i rivelatori di
fumo nelle seguenti situazioni:
♦Non installare i rivelatori di fumo all’interno o vicino ad aree dove sono presenti
particelle di combustione, come cucine senza finestre o scarsa ventilazione,
autorimesse dove ci possono essere fumi di scarico di veicoli, vicino a fornaci,
caldaie e locali con un’elevata temperatura.
♦Non installare i rivelatori a meno di 6 metri da posti dove sono normalmente
presenti particelle di combustione, come per esempio le cucine. Se non è
possibile mantenere una distanza di 6 metri, per evitare falsi allarmi,
provvedere ad effettuare una buona ventilazione all’interno di questi locali.
♦In prossimità di fumi di scarico di automobili; questo danneggerà il rivelatore.
♦Vicino a vapori di solventi.
♦In locali molto sporchi o polverosi, la sporcizia e la polvere possono
depositarsi sulla camera di rilevazione del rivelatore e renderlo
eccessivamente sensibile.
♦Inoltre, la sporcizia e la polvere possono ostruire le fessure di rilevazione della
camera del rivelatore e impedire che il rivelatore rilevi il fumo.
♦In aree infestate da insetti. Se gli insetti si introducono nella camera di
rilevazione del rivelatore, possono causare falsi allarmi. Quando gli insetti
possono essere un problema, disinfestare l’area prima di installare i rivelatori.
♦Vicino a luci fluorescenti, il rumore elettrico delle luci fluorescenti può causare
falsi allarmi. Installare i rivelatori di fumo ad almeno 1,5 metri da queste luci.
IMPORTANATE:
Non provare ad evitare i falsi allarmi escludendo il rivelatore.

Rivelatore Fotoelettrico di Fumo Supervisionato 17
IT
INSTALLAZIONE DEL RIVELATORE
Il rivelatore di fumo può essere installato a soffitto o a parete, se necessario.
ATTENZIONE:
Non collegare i rivelatori di fumo a nessun altro rivelatore o dispositivo ausiliario.
Collegando altri dispositivi a questo rivelatore verrà impedito il suo corretto
funzionamento.
Per installare il rivelatore, eseguire le seguenti fasi (vedi Figure 4):
♦Scegliere il luogo di installazione.
♦Rimuovere la linguetta di blocco
posta su un lato della base di
montaggio dell’unità (vedi Figura 6).
♦Rimuovere la base di montaggio
dall’unità ruotandolo in senso
antiorario.
♦Utilizzare la base come dima per
segnare i punti di fissaggio.
♦Utilizzando un trapano appropriato,
effettuare due fori nei punti marcati
e inserire i tasselli.
♦Utilizzando le viti (fornite) avvitare la
base alla parete, come in Figura 4.
♦Aprire il vano porta-batteria (vedi
Figura 5).
♦Inserire 2 batterie al litio da 3 Volt
tipo CR123 (fornite) nel vano porta-
batteria prestando attenzione alla
polarità, poi chiudere il coperchio
del vano.
♦Il messaggio di “Trasmissione
Indirizzo” (WRITE) viene trasmesso
automaticamente dall’unità, 10
secondi dopo aver inserito le
batterie, o premendo il tamper del
rivelatore per almeno 3 secondi.
♦Allineare la fessura sul bordo della
base di montaggio con la fessura
situata sul rivelatore. Spingere il
rivelatore verso la base e girare in
senso orario per fissarlo alla base.
Inserire la linguetta di blocco in
modo da serrare la base di
montaggio al rivelatore (vedi
Figura 4).
♦Tirare il rivelatore verso il basso per
assicurarsi che sia agganciato
saldamente alla base.
Base di
montaggio Viti
Rivelatore
Linguetta di blocco
Figura 4: Installazione del Rivelatore di Fumo
Vano porta-batteria
Tamper
Linguetta
per aprire il
coperchio
Figure 5. Tamper/Vano porta-batteria
IMPORTANTE:
il rivelatore non può essere agganciato alla base di
supporto se la batteria non è stata installata.
ATTENZIONE:
Questo rivelatore deve essere installato in conformità agli
Standard vigenti relativi ai sistemi di rilevazione incendio.
Rivelatore Fotoelettrico di Fumo Supervisionato18
INDICATORE ROSSO
Quando l’indicatore LED rosso (vedi Figura 6) lampeggia una volta ogni 30 secondi,
indica che il rivelatore è in condizione di funzionamento normale. Quando il LED
rosso lampeggia molto frequentemente e simultaneamente il cicalino interno del
rivelatore emette un tono acustico, indica che il rivelatore sta rilevando fumo.
NOTA:
Il comportamento del LED rosso segue uno dei modi seguenti:
Modo 1: Il LED rosso non si ripristinerà automaticamente alla fine dell’evento di allarme. Questo
significa che dopo che la camera di rilevazione fumo si è svuotata, la segnalazione acustica si
fermerà automaticamente ma il LED rosso continuerà a lampeggiare fino al ripristino manuale
da parte dell’utente. Per ripristinare manualmente premere il pulsante di test per 2-3 secondi e il
LED smetterà di lampeggiare.
Modo 2 (Default): Il LED rosso si ripristinerà automaticamente alla fine dell’evento di allarme.
L’utente può verificare quale modo di funzionamento è stato configurato e modificarlo.
• Per verificare il modo impostato premere il pulsante di test. Il LED rosso si illuminerà.
Se il LED resta acceso stabilmente il modo è il numero 1. Se invece il LED lampeggia, il modo
impostato è il modo 2.
• Per commutare tra un modo di funzionamento ed un altro premere il pulsante di test per 8
secondi. Il buzzer dell’unità emetterà un tono acustico e il LED modificherà il suo
funzionamento da continuamente acceso a lampeggiante o viceversa.
TEST FUNZIONALE DEL RIVELATORE DI FUMO
Per assicurarsi che il rivelatore di
fumo stia funzionando correttamente
testare settimanalmente il sensore
effettuando la seguente procedura:
tenere premuto con un dito il tasto di
test. Se il rivelatore sta funzionando
correttamente, il cicalino interno del
rivelatore emetterà dei brevi toni
acustici fin quando non viene
rilasciato il tasto di test. Se invece il
rivelatore non emette nessun tono
acustico, significa che deve essere
immediatamente riparato o sostituito.
Se il cicalino interno del rivelatore
emette un tono acustico ogni 35
secondi, significa che le batterie del
rivelatore sono scariche. Sostituire
immediatamente le batterie. Si
consiglia di tenere di scorta batterie
cariche da sostituire all’occorenza.
Tasto per il
Test/Tacitazione
Indicatore LED
(Rosso)
Rivelatore
Fessure per
il cicalino
Figura 6: Coperchio del Rivelatore di Fumo
NOTA:
Il fumo di cottura o di griglia può causare una condizione di allarme. Se questo accade,
aprire una finestra o ventilare il locale. L’allarme si taciterà non appena l’aria sarà
completamente pulita. Non scollegare la batteria dal rivelatore. Questa operazione
disabiliterà la protezione antincedio del locale protetto dal rivelatore.

Rivelatore Fotoelettrico di Fumo Supervisionato 19
IT
MANUTENZIONE DEL RIVELATORE DI FUMO
Per mantenere il rivelatore in buone condizioni di funzionamento, dovrebbe essere
testato settimanalmente. Consultare la sezione “Test funzionale del rivelatore di fumo”.
PULIZIA DEL RIVELATORE DI FUMO
Pulire il contenitore con un panno asciutto per rimuovere polvere e sporcizia. Se
necessario, aprire la camera di rilevazione fumo e pulire anche l’interno.
1. Rimuovere il rivelatore dalla base.
2. Rimuovere le batterie.
3. Usare un cacciavite a testa piatta e sollevare con attenzione il contenitore
della camera di rilevazione fumo.
4. Usare un pennello sottile/aria compressa per rimuovere la sporcizia dalla
camera di rilevazione fumo.
5. Terminata la pulizia chiudere la camera di rilevazione fumo, fissare il
contenitore e rimontare il rivelatore sulla base.
NON DIMENTICARE DI RIMETTERE LE BATTERIE NELL’UNITÀ!
SOSTITUZIONE DELLE BATTERIE
Sostituire le batterie del rivelatore una volta l’anno o immediatamente quando il
cicalino interno del rivelatore emette un tono acustico ogni 35 secondi. Il tono
acustico di batterie scariche avverte almeno 30 giorni prima che le batterie si
scarichino completamente.
NOTA:
Se il rivelatore rileva frequentemente falsi allarmi, si deve controllare se la posizione di
installazione del rivelatore è appropriata. Fare riferimento alle sezioni “Scelta della
posizione per l’installazione” e “Dove non installare i rivelatori di fumo”. Spostare il rivelatore
se non è stato posizionato correttamente.

Rivelatore Fotoelettrico di Fumo Supervisionato20
AVVERTENZA! LIMITAZIONI DEI SYSTEMI DI
RILEVAZIONE FUMO
I sistemi radio di rilevazione fumo sono molto affidabili, ma tuttavia non possono
essere utilizzati in tutte le condizioni. Nessuno di questi sistemi garantisce una
totale protezione della propria vita o della propria casa. I sistemi di rilevazione fumo
non sono una sostituzione ad un’assicurazione sulla vita e sulla casa.
I sistemi di rilevazione fumo richiedono una sorgente di alimentazione per poter
funzionare. Questo rivelatore di fumo non funziona e non genera condizioni di
allarme se la batteria è scarica o non è stata installata correttamente.
I sistemi di rilevazione fumo possono non essere sentiti. Una persona che dorme
profondamente o qualcuno che ha assunto droghe o ha abusato di bevande
alcoliche potrebbe non svegliarsi se l’allarme è installato fuori da una camera da
letto. Porte chiuse o parzialmente chiuse possono bloccare il suono d’allarme.
I sistemi di rilevazione fumo si attivano solo quando c’è sufficiente fumo per
raggiunge la soglia di allarme. Se un incendio ha inizio in un camino, su un tetto o
su un piano differente della casa, una quantità di fumo sufficiente potrebbe non
raggiungere tempestivamente il rivelatore per generare una condizione di allarme.
I sistemi di rilevazione fumo sono un’importante aiuto per ridurre danni,
infortuni e anche morte. Comunque, per quanto sia efficiente il dispositivo di
rilevazione, nessun sistema di rilevazione fumo può funziona perfettamente
in tutte le circostanze e non ci si può aspettare che un sistema di rilevazione
fumo assicuri di non subire mai nessun danno o infortunio.
Table of contents
Languages:
Other Risco Smoke Alarm manuals


Popular Smoke Alarm manuals by other brands

Ei Electronics
Ei Electronics Ei3100RF? Ei3500RF Instruction leaflet

IEI Technology
IEI Technology TRI-GARD 510 manual

FCI
FCI 2400 Series Quick user guide

System Sensor
System Sensor 1400A Direct Wire Installation and maintenance instructions

Crossfire
Crossfire CFS10 owner's manual

Teletek electronics
Teletek electronics SensoMAG S30 Installation instruction


