Rise RXD250 User manual

© 2016 RISE, a Hobbico company. RISE0250 v1
Please fully read and understand this manual and the operation and all
safety aspects required of you for the safe operation of this product.
Before use, if you feel this product is not for you please return it to your
place of purchase.
RISE products are to be used by ages 14 and over.
Manual Specifications and Description Changes
The instruction manual, warranties and other associated documentation
are subject to change without notice. Hobbico assumes no responsibility
for inadvertent errors to this manual.
WARNING
INSTRUCTION MANUAL
REQUIRED FOR COMPLETION:
6-channel Transmitter with Receiver
3S 1300m~2200mAh LiPo Battery
LiPo Battery Charger 5.8G Transmitter for FPV (optional)
FPV Camera (optional)
5.8G Receiver with Video Monitor or Goggles (optional)

2
INTRODUCTION
Thank you for purchasing the RXD250 Racer. We want the time you spend
with your new R/C quadcopter to be fun and successful so please read the
entire manual before beginning setup. If for any reason you think this R/C
model is not for you, return it to the dealer immediately. Your dealer cannot
accept returns on any model after final assembly.
For the latest technical updates or manual corrections for the RXD250 please
visit the Rise web site at www.explore-rise.com. If there is any new technical
information, changes or important updates to this model, a “tech notice”
box will appear on the page. Click the “tech notice” box to learn more.
SAFETY PRECAUTIONS
●
Keep your face and body as well as all spectators away from the rotating
plane of the blades whenever the battery is connected. Keep loose clothing,
shirt sleeves, ties, scarfs, long hair or loose objects such as pencils or
screwdrivers that may fall out of shirt or jacket pockets away from the
rotors. The spinning blades of a model quadcopter can cause serious
injury. When choosing a flying site for your RXD250, stay clear of buildings,
trees and power lines. AVOID flying in or near crowded areas. DO NOT
fly close to people or pets. Maintain a safe distance from the quadcopter.
●Your RXD250 should not be considered a toy. Because of its performance
capabilities, the RXD250, if not operated correctly, could cause injury to
you or spectators and damage to property.
●DO NOT alter or modify the model. Doing so may result in an unsafe or
unflyable model.
●When and if repairs are necessary you must correctly install all components
so that the model operates properly on the ground and in the air. Please
check the operation of the model before every flight to insure that all
equipment is operating and that the model has remained structurally
sound. Be sure to check connectors and the propellers before each flight.
Replace them if they show any signs of wear or fatigue.
KNOW BEFORE YOU FLY
As a new owner of an unmanned aircraft system (UAS), you are responsible
for the operation of this vehicle and the safety of those around you. Please
contact your local authorities to find out the latest rules and regulations.
In the United States, please visit:
knowbeforeyoufly.org faa.gov/uas

3
AMA
We urge you to join the AMA (Academy of Model Aeronautics) and a local
R/C club. The AMA is the governing body of model aviation and membership
is required to fly at AMA clubs. Though joining the AMA provides many
benefits, one of the primary reasons to join is liability protection. Coverage
is not limited to flying at contests or on the club field. It even applies to flying
at public demonstrations and air shows. Failure to comply with the Safety
Code may endanger insurance coverage. Additionally, training programs
and instructors are available at AMA club sites to help you get started the
right way. There are over 2,500 AMA chartered clubs across the country.
Contact the AMA at the address or toll-free phone number that follows.
Academy of Model Aeronautics
5151 East Memorial Drive
Muncie, IN 47302-9252
Tele. (800) 435-9262
Fax (765) 741-0057
Or via the Internet at: www.modelaircraft.org
IMPORTANT: Two of the most important things you can do to preserve the
radio controlled aircraft hobby are to avoid flying near full-scale aircraft and
avoid flying near or over groups of people.
BATTERY WARNINGS
●
ALWAYS unplug your battery from either the charger or quadcopter after
use. NEVER store your quadcopter with the battery plugged into the quadcopter.
●DO NOT attempt to charge your battery if it becomes swollen or hot.
●The RXD250 does not have a voltage cutoff failsafe. When the LEDs begin
to flash, land the quad and disconnect the battery.
●
It is best to store your batteries in a cool, dry location at 1/2 charge (11.4V).
Storing a fully discharged battery may cause irreversible damage to the battery.
●NEVER disassemble, puncture or modify the battery pack in any way.
●NEVER allow the battery temperature to exceed 150° F [65° C].
●If your battery begins to swell or “puff” during charge or discharge or
becomes damaged in any way, stop using it.

4
WARRANTY
Rise
™
guarantees this kit to be free from defects in both material and
workmanship at the date of purchase. This warranty does not cover any
component parts damaged by use or modification. In no case shall Rise’s
liability exceed the original cost of the purchased kit. Further, Rise reserves
the right to change or modify this warranty without notice. In that Rise has
no control over the final assembly or material used for final assembly, no
liability shall be assumed nor accepted for any damage resulting from the
use by the user of the final user-assembled product. By the act of using the
user assembled product, the user accepts all resulting liability. If the buyer
is not prepared to accept the liability associated with the use of this product,
the buyer is advised to return this kit immediately in new and unused condition
to the place of purchase.
To make a warranty claim, send the defective part or item to Hobby Services
at this address.
Hobby Services 217-398-8970 ext#6
3002 N. Apollo Dr., Suite 1
Champaign, IL 61822 USA
Include a letter stating your name, return shipping address, as much contact
information as possible (daytime telephone number, fax number, e-mail
address), a detailed description of the problem and a photocopy of the
purchase receipt. Upon receipt of the package the problem will be evaluated
as quickly as possible.
FEATURES
●250 class racing quad
●Extremely durable foam, carbon fiber, and fiberglass frame
●10A brushless speed controls
●2280kV brushless motors
●Receiver Ready, no building required
●Flight Controller is pre-programmed, no setup needed
DIMENSIONS
Size: 250 mm (9.8 in) diagonally motor to motor
Width: 220 mm (8.7 in)
Length: 270 mm (10.6 in)
Blade Length: 125 mm (4.9 in)
Empty Weight: 300 g (10.6 oz) without battery and FPV system
RTF Weight: 437 g (15.4 oz) with 1300mA LiPo and FPV system

5
CONTENTS
●RXR Rise RXD250
●Spare Props
●Hook & Loop pads for the
battery
FLIGHT MODES
The RXD250 has three flight modes.
Stability Mode has limits on the
tilt angle and the quadcopter will
level itself when the right stick is
centered.
The Rattitude Mode will center
the quad and limit the tilt angle when the right stick is near center. When
the stick is moved away from center, the limits are removed making the quad
much more maneuverable. Flips are rolls are easily done in this mode.
Rate Mode is available for experienced pilots that want maximum
maneuverability. In this mode, the quad will maintain its current pitch or
heading when the right stick is released. The quadcopter’s flight will be
smoother and more responsive in this mode.
SETUP
The RXD250 needs only minimal assembly. All the bolts have been set to the
proper torque and have thread locking compound applied to keep them secure.
PROPELLERS
The propellers are counter rotating
and must be installed correctly or
the quad will not fly. When
installing or replacing propellers,
make sure you install the correct
prop on the correct corner. Note
that two of the motor shafts and
nuts are “reverse” threaded.
CW= clockwise rotation when
observed from the top.
CCW=counter clockwise rotation
when observed from the top.
Receiver
Mount
FPV
Transmitter
Mount
Antenna
Mount
Antenna
Mount
HD Camera
Mount
CW PROP
“Reverse” Nut
CW PROP
“Reverse” Nut
FRONT CCW PROP
“Normal” Nut
CCW PROP
“Normal” Nut

6
RADIO SYSTEM
Your transmitter needs to have a switch for channel 5. The setup below is
typical for most transmitters. The receiver must have one port for each
channel. S-bus, X-bus, and satellite receivers cannot be used with the 8 pin
receiver cable.
CHANNEL ASSIGNMENTS
MODEL TYPE: Airplane
Channel
Aileron
Elevator
Throttle
Rudder
Gear
Direction
normal
normal
normal
normal
normal
Dual Rates
80/100
80/100
80/100
Expo
-30/0
-30/0
-30/0
End Points
100/100
100/100
100/100
100/100
100/100
SWITCH ASSIGNMENTS - Ch 5
Gear
Gear
Gear
-100%
0%
+100 %
Stability
Rattitude
Rate
Black
RedThrottle White
Blue
Yellow
Green
Yellow
Black
Roll
Pitch
Yaw
Ch5
Ch6
Mount the receiver just in front of
the flight controller. Install the
antenna mounts as illustrated or
run the antenna down through the
frame.
Receiver location
Mount the receiver
with double-sided tape.
Antenna Antenna
Connect the receiver to
the CC3D flight controller.

7
FLIGHT CONTROLLER SETUP
Download the Librepilot Ground Station app (GCS) from www.librepilot.org
from the software downloads section.
To set up your transmitter using the GCS app, you will need:
A. A mini-USB cable to connect the cc3d controller to the GCS app.
B. A charged flight battery.
C. The transmitter set up with the new model and linked to the receiver.
Open the GCS app and connect the RXD250 with your mini-USB cable.
When the communication window shows that the flight controller is connected
to the GCS app, click on the configuration button.

8
Click on the input button.
Click on the Transmitter setup wizard button and follow the steps to set up
the transmitter.
ARMING SETTING
At the end of the wizard is the screen to set the motor arming procedure.
The recommended setting is Yaw Right which requires the yaw control to be
held to the right while the throttle is at 0 for 3 seconds to arm the motors.
Holding the Yaw control to the left will disarm the motors. There are several
other options available for arming/stopping the motors including using a
switch assigned to Channel 6.

9
After the Arming Setting is completed, the settings need to be saved to the
flight controller.
GENERAL SETTINGS
Any time the controller is connected to the app, the following settings
should be checked.
A. Vehicle Configuration Screen –
Motor Output Channel 1 – Channel3
Motor Output Channel 3 – Channel1

10
B. Attitude Configuration Screen – Yaw is set to -90
FAILSAFE
If your transmitter can set values for all the channels for failsafe, set the roll &
pitch channels to midstick and the throttle to its lowest setting to stop the motors.
For transmitters that only set failsafe on the throttle channel, set the throttle
to its lowest setting
Be sure to remove the props before testing the failsafe operation.
BATTERIES
The RXD250 has been tested with 3 cell lipos between 1300(30C or larger)
and 2200mAh (20C or larger). Typical flight time is between 4 and 6 minutes.
IMPORTANT! The flight controller does not have a low voltage cutoff to
protect the lipo from damage. The LEDs on the bottom of the RXD250 will
start flashing when the battery is at 10.2V for a 3S battery. You MUST land
the quadcopter as soon as the LEDs start to flash.
For your first flight, set a timer for 4 minutes. If the LEDs are not flashing at
the end of the flight, the timer setting could be increased to find the optimal
flight time. If the LEDs are flashing at the end of the flight, the timer setting
should be reduced to protect the battery from damage.
We recommend using a voltage monitor/alarm that plugs into the battery’s
balance connector and will sound an alarm when the battery voltage gets low.
WARNING: Your battery life will be reduced and the battery
can be damaged any time the battery voltage is low enough
for the LEDs to flash. Charging a Lipo battery that is damaged
in any way can pose a fire hazard.

11
VIDEO SYSTEM SETUP
The optional camera (RISE2508)
is designed to fit the camera
mounting plate without any
modifications.
The camera is designed to operate
on just 5 volts. The red and black
wires should be connected to a
receiver port to power the camera.
Warning- check the polarity of the
camera connection before connecting
the flight battery to the RXD250. The
camera will be damaged if the
polarity is backwards.
The Tactic 200mW FPV transmitter
(TACZ5005) is recommended. It can be easily connected to the 12 volt
connector at the back of the RXD250 and has additional cables that make
connecting the optional camera a simple task.
MOTOR ARMING & TAKEOFF
Turn on the transmitter and connect the flight battery to the RXD250.
Place the quadcopter on a level surface and let it sit for 10 seconds to
let the flight controller set up the gyros.
Arm the motors by holding the yaw control to the right for at least 3
seconds, and center the left stick. Advance the throttle to start the motors
and take off.
To disarm the motors, bring the throttle down to 0% and hold the yaw
control to the left.
FLYING
The RXD250 is a racing quad. As such it is capable of flying at high rates
of speed and can get out of sight very quickly. We recommend flying the
quad in stability mode without FPV for several flights until you are fully
familiar with how this quad handles.
As your skills grow, try Rattitude mode. When flying in this mode, let go
of the right stick if you find yourself in trouble. The quad will level itself
and become stable.
FPV RACING WEBSITES
More information about FPV racing can be found at sites like multi.com
and fpvracing.tv
FPV Camera
FPV Transmitter
12
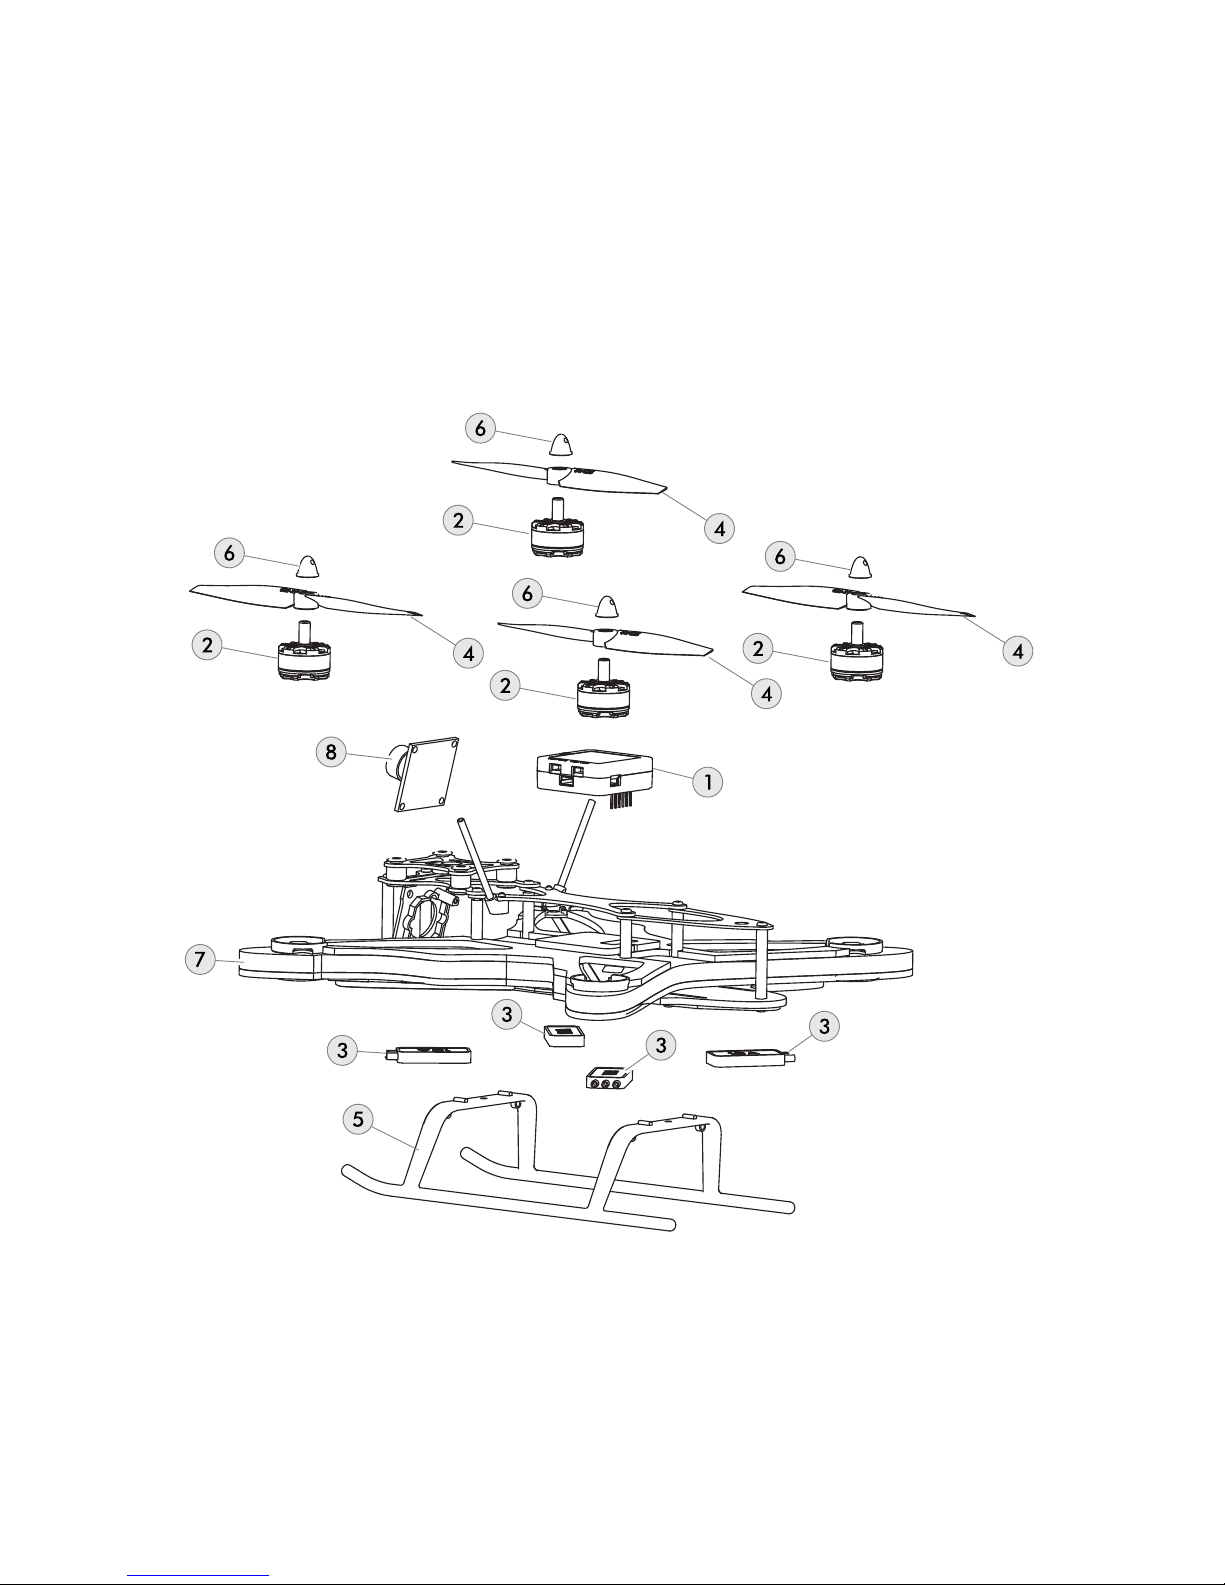
SPARE PARTS
1 RISE2501 CC3D Flight Ccontroller
2 RISE2502 Brushless Motor (2)
3 RISE2503 10 AMP ESC
4 RISE2504 5x3 Propeller Set
5 RISE2505 Landing Gear
6 RISE2506 Prop Nut Set
7 RISE2507 Frame Set
8 RISE2508 Camera (Optional)
EXPLODED VIEW
Table of contents
Other Rise Quadcopter manuals


Popular Quadcopter manuals by other brands


dji
dji PHANTOM Quick start manual

DF-models
DF-models Sky Watcher FUN V2 instruction manual

Walkera
Walkera RUNNER 230 quick start guide

dji
dji LIGHTBRIDGE quick start guide

Carrera RC
Carrera RC RC POWER 370503026 Assembly and operating instructions

Propel Trampolines
Propel Trampolines Atom 1.0 instruction manual