manuals.online logo
Brands
  1. Home
  2. •
  3. Brands
  4. •
  5. RITS-N
  6. •
  7. Switch
  8. •
  9. RITS-N DAW-3 User manual

RITS-N DAW-3 User manual

This manual suits for next models

1

Other RITS-N Switch manuals

RITS-N WT200 User manual

RITS-N

RITS-N WT200 User manual

RITS-N TS400 User manual

RITS-N

RITS-N TS400 User manual

Popular Switch manuals by other brands

SMC Networks SMC6224M Technical specifications

SMC Networks

SMC Networks SMC6224M Technical specifications

Aeotec ZWA003-S operating manual

Aeotec

Aeotec ZWA003-S operating manual

TRENDnet TK-209i Quick installation guide

TRENDnet

TRENDnet TK-209i Quick installation guide

Planet FGSW-2022VHP user manual

Planet

Planet FGSW-2022VHP user manual

Avocent AutoView 2000  AV2000BC AV2000BC Installer/user guide

Avocent

Avocent AutoView 2000 AV2000BC AV2000BC Installer/user guide

Moxa Technologies PT-7728 Series user manual

Moxa Technologies

Moxa Technologies PT-7728 Series user manual

Intos Electronic inLine 35392I operating instructions

Intos Electronic

Intos Electronic inLine 35392I operating instructions

Cisco Catalyst 3560-X-24T Technical specifications

Cisco

Cisco Catalyst 3560-X-24T Technical specifications

Asante IntraCore IC3648 Specifications

Asante

Asante IntraCore IC3648 Specifications

Siemens SIRIUS 3SE7310-1AE Series Original operating instructions

Siemens

Siemens SIRIUS 3SE7310-1AE Series Original operating instructions

Edge-Core DCS520 quick start guide

Edge-Core

Edge-Core DCS520 quick start guide

RGBLE S00203 user manual

RGBLE

RGBLE S00203 user manual

Thrustmaster FLIGHT SIMULATOR X quick guide

Thrustmaster

Thrustmaster FLIGHT SIMULATOR X quick guide

Southwire SURGE GUARD 41390 RVC troubleshooting guide

Southwire

Southwire SURGE GUARD 41390 RVC troubleshooting guide

Buhler Nivotemp NT 61 Brief instructions

Buhler

Buhler Nivotemp NT 61 Brief instructions

Kramer VS-41HDCP user manual

Kramer

Kramer VS-41HDCP user manual

Techly IDATA AU-270 user manual

Techly

Techly IDATA AU-270 user manual

Belkin F1U109 user manual

Belkin

Belkin F1U109 user manual

manuals.online logo
manuals.online logoBrands
  • About & Mission
  • Contact us
  • Privacy Policy
  • Terms and Conditions

Copyright 2025 Manuals.Online. All Rights Reserved.

DAW-3(Receiver), DAW-5(Transmitter
)
Thank you for buying this RITS-N Wireless Touch Switch. This product is a set of wireless transmitter/receiver switches to be installed in the
equipment requiring relay contact input to control motor e.g., of automatic door.
1 Component & Specifications
DAW-5(Transmitter) DAW-3(Receiver)
Double-sided adhesive tape 1EA Power connection wire(black, red) 2 pieces
Two kinds of screws (3*8, 4*16) 2EAeach Output contact wire(green, green) 2 pieces
Batteries 3V(COIN BATTERY) CR2450 2EA Fixing screws (4*16) 2EA
Components
User’s Manual 1 copy User’s Manual 1 copy
Power supply 3V *2 (TYPE : CR2450) Power supply AC220V orAC/DC12V~40V
Rated frequency FM 447.600MHz Relay contact capacity 0.5A/ 125VAC , 2A/ 30VDC
Operating temp. -10℃~ 60℃Reception sensitivity -100 dBm (TEM CELL)
Distance 10m - -
Power consumption 9mA - -
Specifications
Thickness 13mm - -
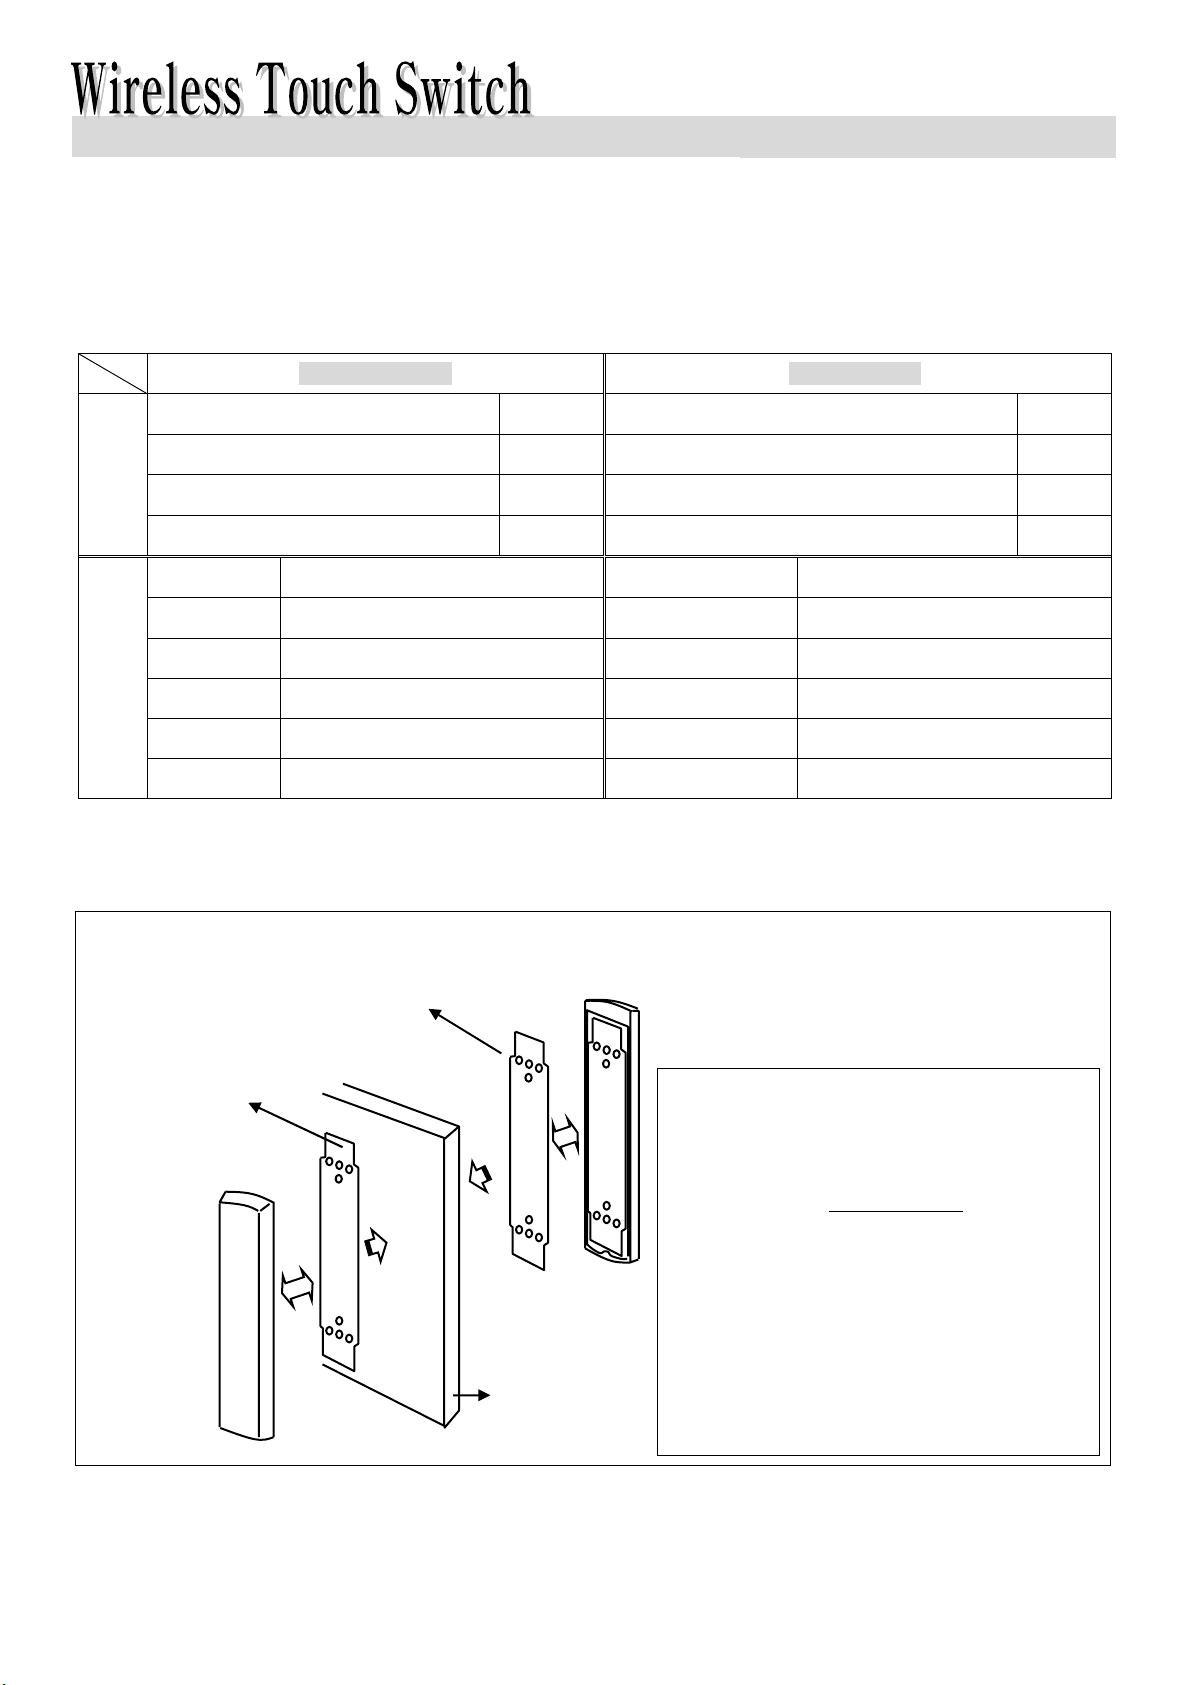
2 How to Install Wireless Touch Transmitter Switch (DAW-5)
Wireless touch switch
(DAW-5)
Double-sided adhesive
Tempered
Wireless touch switch
(DAW-5)
☞Procedures
① Input DAW-5(wireless touch switch) into your
receiver. (Input method: while pressing and
holding the S/W Input Button on the receiver,
press and hold the Wireless Touch Switch for
about six seconds.)
② Attach double-sided adhesive tape to the
assembled wireless touch switch.
③ Fix the wireless touch switch on the tempered
glass or on the desired place to be installed.
Type Registration Certificate No. : R-LARN-02-0264
RITS-N CO., LTD.
3 How to Install Wireless Touch Receiver(DAW-3)
4 External Dimensions (Characters expressed in the country’s Language)
AC220①
①DC12V~30V
AC12V~30V
⑤Transmitter Input Button
②Power On LED
③Operation LED
☞Descriptions of Designations
① Select one ofAC220V orAC, DC 12V~30V for power supply and input power.
② Power On LED: Make sure that red light is on in the Power On LED.
③ Operation LED: When the wireless touch switch is operating, green light blinks.
④ Output Contact: Output contact terminal.
⑤ Transmitter Input Button: While pressing and holding this switch, press and hold the Transmitter Switch for about 6 seconds.
⑥ Transmitter Delete Button: While pressing and holding this switch, press and hold the Transmitter Switch for approx. 1
second.
⑦ Jumper Terminal: When connecting the two terminals and pressing down the wireless touch switch, relay contact duration is
kept for 8 seconds.(If the terminals are disconnected, contact is made only when pressing and holding the switch) .
☞To delete all the transmitters input in the wireless receiver :
Press and hold ⑤and ⑥at the same time for 1 second (10 seconds required to delete them.)
⑦JumperTerminal
☞Internal Designations
☞External Designations
⑥Delete Button
④Output Contact
DAW-3(Receiver)
DAW-5(Transmitter)
40
PUSH
自動
눌러주세요
AUTO
161
185
41 13 51 30
RITS-N CO., LTD.