Riva RC6802HD-6217 User manual

www.blick
-
store
.de
RC6802HD-6217
Installation Guide

www.blick
-
store
.de
INFORMATION TO U ER
CAUTION
RI K OF ELECTRIC HOCK,
DO NOT OPEN
CAUTION: TO REDUCE THE RI K OF ELECTRIC HOCK,
DO NOT REMOVE COVER (OR BACK).
NO U ER ERVICEABLE PART IN IDE.
REFER ERVICING TO QUALIFIED EERIVCE PER ONEL.
This symbol is intended to alert the user to the presence of un-insulated
“dangerous voltage” within the product’s enclosure that may be of
sufficient magnitude to constitute a risk of electric shock to persons.
This symbol is intended to alert the user to the presence of important
operating and maintenance (servicing) instructions in the literature
accompanying the appliance.
!
!

www.blick
-
store
.de
Table of Contents
1. FEATURE ......................................................................................................... 4
2. PACKAGE CONTENT ...................................................................................... 5
3. PART NAME ................................................................................................... 6
4. IN TALLATION .................................................................................................. 7
4.1. Installation Template ...................................................................... 8
4.2. Adjust the angle of the camera ........................................................ 9
4.3. etting the Image Attribute ............................................................. 9
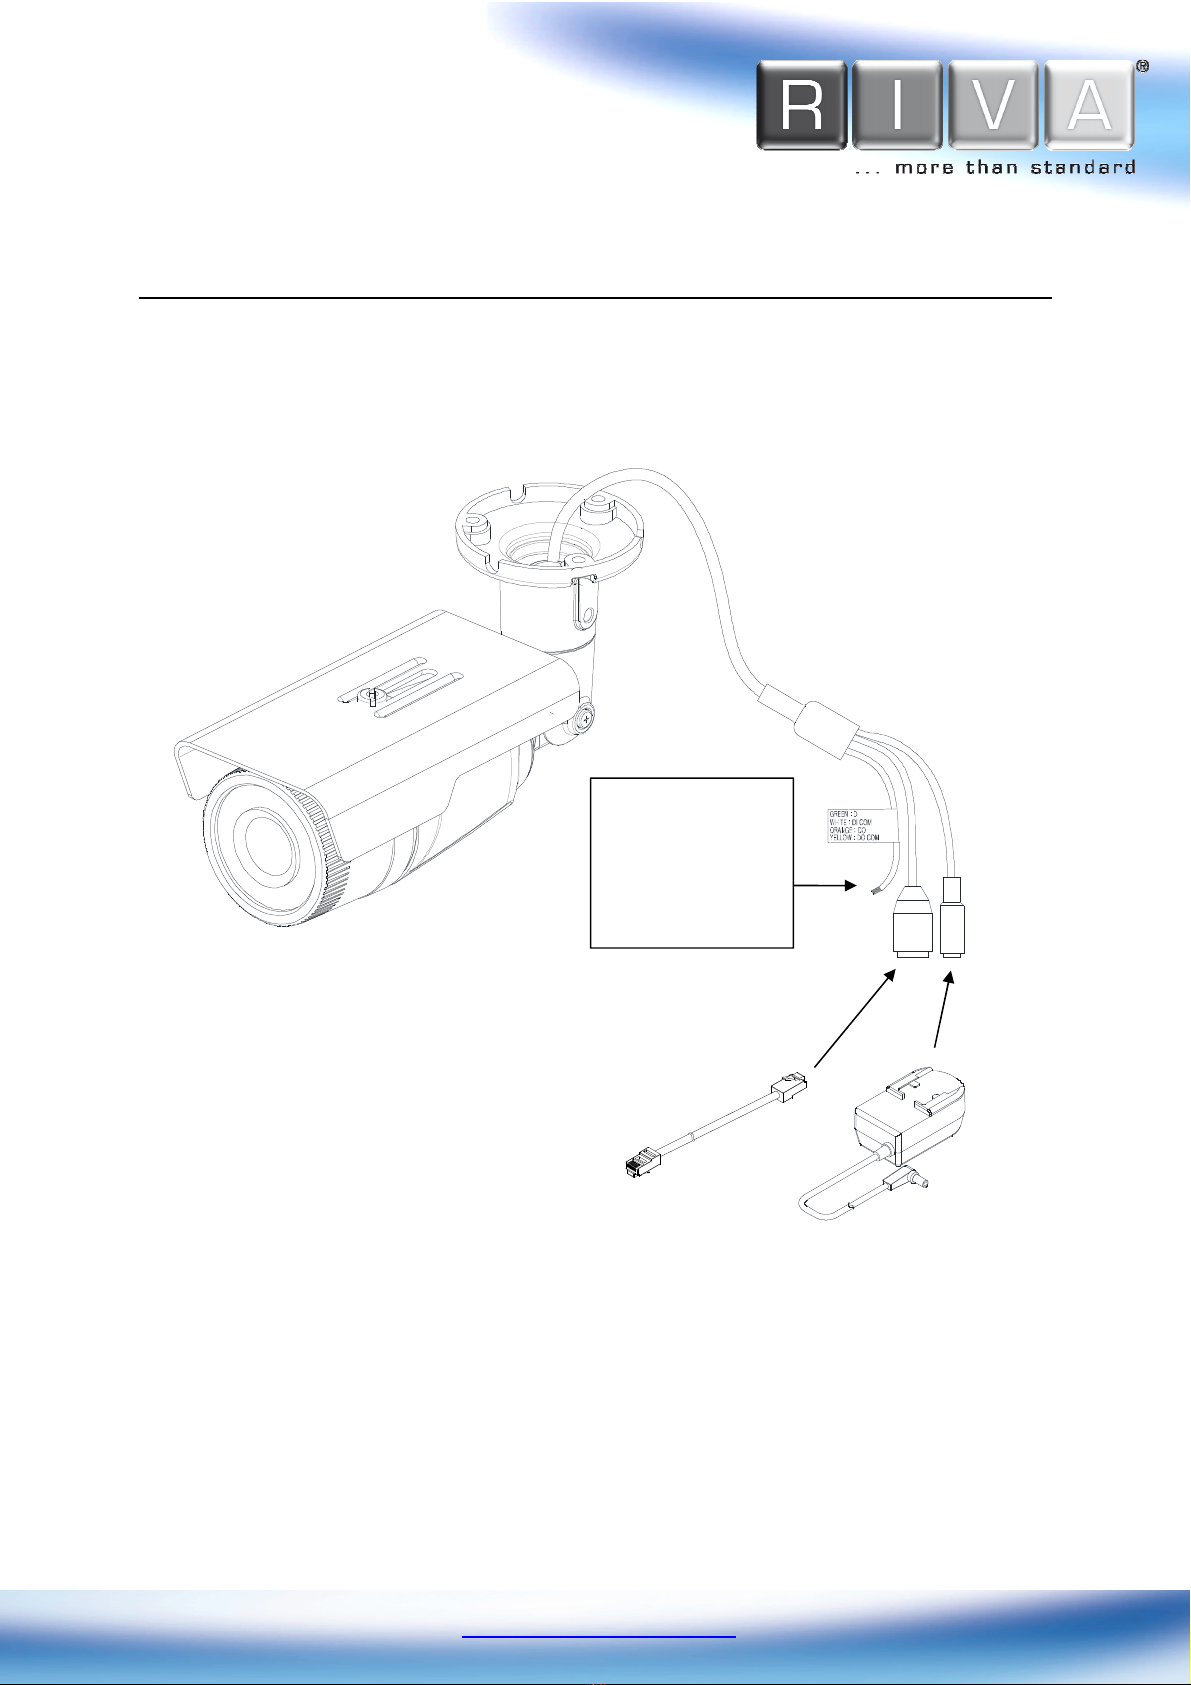
5. CONNECTION ................................................................................................ 10
6. CONFIGURATION ............................................................................................ 12
6.1. et up network environment .......................................................... 12
6.1.1. Generic IP Environment ........................................................... 12
6.1.2. Custom IP Environment ........................................................... 13
6.2. View video on web page ................................................................ 14
6.2.1. Access through IPAdmin Tool................................................... 15
6.3. Reset ........................................................................................ 16
6.4. Factory Default ............................................................................ 16
APPENDIX (A): PECIFICATION ....................................................................... 17
ummary .......................................................................................... 17
Electrical Characteristics ...................................................................... 19
Environment Condition ......................................................................... 19
Mechanical Condition .......................................................................... 19
APPENDIX (B): DIMEN ION ............................................................................ 20
APPENDIX (C): HEXADECIMAL-DECIMAL CONVER ION TABLE ................... 21
REVI ION HI TORY ............................................................................................. 22

www.blick
-
store
.de
1. FEATURE
Camera
•Full HD Indoor/Outdoor IR Bullet IP Camera
•High quality compression in real time streaming
•1/2.9” High Quality CMO Image ensor
•True day & night and digital WDR
•ONVIF upport
treaming
•Dual streaming mode
•Burnt-in text
•Unicast/Multicast
Video/Audio
•Video compression: H.264, MJPEG, 25/30FP @1080p*
•Video motion detection
Network
•RT P/ HTTP protocol supported
•10/100 Base-T Ethernet
Additional Features
•Digital input 1 channel and output 1 channel
•Micro D card
•PoE supported
•Built-in Video Content Analysis VCA
•VCA features extension via license upgrade
•DK ( oftware Development Kit) provided
* When VCA is activated, frame rate is limit to max15fps@1080p. Limitations are
based on V.1.5.0 firmware release and could be changed without notice.
Please note:
When using integrated LED illumination as major light source during night time,
unwanted VCA alarm events through flying insect’s activity are possible.

www.blick
-
store
.de
2. PACKAGE CONTENT
The package contains main camera, DC power adaptor, Universal plugs, screws,
anchors, quick installation guide, hex wrench driver, and silicon waterproof band.
Unpack carefully and handle the equipment with care.
Camera
DC power adaptor
Universal plugs
crews and anchors
Quick installation guide
Hex wrench driver
ilicon waterproof band
The above contents are subject to change without prior notice.
Note
i

www.blick
-
store
.de
3. PART NAME
1unshield
Position the sunshield to prevent direct sunshine.
2Reset button
The reset button can be used for restarting the device or resetting it to Factory
Default. Refer to
6.3. Reset
and
6.4. Factory Default
for more details.
3IO terminal connector
Connect cables into this connector for digital input/output. Refer to
5. Connections
more details.
4Power Adaptor Connector (DC 12V)
The camera requires a DC 12V 1A power adapter.
5LAN connector
This is a RJ45 LAN connector for 10/100 Base-T Ethernet. (PoE supported)
6Micro D card slot
It is a memory card slot for external storage.
⑥
* Models herein and their appearance are subject to change without any prior
notice.

www.blick
-
store
.de
Caution
!
4. IN TALLATION
1)
Place the installation template
(paper) that is included in the
package on the desired installation
surface.
2)
Drill three holes in correct
positions based on the template
paper, and insert anchor blocks
into the holes.
3)
Place the camera body and
match three alignment holes with
three anchor blocks and hold
against the mounting surface.
4)
Tighten the anchor blocks with
screws.
5)
Connect required cables to the
device including a power cable and
a LAN cable. Please refer to the
“
3. PART NAME
” for more detail.
6)
Adjust the heading direction of
the camera. Please refer to the
“
4.2. Adjust the angle of the
camera
” for more detail.
To prevent products from damaging, place the camera on stable
and non-vibrating surfaces If the stability is in doubt, consult with
safety personnel for reinforcements, and then proceed with the
installation.

www.blick
-
store
.de
4.1. Installation Template
(Unit: mm)
Installation template image’s size scale in this installation guide is
not 1:1.
The correct-
size template design paper can be found inside the
package separately.
Caution
!

www.blick
-
store
.de
4.2. Adjust the angle of the camera
1) Adjust the camera to the desired angle by unscrewing the joints referring to the
following pictures.
2) Connect to the web page of the device to see its real-time image in order to check
whether its angle is correctly adjusted. Refer to
6.2. View video on web page
for
details about using its web page.
4.3. etting the Image Attribute
Through the camera’s webpage, users can configure image settings.
The camera image’s brightness, contrast, saturation and sharpness are adjustable
through the image settings. ( etup > Video & Audio > Camera).
Adjust this joint to
install it on the
wall
Tilting adjustment Panning
adjustment

www.blick
-
store
.de
5. CONNECTION
GREEN : DI
WHITE : DI
COM
ORNAGE : DO
YELLOW : DO
COM
LAN
DC
12V

www.blick
-
store
.de
1ensor (DI) connection
The camera provides 1 channel D/I. It can be connected to either a voltage type
sensor or a relay type sensor as the following figures. ettings can be done through
the camera’s webpage.
Input voltage range: 0VDC minimum to 5VDC maximum, Max 50mA
Input voltage: VIL=0.8V(max), VIH=2.0V(min)
Do not exceed the maximum input voltage or relay rate.
2Alarm (DO) connection
Only the relay type is supported.
Relay Rating: Max 24VDC 100mA
Do not exceed the maximum relay rating.
Caution
!
Caution
!
+3.3V
DI
COM
DI
COM
+
-
Relay Type
Voltage Type
+
-
Output
of
ensor
Output
of
ensor
Internal
Internal
+
-
DO
COM
Relay Type
Device
Internal

www.blick
-
store
.de
6. CONFIGURATION
6.1. et up network environment
The default IP address of the device is 192.168.XXX.XXX. Users can identify the IP
address of the device from converting the MAC address’s hexadecimal numbers, which
is attached to the device. Be sure that the device and PC are on a same area network
before running the installation.
IP address : 192.168.xxx.xxx
ubnet mask: 255.255.0.0
6.1.1. Generic IP Environment
In case of generic private network environment where IP address 192.168.XXX.XXX
are used, users may view the live streaming images on a web page using the device’s
default IP address:
1. Convert the device’s MAC address to the IP address. Refer to the Hexadecimal-
Decimal Conversion Chart at the end of the manual.
(The MAC address of the device is attached on the side or bottom of the device.)
MAC address = 00
-
13
-
23
-
01
-
14
-
B1
→
IP address = 192.168.20.177
Convert the last two set of
hexadecimal numbers to decimal numbers.

www.blick
-
store
.de
2. tart the Microsoft® Internet Explorer web browser and enter the address of the
device.
3. Web streaming and device configurations are supported through ActiveX program.
When the ActiveX installation window appears, authorize and install the ActiveX.
6.1.2. Custom IP Environment
IPAdminTool and the manual can download from
www.rivatech.de
homepage.
IPAdminTool is a management tool, which automatically scans all of the network
products for users to perform administrative tasks, which includes network
configurations, firmware update, device reboot, and device organizations.
To modify the device’s default IP address for customized network area;
1. Find the device from the IPAdminTool’s list and highlight the device’s name.
2. Right-click the mouse and select “IP Address”; IP etup window appears.
PC environment
Info
Give new unique IP
address in last two sets

www.blick
-
store
.de
3. In the IP etup’s window, information under ‘Local Network information’ displays the
user/PC’s network area information. Those information need to be incorporated to
the IP Address, ubnet Mask, Gateway, and DN boxes, except the last 2 sets of
IP Address, which are to be the unique numbers for the device. Refer to the image
above for the setting
4. Click ‘ etup’ to complete the modification.
6.2. View video on web page
Once the device’s proper IP address has been identified, type the URL in a web
browser to access the camera. At first time access, installation window may pop up.
1. When the browser asks to install the AxUMF software, click Install to proceed.
2. When etup installation pop-up window appears, click install to proceed with rest
of installations.
Depe
nds on system O and Internet Explorer version, Installation
experience may differ from one another. Figures described above are
from Windows 7, Internet Explorer 9 environment.
Note
i

www.blick
-
store
.de
Caution
!
6.2.1. Access through IPAdmin Tool
IPAdminTool automatically searches all activated network encoders and IP cameras
and shows the product name, IP address, MAC address and etc. IPAdminTool and the
manual can download from
www.rivatech.de
homepage.
1. From the IPAdminTool’s product list, select the device by highlighting it.
2. Right-click the mouse and select web-view
3. The system’s default web browser opens the device’s address.
Whether directly accessing the streaming video through typing IP
address on a web page or taking steps through IPAdminTool, the
ActiveX is needed to be installed for the Microsoft® Internet
Explorer to have the complete configuration privileges.

www.blick
-
store
.de
6.3. Reset
1. While the device is in use, press the Reset button.
2. Wait for the system to reboot.
6.4. Factory Default
1. Press reset button and hold.
2. Release the Reset button after 5 seconds until LED blinks.
3. Wait for the system to reboot.
The factory default settings can be inferred as follows:
More Information
To learn more about using other features of your devices, refer to the manuals as
“RIVA Web Interface Manual Full HD eries” or “VCAsys Manual Full HD eries”, which
is available on
www.rivatech.de
homepage.
IP address:
192.168.xx.yy
Network mask: 255.255.0.0
Gateway: 192.168.0.1
User ID: root
Password: pass

www.blick
-
store
.de
APPENDIX (A): PECIFICATION
ummary
Camera Module
CMO
Image ensor 1/2.9” 1080p CMO
Effective Pixels 1920x1080
canning
system Progressive scanning
ELECTRICAL
Resolution 1920 x 1080
Min.
Illumination Color: 1.0 lux, BW: 0 lux (IR LED On)
AGC Control Auto
Lens 4.3mm F2.0
Day & Night Removal IR Cut Filter
Wide Dynamic Range WDR
Video
Compression Format H.264 and MJPEG electable per tream
Number of treams Dual tream, Configurable
Resolution 1920x1080, 1280x720, 1120x630, 960x540, 800x450,
640x360, 480x270, 320x180
Compression FP 30fps@1080p*
Motion Detection Built-in
Burnt-in Text (Digital) Video stream overlay text
Output -
Audio
Input/output -
Compression Format -
Function
Digital Input/output 1/1 channel
R -485 Not supported
Network 10/100 Base-T
Power over Ethernet (PoE) upported
Protocol
Qo Layer 3 Diff erv, TCP/IP, UDP/IP, HTTP, HTTP ,
RT P,
RTCP, RTP/UDP, RTP/TCP, mDN , UPnP™, MTP, DHCP,
DN , DynDN , NTP, NMPv1/v2c/v3(MIB-II), IGMP, ICMP,
Lv2/v3, TL v1
D lot
1 Micro D/ DHC slot
※ Micro D Card is not included
(Recommend Class 4 and higher for HD recordings)
* When VCA is activated, frame rate is limit to max15fps@1080p. Limitations are

www.blick
-
store
.de
based on V.1.5.0 firmware release and could be changed without notice.

www.blick
-
store
.de
Electrical Characteristics
Power ource
DC
12V
/
PoE
Power Consumption
4.44W @ DC 12V
Video Output
-
Audio Input
-
Audio Output
-
D/I
Max 50mA@5VDC, TTL level, VIL=0.8V(max),
VIH=2.0V(min)
D/O
Max 100mA@24VDC
On-state resistance: 50 Ω (max continuous)
Environment Condition
Operating Temperature
Operating Range
[DC12V] -20°C ~ 50°C (-4°F ~ 122°F)
[PoE] -20°C ~ 45°C (-4°F ~ 113°F)
Operating Humidity
Up to 85% RH
Mechanical Condition
Material
Aluminum Die
-
Casting
Color
Ivory
Dimension
73.5
mm
x 76
mm
x 245
mm
Weight (Approx)
600g

www.blick
-
store
.de
APPENDIX (B): DIMEN ION
(Unit: mm)
Table of contents
Other Riva Security Camera manuals

Riva
Riva RC3402HD-6311 User manual

Riva
Riva RC3702HD-5314 User manual

Riva
Riva RC3402HD-6211IR User manual

Riva
Riva RC3202HD-6111W User manual

Riva
Riva RC4100-1212-27 User manual

Riva
Riva RC6702HD-6211 User manual

Riva
Riva RC5502HD-6415-05 User manual

Riva
Riva RC 4602HD User manual

Riva
Riva RC4602SV01-2017-A User manual

Riva
Riva RC302SV-5117 User manual

Riva
Riva RC5510 User manual

Riva
Riva RC100 User manual

Riva
Riva RC3502HD-5311IR User manual

Riva
Riva RC4202HD User manual

Riva
Riva RC3502HD-5311 User manual

Riva
Riva RC3102HD-5311 User manual

Riva
Riva RC362HD User manual

Riva
Riva RC4602SV-7416A-30 User manual

Riva
Riva RC3402HD-6211R User manual

Riva
Riva RC6702SV-7311 User manual